
Chapter 11. Authenticating users, managing sessions, and securing APIs
This chapter covers
- Adding authentication in the MEAN stack
- Using Passport to manage authentication in Express
- Generating JSON Web Tokens in Express
- Registering and logging in a user
- Securing API endpoints in Express
- Using local storage and Angular to manage a user session
In this chapter we’re going to improve upon the existing application by making users log in before they can leave reviews. This is an important topic, as many web applications need to let users log in and manage a session.
Figure 11.1 shows where we’re at in the overall plan, now working with the MongoDB database, Express API, and Angular single-page application.
Figure 11.1. This chapter adds an authentication system to the application that touches most parts of the architecture, such as the database, API, and front-end SPA.

Our first stop will be an overview of how to approach authentication in a MEAN stack application, before updating Loc8r one piece at a time, working through the architecture from back to front. So we’ll update the database and data schemas first, before upgrading the API, and finally modifying the front end. By the end of the chapter we’ll be able to register new users, log them in, maintain a session, and do actions that only logged-in users can complete.
11.1. How to approach authentication in the MEAN stack
How to manage authentication in a MEAN application is seen as one of the great mysteries of the stack, particularly when using an SPA. This is largely because the entire application code is delivered to the browser, so how do you hide some of it? How do you define who can see or do what?
11.1.1. Traditional server-based application approach
Much of the confusion arises because people are very familiar with the traditional approach of application authentication and user session management.
In a traditional setup, the application code sits and runs on the server. For users to log in they enter their username and password into a form that gets posted to the server. The server then checks against a database to validate the login details. Assuming the login is okay, the server will set a flag or session parameter in users’ sessions on the server to declare that they’re logged in.
The server may or may not set a cookie on users’ browsers with the session information. This is quite common, but isn’t technically required to manage the authenticated session—it’s the server that maintains the vital session information. This flow is illustrated in figure 11.2.
Figure 11.2. In a traditional server application the server and database validate user credentials and add them to users’ sessions on the server.

When users then request a secure resource or try to submit some data to the database, it’s the server that validates their session and whether or not it can continue. The two flows are illustrated in figures 11.3 and 11.4.
Figure 11.3. In a traditional server application the server validates users’ sessions before continuing with a secure request.

Figure 11.4. In a traditional server application the server validates users’ sessions before pushing data to a database.

That’s what the traditional approach looks like, but does it work for the MEAN stack?
Using the traditional approach in the MEAN stack
This traditional approach isn’t a very neat fit for the MEAN stack. The approach relies on the server reserving some resources for each user so that it can maintain the session information. You may remember from all the way back in chapter 1 that Node and Express don’t maintain sessions for each user—the entire application for all users runs on a single thread.
That said, a version of the approach can be used in the MEAN stack if you’re using a server-side application based on Express, like we built up in the book through chapter 7. Rather than using server resources to maintain session information, Express can use a database to store the data. MongoDB can be used; another popular option for this is Redis, which is a lightning-fast key-value store.
We’re not going to cover that approach in this book; we’re going to look at the more complicated scenario of adding authentication to an SPA hitting an API for data.
11.1.2. Full MEAN stack approach
Authentication in the MEAN stack poses two problems:
- The API is stateless as Express and Node have no concept of user sessions.
- The application logic is already delivered to the browser, so you can’t limit the code that gets delivered.
The logical solution to these problems is to maintain some kind of session state in the browser, and let the application decide what it can and cannot display to the current user. This is the only fundamental change in approach. There are a few technical differences, but this is the only major shift.
A great way to securely keep user data in the browser in order to maintain a session is to use a JSON Web Token (JWT). We’ll look at these in more detail later in this chapter when we start using them, but in essence a JWT is a JSON object encrypted into a string that’s meaningless to the human eye, but can be decoded and understood by both the application and the server.
Let’s see how this looks at a high level, starting with the login process.
Managing the login process
Figure 11.5 illustrates the flow of a login process. Users post their credentials to the server (via an API); the server validates these using the database, and returns a token to the browser. The browser will save this token to reuse it later.
Figure 11.5. The login flow in a MEAN application, returning a JSON Web Token to the browser after the server validates user credentials

This is very similar to the traditional approach, but instead of storing each user’s session data on the server, it’s stored in the browser.
Changing views during an authenticated session
While users are in a session, they’ll need to be able to change a page or view, and the application will need to know what they should be allowed to see. So here, as illustrated in figure 11.6, the application will decode the JWT and use the information to show the appropriate data to users.
Figure 11.6. Using data inside the JWT, the SPA can determine which resources users can use or see.

This is where the change from the traditional approach is really obvious. The server is completely unaware that users are doing anything, until they need to access the API and database.
Securely calling an API
If parts of the application are restricted to authenticated users, then it’s quite likely that there will be some database actions that can only be used by authenticated users. As the API is stateless, it has no idea of who is making each call, unless you tell it. The JWT comes back into play here. As figure 11.7 shows, the token will be sent to the API endpoint, which will decode the token before validating whether the user is permitted to make that call.
Figure 11.7. When calling an authenticated API endpoint, the browser sends the JWT along with the data; the server decodes the token to validate a user’s request.

Okay, so that covers the approach at a high level, and now we’ve got a good idea what we’re aiming for. We’ll make the first step toward building this into our Loc8r application by setting up MongoDB to store user details.
11.2. Creating a user schema for MongoDB
Usernames and passwords naturally have to be stored in the database. To do that in the MEAN stack we need to create a Mongoose schema. Passwords should never—absolutely never—be stored in a database as plain text, as doing so presents a massive security breach if the database is ever compromised. So we’ll have to do something else as we generate the schema.
11.2.1. One-way password encryption: Hashes and salts
The thing to do here is run a one-way encryption on the password. One-way encryption prevents anyone from decrypting the password, while still making it quite easy to validate a correct password. When users try to log in, the application can encrypt a given password and see if it matches the stored value.
Just encrypting isn’t quite enough, though. If several people used the word “password” as their password (it happens!) then the encryption for each will be the same. Any hackers looking through the database could see this pattern and identify potentially weak passwords.
This is where the concept of a salt comes in. A salt is a random string generated by the application for each user that’s combined with the password before encryption. The resulting encrypted value is called the hash, as illustrated in figure 11.8.
Figure 11.8. A hash is created by combining a user’s password with a random salt and encrypting them.

The salt and the hash are both stored in the database rather than just a single “password” field. Using this approach, all hashes should be unique, and passwords are well protected.
11.2.2. Building the Mongoose schema
We’ll start by creating the file that will hold the schema and require it into the application. In the folder app_api/models/ let’s create a new file called users.js.
Next we’ll pull that into the application by referencing it in the db.js file in the same folder. It should be required alongside the existing line that brings in the locations model, as shown in the following code snippet:
// BRING IN YOUR SCHEMAS & MODELS
require('./locations');
require('./users');
Okay, now we’re ready to build the basic schema.
Basic user schema
What do we want in the user schema? We know we need a display name to show on reviews, plus a hash and a salt for the password. Let’s also add an email address, and have this be the unique identifier that users log in with.
In the new user.js file we’ll require Mongoose and define a new userSchema as shown in the following listing.
Listing 11.1. Basic Mongoose schema for users
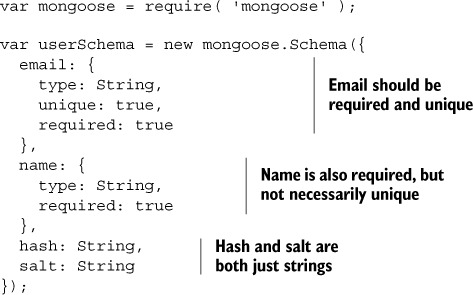
The email and name will both be set from the registration form, but the hash and salt will both be created by the system. The hash, of course, will be derived from the salt and the password supplied via the form.
Now we’ll see how to set the salt and the hash, using a piece of Mongoose functionality we haven’t touched on yet: methods.
11.2.3. Setting encrypted paths using Mongoose methods
Mongoose allows us to add methods to a schema, which get exposed as model methods. Such methods give the code direct access to the model attributes.
The ideal outcome is to be able to do something along the lines of the following pseudocode:

Let’s see how we can add a method to Mongoose to achieve this.
Adding a method to a Mongoose schema
Methods can be added to a schema after the schema has been defined, before the model is compiled. In the application code, methods are designed to be used once the model has been instantiated.
Adding a method to a schema is fairly straightforward, simply by chaining onto .methods of the schema. It’s also easy to pass in an argument. See the following snippet, for example, which will be the outline for the actual setPassword method:
userSchema.methods.setPassword = function(password){
  this.salt = SALT_VALUE;
  this.hash = HASH_VALUE;
};
Unusually for a snippet of JavaScript, this in a Mongoose method actually refers to the model itself. So in the preceding example setting this.salt and this.hash in the method would actually set them in the model.
Before we can save anything, though, we need to generate a random salt value and encrypt the hash. Fortunately, there’s a native Node module for that: crypto.
Using the crypto module for encryption
Encryption is such a common requirement there’s a module built into Node called crypto. It comes with several methods for managing the encryption of data; we’ll look at the following two:
- randomBytes—To generate a cryptographically strong string of data to use as the salt
- pbkdf2Sync—To create the hash from the password and the salt; pbkdf2 stands for password-based key derivation function 2, an industry standard
We’re going to use these methods to create a random string for the salt, and for encrypting the password and salt into the hash. The first step is to require crypto in the top of the users.js file:
var mongoose = require( 'mongoose' );
var crypto = require('crypto');
Second, we’ll update the setPassword method to set the salt and the hash for users. To set the salt we’ll use the randomBytes method to generate a random 16-byte string. Then we’ll use the pbkdf2Sync method to create the encrypted hash from the password and the salt. Here it is all shown together:

Now when the setPassword method is called and supplied with a password, the salt and the hash will be generated for users, and added to the model instance. The password is never saved anywhere, and not even stored in memory.
11.2.4. Validating a submitted password
The other aspect of storing a password is being able to retrieve it when users try to log in—we need to be able to validate their credentials. Having encrypted the password we can’t decrypt it, so what we need to do is use the same encryption on the password the user is trying to log in with, and see if it matches the stored value.
We can do the hashing and validation in a simple Mongoose method. Add the following method to users.js. It will be called from a controller once a user has been found with a given email address, and will return true or false depending on whether the hashes match:
userSchema.methods.validPassword = function(password) {
  var hash = crypto.pbkdf2Sync(password, this.salt, 1000, 64).toString('hex');
  return this.hash === hash;
};
That’s it—it’s pretty simple, right? We’ll see these methods in action when we generate the API controllers.
The final thing the controller will need help to do is generate a JSON Web Token to include some of the model data.
11.2.5. Generating a JSON Web Token
A JWT (pronounced “jot”) is used to pass data around, in our case between the API on the server and the SPA in the browser. A JWT can also be used by the server that generated the token to authenticate a user, when it’s returned in a subsequent request.
Let’s take a quick look at the parts of a JWT.
Three parts of a JWT
A JWT is comprised of three random-looking, dot-separated strings. These can be quite long; here’s a real-world example:
eyJ0eXAiOiJKV1QiLCJhbGciOiJIUzI1NiJ9.eyJfaWQiOiI1NTZiZWRmNDhmOTUzOTViMTlhNjc1
ODgiLCJlbWFpbCI6InNpbW9uQGZ1bGxzdGFja3RyYWluaW5nLmNvbSIsIm5hbWUiOiJTaW1vbiBIb
2xtZXMiLCJleHAiOjE0MzUwNDA0MTgsImlhdCI6MTQzNDQzNTYxOH0.GD7UrfnLk295rwvIrCikbk
AKctFFoRCHotLYZwZpdlE
This is pretty meaningless to the human eye, but you should be able to spot the two dots and therefore the three separate parts. These three parts are
- Header —An encoded JSON object containing the type and the hashing algorithm used
- Payload —An encoded JSON object containing the data, the real body of the token
- Signature —An encrypted hash of the header and payload, using a “secret” that only the originating server knows
Note that the first two parts aren’t encrypted—they’re encoded. This means that it’s easy for the browser—or indeed other applications—to decode them. Most modern browsers have a native function called atob() that will decode a Base64 string. A sister function called btoa() will encode to a Base64 string.
The third part, the signature, is encrypted. To decrypt it you need to use the secret that was set on the server; this secret should remain on the server and never be revealed in public.
The good news is that there are libraries to deal with all of the complicated parts of the process. So let’s install one of these libraries into our application and create a schema method to generate a JWT.
Generating a JWT from Express
The first step toward generating a JWT is to include an npm module called jsonweb-token from the command line:
$ npm install jsonwebtoken --save
Then we need to require it at the top of the users.js file:
var mongoose = require( 'mongoose' );
var crypto = require('crypto');
var jwt = require('jsonwebtoken');
Finally, we need to create a schema method, which we’ll call generateJwt. To generate a JWT we’ll need to provide the payload—that is, the data—and a secret value. In the payload we’ll send the user’s _id, email, and name. We should also set an expiry date for the token, after which the user will have to log in again to generate a new one. We’ll use a reserved field in a JWT payload for this, exp, which expects the expiry data as a Unix number value.
To generate a JWT, we simply need to call a sign method on the jsonwebtoken library, sending the payload as a JSON object and the secret as a string. This will return a token, which we can then return out of the method. The following listing shows this all in place.
Listing 11.2. Create a schema method to generate a JWT

When this generateJwt method is called, it will use the data from the current user model to create a unique JWT and return it.
There’s just one problem with this code: the secret shouldn’t really be visible in the code, so let’s quickly deal with that now.
Keeping the secret secret with environment variables
If you’re going to be pushing your code around in version control, like GitHub for example, you don’t want to have the secret published. Exposing your secret dramatically weakens your security model—with your secret anybody could issue fake tokens that your application believes to be genuine. To keep secrets a secret, it’s often a good idea to set them as environment variables.
Here’s an easy way to do it, that lets you keep track of environment variables in the code on your machine. First create a file in the root of the project called .env, and set the secret as follows:
JWT_SECRET=thisIsSecret
In this case the secret is thisIsSecret, but it can be whatever you want it to be, so long as it’s a string. Now we need to make sure this file isn’t included in any Git commits by adding a line to the .gitignore file in the project. As a minimum the .gitignore file should have the following content:
# Dependency directory
node_modules

# Environment variables
.env
To read and use this new file to actually set environment variables, we’ll need to install and use a new npm module called dotenv. We’ll do this with the following command in terminal:
$ npm install dotenv --save
The dotenv module should be required into the app.js file as the very first line in the file as shown here:
require('dotenv').load();
var express = require('express');
Now all that remains is to update the user schema to replace the hard-coded secret with the environment variable, highlighted in bold in the following snippet:

Of course your production environment will need to know about this environment variable too. You may remember the command from when we set the database URI on Heroku. It’s the same thing here, so run the following command in terminal:
$ heroku config:set JWT_SECRET=thisIsSecret
And that’s the last step. So with the MongoDB and Mongoose side of things covered, next we’ll look at using Passport to manage authentication.
11.3. Creating an authentication API with Passport
Passport is a Node module by Jared Hanson that’s designed to make authentication in Node easy. One of its key strengths is that it can accommodate several different methods of authentication, called strategies. Examples of these strategies include
- OAuth
- Local username and password
You can find many more different strategies by searching for “passport” on the npm website. Using Passport you can easily use one or more of these approaches to let users log in to your application. For Loc8r, we’re going to use the local strategy as we’re storing usernames and password hashes in the database.
We’ll start by installing the modules.
11.3.1. Installing and configuring Passport
Passport is separated out into a core module and separate modules for each of the strategies. So we’ll install the core module and the local strategy module via npm, using the following commands in terminal:
$ npm install passport --save
$ npm install passport-local --save
When both of those are installed we can create the configuration for our local strategy.
Creating a Passport config file
It’s the API in our application that will be using Passport, so we’ll create the config inside the app_api folder. Inside app_api create a new folder called config, and inside that create a new file named passport.js.
At the top of this file we’ll need to require Passport and the local strategy module, as well as Mongoose and the user model. This is shown in the following snippet:
var passport = require('passport');
var LocalStrategy = require('passport-local').Strategy;
var mongoose = require('mongoose');
var User = mongoose.model('User');
Now we can configure the local strategy.
Configuring a local strategy
To set a Passport strategy you use a passport.use method and pass it a new strategy constructor. This constructor takes an options parameter and a function that does most of the work. The skeleton of this looks like the following:
passport.use(new LocalStrategy({},
  function(username, password, done) {
  }
));
By default a Passport local strategy expects and uses the fields username and password. We have password so that one’s okay, but instead of username we’re using email. Passport allows you to override the username field in the options object as shown in the following snippet:
passport.use(new LocalStrategy(
    usernameField: 'email'
  },
  function(username, password, done) {
  }
));
Next is the main function, which is really just a Mongoose call to find users given the username and password supplied into the function. Our Mongoose function will need to do the following:
- Find a user with the email address supplied.
- Check whether the password is valid.
- Return the user object if the user is found and the password is valid.
- Otherwise return a message stating what’s wrong.
As the email address is set to be unique in the schema we can use the Mongoose find-One method. The other interesting point to note is that we’ll make use of the validPassword schema method we created earlier to check whether the supplied password is correct.
The following listing shows the local strategy in its entirety.
Listing 11.3. Full Passport local strategy definition

Now that we have Passport installed and a strategy configured, we need to register it with the application.
Adding Passport and the config to the application
To add our Passport settings to the application we need to do three things in app.js:
- Require Passport.
- Require the strategy config.
- Initialize Passport.
There’s nothing complicated about any of these three things; the important thing is where they go in app.js.
Passport should be required before the database models, and the configuration after the database models. Both should be in place before the routes are defined. If we reorganize the top of app.js slightly, we can bring in Passport and the config as follows:

The strategy needs to be defined after the model definitions, because it needs the user model to exist.
Passport should be initialized in app.js after the static routes have been defined, and before the routes that are going to use authentication—in our case the API routes. The following snippet shows this in place:
app.use(express.static(path.join(__dirname, 'public')));
app.use(express.static(path.join(__dirname, 'app_client')));

app.use(passport.initialize());

app.use('/api', routesApi);
With that in place, Passport is now installed, configured, and initialized in our application. What we’ll do now is create the API endpoints we need to let users register and log in.
11.3.2. Creating API endpoints to return JSON Web Tokens
To enable users to log in and register via our API, we’ll need to have two new endpoints. To do this we’ll need to add two new route definitions and two new corresponding controllers. When we’ve got endpoints in place we can test them using Postman and also validate that the registration endpoint has worked by using the Mongo shell to look inside the database. First up, adding the routes.
Adding the authentication route definitions
The route definitions for the API are held in the index.js file in app_api/routes, so that’s where we’ll start. Our controllers are separated out into logical collections, currently locations and reviews. It makes sense to add a third collection for the authentication. The following snippet shows this added at the top of the file:
var ctrlLocations = require('../controllers/locations');
var ctrlReviews = require('../controllers/reviews');
var ctrlAuth = require('../controllers/authentication');
We haven’t created this controllers/authentication file yet; we’ll do that in the next step when we code up the related controllers. Next we’ll add the route definitions themselves toward the end of the file (but before the module.exports line). We want two, one each for registration and login, which we’ll create at /api/register and /api/login, respectively as shown in the following snippet:
router.post('/register', ctrlAuth.register);
router.post('/login', ctrlAuth.login);
These both need to be post actions, of course, as they’re accepting data, and remember that we don’t need to specify the /api part of the routes as that’s added when the routes are required inside app.js. Now we need to add the controllers before we can test.
Creating the register controller
We’ll look at the register controller first, but to start with we need to create the file specified in the route definitions. So in the app_api/controllers folder create a new file, authentication.js, and enter the code in the following snippet to require the things we’re going to need and bring in the sendJSONresponse function again:
var passport = require('passport');
var mongoose = require('mongoose');
var User = mongoose.model('User');

var sendJSONresponse = function(res, status, content) {
  res.status(status);
  res.json(content);
};
The registration process won’t actually use Passport at all. We can do what we need with Mongoose, as we’ve already set up the various helper methods on the schema.
The register controller will need to do the following:
- Validate that the required fields have been sent.
- Create a new model instance of User.
- Set the name and email address of the user.
- Use the setPassword method to create and add the salt and the hash.
- Save the user.
- Return a JWT when saved.
This seems like quite a lot of things to do, but fortunately it’s all pretty easy—we’ve done the hard work already by creating the Mongoose methods. Now we just need to tie it all together. The following listing shows the complete code for the register controller.
Listing 11.4. Register controller for the API

In terms of this piece of code there’s nothing particularly new or complex here, but it really highlights the power of the Mongoose methods. This registration controller could have been really complex had everything been written in line, which would have been tempting if we’d started here instead of with Mongoose. But as it is, the controller is easy to read and understand—just what you want from your code. Next up, the login controller.
Creating the login controller
The login controller will rely on Passport to do the difficult stuff. We’ll start by simply validating that the required fields have been filled, and then hand over everything to Passport. Passport will do its thing—attempting to authenticate the user using the strategy we specify—and then tell us whether it was successful or not. If it was successful we can use the generateJwt schema method again to create a JWT before sending it to the browser.
All of this, including the syntax required to initiate the passport.authenticate method, is shown in the following listing. This should be added to the new authentication.js file.
Listing 11.5. Login controller for the API


With the login controller we can see that once again all of the complicated work is abstracted out, this time primarily by Passport. This leaves the code really easy to read, follow, and understand, which should always be a goal to have in mind when coding.
Now that we’ve built these two endpoints in our API, let’s test them.
Testing the endpoints and checking the database
When we built the bulk of the API back in chapter 6 we tested the endpoints with Postman. We can do the same here. Figure 11.9 shows testing the register endpoint, and how it returns a JWT. The URL to test is localhost:3000/api/register, creating form fields for name, email, and password. Remember to select the x-www-form-urlencoded form type.
Figure 11.9. Trying out the /api/register endpoint in Postman, returning a JWT when successful

Figure 11.10 shows testing of the login endpoint, including the return of a Passport error message as well as a JWT when successful. The URL for this test is localhost:3000/api/register and requires email and password form fields.
Figure 11.10. Using the api/login endpoint in Postman, testing correct and incorrect credentials

As well as seeing in the browser that JWTs are returned when expected, we can also take a look in the database and check to see whether the user has been created. We’ll go back to the Mongo shell for this, which we haven’t used for a while:
$ mongo
> use Loc8r
> db.users.find()
Or you can find a particular user by specifying the email address of course:
> db.users.find({email : "[email protected]"})
Whichever you use you should see one or more user documents returned from the database, looking something like this:
{  "hash" :
"1255e9df3daa899bee8d53a42d4acf3ab8739fa758d533a84da5eb1278412f7a7bdb36e888ae
b80a9eec4fb7bbe9bcef038f01fbbf4e6048e2f4494be44bc3d5",  "salt" :
"40368d9155ea690cf9fc08b49f328e38",  "email" :  "[email protected]",
"name" :  "Simon Holmes",  "_id" : ObjectId("558b95d85f0282b03a603603"),  "__v"
: 0 }
I’ve made the path names bold to make them easier to pick out in print, but you should be able to see all of the expected data there.
Now that we’ve created the endpoints to enable users to register and log in, the next thing we’re going to look at is how to restrict certain endpoints to authenticated users only.
11.4. Securing relevant API endpoints
It’s a pretty common requirement in web applications to limit access to API endpoints to authenticated users only. In Loc8r, for example, we want to make sure that only registered users can leave reviews. To do this there are really two parts:
- Only allow users sending a valid JWT with their request to call the new review API.
- Inside the controller validate that the user exists and can create a review.
We’ll start by adding authentication to the routes in Express, before getting into the controller.
11.4.1. Adding authentication middleware to Express routes
In Express, middleware can be added to routes, as you’ll see in just a moment. This middleware gets in the middle of the route and the controller. So once a route is called, the middleware is activated before the controller, and can prevent the controller from running or change the data being sent.
We want to use middleware that will validate the supplied JWT, and then extract the payload data and add it to the req object for the controller to use. It’s no surprise that there’s an npm module for this and it’s called express-jwt, so let’s install it now with the following command in terminal:
$ npm install express-jwt --save
Now we can use it in the routes file.
Setting up the middleware
To use express-jwt we need to require it and configure it. When included, express-jwt exposes a function that can be passed an options object, which we’ll use to send the secret and also specify the name of the property we want to add to the req object to hold the payload.
The default property added to req is user, but in our code user is an instance of the Mongoose User model. So we’ll set it to payload to avoid confusion and maintain consistency—it’s what it’s called in Passport and inside the JWT after all.
Open up the API routes file, app_api/routes/index.js, and add the setup to the top of the file, highlighted in bold in the following snippet:

Now that the middleware is configured, we can add the authentication to the routes.
Adding authentication middleware to specific routes
Adding middleware to the route definitions is really simple. We simply need to reference it in the router commands, in between the route and the controller. It really does go in the middle!
The following snippet shows how to add it to the post, put, and delete review methods, while leaving get open—the reviews are supposed to be readable by the public:
router.post('/locations/:locationid/reviews', auth,
      ctrlReviews.reviewsCreate);
router.get('/locations/:locationid/reviews/:reviewid',
      ctrlReviews.reviewsReadOne);
router.put('/locations/:locationid/reviews/:reviewid', auth,
      ctrlReviews.reviewsUpdateOne);
router.delete('/locations/:locationid/reviews/:reviewid', auth,
      ctrlReviews.reviewsDeleteOne);
ctrlReviews.reviewsCreate);
router.get('/locations/:locationid/reviews/:reviewid',
ctrlReviews.reviewsReadOne);
router.put('/locations/:locationid/reviews/:reviewid', auth,
ctrlReviews.reviewsUpdateOne);
router.delete('/locations/:locationid/reviews/:reviewid', auth,
ctrlReviews.reviewsDeleteOne);
So that’s the middleware configured and applied. In just a moment we’ll take a look at how to use it in the controller, but first let’s see how to deal with an invalid token that the middleware rejects.
Dealing with authentication rejection
When the supplied token is invalid—or perhaps doesn’t exist at all—the middleware will actually throw an error to prevent the code from continuing. So what we need to do is catch this error, and return an unauthorized message and status (401).
The best place to add this is with the other error handlers in app.js. We’ll add it as the first error handler so that generic handlers don’t intercept it. The following snippet shows the new error handler to be added to app.js:
// error handlers
// Catch unauthorised errors
app.use(function (err, req, res, next) {
  if (err.name === 'UnauthorizedError') {
    res.status(401);
    res.json({"message" : err.name + ": " + err.message});
  }
});
With that in place and the app restarted we can test that the rejection occurs by using Postman again, this time submitting a review. We can use the same POST request that we had when first testing the API, the result of which is shown in figure 11.11.
Figure 11.11. Trying to add a review without a valid JWT now results in a 401 response.

As expected, trying to call the newly protected API endpoint without including a valid JWT in the request returns an unauthorized status and message. Just what we wanted. Let’s move on to what happens when a request is authorized by the middleware and continues on to the controller.
11.4.2. Using the JWT information inside a controller
In this section we’re going to see how to use the data from the JWT that has just been extracted by the middleware in Express and added to the req object. We’re going to use the email address to get the user’s name from the database, and add it to the review document.
Only run the main controller code if the user exists
The first thing to do, as shown in listing 11.6, is to take the reviewsCreate controller and wrap the contents in a new function that we’ll call getAuthor. This new function should accept the req and res objects, with the existing controller code in a callback.
The whole point of the getAuthor function will be to validate that the user exists in the database, and return the user’s name for use in the controller. So we can pass this through as userName to the callback, and in turn pass it through to the doAddReview function.
Listing 11.6. Update the create review controller to get the user’s name first

Looking at this highlights the two things we still need to do: write the getAuthor function and update the doAddReview function. Let’s write the getAuthor function, so that we can see how to get the JWT data.
Validating the user and returning the name
The idea of the getAuthor function is to validate that the email address is associated with a user on the system, and return the name to use. It will need to do the following:
- Check that there’s an email address in the req object.
- Use the email address to find a user.
- Send the user’s name to the callback function.
- Trap errors and send appropriate messages.
The full code for the getAuthor function is in listing 11.7. The very first thing to do is check for the payload property on req, and in turn check that it has an email property. Remember that payload is the property we specified when we added authentication to the Express routes. After that it’s simply a case of using req.payload.email in a Mongoose query, passing the user’s name through to the callback if successful.
Listing 11.7. Use data from the JWT to query the database

Now when the callback is invoked it will run what was the original code in the controller, finding a location and passing the information to the doAddReview function. It’s also now passing the username to the function, so let’s quickly update doAddReview to use the user’s name and add it to the review documents.
Setting the user’s name on reviews
The change to the doAddReview function is really simple, and is shown in listing 11.8. We were already saving the author of the review, getting the data from req.body .author. Now we have another parameter being passed to the function, and can use this instead. The updates are highlighted in bold.
Listing 11.8. Saving the username in the review

That simple change brings us to the end of the back-end work. We’ve created a new user schema, generated and consumed JWTs, created an authentication API, and secured some other API routes. That’s quite a lot already! And now we’re going to move to the front end and focus on integrating this into the Angular app.
11.5. Creating Angular authentication service
In an Angular app, just like any other application, authentication is likely to be needed across the board, in several different places. So really the obvious thing to do is create an authentication service that can be used anywhere it’s needed.
This service should be responsible for everything related to authentication, including saving and reading a JWT, returning information about the current user, and calling the login and register API endpoints.
We’ll start by looking at how to manage the user session.
11.5.1. Managing a user session in Angular
Let’s assume for a moment that a user has just logged in, and the API has returned a JWT. What should we do with the token? Since we’re running an SPA, we could just keep it in the application memory. This will be okay unless the user decides to refresh the page, which reloads the application, losing anything in memory. Not ideal.
So next we look to save the token somewhere a bit more robust, allowing the application to read it whenever it needs to. The question is, should we use cookies or local storage?
Cookies versus local storage
The traditional approach to saving user data in a web application is to save a cookie, and that’s certainly an option. But cookies are really there to be used by server applications, with each request to the server sending the cookies along in the HTTP header to be read. In an SPA we don’t really need this; the API endpoints are stateless and don’t get or set cookies.
So let’s look somewhere else, toward local storage, which is really designed for client-side applications. With local storage the data stays in the browser and doesn’t get transmitted with requests.
Local storage is also really easy to use with JavaScript. Look at the following snippet that would set and get some data:
window.localStorage['my-data'] = 'Some information';
window.localStorage['my-data']; // Returns 'Some information'
Right, so that’s settled; we’ll use local storage in Loc8r to save the JWT.
Creating a service to save and read a JWT in local storage
We’ll start building the authentication service by creating the methods to save a JWT in local storage and read it back out again. We’ve just seen how easy it is to work with localStorage in JavaScript, so now we just need to wrap this in an Angular service that exposes two methods, saveToken and getToken.
No real surprises here, but the saveToken method should accept a value to be saved, and getToken should return a value. First we’ll create a new file called authentication.service.js inside app_client/common/services. Listing 11.9 shows the contents of the new service, including the first two methods. In Angular it’s best practice to use $window instead of the native window object—primarily for testing reasons—so we’ll inject it into the service. The service also needs to be registered with the application, and must return the methods.
Listing 11.9. Create the authentication service with the first two methods

And there we go, a pretty simple service to handle saving loc8r-token to local-Storage and reading it back out again. Don’t forget to add a reference to this file in the appClientFiles array in app.js!
Next we’ll look at logging in and registering.
11.5.2. Allowing users to sign up, sign in, and sign out
To use the service to enable users to register, log in, and log out, we’ll need to add three more methods. Let’s start with registering and logging in.
Calling the API to register and log in
We’ll need two methods to register and log in, which will post the form data to the register and login API endpoints we created earlier in this chapter. When successful these endpoints both return a JWT, so we can use the saveToken method to save them.
The following snippet shows the two new methods to add to the service. Don’t forget that register and login will also need to be added to the return statement to expose the methods. Here’s the code:
register = function(user) {
  return $http.post('/api/register', user).success(function(data){
    saveToken(data.token);
  });
};

login = function(user) {
  return $http.post('/api/login', user).success(function(data) {
    saveToken(data.token);
  });
};
Remember that $http returns promises, which is why we chain the success method to the request. Now to look at signing out.
Deleting localStorage to sign out
The user session in the Angular application is managed by saving the JWT in localStorage. If the token is there, is valid, and hasn’t expired, then we can say that the user is logged in. We can’t change the expiry date of the token from within the Angular app—only the server can do that. What we can do is delete it.
So to enable users to log out we can create a new logout method in the authentication service to remove the Loc8r JWT, as shown in the following snippet:
logout = function() {
  $window.localStorage.removeItem('loc8r-token');
};
This will simply remove the loc8r-token item from the browser’s localStorage. Again, don’t forget that logout will have to be added to the return statement so that it can be exposed to the application.
Now we have methods to get a JWT from the server, save it in localStorage, read it from localStorage, and also delete it. So the next question is: How do we use it in the application to see that a user is logged in to get data out of it?
11.5.3. Using the JWT data in the Angular service
The JWT saved in the browser’s localStorage is what we use to manage a user’s session. It will be used to validate whether a user is logged in. If a user is logged in, the application can also read the user information stored inside.
First we’ll add a method to check whether somebody is logged in.
Checking the logged-in status
To check whether a user is currently logged in to the application, we need to check to see if the loc8r-token exists in localStorage. We can use the getToken method for that. But the existence of a token isn’t enough. Remember that the JWT has expiry data embedded in it, so if a token exists we’ll need to check that too.
The expiration date and time of the JWT is part of the payload, which is the second chunk of data. Remember that this part is just an encoded JSON object; it’s encoded rather than encrypted, so we can decode it. In fact, we’ve already talked about the function to do this: atob.
So, stitching this all together, we want to create a method that
- Gets the stored token
- Extracts the payload from the token
- Decodes the payload
- Validates that the expiry date hasn’t passed
This method should simply return true if a user is logged in, and false if not. The following snippet shows this put together in a method called isLoggedIn:

There’s not much code there, but it’s doing a lot. And once we’ve referenced it in the return statement in the service, the application will be able to quickly check whether a user is logged in at any given point.
The next and final method to add to the authentication service will get some user information from the JWT.
Getting user information from the JWT
We want the application to be able to get a user’s email address and name from the JWT. We’ve just seen in the isLoggedIn method how to extract data from the token, and our new method will do exactly the same thing.
So we’ll create a new method called currentUser. The first thing this will do is validate that there’s a user logged in by calling the isLoggedIn method. If there’s a user logged in it will get the token by calling the getToken method, before extracting and decoding the payload and returning the data we’re after. The following snippet shows how this looks:
var currentUser = function() {
  if(isLoggedIn()){
    var token = getToken();
    var payload = JSON.parse($window.atob(token.split('.')[1]));
    return {
      email : payload.email,
      name : payload.name
    };
  }
};
With that done and referenced in the return statement the Angular authentication service is complete. Looking back over the code you can see how this is pretty generic and easy to copy from one application to another. All you’d probably have to change is the name of the token and the API URLs, so we’ve got a nice reusable Angular service.
Now that the service is in the application, we can use it. So let’s keep moving forward and create the login and register pages.
11.6. Creating register and login pages
Everything we’ve done so far is great, but without a way for visitors to the website to actually register and log in it would be pretty useless! So that’s what we’ll do now.
In terms of functionality we want a register page for new users to set their details and sign up, and a login page for returning users to input their username and password. When users have gone through either of these processes and are successfully authenticated, the application should send them back to the page they were on when they started the process.
Let’s begin with register page.
11.6.1. Building the register page
To develop a working registration page there are a few things to do:
- Define the route in the Angular application config.
- Create the view for the page.
- Create the controller for the page.
- Get it to redirect to the previous page when successful.
And, of course, we’ll want to test it when it’s done. Step one is to define the route.
Defining the route in the Angular app
First we’ll define the route for the registration page in the Angular application config, which is in app_client/app.js. The route will be /register, and we’ll put the view file in a new folder hierarchy of app_client/auth/register/.
So the new route to add to the config looks like the following snippet:
.when('/register', {
  templateUrl: '/auth/register/register.view.html',
  controller: 'registerCtrl',
  controllerAs: 'vm'
})
There’s nothing new or exciting here, so save that and we’ll move on to creating the view.
Building the registration view
Okay, so now we’re going to build the view for the registration page. Aside from the normal header and footer there are a few things we’re going to need. Primarily we’ll need a form to allow visitors to input their name, email address, and provide a password. In this form we should also have an area to display any errors, and on the page we’ll also pop in a link to the login form, in case users realize that they’re already logged in.
The following listing shows the view all pieced together. Notice how the input fields have the credentials in the view model bound to them using ngmodel.
Listing 11.10. Full view for the registration page
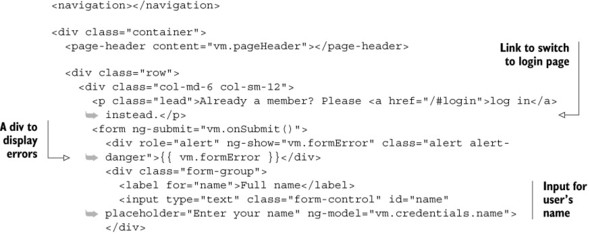

Again, the important thing to note here is that a user’s name, email, and password are bound to the view model in the object vm.credentials. Now to look at the flip-side of this and code up the corresponding controller.
Creating the registration controller skeleton
Based on the view, we’ll need to set up a few things in the register controller. We’ll need the title text for the page header of course, and a vm.onSubmit function to handle the form submission. We’ll also give all of the credentials properties a default empty string value.
Listing 11.11 shows all this. But there’s one more thing. When users have registered we want a way to send them back to the page they were on before. To do this we’ll use a query string parameter called page. So on any page that we create a link to the register URL, we’ll include a query string stating the current URL; for example, something like this: /#register?page=/about.
In the controller, also included as part of listing 11.11, we’ll capture this as vm.returnPage, providing a default of the homepage if the query string can’t be found. To get the query string we’ll need to inject Angular’s $location service into the controller.
Listing 11.11. Skeleton of the register controller

One thing to notice is how we get the page parameter from the query string by running a search on the $location. Now that we’re getting that returnPage value we should make sure that we pass it through if the user chooses to click on the login link in the page. To do that we simply need to update the link in the view highlighted in bold in the following snippet:
<p class="lead">Already a member? Please <a href="/#login?page={{ vm.returnPage }}">log in</a> instead.</p>
Now that we’ve got that set up we can look at coding up the onSubmit function.
Handling the register form submission
When the register form is submitted the first thing the code should do is validate that all of the fields have been filled in. If any are missing we can show the error in the form, just like we did when adding reviews. When this basic validation is passed, we can move on with registering a user.
To register a user we’ll call the register method in the authentication service, passing it the credentials. Remember that the register method uses the $http service, so it will return promises that we can chain to. So if the method returns an error we can display this on the form. But if registration was successful we’ll clear the query string object and then set the application path to be the returnPage we captured earlier. This will redirect the user to that path.
All of this is shown in the following snippet, which is to be added to the register controller:

Don’t forget to add this controller file to the appClientFiles array in app.js. With this in place you can try out the register page and functionality by starting the application running and heading to http://localhost:3000/register.
When you’ve done this and successfully registered as a user, open up the browser development tools and look for the resources. As illustrated in figure 11.12 you should be able to see a loc8r-token under the Local Storage folder.
Figure 11.12. Finding the loc8r-token in the browser

Okay, so we’ve added the ability for a new user to register. Now let’s enable a returning user to log in.
11.6.2. Building the login page
The approach to the login page is very similar to the register page. It’s mainly copying and pasting so we’ll go through the steps quite quickly.
First we need to add the new route to app.js:
.when('/login', {
  templateUrl: '/auth/login/login.view.html',
  controller: 'loginCtrl',
  controllerAs: 'vm'
})
Then we need to create the view file, login.view.html. We can see from the route where we want this to be. It’s very similar to the register view, so it’s probably easiest to duplicate that and edit it. All we need to do is remove the name input and change a couple of pieces of text. The following snippet highlights the changes in bold we need to make in the login view:

And finally the login controller, which again is very similar to the register controller. The changes we need to make are
- Change the name of the controller.
- Change the page title.
- Remove references to the name field.
- Rename doRegister to doLogin.
- Call the login method of the authentication service instead of the register method.
So let’s create login.controller.js as a copy of register.controller.js and make the changes. The following snippet shows the content of the file (without the IIFE wrapper for brevity), and highlights in bold the changes made:

That was easy! There’s no need to dwell on this, as functionally it works just like the register controller. Just remember to add it to the appClientFiles array in app.js so that it’s included in the application code.
Now we’ll move onto the final stage and actually make use of the authenticated session in the Angular application.
11.7. Working with authentication in the Angular app
Once you have a way to authenticate users, the next step is to make use of that information. In Loc8r we’re going to do two things:
- Change the navigation based on whether the visitor is logged in or not.
- Use the user information when creating reviews.
Let’s tackle the navigation first.
11.7.1. Updating navigation
One thing currently missing from the navigation is a sign-in link. So we’ll add one in the conventional place—the top right of the screen. But when a user is logged in, we don’t want to display a sign-in message; it would be better to display the user’s name and give an option to sign out.
That’s what we’ll do in this section, starting by adding a right-hand section to the navigation bar.
Adding a right-hand section to the navigation
The navigation for Loc8r is set up as a directive that we include in every page; the files are in common/directives/navigation. The following snippet highlights in bold the markup we need to add to the template to put a sign-in link on the right-hand side:
<div id="navbar-main" class="navbar-collapse collapse">
  <ul class="nav navbar-nav">
    <li><a href="/#about">About</a></li>
  </ul>
  <ul class="nav navbar-nav navbar-right">
    <li><a href="/#login/">Sign in</a></li>
  </ul>
</div>
This will be our starting point. But to apply some logic behind this—for example, to display a user’s name when logged in—we’re going to need to add a controller to the directive.
Using a controller with a directive
So far the directives we’ve used have consisted of a directive definition and HTML template. But it’s possible to link a controller to a directive to give even more functionality, so that’s what we’ll do here.
This is done by adding a controller property to the directive definition, which can be set with the inline version of the controllerAs syntax. Because a directive is nested inside other pages with a view model already defined, a view model name other than vm is required to avoid conflicts. The following snippet shows how to add a controller to a directive definition, supplying a view model name of navvm:
function navigation () {
  return {
    restrict: 'EA',
    templateUrl: '/common/directives/navigation/navigation.template.html',
    controller: 'navigationCtrl as navvm'
 };
}
Okay then, let’s create the related controller.
Creating the navigation controller
First we’ll create a new file in the same folder as the directive definition and template called navigation.controller.js; let’s add this to the appClientFiles array in app.js. This controller will need to do a few things, and talk to the authentication service quite a lot. But the first thing it needs to do is get the current URL path so that we can add it to the “Sign in” link—remember that we want the user to be sent back to their original page after logging in.
So we’ll create the new controller definition and pass in the native $location service and our authentication service, as we know we’ll need both. For coding consistency we’ll name the view model in the function vm—this is an internal reference for the controller function and doesn’t have to match what’s in the template.
The following snippet shows the starting point of the navigation controller, and exposes the current path as vm.currentPath:
(function () {
  angular
    .module('loc8rApp')
    .controller('navigationCtrl', navigationCtrl);

  navigationCtrl.$inject = ['$location', 'authentication'];
  function navigationCtrl($location, authentication) {
    var vm = this;

    vm.currentPath = $location.path();

  }
})();
With the current path exposed we can now use this in the template to add to the sign-in link as a query string value like this:
<li><a href="/#login/?page={{ navvm.currentPath }}">Sign in</a></li>
Now when users log in or register successfully they’ll be returned to their starting point to continue whatever it was they were doing. Our next step is for signed-in users to show their name and a logout option instead of the link to sign in.
Showing a user’s name and a logout link: The controller
A secondary purpose of this part of navigation is to validate to users that they’re logged in by displaying their name instead of the sign-in link. While we’re at it we’ll also add a dropdown option to enable users to sign out.
So this is where we actually get to use the methods of our authentication service, and some of the data from the JWT saved in local storage. In this navigation controller we want to know whether a user is logged in or not—to display the correct navigation item and also the user’s name. Listing 11.12 shows the controller updated with calls to the isLoggedIn and currentUser methods on the authentication service.
We also want a logged-in user to be able to sign out. Again we created a method for this in the authentication service, so we just need a way to call this before redirecting users to the page they were on when they started the process. We could redirect to a specific confirmation page, but the homepage will do for now. This is also part of the controller code in the following listing.
Listing 11.12. Using the authentication services methods in the navigation controller

With the functions in place we can update the view accordingly.
Showing the user’s name and a logout link: The HTML template
To display the correct navigation item depending on the user’s logged-in status we’ll use Angular’s native ng-show and ng-hide directives, and look up the value of isLoggedIn from the controller. If isLoggedIn returns true then we’ll hide the sign-in link and display the other markup.
Creating a dropdown menu with Bootstrap takes a fair amount of markup, so the following snippet highlights the important parts in bold:

When that’s all in place we’ll have a fully functioning authentication system in Loc8r, which validates the current visitor’s status and displays some of the saved information in the browser. And now we move onto the final piece of functionality: adding a user’s name to a review.
11.7.2. Adding user data to a review
The main use case for authentication in Loc8r is to only accept reviews from registered and logged-in users. There’s some housekeeping to do, like only showing the Add Review button to logged-in users, and removing the name field from the form. The new and important part in this section is how to pass the JWT from the loc8rData service to the API endpoint. Let’s start with the fun stuff and then we’ll tidy up afterwards.
Passing a JWT to a secure API endpoint
A JWT is sent with the request to an API endpoint as an HTTP header called Authorization. In Loc8r the call to add a review is in the loc8rData service, which is in app_client/common/services. The call itself uses the $http.post method.
Adding an HTTP header to the method is a simple case of adding a headers object to the call, as part of an options parameter as shown in listing 11.13. The options parameter comes after the URL and data parameters, and the content of the Authorization header should be the word Bearer followed by a space and the JWT. We’ll need to inject our authentication service into this service to get the token. All of this is highlighted in bold in the following listing.
Listing 11.13. Update the data service to pass the JWT

With this header in place the API endpoint for adding a review will now be able to read the JWT it’s expecting, and validate the user accordingly. Now we’ll quickly tidy up, first only showing the Add Review button when a user is logged in.
Showing different buttons based on the current user’s status
Here we’re going to show different content in a page depending on whether the current visitor is logged in or not. When a user is on a location detail page we only want to show the Add Review button if they’re logged in. If the user isn’t logged in, we can change this button to be a prompt to log in.
Based on some of the things we’ve done earlier in this chapter, such as using currentPath and isLoggedIn along with ng-show and ng-hide, the following snippet highlights in bold the changes to make in the locationDetail.view.html file:
<div class="panel-heading">
  <a ng-show="vm.isLoggedIn" ng-click="vm.popupReviewForm()" class="btn
      btn-default pull-right">Add review</a>
  <a ng-hide="vm.isLoggedIn" href="/#/login?page={{ vm.currentPath }}"
      class="btn btn-default pull-right">Login to add review</a>
  <h2 class="panel-title">Customer reviews</h2>
</div>
That’s pretty straightforward from a view perspective; we just need to make sure that the corresponding controller has the view model methods isLoggedIn and currentPath. As the following snippet shows we just need to pass in the $location and authentication services and define the methods. Note that this snippet only shows a part of the controller; the rest of the code should be left as is:

With those changes saved the button will behave differently for logged-in users. Both states are shown in figure 11.13.
Figure 11.13. The two different states of the Add Review button, depending on whether the user is logged in or not

This is good and works nicely. But when the user clicks the button to add a review, the form in the modal popup still contains an input for the user’s name.
Removing the name field from the review form
We no longer need users to enter their name into the form, as the API will take it from the JWT. So we can delete the following snippet from the reviewModal.view.html file:
<div class="form-group">
  <label for="name" class="col-xs-2 col-sm-2 control-label">Name</label>
  <div class="col-xs-10 col-sm-10">
    <input id="name" name="name" required="required" ng-model="vm.formData.name" class="form-control"/>
  </div>
</div>
Without the form field, we no longer need to validate for it, or send the value to the API, so we can also delete references to it from the controller. The following snippet highlights in bold the pieces to be deleted from reviewModal.controller.js:
vm.onSubmit = function () {
  vm.formError = "";
  if (!vm.formData.name || !vm.formData.rating || !vm.formData.reviewText) {
    vm.formError = "All fields required, please try again";
    return false;
  } else {
    vm.doAddReview(vm.locationData.locationid, vm.formData);
  }
};

vm.doAddReview = function (locationid, formData) {
  loc8rData.addReviewById(locationid, {
    author : formData.name,
    rating : formData.rating,
    reviewText : formData.reviewText
  })

    .success(function (data) {
      vm.modal.close(data);
    })
    .error(function (data) {
      vm.formError = "Your review has not been saved, please try again";
    });
  return false;
};
Figure 11.14 shows how the review form now looks without the name field.
Figure 11.14. The final review form without a name field. Note the user’s name in the top right and the loggedin version of the Add Review button.

And with that update we’ve completed the authentication section. Users must be logged in to add a review, and through the authentication system the review will be given the correct username.
11.8. Summary
In this chapter we’ve covered
- How to approach authentication in the MEAN stack
- Encrypting passwords with hashes and salts
- Using Mongoose model methods to add functions to schemas
- How to create a JSON Web Token with Express
- Managing authentication on the server with Passport
- Making routes in Express available to authenticated users only
- Using local storage to manage a user session in the browser
- How to use JWT data inside Angular
- Adding controllers to Angular directives
- Passing a JWT from Angular to an API via HTTP headers
And that brings us to the end of the book. By now you should have a good idea of the power and capabilities of the MEAN stack and be empowered to get building some cool stuff!
You now have a platform to build REST APIs, server-side web applications, and browser-based single-page applications. You can create database-driven sites, APIs, and applications, and publish them to a live URL.
When starting your next project remember to take a little time to think about the best architecture and user experience. Spend a little time planning to make your development time more productive and enjoyable. And never be afraid to refactor and improve your code and application as you go.
If you’re looking for the next thing to learn, take a look a Gulp at www.gulpjs.com, a great build system for automating activities such as code linting, minification, and concatenation. Depending on your projects you may want to delve deeper into Angular, Express, Node, Mongo, or Mongoose.
Really, we’ve just scratched the surface of what these amazing technologies can offer. So please, dive in, build things, try stuff, keep learning, and, most importantly, have fun!