
Appendix A. Installing a Fresh Operating System Image
The BeagleBone comes pre-installed with Debian, but if you want to reset your board with a clean install (or install Debian on a BeagleBone that originally came with Ångström), sometimes your best bet is to download a new image. On the original BeagleBone, you’ll be writing a bit-for-bit copy of an .img file to a MicroSD card that you boot off of when it’s inserted into the board. You can do the same on the BeagleBone Black, but you also have the option of writing the disk image to the on-board flash memory, or eMMC, so that you can later boot without a MicroSD card inserted.
On OS X
Go to the BeagleBoard latest-images page and download the most recent Debian image, which will be an .xz file.
- If you want to reflash the eMMC on the BeagleBone Black, choose the “eMMC Flasher” image. It contains the same operating system as the standard image, but is configured with a utility to rewrite that image from the MicroSD card to the eMMC.
- If you have the original BeagleBone or you want to boot from the MicroSD card on the BeagleBone Black, choose the standard image.
- Download and install XZ Utils from the Mac OS X Packages page so that you can uncompress the image.
-
In a terminal window, type
df. This will list all the drive volumes connected to your computer. -
Insert your MicroSD card into your computer and type
dfagain. The MicroSD card should now appear as new device on the list of disks. In my case, it’s /dev/disk1. Unmount that disk by typing
sudo diskutil unmountDisk /dev/disk1
Type in your computer’s administrator password when sudo asks for it.
Navigate to the folder where you downloaded the image .xz file. For example:
cd ~/Downloads
Execute the following command to start the process of decompressing and copying the image to the card. Note that you need to add an
rin front of disk (this writes directly to the raw disk device). Replace the name of the .xz file with the name of the file you downloaded and /dev/rdisk1 with the disk that you unmounted in the previous step (but don’t forget to putrin front ofdisk). The first command gives you a root shell on the Mac, and the second runs the command. Exit the root shell by typing exit when it’s done.sudo -s xz -dkc <Debian Image File>.img.xz > /dev/rdisk1
Warning
Make sure you are using the correct device filename, or you could overwrite the wrong disk, including the one your operating system is on!
- The process of uncompressing and copying the image to the MicroSD can take up to an hour. You’ll only see a blinking cursor while it’s in progress, so just let it do its thing.
On Windows
Go to the BeagleBoard latest-images page and download the most recent Debian image, which will be an .xz file.
- If you want to reflash the eMMC on the BeagleBone Black, choose the “eMMC Flasher” image. It contains the same operating system as the standard image, but is configured with a utility to rewrite that image from the MicroSD card to the eMMC.
- If you have the original BeagleBone or you want to boot from the MicroSD card on the BeagleBone Black, choose the standard image.
- Go to the 7-zip main page and download and install 7-Zip, which is what you’ll use to decompress the .xz file.
- Go to the Image Writer for Windows Launchpad page and download and install Win32 Image Writer binary, which is what you’ll use to write the disk image to the MicroSD card.
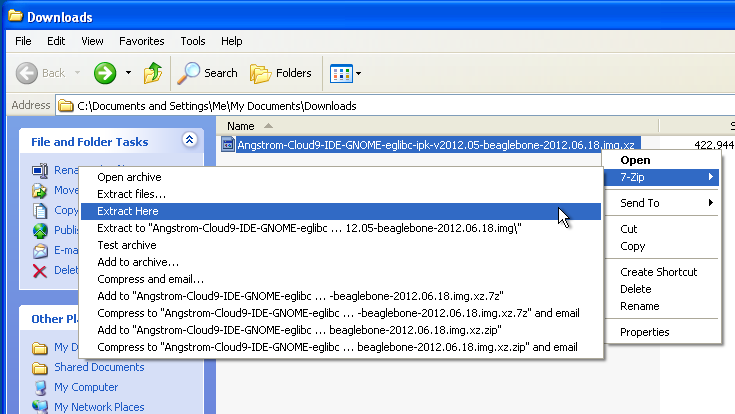
Navigate to the folder where you downloaded the Debian image and right click on it. Under the 7-zip menu, click “Extract Files Here.” This will create an .img file.
- Insert your MicroSD card into your computer.
- Open the .img in Win32 Image Writer and choose your MicroSD card as the device target.
- Click “Write” to start writing the image to the card.
On Linux
Go to the BeagleBoard latest-images page and download the most recent Debian image, which will be an .xz file.
- If you want to reflash the eMMC on the BeagleBone Black, choose the “eMMC Flasher” image. It contains the same operating system as the standard image, but is configured with a utility to rewrite that image from the MicroSD card to the eMMC.
- If you have the original BeagleBone or you want to boot from the MicroSD card on the BeagleBone Black, choose the standard image.
Get a listing of the storage devices connected to your computer:
fdisk -l
Determine the device that matches your MicroSD card. It might be something like /dev/sda1.
Warning
Make sure you are using the correct device filename, or you could overwrite the wrong disk, including the one your operating system is on!
Navigate to the folder where you downloaded the image .xz file. For example:
cd ~/Downloads
Execute the following command to start the process of decompressing and copying the image to the card. Replace the name of the .xz file with the name of the file you downloaded and /dev/sda1 with the device that matches your MicroSD card. The first command gives you a root shell on the Mac, and the second runs the command. Exit the root shell by typing exit when it’s done:
sudo -s
xz -dkc <Debian Image File>.img.xz > /dev/sda1
- The process of uncompressing and copying the image to the MicroSD can take up to an hour. You’ll only see a blinking cursor while it’s in progress, so just let it do its thing.
Flashing the eMMC
On the BeagleBone Black, you can download an image file for an eMMC flasher, which is a MicroSD card that is specifically configured to install the operating system from the MicroSD to the on-board flash memory so that you can boot without a MicroSD card inserted. If you used the steps above to create an eMMC flasher card, having it flash the BeagleBone Black’s memory is easy:
- With the power off on the BeagleBone Black, insert the eMMC flasher MicroSD card into the the MicroSD slot.
- While holding the boot button (Figure A-1), connect the BeagleBone to power (5V DC that supplies at least 1 amp) and keep holding the boot button for about fifteen seconds.
- The USR LEDs will blink while the flashing process is taking place.
- Flashing can take about 45 minutes. When it’s done, all four USR LEDs will be lit solid.
- Remove power from the board.
- Remove the MicroSD card.

Now when you apply power to the board, it will boot off your newly flashed eMMC.