
Chapter 2. The Basics and Getting Set Up
 |
Your first major step into the world of BeagleBone is to hook it up and get to a command prompt so you can start working with files and executing commands. From there, you’ll be able to customize the system to suit your preferences and start creating your own projects.
But before you connect anything, let’s take a closer look at the BeagleBone. There are two versions of the board: the original BeagleBone and the newer BeagleBone Black. For most of this book, you’ll be able to do everything with either board, with a few exceptions that I’ll note.
It’s quite easy to tell the boards apart. The original BeagleBone is mostly white with black lettering and the BeagleBone Black is mostly black with white lettering. The main improvements with the BeagleBone Black are a faster processor, more memory, on-board storage, and on-board video output. Not only that, but the BeagleBone Black is a little more than half the price of the original BeagleBone.
Tour of the Board
When you take a close look at the BeagleBone (Figure 2-1), you’ll see that there are a lot of parts on it, some very small. Luckily, you don’t have to understand what each part is in order to get the most out of the board. Here are a few of the more significant components:
- The Processor. This is essentially the brains of the whole operation. Tasked with most of the heavy lifting, the processor on the original BeagleBone puts it in the same league with the iPhone 4 in terms of power. If you like to hear the numbers, it’s a 720MHz ARM Cortex-A8 equipped with 256 MB of DDR2 RAM. If you have a BeagleBone Black, it’ll be a 1GHz chip with 512MB of DDR3 RAM.
- The Power Connector. Your BeagleBone needs 5 volts and 500 mA of direct current to operate. Most generic 5V DC power adapters with a 2.1mm barrel jack connector will power the board. It’s important to know that even if a power connector will fit into this jack, it doesn’t necessarily mean that it’s providing 5 volts. Right nearby the jack is a small power a protection chip in case you accidentally provide over five and up to 12 volts. It will protect your board and won’t let it power on if you connect too much voltage. Still, it’s probably best to make sure you’re plugging only 5 volts into the board.
- Ethernet Port. This is a standard RJ45 Ethernet port, which will come in handy for Internet-connected projects. You can connect it directly to a router, or you can also share your computer’s WiFi connection through Ethernet to the BeagleBone.
- Reset Button. Press this button to reboot the board. Just like with your computer, it’s best to trigger a reboot properly from within the operating system, otherwise file corruption could occur. This button might come in handy if your system locks up.
- USB Host Port. Just like your computer, the BeagleBone is equipped with a USB port. This will let you attach a slew of hardware—including keyboards, mice, and Wi-Fi adapters—to your board.
- Onboard LEDs. Next to the power connector, you have an LED to indicate when power is applied to the board. There are also four LEDs next to the reset button that can be programmed by you with software. By default, LED 0 will show a “heartbeat” when the system is running. LED 1 will blink when the MicroSD card is being accessed. LED 2 will blink when the CPU is active, and LED 3 will blink when the on-board flash memory is being accessed (on the BeagleBone Black).
Expansion Headers. These two expansion headers, labeled P8 and P9, allow you to integrate your BeagleBone into electronics projects. The pins can be configured for a number of different functions, which we’ll dive into in Chapter 4.
- Mini USB Port. This USB port allows your BeagleBone to act as a device when you connect it to your computer. Your computer will not only provide power to the board over USB, but it also acts as a means of communicating with it. You can also access BeagleBone reference information stored on-board; it will simply appear as a storage device when you plug it in to your computer. If you power your board through this port, processing speed will be reduced to decrease power consumption.
- MicroSD Card Slot. Unlike most computers, the BeagleBone doesn’t have a hard drive and instead uses a MicroSD card to store the operating system, programs, and your data. On a BeagleBone Black, the operating system is stored on the onboard flash memory (see below) and can be updated using the MicroSD card slot.
- Micro HDMI Port (BeagleBone Black only). To connect the BeagleBone Black to a monitor or television, use the Micro HDMI port. By looks, it’s easily to confuse it with the Mini USB port, so if you have trouble plugging the cable in, check that you’ve got the right port.
- Serial Header (BeagleBone Black only). While both the original BeagleBone and the BeagleBone Black have serial outputs for accessing the terminal, only the Black breaks out one of the serial ports in its own header. This header’s layout makes it easy to connect an FTDI TTL-232 cable or breakout board so you can use the text-based terminal via USB.
- On Board Flash Memory (BeagleBone Black only). The BeagleBone Black sports on-board flash memory and can therefore be booted without a MicroSD card inserted. In the technical manuals, this memory is referred to as the eMMC. The original BeagleBone Black came with 2GB, while Revision C of that board boosted it to 4GB.
- Boot Switch (BeagleBone Black only). Holding down the boot switch when you power on your BeagleBone Black instructs the hardware to boot from the MicroSD card instead of the on-board flash memory.

What You Need
As you get familiar with the BeagleBone, you’ll notice that there are a lot of different ways to get things done. Depending on what way works best for you and what your project calls for, you don’t necessarily need everything on this list. However, having all of these components handy will help you try out the projects in this book:
- BeagleBone
- 5V DC power supply
- Ethernet cable
- USB A to mini B cable
- Solderless breadboard
- Jumper cables
- LEDs
- Resistors, assorted
- Buttons
- Switches
- 2K Potentiometer
- TMP35 or TMP36 temperature sensor
- Spare 4 GB MicroSD card
- MicroSD card reader
- PowerSwitch Tail
- Door/window sensor
And if you have a BeagleBone Black, you might also want:
- HDMI capable monitor
- Micro HDMI to HDMI cable or adapter
- Keyboard
- Mouse
- USB hub
- 3.3V FTDI cable (see Connecting via Serial over USB)
The Operating System
Just like a computer, the BeagleBone has an operating system. By default, it uses Linux, which is free and open source. While there are many different flavors, or distributions of Linux out there, BeagleBoard.org offers two Linux distributions tailored for the board: Debian (a version of Linux optimized for desktop and server use with many software packages) and Ångström (a Linux distribution optimized for low-memory embedded devices).
A factory-fresh BeagleBone Black Revision C will have Debian preloaded onto the on-board flash memory, or eMMC. If you have an older BeagleBone, it will come with Ångström Linux on its eMMC or microSD card. Since Linux distributions evolve rapidly, it’s a good idea to stay up-to-date to the latest version. Appendix A walks you through how to keep up to date.
While it’s possible to use other distributions of Linux or even non-Linux operating systems on the BeagleBone, I recommend using Debian since it’s packaged up to install easily on the board and it’s what the folks from BeagleBoard.org work with when they are testing and developing with the board.
Connecting to Your BeagleBone
As I mentioned before, there are a lot of ways to get things done with the BeagleBone and especially so when it comes to ways of connecting to its command line terminal. From the command line, you’ll be able to build and execute programs, run administrative tasks, get information about your board, and much more.
Most of the time, I prefer having the BeagleBone connected to my home network router via Ethernet. This way, I can connect to its command line with SSH (Secure Shell), manage files via SFTP (SSH File Transfer Protocol), and have the BeagleBone access the Internet to download code and software packages when necessary.
When it comes to troubleshooting issues that cause an unstable network connection, I find connecting to the command line via serial over USB to be handy. Below I’ll walk you through a few of the different ways that you can connect.
Connecting via USB and Installing Drivers
The BeagleBone itself is preloaded with documentation and drivers that will help you connect to it from your computer.
- If you have an original BeagleBone, be sure that a MicroSD card with the latest version of a BeagleBone Linux image is inserted into the slot.
- Connect the BeagleBone to your computer via a USB A to mini-B cable
- After about 20 seconds, a drive called BEAGLEBONE should appear in your filesystem’s disk volume list. Open that drive and double click on the START HTML document (START.htm) to open it up in your default web browser.
- Follow the instructions in the “Install Drivers” section on that page for your operating system.
- In your web browser, go to http://192.168.7.2/ to open Bone 101. This page is being served by your BeagleBone and has a lot of information about the board, including some interactive examples of Bonescript, a JavaScript library written for the BeagleBone.
Feel free to explore this if you’re interested. We’ll come back to using Bonescript in Chapter 7, but for now, let’s get to a command prompt.
Connecting via SSH over USB
Open your terminal and connect to the BeagleBone:
-
If you’re on a Mac, open the Terminal application found in /Applications/Utilities/. At the
$prompt, typessh [email protected] -
If you’re using Linux, type
ssh [email protected]at your command-line prompt. - On a Windows PC, download and install PuTTY. Enter 192.168.7.2 as the host address, making sure that “SSH” is selected and press connect. When it shows you the prompt “login as:” type root and press enter.
-
If you’re on a Mac, open the Terminal application found in /Applications/Utilities/. At the
- The first time you connect, you’ll be warned about connecting to an unknown host. Permit the connection to dismiss this message.
- There’s no password set by default, so if it prompts you, just hit enter.
You know you’re connected when you see the prompt:
root@beaglebone:~#
Connecting via SSH over Ethernet
From time to time, you’ll want to connect to your BeagleBone over the network instead of over USB.
- If you have an original BeagleBone, be sure that the included MicroSD card is inserted into the slot.
Connect the BeagleBone to your router with an Ethernet cable and then plug in a 5V power supply to the BeagleBone.
Warning
It’s easy to accidentally eject the MicroSD card when you’re applying force to the board to plug in the cables. To avoid this, hold the BeagleBone by its length-side edges as you plug in the cables (Figure 2-2).
Connect to it via SSH:
-
If you’re on a Mac, open the Terminal application found in /Applications/Utilities/. At the
$prompt, typessh [email protected] -
If you’re using Linux, type
ssh [email protected]at your command-line prompt. - On a Windows PC, download and install PuTTY. Launch PuTTY, then enter “beaglebone.local” as the host address, making sure that “SSH” is selected and press connect. When it shows you the prompt “login as:” type root and press enter.
-
If you’re on a Mac, open the Terminal application found in /Applications/Utilities/. At the

No Connection?
If you’re on Windows and the host name beaglebone.local does not work, you may need to download Bonjour Print Services for Windows. You can also use the IP address of the board instead. Find it by logging into your router and looking for “beaglebone” on the DHCP clients list.
You may need to use beaglebone.home instead of beaglebone.local on some networks.
- The first time you connect, your SSH client may warn you that the host is unknown. It’s OK to accept the host key and dismiss this message.
- There’s no password set by default, so if it prompts you, just hit enter.
-
You know you’re connected when you see the prompt:
root@beaglebone:~#(Figure 2-3).

Using a Keyboard, Monitor, and Mouse
If you have a BeagleBone Black, you can connect it to an HDMI monitor, keyboard, and mouse. There’s only one USB host port, so you’ll need a USB hub to connect the keyboard and mouse unless your keyboard has a built-in hub (a powered USB hub works best). Boot up the BeagleBone Black and you’ll be presented with the desktop environment. To get to the terminal, click the menu in the lower left, and choose Accessories→LXTerminal.
Throughout this book, you’ll do a lot from the command line. Some operations, like creating, modifying and moving files can also be done from the desktop. For more information on the desktop environment, see Chapter 8.
Note
If you intend to use the desktop environment as you read the book, type sudo -i to switch to the root user account before running any of the commands because they require it.
Connecting via Serial over USB
You can also connect to your BeagleBone over USB via serial. This text-only connection is handy when you’re experiencing networking problems. It also lets you see what’s happening while the BeagleBone is booting up, before it has launched the services necessary to connect to it via the network. If you’re able to connect via SSH, there’s no need to do this now, but keep this in mind in case you run into issues logging in over the network.
The process on the BeagleBone Black is slightly different than on the original BeagleBone, so I’ve included separate instructions for each below. If you want to connect to the original BeagleBone via serial, you can use a basic USB A to Mini B cable (which you used in Connecting via USB and Installing Drivers). If you want to connect to the BeagleBone Black, you’ll need to use a 3.3 volt FTDI TTL-232 cable or adapter board. These are much less common than USB A to Mini B cables, but can be purchased from vendors like Sparkfun and Adafruit.
Connecting to the Original BeagleBone via Serial with OS X or Linux
- Install the drivers in Connecting via USB and Installing Drivers if you haven’t already.
- With the included MicroSD card inserted, connect the BeagleBone to your computer with a USB A to Mini B cable.
Open a terminal window and type:
screen `ls /dev/{tty.usb*B,beaglebone-serial}` 115200The screen will blank (besides a blinking cursor). Hit enter to display the login screen (Figure 2-4).
- Log in with the user name root.
- There’s no password set by default, so if it prompts you, just hit enter.
- To exit and disconnect from the BeagleBone, type Control-A and then K.

Connecting to the Original BeagleBone via Serial with Windows
- If you haven’t already, install the drivers in Connecting via USB and Installing Drivers.
- With the included MicroSD card inserted, connect the BeagleBone to your computer with a USB A to Mini B cable.
- Download and install PuTTY. Launch PuTTY.
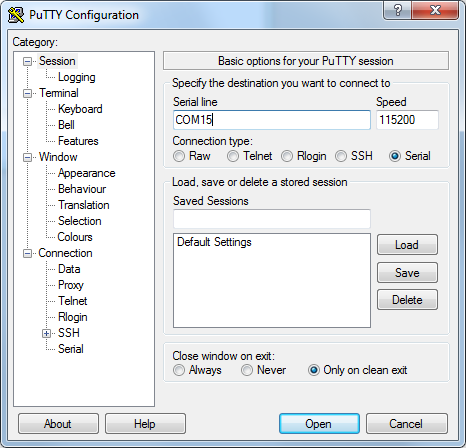
- For the Connection Type, choose Serial.
- Type in the name of the serial port for your connection. You might need to look in Device Manager (Windows Key+R, then type devmgmt.msc, click OK and look under Ports) to find it. On my system, it was COM7. Click OK.
- For Speed, type 115200.
The rest of the defaults should be fine (see Figure 2-5). Click OK.
- You’ll see a flashing cursor in the terminal window. Press enter to be taken to the login screen.
- Log in with the user name root.
- There’s no password set by default, so if it prompts you, just press enter.
Connecting to the BeagleBone Black via Serial with OS X or Linux
- If you haven’t already, install the drivers in Connecting via USB and Installing Drivers.
- Connect the USB side of a 3.3V FTDI cable to your computer.
- Connect the other side of the FTDI cable to the six male pins marked J1 on the BeagleBone Black. The FTDI cable’s black wire should be closer to the “J1” label.
Open a terminal window and type:
screen `ls /dev/tty.usbserial-*` 115200
- The screen will blank (besides a blinking cursor). Hit enter to display the login screen (Figure 2-4).
- Log in with the user name root.
- There’s no password set by default, so if it prompts you, just hit enter.
- To exit and disconnect from the BeagleBone, type CTRL+A and then K.
Connecting to the BeagleBone Black via Serial with Windows
- If you haven’t already, install the drivers in Connecting via USB and Installing Drivers.
- Connect the USB side of a 3.3V FTDI cable to your computer.
- Connect the other side of the FTDI cable to the six male pins marked J1 on the BeagleBone Black. The FTDI cable’s black wire should be closer to the “J1” label.
- Download and install PuTTY. Launch PuTTY.
- For the Connection Type, choose Serial.
- Type in the name of the serial port for your connection. You might need to look in Device Manager (Windows Key-R, then type devmgmt.msc, click OK and look under Ports) to find it. On my system, it was COM7. Click OK.
- For Speed, type 115200.
- The rest of the defaults should be fine (see Figure 2-5). Click OK.
- You’ll see a flashing cursor in the terminal window. Press enter to be taken to the login screen.
- Log in with the user name root.
- There’s no password set by default, so if it prompts you, just press enter.
Later in this book, I’ll cover another way to connect to the BeagleBone to use the Cloud9 integrated development environment (IDE). For now, however, your best bet is to get your BeagleBone on your Ethernet network. This way, you can use SSH to get to the command line, use SFTP to manage files, and the BeagleBone will be able access the Internet, which will be required in Chapter 4.