We've introduced new programming ideas in each chapter (variables, functions, objects) and now we've come to the last step—arrays! An array is a list of variables that share a common name. Arrays are useful because they make it possible to work with more variables without creating a new name for each. This makes the code shorter, easier to read, and more convenient to update.
To see what we mean, refer to Example 7-3: Move a Shape. This code works fine if we're moving around only one shape, but what if we want to have two? We need to make a new x variable and update it within draw():
floatx1=−20;floatx2=20;voidsetup(){size(240,120);smooth();noStroke();}voiddraw(){background(0);x1+=0.5;x2+=0.5;arc(x1,30,40,40,0.52,5.76);arc(x2,90,40,40,0.52,5.76);}
The code for the previous example is still manageable, but what if we want to have five circles? We need to add three more variables to the two we already have:
floatx1=−10;floatx2=10;floatx3=35;floatx4=18;floatx5=30;voidsetup(){size(240,120);smooth();noStroke();}voiddraw(){background(0);x1+=0.5;x2+=0.5;x3+=0.5;x4+=0.5;x5+=0.5;arc(x1,20,20,20,0.52,5.76);arc(x2,40,20,20,0.52,5.76);arc(x3,60,20,20,0.52,5.76);arc(x4,80,20,20,0.52,5.76);arc(x5,100,20,20,0.52,5.76);}
This code is starting to get out of control.
Imagine what would happen if you wanted to have 3,000 circles. This would mean creating 3,000 individual variables, then updating each one separately. Could you keep track of that many variables? Would you want to? Instead, we use an array:
float[]x=newfloat[3000];voidsetup(){size(240,120);smooth();noStroke();fill(255,200);for(inti=0;i<x.length;i++){x[i]=random(-1000,200);}}voiddraw(){background(0);for(inti=0;i<x.length;i++){x[i]+=0.5;floaty=i*0.4;arc(x[i],y,12,12,0.52,5.76);}}
We'll spend the rest of this chapter talking about the details that make this example possible.
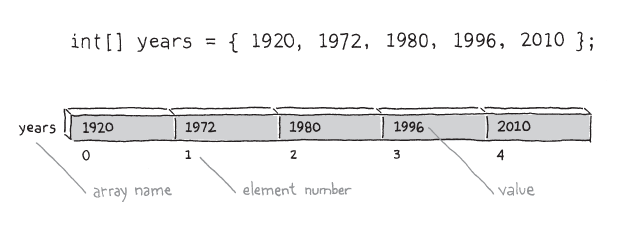
Each item in an array is called an element, and each has an index value to mark its position within the array. Just like coordinates on the screen, index values for an array start counting from 0. For instance, the first element in the array has the index value 0, the second element in the array has the index value 1, and so on. If there are 20 values in the array, the index value of the last element is 19. Figure 10-1 shows the conceptual structure of an array.
Using arrays is similar to working with single variables; it follows the same patterns. As you know, you can make a single integer variable called x with this code:
intx;
To make an array, just place brackets after the data type:
int[]x;
The beauty of creating an array is the ability to make 2, 10, or 100,000 variable values with only one line of code. For instance, the following line creates an array of 2,000 integer variables:
int[]x=newint[2000];
You can make arrays from all Processing data types: boolean, float, String, PShape, and so on, as well as any user-defined classes. For example, the following code creates an array of 32 PImage variables:
PImage[]images=newPImage[32];
To make an array, start with the name of the data type, followed by the brackets. The name you select for the array is next, followed by the assignment operator (the equal symbol), followed by the new keyword, followed by the name of the data type again, with the number of elements to create within the brackets. This pattern works for arrays of all data types.
Note
Each array can store only one type of data (boolean, int, float, PImage, etc.). You can't mix and match different types of data within a single array. If you need to do this, work with objects instead.
Before we get ahead of ourselves, let's slow down and talk about working with arrays in more detail. Like making an object, there are three steps to working with an array:
Declare the array and define the data type.
Create the array with the keyword new and define the length.
Assign values to each element.
Each step can happen on its own line, or all the steps can be compressed together. Each of the three following examples shows a different technique to create an array called x that stores two integers, 12 and 2. Pay close attention to what happens before setup() and what happens within setup().
First we'll declare the array outside of setup() and then create and assign the values within. The syntax x[0] refers to the first element in the array and x[1] is the second:
int[]x;// Declare the arrayvoidsetup(){size(200,200);x=newint[2];// Create the arrayx[0]=12;// Assign the first valuex[1]=2;// Assign the second value}
Here's a slightly more compact example, in which the array is both declared and created on the same line, then the values are assigned within setup():
int[]x=newint[2];// Declare and create the arrayvoidsetup(){size(200,200);x[0]=12;// Assign the first valuex[1]=2;// Assign the second value}
You can also assign values to the array when it's created, if it's all part of a single statement:
int[]x={12,2};// Declare, create, and assignvoidsetup(){size(200,200);}
Note
Avoid creating arrays within draw(), because creating a new array on every frame will slow down your frame rate.
As a complete example of how to use arrays, we've recoded Example 10-1: Many Variables here. Although we don't yet see the full benefits revealed in Example 10-3: Arrays, Not Variables, we do see some important details of how arrays work:
float[]x={-20,20};voidsetup(){size(240,120);smooth();noStroke();}voiddraw(){background(0);x[0]+=0.5;// Increase the first elementx[1]+=0.5;// Increase the second elementarc(x[0],30,40,40,0.52,5.76);arc(x[1],90,40,40,0.52,5.76);}
The for loop, introduced in Repetition in Chapter 4, makes it easier to work with large arrays while keeping the code concise. The idea is to write a loop to move through each element of the array one by one. To do this, you need to know the length of the array. The length field associated with each array stores the number of elements. We use the name of the array with the dot operator (a period) to access this value. For instance:
int[]x=newint[2];// Declare and create the arrayprintln(x.length);// Prints 2 to the Consoleint[]y=newint[1972];// Declare and create the arrayprintln(y.length);// Prints 1972 to the Console
A for loop can be used to fill an array with values, or to read the values back out. In this example, the array is first filled with random numbers inside setup(), and then these numbers are used to set the stroke value inside draw(). Each time the program is run, a new set of random numbers is put into the array:
float[]gray;voidsetup(){size(240,120);gray=newfloat[width];for(inti=0;i<gray.length;i++){gray[i]=random(0,255);}}voiddraw(){for(inti=0;i<gray.length;i++){stroke(gray[i]);line(i,0,i,height);}}
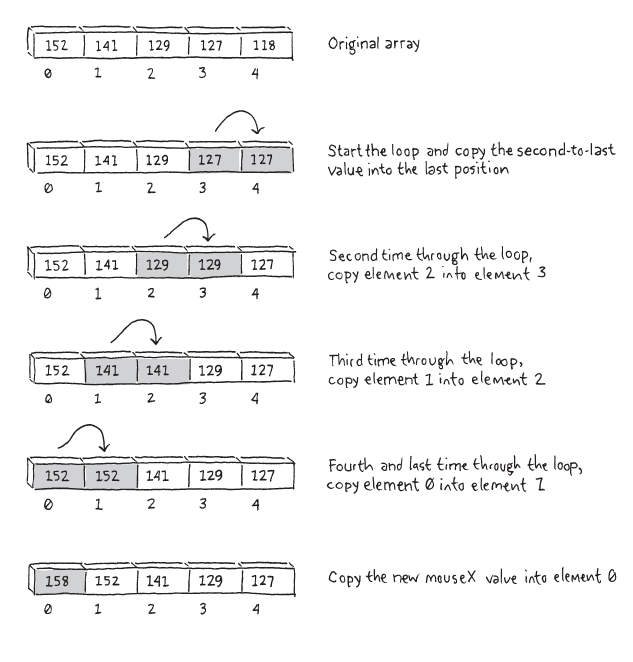
In this example, there are two arrays to store the position of the mouse—one for the x-coordinate and one for the y-coordinate. These arrays store the location of the mouse for the previous 60 frames. With each new frame, the oldest x- and y-coordinate values are removed and replaced with the current mouseX and mouseY values. The new values are added to the first position of the array, but before this happens, each value in the array is moved one position to the right (from back to front) to make room for the new numbers. This example visualizes this action. Also, at each frame, all 60 coordinates are used to draw a series of ellipses to the screen:
intnum=60;int[]x=newint[num];int[]y=newint[num];voidsetup(){size(240,120);smooth();noStroke();}voiddraw(){background(0);// Copy array values from back to frontfor(inti=x.length-1;i>0;i−−){x[i]=x[i-1];y[i]=y[i-1];}x[0]=mouseX;// Set the first elementy[0]=mouseY;// Set the first elementfor(inti=0;i<x.length;i++){fill(i*4);ellipse(x[i],y[i],40,40);}}
Note
The technique for storing a shifting buffer of numbers in an array shown in this example and Figure 10-2 is less efficient than an alternative technique that uses the % (modulo) operator. This is explained in the Examples→Basics→Input→StoringInput example included with Processing.
The two short examples in this section bring together every major programming concept in this book: variables, iteration, conditionals, functions, objects, and arrays. Making an array of objects is nearly the same as making the arrays we introduced on the previous pages, but there's one additional consideration: because each array element is an object, it must first be created with the keyword new (like any other object) before it is assigned to the array. With a custom-defined class such as JitterBug (see Chapter 9), this means using new to set up each element before it's assigned to the array. Or, for a built-in Processing class such as PImage, it means using the loadImage() function to create the object before it's assigned.
This example creates an array of 33 JitterBug objects and then updates and displays each one inside draw(). For this example to work, you need to add the JitterBug class to the code:
JitterBug[]bugs=newJitterBug[33];voidsetup(){size(240,120);smooth();for(inti=0;i<bugs.length;i++){floatx=random(width);floaty=random(height);intr=i+2;bugs[i]=newJitterBug(x,y,r);}}voiddraw(){for(inti=0;i<bugs.length;i++){bugs[i].move();bugs[i].display();}}// Copy JitterBug class here
The final array example loads a sequence of images and stores each as an element within an array of PImage objects.
To run this example, get the images from the media.zip file as described in Chapter 6. The images are named sequentially (frame-0000.png, frame-0001.png, and so forth), which makes it possible to create the name of each file within a for loop, as seen in the eighth line of the program:
intnumFrames=12;// The number of framesPImage[]images=newPImage[numFrames];// Make the arrayintcurrentFrame=0;voidsetup(){size(240,120);for(inti=0;i<images.length;i++){StringimageName="frame-"+nf(i,4)+".png";images[i]=loadImage(imageName);// Load each image}frameRate(24);}voiddraw(){image(images[currentFrame],0,0);currentFrame++;// Next frameif(currentFrame>=images.length){currentFrame=0;// Return to first frame}}
The nf() function formats numbers so that nf(1, 4) returns the string "0001" and nf(11, 4) returns "0011". These values are concatenated with the beginning of the file name ("frame-") and the end (".png") to create the complete file name as a String variable. The files are loaded into the array on the following line. The images are displayed to the screen one at a time in draw(). When the last image in the array is displayed, the program returns to the beginning of the array and shows the images again in sequence.
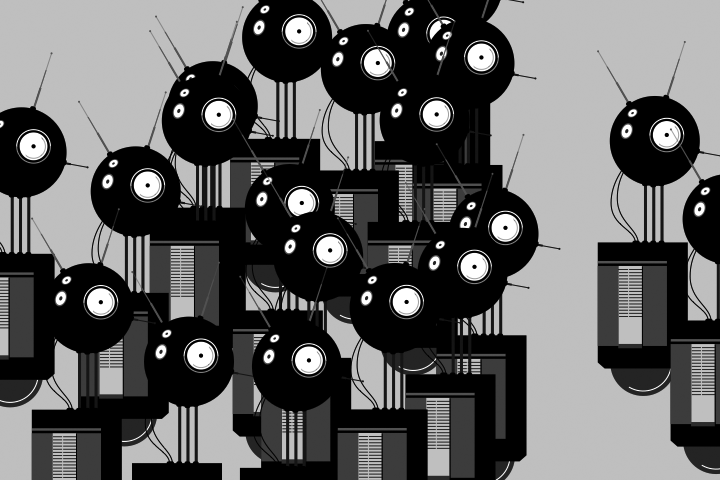
Arrays make it easier for a program to work with many elements. In this example, an array of Robot objects is declared at the top. The array is then allocated inside setup(), and each Robot object is created inside the for loop. In draw(), another for loop is used to update and display each element of the bots array.
The for loop and an array make a powerful combination. Notice the subtle differences between the code for this example and Robot 7 (see Robot 7: Objects in Chapter 9) in contrast to the extreme changes in the visual result. Once an array is created and a for loop is put in place, it's as easy to work with 3 elements as it is 3,000.
The decision to load the SVG file within setup() rather than in the Robot class is the major change from Robot 7. This choice was made so the file is loaded only once, rather than as many times as there are elements in the array (in this case, 20 times). This change makes the code start faster because loading a file takes time, and it uses less memory because the file is stored once. Each element of the bot array references the same file.
Robot[]bots;// Declare array of Robot objectsvoidsetup(){size(720,480);PShaperobotShape=loadShape("robot1.svg");// Create the array of Robot objectsbots=newRobot[20];// Create each objectfor(inti=0;i<bots.length;i++){// Create a random x-coordinatefloatx=random(-40,width-40);// Assign the y-coordinate based on the orderfloaty=map(i,0,bots.length,−100,height-200);bots[i]=newRobot(robotShape,x,y);}smooth();}voiddraw(){background(204);// Update and display each bot in the arrayfor(inti=0;i<bots.length;i++){bots[i].update();bots[i].display();}}classRobot{floatxpos;floatypos;floatangle;PShapebotShape;floatyoffset=0.0;// Set initial values in constructorRobot(PShapeshape,floattempX,floattempY){botShape=shape;xpos=tempX;ypos=tempY;angle=random(0,TWO_PI);}// Update the fieldsvoidupdate(){angle+=0.05;yoffset=sin(angle)*20;}// Draw the robot to the screenvoiddisplay(){shape(botShape,xpos,ypos+yoffset);}}


