
To get the most out of this book, you need to do more than just read the words. You need to experiment and practice. You can't learn to code just by reading about it—you need to do it. To get started, download Processing and make your first sketch.
Start by visiting http://processing.org/download and selecting the Mac, Windows, or Linux version, depending on what machine you have. Installation on each machine is straightforward:
On Windows, you'll have a .zip file. Double-click it, and drag the folder inside to a location on your hard disk. It could be Program Files or simply the desktop, but the important thing is for the processing folder to be pulled out of that .zip file. Then double-click processing.exe to start.
The Mac OS X version is a disk image (.dmg) file. Drag the Processing icon to the Applications folder. If you're using someone else's machine and can't modify the Applications folder, just drag the application to the desktop. Then double-click the Processing icon to start.
The Linux version is a .tar.gz file, which should be familiar to most Linux users. Download the file to your home directory, then open a terminal window, and type:
tar xvfz processing-
xxxx.tgz(Replace
xxxxwith the rest of the file's name, which is the version number.) This will create a folder named processing-1.0 or something similar. Then change to that directory:cd processing-
xxxxand run it:
./processing
With any luck, the main Processing window will now be visible (Figure 2-1). Everyone's setup is different, so if the program didn't start, or you're otherwise stuck, visit the troubleshooting page for possible solutions: http://wiki.processing.org/index.php/Troubleshooting.
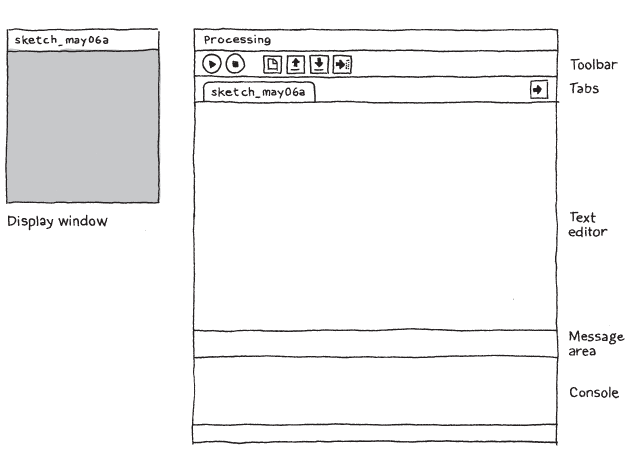
You're now running the Processing Development Environment (or PDE). There's not much to it; the large area is the Text Editor, and there's a row of buttons across the top; this is the toolbar. Below the editor is the Message Area, and below that is the Console. The Message Area is used for one-line messages, and the Console is used for more technical details.
In the editor, type the following:

ellipse(50,50,80,80);
This line of code means "draw an ellipse, with the center 50 pixels over from the left and 50 pixels down from the top, with a width and height of 80 pixels." Click the Run button, which looks like this:

If you've typed everything correctly, you'll see the ellipse image above. If you didn't type it correctly, the Message Area will turn red and complain about an error. If this happens, make sure that you've copied the example code exactly: the numbers should be contained within parentheses and have commas between each of them, and the line should end with a semicolon.
One of the most difficult things about getting started with programming is that you have to be very specific about the syntax. The Processing software isn't always smart enough to know what you mean, and can be quite fussy about the placement of punctuation. You'll get used to it with a little practice.
Next, we'll skip ahead to a sketch that's a little more exciting.
Delete the text from the last example, and try this one:

voidsetup(){size(480,120);smooth();}voiddraw(){if(mousePressed){fill(0);}else{fill(255);}ellipse(mouseX,mouseY,80,80);}
This program creates a window that is 480 pixels wide and 120 pixels high, and then starts drawing white circles at the position of the mouse. When a mouse button is pressed, the circle color changes to black. We'll explain more about the elements of this program in detail later. For now, run the code, move the mouse, and click to experience it.
So far we've covered only the Run button, though you've probably guessed what the Stop button next to it does:

If you don't want to use the buttons, you can always use the Sketch menu, which reveals the shortcut Ctrl-R (or Cmd-R on the Mac) for Run. Below Run in the Sketch menu is Present, which clears the rest of the screen to present your sketch all by itself:
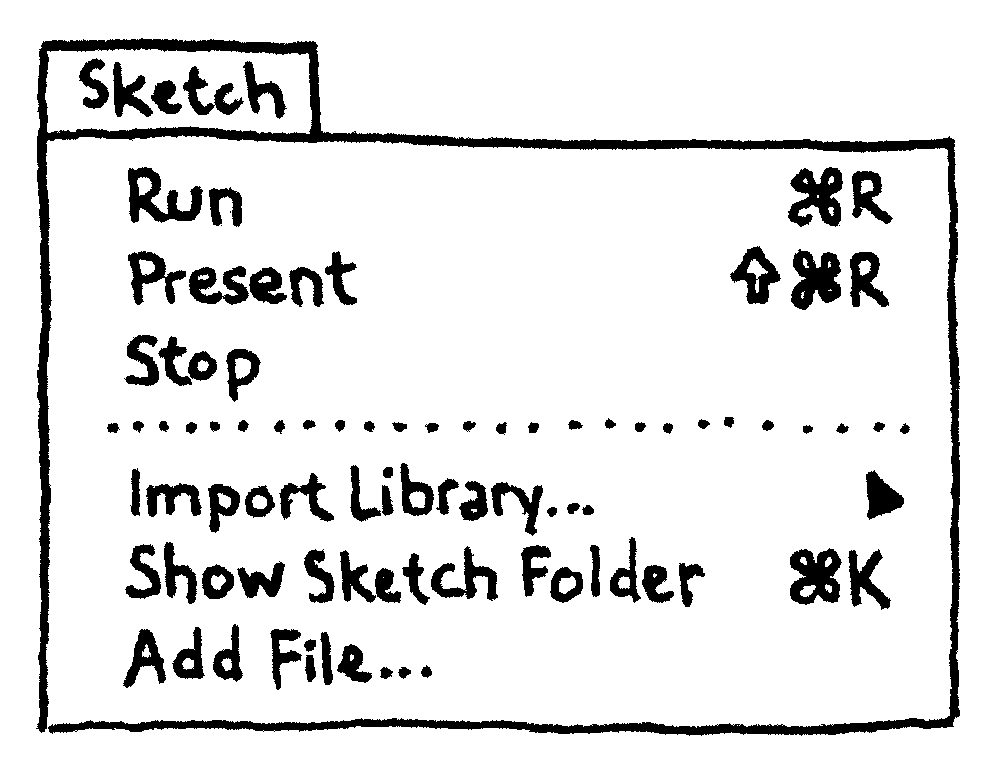
You can also use Present from the toolbar by holding down the Shift key as you click the Run button.
The next command that's important is Save. It's the downward arrow on the toolbar:

You can also find it under the File menu. By default, your programs are saved to the "sketchbook," which is a folder that collects your programs for easy access. Clicking the Open button on the toolbar (the arrow pointing up) will bring up a list of all the sketches in your sketchbook, as well as a list of examples that are installed with the Processing software:

It's always a good idea to save your sketches often. As you try different things, keep saving with different names, so that you can always go back to an earlier version. This is especially helpful if—no, when—something breaks. You can also see where the sketch is located on the disk with Show Sketch Folder under the Sketch menu.
You can also create a new sketch by pressing the New button on the toolbar:

This will replace the sketch in the current window with an empty one. Holding down Shift when you press the New button will create a new sketch in its own window, as will selecting File→New. The Open button works the same way.
Another theme of Processing is sharing your work. The Export button on the toolbar:

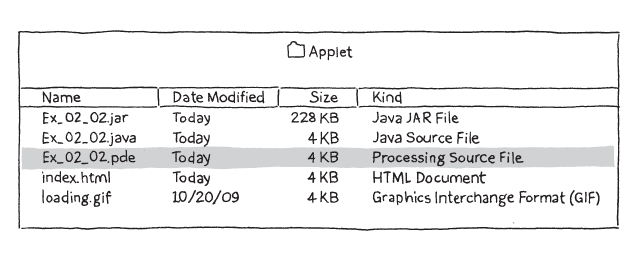
will bundle your code into a single folder titled applet that can be uploaded to a web server (Figure 2-2). After exporting, the applet folder will open on your desktop. The PDE file is the source code, the JAR file is the program, the HTML file is the web page, and the GIF file is displayed in the web browser while the program is loading. Double-clicking the index.html file will launch your web browser and show your sketch on the web page it has created.
Note
The applet folder is erased and recreated each time you use the Export command, so be sure to move the folder elsewhere before you make any changes to the HTML file or anything else inside.
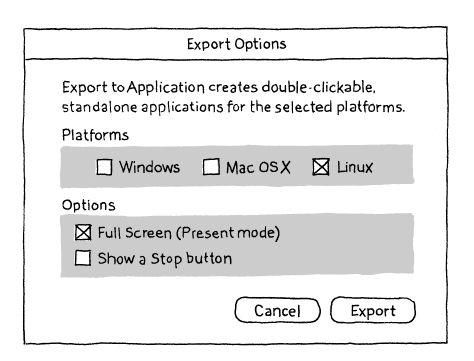
You can also find Export, along with its sibling Export to Application, underneath the File menu. Export to Application creates an application for your choice of Mac, Windows, and/or Linux. This is an easy way to make self-contained, double-clickable versions of your projects (Figure 2-3).
Holding down Shift when you press the Export button on the toolbar is another way to use Export to Application.
Learning how to program with Processing involves exploring lots of code: running, altering, breaking, and enhancing it until you have reshaped it into something new. With this in mind, the Processing software download includes dozens of examples that demonstrate different features of the software. To open an example, select Examples from the File menu or click the Open icon in the PDE. The examples are grouped into categories based on their function, such as Form, Motion, and Image. Find an interesting topic in the list and try an example.
If you see a part of the program you're unfamiliar with that is colored orange (this means it's a part of Processing), select its name, and then click on "Find in Reference" from the Help menu. You can also right-click the text (or Ctrl-click on a Mac) and choose Find in Reference from the menu that appears. This will open the reference for the selected code element in your web browser. The reference is also available online at http://www.processing.org/reference/.
The Processing Reference explains every code element with a description and examples. The reference programs are much shorter (usually four or five lines) and easier to follow than the longer code found in the Examples folder. We recommend keeping the reference open while you're reading this book and while you're programming. It can be navigated by topic or alphabetically; sometimes it's fastest to do a text search within your browser window.
The reference was written with the beginner in mind; we hope that we've made it clear and understandable. We're grateful to the many people who've spotted errors over the years and reported them. If you think you can improve a reference entry or you find a mistake, please let us know by clicking on the link at the top of each reference page.