
2
Basic Soldering Tools and Materials

There are a lot of tools needed to learn all the different types of soldering skills that I will be teaching you in this book. However, if you are just getting started, you really don’t need a lot of tools or equipment—just the basics—and that’s where I will begin this chapter. As we progress through the book, and learn new techniques, I will describe all the required additional tools and equipment.
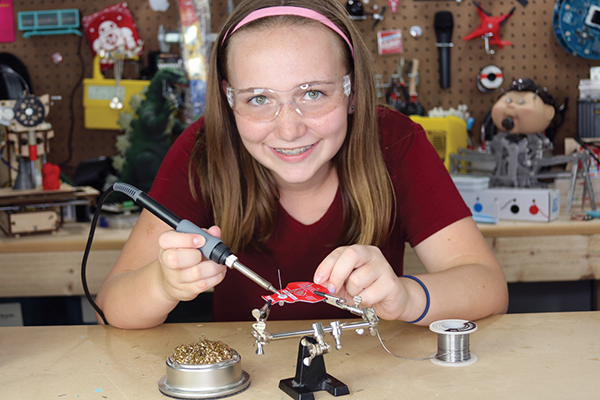
Figure 2-1: Always wear your safety glasses when soldering!
Most of you would guess that a soldering iron is the most important tool you need, but although it’s important, it’s not the most important. Safety comes first, and a comfortable pair of safety glasses is the most important tool (see Figure 2-1). Most people I see soldering do not wear safety glasses—that is, until they have a close call or, even worse, experience some eye damage.
There are some good reasons for wearing safety glasses, most of which involve having two eyes that need to last you the rest of your life. When soldering, the molten solder can sometimes pop and spatter. It’s not a large amount of solder, and it doesn’t happen often, but when it does, one little blob can do a lot of damage to your eye.
You may face another danger when you trim the wire leads to components, which you inevitably have to do when you finish soldering a connection. Everyone who solders, regardless of their propensity to wear safety glasses, has experienced a scare when it comes to trimming these leads, as seen in Figure 2-2, which have a tendency to go flying around like little needle-like projectiles.
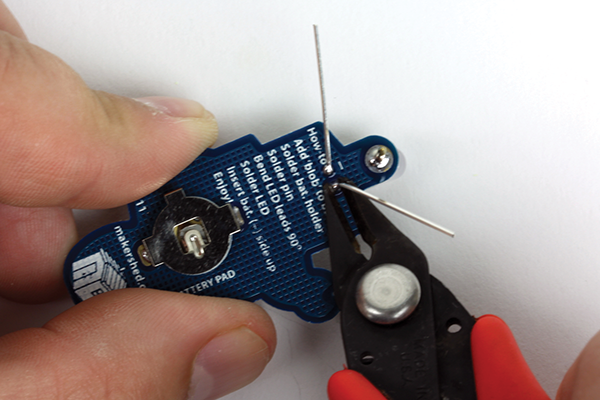
Figure 2-2: Trimming wire leads after soldering
Since we are on the topic of clipping leads, let’s talk about a good strategy for cutting and collecting them. Always place your hand over a piece of wire that you are cutting, which will shield your face from the wire being trimmed (see Figure 2-3).

Figure 2-3: Hand over lead
It’s also a good idea to have a small, magnetic parts dish to store all the wire leads. After just a few projects, you will have hundreds of leads, all of which pose a hazard of shorting out your project. You can purchase a magnetic bowl for just a few dollars, make one yourself by attaching a magnet to any nonmagnetic bowl, or even just use the magnet on its own. In Figure 2-4, you can see a commercial magnetic parts bowl on the left, and my DIY version, which is simply a magnet that I keep on my bench to collect all the trimmed leads.
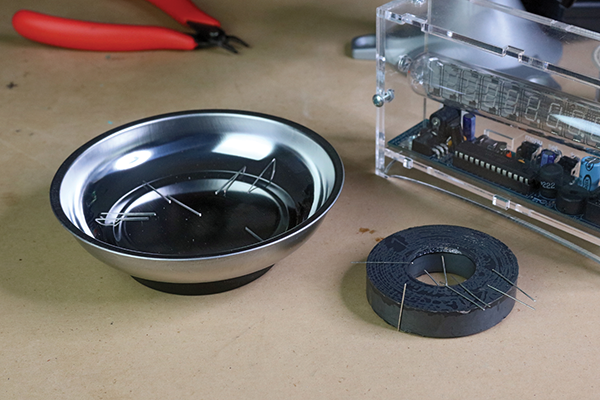
Figure 2-4: Magnetic bowl and DIY magnet version
Now that we have some basic safety out of the way, let’s talk about soldering irons. Your soldering iron is the single biggest key to successful soldering. A bad soldering iron usually leads to bad soldering and, therefore, a bad soldering experience. A good soldering iron typically leads to a good soldering experience. It’s one of those situations where the quality of the tool is important. The good news is that you can get a good quality soldering iron for not too much money. Figure 2-5 shows my personal soldering iron. I bought it off eBay for about $150 USD. This is not what I recommend you purchase as your first soldering iron. Don’t get me wrong; it’s awesome, but it also has some limiting factors for beginners. In fact, I often use a far less expensive iron for soldering due to the ease of changing the temperature, among other things, which I will discuss in greater detail later in this chapter.
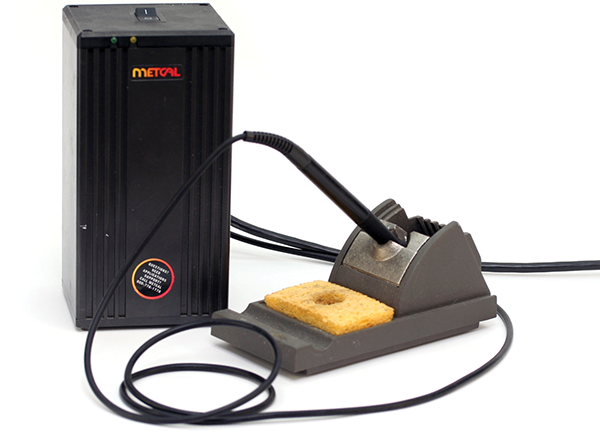
Figure 2-5: My everyday, professional-quality soldering iron
So, What Soldering Iron Should You Purchase?
It depends on a few factors, and once you know about them, you can make the best choice for your budget and skill set. Before we talk about your budget, though, there are a few things to consider first.
Comfort is an important factor to consider when you’re purchasing an iron. Although it’s not always possible to test your soldering iron before you purchase it, you can think about what shape you might prefer.
There isn’t a lot of variation in soldering iron ergonomics, but there are some styles with pencil-like handles and others that have a handle with a much larger diameter (see Figure 2-6). In the end, it won’t matter too much, but it’s something to think about when making your purchase. I have used very inexpensive irons, which typically have a large-diameter handle. They just didn’t feel right and made soldering difficult.

Figure 2-6: Different handle diameters
The most important factor (technically two factors) in purchasing your first soldering iron is the wattage of the iron and the ability to vary the wattage. Most irons range from 20 W to 60 W or more. The inexpensive ones do not allow you to adjust the wattage, which adjusts the temperature, nor do they have enough wattage to make soldering fun.
Now you might be asking why wattage is related to fun. It’s fairly simple: if your soldering iron has a low wattage, say 15 W, it takes a long time to reach the temperature required to solder a connection. In addition to the heat-up time, it will take longer to recover from soldering the connection, which makes the whole process slow and frustrating. Imagine you want to solder 30 connections on a printed circuit board (PCB). If you use a low-wattage iron, it could take a few minutes to warm up, and 10–20 seconds to recover from each connection you solder. Your 30 connections could take a total of 3–5 minutes to make with a low-wattage iron. Trust me: once you learn to solder, each connection should only take about 3 seconds, and waiting an additional 10 seconds gets frustrating very quickly.
You also need the ability to adjust the wattage or temperature of your iron (see Figure 2-7). Some people like to solder quickly, and some like to solder a little slower. Also, different types of solder require different temperatures, so being able to control the temperature is critical to having a great soldering experience. Fortunately, single-wattage soldering irons are becoming rarer; most have some adjustability.
The Good, the Great, and the Never!
Let’s start with the soldering iron that you should never buy. I like to refer to these as beginner irons, or more commonly, fire starters or fire sticks. (See Figure 2-8.) They typically cost less than $15 USD, and don’t have a decent stand, auto-shutoff, temperature control, or any type of UL (Underwriters Laboratory) listing information. In fact, I have seen these types of irons sold at flea markets with no information at all on the packaging—not even a brand or company name.
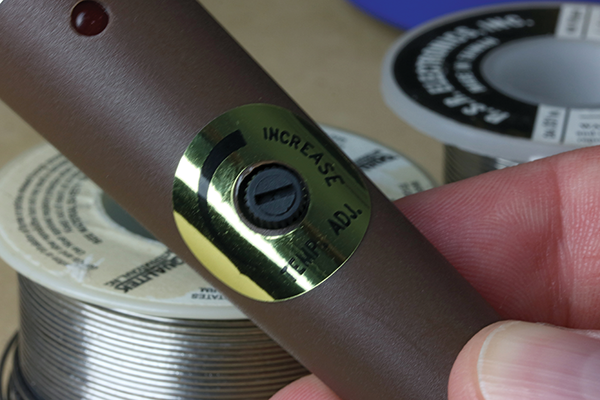
Figure 2-7: Temperature variation close-up shot

Figure 2-8: A soldering iron purchased for less than $10 USD that has no information about the wattage, manufacturer, or UL listing
In addition to the dangers of a non-UL-listed iron, look at the flimsy stand it typically comes with, an example of which is shown in Figure 2-11. Is that what you want to hold up a 700°F soldering iron? Not me, and not in my studio! Now that we’re clear about that, let’s look at some better choices.
You should think about what your long-term expectations are before you make your purchase. If you just need to solder something occasionally, and want it done well, a simple variable-control, pencil-style soldering iron is perfect.
There are a few things to note about even a simple and inexpensive soldering iron. First, make sure the wattage varies from about 20 W to 50 W. This will give you a nice range of temperatures that will work for 99.9% of your soldering needs. Second, make sure it is certified by UL. Your soldering iron gets hot; 700°F (370°C) or more. Do you really want an iron that poses an electrical hazard? Me neither! The soldering iron in Figure 2-9 meets all the criteria mentioned above and is still inexpensive.

Figure 2-9: A 20 W, variable-temperature soldering iron
Image courtesy of Adafruit Industries, CC BY-NC-SA 2.0.
On the other hand, if you think that you will use a soldering iron more regularly, a proper soldering station is most likely a better choice. They typically heat up and recover faster, have more flexibility in their temperature range, and have a better soldering iron holder. Another nice thing about purchasing a soldering station is that the soldering iron is usually smaller, since the temperature control and other electronics can be housed in the base unit. I really like the Hakko soldering station—the one pictured in Figure 2-10 is from Adafruit Industries. It’s a great iron that will last you a very long time, if not a lifetime.

Figure 2-10: Digital Hakko soldering station FX-888D
Image courtesy of Adafruit Industries, CC BY-NC-SA 2.0.
As you solder more, then you might consider a professional-grade soldering station. These types of soldering stations have incredibly fast heat-up times—some take just a second or two—and can be used all day, every day, without any problems. The reason I don’t recommend buying a professional iron to begin with is mostly due to the fact that you may not need one next week, or next month. What if you decide soldering isn’t for you? OK, that’s not going to happen! Another reason is that the tips are usually more expensive, and when you start learning you will inevitably ruin a tip. Besides, even though I have a professional, expensive iron, I use my Hakko iron all the time at another station in my lab. And to be quite honest, I don’t really see much of a difference! An avid enthusiast with two soldering stations is not uncommon.
But wait; there’s more!
You should seriously consider a few accessories that go hand in hand with your soldering iron. The first one is a proper stand for your iron. It’s an important component of your soldering lab that can sometimes be overlooked.
Most, if not all, soldering stations come with a decent stand for your iron, but if you purchase an inexpensive stand-alone soldering iron, it may come with a sheet metal stand, like the one pictured in Figure 2-11, or some kind of cheap, little, bent piece of wire attached to a plastic disk. If so, do not under any circumstances use this as your soldering iron stand. Remember: the iron can heat up to over 700°F. Do you want a cheap, flimsy, poorly made, sheet-metal stand to be your only protection against a fire if the iron falls off and touches a wooden surface or other material? How about when you bump the iron, ever so lightly, and it rolls off the stand and burns you!? Just the weight of the cord can be enough to make the iron fall off a flimsy stand. Do yourself a favor and don’t even unpack this type of stand—just toss it, or use the metal for another project!

Figure 2-11: An example of a soldering iron stand that you should NOT use!
There are much better stands available, and a nice solid stand is a good investment. It also happens to be a fairly inexpensive one, too! Most soldering stations that cost approximately $50 USD or more will come with a decent stand. The less-expensive kits will typically include a stand that looks like a wound-up spring. These work great and are inexpensive. If you purchase a more expensive soldering station, it will most likely come with a more robust version, as pictured in Figure 2-12. All these stands are really good, and will last you a lifetime.
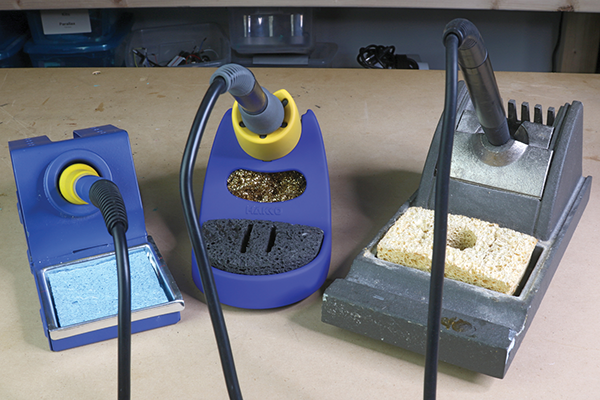
Figure 2-12: A variety of high-quality soldering iron stands
But What about the Other Types of Soldering Irons?
There are also pistol-grip–style soldering irons, one of which is shown in Figure 2-13. These are the ones I usually hear about from Makers who found one in the garage and tried to solder their first printed circuit board. It’s rarely a happy story, and usually ends in catastrophic failure. These types of soldering irons are only appropriate for larger wire diameters, metals like the ones used for automobile batteries, or even soldering leaded windows. A pistol-grip iron is not the type you want to use for hobby electronics. It’s typically difficult to hold, lacks the precision needed for soldering components in electrical circuits, and is higher wattage than necessary. This type is just not appropriate for soldering hobby electronics.

Figure 2-13: Pistol-grip soldering iron
Another common type of soldering iron I hear about from hobbyists is the kind powered by gas; typically, butane (shown in Figure 2-14). Again, this type is not ideal for a few reasons. First, you will go through a lot of fuel, which is certainly less convenient than plugging in a standard soldering iron. The other, more important reason is that regulating the temperature is extremely difficult. The solder you use has a specific melting point, and printed circuit boards, along with integrated circuits, are not tolerant to the high heat levels these irons produce.

Figure 2-14: Gas-fueled soldering iron
That being said, there are certainly times when a gas-powered iron is a great tool to have on hand. You can’t exactly fix a bad wire in a remote location that doesn’t have electricity. These mini-torches are great for other tasks, too; they make a great addition to your lab—just don’t use it for soldering unless it’s 100% necessary.
The Electrical Discharge Soldering Iron
The last type of iron I want to discuss is the electrical discharge soldering iron. These irons work by emitting a quick electrical charge across the tip, which melts the solder or even welds the component in place. The problem with using this type of iron for hobby electronics is the current running through the tip. This current could destroy any sensitive component in your project. As with some of the other less-than-ideal irons I have discussed, there is a time and a place for this type of soldering iron; for example, if you only needed to make a connection between a few light gauge wires at a remote location. However, I would still use an iron powered by butane or other gas source, since it has other uses besides just soldering.
Summary of Soldering Irons
Selecting a soldering iron isn’t too difficult. If you are having trouble deciding which one to buy, just buy a UL-listed iron with temperature control that fits into your budget. If it costs less than a fast food dinner, save up for better one (but remember that it doesn’t have to cost a lot to start learning how to solder).
Soldering Iron Accessories
One other thing to consider when selecting your soldering iron is the availability of replacement tips, including those in different sizes (see Figure 2-16). In general, a medium-size, pointed tip will meet 95% or more of your soldering needs, but the ability to swap out the standard tip for a larger one can be very helpful. The tip of your soldering iron should match the size of the connection being made. A larger component, like a USB port or power jack, requires more heat to make the mechanical connection. A larger tip will make this easier, and the same goes for smaller components. A smaller tip usually allows for better dexterity, which helps you make those connections a bit more easily. Also, when you first learn to solder, it’s not uncommon to burn up a tip from improper care of the iron. So again, being able to replace an old tip is a nice feature.

Figure 2-16: Hakko soldering iron tips from Adafruit Industries
When you’re soldering, it’s important that you keep the tip clean, which means you will need a soldering sponge. You will need a solder sponge even before you make your first connection, so you should have one ready before you even plug your iron in.
There are two types of soldering sponges (shown in Figure 2-17). The most basic is simply a sponge soaked in water. The other type, which performs much better, is a brass sponge. Either one will help keep your soldering iron clean, but the brass version will not constantly cool down your soldering iron as you wipe the tip clean after soldering a joint or two.

Figure 2-17: Two kinds of soldering iron sponges
You will also need something to hold the sponge. A simple plate will work for a standard sponge, and other manufacturers make a nice holder for the brass sponge. If you plan on soldering a lot, go ahead and pick up a brass sponge and holder. Keep in mind that many soldering-iron holders have a sponge holder built in, as do most quality soldering stations.
Another basic item that you will inevitably need once you start soldering is a pair of diagonal cutting pliers. And, just like most tools, there is a lot of variety when it comes to the different wire-cutting pliers available. In Figure 2-18, you will see the two most common types of wire cutters: the linemen’s pliers, also known as linemen’s dykes (left); and the standard diagonal cutting pliers (right). Although both are useful in electronics, diagonal cutting pliers are much more practical for hobby electronics, since they are able to trim the leads closer to the printed circuit board after you have soldered the components in place.
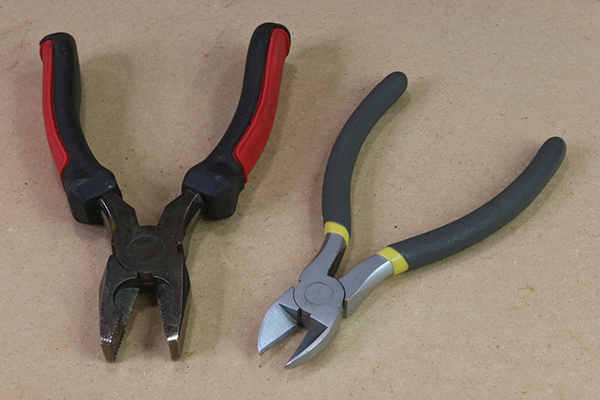
Figure 2-18: Two different kinds of wire-cutting pliers
If you plan on soldering more than just a few projects, or plan on soldering together a PCB, your best bet is a pair of diagonal flush cutting pliers, which are specifically made for electronics (shown in Figure 2-19). They are typically lighter and have a nice padded grip, making extended use easier and more comfortable. Also, the offset of the actual cutting head allows you to get close to the solder joint—although not too close—for trimming. They are also much better in tight spaces, which are very common in hobby electronics.
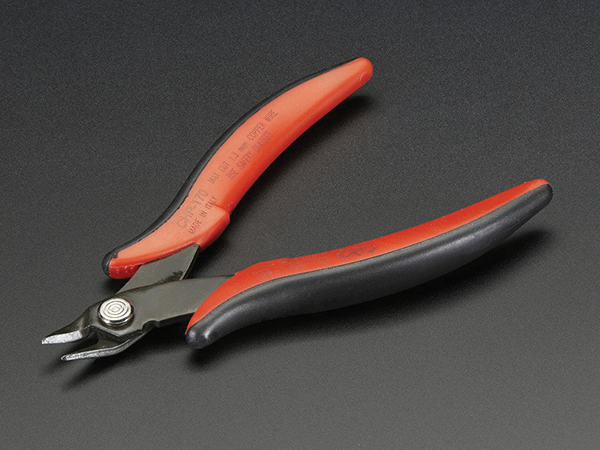
Figure 2-19: Diagonal flush cutting pliers are the best choice for hobby electronics.
Image courtesy of Adafruit Industries, CC BY-NC-SA 2.0.
You will also eventually need something to strip the ends of wires in preparation for soldering. There are a few options and things to consider when selecting a wire stripper. First, how much wire do you actually need to strip? If it’s a lot, as in hundreds of wire ends, then your best bet is to use automatic wire strippers similar to those shown at the top of Figure 2-20. These will make short work of stripping off the exterior insulation from most types of wires. But if you don’t need to prepare hundreds of wires for your next project, then the strippers in the middle of Figure 2-20 will work great. If you are on a budget, the pair on the bottom of Figure 2-20 are only a few dollars and will work just fine.
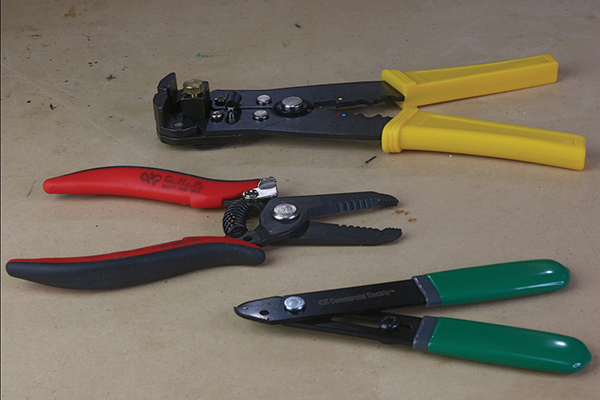
Figure 2-20: Various types of wire strippers
Realistically, you won’t need something as robust as a pair of automatic wire strippers, like those shown at the top of Figure 2-20, when learning to solder. In fact, using your flush cutting pliers with a little dexterity will allow you to score the outer sleeve and remove the protective housing (shown in Figure 2-21). The downside to this technique is that you will, at times, cut the inner wire, possibly making it useless. This is especially true when you’re stripping the wires from a component with the wire leads attached. You might have to try re-stripping the wire, but this may make it too short.
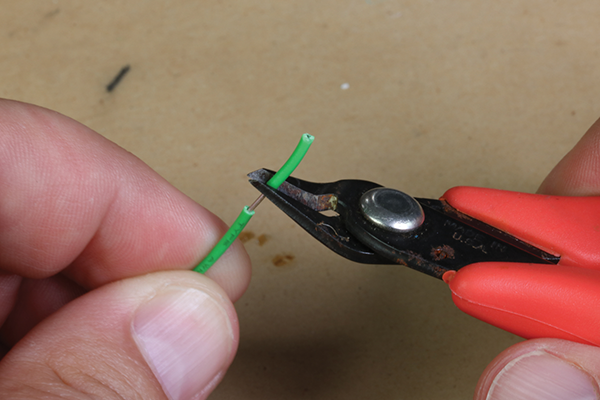
Figure 2-21: Using flush cutters to strip solid core wire
In general, when I have to strip solid core wire, I use my diagonal flush cutting pliers to make a slight cut in the housing and strip the outer layer off. However, anytime I need to strip the outer insulation off of stranded wire or any critical component, I reach for a wire-stripping tool similar to the one pictured in Figure 2-22. When you use flush cutting pliers instead of a proper wire-stripping tool, you will end up cutting some of the strands of the stranded wire, making it weaker and less able to carry current in your circuit. It’s always best to strip stranded and thin gauge wires with proper wire strippers.

Figure 2-22: Standard wire strippers
Image courtesy of Adafruit Industries, CC BY-NC-SA 2.0.
Safety glasses are number one on my list of required soldering safety gear. Next on the list would be a proper fume extractor. If you are just getting started, sitting near a window with a well-placed fan can suffice, but it won’t replace a proper commercial fume extractor (shown in Figure 2-23). A commercial fume extractor, typically consisting of a fan and a carbon filter to remove smoke, does a good job of cleaning the air. Regardless of whether you have a fume extractor, though, you should also consider the air flow of the space you are working in. A small room with the doors and windows closed is still not ideal, even if you have a fume extractor.

Figure 2-23: Commercial fume extractor
And, of course, just like so many tools in the Maker world, you can build your own. It’s not as good at removing smoke as a commercial version, but it’s portable and better than nothing. Best of all, you can practice soldering while building it! Jump to the end of this chapter to learn how to make your own mint tin fume extractor.
Getting a Grip on Your Work
The next tool we are going to look at is aptly called a third hand. It’s a very handy tool, used to hold components together while soldering. It could hold two wires that need to be joined, printed circuit boards, or really anything that needs to be held securely while you make the solder connection. There are many kinds of third hands, all with a slightly different configuration. The most common has two grippers and a magnifying glass. I have never found the magnifying glass useful, and I remove it. I have other tools, which I will discuss later, that are much better for magnifying your work. The one shown in Figure 2-24 is the most basic type, and yes, I removed the magnifying glass. Even if you decide to purchase a more deluxe version, you will still most likely want to have one of these inexpensive versions in your toolbox, as they are very “handy.”

Figure 2-24: A basic third hand tool
Image courtesy of Adafruit Industries, CC BY-NC-SA 2.0.
One downside of almost all third hands is the grippers. They tend to have serrated teeth that can be damaging. They may look innocuous, but they will easily cut through the outer layer of your wires, and that could lead to a short. It also makes your wires look messy! Do yourself a favor and cut a piece of heat-shrink tubing and fit it over each jaw prior to use. Figure 2-25 shows one side of my third hand with the heat-shrink tubing applied and the other without. By installing heat-shrink tubing, your third hand will have a much lighter touch on the components, which will keep it from piercing your wires. Are you not sure how to use heat-shrink tubing? I cover all you need to know about it in Chapter 3, “Let’s Get Soldering.”
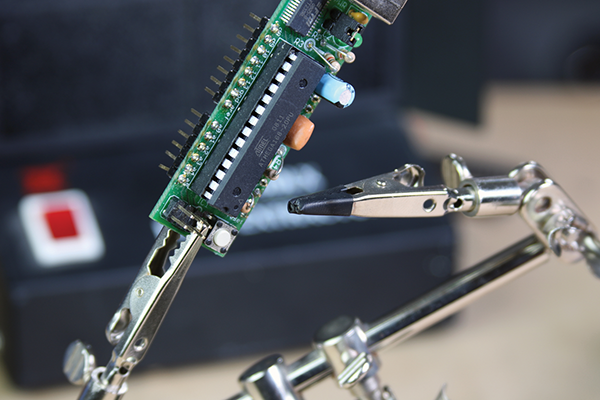
Figure 2-25: Adding heat-shrink tubing to the jaws of your third hand
At some point, you will most likely want a high-quality third hand to add to your toolbox. They typically have a weighted bottom, have longer arms, and just work better than the inexpensive versions. Because of these reasons, the version shown in Figure 2-26 is my go-to third hand. It has a great reach, the grippers come covered in heat-shrink tubing, and it’s ready to go right out of the box. Other variations include versions with magnetic bases, more hands, and a whole host of other options. There are also tons of DIY third hand tutorials on the web. Give it a quick search and find a version that you like. Better yet, come up with your own version and share it with everyone!

Figure 2-26: A high-quality third hand by Hobby Creek
Image courtesy of Adafruit Industries, CC BY-NC-SA 2.0.
When you’re soldering, a third hand is very helpful when it comes to holding wires, and if needed, can be used to hold PCBs, but there is a better alternative that is well worth the investment. A PCB holder is a dedicated vise used to hold PCBs while soldering, and they are extremely helpful if you plan on soldering a lot of PCBs. The most common ones are made by PanaVise, and that’s the kind I use. They make several different versions—all with varying price points. I prefer the PanaVise Jr (shown in Figure 2-27), and the good news is it’s the least expensive. Be sure to check out all the versions of PCB holders available, then select the one that’s right for you. Just like third hands, there are a lot of different types of PCB holders. Your choice will really boil down to your budget, the features you want the vise to have, such as the minimum and maximum size PCB it can hold, and various mounting options.

Figure 2-27: PanaVise Jr
Image courtesy of Adafruit Industries, CC BY-NC-SA 2.0.
A Summary of Tools
I tried to present many different options when it comes to picking out your equipment. It may seem a bit overwhelming, but remember that you only need a few tools to get started:
- Safety glasses
- Adjustable-temperature soldering iron with stand and sponge
- Wire cutters
Everything else falls into the nice-to-have bucket, and while it will make your experience better, it will also cost you more money upfront. It’s a good strategy to get all the basics first, and then grow your electronics arsenal as needed when you tackle new projects. I picked up a few new tools just to write this book. It was a great excuse to expand my own lab! And don’t forget: there are a lot of online DIY resources so you can make your own tools, like I did with my portable fume extractor. This can be a great option—you can save money and learn something, too!
Materials
Next, let’s look at some of the materials needed to learn how to solder. Just like in the tool section of this book, I will cover the basics. In fact, for now, the basics really is just talking about solder. As we learn more advanced techniques, I will cover more relevant and necessary materials like the different fluxes available and other materials needed to solder together kits, like the one pictured in Figure 2-28.

Figure 2-28: An electronic kit being soldered together
Solder
You might think that there can’t be too many types of solder out there to choose from, and you are right—it’s not that complicated. However, there are a few choices you need to be aware of when getting started (see Figure 2-29). The most difficult part when selecting a solder is to decide if you want to use a lead-based solder or lead-free. There are pluses and minuses to each, but most people I have come across use leaded solder for hobby electronics, at least in the United States. “You mean lead, as in poisonous?” Yes, I mean lead!

Figure 2-29: Various types of solder
Now let me explain. Lead can lead to serious health risks, especially when ingested, so be very careful. That being said, soldering with a lead-based solder, as pictured in Figure 2-30, can be fairly safe. The main two rules are to never eat when you solder, and wash your hands immediately after you finish soldering. Your skin is a decent barrier between the inner you and the lead solder. Also, you should have good ventilation and a proper place to solder. Your dining room table is not a proper place to solder!
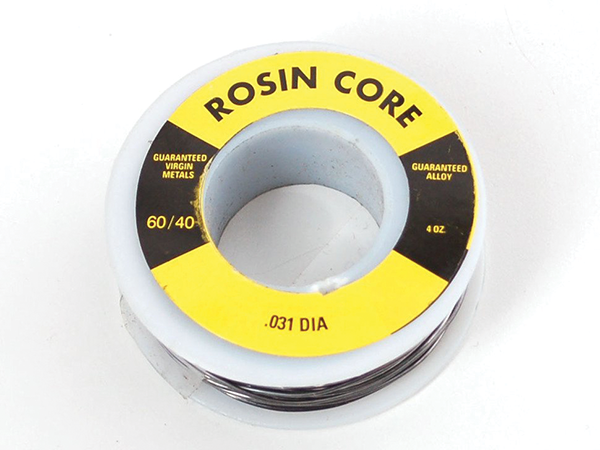
Figure 2-30: A 100 g spool of standard 60/40 lead, flux-core solder
Image courtesy of Adafruit Industries, CC BY-NC-SA 2.0.
You might be asking yourself, “If there is a lead-free alternative, why aren’t more people using it?” The reason is simple: lead-free, silver-based solder can be more expensive, and it is typically slightly more difficult to use, since it has a higher melting temperature. It’s also prone to fatigue cracking, due to the higher temperatures needed and its inherent brittleness, and tin whiskers, which are microscopic “whiskers” that can short out your circuit. While these limitations aren’t serious, I’m hoping that lead-free solder technology advances enough so there are no limitations at all.
So, which one should you use? Go with a lead-free solder to start, especially if you’re teaching kids or in a public area like a Makerspace. It’s totally fine for most hobby electronic projects. Additionally, if the current environmental trends continue, it will become increasingly difficult to buy or use a lead-based solder. And, as I mentioned before, there continue to be improvements in lead-free solder. So, go ahead and give it a chance. Whichever you choose, the way you make the solder connection is essentially the same.
Flux
To flux core, or not to flux core?
Once you decide between lead and lead-free solder, the next thing to consider is flux core (rosin core) or non–flux core. Flux, sometimes referred to as rosin flux or just rosin, is a chemical mixture that helps prevent oxidation during the soldering process. It also helps keep the solder flowing once it’s melted. You will need flux when soldering, but how you introduce the flux is up to you. Using a flux core solder makes your work a bit easier, since the flux is inside the solder and will start to flow when the solder is heated. If you choose a non–flux core solder, you will have to introduce the flux by adding either a paste or liquid to each connection while soldering. Do yourself a favor and use a flux core solder when you’re learning; it’s just easier.

Figure 2-31: A 50 g spool of 0.5 mm RoHS lead-free solder
Image courtesy of Adafruit Industries, CC BY-NC-SA 2.0.
Another factor to consider when selecting solder is the ratio of raw materials used. Typically, I use a 60/40 lead-based solder. That means it is 60% tin and 40% lead, along with flux in the core of the solder. There are other ratios, which will typically vary the melting point. For 99.9% of all hobby electronics, you should choose either a lead-based flux core 60/40 solder or RoHS (lead-free; see Figure 2-31), which is sometimes labeled SAC305.
The last thing you need to consider when selecting a solder is the actual diameter, or gauge, of the wire. Solder is available in many different sizes, from 0.01″ (0.25 mm) all the way up to 0.125″ (3.175 mm) or more. If you buy a small spool, about 50 grams, of solder approximately 0.032″ (0.81 mm) in diameter, it will last you a long time, and work in almost all, if not all, situations. There are times that a smaller or larger diameter would be nice, but in most cases you can do the job with anything that is about 0.032″ (~0.81 mm).
Whatever type of solder you choose, don’t use the kind you find in the hardware store for copper pipes! It has an acid-based flux core and it will ruin your circuits!
Summary of Materials
Just as with the discussion of tools, this is just an overview of the very basic materials that you need when learning to solder. I will cover many more materials and tools later in the book as we learn new skills and techniques (working on a project in Figure 2-32). What you really need to decide is whether or not you want to be soldering with lead-based solder. I have found that most people in the United States use lead-based solder. Different countries have different rules when it comes to the use of lead in any part of a project, so be sure to check your local rules and regulations. I’d recommend you try lead-free solder, as it certainly seems to be a healthier alternative. And no matter what type of solder you choose, make sure you wash your hands after soldering.

Figure 2-32: A kit in the middle of the soldering process
Project: Portable Mint Tin Fume Extractor
A fume extractor uses an activated carbon filter and fan to remove smoke and noxious fumes created from soldering. The average price of a small hobby version is about $100 USD, but the one shown in Figure 2-33 will run you about $10 USD. This fume extractor will not be as effective as a larger one, but it does a fair job and is extremely portable. Remember: always work in a well-ventilated area.

Figure 2-33: Mint tin fume extractor
Tools
- Soldering iron
- Dremel with cutoff wheel
- Drill and small drill-bits
- Fine-tip marker
- Various screwdrivers
- Wire cutters
- Safety glasses
Materials
- 7812 voltage regulator
- Candy tin
- Switch
- 40 mm case fan
- 9 V batteries (2)
- “Cheap” 9 V battery connectors (2); see Steps 2 & 3
- Pieces of screen (2)
- Piece of activated carbon filter
- Some heat-shrink tubing
- A few inches of wire
- Flux core solder
- Miscellaneous screws and washers
- Paint (optional)
Step 1: Build the Circuit
I decided that making a quick mock-up might be a good idea, and I am glad I did. At first, I thought that running the case fan off of just one 9 V battery would provide adequate power. In the end, though, I decided that 12 V “sucked” better—and in this case, that’s a good thing.
The final circuit, shown in Figure 2-34, uses a simple switch, two 9 V batteries, a 40 mm case fan, and a 7812 voltage regulator. The 7812 takes the 18 V from the two 9 V batteries that are wired in series down to 12 V, which is what the fan requires.
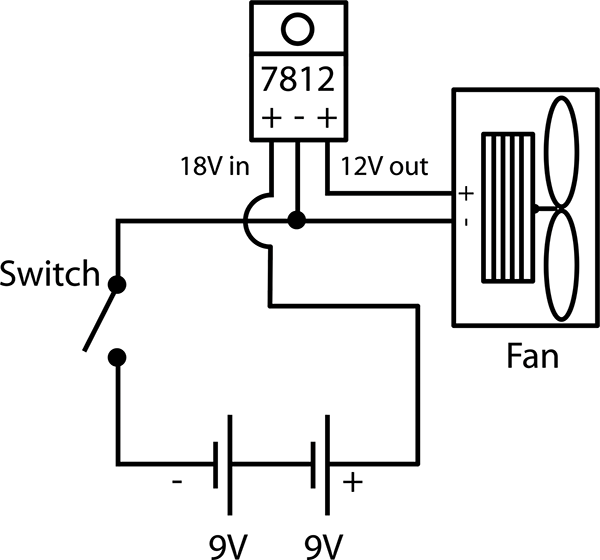
Figure 2-34: DIY mint tin fume extractor circuit
Step 2: Solder the Components
Notice the battery connectors in Figure 2-35, which are the cheap, flexible vinyl version, not the hard-plastic type. This allows them to easily fit in the case. The difference in thickness is minimal, but it is enough to stop you from putting both 9 V batteries in the case.

Figure 2-35: Soldering the battery connections
This is a very simple circuit. Solder it according to the diagram, making sure to attach the component leads to the 7812 in the proper order. (See Figure 2-36.) Don’t forget to use heat-shrink tubing on all the connections. This goes into a metal box—metal conducts electricity!

Figure 2-36: The completed circuit all soldered together
Step 3: Make Sure It all Fits
Make sure that everything can be stuffed into the tin (see Figure 2-37).
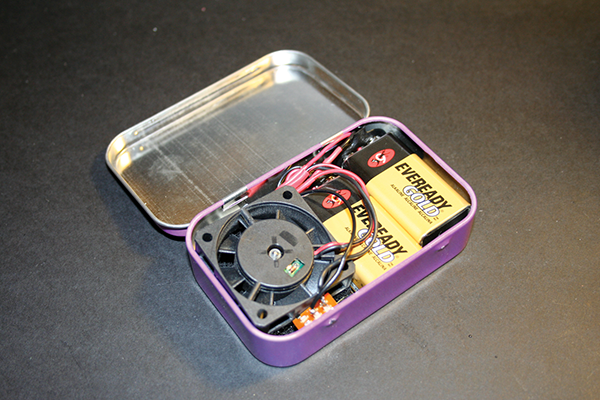
Figure 2-37: Making sure it all fits in the tin
Step 4: Cut and Mark the Openings (Wear Safety Glasses!)
I used a marker and paper to make a template for the fan openings, which are 35 mm square. I marked the opening for the switch at the same time. Then, I cut all the openings with a Dremel tool and cutoff wheel (wear safety glasses!). Next, I marked and drilled the two holes for the switch screws and the hole for the regulator (see Figure 2-38).
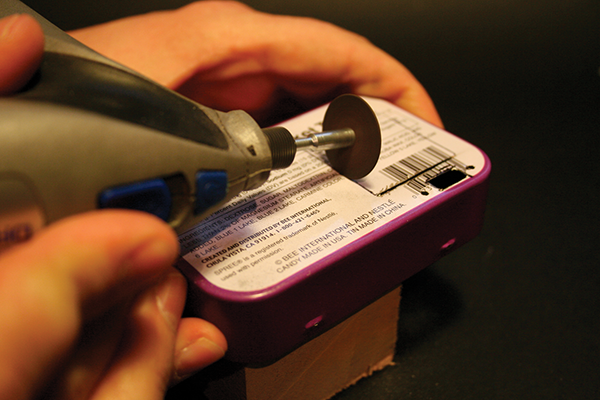
Figure 2-38: Cutting the holes. Be careful and wear safety glasses!
After you cut the first fan hole, close the box and use the 35mm square paper template to align the second hole. Make sure to allow for air flow, but you can just eyeball the placement (see Figure 2-39). In reality, it isn't that crucial for them to line up exactly. There is room for error.

Figure 2-39: Make sure the holes line up for proper air flow.
Step 5: Paint
I decided to paint the tin with a nice, red spray paint (shown in Figure 2-40). I hot-glued a scrap piece of wood to the inside so I could hold it while I spraypainted it. I gave it two quick coats, and I think it looks good. Krylon paint is fairly toxic and flammable, so paint it outside and away from everything!

Figure 2-40: A nice coat of paint is well worth the effort.
Step 6: Attach the Regulator and Switch
First, screw in the 7812 using a screw and a washer or two to add some space between it and the side of the tin. I used a #6-32 screw and one washer to keep it away from the side, but you can use anything that fits. The screws and washer will also act as a heat sink. Finally, screw in the switch. (See Figure 2-41.)

Figure 2-41: All the electrical components being installed
Step 7: Add the Screens and Filter
Here you can see the screen-filter-fan-screen sandwich (Figure 2-42). The screens are 50 mm2 and the filter is 40 mm2. You can buy replacement filters for the commercial extractors at a reasonable price.

Figure 2-42: Filter, fan, and screen sandwich
Next, just hot-glue or epoxy the corners of the screens down, and sandwich the filter and fan in between. Compression will ultimately hold it all together. (See Figure 2-43.)

Figure 2-43: Everything fit!
Step 8: Test
I have run mine continuously for hours and have had no heat buildup from the 7812, and the fan is still running strong. (See Figure 2-44.) It seems to work quite well and, although it is no replacement for a larger commercial fume extractor, it will come in handy for small projects. Remember: follow all safety guidelines when soldering, and work in a well-ventilated room, even if you have a fume extractor.
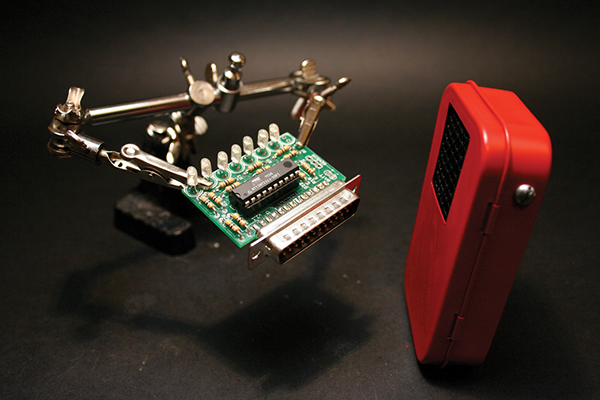
Figure 2-44: Give it a try and see how it performs.