
6
Implementing the Game Mechanics
The focus of the previous chapters was solidly on building an application foundation for Space-Truckers. Now, it’s time to shift gears (as it were) and look at the way we want to implement the game for its first phase: Route Planning. As we usually want to do when faced with a single, daunting, complex problem, we break down this part of the game into two principal facets: simulation and game elements. Throughout this chapter, we’ll start by looking at the simulation part of the game before layering the game mechanics on top of the simulation in a way that gives us the freedom to iterate.
It’s a common tactic of reality shows and gameshows where the host will give a wind-up speech that seems to indicate that they’re about to get to the big reveal, but then instead the show cuts to a commercial. This is relevant because we’re going to perform a similar headfake – instead of diving directly into the exciting simulation and game mechanics, we’re going to first take a short detour so that we can learn about how to manage music and sounds in Space-Truckers. Though a short one, it will be a handy addition as we continue integrating more and more functionality into the application.
In this chapter, we will cover the following topics:
- A Detour into Sound Management
- Designing the Game Elements of the Route Simulation
- Creating the Orbital Mechanics Simulation
- Defining the Rules – Game Mechanics
Technical Requirements
The first section of this chapter deals with audio files and playing them, so it’s helpful but not necessary to have speakers or some other way of hearing sound output. As always, the source code is available on GitHub at https://github.com/jelster/space-truckers/tree/ch6.
As you might expect, most of the technical requirements from previous chapters apply to this one since we’re continuing the work that started there.
Helpful Things to Know
The following are helpful things to know:
- Outside of the technical realm of software, there are some concepts and skills that are helpful to have previous knowledge of coming into this section. Don’t worry if you don’t recognize or aren’t familiar with this stuff – that’s the whole reason you’re reading this book in the first place – to learn! This includes vector operations in 3D space, addition, subtraction, multiplication, and so on, as well as the difference between normalized (1- unit) and non- normalized vectors.
- Basic kinematic physics – calculate the velocity or position of something based on time, with and without including acceleration.
- Familiarity with force and momentum relationships.
Note
Computers are supposed to be the ones who are good at crunching numbers, not you. Don’t freak out if you don't consider yourself a math person – we’ve got you covered!
Useful Links from the Babylon.js Docs
The following are some useful links:
- Physics Engine and Forces: https://doc.babylonjs.com/divingDeeper/physics/forces
- Mesh Copies, Clones, and Instances – look at the Solid Particle System (SPS), Instances, and Thin Instances: https://doc.babylonjs.com/divingDeeper/mesh/copies
- Environment Skyboxes (which we will get more into in Chapter 10, Improving the Environment with Lighting and Materials): https://doc.babylonjs.com/divingDeeper/environment/skybox
- Events and Actions: https://doc.babylonjs.com/divingDeeper/events/actions
A Detour into Sound Management
The topic of playing music and sound FX has come up previously in our journey – the theme song sound is played as part of the Splash Screen that we built in Chapter 5, Adding a Cut Scene and Handling Input, after all. The sound plays just fine, and everything seems to work, so what need is there to make things more complicated for no apparent reason? This is an excellent point to raise because, in software, the best approaches tend to also be the simplest, and simple is good because it means fewer things can go wrong (by definition). When fewer things can go wrong in software, it’s easy and cheap to make changes, additions, and enhancements and that is good for both Engineering and Accounting – a two-for-one special!
What all of that is getting to is that even though it works fine in isolation to load and directly play the BABYLON.Sound instance directly in the Screen itself, things break down when more than one Scene and Screen become involved. The main reason for this has to do with the fact that AudioEngine is independent of the Scene, but the Sound is not. This causes issues when we want to coordinate the starting, stopping, and volume levels of multiple Sounds across multiple different Scenes.
Sounds, SoundTracks, and the AudioEngine
Analogous to how the WebGL2/WebGPU canvas is used to perform rendering, the underlying audio engine used in Babylon.js is based on the Web Audio specification. If you’re interested in diving into that, and/or if you have insomnia, check it out at https://webaudio.github.io/web-audio-api/. To read more details on the abstractions built on top of that specification, the relevant Babylon.js API docs can be found at https://doc.babylonjs.com/typedoc/classes/babylon.sound.
To boil down our requirements when it comes to audio, we need the application to be able to do the following things or have the following qualities:
- We need to be able to control the collective volume (gain) level for groups of related types of sounds, such as background music, UI feedback sounds, and game sound effects
- It should be easy to change out the underlying sound assets without needing to change any of the consuming components’ code
- Consumers of the audio component should be able to easily access the underlying BABYLON.Sound
- The asynchronous loading of audio assets should be coordinated to ensure all of a Scene’s assets have completed their tasks before signaling readiness
To accomplish the first item, we’ll leverage the functionality of BABYLON.SoundTrack. This type is well named because it tells you what it does in the name! Instances of a Sound are associated with a SoundTrack via the SoundTrack.addSound function. The collective volume of any Sounds belonging to a given SoundTrack is controlled with the setVolume function. There are other methods in SoundTrack of course, but the two mentioned functions are the ones that we’re interested in now.
Looking back at the list of requirements, the third can be provided by a property accessor, while the second requirement is fulfilled by creating a mapping between a friendly string identifier and an object map (see Chapter 5, Adding a Cut Scene and Handling Input, the Designing the Input System section for more examples of this). The last requirement can be satisfied easily with the use of the functionality of the JS-standard Promise object. We’ll see how these all work together shortly, but it’s worth taking a moment to step back from the detailed requirements discussed previously to understand how this fits into the bigger picture.
A helpful way of identifying missing requirements and potential opportunities to solve problems relating to those requirements is to mentally picture a concrete scenario involving the matter at hand. In this case, picture the gameplay screen. Things are happening in it – the player inputs commands, the application responds to acknowledge entry, and events happen in-game. At the same time, music is playing in the background underneath the mechanical whines and screeching put out by the player’s cargo pod as it is launched or as it crashes. There is a multitude of audio samples being played at any given time, but they all have different volumes appropriate to their category or type of sound. Keep that goal in mind because as we dive into the details, this overall big picture will help guide and keep us on track.
SpaceTruckerSoundManager
The first two steps – design and build – concern the specifics of how we will use the audio features of Babylon.js to create our audio component, while the third concerns how we will make use of that component. The full code for the following snippets can be found in this chapter’s branch of the Space-Truckers GitHub repository at https://github.com/jelster/space-truckers/blob/ch6/src/spaceTruckerSoundManager.js.
Design
We need a bit of helper logic that will wrap the Babylon.js objects and help us manage their lifetimes and behavior. Because we’re so very imaginative, we’ll call it SpaceTruckerSoundManager – catchy, right? There are probably a lot of different ways that this can be constructed, but we want The Simplest Thing That Could Possibly Work, and that is spaceTruckerSoundMap.js and its soundFileMap:
const soundFileMap = {
    "title": { url: titleSongUrl, channel: 'music',
      loop: true },
    "overworld": { url: backgroundMusicUrl,
      channel: 'music', loop: true },
    "whoosh": { url: uiWhooshSoundUrl,
      channel: 'ui', loop: false }
};
The URL for each sound file is supplied by an associated import statement, with the object key being an arbitrary (but unique) string name. SoundTrack that the sound will be added to, as well as the loop flag to control auto-looping, are the two other data pieces rounding out soundFileMap, so let’s move on to how SpaceTruckerSoundManager uses it.
Build
Each instance of SpaceTruckerSoundManager is initialized with the associated scene, along with a list of one or more soundId. These are stored in the registeredSounds object map, which can be used to retrieve a given Sound by calling the sound(id) accessor function:
registeredSounds = {};
sound(id) {
    return this.registeredSounds[id];
}
The three different SoundTracks are stored in the channels property and initialized in the constructor:
constructor(scene, ...soundIds) {
    this.channels.music = new SoundTrack(scene,
      { mainTrack: false, volume: 0.89 });
    this.channels.sfx = new SoundTrack(scene,
      { mainTrack: true, volume: 1 });
    this.channels.ui = new SoundTrack(scene,
      { mainTrack: false, volume: 0.94 });
As mentioned previously, constructor takes scene and a list of soundIds; what was not mentioned previously was that after the constructor finishes, the component will not be ready for use yet – the onReadyObservable property of the component will notify subscribers when SpaceTruckerSoundManager has finished loading and preparing all its child Sound instances:
Promise.all(onReadyPromises).then(readyIds =>
  this.onReadyObservable.notifyObservers(readyIds));
The bulk of the constructor’s logic is taken up by a loop over the list of soundIds. Inside the loop is logic charged with the business of instantiating and managing how that Sound is loaded, the state of which is represented by prom. When the Sound’s onLoaded callback fires, the newly loaded Sound is added to the appropriate channel, SoundTrack, and the promise is resolved successfully:
const onReadyPromises = [];
soundIds.forEach(soundId => {
    const mapped = soundFileMap[soundId];
    const chan = this.channels[soundId] ??
        scene.mainSoundTrack;
    // guard logic omitted for length
    const prom = new Promise((resolve, reject) => {
        const sound = new Sound(soundId, mapped.url, scene,
           () => {
            chan.addSound(this.registeredSounds[soundId]);
            resolve(soundId);
        }, {
            autoplay: false,
            loop: mapped.loop,
            spatialSound: mapped.channel === 'sfx'
        });
        sound.onEndedObservable.add((endedSound, state)
          => {
                this.onSoundPlaybackEnded
                    .notifyObservers(endedSound.name);
            });
        this.registeredSounds[soundId] = sound;
        });
        onReadyPromises.push(prom);
    });
}
The individual asynchronous Promises are coordinated in two ways: first, an array of promises is constructed containing all of the different asynchronous calls that need to be resolved before continuing. Second, the Promise.all method takes that array of Promises and returns another Promise that, when resolved, will contain the results of each Promise contained in the array. In other words, it waits until everything has finished and then announces its completion.
Because we can’t mark the constructor as async, we can’t await the Promise results. Instead, we attach a function to the Promise.then chain, which, in turn, signals readiness via onReadyObservable. What’s notable is the absence is any sort of error or exception handling or catching – something that we will want to include in a more production-hardened application!
Integrate
The Splash Screen (see Chapter 5, Adding a Cut Scene and Handling Input) already plays a Sound, so we’ll want to replace that with a SpaceTruckerSoundManager instance that is initialized in the constructor:
this.audioManager = new SpaceTruckerSoundManager
  (scene, 'title');
this.audioManager.onReadyObservable.addOnce(_ =>
  this.onReadyObservable.notifyObservers());
The Scene will have completed loading and initialization long before audioManager.onReadyObservable fires, so we will use that event to signal the Screen’s overall readiness. To make the refactor seamless and easy, the music field of SplashScene is changed into the get music() accessor, which retrieves the title Sound from the underlying audioManager:
get music() {
    return this.audioManager.sound("title");
}
As a result, no other code changes are necessary to retrofit SpaceTruckerSoundManager into SplashScreen – it’s good to go! This brings our little detour to its end, but this won’t be the last time we see this since we’re going to be making direct use of it later in this chapter. For now, however, we’re going to be shifting topics to look at the route simulation and how it is constructed.
Designing the Game Elements of the Route Simulation
The Helios star system is the setting for Space-Truckers, but up until now, we haven’t gotten into what that entails. A topic covered in exhaustive detail in other books both fiction and non- is the well-known fact that Space Is Big. Like, Really Big. At the scale of a solar system, distances involved are so large compared to relative sizes of things that trying to represent this huge scale accurately in our game will neither be fun nor performant.
An Overview of the Helios System
The following diagram is a rather stylized view of the Helios system – the home setting for Space-Truckers – from a bird’s-eye view. Bracketed planetary bodies show the two different start and end route possibilities –outward going in toward the sun and vice versa. In the following diagram, the different shaded regions correspond to different potential encounters for players during the driving phase:
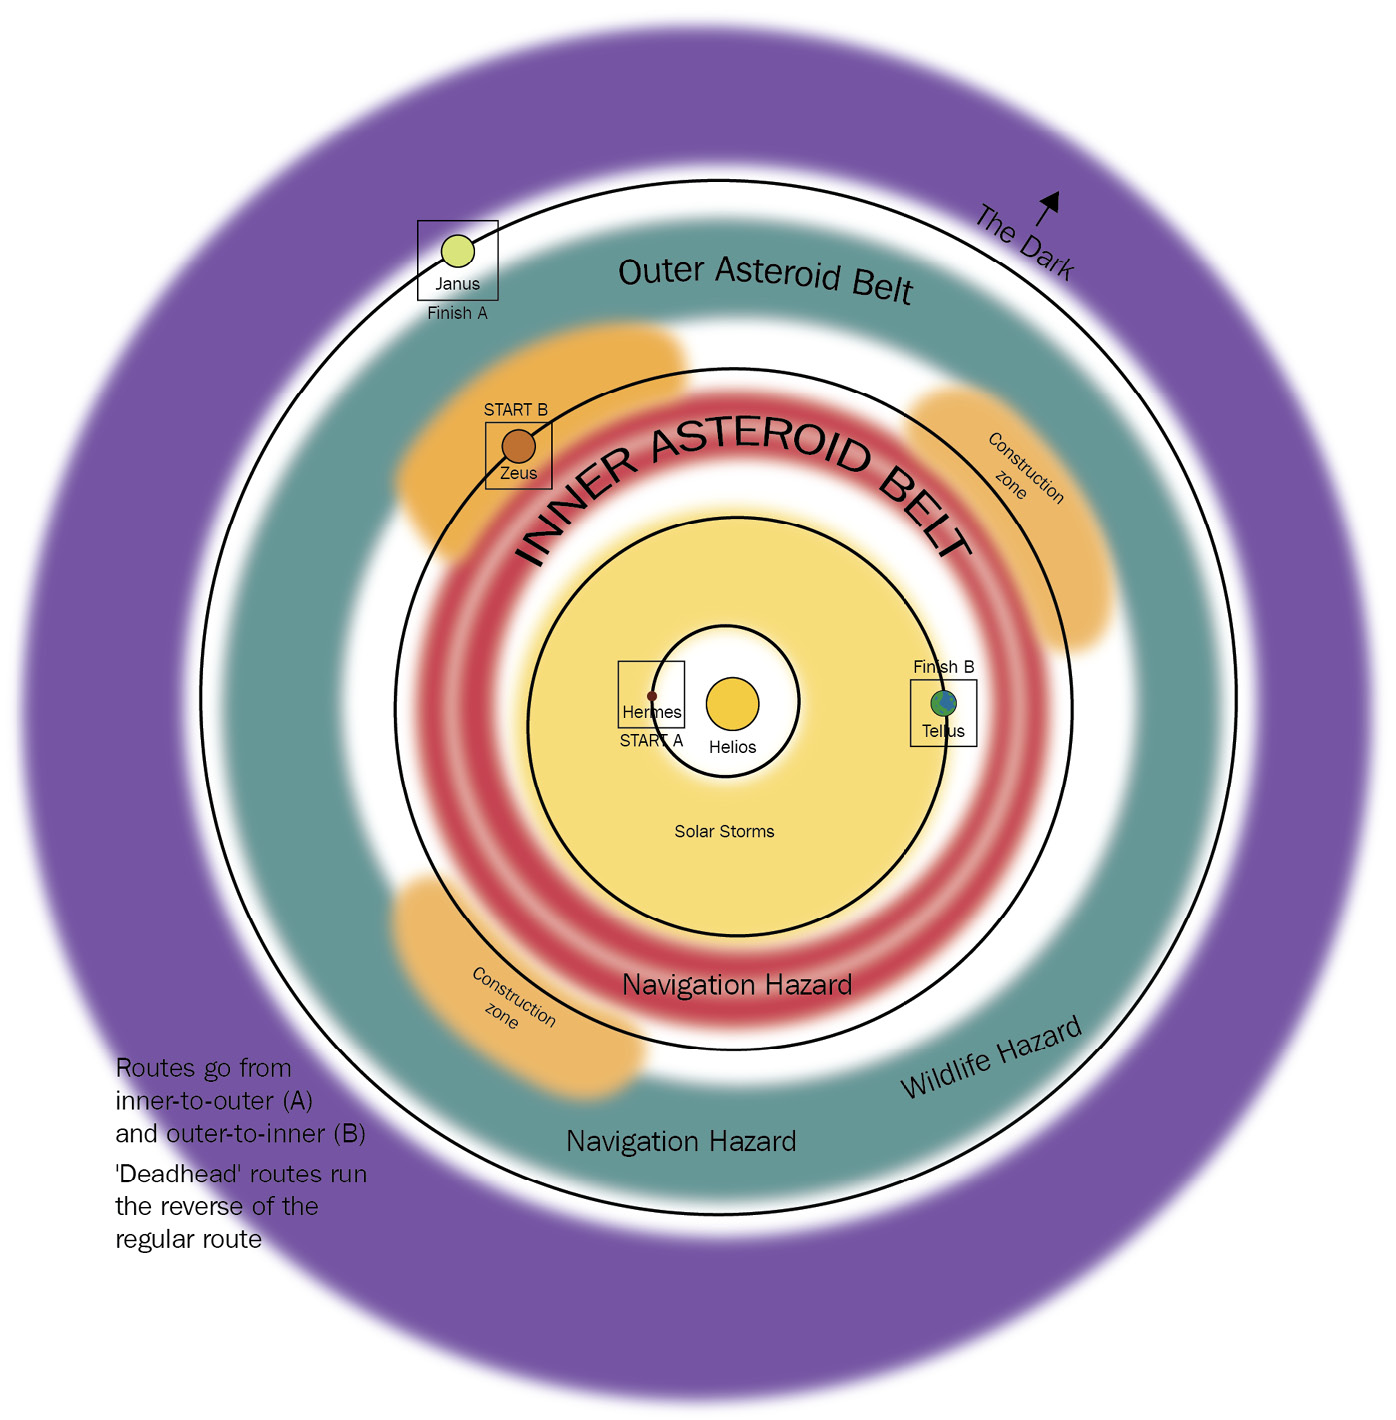
Figure 6.1 – Depiction of the route planning gameplay map
The closest planet is Hermes, so-called because it speeds around in its tight orbit of Helios. In the game world, it’s the primary starting position for route planning. Routes originating from Hermes will end at the busy hive of construction at Zeus. The alternative, the B route, starts a bit further out from the star around the planet Tellus and has as its destination as the distant ice factories of Janus.
In between either set of origins and destinations are a whole solar system’s worth of potential hazards and obstacles. Close to the turbulent star, solar storms are common. They can ruin a Space-Trucker’s Day by twisting and curling the Space-Road and forcing operators to steer their vehicle and cargo through them to maintain accurate navigation. A bit past the orbit of the blue-and-green jewel Tellus is another navigation hazard in the form of a dense asteroid belt.
In the real world, there’s no such thing as an asteroid belt thick enough to be a meaningful navigation hazard, but in the world of Space-Truckers, decades of asteroid mining operations have littered and set loose enough debris to make it a real problem for vessels aiming to pass through the rocky hazards. Past the asteroid belt lies the gas giant Zeus, the titan of planets in the Helios system, where a hive of industrial activity sparkles and glimmers around the clock. The busy factories require a constant supply of raw materials, spare parts, and supplies, and that’s where Space-Truckers come in. Getting straight to Zeus isn’t always as easy as it may seem, though.
Not content to confine their industries to merely the orbit of the giant planet, recent engineering projects at the leading and trailing LaGrange points take advantage of the rich resources present in the so-called Trojan and Greek families of asteroids. Anyone familiar with road construction knows the delays, detours, and occasional flag-waver directing traffic that has been diverted, and those construction zones are no different in space!
Past the glowing forges and factories of the Zeus system, things start to get dark and cold. The ice giant Janus sits at the gateway between the warm buzzing of activity of the inner system with the quiet darkness of the outer. Space-Truckers arrive and depart from the area on journeys to deliver stored energy gathered in the brightness sunward, departing with full loads of icy volatiles vital to sustaining life in the inner system. However, they are not alone out there – large herds of simple space-life roam these cold and distant plains. Not used to seeing visitors, they present a navigational hazard for the unwary Space-Trucker on the tail-end of a long haul.
Putting everything together, the following screenshot shows what the system looks like when the route planning begins:
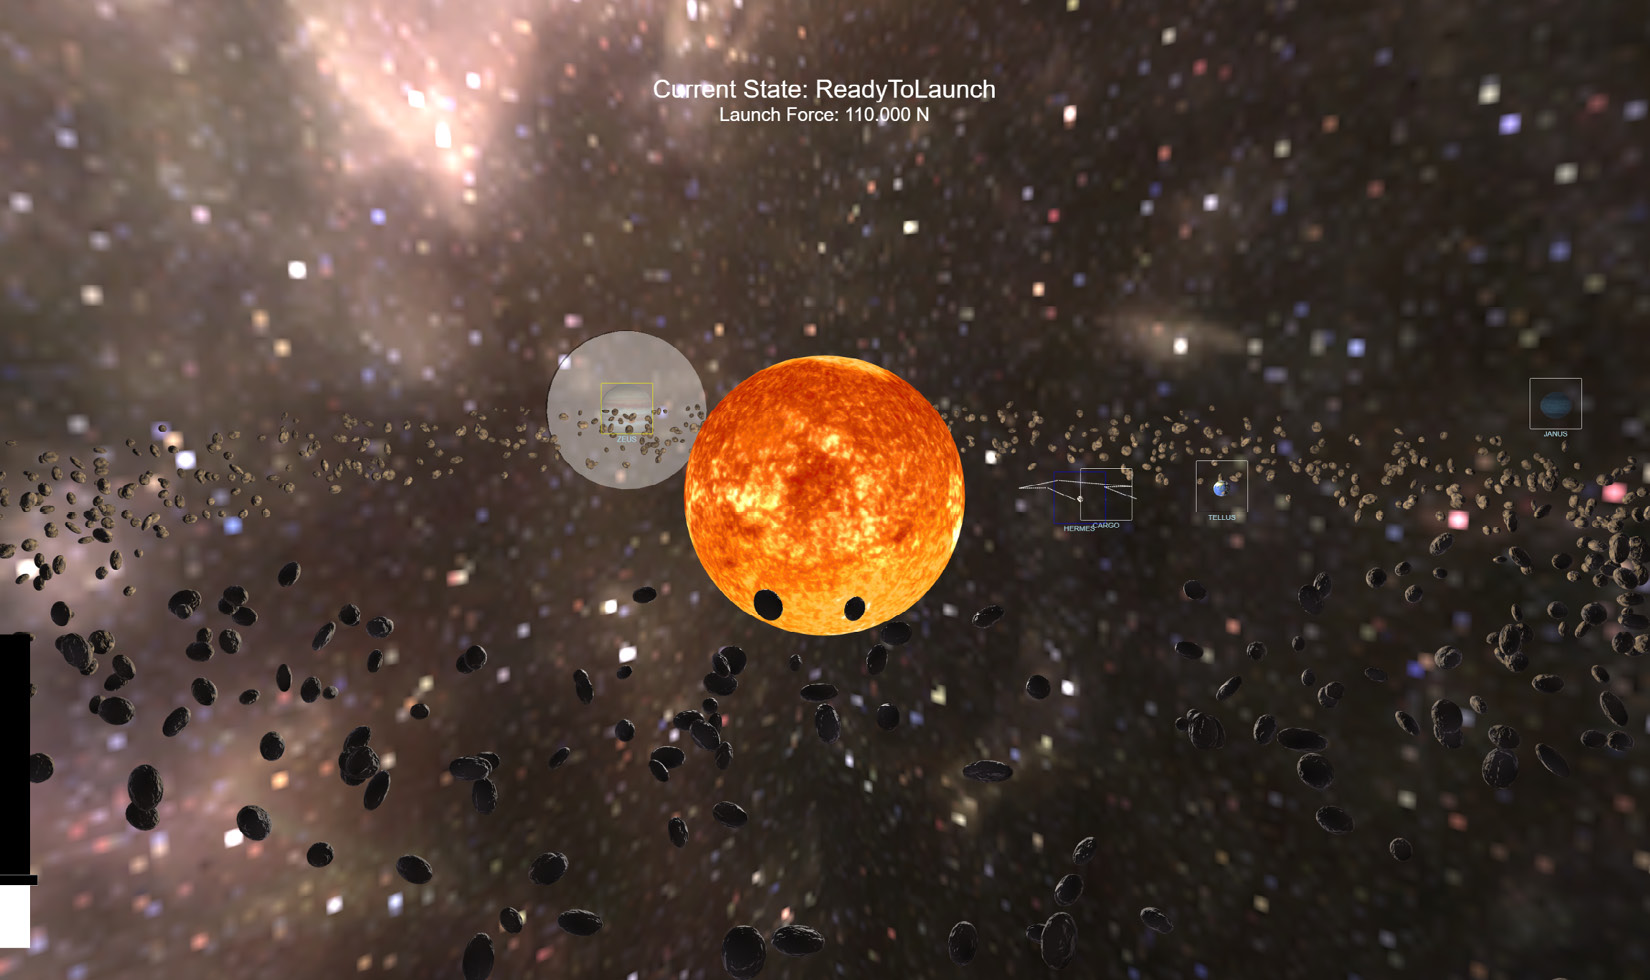
Figure 6.2 – The ReadyToLaunch phase of the route planning screen. This shows most of the actors involved, including the Star, destinationMesh, planets, launchArrow, and cargo
Now that we’ve looked at the system from the big picture perspective, it’s time to break out the individual actors and look for commonalities between them. This allows us to start creating game components that will help service the game concepts that in a way is kind of like putting together a list of job requirements.
Actors and Their Behavior
Before we get into the specifics of the different objects and components that will comprise the route planning screen, let’s take a look at what our object hierarchies look like concerning our game objects. The basic idea is that there are several pieces of data and behaviors that we know our game objects will need, but at the same time, we want to avoid writing repetitive code. We need to be able to update or advance the simulation, sometimes at a very fine-grained level, so we will generally avoid having components register their own onBeforeRender handlers and instead provide an update(deltaTime) method that will serve the same purpose. Here is one way of depicting how our various components interact with each other, with data, and with the application:

Figure 6.3 – A class diagram of the Game Components involved in RoutePlanningScreen
In the preceding diagram, the abstract hierarchy of classes is in the center. BaseGameObject is the least derived (for example, it doesn’t extend any other type), while the various classes for the game concepts are the most derived. RoutePlanningScreen hosts the various instances of those game component classes, managing their behavior in a fashion that is like the overall rendering pipeline:

Figure 6.4 – The SpaceTruckerApplication update and render cycle, simplified
Each frame that the RoutePlanningScreen.update method is invoked by SpaceTruckerApplication, RoutePlanningScreen goes through its own child components and (optionally) calls their update methods. When all of those have been completed and RoutePlanningScreen has finished its update cycle, the screen is finally rendered. There are a few steps that are missing in this diagram, such as the before and after physics steps, but that is the mechanism for how our game’s underlying state can change and evolve. That’s how we describe the most primitive behavior needed by our game objects, so let’s use that knowledge to code it up!
Abstracting the BaseGameObject Class
The BaseGameObject class (see https://github.com/jelster/space-truckers/blob/ch6/src/baseGameObject.js for its source) is what provides that shared, low-level functionality that we don’t want to have to duplicate across game objects. It is the least common denominator for any object that we may want to render in a Scene. Many of the properties of BaseGameObject are simple proxies that allow access to the underlying properties of the different Babylon.js components comprising the game object, such as the Vector3 rotation property accessors:
get rotation() { return this.mesh?.rotation; }
set rotation(value) { this.mesh.rotation = value; }
In addition to consolidating access to the various component and data properties, BaseGameObject provides two crucial behaviors: update and dispose.
update doesn’t seem to do much in this base class, since all it does is update the lastSceneTime property, but it’s an important role; many types of behaviors require tracking not just the amount of time since the last frame was rendered but also the previous value to properly integrate things such as velocity and acceleration.
Important note
If an extending class depends on the deltaTime and/or lastSceneTime value, make sure to call super.update(deltaTime) as the first thing it does in its update method.
For folks with experience in traditional Object-Oriented Programming (OOP) languages, the usage pattern might be familiar: an abstract base class provides common functionality to its more derived classes. An example of how this works is in the orbital mechanics simulation that we’ve implemented.
Defining the Orbital Mechanics Simulation Elements
The Planet class (covered shortly) builds off the OrbitingGameObject class (https://github.com/jelster/space-truckers/blob/ch6/src/orbitingGameObject.js), which, in turn, is derived from the BaseGameObject prototype. OrbitingGameObject provides a base suite of data and behavior about the various calculations involved in both orbital motion and gravitational acceleration – the nerdy but interesting physics and math stuff we’d otherwise end up repeating across multiple places in the code base. Though it isn’t intended for objects of this type to be rendered directly, it would still be possible to do so by simply setting the mesh and material properties appropriately. The following table summarizes the data and behavior of OrbitingGameObject:

Figure 6.5 – Summary of the behavior and data of the OrbitingGameObject component
By abstracting away the details of the orbital and gravitational calculations, more derived classes are much easier to understand, build, and maintain. A great example of how this can be leveraged is the Planet class.
Implementing the Star and Planets
The bulk of the constructor logic for the Planet class (https://github.com/jelster/space-truckers/blob/ch6/src/route-planning/planet.js) is devoted to the pertinent needs of reading the input planData and then instantiating and configuring the render-specific aspects of the component – tasks such as creating materials and loading and applying textures. Notice that there is no mention in the Planet class file of anything relating to our orbital simulation – only the specifics that make a given Planet instance different from another.
To aid in this effort, the class is data-driven: planData passed into the constructor function contains all the data needed. That’s the beauty of the mixed inheritance/composition patterns that we’ve been applying; each of our components only needs to concern itself with the specific tasks that it has been designed to accomplish and nothing more! As a result, this is what a typical planData looks like:
{
        name: "tellus",
        posRadians: Scalar.RandomRange(0, 2 * Math.PI),
        posRadius: 750,
        scale: 30,
        color: new Color3(0.91, 0.89, 0.72),
        diffuseTexture: earthDiffuseUrl,
        normalTexture: earthNormalUrl,
        specularTexture: earthSpecularUrl,
        lightMapUrl: earthCloudsUrl,
        mass: 1e14
    }
Perhaps this looks familiar? Back in Chapter 2, Ramping Up on Babylon.js, we saw a very similar structure that was used to generate the orbiting planets of the Loading Screen – with a few new members (such as mass). Similarly, the Star class (https://github.com/jelster/space-truckers/blob/ch6/src/route-planning/star.js) can be very short and sweet since although it does not orbit like other game objects, it does participate in gravitational calculations.
By setting autoUpdatePosition = false, the star will not move in its central position in the world space. This makes the constructor and subsequent class quite simple:
constructor(scene, options) {
    super(scene, options);
    this.autoUpdatePosition = false;
    const starData = options;

    this.mesh = MeshBuilder.CreateSphere("star",
      { diameter: starData.scale }, this.scene);
    this.material = new StandardMaterial("starMat",
      this.scene);
    this.material.emissiveTexture = new
      Texture(starData.diffuseTexture, this.scene);
}
The last two actors of our dramatis personae are the player’s avatar, also known as the cargo, and the hazardous collection of boulders that form the asteroid belt. We’ll cover the cargo later because we have a major new concept to cover first in the Asteroid Belt – Thin Instances. If you have a phobia of numbers and math (and it’s OK if you do!), fair warning – there be matrices and quaternions ahead, but there’s no need to worry – you won’t have to sweat any of the hard maths. All of the hard work and heavy thinking is done by functions in Babylon.js, so all we need to do is understand when and how to use them!
Procedurally Generating the Asteroid Belt
Before we talk about the particulars of the AsteroidBelt class (https://github.com/jelster/space-truckers/blob/ch6/src/route-planning/asteroidBelt.js), we should review some definitions and concepts in the context of rendering meshes. Firstly, it’s important to understand what a mesh is at its simplest level. Starting with the simplest explanation, a mesh is a bunch of points set up in a particular order in 3D space. More in-depth, a mesh is a collection of points in 3D space that can be positioned, rotated, and scaled together. To describe it in extremely precise terms, a mesh is an array of vectors grouped as a set of matrices that represent the position, translation, and rotation of each part of the 3D model, respectively. While a mesh’s geometry is sent to the GPU once, that same geometry can be linked (reused) by the GPU to render as many additional instances as are required.
In the case of regular instances, it is important to understand that although the mesh geometry is not duplicated in the GPU, there is still a CPU (JavaScript) overhead stemming from the need to iterate over each instance every frame for processing. That’s the price of being able to retain control over individual instances, but some situations may not require that much control. That’s where Thin Instances come into play.
Note
If you’ve used 3D Modeling tools such as Blender, Thin Instances in Babylon.js are referred to as linked objects in Blender.
The essential concept that we’re focusing on here is the idea that there are circumstances where we might need hundreds, thousands, or even tens of thousands of individual copies of a given mesh to be rendered in a particular Scene, but we don’t want to incur the memory or CPU overhead of having to process and maintain multiple copies of that mesh’s geometry. Think trees in a forest (for example, https://playground.babylonjs.com/#YB006J#75), or an ocean comprised of LEGO® (for example, https://playground.babylonjs.com/#TWQZAU#3), or, as is relevant to our case, a large number of asteroids – giant, floating space rocks (for example, https://playground.babylonjs.com/#5BS9JG#59 – with a tip of the hat to Babylon.js community member Evgeni_Popov).
The key limitations to keep in mind when thinking about (Thin) Instances are as follows:
- All instances, Thin or not, must share the same Material
- Although much more efficient than cloning a mesh, Instances are still both CPU- and GPU-bound
- For Thin Instances, you must manipulate an individual Instance’s properties (for example, position, scaling, rotation, and so on) by manually manipulating the specific Instance’s matrix values
- All Thin Instances are always drawn (or not) – there is no way to hide or skip the rendering of an individual Thin Instance
- Thin Instances check collisions as a single, giant mesh; there is no way to register collision detection for individual Instances
Even with those limitations in mind, it makes sense to use Thin Instances to render the Asteroid Belt – we want at least a thousand (or so...) of them, so we don’t need to exercise much control over them, and since we want them to look relatively homogenous, it’s OK for them to share the same Material. We’ll get more into the Material we’ll use for the asteroids later, so for now, let’s look at how we are creating each asteroid’s Thin Instance through the power of Analogy.
Important note
We are operating under the assumption that an instance has the same sign for its scaling, position, and rotation components (this is known in matrix jargon as having the same sign determinant). You should not directly mix elements with opposite signs. For example, the following statement results in a mixed determinant sign:
Matrix.Compose(new Vector3(-1, 1, 1),Quaternion.Identity(), newVector3(2, 1, 0))
This is because the negative sign in the first argument conflicts with the positive 1 that an Identity Quaternion represents.
Astrophysicists who study black holes have an interesting way of describing the properties of their scientific studies.
The idea is that, any given black hole only has three observable properties – electric charge, mass, and spine that uniquely defines it, whereas things like people, stars and plants, have quite a few additional attributes making them – and you – uniquely special. Like this no-hair theorem, as it’s called, each Thin Instance of our asteroid will be distinguished apart from its brethren by just their properties of position, rotation, and scale. We will define values for each of these properties, for each instance individually, storing the arrays as class members. Thus, the algorithm for generating the asteroids can be relatively quite simple: declare the matrices, quaternions, rotations, scalings, and position arrays. Then, allocate a Float32Array to use as the matrix buffer. The size should be nine times the count of asteroids to create to hold the resulting data.
For every asteroid that we want to create, we must do the following:
- Generate a set of three vectors, one each for the position, rotation, and scale.
- Randomly set the component values of each vector to a number in limits.
- Add the new vectors to their respective arrays.
- Create and add a new, empty Quaternion, Matrix to arrays.
- Convert the rotation vector into a Quaternion.
- Use vectors and quaternions to compose the Matrix.
- Copy the matrix elements to the matrix buffer.
- Set the thinInstance buffer on the target mesh to the instance from the matrix buffer.
When we randomly generate the values, we need to ensure that the values are all within valid parameters, and we can do this in several different ways. The first is used for the scaling and rotational vector values and helps to create the rough, rock-shaped surface of what started as a smooth IcoSphere mesh. Because Math.random() returns a floating-point number between zero and one, we scale that number out by a factor representing the maximum in the range of values we want to see generated – in other words, when the random value is equal to one.
Since it’s also possible to get zero as a value, the scale has an additional additive constant to ensure at least a minimum value. A similar, though more simple expression, generates rotations for each axis. The scaling Vector3 works well for defining the scale and rotation of the asteroid instance, but specifying the position requires another approach.
Once again, we must shift from thinking in linear terms to that of angular. Using the Babylon.js Scalar.RandomRange() utility function, we can generate a random point somewhere in the torus (donut shape) by defining innerBeltRadius and outerBeltRadius – that is, we generate a random number (rTheta) that is then combined with another random number between 0 and 2 * π.
Note
Recall that the sine and cosine functions take their inputs in radians, and a full circle is described by 2 * π or approximately 6.28319 radians.
The X and Z-axis values for the world position of the asteroid are computed by converting the radial (angular) value into world coordinates – for example, Math.sin(theta) or Math.cos(theta) – which yields a normalized value, then multiplying that by our randomized scale constant to properly place the object in the world. Because we are using a very simplified mathematical model to distribute the asteroids in space, we can treat the vertical Y-axis by multiplying half of a random number by the density configuration constant:
this.positions.push(new Vector3(
    Math.sin(theta) * rTheta,
    (Math.random() - 0.5) * density,
    Math.cos(theta) * rTheta
));
Updating an asteroid’s rotation, position, or scale is a two-step process. The first step is for the AsteroidBelt class to modify values in the desired array at the index corresponding to the desired asteroid instance. In the update loop, each asteroid’s rotation values are tweaked by a small random amount by modifying this.rotations[i].
Once that has been completed, the second step is the same as the original generation algorithm, conveniently factored out into the updateMatrices function of the class. The only difference between creating and updating the thin instance data is that when we update, we use mesh.thinInstanceBufferUpdated instead of mesh.thinInstanceSetBuffer.
Note
For more on the technical aspects of using Babylon.js with meshes, Instances, and the GPU, see the official docs at https://doc.babylonjs.com/divingDeeper/mesh/copies/instances and https://doc.babylonjs.com/divingDeeper/mesh/copies/thinInstances.
It is finally time to put everything we’ve been looking at together into one and begin our examination of the actual Route Planning Screen. Although it may seem a bit confusing due to an apparent lack of big-picture focus, we didn’t have the proper context established yet to take that picture in. Still, it can be difficult to follow along with this type of overview, so here’s yet another occasion where the PG comes in handy. As shown previously, this snippet (https://playground.babylonjs.com/#5BS9JG#59) is a preliminary, basic implementation of the planet simulation, and although not 100% identical to the game’s code, it’s illustrative of all the concepts described previously, as well as some we have yet to cover!
Adding the CargoUnit Class
The CargoUnit class is this part of the game’s projection of the player into the game world. It derives from OrbitingGameObject, but it does not automatically have its position updated – just like the Star class we just finished looking at. Unlike the Star class, there’s a little bit more happening.
Starting with the data, the CargoUnit class tracks several pieces of game-specific in-flight information, such as timeInTransit and distanceTraveled. The isInFlight Boolean flag is implicitly correlated with PLANNING_STATE.InFlight, if that wasn’t apparent already. These and other pieces of data are consumed by both RoutePlanningScreen and PlanningScreenGui (more on that later) and get updated as part of the hopefully now-familiar update method pattern shown in the following code.
During the update, there is some logic to point the cargo unit’s rotation in the direction of flight, which involves a tiny bit of vector math, but more importantly, there is logic to apply the current frame’s accumulated gravitational forces to the box. Since force is calculated in terms of effect per second, it must be scaled to the amount of time that has passed since the last frame, using deltaTime. After the force is applied, we clear the currentGravity field to prevent forces from infiltrating across rendered frames:
update(deltaTime) {
        super.update(deltaTime);
        if (this.isInFlight) {
            this.lastGravity = this.currentGravity.clone();
            const linVel =
              this.physicsImpostor.getLinearVelocity();
            this.lastVelocity = linVel.clone();
            linVel.normalize();
            this.timeInTransit += deltaTime;
            this.distanceTraveled +=
              this.lastVelocity.length() * deltaTime;

            this.rotation = Vector3.Cross(this.mesh.up,
              linVel);
            this.physicsImpostor.applyImpulse(this.
              currentGravity.scale(deltaTime),
              this.mesh.getAbsolutePosition());
            this.currentGravity = Vector3.Zero();
        }
    }
A vector cross-product is a mathematical operation that takes two orthogonal vectors (that is, two vectors perpendicular to each other) and yields a third, new vector that points in a direction perpendicular to both of the inputs. By inputting the (normalized) physical velocity of cargoUnit along with the local Up axis, we are given the resulting rotational coordinates that cargoUnit must adopt to point itself in the direction of travel.
Note
A force applied to an asymmetrically massed body such as cargoUnit will cause angular rotation, or torque, causing the unit to spin wildly around its center of mass. This is not as bad as the game crashing, but not great, especially when paired with TrailMesh! By setting the rotation to point in the direction of travel, we are ensuring that gravitational forces transfer to the unit’s linear – not angular – velocity. Also, we prevent TrailMesh from twisting itself up into knots – a factor that is critical when generating the next phase’s route.
Defining the CargoUnit’s behaviors is the last thing to cover before we shift focus. In addition to the update behavior, only three other actions are implemented by the class.
The reset, launch, and destroy actions are fairly self-explanatory from their names. The reset method is called any time the simulation is being restarted, such as when the player presses the Delete key on their keyboard. It clears all of the stored state data from CargoUnit before moving itself back to its initial start location and setting the isInFlight flag to false. The launch function is where TrailMesh is instantiated, along with the initial kick from the launcher; it is responsible for setting the isInFlight flag appropriately. Lastly, the destroyed function is called whenever SpaceTruckerApplication has determined that CargoUnit has been officially destroyed, for example, when encountering an obstacle that is not amused by the impact. It is responsible for making sure that CargoUnit doesn’t fly off at infinite velocity after a collision and instead stays put where it is.
That was certainly a large number of different concepts and classes to go over in such a short space, but there is so much more to see we can’t possibly stay on this topic any longer. We have mentioned several times that we would eventually go into some detail regarding how the flight mechanics are implemented with the physics engine, and we’ve almost got to the point where we can create a critical mass of contextual knowledge. This knowledge will propel us toward a greater understanding and progress – hang in there!
Establishing the Basic Route Planning Screen
Of all the different things we’ve worked on to date in Space-Truckers, SpaceTruckerPlanningScreen (https://github.com/jelster/space-truckers/blob/ch6/src/route-planning/spaceTruckerPlanningScreen.js) is by far the most complex. We’ve come prepared to manage that complexity by looking at the individual components first; with fewer things to have to try and keep track of, it’s much easier to stay focused on the topic at hand. Let’s break down the different aspects of the screen to make it a bit more manageable. There are three basic categories or facets that we’ll focus on – this should start to be getting familiar by now – data, behavior, and state transitions. Each has a distinct role to play, and by understanding each, in turn, we will be prepared to take the next steps toward creating the simulation.
Developing the Data
A lot of different pieces of data are needed to both run the simulation and embody the game mechanics. Some of them, such as launchForce, origin, and cargo, deal with the game mechanics, while others, such as the planets array and the asteroidBelt and star objects, store information needed for the gravitational simulation. onStateChangeObservable is used by other components (for example, the PlanningScreenGui class at https://github.com/jelster/space-truckers/blob/ch6/src/route-planning/route-plan-gui.js) to respond to changes in the gameState property, an enumeration value of one of the PLANNING_STATE keys:
static PLANNING_STATE = Object.freeze({
        Created: 0,
        Initialized: 1,
        ReadyToLaunch: 2,
        InFlight: 3,
        CargoArrived: 4,
        GeneratingCourse: 6,
        CargoDestroyed: 7,
        Paused: 8
    });
Rounding out the defined data for this Screen is preFlightActionList (see Chapter 5, Adding a Cut Scene and Handling Input), which specifies the names of the input actions this class should handle, as well as whether the input should be bounced, or prevented from repeating for a brief time:
const preFlightActionList = [
    { action: 'ACTIVATE', shouldBounce: () => true },
    { action: 'MOVE_OUT', shouldBounce: () => false },
    { action: 'MOVE_IN', shouldBounce: () => false },
    { action: 'GO_BACK', shouldBounce: () => true },
    { action: 'MOVE_LEFT', shouldBounce: () => false },
    { action: 'MOVE_RIGHT', shouldBounce: () => false },
];
In this particular instance, our actions will be linked to the previously mentioned factors such as launchForce, allowing players to choose their launch direction, timing, and speed using whatever input method has been configured – except for touch and visual controls (those must be created and hosted in the GUI).
As you may expect, the constructor is where the majority of the Screen’s objects are initialized. Game Components such as soundManager, actionProcessor, camera, lights, skybox, and so on are all created and configured there. For lighting, we use a PointLight with the intensity cranked up to a cool ten million – the vastness of space is dark – and we want to make sure the light of star can light up the scene in the way we want. That covers many of the familiar happenings occurring in the constructor, but there’s a lot more going on that falls outside of the familiar.
Driving Behavior with Data
An important factor driving the code design is the need to drive the behavior of the simulation via data as much as possible (without going overboard). This means that instead of hardcoding values directly into SpaceTruckerPlanningScreen, we define the gameData file to hold our configuration values. By reading through the configuration data passed into the constructor, it is easy to run the simulation using arbitrary, easily changed values (more on refactoring to accommodate iteration will be covered shortly). Factors such as the origin planet and the destination planet are stored in gameData, along with physical information about the system (for example, PrimaryReferenceMass, or how much the central star weighs).
Some components of SpaceTruckerPlanningScreen are defined internally to the class. An example of this is the launchArrow mesh, which was created using a combination of the arrowLines Vector3 array, and MeshBuilder.CreateDashedLines functions, which returns a mesh from a passed-in array of points. Other meshes are much simpler, such as destinationMesh – a sphere parented to a Planet that’s used for visual and collision purposes.
Preparing for the implementation of the game mechanics is part of our task here, so we will create and set up destinationMesh with an ActionManager that will look out for intersections with cargo.mesh (the player’s cargo unit), invoking the cargoArrived function if that does happen:
this.destinationMesh.actionManager = new ActionManager(this.scene);
this.destinationMesh.actionManager.registerAction(
   new ExecuteCodeAction(
       {
           trigger:
             ActionManager.OnIntersectionEnterTrigger,
           parameter: this.cargo.mesh
       },
       (ev) => {
           console.log('mesh intersection triggered!', ev);
           this.cargoArrived();
       }
   ));
The purpose of cargoArrived is to set the current state for Screen, along with any other needed state-change-related actions to stop the simulation. For now, this is enough, but later, we will be adding additional behavior to this function.
Similar to how SpaceTruckerApplication takes different sets of actions in its per-frame update method, (see Chapter 3, Establishing the Development Workflow), switching on currentState to control its behavior, SpaceTruckerPlanningScreen does so as well. The first thing to do is calculate the number of milliseconds since the last time the frame was rendered, which we can do using the deltaTime parameter (for testing) or retrieve using scene.getEngine().getDeltaTime() if missing. After that, actionProcessor updates its list of inputs and mappings to actions. Now, it’s time to switch on gameState:
switch (this.gameState) {
    case SpaceTruckerPlanningScreen.PLANNING_STATE.Created:
        break;
    case SpaceTruckerPlanningScreen.
        PLANNING_STATE.ReadyToLaunch:
        this.star.update(dT);
        this.planets.forEach(p => p.update(dT));
        this.asteroidBelt.update(dT);
        this.cargo.update(dT);
        this.cargo.position = this.origin.position.clone().
          scaleInPlace(1.1, 1, 1);
        break;
    case SpaceTruckerPlanningScreen.
        PLANNING_STATE.InFlight:
        this.star.update(dT);
        this.planets.forEach(p => p.update(dT));
        this.asteroidBelt.update(dT);
        this.cargo.update(dT);
        let grav =
          this.updateGravitationalForcesForBox(dT);
        this.cargo.physicsImpostor.applyImpulse(grav,
          this.cargo.mesh.getAbsolutePosition());
        break;
    // ...and so on
}
Looking at the statement, it’s easy to see that when gameState is in the ReadyToLaunch or InFlight stages, the various celestial bodies get their update methods called. In other words, the simulation is only advanced when the game state is either ReadyToLaunch or InFlight. This brings up the overall question of how we will implement the signature feature of this Screen: the orbital mechanics simulation.
Transitioning States
As implied in the previous discussion about the cargoArrived function, changes in the Screen’s gameState are triggered by cargoArrived and similar functions. Here is a summary of the different state changes, the functions initiating the change, and their usage:

Except for the setReadyToLaunchState function, all of the state changes in this Screen arise from either events happening in the game or via direct user input. The reason that setReadyToLaunchState is the exception is that while the Screen is created as part of the overall application initialization process, certain things can’t happen until the Scene is being rendered. In addition, we need to be able to arbitrarily reset the screen to its initial state so that players don’t have to restart the entire application when they want to try a new route. Here’s what a very basic success route looks like with the CargoArrived state:

Figure 6.6 – The Route planning screen after a successful cargo arrival at the Destination planet. The trail mesh shows the path of the cargo from start to finish
On the topic of routes, it can be difficult at first to figure out how to get a successful cargo launch, so here is a quick tip – aim in the opposite (retrograde) direction to the direction of the orbital motion to get a more direct flight path. As depicted in the preceding screenshot, you can see the trail of the cargo unit going in a counterclockwise direction to the camera while the planets all orbit clockwise.
Understanding the three facets we examined for the Route Planning Screen helps make the connection between the inputs and how the application should behave as a result (its outputs). Behaviors are defined to be dependent upon data to drive the specifics of that behavior. Game data specifies how far planets might orbit from their star, their mass, and more, but the application state is what ultimately controls and decides whether and how much to move them in their celestial dance.
Creating the Orbital Mechanics Simulation
When thinking about the various components involved in SpaceTruckerPlanningScreen, it’s important to consider how the simulation runs. Every frame (actually, it could be potentially more than once per frame, but for simplicity’s sake, we’ll go with once per frame), the physics simulation updates its own internal state. That state is largely opaque to us – though if needed we can always access it – but is manifested through the post-physics step changes that are made to an object’s position and/or rotation. To make our CargoUnit perform the necessary gravitational boogie, we need to tell the physics simulation the force it should impart, calculated from the accumulated gravitational forces of the system.
Though very similar in appearance, the InFlight game state has two major differences from ReadyToLaunch: when we are InFlight, we want the cargo to be affected by the gravity of all the different massive bodies in the system. To keep things tidy, we wrap up the task of summing together all these forces into the updateGravitationalForcesForBox function:
updateGravitationalForcesForBox(timeStep) {
    const cargoPosition = this.cargo.position;
    let summedForces =
      this.star.calculateGravitationalForce(cargoPosition);
    this.planets.forEach(p => summedForces.addInPlace(p.
      calculateGravitationalForce(cargoPosition)));
    return summedForces.scaleInPlace(timeStep);
}
What’s nice about this function is that it can leverage the base functionality provided by OrbitingGameObject to obtain each component’s contribution to the overall forces experienced by the cargo unit, even though we are mixing different types of objects such as stars and planets. The returned Vector3 is passed to physicsImpostor (see the Understanding the Physics section) as an impulsive shove imparted to the cargo object. From there, we let the physics engine take over the task of updating the CargoUnit’s position and velocity.
Understanding the Physics
Most people are familiar with the apocryphal story of how Isaac Newton came up with his Theory of Gravity after getting hit on the head by a falling apple, and of how he changed how we think about the world we live in and the universe we inhabit. We don’t need to have memorized the equations to experience the effects of gravity – being a law of nature and all, it doesn’t care one way or another how someone feels about it. Stars wheel and twinkle around the night sky as planets spin in a celestial dance, and all of it – at least from the viewpoint of a 17th-century scientist – can be described with just a few equations.
Important note
We will be diving a bit into some physics and algebra here, but greatly simplified from what a more realistic simulation would require. For example, by assuming that our planets all have perfectly circular orbits, we obviate the need to implement the more complicated equations needed to support elliptical ones. Another example of how we’re simplifying this is that the force calculations are only being performed on cargoUnit and not between each massive body, as would be the case in the real world.
The first and most fundamental is known as Newton’s First Law of Motion. It describes the relationship between an object, a force applied to that object, and the object’s resistance to being accelerated – its inertia:
Figure 6.7 – Newton’s First Law of Motion. The force (a vector) on an object is equal to the object’s mass times its current acceleration. This is commonly re-arranged to solve for either m or a unknowns
Since force is what we ultimately want to calculate when we are running the simulation, we can replace the left-hand side of the preceding equation with the following equation. The two values for the object’s mass cancel each other out, leading to a rather curious conclusion – the only mass that matters for our calculations is the mass of the larger body. The mass of cargoUnit does not factor in at all:
Figure 6.8 – Newton’s Law of Universal Gravitation. Implemented in OrbitingGameObject. The value of the Gravitational Constant (G) has been experimentally verified to many decimal places
In conversational language, the equation can be phrased thus: the force (F) experienced by an object of a given mass (m1) at a distance of r from another mass (m2) is equal to a constant value (G), times the product of the two masses divided by the square of the distance between them. In computational terms, we separately compute the direction of the force (via a vector subtraction of the two object’s positions) and its magnitude (via the preceding equation), or scale, before combining and returning a final result vector.
The choice of units can be arbitrary but must be consistent; the metric system is assumed throughout this text because sanity is a prized possession and should be treasured. Therefore, masses are in kilograms, and the radius is in meters. This makes the resulting Force a value with units of ![]() . Put alternatively, this is the measure of how fast a 1 kg mass is accelerated in 1 second by the applied force and is known as the N, or Newton, for obvious reasons. What is much less obvious are some of the implications of the equation.
. Put alternatively, this is the measure of how fast a 1 kg mass is accelerated in 1 second by the applied force and is known as the N, or Newton, for obvious reasons. What is much less obvious are some of the implications of the equation.
First, the force, F, is a vector value, not a scalar. This means that there are both direction and magnitude components to the force.
Second, unlike electrical and magnetic forces, which have positive or negative charges, gravity is always positive. Because mathematicians are constantly trying to prove their theory that they have a sense of humor, this fact is denoted in the equation by the negative sign, indicating that objects are always pulled toward the gravitational mass, never pushed away.
Third, the force experienced by the object is dictated by the sum of all the forces from each mass capable of influencing the object. This means that the overall force may be lessened to a degree or even canceled out altogether from equal or stronger resulting forces at opposing positions from the object under scrutiny.
A final note on this topic aimed at those who might have some knowledge of calculus and numerical integration: though our time step between physics calculations may be around 1/60th of a second, the straightforward integration via summation is inherently inaccurate. It is accurate enough, however, to allow the simulation to exhibit the type of emergent behavior that we’re looking to see using our simplified orbital physics model. The full implementation of the gravitational force calculation for a single pair of bodies is contained in OrbitingGameObject.calculateGravitationalForce(position). The code can also be viewed at https://github.com/jelster/space-truckers/blob/8a8022b4cac08f1df9e4c7cfc8ff7c6275c71558/src/orbitingGameObject.js#L72.
Hopefully, that little digression into abstract equations wasn’t too intimidating, because that was the worst of it (for now…) and understanding how those equations are structured helps to clarify the simulation’s InFlight behavior. But before the simulation can perform any InFlight calculations, the physics engine and the data it depends upon must be initialized and configured.
Driving the Simulation’s Physics
The Babylon.js distribution contains built-in support for four separate physics engines: Cannon, Oimo, Energy, and Ammo. Each of them has pros and cons, and though not perfect, the Ammo physics library is what is being used in Space-Truckers. The choice comes down to an individual project’s needs and the developer’s preferences, but there are some practical matters relating to the developer’s experience that are worth understanding.
The team behind Babylon.js is fiercely dedicated to maintaining backward-compatibility support for users. As we discussed in Chapter 3, Establishing the Development Workflow, the Babylon.js ES6 libraries retain some of the prior versions’ patterns in use at the time, such as the use of side-effect only import statements. Further complicating matters is the fact that the Babylon.js team doesn’t own or maintain any of the physics engines themselves – only the Babylon.js plugin wrapper for the library – yet the CDN and full Babylon.js distributions come bundled with all supported engines.
Because the point of tree-shaking with ES6 modules is to only package and load the source files needed, it is necessary to add a package.json reference to one or more physics engines. Unfortunately, none of the libraries with available Babylon.js plugins currently have a trusted, verified, and up-to-date package published to the NPM, but the GitHub repository for Ammo shows the most consistent activity over the last few years, indicating that it is likely to continue active development on updates, bug fixes, and feature enhancements, which is where Node’s support for referencing a package directly from a GitHub repository is very handy.
Important note
The initialization of the Ammo.js physics library is asynchronous (this is a breaking change from the previous 4.X version of the library), meaning that it is necessary to resolve or somehow await the Ammo promise. To ensure that the library has been properly initialized and loaded, a wrapper is needed. The /src/externals/ammoWrapper.js module first imports the ammo.js library, and exports two variables: ammoModule itself along with an ammoReadyPromise that populates ammoModule before resolving.
In SpaceTruckerPlanningScreen, ammoReadyPromise is imported and resolved as part of the constructor logic, ensuring that by the time initializePhysics is called, AmmoJsPlugin has everything it needs to do its job (see the next section for more on initializePhysics).
The great thing about using a physics engine that has already been built and proven is that there isn’t much to do other than set up the desired parameters for the physics simulation. This is done in the SpaceTruckerPlanningScreen.initializePhysics method.
Configuring the InFlight Physics Simulation
The initializePhysics method is not invoked during object construction because we know the screen won’t initially be shown to players, and we want to make sure that the scene has been completely set up with all the meshes involved before doing anything with the physics engine. It is invoked by setReadyToLaunchState, and since that method can be called several different ways, the initializePhysics function can’t make assumptions about the current state of the engine. That is why the physics engine is reset and cleared before every flight – keeping the interface between the engine and game opaque makes for simpler code.
The first thing we want to make sure and do is set scene.gravity to Vector3.Zero – otherwise, it would default to the Earth-normal value of (0, -9.8, 0). This is a space simulation, and it wouldn’t pass muster to have players falling at the wrong speed and direction! Next, we must dispose of any existing physics impostors before disabling the engine entirely. That paves the way for the newly-created AmmoJSPlugin to get passed into the scene.enablePhysics method. Let’s slow down for a moment – what is a PhysicsImpostor?
Most meshes (or at least most interesting meshes) are going to have complicated geometries. The overall shape of the mesh may not be symmetric on all axes, and there may be convex or concave surfaces that can obscure or hide other parts of the geometry, depending on the angle in question. Some meshes may also have dense geometries, with vertice counts in the hundreds of thousands or more. Performing physics – and when we mention physics in this context, what we are referring to are collision calculations for the most part – against such complicated geometries is complicated, inaccurate, and untenably slow.
To make these calculations work in the short amount of time available between frames, we must substitute a much simpler geometric shape that can approximate the actual mesh’s shape in place of the original. This approximation is generally a simple shape, such as a Box, Sphere, or Cylinder. The challenge for the developer is to select the most appropriate impostor type for the mesh getting physics applied.
The physics Impostor sounds pretty cool as a name, but in terms of its functionality, it might also be thought of as being a proxy object to act on behalf of the Mesh when dealing with the Physics engine. It holds information such as mass, linear and angular velocities, and friction values, as you might expect, but there’s also logic for controlling how the Impostor syncs data between engine and mesh.
After enabling the physics engine with AmmoJSPlugin, every planet, as well as star and cargoUnit have their physicsImpostor properties populated with appropriate values read from the gameData configuration, similar to the one shown here:
this.star.physicsImpostor = new
  PhysicsImpostor(this.star.mesh,
  PhysicsImpostor.SphereImpostor, {
    mass: this.config.starData.mass,
    restitution: 0,
    disableBidirectionalTransformation: false,
}, this.scene);
Once the impostors have been created, cargoUnit.physicsImpostor is subscribed to the onCargoDestroyed method handler, which is responsible for transitioning the game state from InFlight to CargoDestroyed.
This was a big lead-up to what is a bit of an anti-climax – shouldn’t complex stuff like physics and gravity be a lot more complicated? Perhaps it should be, but thanks to the hard work of a LOT of people over a very long time, it isn’t anymore! That’s a fortunate thing indeed because that allows us to pay more attention to the game mechanics and how they fit on top of the orbital simulation.
Defining the Rules – Game Mechanics
Typical business application development focuses on dividing the responsibilities of the application into logical segments that layer on top of one another, with the user on one side and the application’s foundational infrastructure on the other. Data and commands pass sequentially from one layer to another as user-initiated events propagate in concert with system and application events. Ideally, the code has the qualities of both being loosely coupled and tightly cohesive.
This may sound like a paradox or contradiction – how can something be both loose and tight at the same time? The answer is that it can be both because the two qualities tend to be inversely correlated with each other. Loose coupling between components means that making changes to one has little to no effect on the other. A tightly cohesive system is one where functionality is confined to a small number of code or application components; everything needed to accomplish a particular task is close at hand.
When developing a game, we strive to factor it in a similarly well-structured fashion – not because it looks nice in a class diagram but because it makes it easy to change, extend, fix, and enhance. Now, let’s provide a summary of the basic game mechanics (also known as Business Rules) that are applied to RoutePlanningScreen.
Controllable Launch Parameters
A key part of the principal game loop in route planning is that the player should be able to control the timing, angle, and velocity of their launch. This only applies in the ReadyToLaunch phase. A minimum and a maximum launch velocity should be enforced, with the specific values for the minimum and maximum determined by empirical iteration (for example, trial and error).
The player should be able to visually gauge the launch factors, with or without the help of seeing the underlying data. If the player isn’t satisfied with their alignments or they want to start over, they should be able to reset to starting parameters. In the Supporting Input Controls section, we’ll look at the input mapping to see how players should interact from their end of things. Next, we’ll talk about how a player might succeed or fail at the game along with what defines a particular scenario.
Going Places and Crashing EVERYWHERE
A given game playthrough should have an origin and a destination Planet designated in the scenario’s gameData. These should be visible to the player so that they know where they are and where they need to be. Potential hazards and obstacles should be made visible to players. After the player has elected to launch their cargo into its ballistic trajectory, the game ends in a losing state (CargoDestroyed) if CargoUnit contacts our Star or any Planet.
If the player can align their launch so that it intersects the destination within a certain radius, they will be considered to have successfully planned their flight route. If the player chooses to reject the given flight plan, the simulation is reset in the same way as it is elsewhere. Should the player accept the flight plan, gameplay moves to the next phase.
Future game phases, along with the game mechanics of scoring, will be covered later in this book. To read more about the basic game design, the original game design docs for Space-Truckers can be found at https://github.com/jelster/space-truckers/blob/develop/design/game-design-specs.md. While mostly out of date, it can provide further insights into how the game’s elements have evolved and grown over time, in addition to potentially deriving some degree of amusement by looking at the various concept sketches.
Supporting Input Controls
In the previous chapter, we looked at the input processing and control system. That system defines an inputActionMap, with every potential input getting mapped to the name of an Action (Command). The specific meaning and effect of a given action is determined by whatever code implements that action and is specific to the Screen.
Let’s look at the Route Planning’s control scheme in its entirety. Some entries are new since the preceding chapter; the pointer (touch/mouse) operations are assumed to be centered around GUI elements (see the Showing Game Information with the GUI section) and the camera controls are using native keymaps unless otherwise noted:

The GamePad control scheme is oriented toward an Xbox® controller, but other types of controllers can still be supported with little effort – see Chapter 5, Adding a Cut Scene and Handling Input, along with the gamePadControlMap constant in the inputActionMap.js file at https://github.com/jelster/space-truckers/blob/ch6/src/inputActionMaps.js.
For the most part, we’ve already covered the function implementations for each of these actions separately in earlier sections of this chapter, so we aren’t going to spend time on how that operates because we’ve only looked at half of the feedback loop by looking at user input. We need to close that loop by examining the sorts of information that the game presents back to the user.
Showing Game Information with the GUI
When folks think about UIs, the first thing that comes to mind are those of a graphical nature – web pages, start menus, and the like. While the visual medium is one of the dominant means of communication between person and computer, audio and other channels of output are definitely on the docket for us to look through – just not at this time. We’ll be beefing up the environmental effects both visually and audibly in the next chapter. For now, let’s look at how the GUI is structured.
Unlike the Splash and Main Menu Screens, the Planning Screen screen doesn’t directly create or manage its UI. As you may recall, we’ve been using the Babylon.js GUI’s AdvancedDynamicTexture to render our GUI elements, and that isn’t going to change. What is different, however, is that SpaceTruckerPlanningScreen hosts an instance of PlanningScreenGui (see https://github.com/jelster/space-truckers/blob/ch6/src/route-planning/route-plan-gui.js). In turn, PlanningScreenGui takes the SpaceTruckerPlanningScreen instance in its constructor, allowing it to access all of the data it needs to dynamically update the GUI. We need to perform our UI initialization and configuration after the Scene has finished loading and the Screen is completely constructed; otherwise, our GUI will need to contain an eventual spaghetti-flavored mess of conditional and null checks.
Avoiding that is straightforward: listen for scene.onReadyObservable and then use that to instantiate the GUI. To provide additional flexibility in separating construction from configuration time, the bindToScreen function creates the actual UI components, links display objects with meshes from the Screen, and performs other boilerplate-type creation tasks. This completes the static configuration of the GUI, but we want – no, demand – that the GUI should update in more-or-less real time with the latest data from the simulation and game. That’s where our double-fisted combination comes in handy!
The first punch is given by the event subscription to SpaceTruckerPlanningScreen.onStateChangeObservable with the onScreenStateChange function:
this.planningScreen.onStateChangeObservable.add(state => {
    const currentState = state.currentState;
    this.onScreenStateChange(currentState);
});
This ensures that the GUI is informed whenever the game state changes, such as from ReadyToLaunch to InFlight. The logic in that method looks at newState to determine which controls should be visible, and what color the text should be. That handles the problem of needing to coordinate UI changes with state changes, while the other side of this pugilistic analogy is the knock-out blow of per-frame updates to controls done as part of the update method.
In the update method, numbers are formatted for display, controls update their text properties, and the Launch Arrow gets scaled according to the current launch Force. Essentially, anything that doesn’t directly affect the game gets updated in this method. The problem of needing to display dynamically updated data has been solved as well – we can cease our unyielding demands and claim victory!
It’s a great thing that we’ve knocked out the rest of this chapter, not only because of the great amount of information we’ve covered in quite a small amount of text but because the boxing analogy is very off-brand for Space-Truckers and it was wearing quite thin. Let’s review what we’ve just gone over and look at some ideas for what you can do to practice working with the concepts.
Summary
We started this chapter having freshly completed the Main Menu Screen, and we’ve finished it having implemented the Route Planning Screen and the bulk of its core game loop – that’s quite the trip for how short a time we’ve been traveling! SpaceTruckerSoundManager maintains an internal catalog of all sound assets and makes those assets available to hosting Screens that want to play sounds. Although it seems like it does a lot, when it comes to actual Babylon.js Sounds, it likes to delegate responsibility to the Sound.
The ability to mix different sounds and sources is provided by the different SoundTracks defined by SpaceTruckerSoundManager, and they make it very easy to have background music playing at the same time as a game sound effect without having to code logic around volume levels. This is because each soundtrack has a volume (gain) control.
After reviewing the GameObject class hierarchy, we dove – or more appropriately, fell – into the specifics of how the rendered actors are constructed. Toolbox ready, we created SpaceTruckerPlanningScreen and set up a set of states and transitions between them. From there, we danced over basic gravitational physics – doesn’t that sound cool? Find a way to work into your next conversation that you know gravitational physics and stroke your chin thoughtfully.
Then, we learned a bit about how the Ammo.js physics engine is set up and configured with our project. Having set the planets in motion, we shifted our focus to layering on some of the gameplay elements. Player-controlled launch parameters, collision detection, and showing players their stats all went quickly to our enlightened senses, leaving us facing the path forward.
In the next chapter, solar flares and prominences will erupt from the particle systems we’ll put in place.Later, we will explore encounter zones and focus on capturing route data as we flesh out route planning and prepare for the next phase of gameplay.
Extended Topics
Are you not feeling quite ready to move on to the next chapter? Are you having trouble figuring out how all of what you’ve just read works? Jump over to the Space-Truckers discussion board (https://github.com/jelster/space-truckers/discussions) to search for answers or post your questions so that others may be able to help answer them. Not ready to move on but feel like you’ve got a good grasp of things? Why not try enhancing the Screen with some of these ideas:
- When the game begins, have the camera start somewhere far out before pulling in toward the star, giving a tour of the system as it does so, before ending in the starting camera position. There are lots of ways to accomplish this, but one potential approach would be to create an animation and set of keyframes that dictate the camera’s position. Another might be to use autoFramingBehavior, along with tweaking the camera’s inertia and other related values.
- Make the gamepad’s triggers usable for adjusting the launch force; pulling on the left could decrease the force while pulling on the right could increase the force. Essentially, this would work the same way as the current button presses do, except that the constant value being incremented is scaled or replaced by the trigger value instead (the trigger is the positive axis, while the other is negative).
- Think the physics calculations are too inaccurate? Do you sneer at the idea of matrix math being complex? Do you begin to question your existence when someone says that you’re irrational? OK, here’s a challenge: add a basic numerical integrator to the part of the simulation where the forces are scaled according to deltaTime.
(Easier) Use Euler’s method to calculate the cargo unit’s new/future position using the current velocity and the frame’s deltaTime combined with the previous frame’s velocity and position (https://en.wikipedia.org/wiki/Euler_method).
(Harder) Use Verlet integration to do the same (https://en.wikipedia.org/wiki/Verlet_integration).
- OK, so maybe the last one was a bit too hardcore, but there’s still the urge to do something to make the code suck a little bit less… here’s a challenge that doesn’t specifically require knowledge of any of the aforementioned topics but does require engineering savvy and great source code literacy: integrate the core gravitational simulation into the Babylon.js physics plugin/engine.
- If you accomplish any of these things, be sure to share your work with the world by posting links on the Space-Truckers discussion, the Babylon.js Forums, and/or by opening a Pull Request!