10
Improving the Environment with Lighting and Materials
Welcome to Chapter 10! This chapter is brought to you by The Number 5, twice. Babylon.js v5 brings with it not only incredibly powerful and fast features but also a suite of new tools to help work with almost every area that a game engine could ask for from a framework. We’ve worked with several of them already, including just this past chapter on the GUI Editor (GUIE). Previously, we’ve worked with the Particle Editor in the Inspector in addition to the GUIE and the Playground. But that’s not all of them, not by a long shot.
As we cover the IBL Toolkit and the Sandbox in this chapter, the shadow of a giant looms over us. The mighty Node Material Editor (NME) will be the topic of the next chapter, and we’re going to use this chapter to prepare for it by leveling up our knowledge of some important topics in 3D graphics programming.
When it comes to the graphical experience of a game or 3D application, lighting is probably the single greatest contributor to the overall look and feel of a scene. Like many of the topics we’ve covered or will be covering, there are entire libraries of much more in-depth, better written, and thorough texts that cover these subjects. Hence, our objective will be to provide a solid basis of the principles, grounded in a practical usage scenario. No matter what visual effects look is desired, the best and most performant lighting technique for current real-time 3D rendering is Image-Based Lighting (IBL), where the main source of light for a scene is, as the name implies, a specially prepared image texture.
Note
The 1993 movie Jurassic Park pioneered this technique as a way to capture the on-set lighting for use with the computer-generated elements of scenes.
This chapter isn’t just about lighting, however. It’s incredibly difficult to talk meaningfully about lighting in a scene without involving the concept of materials. Simply put, material is the term we use for mathematics to describe how light interacts with a surface. There’s quite a lot more that goes into that definition, but as usual, Babylon.js provides a shortcut with the PBRMaterial. This helps keep the most complicated parts of the math – both here in this book and in your code – tucked and hidden away behind a shiny abstraction that leaves us the task of knowing which parameters need to be set and to what value.
Before we try to drink from the firehose of lighting topics, there are some other pieces of business for us to tackle. Make sure to check out the Technical Requirements section for some links to posts, books, and articles relevant to the topics in this chapter. There’s also a list of fancy words you can use in Scrabble or to impress your friends who aren’t fortunate enough to be reading this book like you are and a list of both free and paid software for working with and preparing images to use in your project. Don’t feel guilty about your rapidly growing knowledge – feel good as you read the first section to learn about all the different things we’ve done and changed since we last visited the code base.
In this chapter, we will cover the following topics:
- Materials, Lighting, and the BRDF
- Working with PBR Materials and IBL Scenes
- Tone Mapping and Basic Post-Processing
Technical Requirements
The source code for this chapter is located at https://github.com/jelster/space-truckers/tree/ch10. While we’ll still be looking at some Playground code, most of our work in this chapter lies elsewhere. For working with images and textures, the following non-exhaustive list of tools will be useful for preparing and converting image assets for use with Babylon.js.
Tools
The following tools will help you in this chapter:

Glossary of terms (abridged)
Here is a list of some of the more common acronyms and terms that you might encounter during this chapter or while reading other resources on the topic of 3D lighting and materials. It’s far from complete but will serve as a jumping-off point to expand your vocabulary further:
- Direct Draw Surface (DDS): A file format that’s useful for storing high-resolution images. This includes MIP maps. Babylon.js supports the so-called “legacy” DX1 DDS format.
- MIP map: Referred to as pyramids in some areas of 3D graphics, a MIP map is a series of progressively smaller, lower- resolution reproductions of the original image. This is used for many applications, such as Level of Detail (LOD) and storing pre-computed lighting values.
- Physical Based Rendering (PBR): This is a technique for realistically simulating the behavior of light after interacting with some surface material. A Specular/Glossiness model and a Roughness/Metallicity model are two approaches. For the two major parameters, there are pairs of Specular/Gloss, and Rough/Metallic, respectively, with values that fall in the range of [0,1].
- Image-Based Lighting (IBL): A method of scene illumination that incorporates a spherical projection of an image to provide lighting.
- Skybox: A mesh cube textured on the inside, with the camera positioned within. This is done by using a specially laid out single image or six separate individual images. A camera positioned on the interior of the cube will view the texture as if it appeared very far away.
- Environment Texture: This is a special type of texture; it is the “I” of “IBL.”
- BRDF: This stands for Bidirectional Reflectance Distribution Function (pronounced similar to “Bird”) and is a mathematical function that contributes terms to the overall Rendering Function that relates the angle of reflectance to the amount of incoming and outgoing light.
- Rendering Function: When implemented, this is known as a rendering pipeline. This is a mathematical function that’s used to calculate the final screen color of a 2D pixel depicting part of a 3D scene. The final color value of that pixel is influenced by many different factors, such as lighting or the position of the camera.
- Material: This is an asset or code component that, when applied to a mesh geometry, defines the behavior of light impacting upon the mesh.
- Luminance: This is a measurement of the amount of light in a given unit area.
- Dynamic Range: The ratio between the brightest and the darkest parts of a scene.
- Tone Mapping: Used to adapt an HDR image for use in a non-HDR display or medium.
- Color Space: The potential range of colors that can be represented by a particular file or image format. This is often notated in terms of bytes per channel; for example, R8G8B8A8.
Recommended Reading
Here are some links to resources that can be helpful to skim before, during, or after reading this chapter. Some are more on the conceptual side, while the documentation links are eminently practical:
- The BRDF, as told by Wikipedia: https://en.wikipedia.org/wiki/Bidirectional_reflectance_distribution_function
- The PBR BRDF, as described by the Academy Award-winning engineering group who pioneered the technique in professional film: https://www.pbr-book.org/
- Official BJS docs:
- Setting up an HDR Environment to use with PBR: https://doc.babylonjs.com/divingDeeper/materials/using/HDREnvironment
- All the things you never knew you wanted to know about the properties of PBRMaterial: https://doc.babylonjs.com/divingDeeper/materials/using/masterPBR
- Break-out of different reflection and refraction features: https://doc.babylonjs.com/divingDeeper/materials/using/reflectionTexture
- The Khronos Foundation BRDF reference implementation used by Babylon.js for modeling metallic roughness materials: https://www.khronos.org/registry/glTF/specs/2.0/glTF-2.0.html#appendix-b-brdf-implementation
- Two separate Hard-Core BRDF definitions, along with example implementations of realistic PBR suitable for scientific or engineering models:
- For the textbook crowd: Essential Mathematics for Games and Interactive Applications, 3rd ed. Van Herth and Bishop. 2016 Taylor & Francis Group. (https://www.essentialmath.com)
- Image Encoding for HDR: http://www.anyhere.com/gward/hdrenc/hdr_encodings.html
Materials, Lighting, and the BRDF
The analogy of a 3D scene to a real-world movie studio set is an obvious but useful one. Some parts are obvious, such as the scene and stage, cameras, and lights, while others are not. Meshes are the actors and the set pieces, while materials are their costumes. This section is all about the costuming and lights, but it’s tough to discuss either without digging down a bit into the theoretical underpinnings of how light gets modeled in a scene.
This section is a bit of a doozy, so here’s a quick fly-over of what we’re going to talk about. First, we’re going to dabble with a little bit of symbolic mathematics and some extremely light calculus. Next, we’ll look at the different ways that light can reflect and interact with surfaces, and how it’s modeled or approximated in 3D. This will serve as a strong basis for us to learn about Materials and how they relate to math at a high level. After that, we will introduce PBR and Environments to cap off our tour. Time to dive in!
Introducing the BRDF
Light is modeled in terms of either being incident or reflected – denoted with the subscripts i and r – representing a measured amount of light that is either incident upon an object (is being reflected) or coming from an object (reflected off of it). The terms for these two scenarios are radiance for the light reflected from the object and irradiance to represent the amount of incoming light. The ratio between the incident radiance and the reflected irradiance is computed using some derivation of the BRDF:
This is a scary-looking piece of math if you’re not a level 3 calculus adept or higher, but it’s not as bad as it seems when we restate the equation in terms of how it works. The change in reflected radiance (dLr) depends on the angle between the incident (Li) ray of light and the surface normal (n) – used to calculate θ, with input values represented by the combination of (ωi, ωr). There are three important constraints that any code implementing this function must satisfy to realistically model a physical system:
- The result of fr(ωi, ωr) must be greater than or equal to zero.
- Reversing the terms (ωi, ωr) yields identical output. This is known as reciprocity.
- Energy must be conserved. In other words, the total amount of irradiance going into a particular area and the total amount of radiance going out of that same area must be less than or equal to one.
We don’t ever have to directly deal with implementing this equation, fortunately, but it’s good to know the underlying forces driving the higher-level abstractions in Babylon.js. Later in this section, we’ll look at how the PBRMaterial parameters affect the underlying BRDF, but first, we’re going to continue exploring the theory and concepts behind lighting.
How Light is Modeled in 3D Applications
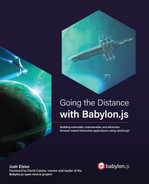
To reduce the sheer number and complexity of lighting calculations needed, we need to simplify how we treat light. For our purposes, light behaves as a ray emitted from its source that then reflects from surfaces in a deterministic fashion. When it comes to these calculations, there can be great numbers of individual parameters that contribute to the result, but at the heart of it, there are just a few parameters that contain essential terms for lighting computation: light direction (I), radiance (L), the surface normal (n), and the view position (V). The BRDF is evaluated once per light source, for every light sample in a scene, because of the need to calculate the angle between the object’s surface normal and the point of incidence:
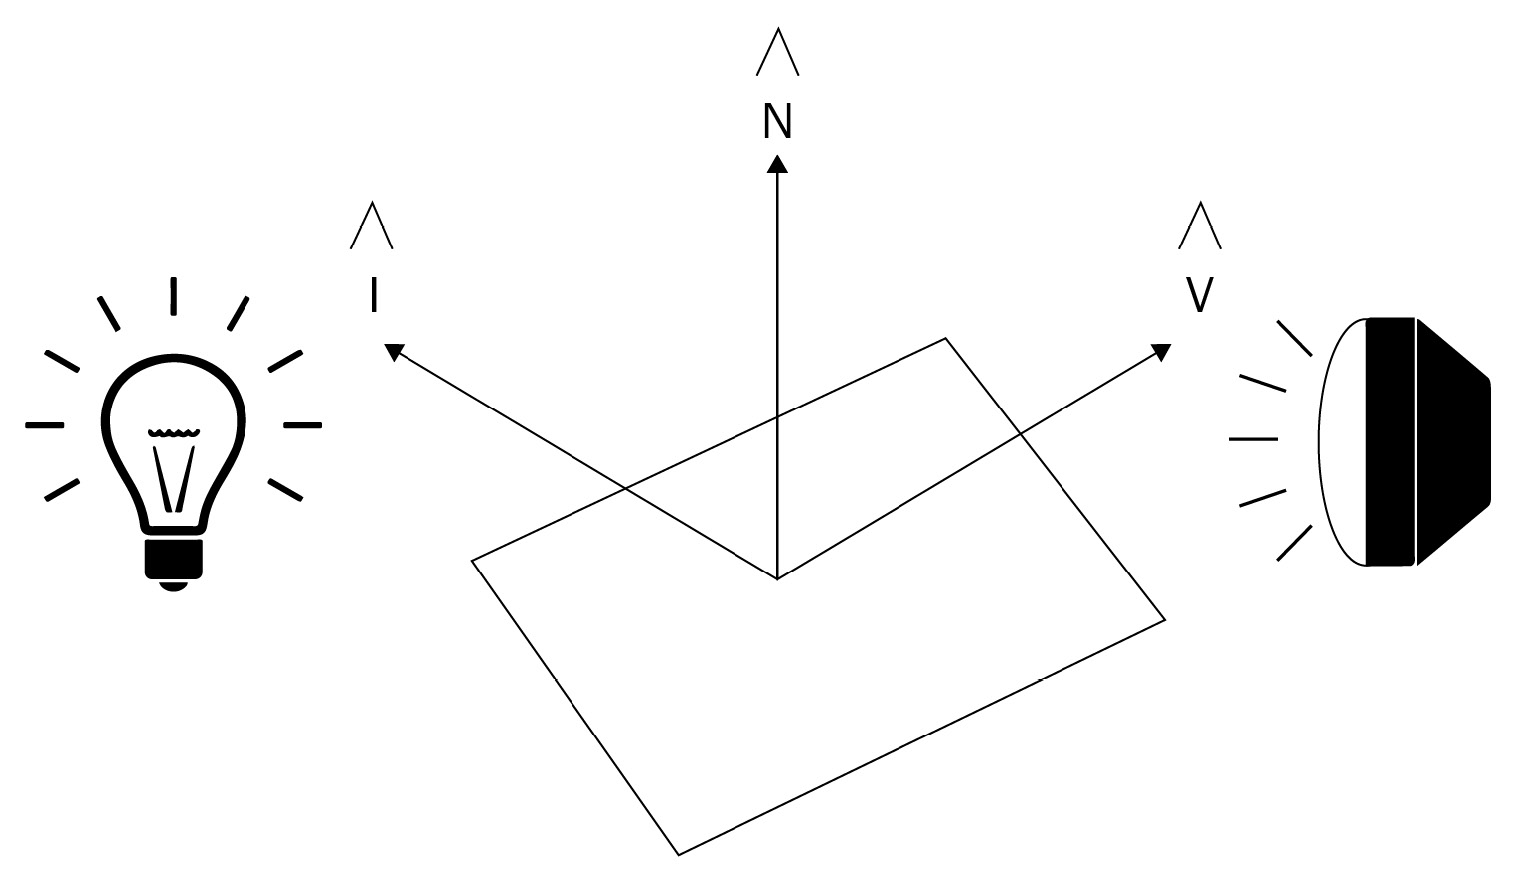
Figure 10.1 – Basic parameters involved in lighting computations. The normalized vectors, I and V, represent the direction of the light and the viewer, respectively, while the normalized vector, n, points in the direction of the surface normal
The normalized vector I points toward the light source, while the vector L – sometimes denoted with ω in equations – provides the intensity. When you put these together, you get the brightness (luminance) of light incident upon the object in each color. Different light sources use different equations to compute values for I and L. Two examples of this are the point light, which radiates light equally in all directions, and the spotlight, which radiates light in a single direction. Both types of lights illuminate an object, but their properties result in different behavior in surface interactions.
Note
It’s important that the I, N, and V vectors are normalized to preserve the relationships between values after transformation. The final value is scaled by either a color or scalar value computed from L.
The quality of radiance is a measure of the amount of incident light impacting a square meter area if you want to be technically precise. More colloquially, radiance is the brightness of a particular source of light. Complementary to radiance is color. Color is, physically speaking, defined by the wavelength of a particular packet of light, or the amount of energy contained in a photon. Computationally, color is usually represented as a Vector3 or Vector4 quantity, depending on whether an alpha transparency channel is being used. Being able to treat colors as vectors is a very useful technique since the whole toolbox of vector calculations then applies to mixing and blending colors. Before we know what types of calculations to perform, though, we need to know more about the types of reflected light.
Diffuse
When light reaches the View position, it can do so along an almost infinite number of different combinations of paths. The diffuse lighting term refers to light that is evenly scattered from the surface of an object. Another way of putting it is that a shaft of light striking the object’s surface scatters diffuse light in all possible directions. Light being scattered will be influenced by the color specified by the object’s diffuse material settings or from a texture lookup:
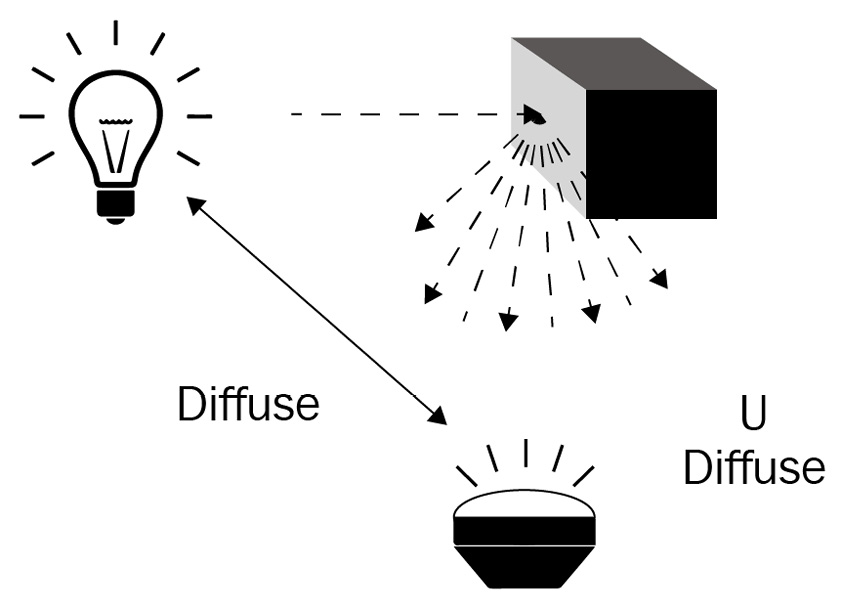
Figure 10.2 – Diffuse light is scattered in all directions
Specular
The Specular term of the lighting model represents light that reflects directly from an object to the viewer. Depending on the term’s value, this can give an object a “shiny” appearance, approximating a smooth or rough surface. The specular term is very strongly affected by the angle between the incident shaft of light, the object, and the viewer as the angle approaches 90 degrees:
Figure 10.3 – Specular light is directly reflected by the viewer
Emissive
Unlike the other lighting terms, the emissive term is not related to the external light source, but rather is light that is generated by the object itself. Importantly for lighting design purposes, it does not illuminate other objects in the scene. For that reason, emissive lighting is sometimes referred to as self-lighting:
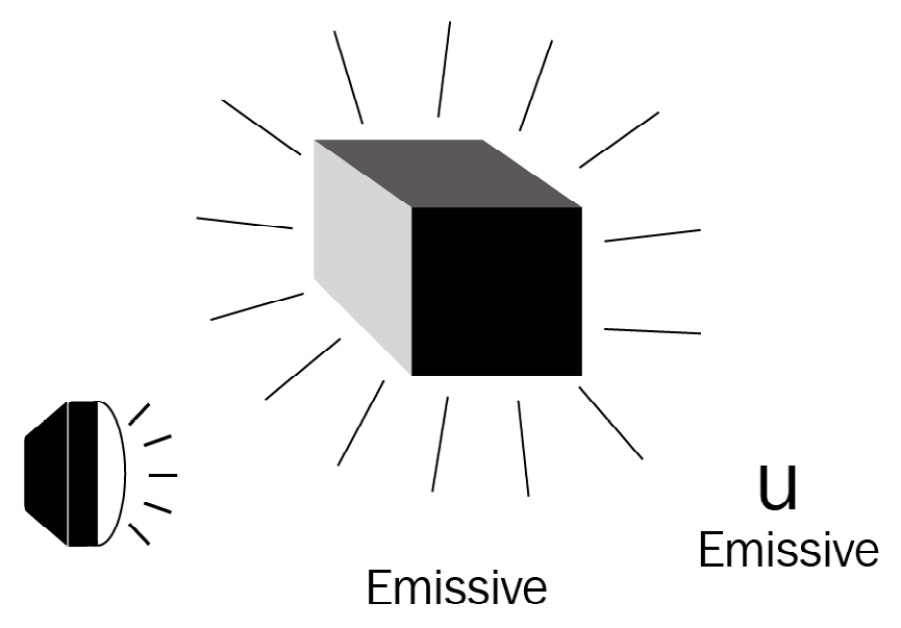
Figure 10.4 – Emissive lighting or self-lighting illuminates only the object itself
So far, we’ve looked at the definitions for the Uem, Uspec, and Udiffuse terms, but we’ve said nothing as to how we compute those values in the first place, nor how we combine these values. If you are curious, you can go to the Recommended Reading section of this chapter for more information on the details of these equations. The last lighting term we’ll cover is ambient lighting, one of the simplest forms of light.
Ambient
When ambient lighting is discussed in the context of 3D applications, it refers to a general class of lighting contributors that are incident to the surface but whose paths do not directly come from the light source. An intuitive example of this is the lighting of a cloudy, sunless day. On such a day, all light from the environment seems to come from every direction; it’s omnidirectional. Shadows (that is, Ambient Occlusion or AO) can be pre-baked and are easy to make and fast to render:

Figure 10.5 – UAmbient light doesn’t depend on direction and comes from the indirect incidence of light from the source environment. It is approximated by a single color with a constant value across the scene
Because of the indirect path taken by the light ray from the source to the receiver via the object’s surface, we approximate the ambient contribution by setting a single color per scene. Ambient light has no direction, so its brightness is constant throughout the scene.
Defining the properties of light and its basic behavior is but one piece of the lighting puzzle. The other piece of the puzzle is the surface material properties that govern what happens to incident light coming in from a given direction with a given view position. Modern 3D engines and asset creation tools have embraced the concept of a material as a means of defining how an object’s surface reacts to light at any given angle and point.
Materials and Textures
At a conceptual level, a material is a BRDF implementation; the material contains a combination of data and logic that’s plugged into the relevant terms of the overall graphics pipeline (see Chapter 11, Scratching the Surface of Shaders, for more on graphics pipelines and shaders) in the form of programmable shaders, textures, and other attributes. Bringing together the concepts from the previous sections, we’ll see why it makes sense to use the term Material to encompass the specific configuration of shaders and textures and introduce the approximations that allow for real-time realistically lit scenes in the form of PBR.
Materials Overview
In Babylon.js, there are two basic general-purpose material components, along with a library of specialized ones, that allow you to add cool and interesting effects with very little effort. For example, the Lava Material procedurally simulates a lava effect to applied meshes, while the Fur Material gives meshes a furry appearance. You can even render video from external sources into your scene using the VideoTexture! Browse the Babylon.js Materials Library and read about how to use them at https://doc.babylonjs.com/toolsAndResources/assetLibraries/materialsLibrary.
StandardMaterial is the workhorse material in Babylon.js. Materials in general (for example, StandardMaterial) group color and texture attributes and shaders, with an important performance implication: each distinct material is drawn to the screen in a separate call. Better performance is generally realized with fewer draw calls, so avoid creating new instances of a particular material and instead assign existing instances to meshes when possible. PBRMaterial is the Babylon.js implementation of PBR, a technique we’ll discuss in further detail shortly.
Which material to use, be it standard or PBR, depends on the needs of the scene. Most of the time, a properly set up PBRMaterial will have a far greater degree of photorealism than one using StandardMaterial. The realism comes at the expense of greater computational cost. Given the additional and much more complex BRDF involved, it doesn’t always make the most sense. For example, a depiction of a star, such as the Sun in the route planning screen, should use StandardMaterial since it self-illuminates via emissive lighting. Emissive lighting isn’t necessarily contradictory to a PBR process, but in the example of the Sun, any visual benefits of PBR are lost in the emissive glare.
As mentioned earlier, a material is a container and a wrapper of both assets and executable logic. Calling back to even earlier discussions, it is responsible for computing the various lighting terms in its BRDF. The Ambient, Specular, Emissive, and Diffuse options can vary by the material type for the specialized materials, but for both StandardMaterial and PBRMaterial, each of those lighting terms can be specified by either a color or a set of one or more different texture images.
Textures and Materials
Setting the color for a particular term, say the diffuse term, has the effect of introducing that color evenly across every mesh covered by that material. This might be OK for some scenarios, but it makes for a very bland and boring-looking scene. Assigning textures to different terms is the way to go here, and it’s also where the complexity starts ramping up (as if it weren’t already complex enough!) significantly. Another factor that complicates things is that the choices and types of textures you’ll want to use can differ between StandardMaterial and PBRMaterial.
Important note
You may notice mention of PBRMetallicRoughnessMaterial and PBRSpecularGlossinessMaterial in the Babylon.js docs and APIs. These materials provide a fast on-ramp to converting from using StandardMaterial to PBRMaterial with little effort or for adding PBR to a scene quickly at the cost of fine control over parameters. See https://doc.babylonjs.com/divingDeeper/materials/using/masterPBR#from-metallicroughness-to-pbrmaterial for more on the differences between the simplified PBRXXXMaterials and the general-purpose PBRMaterial.
Texturing assets is a sub-skill of 3D graphics design that takes practice, patience, and the ability to look at the world in a slightly warped fashion. If a mesh’s material is its costume, then the material’s textures are the mesh’s blouse. A mesh defines a 2D set of coordinates for each vertex commonly referred to as (u,v) instead of (x,y). A UV is a tuple (two-member set) with values between [0,1]. It is the point on the texture that, when sampled, defines the color of that point on the mesh. This lookup is referred to as using a Texture Map.
On the topic of maps, think of how you can project the Earth, which is spherical, onto a flat piece of paper. Even though Australia is roughly three times larger in area, Greenland appears to be the same size. This is the distortion inherent to mapping the surface of a sphere onto the surface of a plane, and the degree to which it will be apparent is largely dependent upon the geometry that the texture was created to cover. We’ll return to this topic when we cover spherical environment maps, but returning to the topic of Texture Maps, it is the lookup aspect that is most pertinent to our current discussion.
Note
Albedo is to Diffuse as Reflectivity is to Specular when looking at the Babylon.js PBRMaterial. Colors can be set for each lighting term as an alternative or in addition to textures providing the same.
As we saw earlier in our discussion of How Light is Modeled, there is more to lighting than just looking up a particular color from a texture and adjusting its intensity based on the distance to the light source. The preceding Note gives an analogy for translating the terms for base texture between materials, but there will often be more than one texture involved in a Material.
When additional image textures are mixed with either diffuseTexture in StandardMaterial or albedoTexture in PBRMaterial to provide fine details or show relief of surface features, we call those textures detail maps. A detail map is commonly used with a normal map, oftentimes referred to as a bumpTexture. An ambient (sometimes also called occlusion) texture and other lighting factors, such as the surface normal (N), aren’t part of a regular texture image and are supplied as data contained in one or more separate texture images. Most 3D content creation software has varying capabilities for generating and creating these alternative types of textures, and as a result, most 3D models that can be obtained via asset marketplaces and the like will already have these textures packaged. The key to making the best use of these is knowing which things to plug into what values, so let’s learn about the parameters that we can supply before looking at how we can supply them!
PBR as a Different Type of BRDF
Looking at PBRMaterial through the “lens” of the BRDF, though the output has the same shape (that is, format) as any other BRDF, the means of arriving at the values is quite different. This manifests in the form of a whole swathe of different parameters controlling very specific aspects of the material’s behavior toward lighting. Here is a selected list of commonly used properties and a short description, in the order that they appear in the Babylon.js documentation at https://doc.babylonjs.com/divingDeeper/materials/using/masterPBR. This page contains many Playground examples showing the different effects of setting various PBR properties, which can be useful in understanding what options are available:
- Metallic: This affects the specular term and determines how much the material behaves like a conductive or metal substance.
- Roughness: This specifies how smooth a surface is. Smoother surfaces will have sharper specular highlights (that is, shiny spots).
- Subsurface (#sub-surface): A whole category of properties that are used in things from flesh tones to translucent reflective materials. This specifically applies to refraction and translucency in v5.0 of Babylon.js. It also controls the scattering effect.
- Clear Coat (#clear-coat): Models light interactions with the topmost surface of the material. A shiny clean waxed car has a clear coat layer just visible above the actual paint color.
- Anisotropy (#anisotropy): This is used to shape asymmetrical reflections (specular highlights) and is highly dependent upon view and incident angles.
Many different parameters and settings can be configured on PBRMaterial, so it’s worth taking a step back to look at what goes into PBR.
PBR and IBL
Formally speaking, PBR is a technique for the realistic real-time simulation of lighting in a 3D scene. A smooth, shiny object reflects more incident light directly into the viewer (specular), whereas a rough, dull object tends to scatter light in all directions more evenly (diffuse or ambient). Other sources of scattering at, above, or below the surface of the material can further affect the course and fate of a light ray in conjunction with the object’s basic surface properties. Textures can be used to supply many of these property values, oftentimes by using different color channels to store different material data. An example of this is the Unity convention for detail maps, which uses a single detail map to store diffuse, normal, and roughness data. It does this by using the Red channel for a grayscale albedo (diffuse) map, the Green channel for the green component of the normal map, the Blue channel for roughness values, and the Alpha channel for the red component of the normal map. Properties in PBRMaterial such as useRoughnessFromMetallicTextureAlpha and useMetallnessFromMetallicTextureBlue can allow broad flexibility on the part of the asset designer, as well as the developer, to be creatively efficient in how material data is supplied at runtime. This can be of vital importance when memory and compute resources are limited – it’s far better to process a single texture than three separately. PBR can give great-looking results on its own in a scene, but it is far more effective when used in conjunction with IBL.
Important note
Despite the superficial resemblance to the acronym for Irritable Bowel Syndrome (IBS), IBL has nothing to do with yours nor with anyone else’s bowels. Neither does PBR, in case there was any need for clarification.
IBL is a technique for lighting a scene that derives a scene’s primary lighting information from an image source. While other light sources may still be present, such as a PointLight, they are there to provide secondary and/or supplemental illumination. IBL is a distinctly different category of technique from PBR, but it doesn’t make much sense to set up an IBL scene and not use PBR Materials that can take advantage of it! The way that IBL works is that, during rendering, a high dynamic range (HDR) image – that’s been specially captured and prepared as a CubeMap – is sampled to supply the Li values instead of a particular light source.
Environment Textures and Reflection Textures
One of the benefits of using IBL and PBR is that with the right setup, things that would be otherwise complex to procedurally model simply fall out of the physical light simulation. Take, for example, an urban scene.
It is night, and there are neon lights above dark restaurant doorways. The center of the scene is a four-way street intersection, where a car has suffered an accident. Reflections in the windshield show the surrounding buildings, while shattered panes of glass gleam with scintillations tinged with the neon glow of signs advertising cheap beer. Water gushes onto the street from a broken fire hydrant, and in the rippling faces of the growing puddles, the driver’s shock of curly hair can be seen exploding from the sides of the airbag, her visible eye appearing to tremble with the rippling puddle. What a rich description!
In a conventional or, more accurately nowadays, a more legacy rendering approach, almost all the details described in the preceding passage would need to be custom crafted and coded for a single use and purpose. Using IBL and PBR in combination with appropriate texture assets can allow designers to create and use scenes with the kind of details you can only read about in a cheap noir detective novel! The key component of an IBL setup is the image part, naturally. This image is known as the Environment Texture and, as mentioned earlier, is what is sampled to provide lighting information for PBRMaterial instances.
While it is certainly possible to specify a separate environment map for each PBRMaterial, it’s generally easier to set it up on the Scene, a task which we will see how to accomplish in greater detail in the next section, Working with PBR Materials and IBL Scenes. A specific use case where an environment texture and a material’s reflection texture might be different might be the rear-view mirror of a car, which shows not just the environment but reflections of objects within the scene itself – something that IBL and environment lighting can’t do.
In this scenario, a common solution is to dynamically generate a reflection texture using a Reflection Probe. This is a form of Render Target Texture (which itself is a form of procedural texture) that can provide an updated environment map from a specified position’s perspective using a list of render targets to track. The Babylon.js docs contain more details on how to use reflection probes: https://doc.babylonjs.com/divingDeeper/materials/using/reflectionTexture#dynamic-environment-maps-rendertargettexture-and-friends.
In this section, we’ve introduced a raft of new concepts, such as the BRDF and some of the parameters and terms involved in simulating lighting, starting with an understanding of the difference between diffuse, specular (Albedo), emissive, and ambient lighting sources. That laid the groundwork for us to explore the concept of a material with a focus on the Babylon.js PBRMaterial. PBRMaterial implements a technique known as PBR, which uses lighting information provided by the environment, along with a constellation of material properties, to realistically simulate the behavior of light against surfaces rough and shiny, smooth, and dull. Once we learned about materials and lighting, we looked at how IBL can be used to further enhance the realism of a rendered scene.
In the next section, we’re going to put theory into practice and learn about the different assets needed to make use of the previously discussed concepts. After learning about some of the asset types involved and the file and image formats related to them, we’ll look at some of the tooling needed to produce those assets and how to use them.
This is a complicated subject, so if you don’t feel like everything makes sense yet, it’s OK to take a beat and look at some of the Playground examples listed in the Babylon.js documents. If this section has mostly been a review for you, then you might be interested in some of the more advanced topics linked in the Recommended Reading section earlier in this chapter.
Working with PBR Materials and IBL Scenes
StandardMaterial is very forgiving when it comes to being able to use various types of assets. It doesn’t mind if a texture is 8, 16, or 3 bits per pixel or JPEG, GIF, or PNG – it’ll paint a mesh with it. While this is also largely true for PBRMaterial in that it is a robust component and able to operate with a wide range of inputs, the rendered look of any PBRMaterial is far more sensitive to insufficient or improperly formatted texture data. We’re going to look at the specifics of what the Babylon.js PBR implementation expects, as well as the tools that will help create assets that fit those specifications. Later, we’ll go through the heuristics – a set of guidelines – of how to decide what and which assets and values to put into which properties to accomplish a particular look for your material. Let’s start by examining some of the ways to represent an image digitally.
Image Formats and File Types
Bitmaps are the simplest type of image. The name says it all – it’s a sequential array (or map) of values that each represent a single channel (red, green, or blue) of a single pixel in the image. When an image is decompressed into (typically the GPU) RAM, a bitmap is the result. With each pixel mapped to a different location in memory, it is extremely fast to look up values from arbitrary locations in the image. When storing images on a disk, however, the goal is to optimize file size at the expense of computational speed.
There are only a few file formats that can support HDR images. Two popular native HDRI formats are HDR and EXR. The RAW image format captures pixel values as close to the digital camera’s sensors as possible, meaning calibration may be needed across different devices to get consistent results. Some image types, such as TIFF, can act as containers for other images, and similarly, some offer a wide range of options in their formats, such as DDS. Despite their popularity, GIF, and JPEG are not formats that are capable of representing an HDRI, even though they may still be able to display what appears to be an HDR image. This is made possible by a process known as tone mapping, which we’ll discuss after we finish exploring why a JPEG isn’t an HDRI. To do so, we will cover bit depth and dynamic ranges.
Bit Depth and Dynamic Ranges
When thinking about graphics and how they are displayed, it’s useful to break the topic down into fundamentals. Each pixel of an image has a value for each of the red, green, and blue color channels (some images may also have an additional alpha channel for transparency).
If we use a single byte (8 bits) to represent each channel, we have 24 or 32 bits per pixel, again depending on the presence of a dedicated alpha channel. Each color channel can only take on a value between 0 and 255, for a total of 65,536 total unique possible colors in the color space. That sounds like a lot of colors – and it is – but it is a far cry from the range of colors discernable by the human eye. More importantly, in the context of display technologies, it is incapable of properly representing an HDR without tone mapping. Tone mapping is the process of scaling down from the infinite to the finite in discrete steps.
Between zero and one lies infinity, or close enough to it if you’re using 32-bit floating point numbers to represent a color channel. On the other hand, the much smaller and countable ratio of 1:256 is the full dynamic range possible in an 8-bit channel. To be a High Dynamic Range Image (HDRI), an image needs to be able to use 16- or 32-bit floating point numbers to represent the red, green, and blue color channels. This adds up to a total of 48/96 bits per pixel, allowing for a theoretically 1:infinite dynamic range. As a practical matter, though, this can take quite a large amount of space – a 4K image has roughly 8.3 million pixels, and at 96 bpp has a raw size of 800 MB!
That’s not all, though. An image used in PBR and IBL needs to have what is known as mipmaps, either generated at loading time or pre-baked into the image file. A mipmap is a lower-resolution version of the main texture and is used similarly to a meshes Level-of-Detail (LOD) in which objects further away are rendered using less detailed textures, thus saving memory and rendering time. Just like auto-LOD works for meshes, Babylon.js can generate mipmaps at the time a texture is loaded.
Note
As pretty much anyone who has purchased a download-only version of a modern AAA game knows, those high-quality textures come with a high-bandwidth and high-disk usage cost. The last installment of the Call of Duty franchise, Modern Warfare, is over 175 GB! If the assets are all that size after being compressed, consider how large the textures are and that will answer the question of what all those gigabytes of RAM are doing during gameplay.
It’s not just important that an art asset looks good in an image viewer – it must be sized and formatted properly so that it contains or retains the full range of colors and brightness across the image. Fortunately, there are a few available tools within the Babylon.js ecosystem alone that can help with that task.
Using and Creating Assets for PBR and IBL
Because there are such varying ways to consume and use assets with PBR and IBL, it’s difficult to figure out what to use where, and why. Assets created specifically for a given project are the most likely to give the best results overall but have the inherent difficulty of requiring the skill and knowledge to create the assets yourself, or the financial resources to purchase or commission the assets from someone who does. Regardless of how the texture or other asset is obtained, more decisions are required to assess its suitability and compatibility with Babylon.js. The following diagram illustrates the high-level decision-making process you can use to evaluate a given texture asset, known as the “I” in IBL:
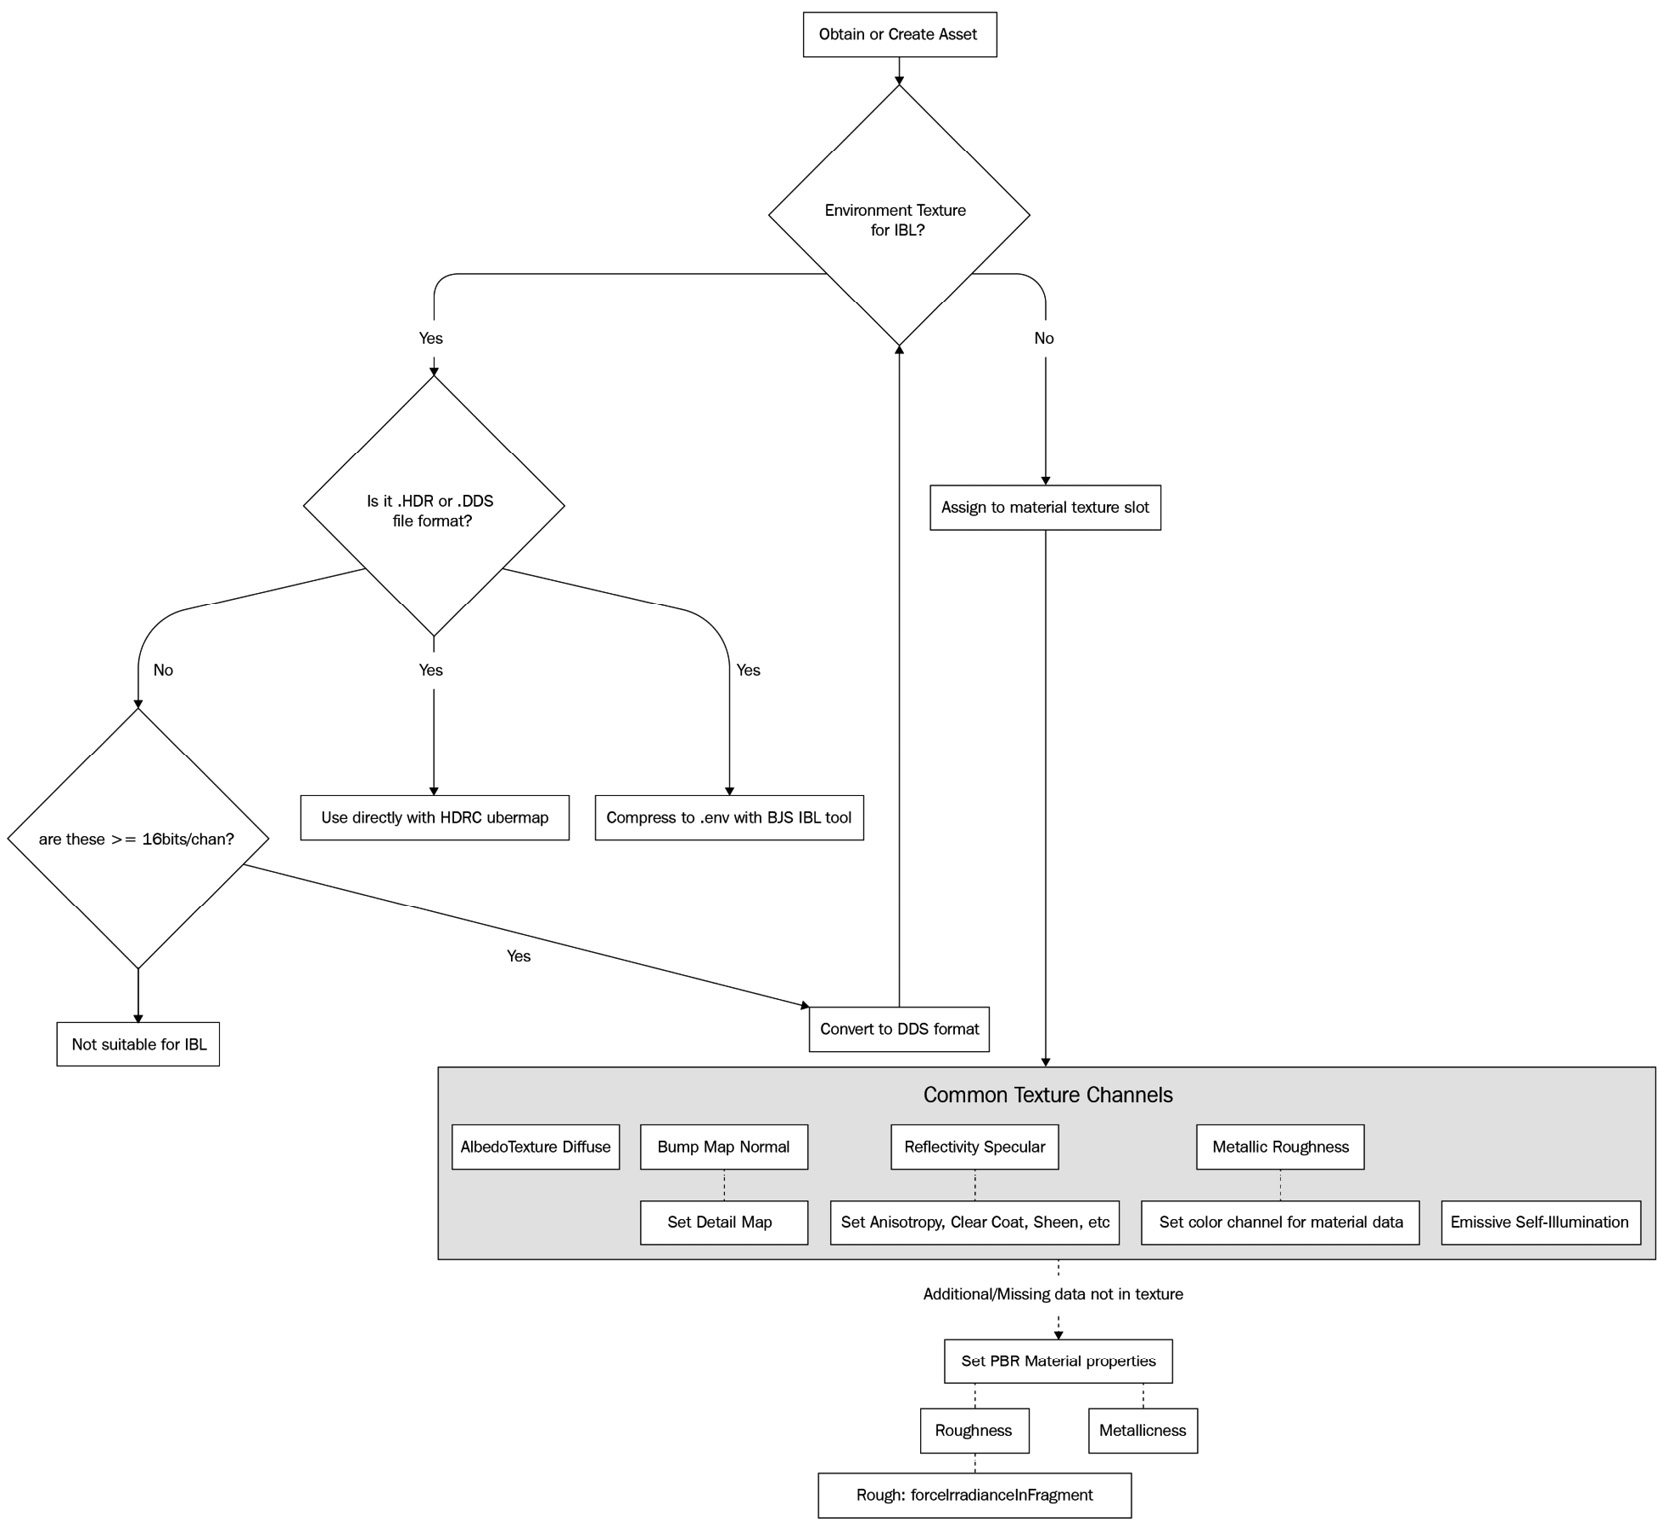
Figure 10.6 – High-level evaluation process for working with a texture and IBL/PBR. This is a qualitative assessment, not a quantitative one, so other factors such as texture resolution are still important to evaluate
Let’s walk through the highlights for each of these nodes. Keep in mind that whether or not an asset is suitable for use with PBR and IBL doesn’t necessarily mean that it is useful. At the same time, it is useful to consider the context in which the asset will be viewed; what good is a high-resolution texture that is only ever rendered at a large distance from the camera?
Obtaining Assets
This step is one of the more complicated and hard-to-define steps. The process of getting the proper 3D assets will differ greatly, depending on a few basic factors:
- Access to a professional graphic artist (and the time for them to work on it!)
- Purchase/obtain an asset pack from a vendor
- Self-authoring capabilities – for example, produce everything yourself
- A la carte assemble assets from a mixture of sources
Important note
No matter which approach or path you take, always make sure that you have clear and free permission and rights to use an art asset before deciding to include it.
If you have the resources, it’s best to engage with a professional artist or team of artists, but these people can’t draw for free. Be prepared to compensate them for their work. Purchasing a set of pre-made assets can often be almost as good as having assets custom made-to-suit, but they have the advantage of being able to be deployed almost immediately at the cost of a lack of flexibility – any changes or file conversions are up to you. Unless you are a polymath – that is, professionally skilled in multiple areas such as the famed creator of Babylon.js Deltakosh, then it’s usually going to be a better use of your time and efforts to not try and do more than a light edit of assets.
Important note
Don’t neglect to browse through the Babylon.js Asset Library – it contains many very useful “base” texture and mesh assets that are ready for you to put into your project! New to v5, the Asset Librarian is a tool for directly injecting references to BJS Assets into a Playground. You can learn more at https://doc.babylonjs.com/toolsAndResources/assetLibrarian.
The last option, a la carte asset amalgamation, is a compromise of the other three options, and as such, basically offers almost all the downsides from each and only a few of the upsides. The only thing this approach has going for it is its flexibility, which can’t be beaten. It is a sort of lowest common denominator to take this approach, but care and effort are needed to provide a consistent overall look and feel for the application. As a corollary to this approach, there is always the “escape hatch” of programmatically setting the material properties through code without textures.
Environment Textures, Conversions, and Compression
To be used in Babylon.js as an HDRI for PBR, an environment texture must be in an HDR format. If it isn’t, then it needs to be converted into either HDR or DDS format if it can store 16- or 32-bit floating point representations of each color channel for the texture. From that point, there are a couple of options, but from a scene quality perspective, it’s important to make sure that the image has been prepared as either a single Equirectangular or as a series of CubeMap images.
In a process such as adapting a flat paper map of the world onto a globe, the environment map represents a spherical or panoramic view of the surrounding environment. As an alternative to using a sphere, a cube can also be used in the same fashion, with a projected image of each face on the cube unwrapped into six separate images or image sections. See https://doc.babylonjs.com/divingDeeper/environment/skybox#about-skyboxes for more on CubeMap images.
Important note
When the environment texture is a Cube Map, HDR rendering is unavailable and seams or other visual artifacts may be visible.
As mentioned in the Bit Depth and Dynamic Ranges section, there is a large footprint to storing all that floating-point image data, something that can be very important when dealing with web-based applications. The easiest way to compress a DDS or HDR image for use in an application is to use the Babylon.js IBL tool at https://www.babylonjs.com/tools/ibl/. Using an image that has been prepared as an equirectangular, as described earlier, will give the best results, but it isn’t required. Drag and drop the image file you want to use into the central panel of the page and wait a moment – you may not see anything immediately happen because it can take some time to process an image, depending on its size and type. Once the tool has finished, two things will happen: first, the image will appear on the page, prepped and ready as a preview. Second, a .env file will be downloaded to your computer. This file is a compressed and pre-processed version of the source image, and a quick comparison of file sizes will show a significant difference between the source and output files – 30 MB can easily be compressed to a few hundred KB! You can read more about the rle-RGBE format and extra pre-computed data that allows this compression to be achieved at https://doc.babylonjs.com/divingDeeper/materials/using/HDREnvironment#what-is-a-env-tech-deep-dive.
Assigning to Material Texture Slots
The non-environmental texture section of Figure 10.6 illustrates some of the more commonly used texture channels in a Babylon.js PBRMaterial, along with some things to keep in mind when using it. For example, when using a texture to define the material’s metallic and/or roughness parameters, it might be necessary to specify which color channel (R, G, or B) contains the relevant data values.
Some properties of PBRMaterial expand into a new set of properties, many of which can accept a texture as the means of specifying values. Clear coat, subsurface, and detail maps (and more) each have their own set of parameters and textures that can be used to improve the quality of the final output, making for a bewildering array of possible configurations. Don’t worry about trying to understand and visualize every one of them and how they work – in the next chapter, we’ll learn how the Node Material Editor (NME) helps make sense of these options.
In this section, we built upon the theoretical foundations established by previous sections to learn about how HDR images are digitally represented and stored. An HDR image is in linear color space (as opposed to gamma or sRGB space – that is, how many and what arrangement of bits are used to represent each color channel) and uses at least 16-bit floating point numbers for each color. Most of the time, in standard Dynamic Range images, linear colors fall between the range of [0,1]. An HDRI, though, has a range that can, at a practical level, go from [0, ∞]. For example, an HDRI of a scene including the Sun on a cloudless day might have a range of [0, 150000]!
There are several commonly-used file formats for storing HDR images, but the two best-supported for use with Babylon.js assets are HDR and DDS. Environment textures need to be laid out in either a rectangular projection onto a spherical surface – an Equirectangular projection – or as a series of six images in a Cube Map. The Babylon.js IBL Tool is useful for viewing the fine details of an image dropped onto it, but more importantly, it can convert and compress an HDR or DDS image into a size much more manageable for use on the web: the ENV file format.
Most computer displays and print technologies are incapable of rendering such a wide range of values – and indeed, any display capable of accurately representing the brightness of the Sun would be an extremely toasty experience for anyone viewing it. To accurately render an HDR image in a non-HDR display, it is necessary to remap color values back into the range of [0,1]. The process of doing this is called tone mapping and is part of an important step in finishing a scene for presentation, known as Post-Processing.
Tone Mapping and Basic Post-Processing
Although this section is split into separate sub-sections between tone mapping and Post-Processing, tone mapping is technically a type of post-process. It’s an important enough subject within the context of this chapter to warrant a bit of space to explain it.
Post-Processing is a familiar concept wrapped in a potentially unfamiliar language. When you superimpose cat ears on your FaceTime, Zoom, or Teams calls, you are using a post-process. If you select an Instagram filter, you’re using a post-process. When you give yourself a cool motion blur effect in TikTok, you’re using a post-process. Babylon.js comes with several different built-in effects, both subtle and not so, and to avoid you having to remember and create the most common post-process effects, there’s also a Default Rendering Pipeline that comes with all the basics wrapped up in a plug-and-play fashion.
Tone Mapping
As we discussed in the previous section, rendering an HDR image onto a non-HDR display medium requires the values for each pixel’s colors to be remapped from a potentially infinite range into a decidedly finite one via the process of tone mapping. There are several different algorithms and ways to accomplish this, but regardless of the specifics, any tone map is going to have to make compromises.
Let’s just say that we have a set of numbers – [0.1, 0.1, 0.2, 0.3, 0.5, 0.8, 1.0, 1.0, 2.5, 10] – that we need to remap into a range between zero and one. Here’s a chart that shows the difference before and after tone mapping that series using the simplest tone mapping technique:

Figure 10.7 – Chart of pre- and post- tone mapping combined radiance values with HDR values. This mapping doesn’t perfectly capture the original dynamic range of values
The dashed line in the preceding chart shows how the range represented by the solid line has been compressed to fit between the zero and one bars of the chart. An ideal mapping would closely mimic the solid line as much as possible – this is not the case with this simple linear mapping. This is adequate for many applications, but other mapping functions can get us closer to matching the curve. A gamma-correction function uses two constants, A and γ, which must be either separately computed or manually determined, to map values in a way that much more closely matches the original curve:
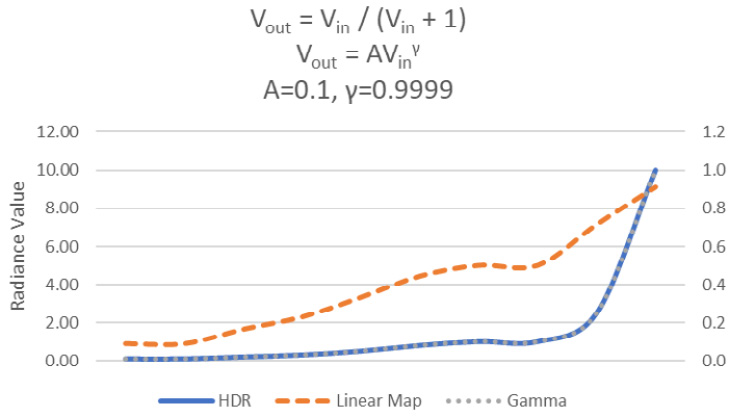
Figure 10.8 – Tone mapping with gamma correction produces a curve almost indistinguishable from the original. The values for the two constants must be determined separately
The dashed line perfectly overlaps with the original HDR brightness curve when the appropriate values of the constants, A and gamma, are supplied. A drawback of this technique is that those constants can vary by display device, OS, and other potential variables. Fortunately, Babylon.js does all the work for you when it comes to tone mapping as part of its built-in Image Processing and Post-Processing features.
Post-Processing and the Rendering Pipeline
It’s a safe assumption that anyone reading this is familiar with the concept of a live camera filter. Flip a switch and your photo looks like an old-time photo, another and it takes on the look of a comic book poster, all in real time. If you’ve ever wondered how that sort of thing works, then Post-Processing is as good a place as any to start! Think of a post-process as being like a real-time Photoshop for your scene. In games, some of the more obvious post-processes are ones such as rain or snow falling, screen shaking, and the always classic “drunken stagger.”
There are a few different ways to implement, import, and employ post-processes with Babylon.js, but all post-process effects work the same way: they start with a texture. This texture is kind of like a framed blank canvas at the start of the frame; the color of the blankness is the Scene’s clear color. If each stage in the digital rendering process is like a step in the manual rendering of paint onto canvas, the point in time during the frame’s rendering pipeline we are interested in is the part after the paint’s been laid down on the canvas but before it’s been set and dried. This texture is the output of transforming all the scene’s geometry into positions relative to the camera, then to 2D screen space. A post process deals with the individual pixels of this texture, not the geometry of the scene. Babylon.js has several ready-to-use PostProcessRenderingPipelines and PostProcesses that can be added with a line or two of code. A little bit further down the road in the next chapter, we’ll look at how we can create post processes and two different ways to accomplish that. Let’s not let the next chapter steal this chapter’s thunder and continue to look at more built-in post-processing functionality with volumetric light scattering – that is, “God Rays.”
Adding the Volumetric Light Scattering Post-Process Effect
Let’s look at a simple yet concrete example of using a built-in post process in the route planning screen. When a strong light source lies behind an object and the viewer, light striking the object at oblique angles may scatter, creating a distinctive glare effect that will make the Sun, well, shine! This type of effect is called volumetric light scattering (also known as “God Rays”), and it’s so easy to use you don’t even need to know how it works. Here are the two lines of code needed (split across multiple lines for clarity):
var godrays = new VolumetricLightScatteringPostProcess(
    'godrays', 1.0, this.scene.activeCamera,
    this.mesh, 100, Texture.BILINEAR_SAMPLINGMODE,
    this.scene.getEngine(), false, this.scene);
godrays._volumetricLightScatteringRTT.renderParticles =
  true;
These lines, added to the Star.js constructor, are all that is needed. The constructor for the VolumetricLightScatteringPostProcess (VLSPP) takes several standard parameters and attaches them to the Star.mesh sphere, using the active camera for rendering. The last line sets an internal property that instructs the internally used Render Target Texture involved in the post-processing to render particles to include in the effect.
The following screenshot depicts the results of applying this post-process. Quite the improvement:
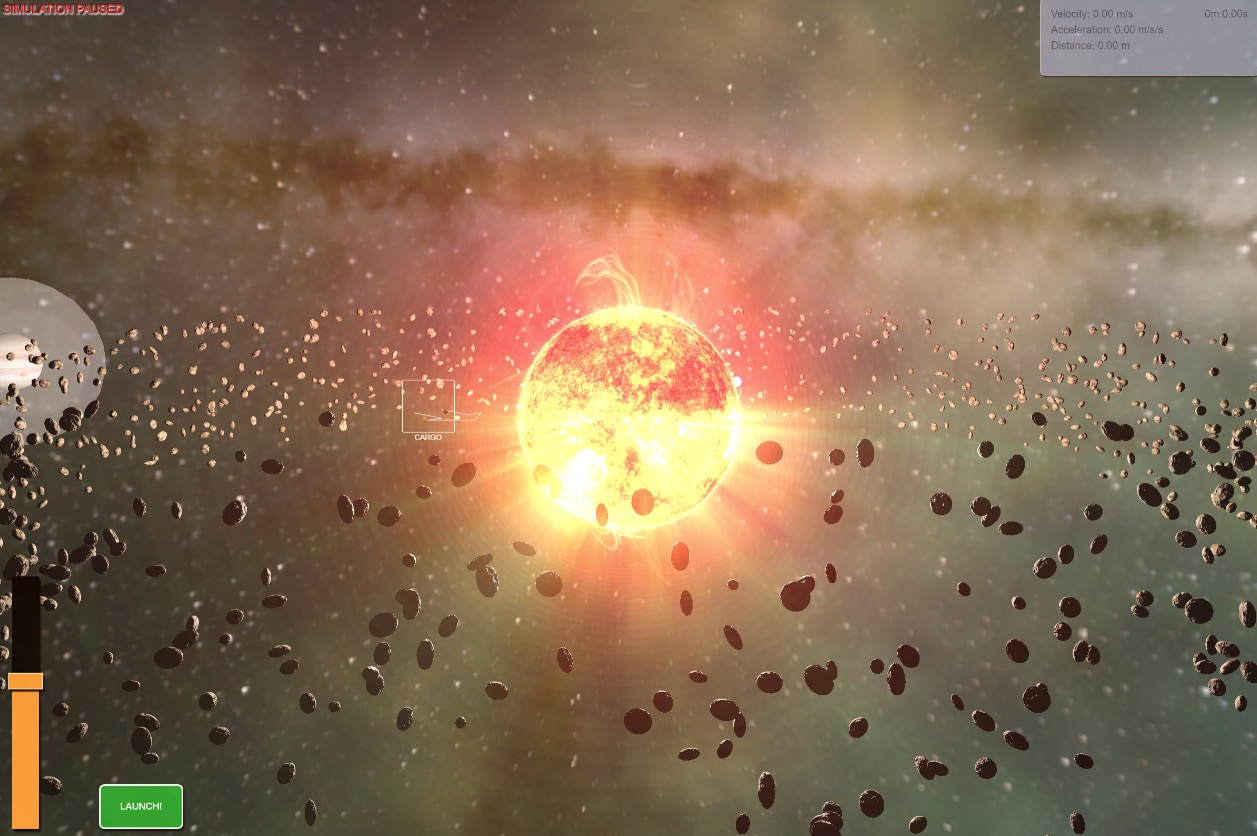
Figure 10.9 – The volumetric light scattering effect added via post-processing gives the apparent impression of camera glare from the bright Sun on the route planning screen
Babylon.js has several post processes available right out of the box in addition to the VLSPP, most of which are just as easy to use. If none of those suit your needs, the option to create a post-process of your own always exists in several forms, which we’ll cover in the next chapter. To wrap things up with the current subject matter, we’ll look at how easy it is to get a big bundle of rendering quality improvements for a small bit of code with the Default Rendering Pipeline of post processes.
The Default Rendering Pipeline
It’s not as much of a mouthful to say as the previous section was, but the Default Render Pipeline makes up for it by being such a cute and useful bundle of different effects. A diligent browser of video game graphics settings menus (who isn’t?) will recognize many of the post processes that comprise this Rendering Pipeline. Included in the pipeline are the same Image Processing effects that are available at the material level, but there are also others such as Bloom, Film Grain, FXAA, and more! Each is provided with sensible defaults, but it is important to know what those are so they can be adjusted to fit the specifics of the situation. The BJS Playground at https://playground.babylonjs.com/#Y3C0HQ#146 is a complete example of the Default Rendering Pipeline straight from the Babylon.js docs page – it has an interactive UI to allow you to quickly change parameters or enable/disable post processes and see their effects. Play around with the sample to get a feel for how different types of effects and their settings can completely change a scene’s look and feel with only a few adjustments! Using this rendering pipeline is basic table stakes for getting a high-quality image; it’s a good place to start.
The evolution of an application or game’s look and feel will invariably include the addition of other, unique combinations of post processes and effects. This is what makes a game or application stand out from others, and it’s a place where there’s lots of room for art and aesthetics. In this section, we discussed how tone mapping works to “shift” a high-dynamic range image or scene into a range that displays are capable of rendering. There are different types of tone mapping algorithms because there are some compromises that need to be made when performing tone mapping that result in varying visual differences in output. We learned about how tone mapping fits into a post-processing pipeline as part of either material-based or pixel-based Image Processing effects. These effects share common configurations and include several adjustments in addition to tone mapping. Other post-processing effects are included with the Image Processing effect in the Default Rendering Pipeline. These effects include FXAA, Bloom, Film Grain, and more.
Summary
This chapter may have felt either extremely long, extremely short, or extremely boring, depending on your existing knowledge and experience. The behavior of light in the real world is extremely complicated, so when simulating it in a scene, it’s necessary to make simplifications and assumptions about that behavior.
Traveling in rays from source to destination material, light is modeled using some implementation of the Bi-Directional Reflectance Function (BRDF). This function computes the (ir)radiance or brightness at a given input point and angle from a source of light. The function has a set of terms that are each calculated in separate functions, then combined to provide a result.
The Diffuse term (also called Albedo) accounts for light that has been evenly scattered from the surface of the material, kind of like how a point light evenly projects light in all directions. Specular is the term for light that is reflected from the material directly into the camera or observer and has a bright, potentially sharp outline. The specifics of the specular lighting contribution depend greatly on the material’s properties; a metallic, smooth surface will more cohesively reflect light than a rough, non-metallic one will. Emissive light is also called self-illumination because it is light that doesn’t have a light source as an origin and it does not factor into other material’s lighting. Finally, ambient lighting is a catch-all term for any type of lighting that arrives at the camera indirectly from its source. Atmospheric scattering is one example of an ambient lighting source.
The different qualities and properties that describe the behavior of light on a mesh are grouped into components called materials. A material implements various key functions that go into the BRDF. StandardMaterial of Babylon.js fulfills most basic scene needs that do not require a photorealistic rendering, while PBRMaterial provides a Physically-Based Rendering (PBR) BRDF implementation that closely models the real-world behavior of different surface types, from rough to smooth, shiny to dull.
For PBR to work effectively, the environment of a scene needs to provide essential lighting information. Image-Based Lighting (IBL) is a technique in which a special type of image is sampled at rendering time to provide information about the scene’s lighting at the current camera position and view. What makes the image type special is that it represents image data using 16- or 32-bit floating point numbers for each color channel (Red, Green, Blue, and, sometimes, Alpha). Having more bits to represent a number means that, for practical purposes, the ratio, or range of brightness in a scene between its brightest and darkest areas, can effectively be infinite. This is what both defines and allows an HDR photo or image to be captured and stored.
The texture is known as an Environment texture, but in the context of a skybox, this comes in the form of a reflection texture; both perform the same duties using the same texture, but from different approaches. Environment or reflection textures for a static scene can be pre-generated in several ways. They can be “baked” using a 3DCC tool such as Blender or Maya from an existing scene, they can be captured from render output by a suitably configured camera, or they can be manually prepared from an existing image using a tool such as GIMP or Photoshop. These will be unable to take into account the scene’s meshes and their properties, so a dynamic approach such as Reflection Probes can be used to generate a reflection texture in real time.
Once you’ve obtained an HDR image, there are a couple of options regarding what to do next. File sizes for DDS and HDR images can be quite large, so the Babylon.js IBL Tool is where to go to convert images into the ENV format for use in Babylon.js scenes. There are several different parameters and texture slots available to assign on a PBRMaterial, but between the BJS docs, Playground examples, and, of course, this book, you should be sufficiently equipped to explore them all!
Once a scene has been rendered on the GPU, it isn’t necessarily passed to the display device right away. Post-processes are employed in the form of a series of Pipelines that allow the output from a scene’s camera to be successively processed in different ways. The built-in ImageProcessing offers many common image corrections and adjustments that you may recognize from your smartphone’s photo editing software, but other post processes are available that add real-time effects only limited by RAM and imagination.
One of the more important post processes to engage when working with PBR/HDR scenes is tone mapping. This is a mathematical operation that converts the High Dynamic Range, which can’t be represented by most display devices, into a standard range of colors and brightness. Because this involves compressing the potentially infinite (or at least very large) into a much more finite space, there will be some losses in fidelity and accuracy. Thus, there are different algorithms for performing this mapping that emphasize different areas of the brightness or color curve.
In the next chapter, we’re going to be taking a diamond awl to the rock-hard topic of Shaders. Babylon.js has many ways that allow developers to write, manage, and apply standard GLSL code. What that means and what a shader is are things that will be defined shortly, so buckle up – this next chapter’s going to be a wild ride!
Extended Topics
There’s no better way to learn something new than to just take a stab at carving something familiar from what is unfamiliar territory. At the same time, it can be difficult to determine where and what slices are best to cut off. Here are some ideas, exercises, and examples that might give you a good starting point:
- Using an example from your IRL world, create a photorealistic recreation of that example’s environment:
- Use the camera on your smartphone or device to capture the surrounding cube or sphere map texture in as high of a quality as the device allows.
- Import the pictures into an image editing tool and adjust the image to give it a high dynamic range (make sure to save it in a 32-bit RGBA format!).
- Export the HDR images in DDS format, then convert them into an ENV file using the BJS texture tools.
- Create a PG that uses your environment and test it by placing some meshes into the environment. Make sure to configure and give them a PBR Material!
- A skybox doesn’t have to share the same texture as the scene’s environment (reflection) texture. Demonstrate this by modifying the Space-Truckers route planning scene to use a high-quality skybox with a highly compressed ENV file.
- Using a static background environment for reflections doesn’t mean that a scene can’t create a reflection texture on the fly that is dynamic to the scene. Make the driving phase route mesh shiny and reflective and then use a reflection probe (see https://doc.babylonjs.com/divingDeeper/environment/reflectionProbes for how to use them) to cause the surface of the Space-Road to reflect an image of the truck as it passes over it.
- Some systems can handle the added load of post-processes, but others (especially mobile devices) may not be able to maintain a desirable frame rate. Enable the post-processes to be toggled and for variables to be tweaked by the end users of Space-Truckers. Later, this can be hooked up to a Settings dialog, or potentially linked to a Scene Optimization (see Chapter 12, Measuring and Optimizing Performance, for more details).