CHAPTER 3
Next-Generation Fuzzing
This chapter shows you how to use fuzzing techniques for software testing and vulnerability discovery. Originally, fuzzing (or fuzz testing) was a class of black box software and hardware testing in which the data used to perform the testing is randomly generated. Over the years, fuzzing evolved as it came to the attention of many researchers who extended the original idea. (See “For Further Reading” for great works by Charlie Miller, Michal Zalewski, Jared DeMott, Gynvael Coldwind, Mateusz Jurczyk, and many others.) Nowadays, fuzzing tools support black box and white box testing approaches and have many adjustable parameters. These parameters influence the fuzzing process and are used to fine-tune the testing process for a specific problem. By understanding the different approaches and their parameters, you will be able to get the best results using this testing technique.
In this chapter, we discuss the following topics:
• Introduction to fuzzing
• Types of fuzzers
• Mutation fuzzing with Peach
• Generation fuzzing with Peach
• Genetic or evolutionary fuzzing with AFL
Introduction to Fuzzing
One of the fastest ways to get into vulnerability research is through software testing. Traditional black box software testing is interesting from a vulnerability research perspective because it doesn’t require an understanding of the internal software mechanisms. The only requirement to start looking for vulnerabilities is knowing which interfaces allow interaction with the software and generating the data to be passed through those interfaces.
Fuzzing or fuzz testing is a class of software and hardware testing in which the data used to perform the testing is randomly generated. This way, the problem of generating the input data is vastly simplified and sometimes doesn’t require any knowledge about the internal workings of software or the structure of the input data. This might seem like an oversimplified approach, but it has been proven to produce results and find relevant security vulnerabilities in software.
Over the years, much research has been done on improving the software testing and fuzzing techniques. Nowadays, fuzzing no longer implies the use of randomly generated data as a means of input testing, but is instead used more generally to describe the validation of input through various means.
This chapter looks into the process of fuzzing and examines several ideas for improving the different stages in fuzzing that should lead to finding more security vulnerabilities.
Types of Fuzzers
We mentioned already that fuzzers have evolved over time and are no longer solely based on random data generation. Because fuzzing is not an exact science, experimentation with different fuzzing types and parameters is encouraged.
Following is a list of common fuzzer classifications based on the data-generation algorithms:
• Mutation fuzzers
• Generation fuzzers
• Genetic or evolutionary fuzzers
Mutation Fuzzers
Mutation-based fuzzers, also called dumb fuzzers, are the simplest variant and closest to the original idea of randomizing the input data. The name comes from changing (mutating) the input data, usually in a random way. The mutated data is then used as input for the target software in order to try and trigger a software crash.
Generation Fuzzers
Generation fuzzers are also called grammar-based or white box fuzz testing, due to prior knowledge of the internal workings of the protocol. This approach is based on the premise that efficient testing requires understanding the internal workings of the target being tested. Generation fuzzers don’t need examples of valid data inputs or protocol captures like the mutation-based ones. They are able to generate test cases based on data models that describe the structure of the data or protocol. These models are usually written as configuration files whose formats vary based on the fuzzing tools that use them.
One of the main problems with generation fuzzers is writing data models. For simple protocols or data structures that have documentation available, this is not a major problem, but such cases are rare and not so interesting because of their simplicity.
In reality, things are much more complicated, and the availability of specifications and documentation still requires significant effort to correctly translate to a fuzzing model. Things get even more complicated when software companies don’t follow the specifications and slightly modify them or even introduce new features not mentioned in the specification. In such cases, it is necessary to customize the model for the target software, which requires additional effort.
Genetic Fuzzing
Genetic fuzzing is also called evolutionary fuzzing because the tool determines the best set of input tests, based on maximizing code coverage over time. Actually, the fuzzer makes notice of input mutations that reach new code blocks and saves those mutated inputs to the body (corpus) of tests. In this sense, the fuzzing tool can learn in a “survival of the fittest” manner—thus the term genetic or evolutionary fuzzing.
Mutation Fuzzing with Peach
This section provides an overview of the Peach mutation fuzzer, which should provide you with enough information to start experimenting with fuzzing and looking for vulnerabilities.
The Peach framework can be used on Windows, Linux, and OS X operating systems. On Linux and OS X, a cross-platform .NET development framework called Mono is necessary to run Peach. In this section, we use the 64-bit version of Windows 10. Your steps and outputs may vary slightly from those in this chapter if you choose to use a different platform.
As mentioned previously, mutation fuzzing is an extremely interesting idea because it usually doesn’t require much work from the user’s perspective. A set of samples has to be chosen as input to the mutation program, and then the fuzzing can begin.
To start fuzzing with Peach, you have to create a file called Pit. Peach Pit files are XML documents that contain the entire configuration for the fuzzing session. Here is some typical information contained in a Pit file:
• General configuration Defines things not related to the fuzzing parameters (for example, the Python path).
• Data model Defines the structure of the data that will be fuzzed in the Peach-specification language.
• State model Defines the state machine needed to correctly represent protocols where a simple data model is not enough to capture all the protocol specification.
• Agents and monitors Define the way Peach will distribute the fuzzing workload and monitor the target software for signs of failure/vulnerabilities.
• Test configuration Defines the way Peach will create each test case and what fuzzing strategies will be used to modify data.
Mutation Pits are fairly easy to create, and Peach provides several templates that can be examined and modified to suit different scenarios. Pit configurations can be created and modified using any text editor—or, more specifically, one of the XML editors. Peach documentation suggests using Microsoft Visual Studio Express, but even Notepad++ or Vim can suffice for this task.
The following is the rm_fuzz.xml Peach Pit file:


The Pit file consists of several important sections that will influence and determine the fuzzing process. Following is a list of these sections and how each one influences the fuzzing process for this Pit file:
• DataModel (![]() and
and ![]() ) Defines the structure of data that will be fuzzed. In case of black box testing, DataModel is typically unknown and will be represented by a single data entry, <Blob/>, that describes an arbitrary binary data unit and doesn’t enforce any constraints on the data (be it values or order). If you omit the data model, Peach will not be able to determine the data types and their respective sizes, resulting in a somewhat imprecise data-modification approach. On the other hand, omitting the data model reduces the time needed to start the fuzzing. Because black box fuzzing is very quick and cheap to set up, it is usually worth it to start the black box testing while working on a better data model.
) Defines the structure of data that will be fuzzed. In case of black box testing, DataModel is typically unknown and will be represented by a single data entry, <Blob/>, that describes an arbitrary binary data unit and doesn’t enforce any constraints on the data (be it values or order). If you omit the data model, Peach will not be able to determine the data types and their respective sizes, resulting in a somewhat imprecise data-modification approach. On the other hand, omitting the data model reduces the time needed to start the fuzzing. Because black box fuzzing is very quick and cheap to set up, it is usually worth it to start the black box testing while working on a better data model.
• StateModel (![]() and
and ![]() ) Defines the different states the data can go through during the fuzzing of the application. The state model is very simple for file fuzzing because only a single file is generated and used for testing purposes.
) Defines the different states the data can go through during the fuzzing of the application. The state model is very simple for file fuzzing because only a single file is generated and used for testing purposes.
Fuzzing network protocols is a good example of where the state model plays an important role. To explore the different states in the protocol implementation, it is necessary to correctly traverse the state graph. Defining StateModel will instruct the fuzzer how to walk through the state graph and allow for testing more code and functionality, thus improving the chances for finding vulnerabilities.
• Agent (![]() and
and ![]() ) Defines the debugger that will be used to monitor the execution of the target program and collect information about crashes. The collected crash data then has to be manually reviewed and classified as relevant or irrelevant. Relevant crashes should then be reviewed again to check for exploitable conditions and to determine their value.
) Defines the debugger that will be used to monitor the execution of the target program and collect information about crashes. The collected crash data then has to be manually reviewed and classified as relevant or irrelevant. Relevant crashes should then be reviewed again to check for exploitable conditions and to determine their value.
• Test (![]() and
and ![]() ) Defines configuration options relevant to the testing (fuzzing) process. In this case, it will define the filename for the generated test cases as fuzzed.rm and define logs as the logging directory containing data about program crashes.
) Defines configuration options relevant to the testing (fuzzing) process. In this case, it will define the filename for the generated test cases as fuzzed.rm and define logs as the logging directory containing data about program crashes.
To test that the written Pit has a valid structure, Peach offers several solutions. The first thing to do is to test and validate the Pit with the --test command, which will perform a parsing pass over the Pit file and report any problems found. Following is an example of how to test Pit XML:

The following shows how to start a new Peach session with the previously created Pit file:

Sometimes it is necessary to stop the fuzzer and perform maintenance on the machine it’s running on. For such cases, Peach allows for easy stopping and resuming of the session. To stop the current Peach session, just press CTRL-C in its terminal window. Suspending the session will result in the following Peach output:
![]()

The results of a terminated session can be examined in the session folder under the Peach “logs” directory. Folders in the logs directory use a naming scheme in which a timestamp with the current time at the moment of directory creation is appended to the filename of the Pit XML configuration used for fuzzing (for example, rm_fuzz.xml_2017051623016). Inside the session directory is the status.txt file, which contains the information about the session, such as the number of cases tested and information about times and filenames that generated crashes. If the session was successful, an additional folder named Faults would exist in the session folder. The Faults directory contains a separate folder for each class of crash detected. Inside each of these crash clusters are one or more test cases that contain the following information:
• The mutated test case that triggered the crash.
• A debugging report collected about the program state at the time of the crash. This report includes information about the state and values of the processor register, a portion of stack content, and information gathered from the WinDbg plug-in !exploitable, which provides automated crash analysis and security risk assessment.
• The original test case name that was mutated to create this specific mutation.
The session can be resumed by skipping the already preformed test. Information about which test case was the last performed by the fuzzer can be seen in the Logs folder under the session name in the file status.txt:

Another way to see the progress and number of iterations performed by Peach is in the command-line output during fuzzing, which will show in the first entry of a list iteration number. In the following example, the iteration number of the current test is 13:

One thing to keep in mind is that resuming the fuzzing session only has real value if the fuzzing strategy chosen is deterministic. When you use the “random” strategy, resuming the previous session doesn’t make much difference.
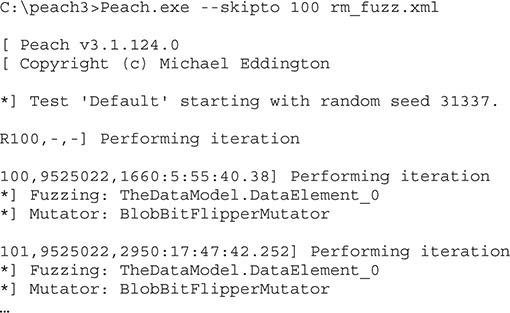
To resume a session, it is enough to run the Pit file, as previously shown, and use the --skipto option to jump to a specific test case number. An example of skipping 100 tests is shown here:
Lab 3-1: Mutation Fuzzing with Peach
In this lab, we look at mutation fuzzing with Peach using Pit files. To successfully complete the lab, follow these steps (which assume the 64-bit version of Windows 10):
1. Download and install the VLC application from https://www.videolan.org/vlc.
2. Install Windows Debugger Tools for your version of Windows (for Windows 10): https://developer.microsoft.com/en-us/windows/downloads/windows-10-sdk. During installation, select the Debugging Tools for Windows option and uncheck the others.
3. Download and install Peach 3 from the links at www.peachfuzzer.com/resources/peachcommunity using the instructions at http://community.peachfuzzer.com/v3/installation.html. Right-click the file peach-3.1.124-win-x64-release.zip. Install Peach 3 into the C:peach3 directory.

NOTE On Windows 10, you have to “unblock” the downloaded .zip file (right-click under the security option Unblock) before you unzip it on Windows by default. Otherwise, you get “Error, could not load platform assembly ‘Peach.Core.OS.Windows.dll’. This assemly [sic] is part of the Internet Security Zone and loading has been blocked.”
4. Find about six .rm (RealMedia) test files and download them into the (new) directory C:peach3 m_samples using the following Google search query:
![]()

CAUTION Be careful with .rm files you get on the Internet. It is best to perform this exercise on a throwaway VM or at least to revert after completing and/or push the .rm files up to virustotals.com prior to use.
5. Copy the rm_fuzz.xml file from book download site to C:peach3 folder. Test your Peach Pit file:
![]()
6. Confirm and fix the locations of your VLC application and the other paths as needed.
7. Run your Peach Pit from an administrator’s command prompt (required for heap monitoring on Windows 10):
![]()
8. Let this Pit run a while (overnight) and see if you have any bugs listed in the log. (We’ll cover crash analysis later in this chapter.)
Generation Fuzzing with Peach
As you have seen already, Peach is a capable mutation fuzzer; however, it turns out to be an even better generation fuzzer. In this section, we attempt to discover vulnerabilities in Stephen Bradshaw’s vulnserver—a vulnerable server created for learning about fuzzing and exploits.
The vulnserver application comes with precompiled binaries. Alternatively, you may compile them from source code by following the instructions provided. After launching the vulnserver on a Windows machine, you will get the following greeting:

This advice should be well heeded: do not run this software on anything but an isolated test system or virtual machine in host-only mode. You have been warned!
You can test the vulnerable server by connecting via netcat (in another window) as follows:


Now that you know a little about the vulnserver application and what commands it takes, let’s create a Peach Pit targeting this application. Because you are already familiar with Peach, we will jump right into the Peach Pit. However, this time we will change the DataModel to show the structure of the valid application commands. To keep things simple, we will fuzz the TRUN command (for no reason other than it sounds cool). As part of the lab for this section, you may fuzz the other commands. Note that this Peach Pit is based on an example from David Um’s excellent post, which itself was based on an earlier post by Dejan Lukan (see the “For Further Reading” section for more information).

Here are the main differences between this generation-based Peach Pit and the previous mutation Peach Pit:
• DataModel ![]() The data model has been modified to describe the TRUN command syntax, which is TRUN, followed by a space, which is mutable (fuzzable), and then by a carriage return (
n).
The data model has been modified to describe the TRUN command syntax, which is TRUN, followed by a space, which is mutable (fuzzable), and then by a carriage return (
n).
• Agent ![]() The agent has been modified to show that a remote Peach agent will be started to monitor the progress of the application and restart it if needed.
The agent has been modified to show that a remote Peach agent will be started to monitor the progress of the application and restart it if needed.
• Publisher ![]() The publisher has been modified to demonstrate the TCP connection capability of Peach, given the address and port of the vulnerable application.
The publisher has been modified to demonstrate the TCP connection capability of Peach, given the address and port of the vulnerable application.
In order to run this Peach Pit, we first need to start the Peach agent, like so:
![]()
Next, let’s fire it up within an administrator command prompt and look at the results:

The fuzzer is now running, and after watching it for a while, we notice the following:
NOTE Depending on your seed value, your count may be different, which is just fine.

As you can see, the fuzzer found an exception and was able to reproduce it.
Crash Analysis
During a fuzzing session, if everything is going as planned, there should be some logs for the target application crashes. Depending on the fuzzer used, different traces of a crash will be available. Here are some of the usual traces of crashes available:
• Sample file or data records that can be used to reproduce the crash. In the case of a file fuzzer, a sample file that was used for testing will be stored and marked for review. In the case of a network application fuzzer, a PCAP file might be recorded and stored when an application crash was detected. Sample files and data records are the most rudimentary way to keep track of application crashes; they provide no context about the crash.
• Application crash log files can be collected in many ways. Generally, a debugger is used to monitor the target application state and detect any sign of a crash. When the crash is detected, the debugger will collect information about the CPU context (for example, the state of registers and stack memory), which will be stored along with the crash sample file. The crash log is useful for getting a general idea about the type of crash as well as for crash clustering. Sometimes an application can crash hundreds of times because of the same bug. Without some context about the crash, it is very hard to determine how much different the vulnerabilities are. Crash logs provide a great first step in filtering and grouping crashes into unique vulnerabilities.
• When an application crash is detected, many custom scripts can be run that collect specific types of information. The easiest way to implement such scripts is by extending the debugger. !exploitable is one such useful debugger extension. It was developed by Microsoft for WinDbg and can be used for checking whether or not a crash is exploitable. It should be noted that even though !exploitable is useful and can provide valuable information regarding the crash and its classification, it should not be fully trusted. To thoroughly determine whether or not a crash is exploitable, you should perform the analysis manually because it is often up to the researcher to determine the value of the vulnerability.
Using Peach as the framework produces some nice benefits when you’re dealing with crashes. Peach uses WinDbg and the !exploitable extension to gather contextual information about a crash and to be able to perform some crash clustering.
Peach will organize all crash data in the folders under the Fault directory. An example of Peach’s Fault directory structure is shown here:
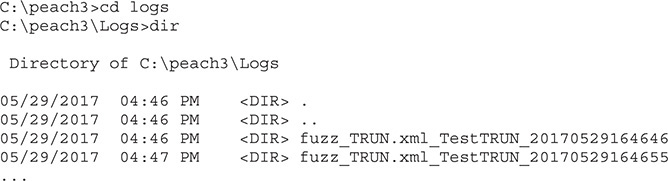
Drilling down into the second test run, we find the following directory listing in the Faults directory:

Drilling down further, we find the actual test case ID (185) and its contents:
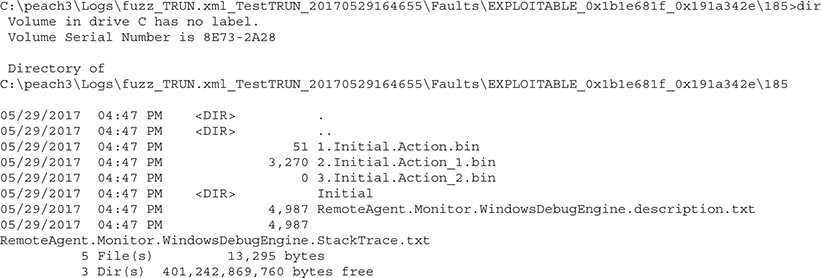
Out of the five files located under the test case 185 folder file, RemoteAgent.Monitor.WindowsDebugEngine.description.txt, contains the best information about the crash. An example of a crash log (with some lines removed for brevity) is presented next:


The file consists of two main sections:
• Crash information collected from the debugger, including loaded module names, information about CPU registers, and an excerpt from memory. This information starts at ![]() in the preceding log.
in the preceding log.
• An !exploitable report that contains information about and a classification of the crash. Information that can be found in this part of the log gives more context to the crash and includes exception code, stack frames information, bug title, and classification. Classification is the !exploitable conclusion about the potential exploitability of the crash. It can contain one of four possible values: Exploitable, Probably Exploitable, Probably Not Exploitable, or Unknown. This information spans from ![]() to
to ![]() in the preceding log.
in the preceding log.
A quick glance at the classification on line ![]() will let us know if we need to spend more time on this potential vulnerability. In this case, we see it is vulnerable, but we’ll leave the details of further analysis and exploitation for another chapter.
will let us know if we need to spend more time on this potential vulnerability. In this case, we see it is vulnerable, but we’ll leave the details of further analysis and exploitation for another chapter.
Lab 3-2: Generation Fuzzing with Peach
You can follow along with the preceding example by performing the following lab steps:
1. Download the vulnerable server application (the .exe and .dll) to your test lab or build it yourself (https://github.com/stephenbradshaw/vulnserver). Then place the executable in C:vulnserver.
2. Launch the vulnerable server, like so (note the warning in the output):
![]()
3. Download and install the A/V safe version of netcat (without –e) for Windows (https://joncraton.org/blog/46/netcat-for-windows/).
4. From another window, test the vulnerable server, like so:
![]()
5. Copy the fuzz_TRUN.xml file listed previously (available from the book download site) to the C:peach3 folder.
6. From an administrator command prompt, start your Peach agent:
![]()
7. From a new administrator command prompt, launch the Peach Pit:
![]()
8. Monitor and review the Logs folder (C:peach3logs).
CAUTION Depending on your version of Windows, you may experience warnings or the vulnerable server may crash and you need to restart testing again. Depending on how lucky (or unlucky) you are, you may need to generate many test cases—even as many as a thousand—before the program generates faults.
Genetic or Evolutionary Fuzzing with AFL
When it comes to genetic or evolutionary fuzzing, the best option is AFL, particularly for file-based parsers written in C or C++. When source code is available, the application may be instrumented with AFL during compilation with either clang or g++. For this section, we will take a look at this file-parsing application, which would pose a significant challenge to a mutation fuzzer. This program has been adapted from an example given by Gynvael Coldwind (Michael Skladnikiewicz) during an excellent video blog on genetic fuzzing (see “For Further Reading”). As Gynvael explains, when an application has many nested if/then blocks, it is often difficult, if not impossible, for a mutation fuzzer to reach full code coverage, at least in our lifetime. Consider this simple example:
NOTE At this time, we will switch to Kali Linux 2017, which you can download from kali.org.

The abort() statement at ![]() will cause the program to crash. The question is whether the fuzzer will find it. Using a mutation fuzzer, if we submit one input file at a time, we would have a 1 in 2568 chance of hitting that innermost code block. If your computer was able to process 1,000 files per second (and you were unlucky), it might take upward of a number of years to complete this fuzzing task with a mutation fuzzer, as calculated here:
will cause the program to crash. The question is whether the fuzzer will find it. Using a mutation fuzzer, if we submit one input file at a time, we would have a 1 in 2568 chance of hitting that innermost code block. If your computer was able to process 1,000 files per second (and you were unlucky), it might take upward of a number of years to complete this fuzzing task with a mutation fuzzer, as calculated here:

That’s a lot of years! Now let’s see how AFL does with this difficult problem. First, compile with the AFL instrumentation, like so:

Now let’s start the fuzzing with AFL:

As shown next, AFL comes with an information-packed interface. The most important information appears in the upper-right corner, where we see the cycles completed, total paths found, and the number of unique crashes.

As you can see, the fuzzer has found one crash—the one we expected it to find. Not bad. AFL found the inner code block in a little more than five minutes.
Similar to Peach, AFL provides a log of crashes, where you will find the file input that reached the vulnerable block of code:

As expected, the first 8 bytes of the string “abcdefgh” were parsed and hit the inner code block, where the program aborted (crashed).
Lab 3-3: Genetic Fuzzing with AFL
For this lab, you will build and use AFL, as just shown, in the following steps:
1. From Kali Linux 2017, 32-bit image, with 2GB RAM and two cores allocated in virtual machine, download and build AFL:
• wget lcamtuf.coredump.cx/afl/releases/afl-latest.tgz
• tar -xzvf afl-latest.tgz
• cd afl-2.41b/
• make
2. Copy the asdf3.c file or download it from the book’s web page and save it to the afl-2.41b/ directory.
3. Compile with AFL instrumentation:
![]()
4. Create an input/ directory under the afl-2.41b/ directory.
5. Inside that directory, create a file.txt file with “aaaaaaaa” as the content (with no quotes).
6. Start the fuzzing with AFL by executing the following from within the afl-2.41b/ directory:
![]()
7. Inspect the GUI for a crash and then inspect crash logs, as shown previously.
Summary
Fuzzing as a testing methodology gained popularity because of its simplicity and ease of setup. Today’s fuzzing frameworks, such as Peach, build upon the original idea of random testing. They constantly evolve by keeping track of the latest advances in the fuzzing community. AFL takes fuzzing to a new level, using genetic algorithms to evolve into the best code coverage. To efficiently use these new tools, it is necessary to play with them and understand them. This chapter should give you the necessary language and an overview of the fuzzing world to get you started with testing and hunting for vulnerabilities.
For Further Reading
!exploitable WinDbg plug-in msecdbg.codeplex.com
“Analysis of Mutation and Generation-Based Fuzzing” (C. Miller and Z. N. J. Peterson) fuzzinginfo.files.wordpress.com/2012/05/analysisfuzzing.pdf
“Babysitting an Army of Monkeys” (C. Miller) fuzzinginfo.files.wordpress.com/2012/05/cmiller-csw-2010.pdf
Bochspwn Blackhat presentation (Gynvael and Mateusz Jurczyk) media.blackhat.com/us-13/us-13-Jurczyk-Bochspwn-Identifying-0-days-via-System-wide-Memory-Access-Pattern-Analysis-Slides.pdf
Boofuzz (Joshua Pereyda) github.com/jtpereyda/boofuzz
“Fuzzing Panel,” YouTube (Mike Eddington, Jared DeMott, Ari Takanen) https://www.youtube.com/watch?v=TDM-7xUPzqA
“Fuzzing Vulnserver with Peach 3” (David Um) www.rockfishsec.com/2014/01/fuzzing-vulnserver-with-peach-3.html
“Fuzzing Vulnserver with Peach: Part 2” (Dejan Lukan) http://resources.infosecinstitute.com/fuzzing-vulnserver-with-peach-part-2/
“Fuzzing Workflows; a FuzzJob from Start to End” (Brandon Perry) foxglovesecurity.com/2016/03/15/fuzzing-workflows-a-fuzz-job-from-start-to-finish/
IANA media types www.iana.org/assignments/media-types
Microsoft Visual Studio Express www.visualstudio.com
Notepad++ editor notepad-plus-plus.org
Peach fuzzing framework peachfuzzer.com
Python language www.python.org
Radamsa fuzzer github.com/aoh/radamsa
“RAM Disks and Saving Your SSD from AFL Fuzzing” (Michael Rash) www.cipherdyne.org/blog/2014/12/ram-disks-and-saving-your-ssd-from-afl-fuzzing.html
Repository for multimedia samples samples.mplayerhq.hu
“Software Exploit Development – Fuzzing with AFL” (Jonathan Racicot) thecyberrecce.net/2017/03/20/software-exploit-development-fuzzing-with-afl/
“Tutorial – Beginner’s Guide to Fuzzing” (Hanno Böck) fuzzing-project.org/tutorial1.html
Vblog by Gynvael www.youtube.com/watch?v=JhsHGms_7JQandgithub.com/gynvael/stream-en/tree/master/019-genetic-fuzzing
Vulnserver (Stephen Bradshaw) github.com/stephenbradshaw/vulnserver