
CHAPTER 19
Dissecting Ransomware
This chapter dissects a unique family of malware known as ransomware. This malware is able to take control of a system unless a ransom is paid to its creators.
In this chapter, we cover the following topics:
• History of ransomware
• Options for paying a ransom
• Dynamic and static analysis of Ransomlock
• Decoding in memory
• Anti-debugging checks
• Taking control of the Desktop
• Identifying and analyzing Wannacry encryption
The Beginnings of Ransomware
Ransomware is a unique family of malware that is able to take full control of a machine until a ransom is paid by the victim. In order to increase the chances of getting money, the malicious program will pretend to look like it’s coming from a legitimate source, such as a law enforcement agency, stating that the end user has been caught visiting unauthorized websites and therefore needs to pay the violation fee. Other strategies to fool the end user include presenting a fake Windows Product Activation screen, asking the victim to pay to reactivate the system due to a specific fraud being detected. Normally, the crooks will set an expiration period in which to pay the ransom, forcing the victim to send the money right after being infected. An excellent video from Symantec explaining ransomware can be found in the “For Further Reading” section at the end of the chapter.
Ransomware can be classified in a few different ways, based on the way it manipulates the data:
• Crypters A type of ransomware that encrypts user data, effectively holding it for ransom until the victim decides to exchange money for the decryption key.
• Lockers A type of ransomware that utilizes various techniques to prevent users from interacting with their operating system. In this case, the operating system is held for ransom; the user’s data on disk is not modified by the malware.
• Leakware (doxware) Unlike the previous two classes, where the attacker doesn’t have access to the data, leakware typically employs a remote administration tool to exfiltrate the victim’s data. The attacker then threatens to publish the data unless a ransom is paid.
This kind of malware is not new. The first ransomware utilizing encryption, called the “AIDS Trojan,” was created by Dr. Joseph Popp and documented around 1989. At that time, the name of this family of malware was a little bit different: it was called “cryptoviral extortion.” The AIDS Trojan encrypted all files from the hard drive and asked the victims to pay US$189 to “PC Cyborg Corporation.” When Popp was caught, he said the money he earned was going to be used to support AIDS research.
The AIDS Trojan used symmetric keys to encrypt the information. Because the key was embedded in the binary, it was easy to recover the encrypted files. Later on, the researchers Adam Young and Moti Yung fixed this issue by implementing public key cryptography. That way, the files were encrypted with a public key, and once the ransom was paid, the corresponding private key needed to decrypt data was given to the victim. In this scenario, there was no way to find the key needed to decrypt the information, thus improving the extortion attack.
Due to its popularity, ransomware malware spread to other platforms, and in mid-2014 the first ransomware designed for Android devices was discovered: Simplelocker.
Options for Paying the Ransom
From the criminal’s point of view, the most important part is to remain anonymous when receiving the money. That is why the methods of payments mentioned here have evolved over time:
• Premium-rate SMS This is an easy method for sending the payment, but it’s also easy for tracking the receiver. The victim just needs to send a text message to recover their computer.
• Online cash payment providers This method of payment does not require the use of a credit card. A victim can go to the nearest local provider and buy some credit with cash in order to receive a specific code to spend the money. This code is sent to the criminals in order to recover the machine. Here, the only way to know the receiver getting the money is by reversing the piece of malware. Some of the well-known online cash providers are Ukash, MoneyPak, and Paysafecard.
• Bitcoin Described as digital cash and considered a digital currency (because it is not considered a true currency), bitcoin is a peer-to-peer method of payment that has gained massive attention in recent months. Because the bitcoin can be transferred from one person to another person directly, it is significantly more difficult to track the sender and receiver, making it easier than ever for crooks to capitalize on their malicious efforts.

CAUTION Before you consider paying the ransom, it’s suggested that you consult the nearest technical support person to try to regain control of your data.
Now that you have an overview of how ransomware works, let’s dissect a couple of examples to understand their inner workings.
Dissecting Ransomlock
When you’re dealing with ransomware, dynamic analysis is useless most of the time. This is because once you run it, your Desktop will be controlled by the malware; therefore, you will not be able to review the logs or results from the monitoring tool. However, there are many tricks you can perform in order to recover the machine after running the malware to get access to the monitoring results. In this section, we take a look at a Ransomlock malware sample that belongs to the Locker ransomware family and implements the techniques typical for this class of ransomware.

NOTE The exercises in this chapter are provided as examples rather than as labs due to the fact that in order to perform these exercises, you need a malicious binary.
Example 19-1: Dynamic Analysis
NOTE The MD5 hash of the Ransomlock sample that will be analyzed in this section is ED3AEF329EBF4F6B11E1C7BABD9859E3.
Ransomlock will lock the screen but will not try to kill any processes or deny network access to the machine. Therefore, as analysts, we can leave a backdoor in the virtual machine (VM) to kill the malicious process at any time and recover control of the infected system. Let’s see how this works:
1. We need to create a bind shell to get remote access to the infected machine. We can use Metasploit in our Kali machine to do that, as shown here, making sure to change the RHOST to your IP. Because no port is defined, the default one will be 4444.
![]()
Now download malo.exe onto the victim machine by browsing to http://<kali-IP>/GH5/malo.exe.
2. Run netcat on Kali to wait for the remote shell and then run malo.exe on the victim machine. Here, you can see that a Windows shell has been received:

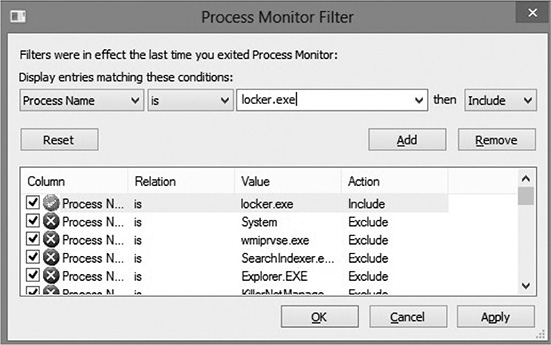
3. Fire up Procmon and set a filter to only monitor locker.exe. Select Filter | Filter… and then create the condition “Process Name is locker.exe,” as shown next. Click Add and then click Apply.
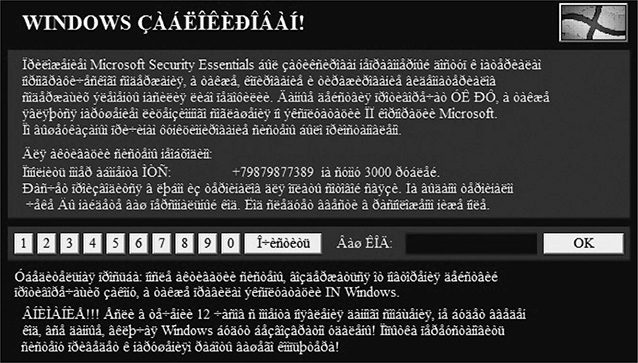
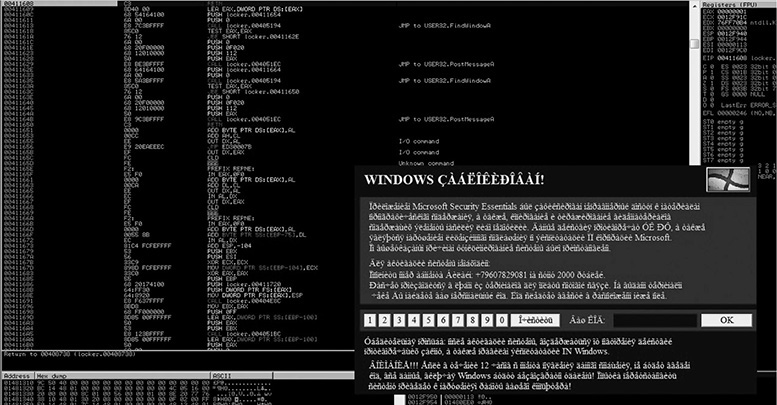
4. Run the malware. After a few seconds, the screen will be locked with a message in a Russian-like language, as shown next. Due to the lack of a language pack being installed, you’ll see many weird characters. However, the content of the message is not relevant for this exercise.
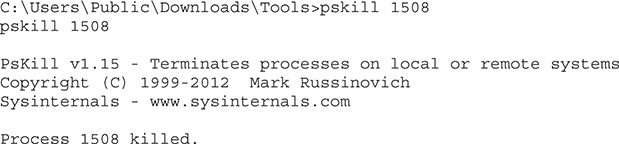
5. To unlock the screen by killing the malicious process, go to the shell obtained in Step 2, run tasklist /v | find locker.exe, and then kill it (assuming the PID of locker.exe is 1508):
6. After all the malicious processes have been killed, the Desktop should be unlocked, and you can review the results of Procmon or any other dynamic analysis tool.
Another way to get the Desktop back to the victim is to start explorer.exe from the remote shell (which was killed by the malware before it controlled the machine).
CAUTION The fact that you killed locker.exe does not mean the system is disinfected. The purpose of this step is only to unlock the screen to analyze the malware after infection.
We are done with the remote shell, so let’s go back to Windows in the VM, which should be unlocked by now:
1. Review the Procmon results in detail. You can see that the malware is searching for taskkill.exe (it was probably used to kill explorer.exe). It also looks like it is trying to find custom DLLs such as NATIONA_PARK23423.DLL and HERBAL_SCIENCE2340.DLL, but not many details can be found from this tool.
2. Run the Autoruns tool from Sysinternals and go to the Logon tab, as shown next. Here, you can see the malware will be executed upon every reboot because the explorer value has been added under the Run key and the default shell has been set to locker.exe by changing the WinlogonShell key (normally, explorer.exe is the expected value). This way, Ransomlock takes control as soon as the end user logs in.

So, we now have a better idea of the malware’s behavior. However, we are far from understanding the inner workings. Dynamic analysis is good for a quick glance because sometimes it gives us enough information to be able to understand the key points. However, we still do not know how the screen is locked, whether the malware will try to call out to a command-and-control (C2) server, or if any other damage is caused to the infected machine. Those different questions can be better understood by debugging the malicious program and performing static analysis with IDA—a perfect combination when doing in-depth malware analysis.
Example 19-2: Static Analysis
NOTE The MD5 hash of the Ransomlock sample that will be analyzed in this section is ED3AEF329EBF4F6B11E1C7BABD9859E3.
Typically, ransomware is known to use sophisticated obfuscation, anti-debugging, anti-disassembly, and anti-VM techniques, aiming to make it really hard to understand the inner workings of the malware.
NOTE In this chapter, the term decoding will be used as a synonym of de-obfuscation, unpacking, or decryption.
Therefore, we have two goals:
• To understand the “anti” techniques used to avoid detection, debugging, and virtualization, if any.
• To understand the techniques used to take control of our Desktop. After this example, we should be able to respond to questions such as the following: Why did my mouse and keyboard stop working? Why did all the windows disappear? Why does running the malware through a debugger not work?
Decoding in Memory
We will again play with the locker.exe binary we used in the previous exercise, so let’s open it up in Immunity Debugger within a VM. If you just press F9 to run it, for some reason the Desktop will not be locked, probably due to some anti-debugging checks. Let’s find out why. When we reopen it with the debugger, we land on the following entry point:


These instructions are just gibberish code pretending to look as if the program is performing normal actions. If we keep stepping into the code (using F7), we will eventually realize there are dozens of repetitive lines of code decoding new sets of instructions. A good example is shown here:
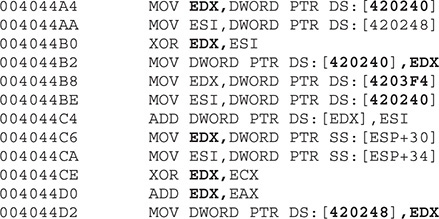
We can see that the double words at offsets 0x420240 and 0x420248 (from the data section) are being modified after some calculations. These kinds of decoding instructions will be found multiple times in the whole binary, and it can be really tedious and time consuming to step into each instruction. Therefore, we need to find a way to skip over those instructions to reach the interesting code that will help us to understand the malware behavior.
A good strategy for a faster analysis is to find calls to addresses generated at runtime. Normally, those addresses are found once the decoding steps have been completed; such an instruction can be found at address 0x00401885:
![]()
NOTE Something to keep in mind that will be useful during our analysis is that the preceding instruction was found at the relative address 0x1885 from the base address 0x00400000.
Let’s step into this instruction to find out the value of EAX. We can set a breakpoint at 0x00401885, and once we hit that instruction we see that the value of EAX is equal to 0x0041FD12, which is located in the resources (.rsrc) section.
Before pressing F7 to step into the call, let’s make sure to remove any breakpoints (by pressing ALT-B to get the list of breakpoints and using the DELETE button) because internally the debugger changed the value of the first byte of the command to 0xCC (which tells the debugger to stop at that instruction). Therefore, instead of the original opcode equal to FF D0 ![]() , the value has been altered in memory to CC D0. Later on, the malware will copy these instructions to a new location and therefore will spoil the next instruction to be executed. When we remove the breakpoint, the byte altered by the debugger is restored to its original value. That is one of the reasons the malware copies itself to other memory locations—to carry over breakpoints that will spoil the execution commands in the next round.
, the value has been altered in memory to CC D0. Later on, the malware will copy these instructions to a new location and therefore will spoil the next instruction to be executed. When we remove the breakpoint, the byte altered by the debugger is restored to its original value. That is one of the reasons the malware copies itself to other memory locations—to carry over breakpoints that will spoil the execution commands in the next round.
Once we remove the breakpoint and press F7, we jump to the address 0x0041FD12. From there, we follow the same strategy to find a command such as CALL <register>. In the following commands, we will find one here:
![]()
By stepping into the preceding call, we jump to a new address space. In this example, EAX is now equal to 0x002042C2. Here is the content of some instructions at this offset:

In case you did not notice it yet, this code is the same as the one shown in the entry point, just in a new location, as expected. Let’s again apply our formula to find a CALL EAX, which is base_address + 0x1885 (in this case, 00200000 + 0x1885). And there it is—we found our instruction again at the expected offset:
![]()
This time, EAX is equal to 0x0021FD12 at runtime, so after stepping into this call, we get the following instructions:


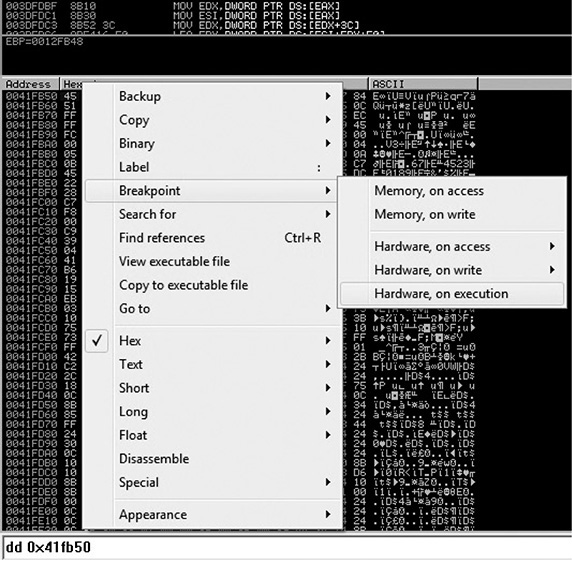
A couple of things happened here. First, we cannot find another CALL EAX instruction in the addresses, so we are probably close to the end of the decoding phase. Actually, if we step over the call at 0x0021FD44 (by pressing F8), the malware will terminate itself. Therefore, let’s step into that call. For the sake of brevity, we will take a shortcut. Eventually, the malware will jump back to the resources section at offset 0x0041FB50, where new decoded instructions are waiting. So let’s go there quickly by setting a hardware breakpoint on execution at that address; we can do this by executing the instruction dd 0x41fb50 at the command box from the debugger and then right-clicking the first byte (in the lower-left pane, which is the Memory window) and selecting Breakpoint | Hardware, On Execution, as shown here.
Now when we press F9 to run the malware, we hit our hardware breakpoint successfully. Here are the first instructions at our offset; as expected, we can see a new set of decoded instructions ready to be executed:

The common instruction PUSHAD is used to preserve the current values of the CPU registers. This is normally used before decoding data in memory, which is the case here because the “.text” section of the malware was zeroed out and will be filled with the next instructions. This clearly tells us that the malware is decoding itself in memory with the real malicious set of instructions. We can print the current content by entering the command dd 0x401000 in the command box from the debugger:

By stepping into the next instructions, we see that the whole text section is loaded with the real malicious instructions. If we keep stepping into the code, we see that the processes are enumerated. Therefore, let’s set a breakpoint on the proper API in the debugger command box again:
![]()
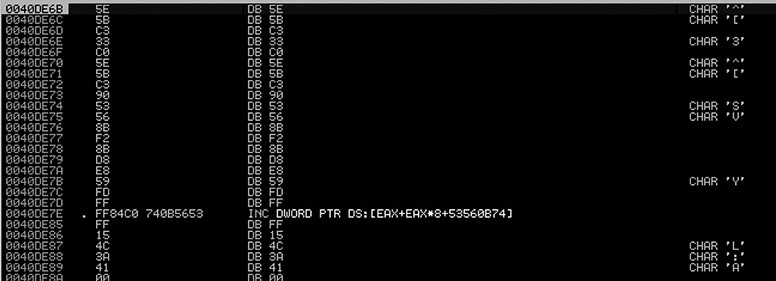
Press F9, and when the breakpoint is hit, press ALT-F9 to return to the malware code at the address 0x0040DE6B. There, we see instructions without them being properly disassembled by the debugger, as shown here:
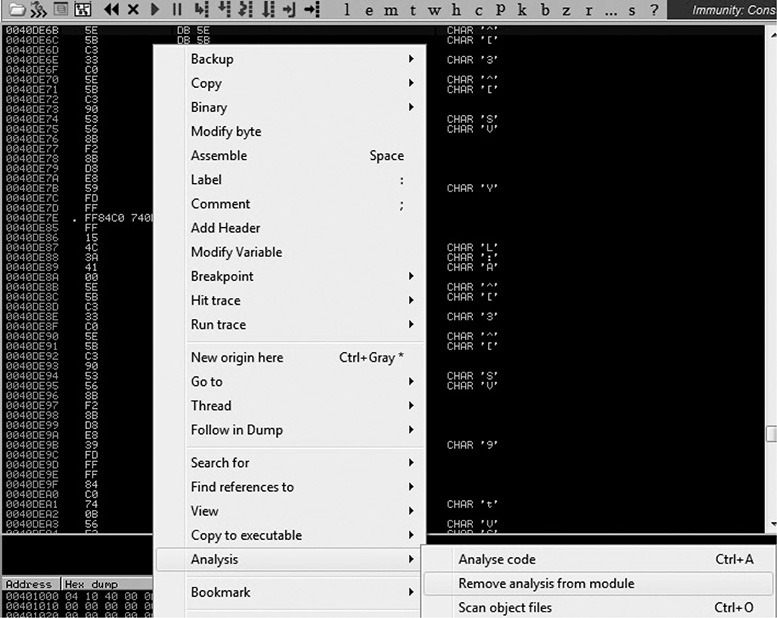
Let’s make the debugger display those instructions properly by right-clicking any instruction in the upper-left window and selecting the option Analysis | Remove Analysis from Module, as shown here:
After this step, we see the proper assembly code displayed. Here are some important addresses that give us evidence that the processes are being enumerated:

Anti-Debugging Checks
As shown in the previous steps, the first anti-debugging technique of the ransomware is to copy itself to other locations so that if an int3 (0xCC) is set, it will be carried over to the next memory space and will break the code changing the opcodes. Let’s see what other anti-debugging techniques will be used by the malware.
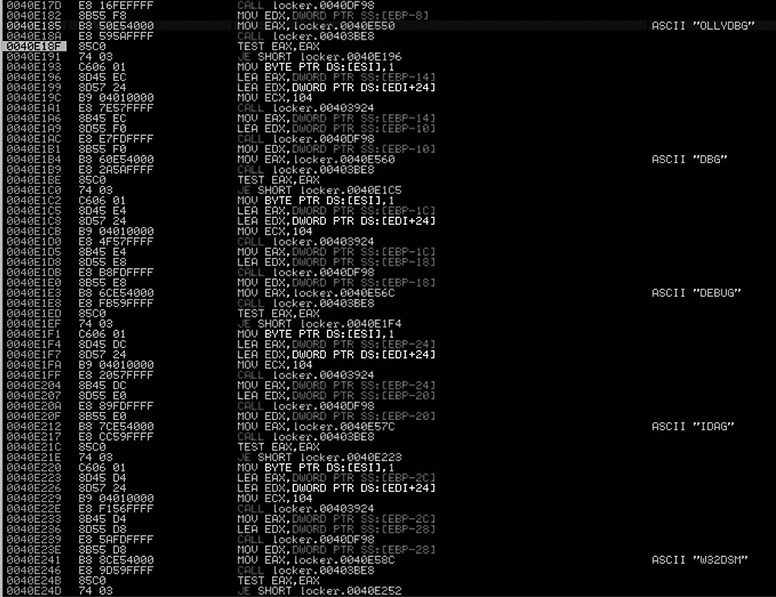
Let’s remove all the breakpoints (ALT-B). Then, in the upper-left disassembly window, press CTRL-G, go to the address 0x0040E185, set a breakpoint there, and press F9. At this point, the malware will check whether a well-known debugger is running in the infected system by enumerating all the processes and its related modules, trying to find a process or module with the name OLLYDBG, DBG, DEBUG, IDAG, or W32DSM, as shown here.
Because we are using Immunity Debugger, we are not going to be caught by this check, but even if we were using OllyDbg, we could either change the name of the executable before running it or patch the binary in memory to force the malware to keep running.
Then, if we keep “stepping into,” the malware will try to find a debugger based on the common names of the drivers installed in the system inside c:windowssystem32drivers, such as sice.sys and ntice.sys (related to SoftICE) and syser.sys (related to the Syser Kernel Debugger), among others. Also, other checks exist for old virtual drivers (with a .vxd extension), as well as loaded services with paths such as \.SICE, \.TRW, \.SYSER, and so on. Here’s an example of this anti-debugging check.

Moving forward, we will find another anti-debugging check:
![]()
This is a very old and easy-to-bypass technique to check whether the malware is being debugged. After the call, if EAX = 0, no debugger was found.
At the end of all the checks to detect a debugger, the content of ESI will have a 1 if a debugger is present and 0 if not; that value is saved at the BL register:
![]()
We can easily fool the malware into thinking there is no debugger by patching the preceding instruction (by double-clicking the instruction in the debugger, we can modify it) with something like this:
![]()
Unfortunately, we cannot patch the binary permanently because those instructions are decoded at runtime, and therefore the file on disk is different. However, we can create a VM snapshot right after patching it to always start debugging from that point onward during the analysis.
Eventually the new value of BL will be copied to AL. We can see that at 0x410C52, we are able to bypass the debugger check (if AL = 1, the program will terminate; otherwise, it will jump to 0x00410C60):
![]()
Taking Control of the Desktop
At this point, all the checks are done, and the malware is ready to start preparing the steps to own the Desktop:
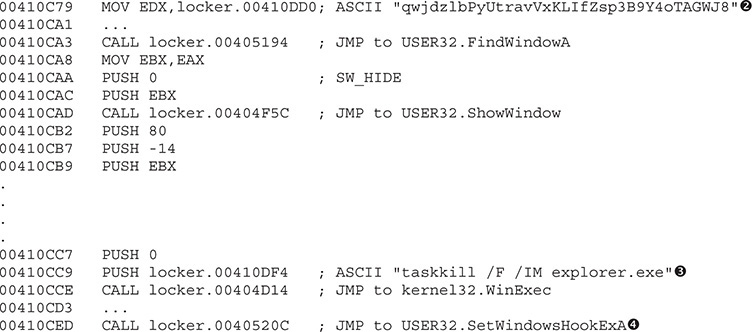
The malicious window has been created with a unique window name (the window’s title) ![]() . The window will be found at 0x00410CA3 and hides from the Desktop at 0x00410CAD. This happens within milliseconds, so the end user will not even notice it. Later, two very important tasks take place: The explorer.exe process will be killed so that, among other things, the task bar is removed and is not accessible by the end user
. The window will be found at 0x00410CA3 and hides from the Desktop at 0x00410CAD. This happens within milliseconds, so the end user will not even notice it. Later, two very important tasks take place: The explorer.exe process will be killed so that, among other things, the task bar is removed and is not accessible by the end user ![]() . Then, the keyboard will be intercepted
. Then, the keyboard will be intercepted ![]() so it cannot be used by the victim once the malicious window is activated. We know the keyboard is being hooked by stepping into the call and checking the HookType parameter in the stack, which is 2 (for WH_KEYBOARD):
so it cannot be used by the victim once the malicious window is activated. We know the keyboard is being hooked by stepping into the call and checking the HookType parameter in the stack, which is 2 (for WH_KEYBOARD):

NOTE Many other actions are performed by the malware. We are just listing the more relevant ones to keep the chapter’s length reasonable.
Moving forward, we find a loop whose only purpose is to find and minimize all the windows on the Desktop:
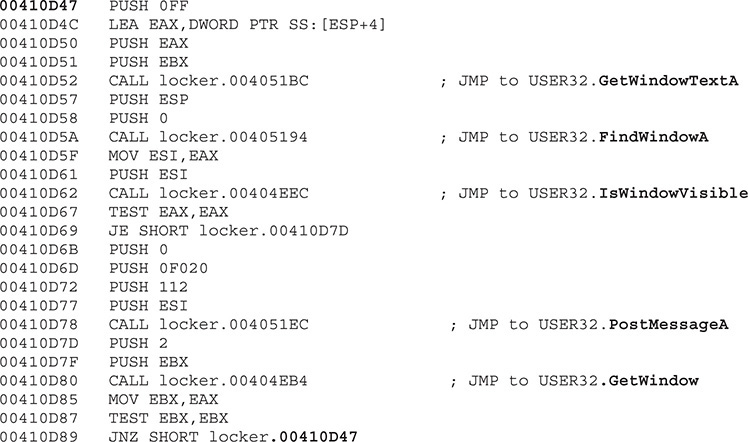
This check is self-explanatory. It gets the title of the current window displayed via GetWindowTextA and finds that window. If the window is visible, it is minimized via a PostMessage with the following parameters:

The last step in the loop is to call GetWindow to get the next available window currently being displayed. This loop is done until no more windows are found maximized.
Once all windows have been minimized, the loop identifies the malicious one by calling FindWindowA again and restores it via a PostMessageA call:
![]()
For this call, the following parameters are used:

Again, another jump to a different set of instructions is done, so we step into (F7) the following call to follow it:
![]()
The content of the malicious window starts to be added:
![]()
The following parameters appear in the stack:

Let’s set a breakpoint at SetWindowPos and press F9 to go there. Then, press ALT-F9 to return to the malware program. We should see a pop-up ransomware window displayed. This API was called with the HWND_TOPMOST option, which essentially means that any window displayed in the system will always be behind this one:
![]()
We can see that the Ransomlock window has been displayed! However, the locking process has not yet been done. Thanks to the debugger, the malware is under our control, as shown here.
Because the mouse and keyboard are not being blocked, we can interact with the Desktop and bring up other windows. However, because the malicious window is set to be at the top of any other one, even if we maximize other windows, they will remain behind it. This is done so the infected user can only interact with the ransomware window. In our environment, we’ll just maximize IE and the Calculator, but as expected, they are displayed behind the window, as shown here.

We can check all the windows associated with this process by going to the View | Windows option in the menu. Here, we can confirm that the malicious window is set as the topmost. We can also see in the ClsProc column that the procedure address of the topmost window is 0x00405428, as shown here. We can set a breakpoint there to catch every single action related to that window.

Especially with ransomware, it is highly recommended that you use a tool such as Spy++ from Microsoft Visual Studio to be able to identify all the hidden windows in the system and their properties during the analysis.
The hotkey ALT-TAB is defined for the malicious window via the RegisterHoyKey API at 0x00411005. This way, once the Desktop is locked, if the user tries to switch to another window, they will be rejected:
![]()
Here are the stack parameters:

In some later instructions, we find a call to the ClipCursor API:
![]()
Here are the stack parameters:
![]()
This API will keep the cursor or the mouse inside the malicious window rectangular area; therefore, the coordinates ![]() are passed as parameters.
are passed as parameters.
After this call, the victim will be forced to only interact with the ransomware window via the mouse! If we try to click a different area of the screen, it will not be possible. At this point, your Desktop should already be locked, but because the malware has not completed yet, some more steps are needed for it to be owned completely. Let’s set a breakpoint on SetFocus (via the command-line bp SetFocus). Press F9, press ALT-F9, and the game is over.
Internally, the malware will run an infinite loop to make sure all windows from the Desktop are minimized. We can confirm this behavior by pressing CTRL-ALT-DEL and then ALT-T to bring up the Task Manager window. As soon as it is displayed, it will be minimized by the ransomware.
Interestingly, if we try to capture the network traffic to the C2 by entering a fake number in the text box and then click OK to send the payment, no action will be performed by the malware. However, although this makes it look like the malware is not active, unfortunately, it does not prevent our machine from being owned.
Other tasks were performed by the malware trying to take control of the Desktop; some of them were not successful because they are pretty old techniques. We’ve just focused on the most important ones to help us in understanding the inner workings.
The malware uses old but still useful techniques to take control of the Desktop (see the “For Further Reading” section for some examples). We learned that the core techniques implemented by the ransomware to own the Desktop are related to the windowing system. Here are the most important steps used to take control of the Desktop:
1. Minimize all the windows in an infinite loop. As soon as a new window is maximized, it will be minimized immediately.
2. Hook the keyboard so that it cannot be used by the victim.
3. Set up specific hotkeys such as ALT-TAB to prevent the victim from switching to other windows.
4. Set the malicious window as the topmost so that any other window that might pop up will always be behind it.
5. Restrict the usage of the mouse to the area where the malicious window is located.
Although the consequence of having your Desktop locked by the malware is scary, most of the time this kind of malware comes as a stand-alone program that is executed from a specific location in your file system. Therefore, it is pretty easy to deactivate it: just boot the machine with a live CD, mount the Windows hard drive if you’re using a Linux distro, and search for executables under the infected user’s account. Here are the common paths you should check:
c:Users<user>AppDatac
:Users<user>Local Settings
c:Users<user>Application Data
Alternatively, you can boot in Safe mode and go to the Run registry key, where you might find the executable name (although multiple places in the Registry are used to start the malware after reboot):
HKLMSoftwareMicrosoftWindowsCurrentVersionRun
Wannacry
Wannacry is an infamous ransomware worm that appeared in May 2017 and quickly made headlines worldwide. It is labeled a worm because it used the CVE-2017-0144 vulnerability, named ETERNALBLUE, in the Server Message Block (SMB) protocol to infect vulnerable Windows hosts on the Internet. The ETERNALBLUE vulnerability was famous because it was disclosed as part of the information leak by the Shadow Brokers hacking group. The group released to the public several exploits that were developed and used by the NSA, one of which was ETERNALBLUE.
Wannacry is part of the crypter ransomware family because it encrypts the victim’s data and holds it for ransom. In this section, we examine different approaches to analyzing Wannacry ransomware and try to answer following questions:
• How are the files encrypted and which cryptographic algorithms are used?
• Is it possible to decrypt the ransomed files?
Example 19-3: Analyzing Wannacry Ransomware
Identifying and understanding the encryption scheme used by ransomware is one of the most important pieces of information for the affected victims. This information can help reveal any vulnerabilities in the implementation of file encryption or key management, which could lead to recovering ransomed files. On the other hand, confirming that the encryption scheme used by ransomware is secure allows the victims to prioritize their efforts and proceed with remediation.
Two main classes of encryption algorithms are employed by ransomware:
• Symmetric-key algorithms These algorithms use the same key for encryption and decryption. They are typically much faster at encrypting/decrypting the data than asymmetric algorithms but typically require the ransomware to “leak” the decryption key on the infected machine since the same key is used to encrypt data.
• Asymmetric-key algorithms These algorithms split the secret in two keys: public and private. The public key can be distributed with the malware and is used only for encrypting data. To decrypt the data, one would need the private part of the key, which is managed by malware authors and sold to victims for a ransom. Asymmetric algorithms are mostly used for secure key exchange of symmetric keys, which allows for much faster encryption/decryption.
Designing a secure crypto system is a complex endeavor; to be truly secure, the system requires a careful design that depends on various interconnected pieces such as algorithms, key parameters, key handling, and a security-aware implementation.
Because implementing cryptographic algorithms is a fairly complex and security-sensitive undertaking, most developers decide to use operating system crypto APIs or to import, either statically or dynamically, third-party crypto libraries. Checking the imported functions is the easiest way to identify if the malware uses one of the native crypto APIs.
One of the oldest and simplest ways to identify the usage of cryptographic algorithms, in the case of statically linked libraries, has been by using static signatures for various constants on which the algorithms depend. One of the early tools that leveraged these constants for detection was KANAL – Crypto Analyzer, a plug-in for the PEiD signature scanner. Nowadays, most tools rely on the YARA format for static signatures or allow users to leverage signatures using third-party plug-ins. Some of the common reverse engineering tools that support YARA are IDA, x64dbg, Binary Ninja, and Radare2.
NOTE The MD5 hash of the t.wnry Wannacry component, which will be analyzed in this section, is F351E1FCCA0C4EA05FC44D15A17F8B36.
To start with the identification of cryptographic algorithms, we will open the t.wnry component in IDA and examine the Imports section of the PE file. By sorting the imported functions by name, we organize the functions by the functionality they provide, which allows us to spot several crypto APIs:
• CryptExportKey This function exports a cryptographic key or a key pair from a cryptographic service provider (CSP) in a secure manner.
• CryptReleaseContext This function releases the handle of a CSP and a key container.
• CryptGenRandom This function fills a buffer with cryptographically random bytes.
• CryptGetKeyParam This function retrieves data that governs the operations of a key.
Imported functions give a glimpse of the cryptographic functionality but don’t reveal any details about the algorithms we are dealing with. They do, however, provide shortcuts for the analyst to find the functions responsible for the desired functionality (in this case, encryption).
NOTE This analysis methodology is known as a bottom-up approach. It keeps the focus on answering a specific question by efficiently guiding the analysis efforts using available clues. This approach is especially useful when dealing with overwhelmingly big and complex binaries.
For the second preliminary crypto identification step, the findcrypt-yara IDA plug-in will be used. This plug-in comes with various open source YARA rules that can detect both imported or dynamically resolved crypto functions as well as different cryptographic constants associated with crypto algorithms. The included YARA signatures are missing some of the common crypto API functions, so before running them on the analyzed sample, we’ll add the following YARA rule:

Running the FindCrypt plug-in on the analyzed file reports nine signature matches—three RijnDael_AES and six Crypt* APIs—that weren’t present in the Imports section we analyzed previously. By looking at the identified constants, we can safely assume that the ransomware is using AES encryption and potentially some other algorithms. Identifying the CSP used in CryptAcquireContextA will narrow down the available algorithms, so we’ll start by finding cross-references (XREFs) from the address of the CryptAcquireContextA string located here:
![]()
The string is only used in one location, and that function is responsible for dynamically resolving the crypto functions. After the variable names and types are annotated, the code looks like the following in the Hex-Rays decompiler:

NOTE Dynamic resolution of API functions using LoadLibrary and GetProcAddress is a common occurrence in malware. It allows the authors to hide the functionality from the static analysis tools relying on the import table. Another improvement on this approach is obfuscating or encrypting the strings of API functions, which further prevents static signatures and reasoning about executable functionality. When analyzing malware, make sure you check LoadLibrary and GetProcess API references in code and determine if they are resolving additional APIs.
When dealing with dynamically resolved APIs in IDA, you can name the variables as the resolved functions, and IDA will automatically apply the corresponding API prototype. Here is an example of naming the variable CryptAcquireContextA:

Although this prototype might look correct, it won’t allow IDA to propagate argument names in the disassembly and will result in a somewhat messy decompiler representation. The issue here is that the automatic type assigned to the variable by IDA is a function declaration instead of a function pointer. To fix the variable’s type, remember to change it to a function pointer by wrapping the function name in curly braces and adding a pointer (*) in front of the name, as follows:
![]()
To identify the CSP, we continue with looking at cross-references of CryptAcquireContextA and will analyze a function at .text:10003A80. Having annotated the function pointer, we can easily identify the names of arguments and find the value of the pszProvider argument:
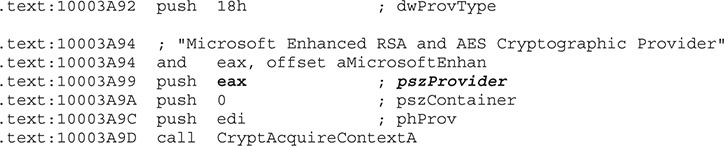
The CSP used by malware supports the AES and RSA algorithms. We already identified AES constants in the sample, so this is just another confirmation that this algorithm is used in some form, either for encryption, decryption, or both. The usage of RSA hasn’t been confirmed yet, so the next step is to understand how this cryptographic provider is used. We continue by analyzing XREFs of the current function and will look at sub_10003AC0. Because this function likely contains crypto-related logic, we need to understand the code and all surrounding functions.
In situations like this where an in-depth understanding of a function is necessary, a top-down approach makes the most sense. In this case, all functions are very simple wrappers around APIs, so we won’t go into many details. Shown next is an IDA proximity view of the functions called from sub_10003AC0, which has been renamed InitializeKeys.
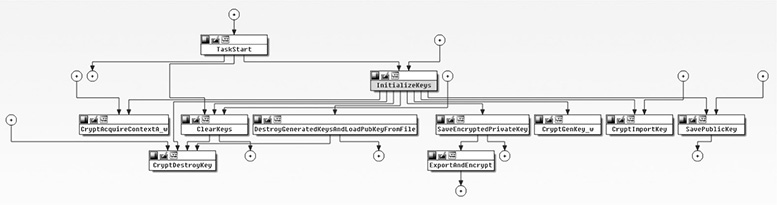
NOTE The IDA proximity browser provides a convenient way to explore the call graph and get a better overview of the related functions. Proximity view is most useful after the surrounding functions are named during the top-down analysis pass.
The InitializeKeys function reveals several important properties of the crypto setup:
• Malware comes with a hardcoded 2048-bit RSA public key.
• Sample generates a new 2048-bit RSA public/private key pair.
• The public key is saved unencrypted to the file system as 00000000.pky.
• The private key is saved encrypted with the hardcoded public RSA key as 00000000.eky.
• Destroys the keys from memory using the CryptDestroyKey API.
The fact that the generated private key is encrypted with a hardcoded public key and destroyed after use hints that the public part of the generated key pair is used to encrypt something important. Because the private key was encrypted with the author’s public key, only the author can access the encrypted key, giving them the exclusive ability to decrypt everything encrypted with the generated public key. Because the generated public key is used to encrypt something important, the next step is to identify what exactly that is.
To find the code location where the key is used to encrypt data, we will once again leverage XREFs to identify locations that use CryptEncrypt API. There are five references in total, and three of them we already analyzed while investigating InitializeKeys. Therefore, we’ll take a look at sub_10004370.
The function is very simple; it generates a random 16-byte buffer using the CryptGenRandom API and encrypts the buffer with the generated RSA public key. Both the unencrypted and encrypted buffers are returned to the calling function. By following the use of both buffers in the calling function, we can notice the following differences:
• The encrypted buffer is written to a file as a part of a header.
• The unencrypted buffer is used as the AES key to encrypt the content of ransomed files.
Now that we have collected all the pieces, here is how Wannacry utilizes AES and RSA for encrypting files:
1. A new 2048-bit RSA key pair is generated per infected machine.
2. The private RSA key is encrypted with the attacker’s hardcoded public RSA key, preventing anyone other than the attacker from decrypting the machine’s private key.
3. A random 128-bit AES key is generated for every victim’s file the Wannacry encrypts.
4. The public part of the generated RSA pair is used to encrypt the AES key used for encrypting the user’s files and is saved as part of the victim’s encrypted file header.
This is a pretty robust crypto design that prevents anyone other than the attackers, who have the private part of the hardcoded public key, from decrypting the AES keys used to encrypt the victim’s files.
However, luckily for victims, the theoretical concepts and practical implementation often leave enough room for the security researcher to find subtle differences and attack the shortcomings of implementation. In this case, researchers have found that on some versions of Windows, it is possible to recover the prime number of the private RSA key due to inadequate memory wiping. This allows the victims who haven’t killed the ransomware process to look for the private RSA key in memory and use it to decrypt all the affected files.
Another vulnerability was identified in the way the files are deleted if they are located outside the predefined list of locations. The cleartext files located in the predefined list of directories were overwritten with random data before they were deleted. All other files are simply deleted from the file system without the file content being overwritten. This has allowed users to employ common forensic tools to recover the deleted cleartext files and partially remediate the impact of ransomware.
It is not always possible to find vulnerabilities in the ransomware and provide workarounds for victims, but without even looking, one can’t hope to find any. By using the presented bottom-up approach, the analyst can quickly identify the relevant parts of the code, dive into large binaries, concentrate on answering the important questions, and look for implementation vulnerabilities.
Summary
Dealing with ransomware can be a real challenge from a reverse engineering point of view. The criminals put a lot of effort into making it hard to detect and reverse the malware in an attempt to get as much money as possible before the malware gets detected.
Studying and understanding methods and techniques used by attackers help private users and corporations protect themselves from the ever-growing new malware families. Wannacry ransomware took the world by surprise and once again proved that attackers don’t need 0-day vulnerabilities to wreak havoc and that software patches are still a worldwide problem.
Regular backup of your personal data on a cloud provider and regular software updates are probably the most effective protections against ransomware.
For Further Reading
The AIDS trojan en.wikipedia.org/wiki/AIDS_(trojan_horse)
Android Simplelocker ransomware nakedsecurity.sophos.com/2014/06/06/cryptolocker-wannabe-simplelocker-android/
Bitcoin en.wikipedia.org/wiki/Bitcoin
EternalBlue https://en.wikipedia.org/wiki/EternalBlue
“Lock Windows Desktop” www.codeproject.com/Articles/7392/Lock-Windows-Desktop
Symantec Ransomware Video symantec.com/tv/allvideos/details.jsp?vid=1954285164001
Trojan.Cryptolocker.E www.symantec.com/security_response/writeup.jsp?docid=2014-050702-0428-99
Wannacry https://en.wikipedia.org/wiki/WannaCry_ransomware_attack