
CHAPTER 14
Advanced Windows Exploitation
In the last chapter we took a look at basic Windows exploitation via return pointer overwrites, Structured Exception Handling (SEH) overwrites, and some basic exploit-mitigation bypass techniques related to SafeSEH and Structured Exception Handling Overwrite Protection (SEHOP). For quite a few years now, exploit writers have been taking advantage of a technique known as return-oriented programming (ROP) to bypass memory protections such as hardware Data Execution Prevention (DEP). A number of controls are aimed at preventing the technique from working, including various controls implemented in Microsoft’s Enhanced Mitigation Experience Toolkit (EMET). EMET will be end-of-life as of July 2018; however, it is set to live on with modern implementations of Windows Defender Exploit Guard. The first introduction of Exploit Guard started with the Windows 10 Fall Creators Update in October 2017. Other common general controls include address space layout randomization (ASLR), Control Flow Guard (CFG), isolated heaps, MemGC, and others.
In this chapter, we cover the following topics:
• Utilizing ROP to bypass hardware DEP
• Abusing browser-based memory leaks to bypass ASLR
Data Execution Prevention (DEP)
Data Execution Prevention is meant to prevent the execution of code placed in the heap, stack, and other sections of memory where code execution should not be permitted. This has long been a goal of operating systems, but until 2004, the hardware did not include support. In 2004, AMD came out with the NX bit in its CPU. This allowed, for the first time, the hardware to recognize the memory page as executable or not and to act accordingly. Soon after, Intel came out with the XD feature, which did the same thing.
Windows has been able to use the NX/XD bit since XP SP2. Applications can be linked with the /NXCOMPAT flag, which will enable hardware DEP for that application depending on the OS version and support for various critical functions related to memory permissions and protections. There are arguably three primary categories of exploit mitigations:
• Application optional
• OS controls
• Compiler controls
The “application optional” category is not considered as effective as the other two categories of exploit mitigations because applications can be compiled to not participate in selected controls and are also victim to anyone with a hex editor going in and changing meaningful flags. Microsoft removed support for two critical functions (NtSetInformationProcess and SetProcessDEPPolicy) starting with Windows 7 to prevent applications from having the choice as to whether they would participate in DEP. Those functions were often used with a technique discovered by researchers Skape and Skywing to disable DEP on a running process.1
The “OS control” category includes those exploit mitigations that are supported by the OS, some of which are configurable, like DEP. The administrator of a system can select which third-party applications participate in DEP, as opposed to allowing the applications to decide. OS controls such as address space layout randomization (ASLR) are enabled by default as of Windows Vista, which includes randomizing segments in memory, including the stack and heap.
The “compiler controls” category includes protections such as security cookies, rebasing, and Control Flow Guard. If a library is not compiled with the /DYNAMICBASE option, then it will request to be mapped to the same static memory address each time it is loaded by an application. Tools such as Microsoft’s EMET and Windows Defender Exploit Guard can allow this to be overridden with a control called Force ASLR.
The topic of exploit mitigations requires its own chapter and is not the focus of this chapter in a general sense. This chapter is focused on defeating DEP and ASLR—hence the limited focus on other mitigations. That being said, we must also cover isolated heaps and MemGC when appropriate.
Address Space Layout Randomization (ASLR)
The purpose of address space layout randomization is to introduce randomness (entropy) into the memory addressing used by a process. This increases the difficulty during exploitation as memory addresses keep changing. Microsoft formally introduced ASLR in Windows Vista and subsequent operating systems. Applications and DLLs can opt for using the /DYNAMICBASE linker flag (this is the default behavior), which ensures that loaded modules also enjoy the benefits of randomization. The entropy is different on each version of Windows. As you can imagine, 64-bit Windows 10 supports much better randomization than a 32-bit Vista system (the system where ASLR was first introduced). In fact, 64-bit versions of Windows can benefit from high-entropy ASLR (HEASLR), which greatly increases the available virtual address space range. Imagine if there were 1,000 chairs in a room and you could choose to sit in one of them. Each time you come back into the room, you can choose a new seat out of the 1,000 available. Someone would have a 1 in 1,000 chance of guessing where you are sitting, barring that you are truly randomizing your seat selection. Let’s pretend that is a 32-bit example. Next, imagine if you went into a stadium with 50,000 available seats. You still only need one seat, but the location would be more difficult to guess because there is a larger number of seats. This example certainly isn’t to scale, but it gets the point across.
Some segments in memory have less entropy when randomizing addressing, especially on 32-bit OSs and 32-bit applications. This may allow the process to fall victim to brute-force attacks, depending on the conditions, such as whether or not a process crashes during an attempted exploit. Randomization in the kernel, such as that with driver addressing and the hardware abstraction layer (HAL), has also been more limited historically. High-entropy ASLR was introduced with Windows 8, as presented by Ken Johnson and Matt Miller at the Black Hat 2012 conference in Las Vegas, Nevada. It greatly increases the number of bits in the entropy pool, making predictability more difficult, as well as makes use of spraying techniques.2 At Black Hat 2016, Matt Miller and David Weston presented a talk titled, “Windows 10 Mitigation Improvements.” You can find the link to the presentation in the “For Further Reading” section at the end of the chapter.
Enhanced Mitigation Experience Toolkit (EMET) and Windows Defender Exploit Guard
For quite a while now, Microsoft has offered increased exploit mitigation support with the Enhanced Mitigation Experience Toolkit (EMET). At the time of this writing, EMET 5.5x was the most stable release. Examples of exploit mitigations in EMET, or managed by EMET, include Export Address Table Access Filtering (EAF/EAF+), stack pivot protection, deep hooks, ASLR improvements, SEHOP support, font protection, additional ROP protections, and several other controls. Each of these poses additional challenges to attackers. Known (as well as novel) techniques must be used to bypass or disable a control. Administration of EMET has improved from prior versions, allowing for easy selection of applications opted in for participation, as well as granular control over which exploit mitigations to enforce per each application. Some of the EMET controls are available to Windows 7 and Windows 8 natively, but require some level of configuration, often involving interfacing with the registry. EMET provides a much more straightforward approach to administering these controls at a granular level. Many EMET controls are not available natively and require EMET to be installed.
Microsoft’s Security Intelligence Report, Volume 12, showed an example of an unpatched Windows XP SP3 system that was run against 184 exploits, of which 181 were successful. They then applied a version of EMET, ran the testing again, and 163 of the exploits were blocked due to EMET.3
Microsoft announced that EMET would be end-of-life in July 2018, and that date is after an 18-month extension.4 However, when many in the security community expressed disappointment, Microsoft listened and announced that EMET would live on through Windows Defender. Windows Defender Exploit Guard includes support for the majority of controls in EMET. The main concern is that, at least at the time of this writing, Exploit Guard is only offered to Windows 10 users, starting with the fall 2017 Creators Update. This means that continued use of EMET on Windows 7 and 8 will be unsupported after July 2018.
Bypassing ASLR
The easiest way to bypass ASLR is to return into modules that are not compiled with the /DYNAMICBASE option. The Mona tool discussed in Chapter 13 has an option to list all non-ASLR linked modules:
![]()
When this mona command is run against the wsshd.exe process, the following table is provided on the log page.
As you can see, the MSVCR71.dll module is not protected with ASLR. We will use that in the following example to bypass DEP. The on-screen results on your system may differ due to the version of Mona used, as well as other factors such as debugger appearance settings.

NOTE This method doesn’t really bypass ASLR, but for the time being, as long as some developers continue to compile modules without the /DYNAMICBASE option, it will be a viable method to at least “avoid” ASLR. This is certainly the easiest option. Sometimes, partial return pointer overwrites can be used to bypass ASLR, especially in 32-bit processes.
A more difficult but lucrative method to defeat ASLR is to find a memory leak. If the address of a known object from a loaded module can be leaked, we can subtract its known relative virtual address offset from the full address to determine the rebased module load address. Armed with this information, an ROP chain can be generated on the fly. Later in this chapter we walk through a use-after-free memory leak against Internet Explorer 11 that allows for a full ASLR bypass. A use-after-free bug is commonly the result of a C++ object being prematurely freed. If a reference still exists to the freed object, it may be susceptible to exploitation by allocating a malicious, controlled object to the freed location.
Bypassing DEP and Avoiding ASLR
To demonstrate bypassing DEP, we will use the program we are familiar with, ProSSHD v1.2, from Chapter 13.
VirtualProtect
If a process needs to execute code in the stack or heap, it may use the VirtualAlloc or VirtualProtect function to allocate memory and/or mark the existing pages as executable. The API for VirtualProtect follows:
Therefore, we will need to put the following on the stack and call VirtualProtect():
• lpAddress The base address of the region of pages to be marked executable.
• dwSize The size, in bytes, to mark executable; you need to allow for the expansion of shellcode. However, the entire memory page will be marked, so “1” may be used.
• flNewProtect New protection option: 0x00000040 is PAGE_EXECUTE_READWRITE.
• lpflOldProtect The pointer to the variable to store the old protection option code.
Using the following command, we can determine the address of pointers to VirtualProtect() inside the MSVCR71.dll:
![]()
This command provides the output in a file called ropfunc.txt, which can be found in the output folder Mona was configured to use.
Return-Oriented Programming
So, what can we do if we can’t execute code on the stack? Execute it elsewhere? But where? In the existing linked modules are many small sequences of code that end with a RETN instruction. These sequences of code may or may not ever be executed by the program. Imagine we have control of a process via a buffer overflow. If we lay out a series of pointers to these desired code sequences, pointed to by the stack pointer, and return to each of them in succession, we can maintain control of the process and have it do our bidding. This is called return-oriented programming and was pioneered by Hovav Shacham. It is the successor to techniques such as ret2libc.
Gadgets
The small sections of code mentioned in the previous section are what we call gadgets. The word code is used here because it does not need to be an instruction used by the program or module; you may jump to an address in the middle of an intended instruction, or anywhere else in executable memory, as long as it performs the task you are looking to perform and returns execution to the next gadget pointed to by the stack pointer. The following example shows an intended instruction used inside of ntdll.dll at memory address 0x778773E2:
![]()
Watch what happens when we go from 0x778773E2 to 0x778773E3:
![]()
The sequence of code still ends with a return, but the instruction above the return has changed. If this code is meaningful to us, we can use it as a gadget. Because the next address pointed to by ESP or RSP on the stack is another ROP gadget, the return statement has the effect of calling that next sequence of code. Again, this method of programming is similar to ret2libc, and is actually the successor to it, as discussed in Chapter 11. With ret2libc, we overwrite the return pointer with the address of the start of a function, such as system(). In ROP, once we gain control of the instruction pointer, we point it to the location of the pointers to our gadgets and return through the chain.
Some gadgets include unwanted instructions in them for which we must compensate, such as a POP or other instruction that could negatively modify the stack or a register. Take a look at the disassembly:
![]()
In this example, we desire to have the EAX register zeroed out, followed by a return. Unfortunately, there is a POP EDI instruction in between. To compensate for this, we can simply add 4 bytes of padding onto the stack so that it doesn’t pop the address of our next gadget into EDI. If EDI has something we need in it, then this gadget may not be usable. Let’s pretend that the unwanted instruction in this gadget can be tolerated, and so we compensate by adding the padding onto the stack. Now, look at the following example:
![]()
In this example, we simply changed the POP EDI to a POP EAX. If our goal is to zero out the EAX register, then the unwanted POP EAX would make this gadget unusable. There are other types of unwanted instructions, some of which can be quite challenging to resolve, such as a memory address being accessed that is not mapped.
Building the ROP Chain
Using the Mona PyCommand plug-in from corelanc0d3r, we can find a list of recommended gadgets for a given module (-cp nonull is being used to ensure that no null bytes are used as part of the ROP chains):
![]()
The execution of this command results in the creation of several files, including the following:
• An rop_chains.txt file that has completed or semi-completed ROP chains that can be used to disable DEP, using functions such as VirtualProtect() and VirtualAlloc(). These chains can save you countless hours manually going through and building an ROP chain.
• An rop.txt file that contains a large number of gadgets that may be of use as part of your exploit. It is often uncommon for generated ROP chains to work straight out of the box. You will often find yourself looking for gadgets to compensate for limitations, and the rop.txt file can help.
• A file called stackpivot.txt, which will only contain stack pivot instructions.
• Depending on the version of Mona being used, other files may be generated, such as rop_suggestions.txt and XML files containing completed ROP chains. Also, the ROP chains generated may vary depending on the version of Mona you are using and the options you select.
More info about the function and its parameters can be found in the Mona usage page.
The rop command will take a while to run and will produce the output files to whatever folder you selected with Mona using the !mona config -set workingfolder <PATH>/%p command. The contents of the very verbose rop.txt file will include entries such as this:

From this output, you may chain together gadgets to perform the task at hand, building the arguments for VirtualProtect() and calling it. It is not quite as simple as it sounds; you have to work with what you have available. You may have to get creative. The following code, when run against the ProSSHD program, demonstrates a working ROP chain that calls VirtualProtect() to modify the permissions where the shellcode is located on the stack, so that it becomes executable. DEP has been turned back on for wsshd.exe. The script has been named prosshd_dep.py.
NOTE You may or may not need the # -*- coding: utf-8 -*- line.


Although following this program may appear to be difficult at first, when you realize that it is just a series of pointers to areas of linked modules that contain valuable instructions, followed by a RETN instruction that simply returns the next gadget, then you can see the method to the madness. There are some gadgets to load the register values (preparing for the call to VirtualProtect). There are other gadgets to compensate for various issues to ensure the correct arguments are loaded into the appropriate registers. When using the ROP chain generated by Mona, this author determined that when aligned properly, the call to VirtualProtect() is successfully made; however, upon return from SYSEXIT out of Ring0, we are returning too far down the stack and into the middle of our shellcode. To compensate for this, some gadgets were manually added to ensure EBP is pointing into our NOP sled. One could spend the time to line things up with precision so that so much padding is not necessary; however, that time can also be spent on other tasks.
In the following code, we are first popping the value 0xfffffcdf into EAX. When this gets added to the address in EBP that points into our shellcode, it will roll over 2^32 and point into our NOP sled.

To calculate this, all you need to do is some basic math to ensure that EBP points to a location inside the NOP sled. The final instruction performs this addition. To demonstrate the before and after, take a look at the following images.
In this first image, the program is paused before the adjustment to EBP. As you can see, EBP points into the middle of the shellcode. The next image shows the address of where EBP is pointing after the adjustment has been made.

As you can see, EBP points to our NOP sled, just before the shellcode. The shellcode used in the exploit, generated with Metasploit, binds a shell to port TCP 31337. When the exploit is allowed to continue, the shellcode is successfully executed and the port is open, as shown here.
Defeating ASLR Through a Memory Leak
In the prior example, getting around ASLR was trivial. Let’s take a look at a more complex example of defeating ASLR by exploiting a memory leak bug. This bug comes from Ivan Fratric of Google’s Project Zero team and was assigned CVE-2017-0059, available at www.cve.mitre.org/cgi-bin/cvename.cgi?name=CVE-2017-0059. The bug was reported to Microsoft on January 10, 2017, and trigger code was made available publicly on March 20, 2017, once Microsoft released a patch. Fratric stated the following in the release: “There is a use-after-free bug in IE which can lead to info leak / memory disclosure.”5 Per Microsoft, the bug affects Internet Explorer 9 and 11. We will use IE 11 in this walkthrough.
After working through this bug for Gray Hat Hacking, Fifth Edition in early 2017, we discovered that in July 2017, Claudio Moletta had done some fantastic work combining this bug with a type confusion bug, also discovered by Ivan Fratric to demonstrate full code execution.6 The second bug is a type confusion bug that allows full control of the instruction pointer.7 It is highly recommended that you take a look at the fully working exploit put together by Claudio once you work through this first bug. We will do a detailed walkthrough of the use-after-free memory leak bug showing the complexities involved in browser object and text allocations. Various trigger code files are provided in the event you wish to try walking through this bug on your own. You will need an unpatched version of Windows 7 x64 running IE 11 Version 11.0.9600.18537. Debugging Tools for Windows 8.0 was used for debugging, as coalescing behavior in Windows 10 Debugging Tools was interfering with the use of PageHeap functionality.
If you have trouble locating a Windows 7 x64 VM, Microsoft provides some for various forms of testing web applications at the following location: https://developer.microsoft.com/en-us/microsoft-edge/tools/vms/. You would then need to revert back to the following Internet Explorer update before the bug was patched by Microsoft: https://www.catalog.update.microsoft.com/search.aspx?q=kb3207752.
Triggering the Bug
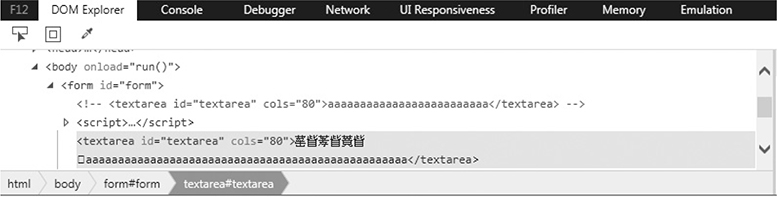
Let’s first take a look at the trigger code provided by Ivan Fratric:

We’ll start with the HTML at the bottom. A Text Area object is being created with an ID of textarea. The cols="80" attribute sets the size, in characters, of the visible text area, and it’s being filled with a value of 25 lowercase a’s. Inside of MSHTML.DLL exists the CTextArea class:
![]()
The disassembly within the CreateElement member function of CTextArea shows a call to HeapAllocClear with an object size of 0x78 bytes, and it allocates the object into the Isolated Heap, as shown here:

This behavior is part of the MemGC and Isolated Heap exploit mitigations introduced into MSHTML.DLL by Microsoft, which greatly mitigates the exploitability of use-after-free bugs. In Fratric’s disclosure he stated, “Note: because the text allocations aren’t protected by MemGC and happen on the process heap, use-after-free bugs dealing with text allocations are still exploitable.”4 As we work our way through the bug, you will see that text allocations are allocated into the default process heap and do not utilize protected free, which gets us around MemGC.
In the trigger, also at the bottom in the HTML, you can see that the function run is executed immediately as the page loads. A form element is also created with an ID of "form". Let’s move on to the run function, which consists of the following:

First, the JavaScript document.getElementById method is used to get the Text Area element and assign it to a variable called textarea. An iframe object is then created and assigned to a variable named frame. The iframe object is then appended to the textarea node as a child. Next is the line frame.contentDocument.onreadystatechange = eventhandler;. First, let’s talk about the readystate property of a document. While a document is loading, it can be in one of several states: loading, interactive, and full. “When the value of this property changes, a readystatechange event fires on the document object.”8 So when a “ready state change” event occurs on the iframe object, the eventhandler function is called. The form.reset() call will reset all values. This results in a state change to the frame node and the calling of the eventhandler function. Let’s take another look at the eventhandler function:

This function changes the value property of the textarea object to the string “foo.” It’s followed with an alert to the screen that says, “Text value freed, can be reallocated here.” For some reason, resetting the values of the form, followed by setting the text of the textarea object to something else, results in a memory leak. As you will see, the text displayed in the browser window inside the textarea object after the call to eventhandler does not show the text “foo” and instead shows some garbled information followed by the old a’s. As Fratric suggested, allocating memory after the value property is changed to “foo” inside the eventhandler function could result in memory allocations to freed memory associated with the textarea value that is still referenced. If we can replace it with something useful, then perhaps the memory leak could be meaningful. We are jumping ahead of ourselves and speculating a bit here, but now we need to confirm our assumptions and work toward an ASLR bypass.
Let’s run the original trigger code from Ivan Fratric. The file is named trigger.html. Here are two images. The first one shows the browser window before the alert is clicked, and the second shows the browser window after the alert is clicked.

Clearly, after the OK button on the alert is clicked, the result is abnormal. It shows what looks to be part of a function name. When we refresh again and then click OK, we get the following result, which appears to be some strange characters, followed by some a’s.

Let’s turn on PageHeap and run the trigger file again. We first navigate to c:Program Files (x86)Windows Kits8.0Debuggersx86> from an Administrator command shell and execute the command gflags.exe /p /enable iexplore.exe /full. This turns on PageHeap, which tracks memory allocations on the heap with much more detail. More information about the inner workings of PageHeap can be found at https://docs.microsoft.com/en-us/windows-hardware/drivers/debugger/gflags-and-pageheap. In this same command prompt session we also run windbg.exe -I. This will set WinDbg as our postmortem debugger. With PageHeap now running for IE 11 and our postmortem debugger set up, we are ready to run the trigger file. This time WinDbg pops up with the following result (note that we had to refresh the browser screen once to get the debugger to catch the exception):

The crash occurred at the msvcrt!wcscpy_s+0x46 location on the instruction movzx eax,word ptr [esi]. This is the Move with Zero-Extend instruction, which should be loading the WORD of memory pointed to by ESI into the 32-bit EAX register. ESI is pointing to unmapped or freed memory, noted by the ????, resulting in the crash. This is typical behavior of a use-after-free bug. The following shows the result of using the k command to dump the call stack. Only the first few hits are shown:

In the function names are mentions of DoReset and InjectInternal, which could lead one to believe that this might be the result of the form.reset() JavaScript code and the setting of the default value to “foo,” but we have not verified anything at this point.
Next, let’s take a look at the memory pointed to by ESI with the WinDbg extension command !heap -p -a esi:
We can see that the function MSHTML!BASICPROPPARAMS:SetStringProperty made a call to HeapReAlloc. The HeapReAlloc function is used to resize an existing chunk of memory. The behavior typically results in a call to the function memmove from inside NTDLL. The old location of the chunk is then freed. Let’s turn off PageHeap using our Administrator command shell with gflags.exe /p /disable iexplore.exe.
Tracing the Memory Leak
The next trigger file we will work with is trigger_with_object.html. Let’s take a look at the source code and see what we are doing:


You need to take note of a couple of important changes. First, we increased the number of a’s in the value property of the textarea object. Increasing and decreasing the number of bytes changes the allocation size. This has an effect on what ends up replacing the freed memory. Feel free to experiment with changing the size of this field and examine the result. The type of object you create in the eventhandler function after the value is set to “foo,” and its resulting allocations, has a direct correlation to the size of the value property for the textarea object. This requires experimentation to understand fully. We have also added a button to the screen that calls the function setBs. This function simply changes the value property to a set of B’s. You could also use innerHTML, but value is per the specification. Next, take a look back up at the eventhandler function to see the object we are creating. You should notice the following two new lines:
![]()
We are simply creating an object instance of an HTML INPUT element and setting it to a type of range. When attempting to replace the freed memory involved in the use-after-free, we tried many objects/elements. Some of them resulted in the ability to control the memory leak and others failed. The creation of HTML objects results in their allocation ending up in the Isolated Heap. Some of the properties of these elements result in allocations of various types in the default process heap. A large number of attributes and properties are associated with a large number of HTML elements. The way that allocations work requires you to spend a lot of time disassembling and debugging. Sometimes the allocations intentionally being made to try and leak something useful are unrelated to what we actually end up accessing. Although that is a bit of a strange sentence, the freed memory may be taken by something completely unrelated to your memory allocations, or at least indirectly related. A couple of alerts can also be seen in the preceding source code so that we can attach with the debugger accordingly.
We will now walk through the execution of this script inside of WinDbg. The selected breakpoints were based on looking at the call stack during the crashes, using PageHeap and analyzing chunks in memory, and reversing MSHTML.DLL in IDA. We will first open up the trigger_with_object.html file in IE 11. We get a pop-up alert that says, “Before Creation of Text Area Object: Attach and Set Breakpoints.” We then open up WinDbg and press F6 to attach to the Internet Explorer process, as shown here.
Notice that we are attaching to the bottom of two iexplore.exe processes. By starting IE with a single tab open, two processes are started automatically. This goes back to IE 8, where Microsoft split the control of the broker, used by IE protected mode, and the frame from the individual tabs. This was primarily used to help improve the user experience by preventing errors from crashing the whole browser and allowing for auto-recovery. If you open a second tab, another process should be created. Regardless, for our purposes, just know that we need to attach to the lower instance.
Now that we are attached, let’s add the following breakpoints:

We cover each breakpoint in the following list:
• MSHTML!CTextArea::CreateElement+13 This is set for the return from the call to HeapAlloc. Examining EAX at this point will show us the address of the textarea object.
• MSHTML!BASICPROPPARAMS::SetStringProperty If you recall from earlier, this function is seen in the call chain of the object involved in the use-after-free. It leads to the call to HeapReAlloc and a likely free.
• MSHTML:CTxtPtr::InsertRange This function leads to a memcpy call that copies the a’s from an initial memory allocation associated with the textarea object to the destination where it displays on the screen in the browser.
• MSHTML!CStr::_Alloc+0x4f We use this breakpoint to track some BSTR allocations made that will store our a’s. We’ll then see that one or more of these allocations are freed, reallocated with our object, and involved in the use-after-free. You may need to double-check the offset to ensure that it matches up with the expected test eax, eax instruction.
• bm MSHTML!_HeapRealloc<0> We use the “break match (bm)” option because the function name has special characters. We will only use this breakpoint once to track the object being freed.
• urlmon!CoInternetCreateSecurityManager This breakpoint is associated with the INPUT object we are creating. This function will lead to an allocation that ends up storing a virtual function table pointer that we’ll eventually use to bypass ASLR.
• ole32!CoTaskMemAlloc+0x13 This is the actual moment of allocation related to the preceding breakpoint. The offset is when the pointer to the allocation is returned. The addresses of the allocations should match up to the earlier allocations from MSHTML!CStr::_Alloc, showing that they are involved in the use-after-free.
We will be enabling and disabling these breakpoints at various points in order to debug efficiently. Next, let’s issue the command bl to list out our breakpoints, then disable all of them with bd *, and then enable breakpoint 0 and 1 with the command be 0 1. We then tell the debugger to continue execution by pressing F5 or entering g.
With the breakpoints set and IE 11 running in the debugger, we then click OK on the alert pop-up. We instantly hit breakpoint 0 on MSHTML!CTextArea::CreateElement+0x13:

At this point, inside EAX is the memory address 0x03018300, which is the textarea object just after creation. At this point we want to enable breakpoint 2 for MSHTML!CTxtPtr::InsertRange so that we can track the copying of the a’s from an allocation associated with the textarea element. After enabling this breakpoint with be 2, we press F5 twice to hit breakpoint 2 a second time. Once we hit the breakpoint, we hold down F8 to single-step until we reach the call to memcpy, as shown here:

You can see we have reached the call from MSTHML!CTxtPtr::InsertRange to memcpy_s. The EAX register holds the address 0x0050dafa, which is the destination address for where the a’s will be written. The following shows the memory at the address before the completion of the memcpy_s function, followed by the gu command to step out of the function, and then another dump:
You can see that our a’s were copied into memory. This is the actual address of the a’s that you can visibly see in the browser windows. This will become apparent soon when the memory leak occurs. Next, we disable breakpoint 2 and enable breakpoint 3 for MSHTML!CStr::_Alloc+0x43. We also need to set a “break on access” breakpoint on the address of where the a’s were just written because this location is important for the memory leak. We need to subtract 2 bytes from the address 0x0050dafa so that it is 4-byte aligned. After making these changes, we list out the breakpoints to verify they are correct.
You can see whether the breakpoints are enabled or disabled by the e or d, respectively, next to the breakpoint number. We are ready to continue execution with F5. We instantly hit the breakpoint on MSHTML!CStr::_Alloc+43. For whatever reason, even though we put the breakpoint in as +4f, it shows as +43. You can disregard that for now because it still looks to be breaking on the appropriate location of the test eax, eax instruction. Let’s record the 0x04ec71b8 address held in EAX because it will also store our a’s, to be shown in a moment. After executing gu a couple of times, our a’s show up at the address. This chunk address is important because it will get reallocated shortly due to the eventhandler function.
Also, note the following disassembly for the memory allocation performed by CStr:_Alloc:
![]()
The allocations are using the process heap, and tracing execution shows that MemGC is not protecting the allocations. Next, we continue execution in the debugger and immediately hit the MSHTML!CStr::_Alloc+43 breakpoint again:

We record the address of 0x04ec74b8 stored in EAX because it also is related to the prior hit on this breakpoint and our source code. Next, we disable breakpoint 3 and continue execution. After continuing execution, we reach the breakpoint on MSHTML!BASICPROPPARAMS::SetStringProperty, which is reached while inside the eventhandler function triggered by the form.reset() state change:

This is just before the text area default value is set to “foo.” We will now enable the breakpoint for MSHTML!_HeapRealloc<0>. This causes execution to pause when realloc is called on the initial chunk allocated by MSHTML!CStr::_Alloc to be resized.

As you can see, EAX holds the address 0x04ec71bc, which is the same address as the initial chunk we tracked from MSHTML!CStr::_Alloc. Actually, it is a couple of bytes off, but that is simply due to alignment. The next output shown is after we hold the F8 key down for a few seconds, carefully stopping as soon as we see the call to memmove reached.

A few instructions into the memmove function, the source and destination arguments are loaded into ESI and EDI. In EDI is the destination address for the resized chunk that will eventually get set to “foo.” ESI holds the address of the chunk we just saw in the realloc call. Let’s use the !heap command to check the status of the source chunk before the move, and then again after we step out of these function calls:
You can see that the chunk is now free and available for reallocation. If you track the other chunk we saw allocated from the MSHTML!CStr::_Alloc function, you’ll see that it is also freed at various points. We will continue by enabling the breakpoint on urlmon!CoInternetCreateSecurityManager:


We are hitting this breakpoint due to the OBJECT we are creating after the freeing of the preceding object, along with setting it to the type range. We now must enable the breakpoint on ole32!CoTaskMemAlloc+0x13 to track the address being used for allocation:
The address in EAX should look familiar. It is the chunk address we have been tracking thus far. Let’s dump out the contents, followed by stepping out of a couple of functions, and then dump it again:
Take a look at the addresses at the top of the chunk. They are 0x7725442c, 0x77254504, 0x772544d4, and 0x77254514. Let’s run the dt command on these addresses to see what they are:
Pointers to various CSecurityManager virtual function tables have been written, as well as a pointer to the CSecurityManager::CPrivUnknown table. Let’s continue execution, where you may see the same VTable information written to other locations:
Note that we hit the “break on access” breakpoint we created early on, where our a’s were originally written to the visible window in the browser user interface. This address is 0x0050dafa and is stored in the EDI register at this breakpoint. The address in the ESI register is the object we have been tracking all along that was freed after the realloc call. You may actually hit this breakpoint multiple times. After dumping contents of the address after each break on memcpy associated with that address, we finally get the preceding output. After entering gu to step out of this last memcpy call, we get the following result:

After letting the process continue, we look back at the browser window and see the result shown here.

The Chinese characters are the displayed result when the VTable address is converted from Unicode, but we know what they really are! As a final validation, we will click the “Replace Text With B’s” button. We hit our breakpoint:

You can see here that we hit the breakpoint, caused by clicking the alert button. We dump out the memory at the breakpoint to show that it is unchanged, followed by a gu, and then another dump. You can see that our B’s have been written to the address. Allowing execution to continue results in the following result in the browser window.

When inspecting the element in the browser, we get the result shown next.
We need to get the Unicode of the characters printed onto the screen and convert it to hexadecimal so that we can see if it matches what we are expecting to see. We have confirmed and tracked the memory leak bug, so now let’s move on to weaponizing it!
Weaponizing the Memory Leak
We are now at the point where we need to add some simple lines of JavaScript in order to utilize the leaked address. We first want to confirm that we are able to successfully access and convert the Unicode to a hexadecimal value. We then need to locate the RVA offset and subtract it from the leaked address to get the base address. Once we do that, we can use mona.py from corelanc0d3r—or another tool, such as Ropper by Sascha Schirra—to generate an ROP chain based on the RVA offsets.
We will use the file Leaked_urlmon.html for this next run. First, let’s look at the addition of the printLeak function that will convert our leaked address:
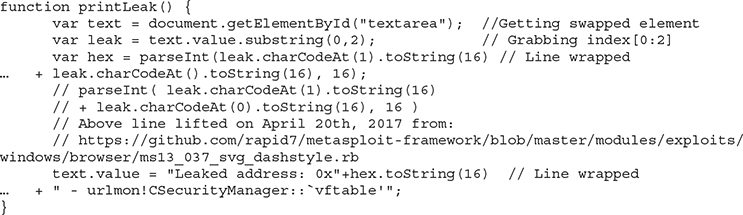
Let’s go through each line. Here’s the first one:
![]()
This line simply gets the textarea element based on its ID and assigns it to the variable text. In the second line, we are creating a variable called leak and accessing the first two Unicode characters printed on the page:
![]()
The first character we saw earlier was ![]() . Let’s use an online converter to print out the hexadecimal value for that character. We will use the converter at https://unicodelookup.com. The result is shown here.
. Let’s use an online converter to print out the hexadecimal value for that character. We will use the converter at https://unicodelookup.com. The result is shown here.
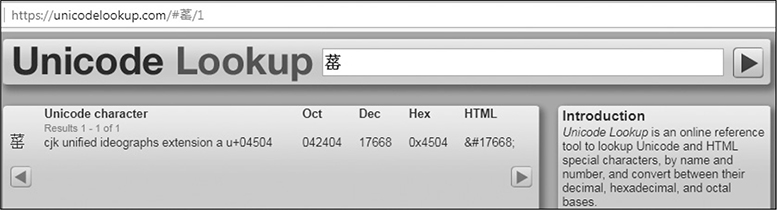
As you can see, the hexadecimal value is 0x4504. When we convert the first two characters, ![]() and
and ![]() , we get the following in Unicode Lookup.
, we get the following in Unicode Lookup.

The hex value for the two values concatenated is 0x77254504. Until we reboot the system and the DLL is rebased, this address will remain the same. Let’s take a look inside the debugger to confirm this address:
![]()
Let’s also analyze the address:
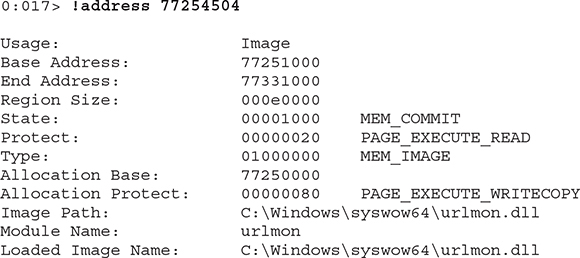
We can see that the address belongs to urlmon.dll and that the base address is 0x77250000, making the RVA offset 0x4504. Now back to the line of code we were looking at:
![]()
This code simply assigns the first two Unicode values that we just looked at to the variable leak. Here’s the next line:
![]()
As shown in the comment in the source code, this line was lifted from https://github.com/rapid7/metasploit-framework/blob/master/modules/exploits/windows/browser/ms13_037_svg_dashstyle.rb on April 20, 2017. It simply takes the leak variable and converts it from Unicode to hexadecimal in reverse order so that the value is 0x77254504 and not 0x45047725, due to the storage in memory. The following is the last line in the printLeak function:
![]()
Here, we are simply setting text.value or “innerHTML” to the leaked and converted hexadecimal address so that it is displayed in the textarea location on the screen. Next to it we print “urlmon!CSecurityManager:`vftable’” because we confirmed this to be the destination of the leaked pointer.
In the HTML source, we also created a CButton that executes the printLeak function when it is clicked. The following images show the result before and after the button is clicked, respectively.
Everything looks to be in order. Let’s add and modify the following to subtract the RVA offset of 0x4504 to calculate the base address:
![]()
The following is the result on the screen in the browser.

Building the RVA ROP Chain
Our final effort in this chapter is to use mona.py from corelanc0d3r to generate an RVA ROP chain. Though Mona is available for WinDbg, we will use Immunity Debugger from Immunity Security. With Immunity Debugger attached to IE 11, we execute the following command to generate the ROP chain:
![]()
The following is an example of one of the generated ROP chains for VirtualProtect:

It looks like all but one gadget was found. We are missing the gadget to put 0x201 into EBX to serve as the size argument to VirtualProtect. This can easily be resolved by looking for gadgets to compensate. At quick glance, the following gadgets were manually found and could be added:
There are likely many ways to accomplish that goal. In this example, you would need to reorder the gadgets because EAX needs to dereference the IAT entry for VirtualProtect and then exchange it with ESI, as shown in the first portion of the ROP chain. For now, we’ll just take the ROP chain with the unresolved gadget and add it to our memory leak HTML file to demonstrate the point. The following script is partially unnecessary; however, it has been created as such so that you can visually see how the RVA offsets are added to the recovered base address. Here is part of the updated Final_leaked.html file:
As you can see, we are creating our gadget variables using the leaked base address and the RVA offsets from Mona. Another button was created that prints out the generated ROP chain after the memory leak. Again, this is totally unnecessary, but it shows you how the final addresses are calculated. The following images show the results, with the final one showing the full ROP chain.


At this point, we need only fix the one ROP gadget, as previously described, and then combine it with another bug that gets control of the instruction pointer. This is left as an exercise for the reader, and this author highly recommends taking a look at the previously mentioned work of Claudio Moletta.
Summary
This chapter provided a brief introduction to a couple of common exploit mitigations: DEP and ASLR. We then took the SSH exploit from Chapter 13 and modified it to disable DEP using a ROP chain generated with Mona that gets around ASLR by using a non-rebased module. Finally, we took a detailed look at a full ASLR bypass through the use of a memory leak bug in IE 11 discovered by Ivan Fratric. We weaponized it into a working example to bypass DEP in a situation when all modules are rebased. Techniques such as these are fairly standard nowadays, and as the mitigations improve, new techniques will be required.
For Further Reading
“Windows 10 Mitigation Improvements” https://www.blackhat.com/docs/us-16/materials/us-16-Weston-Windows-10-Mitigation-Improvements.pdf
References
1. skape and Skywing, “Bypassing Windows Hardware-enforced Data Execution Prevention,” October 2, 2005, www.uninformed.org/?v=2&a=4&t=txt.
2. Ken Johnson and Matt Miller, “Exploit Mitigation Improvements in Windows 8,” BlackHat, August 2012, media.blackhat.com/bh-us-12/Briefings/M_Miller/BH_US_12_Miller_Exploit_Mitigation_Slides.pdf.
3. Microsoft, “Microsoft Security Intelligence Report, Volume 12,” MSDN, December 2011, www.microsoft.com/en-us/download/confirmation.aspx?id=29569.
4. Swiat, “Moving Beyond EMET,” TechNet, November 2016, https://blogs.technet.microsoft.com/srd/2016/11/03/beyond-emet/.
5. Ivan Fratric, “Microsoft IE: textarea.defaultValue Memory Disclosure,” blog.chromium.org, March 2017, https://bugs.chromium.org/p/project-zero/issues/detail?id=1076.
6. Claudio Moletta, “IE11 Exploit for Windows 7 x64,” Redr2e, July 2017, https://redr2e.com/cve-to-exploit-cve-2017-0037-and-0059/.
7. Ivan Fratric, “Microsoft Edge and IE: Type Confusion in HandleColumnBreakOnColumnSpanningElement,” blog.chromium.org, February 2017, https://bugs.chromium.org/p/project-zero/issues/detail?id=1011.
8. anonyco, “Document.readyState,” Mozilla Developer’s Network, May 2017, https://developer.mozilla.org/en-US/docs/Web/API/Document/readyState.