
Chapter 4 Outline
One of the most important ways to enhance group discussion is to record participants’ comments publicly. This technique is known as “graphic facilitation,” because you use graphics—such as notes on flipcharts or boards—in addition to words (known as “verbal facilitation”). This section covers deciding (1) whether to record ideas, (2) what equipment to use, and (3) how to use frameworks and headings.
MEETING PLANNING CHECKLIST |
|---|
1. Why meet? Define your purpose and choose your channel. |
2. Who to include? Select and analyze the participants. |
3. What to discuss? Orchestrate the roles and set the agenda. |
4. How to record ideas? Plan for graphic facilitation. |
5. Where to meet? Plan for technology and logistics. |
When most people think about meeting faciltation, they think of “verbal facilitation”—that is, what you say during the meeting to generate discussion (such as asking open questions, paraphrasing participant responses, etc.). These verbal facilitation skills are covered on pages 58–67.
We encourage you, however, to consider adding a second set of skills to your repertoire, known as “graphic facilitation”—that is, what you write during the meeting (such as notes taken on flipcharts or boards) to publicly record what participants say.
Graphic facilitation is arguably one of the most underutilized aspects of effective meeting management. This is unfortunate, because it allows a group to achieve the competing goals of speed and inclusiveness (described on page 11)—in addition to the following benefits:
Accuracy: Recording ideas publicly ensures an accurate record of what was said.
Morale: Recording ideas makes people feel heard and appreciated, even if their ideas are rejected later on.
Links: Recording ideas also encourages participants to see links between one another’s comments and to build on or react to one another’s ideas.
Timing control: Recording people’s points tends to discourage them from talking too long or repetitively.
Permanent record: From your charts, you can later come up with a permanent record, either electronically if you have an electronic board or by minutes based on the charts.
Action plans: The written display of ideas helps participants identify future action plans emerging out of those ideas.
Despite all of these benefits, meeting facilitators often wander into the meeting room having given no advance thought to graphic facilitation. In such cases, they may:
Find the wrong equipment, or no equipment, available;
Waste time preparing and writing as the participants sit and wait;
Squander opportunities to make their meetings more successful.
Therefore, it’s in your best interests to plan your “visual aids” for graphic facilitation in advance, just as you would plan your visual aids for a formal presentation in advance.
Give some thought to what equipment would be most effective in your meeting. Before you decide on what equipment to use, (1) find out if a certain type of equipment is preferred or expected by the participants, their organization, or their culture; (2) think about the size of your group and your room, and be sure to choose something that can be read by all participants; and (3) consider the characteristics intrinsic in the various kinds of equipment, described below.
Flipcharts are a popular choice for recording group discussions in meetings. An advantage of flipcharts over boards is that you can take flipchart pages with you for a permanent record of the session. In addition, flipcharts tend to elicit a great deal of group discussion because they:
Are “low tech”—therefore nonthreatening and unintimidating to low tech participants and devoid of electronic problems;
Allow for a brightly lit room;
Make it easy to use color to increase visual interest;
May be attached to the walls for easy viewing and further discussion—using tape, tacks, static-cling, or adhesive post-it paper.
Boards may encourage group discussion because, like flipcharts, they are low-tech, unintimidating, and allow for a brightly lit room. However, boards must be erased to regain free space, they do not provide hard copy, and they may appear “schoolish” and unprofessional to some participants.
Some electronic “copy boards” are used in face-to-face meetings; they look like traditional boards, with the added advantage that they can print hard copy of what you write on them, so you can keep a permanent record. Another kind of electronic board is used in electronic meetings; these can be annotated in one location and simultaneously viewed on computer screens in multiple locations. Such boards are capable of providing digitized hard copy of document computer files and two-dimensional objects.
In some electronic meetings, people participate not by talking, but by writing on electronic “live boards” from their computers. Unlike copy boards, they can be annotated from multiple locations and they may also have application-sharing capabilities.
You might also choose to use “still” projectors (either an overhead projector or a document camera) to record people’s ideas. Projectors can be effective because of enhanced visibility, due to the large screen and to your ability to make the words larger by moving the projector closer to the screen. The problems with projectors include: (1) you must usually dim the lights, which may decrease audience interaction; (2) some participants may associate projectors with a formal presentation, which may decrease their participation; and (3) the projector sits in front of the screen with you next to it, possibly blocking someone’s view.
The two kinds of projectors have different preparation requirements. If you use an overhead projector, be sure to bring special acetate sheets and special markers, which are not the same as regular marking pens. If you choose a document camera, you can use regular paper and pens; however, their resolution is not as high as that of an overhead projector.
Another option is to use handouts before, during, or after the meeting—either using email, which can be distributed faster and does not waste paper, or using hard copy, which has high resolution and can be more attractive in appearance and feel.
Handouts before the meeting: Since you want to elicit participants’ most thoughtful and informed thoughts, distribute any handouts or background information before the meeting, as a part of the agenda. These advance handouts provide an opportunity for participants to annotate them, thus combining their ideas with yours. You might want to bring extra copies along with you in case participants misplace theirs.
Handouts during the meeting: If you have information that you do not want people to read in advance and that is too detailed or complex to show on a chart or board, use a handout. However, remember that people tend to read whatever is in front of them, so distribute new handouts only when you want them to be read. After you distribute them, either give the participants time to read them and/or direct their attention (referring to page numbers or exhibit numbers, if applicable) to the points you wish to discuss.
Summary handouts after the meeting: On page 23, we discussed the importance of providing a summary handout, usually called meeting minutes, and of possibly delegating that task. This crucial summary reminds participants about what was said, allows them to keep these ideas on file, and encourages follow-up actions.
Another option is to use computer projection, together with computer graphics software, such as PowerPoint. Computer graphics allow you to create polished and dramatic images easily, but invite visual overload and overuse of animation bells and whistles. In general, such graphics are more effective in formal presentations, when you are doing most of the talking, than in meetings, when the participants are doing most of the talking—for the obvious reason that you cannot record on them in real time. You might, however, wish to use computer graphics to introduce or explain ideas before the discussion starts. On the other hand, if you can present the information just as effectively using a handout or chart, then choose the simple medium and leave the computer turned off. By turning the projector off, you can spend more time focusing on and interacting with the participants.
The table on the following page provides a quick reference to help you select the appropriate equipment for using graphics for meeting facilitation.
EQUIPMENT FOR GRAPHIC FACILITATION | ||
|---|---|---|
Equipment | Advantages | Disadvantages |
Flipcharts | Unintimidating, no electronic problems, allow bright lights, may be attached to walls, provide hard copy | May seem too low-tech, clumsy to transport |
Boards | Unintimidating, no electronic problems, allow bright lights | Must be erased to regain space, no hard copy, may appear “schoolish” |
Electronic boards | Provide hard copy, some can be viewed in multiple locations | Must be erased to regain space |
Live boards | Can be annotated from multiple locations | Must be erased to regain space |
Overhead projectors | Good visibility, can make words bigger | Need dimmed lights, may be associated with formal presentations, projector may block view |
Handouts | Can be distributed in advance, can be used for reference or note taking, can be used for summary | Can be lost, hard to control when people read them, can be distracting |
Computer projectors | Allow for polished and dramatic images, may be used to introduce or explain ideas | Do not allow for real-time annotation of group ideas, may emphasize the graphics over the discussion |
Once you have selected your equipment, a little advance thought about design and headings can improve participation enormously.
One design issue to consider in advance is that of a visual framework. Visual frameworks enhance discussion because participants can see the relationship among ideas visually and are reminded of those relationships throughout the meeting. The chart on the following page illustrates several possible design options you might use to enhance group discussion. (See the Howell book in the bibliography, page 89, for much more on visual frameworks.)
Another design issue has to do with color. A little bit of color goes a long way toward making meetings more visually stimulating and graphically attractive for the participants. Color also allows you (or the scribe) to emphasize certain ideas—such as headings, summary phrases, or vote tallies. To use color effectively:
Plan your equipment. Use either flipcharts, a white board, or an overhead projector. Be sure to have the correct kind of markers for the equipment and to check each marker in advance.
Choose dark, cool colors. Usually, dark, cool colors—such as black, blue, and green—show up the best. Avoid warm, light colors—such as yellow and orange—because they often cannot be seen.
Use color consistently, rather than randomly. For example, you might: (1) use one color to write up your main headings in advance, then another color to record participant ideas during the meeting; (2) use green to record ideas in an “Advantages” column and red to record ideas in the “Disadvantages” column; or (3) use one color to record various options, and a contrasting color to tally votes for each one.
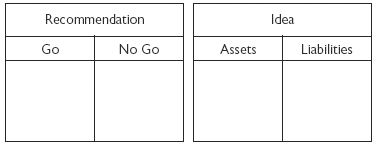
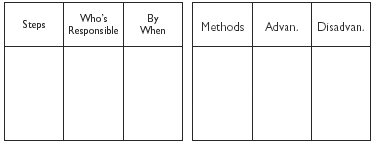
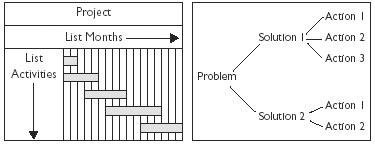
POSSIBLE VISUAL FRAMEWORKS | |
|---|---|
Adapted from J. Howell, Tools for Facilitating Meetings | |
T Chart |
|
TT Chart |
|
Matrix Chart |
|
Sequence Chart |
|
Gantt Chart/Tree Diagram |
|


A third way to enhance your ability to record ideas has to do with giving some advance thought to your headings. The headings you write on the board or charts are crucial to participant understanding and participation. Therefore, compose headings that:
Make the topic clear: Since you want participants to offer ideas, each heading should keep them reminded of exactly what content they are discussing (e.g., what you are listing on a certain chart). Imagine a meeting participant whose attention wanders or who needs to leave the meeting momentarily or who joins the meeting late. Such participants should be able to tell the topic of discussion simply by looking at the heading.
Make the discussion process clear: Those same imaginary participants should also be able to tell at a glance what kind of discussion process is underway; for example, “Brainstormed List of New Names,” “Desired Project Outcomes,” “To Do,” or “What Are the Current Problems?”
Are written up in advance: Once you decide in advance what your visual framework and main headings are going to be, write them up in advance. For example, provide a blank matrix chart with each criterion summarized across the top and each job candidate’s name listed down the side, or outline a TT chart with various options to be discussed listed across the top. By doing so, you can avoid wasting time by writing them during the meeting itself and encourage people who arrive early to start thinking about the agenda items. Leave space to fill in ideas as they are generated; for example, you might write three different topics for brainstorming at the top of each of three different flipchart pages.
Tie to the agenda: Participants should find it easy to glance back and forth between the agenda and the headings to track exactly where you are in the discussion. Therefore, use exactly the same wording and organization on your charts as you used in your agenda. Participants should also be able to see the meeting agenda at all times during the meeting. Either refer to their paper copy of the agenda or make the agenda visible (e.g., post it on an extra flipchart or project it on an extra overhead located at the side of the room).