
Chapter 9
Network Infrastructure Systems
In This Chapter
![]() Selecting tools
Selecting tools
![]() Scanning network hosts
Scanning network hosts
![]() Assessing security with a network analyzer
Assessing security with a network analyzer
![]() Preventing denial-of-service and infrastructure vulnerabilities
Preventing denial-of-service and infrastructure vulnerabilities
To have secure operating systems and applications, you need a secure network. Devices such as routers, firewalls, and even generic network hosts (including servers and workstations) must be assessed as part of the security testing process.
There are thousands of possible network vulnerabilities, equally as many tools, and even more testing techniques. You probably don’t have the time or resources available to test your network infrastructure systems for all possible vulnerabilities, using every tool and method imaginable. Instead, you need to focus on tests that will produce a good overall assessment of your network — and the tests I describe in this chapter produce exactly that.
You can eliminate many well-known, network-related vulnerabilities by simply patching your network hosts with the latest vendor software and firmware updates. Because many network infrastructure systems aren’t publicly accessible, odds are good that your network hosts will not be attacked from the outside. You can eliminate many other vulnerabilities by following some solid security practices on your network, as described in this chapter. The tests, tools, and techniques outlined in this chapter offer the most bang for your security assessment buck.
 The better you understand network protocols, the easier network vulnerability testing is because network protocols are the foundation for most information security concepts. If you’re a little fuzzy on how networks work, I highly encourage you to read TCP/IP For Dummies, 6th Edition, by Candace Leiden and Marshall Wilensky. TCP/IP For Dummies is one of the original books that helped me develop my foundation of networking concepts early on. The Request for Comments (RFCs) list on the Official Internet Protocol Standards page,
 www.rfc-editor.org/search/standards.php, is a good reference as well.
Understanding Network Infrastructure Vulnerabilities
Network infrastructure vulnerabilities are the foundation for most technical security issues in your information systems. These lower-level vulnerabilities affect practically everything running on your network. That’s why you need to test for them and eliminate them whenever possible.
Your focus for security tests on your network infrastructure should be to find weaknesses that others can see in your network so you can quantify and treat your network’s level of exposure.
 Many issues are related to the security of your network infrastructure. Some issues are more technical and require you to use various tools to assess them properly. You can assess others with a good pair of eyes and some logical thinking. Some issues are easy to see from outside the network, and others are easier to detect from inside your network.
When you assess your company’s network infrastructure security, you need to look at the following:
- Where devices, such as a firewall or an IPS, are placed on the network and how they’re configured
- What external attackers see when they perform port scans and how they can exploit vulnerabilities in your network hosts
- Network design, such as Internet connections, remote access capabilities, layered defenses, and placement of hosts on the network
- Interaction of installed security devices, such as firewalls, intrusion prevention systems (IPSs), antivirus, and so on
- What protocols are in use, including known vulnerable ones such as Secure Sockets Layer (SSL)
- Commonly attacked ports that are unprotected
- Network host configurations
- Network monitoring and maintenance
If someone exploits a vulnerability in one of the items in the preceding list or anywhere in your network’s security, bad things can happen:
- An attacker can launch a denial of service (DoS) attack, which can take down your Internet connection — or your entire network.
- A malicious employee using a network analyzer can steal confidential information in e-mails and files sent over the network.
- A hacker can set up back-door access into your network.
- A contractor can attack specific hosts by exploiting local vulnerabilities across the network.
Before assessing your network infrastructure security, remember to do the following:
- Test your systems from the outside in, and the inside in (that is, on and between internal network segments and demilitarized zones [DMZs]).
- Obtain permission from partner networks to check for vulnerabilities on their systems that can affect your network’s security, such as open ports, lack of a firewall, or a misconfigured router.
Choosing Tools
As with all security assessments, your network security tests require the right tools — you need port scanners, protocol analyzers, and vulnerability assessment tools. Great commercial, shareware, and freeware tools are available. I describe a few of my favorite tools in the following sections. Just keep in mind that you need more than one tool because no tool does everything you need.
If you’re looking for easy-to-use security tools with all-in-one packaging, you get what you pay for most of the time — especially for the Windows platform. Tons of security professionals swear by many free security tools, especially those that run on Linux and other UNIX-based operating systems. Many of these tools offer a lot of value — if you have the time, patience, and willingness to learn their ins and outs. It’d behoove you to compare the results of the free tools with that of their commercial counterparts. I’ve definitely found some benefits to using the latter.
Scanners and analyzers
These scanners provide practically all the port scanning and network testing you need:
- Cain & Abel (
www.oxid.it/cain.html) for network analysis and ARP poisoning - Essential NetTools (
www.tamos.com/products/nettools) for a wide variety of network scanning functionality - NetScanTools Pro (
www.netscantools.com) for dozens of network security assessment functions, including ping sweeps, port scanning, and SMTP relay testing - Getif (
www.wtcs.org/snmp4tpc/getif.htm) an oldie but goodie tool for SNMP enumeration - Nmap (
http://nmap.org) — or NMapWin (http://sourceforge.net/projects/nmapwin), the happy-clicky-GUI front end to Nmap — for host-port probing and operating system fingerprinting - Savvius OmniPeek (
www.savvius.com) for network analysis - Wireshark (
www.wireshark.org) for network analysis
Vulnerability assessment
These vulnerability assessment tools, among others, allow you to test your network hosts for various known vulnerabilities as well as potential configuration issues that could lead to security exploits:
- GFI LanGuard (
www.gfi.com/products-and-solutions/network-security-solutions/gfi-languard) for port scanning and vulnerability testing - Nexpose (
www.rapid7.com/vulnerability-scanner.jsp), an all-in-one tool for in-depth vulnerability testing
Scanning, Poking, and Prodding the Network
Performing the ethical hacks described in the following sections on your network infrastructure involves following basic hacking steps:
- Gather information and map your network.
- Scan your systems to see which ones are available.
- Determine what’s running on the systems discovered.
- Attempt to penetrate the systems discovered if you choose to.
Every network card driver and implementation of TCP/IP in most operating systems, including Windows and Linux, and even in your firewalls and routers, has quirks that result in different behaviors when scanning, poking, and prodding your systems. This can result in different responses from your various systems, including everything from false-positive findings to denial of service (DoS) conditions. Refer to your administrator guides or vendor websites for details on any known issues and possible patches that are available to fix those issues. If you patched all your systems, you shouldn’t have any issues — just know that anything’s possible.
Scanning ports
A port scanner shows you what’s what on your network by scanning the network to see what’s alive and working. Port scanners provide basic views of how the network is laid out. They can help identify unauthorized hosts or applications and network host configuration errors that can cause serious security vulnerabilities.
The big-picture view from port scanners often uncovers security issues that might otherwise go unnoticed. Port scanners are easy to use and can test network hosts regardless of what operating systems and applications they’re running. The tests are usually performed relatively quickly without having to touch individual network hosts, which would be a real pain otherwise.
The trick to assessing your overall network security is interpreting the results you get from a port scan. You can get false positives on open ports, and you might have to dig deeper. For example, User Datagram Protocol (UDP) scans — like the protocol itself — are less reliable than Transmission Control Protocol (TCP) scans and often produce false positives because many applications don’t know how to respond to random incoming UDP requests.
A feature-rich scanner such as Nexpose often can identify ports and see what’s running in one step.
 Port scans can take a good bit of time. The length of time depends on the number of hosts you have, the number of ports you scan, the tools you use, the processing power of your test system, and the speed of your network links.
An important tenet to remember is that you need to scan more than just the important hosts. Leave no stone unturned — if not at first, then eventually. These other systems often bite you if you ignore them. Also, perform the same tests with different utilities to see whether you get different results. Not all tools find the same open ports and vulnerabilities. This is unfortunate, but it’s a reality of ethical hacking tests.
If your results don’t match after you run the tests using different tools, you might want to explore the issue further. If something doesn’t look right — such as a strange set of open ports — it probably isn’t. Test again; if you’re in doubt, use another tool for a different perspective.
If possible, you should scan all 65,534 TCP ports on each network host that your scanner finds. If you find questionable ports, look for documentation that the application is known and authorized. It’s not a bad idea to scan all 65,534 UDP ports as well. Just know this can add a considerable amount of time to your scans.
For speed and simplicity, you can scan the commonly hacked ports, listed in Table 9-1.
Table 9-1 Commonly Hacked Ports
|
Port Number |
Service |
Protocol(s) |
|
7 |
Echo |
TCP, UDP |
|
19 |
Chargen |
TCP, UDP |
|
20 |
FTP data (File Transfer Protocol) |
TCP |
|
21 |
FTP control |
TCP |
|
22 |
SSH |
TCP |
|
23 |
Telnet |
TCP |
|
25 |
SMTP (Simple Mail Transfer Protocol) |
TCP |
|
37 |
Time |
TCP, UDP |
|
53 |
DNS (Domain Name System) |
UDP |
|
69 |
TFTP (Trivial File Transfer Protocol) |
UDP |
|
79 |
Finger |
TCP, UDP |
|
80 |
HTTP (Hypertext Transfer Protocol) |
TCP |
|
110 |
POP3 (Post Office Protocol version 3) |
TCP |
|
111 |
SUN RPC (remote procedure calls) |
TCP, UDP |
|
135 |
RPC/DCE (end point mapper) for Microsoft networks |
TCP, UDP |
|
137, 138, 139, 445 |
NetBIOS over TCP/IP |
TCP, UDP |
|
161 |
SNMP (Simple Network Management Protocol) |
TCP, UDP |
|
443 |
HTTPS (HTTP over TLS) |
TCP |
|
512, 513, 514 |
Berkeley r-services and r-commands (such as rsh, rexec, and rlogin) |
TCP |
|
1433 |
Microsoft SQL Server (ms-sql-s) |
TCP, UDP |
|
1434 |
Microsoft SQL Monitor (ms-sql-m) |
TCP, UDP |
|
1723 |
Microsoft PPTP VPN |
TCP |
|
3389 |
Windows Terminal Server |
TCP |
|
8080 |
HTTP proxy |
TCP |
Ping sweeping
A ping sweep of all your network subnets and hosts is a good way to find out which hosts are alive and kicking on the network. A ping sweep is when you ping a range of addresses using Internet Control Message Protocol (ICMP) packets. Figure 9-1 shows the command and the results of using Nmap to perform a ping sweep of a class C subnet range.

Figure 9-1: Performing a ping sweep of an entire class C network with Nmap.
Dozens of Nmap command line options exist, which can be overwhelming when you want only a basic scan. Nonetheless, you can enter nmap on the command line to see all the options available.
The following command line options can be used for an Nmap ping sweep:
- -sP tells Nmap to perform a ping scan.
- -n tells Nmap not to perform name resolution.
- -T 4 tells Nmap to perform an aggressive (faster) scan.
- 192.168.1.1-254 tells Nmap to scan the entire 192.168.1.0 subnet.
Using port scanning tools
Most port scanners operate in three steps:
The port scanner sends TCP SYN requests to the host or range of hosts you set it to scan.
Some port scanners perform ping sweeps to determine which hosts are available before starting the TCP port scans.
Most port scanners by default scan only TCP ports. Don’t forget about UDP ports. You can scan UDP ports with a UDP port scanner, such as Nmap.- The port scanner waits for replies from the available hosts.
- The port scanner probes these available hosts for up to 65,534 possible TCP and UDP ports — based on which ports you tell it to scan — to see which ones have available services on them.
The port scans provide the following information about the live hosts on your network:
- Hosts that are active and reachable through the network
- Network addresses of the hosts found
- Services or applications that the hosts may be running
After performing a generic sweep of the network, you can dig deeper into specific hosts you find.
Nmap
After you have a general idea of what hosts are available and what ports are open, you can perform fancier scans to verify that the ports are actually open and not returning a false positive. Nmap allows you to run the following additional scans:
- Connect: This basic TCP scan looks for any open TCP ports on the host. You can use this scan to see what’s running and determine whether intrusion prevention systems (IPSs), firewalls, or other logging devices log the connections.
- UDP scan: This basic UDP scan looks for any open UDP ports on the host. You can use this scan to see what’s running and determine whether IPSs, firewalls, or other logging devices log the connections.
- SYN Stealth: This scan creates a half-open TCP connection with the host, possibly evading IPS systems and logging. This is a good scan for testing IPSs, firewalls, and other logging devices.
- FIN Stealth, Xmas Tree, and Null: These scans let you mix things up a bit by sending strangely formed packets to your network hosts so you can see how they respond. These scans change around the flags in the TCP headers of each packet, which allows you to test how each host handles them to point out weak TCP/IP implementations as well as patches that might need to be applied.
Be careful when performing these scans. You can create your own DoS attack and potentially crash applications or entire systems. Unfortunately, if you have a host with a weak TCP/IP stack (the software that controls TCP/IP communications on your hosts), there’s no good way to prevent your scan from creating a DoS attack. A good way to help reduce the chance of this occurring is to use the slow Nmap timing options — Paranoid, Sneaky, or Polite — when running your scans.
Figure 9-2 shows the NMapWin Scan tab, where you can select the Scan Mode options (Connect, UDP Scan, and so on). If you’re a command line fan, you see the command line parameters displayed in the lower-left corner of the NMapWin screen. This helps when you know what you want to do and the command line help isn’t enough.

Figure 9-2: In-depth port-scanning options in NMapWin.
If you connect to a single port (as opposed to several all at one time) without making too much noise, you might be able to evade your firewall or IPS. This is a good test of your network security controls, so look at your logs to see what they saw during this process.
NetScanTools Pro
NetScanTools Pro (www.netscantools.com) is a very nice all-in-one commercial tool for gathering general network information, such as the number of unique IP addresses, NetBIOS names, and MAC addresses. It also has a neat feature that allows you to fingerprint the operating systems of various hosts. Figure 9-3 shows the OS Fingerprinting results while scanning a wireless network access point.
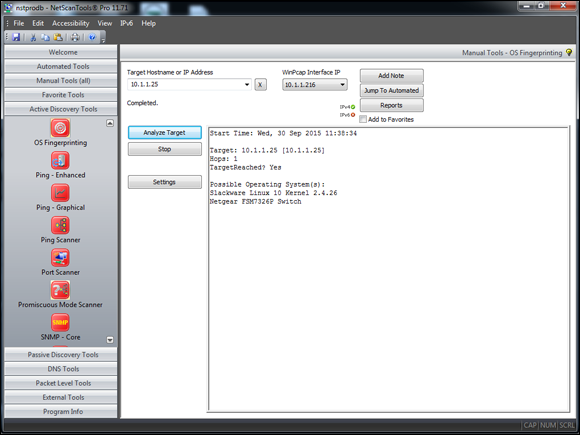
Figure 9-3: NetScanTools Pro OS Fingerprinting tool.
Countermeasures against ping sweeping and port scanning
Enable only the traffic you need to access internal hosts — preferably as far as possible from the hosts you’re trying to protect — and deny everything else. This goes for standard ports, such as TCP 80 for HTTP and ICMP for ping requests.
Configure firewalls to look for potentially malicious behavior over time (such as the number of packets received in a certain period of time) and have rules in place to cut off attacks if a certain threshold is reached, such as 10 port scans in one minute or 100 consecutive ping (ICMP) requests.
Most firewalls and IPSs can detect such scanning and cut it off in real time.
You can break applications on your network when restricting network traffic, so make sure that you analyze what’s going on and understand how applications and protocols are working before you disable any type of network traffic.
Scanning SNMP
Simple Network Management Protocol (SNMP) is built in to virtually every network device. Network management programs (such as HP OpenView and LANDesk) use SNMP for remote network host management. Unfortunately, SNMP also presents security vulnerabilities.
Vulnerabilities
The problem is that most network hosts run SNMP enabled with the default read/write community strings of public/private. The majority of network devices I come across have SNMP enabled and don’t even need it.
If SNMP is compromised, a hacker may be able to gather such network information as ARP tables, usernames, and TCP connections to attack your systems further. If SNMP shows up in port scans, you can bet that a malicious attacker will try to compromise the system.
Here are some utilities for SNMP enumeration:
- The commercial tools NetScanTools Pro and Essential NetTools
- Free Windows GUI-based Getif
- Free Windows text-based SNMPUTIL (
www.wtcs.org/snmp4tpc/FILES/Tools/SNMPUTIL/SNMPUTIL.zip)
You can use Getif to enumerate systems with SNMP enabled, as shown in Figure 9-4.
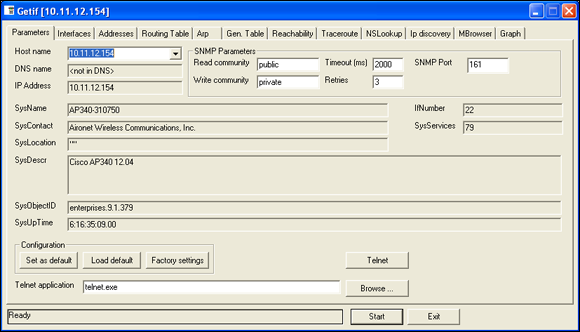
Figure 9-4: General SNMP information gathered by Getif.
In this test, I was able to glean a lot of information from a wireless access point, including model number, firmware revision, and system uptime. All this could be used against the host if an attacker wanted to exploit a known vulnerability in this particular system. By digging in further, I was able to discover several management interface usernames on this access point, as shown in Figure 9-5. You certainly don’t want to show the world this information.
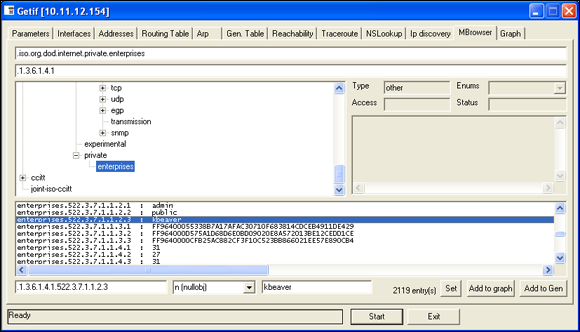
Figure 9-5: Management interface user IDs gleaned via Getif’s SNMP browsing function.
For a list of vendors and products affected by the well-known SNMP vulnerabilities, refer to www.cert.org/historical/advisories/CA-2002-03.cfm.
Countermeasures against SNMP attacks
Preventing SNMP attacks can be as simple as A-B-C:
- Always disable SNMP on hosts if you’re not using it — period.
- Block the SNMP ports (UDP ports 161 and 162) at the network perimeter.
- Change the default SNMP community read string from public and the default community write string from private to another long and complex value that’s virtually impossible to guess.
There’s technically a “U” that’s part of the solution: upgrade. Upgrading your systems (at least the ones you can) to SNMP version 3 can resolve many of the well-known SNMP security weaknesses.
Grabbing banners
Banners are the welcome screens that divulge software version numbers and other system information on network hosts. This banner information might identify the operating system, the version number, and the specific service packs to give the bad guys a leg up on attacking the network. You can grab banners by using either good old telnet or some of the tools I mention, such as Nmap and SuperScan.
telnet
You can telnet to hosts on the default telnet port (TCP port 23) to see whether you’re presented with a login prompt or any other information. Just enter the following line at the command prompt in Windows or UNIX:
telnet ip_address
You can telnet to other commonly used ports with these commands:
- SMTP: telnet ip_address 25
- HTTP: telnet ip_address 80
- POP3: telnet ip_address 110
Figure 9-6 shows specific version information about an IceWarp e-mail server when telnetting to it on port 25. For help with telnet, simply enter telnet /? or telnet help for specific guidance on using the program.

Figure 9-6: Information gathered about an e-mail server via telnet.
Countermeasures against banner-grabbing attacks
The following steps can reduce the chance of banner-grabbing attacks:
- If there isn’t a business need for services that offer banner information, disable those unused services on the network host.
- If there isn’t a business need for the default banners, or if you can customize the banners, configure the network host’s application or operating system to either disable the banners or remove information from the banners that could give an attacker a leg up. Check with your specific vendor for information on how to do this. TCP Wrappers in Linux is another solution.
If you can customize your banners, check with your lawyer about adding a warning banner. It won’t stop banner grabbing but will show would-be intruders that the system is private and monitored (assuming it truly is). A warning banner may also help reduce your business liability in the event of a security breach. Here’s an example:
Warning! This is a private system. All use is monitored and recorded. Any unauthorized use of this system may result in civil and/or criminal prosecution to the fullest extent of the law.
Testing firewall rules
As part of your ethical hacking, you can test your firewall rules to make sure they’re working as they’re supposed to.
Testing
A few tests can verify that your firewall actually does what it says it’s doing. You can connect through the firewall on the ports that are open, but what about the ports that can be open but shouldn’t be?
Netcat
Netcat (http://netcat.sourceforge.net) can test certain firewall rules without having to test a production system directly. For example, you can check whether the firewall allows port 23 (telnet) through. Follow these steps to see whether a connection can be made through port 23:
Load Netcat on a client machine inside the network.
This sets up the outbound connection.
Load Netcat on a testing computer outside the firewall.
This allows you to test from the outside in.
Enter the Netcat listener command on the client (internal) machine with the port number you’re testing.
For example, if you’re testing port 23, enter this command:
nc –l –p 23 cmd.exeEnter the Netcat command to initiate an inbound session on the testing (external) machine. You must include the following information:
- The IP address of the internal machine you’re testing
- The port number you’re testing
For example, if the IP address of the internal (client) machine is 10.11.12.2 and the port is 23, enter this command:
nc –v 10.11.12.2 23
If Netcat presents you with a new command prompt (that’s what the cmd.exe is for in Step 3) on the external machine, you’ve connected and can execute commands on the internal machine! This can serve several purposes, including testing firewall rules, network address translation (NAT), port forwarding and — well, uhhhmmm — executing commands on a remote system!
AlgoSec Firewall Analyzer
A commercial tool I often use with great results is AlgoSec’s Firewall Analyzer (www.algosec.com) as shown in Figure 9-7.

Figure 9-7: Using AlgoSec Firewall Analyzer to uncover security gaffes in a firewall rulebase.
AlgoSec Firewall Analyzer, and similar ones such as SolarWinds Firewall Security Manager (www.solarwinds.com/firewall-security-manager.aspx), allows you to perform an in-depth analysis of firewall rulebases from all the major vendors and find security flaws and inefficiencies you’d never uncover otherwise. Firewall rulebase analysis is a lot like software source code analysis — it finds flaws at the source that humans would likely never see even when performing in-depth security tests from the Internet and the internal network. If you’ve never performed a firewall rulebase analysis, it’s a must!
Countermeasures against firewall rulebase vulnerabilities
The following countermeasures can prevent a hacker from testing your firewall:
- Perform a firewall rulebase audit. I’m always saying that you cannot secure what you don’t acknowledge. There’s no better example of this than your firewall rulebases. No matter how seemingly simplistic your rulebase is, it never hurts to verify your work using an automated tool.
Limit traffic to what’s needed.
Set rules on your firewall (and router, if needed) that passes only traffic that absolutely must pass. For example, have rules in place that allow HTTP inbound traffic to an internal web server, SMTP inbound traffic to an e-mail server, and HTTP outbound traffic for external web access.
This is the best defense against someone poking at your firewall.- Block ICMP to help prevent an external attacker from poking and prodding your network to see which hosts are alive.
- Enable stateful packet inspection on the firewall to block unsolicited requests.
Analyzing network data
A network analyzer is a tool that allows you to look into a network and analyze data going across the wire for network optimization, security, and/or troubleshooting purposes. Like a microscope for a lab scientist, a network analyzer is a must-have tool for any security professional.
 Network analyzers are often generically referred to as sniffers, though that’s actually the name and trademark of a specific product from Network Associates’ original Sniffer network analysis tool.
A network analyzer is handy for sniffing packets on the wire. A network analyzer is simply software running on a computer with a network card. It works by placing the network card in promiscuous mode, which enables the card to see all the traffic on the network, even traffic not destined for the network analyzer’s host. The network analyzer performs the following functions:
- Captures all network traffic
- Interprets or decodes what is found into a human-readable format
- Displays the content in chronological order (or however you choose to see it)
When assessing security and responding to security incidents, a network analyzer can help you
- View anomalous network traffic and even track down an intruder.
- Develop a baseline of network activity and performance, such as protocols in use, usage trends, and MAC addresses, before a security incident occurs.
When your network behaves erratically, a network analyzer can help you
- Track and isolate malicious network usage
- Detect malicious Trojan horse applications
- Monitor and track down DoS attacks
Network analyzer programs
You can use one of the following programs for network analysis:
- Savvius OmniPeek (
www.savvius.com) is one of my favorite network analyzers. It does everything I need and more and is very simple to use. OmniPeek is available for Windows operating systems. - TamoSoft’s CommView (
www.tamos.com/products/commview) is a great, low-cost, Windows-based alternative. - Cain & Abel (
www.oxid.it/cain.html) is a free multifunctional password recovery tool for performing ARP poisoning, capturing packets, cracking passwords, and more. - Wireshark (
www.wireshark.org), formerly known as Ethereal, is a free alternative. I download and use this tool if I need a quick fix and don’t have my laptop nearby. It’s not as user-friendly as most of the commercial products, but it is very powerful if you’re willing to learn its ins and outs. Wireshark is available for both Windows and OS X. - ettercap (
http://ettercap.github.io/ettercap/) is another powerful (and free) utility for performing network analysis and much more on Windows, Linux, and other operating systems.
Here are a few caveats for using a network analyzer:
- To capture all traffic, you must connect the analyzer to one of the following:
- A hub on the network
- A monitor/span/mirror port on a switch
- A switch that you’ve performed an ARP poisoning attack on
- If you want to see traffic similar to what a network-based IPS sees, you should connect the network analyzer to a hub or switch monitor port — or even a network tap — on the outside of the firewall, as shown in Figure 9-8. This way, your testing enables you to view
- What’s entering your network before the firewall filters eliminate the junk traffic.
- What’s leaving your network after the traffic passes through the firewall.

Figure 9-8: Connecting a network analyzer outside the firewall.
Whether you connect your network analyzer inside or outside your firewall, you see immediate results. It can be an overwhelming amount of information, but you can look for these issues first:
- Odd traffic, such as:
- An unusual amount of ICMP packets
- Excessive amounts of multicast or broadcast traffic
- Protocols that aren’t permitted by policy or shouldn’t exist given your current network configuration
- Internet usage habits, which can help point out malicious behavior of a rogue insider or system that has been compromised, such as:
- Web surfing and social media
- Instant messaging and other P2P software
- Questionable usage, such as:
- Many lost or oversized packets, indicating hacking tools or malware are present
- High bandwidth consumption that might point to a web or FTP server that doesn’t belong
- Reconnaissance probes and system profiling from port scanners and vulnerability assessment tools, such as a significant amount of inbound traffic from unknown hosts — especially over ports that aren’t used very much, such as FTP or telnet.
- Hacking in progress, such as tons of inbound UDP or ICMP echo requests, SYN floods, or excessive broadcasts.
- Nonstandard hostnames on your network. For example, if your systems are named Computer1, Computer2, and so on, a computer named GEEKz4evUR should raise a red flag.
- Hidden servers (especially web, SMTP, FTP, DNS, and DHCP) that might be eating network bandwidth, serving illegal software, or accessing your network hosts.
- Attacks on specific applications that show such commands as /bin/rm, /bin/ls, echo, and cmd.exe as well as SQL queries and JavaScript injection, which I cover in Chapter 15.
You might need to let your network analyzer run for quite a while — several hours to several days, depending on what you’re looking for. Before getting started, configure your network analyzer to capture and store the most relevant data:
If your network analyzer permits it, configure it to use a first-in, first-out buffer.
This configuration overwrites the oldest data when the buffer fills up, but it might be your only option if memory and hard drive space are limited on your network analysis computer.If your network analyzer permits it, record all the traffic into a capture file and save it to the hard drive. This is the ideal scenario — especially if you have a large hard drive, such as 500GB or more.
You can easily fill several hundred gigabytes’ worth of hard drive space in a short period. I highly recommend running your network analyzer in what OmniPeek calls monitor mode. This allows the analyzer to keep track of what’s happening such as network usage and protocols but not capture and store every single packet. Monitor mode — if supported by your analyzer — is very beneficial and is often all you need.When network traffic doesn’t look right in a network analyzer, it probably isn’t. It’s better to be safe than sorry.
Run a baseline when your network is working normally. When you have a baseline, you can see any obvious abnormalities when an attack occurs.
One thing I like to check for is the top talkers (network hosts sending/receiving the most traffic) on the network. If someone is doing something malicious on the network, such as hosting an FTP server or running Internet file-sharing software, using a network analyzer is often the only way you’ll find out about it. A network analyzer is also a good tool for detecting systems infected with malware, such as a virus or Trojan horse. Figure 9-9 shows what it looks like to have a suspect protocol or application running on your network.

Figure 9-9: OmniPeek can help uncover someone running an illicit system, such as an FTP server.
Looking at your network statistics, such as bytes per second, network utilization, and inbound/outbound packet counts, is also a good way to determine whether something fishy is going on. Figure 9-10 contains network statistics as seen through the powerful CommView network analyzer.

Figure 9-10: CommView’s interface for viewing network statistics.
TamoSoft — the maker of CommView — has another product called NetResident (www.tamos.com/products/netresident) that can track the usage of well-known protocols, such as HTTP, e-mail, FTP, and VoIP. As shown in Figure 9-11, you can use NetResident to monitor web sessions and play them back.

Figure 9-11: NetResident can track Internet usage and ensure security policies are enforced.
NetResident also has the capability to perform ARP poisoning via its PromiSwitch tool available under the Tools menu, which allows NetResident to see everything on the local network segment. I cover ARP poisoning in the section “The MAC-daddy attack,” later in this chapter.
Countermeasures against network protocol vulnerabilities
A network analyzer can be used for good or evil. The good is to help ensure your security policies are being followed. The evil is when someone uses a network analyzer against you. A few countermeasures can help prevent someone from using an unauthorized network analyzer, although there’s no way to prevent it completely.
If an external attacker or malicious user can connect to your network (physically or wirelessly), he can capture packets on the network, even if you’re using an Ethernet switch.
Physical security
Ensure that adequate physical security is in place to prevent someone from plugging into your network:
Keep the bad guys out of your server room and wiring closet.
Ensure that the web, telnet, and SSH management interfaces on your Ethernet switches are especially secure to keep someone from changing the switch port configuration and seeing everything going across the wire.- Make sure that unsupervised areas, such as an unoccupied lobby or training room, don’t have live network connections.
For details about physical security, see Chapter 7.
Network analyzer detection
You can use a network- or host-based utility to determine whether someone is running an unauthorized network analyzer on your network:
- Sniffdet (
http://sniffdet.sourceforge.net) for UNIX-based systems - PromiscDetect (
http://ntsecurity.nu/toolbox/promiscdetect) for Windows
Certain IPSs can also detect whether a network analyzer is running on your network. These tools enable you to monitor the network for Ethernet cards that are running in promiscuous mode. You simply load the programs on your computer, and the programs alert you if they see promiscuous behaviors on the network (Sniffdet) or local system (PromiscDetect).
The MAC-daddy attack
Attackers can use ARP (Address Resolution Protocol) running on your network to make their systems appear as your system or another authorized host on your network.
ARP spoofing
An excessive number of ARP requests can be a sign of an ARP spoofing attack (also called ARP poisoning) on your network.
A client running a program, such as dsniff (www.monkey.org/~dugsong/dsniff) or Cain & Abel (www.oxid.it/cain.html), can change the ARP tables — the tables that store IP addresses to media access control (MAC) address mappings — on network hosts. This causes the victim computers to think they need to send traffic to the attacker’s computer rather than to the true destination computer when communicating on the network. ARP spoofing is used during man-in-the-middle (MITM) attacks.
Spoofed ARP replies can be sent to a switch, which reverts the switch to broadcast mode and essentially turns it into a hub. When this occurs, an attacker can sniff every packet going through the switch and capture anything and everything from the network.
This security vulnerability is inherent in how TCP/IP communications are handled.
Here’s a typical ARP spoofing attack with a hacker’s computer (Hacky) and two legitimate network users’ computers (Joe and Bob):
- Hacky poisons the ARP caches of victims Joe and Bob by using dsniff, ettercap, or a utility he wrote.
- Joe associates Hacky’s MAC address with Bob’s IP address.
- Bob associates Hacky’s MAC address with Joe’s IP address.
- Joe’s traffic and Bob’s traffic are sent to Hacky’s IP address first.
Hacky’s network analyzer captures Joe’s and Bob’s traffic.
If Hacky is configured to act like a router and forward packets, it forwards the traffic to its original destination. The original sender and receiver never know the difference!
Using Cain & Abel for ARP poisoning
You can perform ARP poisoning on your switched Ethernet network to test your IPS or to see how easy it is to turn a switch into a hub and capture anything and everything with a network analyzer.
ARP poisoning can be hazardous to your network’s hardware and health, causing downtime and more. So be careful!
Perform the following steps to use Cain & Abel for ARP poisoning:
Load Cain & Abel and then click the Sniffer tab to enter the network analyzer mode.
The Hosts page opens by default.
Click the Start/Stop APR icon (the yellow and black circle).
The ARP poison routing (how Cain & Abel refers to ARP poisoning) process starts and enables the built-in sniffer.
- If prompted, select the network adapter in the window that appears and then click OK.
- Click the blue + icon to add hosts to perform ARP poisoning on.
- In the MAC Address Scanner window that appears, ensure the All Hosts in My Subnet option is selected and then click OK.
- Click the APR tab (the one with the yellow-and-black circle icon) to load the APR page.
Click the white space under the uppermost Status column heading (just under the Sniffer tab).
This re-enables the blue + icon.
- Click the blue + icon and the New ARP Poison Routing window shows the hosts discovered in Step 3.
Select your default route (in my case, 10.11.12.1).
The right-hand column fills with all the remaining hosts, as shown in Figure 9-12.
- Ctrl+click all the hosts in the right column that you want to poison.
Click OK and the ARP poisoning process starts.
This process can take anywhere from a few seconds to a few minutes depending on your network hardware and each hosts’ local TCP/IP stack. The results of ARP poisoning on my test network are shown in Figure 9-13.
- You can use Cain & Abel’s built-in passwords feature to capture passwords traversing the network to and from various hosts simply by clicking the Passwords tab.

Figure 9-12: Selecting your victim hosts for ARP poisoning in Cain & Abel.

Figure 9-13: ARP poisoning results in Cain & Abel.
The preceding steps show how easy it is to exploit a vulnerability and prove that Ethernet switches aren’t all they’re cracked up to be from a security perspective.
MAC address spoofing
MAC address spoofing tricks the switch into thinking your computer is something else. You simply change your computer’s MAC address and masquerade as another user.
You can use this trick to test access control systems, such as your IPS/firewall, and even your operating system login controls that check for specific MAC addresses.
UNIX-based systems
In UNIX and Linux, you can spoof MAC addresses with the ifconfig utility. Follow these steps:
While logged in as root, use ifconfig to enter a command that disables the network interface.
Insert the network interface number that you want to disable (usually, eth0) into the command, like this:
[root@localhost root]# ifconfig eth0 downEnter a command for the MAC address you want to use.
Insert the fake MAC address and the network interface number (eth0) into the command again, like this:
[root@localhost root]# ifconfig eth0 hw ether
new_mac_address
You can use a more feature-rich utility called GNU MAC Changer (https://github.com/alobbs/macchanger) for Linux systems.
Windows
You can use regedit to edit the Windows Registry, but I like using a neat Windows utility called SMAC (www.klcconsulting.net/smac), which makes MAC spoofing a simple process. Follow these steps to use SMAC:
- Load the program.
- Select the adapter for which you want to change the MAC address.
- Enter the new MAC address in the New Spoofed MAC Address fields and click the Update MAC button.
- Stop and restart the network card with these steps:
- Right-click the network card in Network and Dialup Connections and then choose Disable.
Right-click again and then choose Enable for the change to take effect.
You might have to reboot for this to work properly.
- Click the Refresh button in the SMAC interface.
To reverse Registry changes with SMAC, follow these steps:
- Select the adapter for which you want to change the MAC address.
- Click the Remove MAC button.
- Stop and restart the network card with these steps:
- Right-click the network card in Network and Dialup Connections and then choose Disable.
Right-click again and then choose Enable for the change to take effect.
You might have to reboot for this to work properly.
Click the Refresh button in the SMAC interface.
You should see your original MAC address again.
Countermeasures against ARP poisoning and MAC address spoofing attacks
A few countermeasures on your network can minimize the effects of an attack against ARP and MAC addresses:
Prevention: You can prevent MAC address spoofing if your switches can enable port security to prevent automatic changes to the MAC address tables.
No realistic countermeasures for ARP poisoning exist. The only way to prevent ARP poisoning is to create and maintain static ARP entries in your switches for every host on the network. This is something that hardly any network administrator has time to do in today’s rat race.Detection: You can detect these two types of hacks through an IPS or a standalone MAC address–monitoring utility.
Arpwatch (http://linux.maruhn.com/sec/arpwatch.html) is a Linux-based program that alerts you via e-mail when it detects changes in MAC addresses associated with specific IP addresses on the network.
Testing denial of service attacks
Denial of service (DoS) attacks are among the most common hacker attacks. A hacker initiates so many invalid requests to a network host that the host uses all its resources responding to the invalid requests and ignores the legitimate requests.
DoS attacks
DoS attacks against your network and hosts can cause systems to crash, data to be lost, and every user to jump on your case wondering when Internet access will be restored.
Here are some common DoS attacks that target an individual computer or network device:
- SYN floods: The attacker floods a host with TCP SYN packets.
- Ping of Death: The attacker sends IP packets that exceed the maximum length of 65,535 bytes, which can ultimately crash the TCP/IP stack on many operating systems.
- WinNuke: This attack can disable networking on older Windows 95 and Windows NT computers.
Distributed DoS (DDoS) attacks have an exponentially greater impact on their victims. One of the most famous was the DDoS attack against eBay, Yahoo!, CNN, and dozens of other websites by a hacker known as MafiaBoy. While updating this book to the third edition, there was a highly publicized DDoS attack against Twitter, Facebook, and other social media sites. The attack was apparently aimed at one user from Georgia (the former Soviet country, not the state where I live), but it affected everyone using these sites. I couldn’t tweet, and many of my friends and family members couldn’t see what everyone was blabbing about on Facebook (oh, the humanity!). There have been numerous other highly-publicized DDoS attacks since then. Think about this: When hundreds of millions of people can be taken offline by one targeted DDoS attack, you can see why understanding the dangers of denial of service against your business’s systems and applications is important.
Testing
Denial of service testing is one of the most difficult security checks you can run. There just aren’t enough of you and your computers to go around. Don’t fret. You can run a few tests to see where you’re weak. Your first test should be a search for DoS vulnerabilities from a vulnerability-scanning perspective. Using vulnerability scanners, such as Nexpose (www.rapid7.com/products/nexpose) and AppSpider (www.rapid7.com/products/appspider), you can find missing patches and configuration weaknesses that can lead to denial of service.
I once performed a security assessment where I used Qualys to find a vulnerability in an older version of OpenSSL running on a web server. As with most DoS findings, I didn’t actually exploit the vulnerability because I didn’t want to take down the production system. Instead, I listed it as a “medium priority” vulnerability — an issue that had the potential to be exploited. My client pushed back and said OpenSSL wasn’t on the system. With permission, I downloaded the exploit code available on the Internet, compiled it, and ran it against my client’s server. Sure enough, it took the server offline.
At first, my client thought it was a fluke, but after taking the server offline again, he bought into the vulnerability. It ended up that he was using an OpenSSL derivative, hence the vulnerability. Had my client not fixed the problem, there could have been any number of attackers around the world taking — and keeping — this production system offline, which could have been both tricky and time consuming to troubleshoot. Not good for business!
Don’t test for DoS unless you have test systems or can perform controlled tests with the proper tools. Poorly planned DoS testing is a job search in the making. It’s like trying to delete data from a network share and hoping that the access controls in place are going to prevent it.
Other DoS testing tools worth checking out are UDPFlood (www.mcafee.com/us/downloads/free-tools/udpflood.aspx), Blast (www.mcafee.com/us/downloads/free-tools/blast.aspx), NetScanTools Pro, and CommView.
Countermeasures against DoS attacks
Most DoS attacks are difficult to predict, but they can be easy to prevent:
- Test and apply security patches (including service packs and firmware updates) as soon as possible for network hosts, such as routers and firewalls, as well as for server and workstation operating systems.
Use an IPS to monitor regularly for DoS attacks.
You can run a network analyzer in continuous capture mode if you can’t justify the cost of an all-out IPS solution and use it to monitor for DoS attacks.- Configure firewalls and routers to block malformed traffic. You can do this only if your systems support it, so refer to your administrator’s guide for details.
- Minimize IP spoofing by filtering out external packets that appear to come from an internal address, the local host (127.0.0.1), or any other private and non-routable address, such as 10.x.x.x, 172.16.x.x–172.31.x.x, or 192.168.x.x. The following paper from Cisco Systems provides more information:
www.cisco.com/web/about/ac123/ac147/archived_issues/ipj_10-4/104_ip-spoofing.html. - Block all ICMP traffic inbound to your network unless you specifically need it. Even then, you should allow it to come in only to specific hosts.
- Disable all unneeded TCP/UDP small services, such as echo and chargen.
Establish a baseline of your network protocols and traffic patterns before a DoS attack occurs. That way, you know what to look for. And periodically scan for such potential DoS vulnerabilities as rogue DoS software installed on network hosts.
If you get yourself in a real bind and end up under direct DoS assault, you can reach out to managed service vendors such as Imperva’s Incapsula (www.incapsula.com), CloudFlare (www.cloudflare.com), and DOSarrest (www.dosarrest.com) who can help you out.
Work with a minimum necessary mentality (not to be confused with having too many craft beers) when configuring your network devices, such as firewalls and routers:
- Identify traffic that is necessary for approved network usage.
- Allow the traffic that’s needed.
- Deny all other traffic.
If worse comes to worst, you’ll need to work with your ISP and see whether they can block DoS attacks on their end.
Detecting Common Router, Switch, and Firewall Weaknesses
In addition to the more technical exploits that I cover in this chapter, some high-level security vulnerabilities commonly found on network devices can create many problems.
Finding unsecured interfaces
You want to ensure that HTTP and telnet interfaces to your routers, switches, and firewall aren’t configured with a blank, default, or otherwise easy-to-guess password. This advice sounds like a no-brainer, but it’s by far one of the most common weaknesses. When a malicious insider or other attacker gains access to your network devices, he owns the network. He can then lock out administrative access, set up back-door user accounts, reconfigure ports, and even bring down the entire network without you ever knowing.
I once found a simple password that a systems integrator had configured on a Cisco ASA firewall and was able to log in to the firewall with full administrative rights. Just imagine what could happen in this situation if someone with malicious intent came across this password. Lesson learned: It’s the little things that can get you. Know what your vendors are doing and keep an eye on them!
Another weakness is related to HTTP and telnet being enabled and used on many network devices. Care to guess why this is a problem? Well, anyone with some free tools and a few minutes of time can sniff the network and capture login credentials for these systems when they’re being sent in cleartext. When that happens, anything goes.
Exploiting IKE weaknesses
Businesses running a VPN on a router or firewall are common. If you fall into this category, chances are good that your VPN is running the Internet Key Exchange (IKE) protocol, which has a couple of well-known exploitable weaknesses:
- It’s possible to crack IKE “aggressive mode” pre-shared keys using Cain & Abel and the IKECrack tool (
http://ikecrack.sourceforge.net). - Some IKE configurations, such as those in certain Cisco PIX firewalls, can be taken offline. All the attacker has to do is send 10 packets per second at 122 bytes each and you have a DoS attack on your hands.
You can manually poke around to see whether your router, switches, and firewalls are vulnerable to these issues, but the best way to find this information is to use a well-known vulnerability scanner, such as Nexpose. After you find which vulnerabilities exist, you can take things a step further by using the Cisco Global Exploiter tool (available via the Kali Linux toolset). To run Cisco Global Exploiter, follow these steps:
- Download and burn the BackTrack Linux ISO image to DVD or boot the image directly through VMware or VirtualBox.
- After you enter the Kali Linux GUI, click Applications, Vulnerability Analysis, Cisco Tool, and then cisco-global-exploiter.
- Enter the command perl cge.pl ip_address exploit_number, as shown in Figure 9-14.
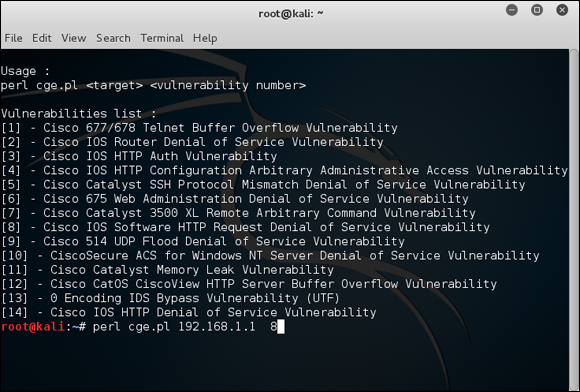
Figure 9-14: Cisco Global Exploiter tool for exploiting well-known Cisco weaknesses.
Another Cisco router-related tool is called Synful Knock Scanner (http://talosintel.com/scanner) that tests systems for the nasty SYNful Knock malware that was discovered in 2015.
Good scanners and exploitation tools will save you a ton of time and effort that you can spend on other, more important things, such as Facebook and Twitter.
Uncovering issues with SSL and TLS
SSL and Transport Layer Security (TLS) were long touted as the solution for securing network communications. However, recently, SSL and TLS have come under fire with demonstrable exploits such as Heartbleed, Padding Oracle On Downgraded Legacy Encryption (POODLE), and Factoring Attack on RSA-EXPORT Keys (FREAK).
General security vulnerabilities related to SSL and TLS are often uncovered by vulnerability scanners such as Nexpose and Netsparker. In addition to the three SSL/TLS vulnerabilities above, be on the lookout for the following flaws as well:
- SSL versions 2 or 3 as well as TLS versions 1.0 or 1.1 in use.
- Weak encryption ciphers such as RC4 and SHA-1.
If you are unsure about existing SSL and TLS vulnerabilities on your systems, you don’t have to use a vulnerability scanner at all. Qualys has a nice website called SSL Labs (www.ssllabs.com) that will scan for these vulnerabilities for you.
I didn’t used to be too concerned with SSL and TLS-related vulnerabilities, but as security researchers and criminal hackers have been demonstrating, the threat is real and needs to be addressed.
Putting Up General Network Defenses
Regardless of the specific attacks against your system, a few good practices can help prevent many network problems:
- Use stateful inspection rules that monitor traffic sessions for firewalls. This can help ensure that all traffic traversing the firewall is legitimate and can prevent DoS attacks and other spoofing attacks.
- Implement rules to perform packet filtering based on traffic type, TCP/UDP ports, IP addresses, and even specific interfaces on your routers before the traffic is allowed to enter your network.
- Use proxy filtering and Network Address Translation (NAT) or Port Address Translation (PAT).
- Find and eliminate fragmented packets entering your network (from Fraggle or another type of attack) via an IPS.
- Include your network devices in your vulnerability scans.
- Ensure your network devices have the latest vendor firmware and patches applied.
- Set strong passwords — better yet, passphrases — on all network systems. I cover passwords in more detail in Chapter 8.
- Don’t use IKE aggressive mode pre-shared keys for your VPN. If you must, ensure the passphrase is strong and changed periodically (such as every 6–12 months).
- Always use TLS (via HTTPS, etc.) or SSH when connecting to network devices.
- Disable SSL and weak ciphers and only use TLS version 1.2 and strong ciphers such as SHA-2 where possible.
- Segment the network and use a firewall on the following:
- The DMZ
- The internal network
- Critical subnetworks broken down by business function or department, such as accounting, finance, HR, and research