
Chapter 10
Wireless Networks
In This Chapter
![]() Understanding risks of wireless networks
Understanding risks of wireless networks
![]() Selecting wireless network hacking tools
Selecting wireless network hacking tools
![]() Cracking wireless encryption
Cracking wireless encryption
![]() Minimizing wireless network risks
Minimizing wireless network risks
Wireless local area networks (or Wi-Fi) — specifically, the ones based on the IEEE 802.11 standard — are increasingly being deployed into both business and home networks. Wi-Fi has been the poster child for weak security and network hack attacks since the inception of 802.11 a decade and a half ago. The stigma of unsecure Wi-Fi is starting to wane, but this isn’t the time to lower your defenses.
Wi-Fi offers a ton of business value, from convenience to reduced network deployment time. Whether or not your organization allows wireless network access, you probably have it, so testing for Wi-Fi security vulnerabilities is critical. In this chapter, I cover some common wireless network security vulnerabilities that you should test for, and I discuss some cheap and easy countermeasures that you can implement to help ensure that Wi-Fi isn’t more of a risk to your organization than it’s worth.
Understanding the Implications of Wireless Network Vulnerabilities
Wi-Fi is very susceptible to attack — even more so than wired networks (discussed in Chapter 9) if it’s not configured or deployed properly. Wireless networks have long-standing vulnerabilities that can enable an attacker to bring your network to its knees or allow your sensitive information to be extracted right out of thin air. If your wireless network is compromised, you can experience the following problems:
- Loss of network access, including e-mail, web, and other services that can cause business downtime
- Loss of sensitive information, including passwords, customer data, intellectual property, and more
- Regulatory consequences and legal liabilities associated with unauthorized users gaining access to your business systems
Most of the wireless vulnerabilities are in the implementation of the 802.11 standard. Wireless access points (APs) and client systems have some vulnerabilities as well.
Various fixes have come along in recent years to address these vulnerabilities, yet still many of these fixes haven’t been properly applied or aren’t enabled by default. Your employees might also install rogue wireless equipment on your network without your knowledge. Then there’s “free” Wi-Fi practically everywhere your mobile workforce goes. From coffee shops to hotels to conference centers, these Internet connections are one of the most serious threats to your overall information security and a pretty difficult one to fight. Even when Wi-Fi is hardened and all the latest patches have been applied, you still might have security problems, such as denial of service (DoS), man-in-the-middle attacks, and encryption key weaknesses (like you have on wired networks — see Chapter 9), that will likely be around for a while.
Choosing Your Tools
Several great wireless security tools are available for both the Windows and Linux platforms. Earlier on, Linux wireless tools were a bear to configure and run properly, probably because I’m not that smart. However, that problem has changed in recent years with programs such as Kismet (www.kismetwireless.net), Wellenreiter (http://sourceforge.net/projects/wellenreiter), and Kali Linux (www.kali.org).
 If you want the power of the security tools that run on Linux, but you’re not interested in installing and learning much about Linux or don’t have the time to download and set up many of its popular security tools, I highly recommend you check out Kali Linux. The bootable Debian-based security testing suite comes with a slew of tools that are relatively easy to use. Alternative bootable (or live) testing suites include the Fedora Linux-based Network Security Toolkit (
www.networksecuritytoolkit.org). A complete listing of live bootable Linux toolkits is available at www.livecdlist.com.
Most of the tests I outline in this chapter require only Windows-based utilities but use the platform you’re most familiar with. You’ll get better results that way. My favorite tools for assessing wireless networks in Windows are as follows:
- Aircrack-ng (
http://aircrack-ng.org) - CommView for WiFi (
www.tamos.com/products/commwifi) - ElcomSoft Wireless Security Auditor (
www.elcomsoft.com/ewsa.html) - OmniPeek (
www.savvius.com)
You can also use a handheld wireless security testing device, such as the handy Digital Hotspotter by Canary Wireless (www.canarywireless.com) and even your Android-based phone or tablet with apps such as WiEye or Wifi Analyzer or iOS device with apps such as Network Analyzer and Network Multimeter. An external antenna is also something to consider as part of your arsenal. I have had good luck running tests without an antenna, but your mileage may vary. If you’re performing a walkthrough of your facilities to test for wireless signals, for example, using an additional antenna increases your odds of finding both legitimate and (more important) unauthorized wireless systems. You can choose among three types of wireless antennas:
- Omnidirectional: Transmits and receives wireless signals in 360 degrees over shorter distances, such as in boardrooms or reception areas. These antennas, also known as dipoles, typically come installed on APs from the factory.
- Semidirectional: Transmits and receives directionally focused wireless signals over medium distances, such as down corridors and across one side of an office or building.
- Directional: Transmits and receives highly focused wireless signals over long distances, such as between buildings. This antenna, also known as a high-gain antenna, is the antenna of choice for wireless hackers driving around cities looking for vulnerable APs — an act known as wardriving.
As an alternative to the antennas described in the preceding list, you can use a nifty can design — called a cantenna — made from a Pringles, coffee, or pork-and-beans can. If you’re interested in trying this, check out the article at www.turnpoint.net/wireless/has.html for details. A simple Internet search turns up a lot of information on this subject, if you’re interested. One site in particular (www.cantenna.com) sells the Super Cantenna kit, which has worked well for me.
Discovering Wireless Networks
After you have a wireless card and wireless testing software, you’re ready to roll. The first tests you should perform gather information about your wireless network, as described in the following sections.
Checking for worldwide recognition
The first test requires only the MAC address of your AP and access to the Internet. (You can find out more about MAC addresses later in this chapter, in the “Mac spoofing” section.) You’re testing to see whether someone has discovered your Wi-Fi signal and posted information about it for the world to see. Here’s how the test works:
Find your AP’s MAC address.
If you’re not sure what your AP’s MAC address is, you should be able to view it by using the arp -a command at a Windows command prompt. You might have to ping the access point’s IP address first so the MAC address is loaded into your ARP cache. Figure 10-1 shows what this can look like.
- After you have the AP’s MAC address, browse to the WiGLE database of wireless networks (
https://wigle.net). - Register with the site so you can perform a database queries. It’s worth it.
Select the Login link in the upper right corner of the website and then select View and then Search
You see a screen similar to Figure 10-2.
To see whether your network is listed, you can enter such AP information as geographical coordinates and SSID (service set identifier), but the simplest thing to do is enter your MAC address in the format shown in the example for the BSSID/MAC text box.
If your AP is listed, someone has discovered it — most likely via wardriving — and has posted the information for others to see. You need to start implementing the security countermeasures listed in this chapter as soon as possible to keep others from using this information against you!

Figure 10-1: Finding the MAC address of an AP by using arp.
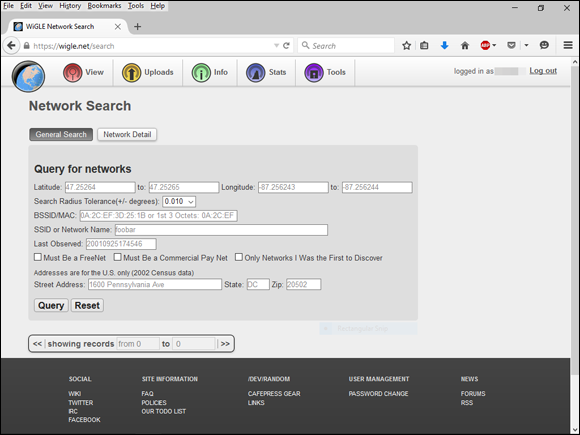
Figure 10-2: Searching for your wireless APs using the WiGLE database.
Scanning your local airwaves
Monitor the airwaves around your building to see what authorized and unauthorized APs you can find. You’re looking for the SSID, which is your wireless network name. If you have multiple and separate wireless networks, each one may or may not have a unique SSID associated with it.
You can get started with a tool such as NetStumbler (www.netstumbler.com/downloads). NetStumbler can discover SSIDs and other detailed information about wireless APs, including the following:
- MAC address
- Name
- Radio channel in use
- Vendor name
- Whether encryption is on or off
- RF signal strength (signal-to-noise ratio)
NetStumbler is quite old and is no longer maintained but it still works nonetheless. Another tool option is inSSIDer (www.inssider.com).
Figure 10-3 shows an example of what you might see when running NetStumbler in your environment. The information that you see here is what others can see as long as they’re in range of your AP’s radio signals. NetStumbler and most other tools work by sending a probe-request signal from the client. Any APs within signal range must respond to the request with their SSIDs — that is, if they’re configured to broadcast their SSIDs upon request.

Figure 10-3: NetStumbler displays detailed data on APs.
When you’re using wireless network analyzers, including OmniPeek and CommView for WiFi, your adapter might enter passive monitoring mode. This means you can no longer communicate with other wireless hosts or APs while the program is loaded.
Discovering Wireless Network Attacks and Taking Countermeasures
Various malicious hacks — including DoS attacks — can be carried out against your WLAN. This includes forcing APs to reveal their SSIDs during the process of being disassociated from the network and rejoining. In addition, hackers can literally jam the RF signal of an AP — especially in 802.11b and 802.11g systems — and force the wireless clients to re-associate to a rogue AP masquerading as the victim AP.
Hackers can create man-in-the-middle attacks by maliciously using a tool such as the WiFi Pineapple (www.wifipineapple.com/index.php) and can flood your network with thousands of packets per second by using the raw packet-generation tools Nping (https://nmap.org/nping) or NetScanTools Pro (www.netscantools.com) — enough to bring the network to its knees. Even more so than with wired networks, this type of DoS attack is very difficult to prevent on Wi-Fi.
You can carry out several attacks against your WLAN. The associated countermeasures help protect your network from these vulnerabilities as well as from the malicious attacks previously mentioned. When testing your WLAN security, look out for the following weaknesses:
- Unencrypted wireless traffic
- Weak WEP and WPA pre-shared keys
- Crackable Wi-Fi Protected Setup (WPS) PINs
- Unauthorized APs
- Easily circumvented MAC address controls
- Wireless equipment that’s physically accessible
- Default configuration settings
A good starting point for testing is to attempt to attach to your WLAN as an outsider and run a general vulnerability assessment tool, such as LanGuard or Nexpose. This test enables you to see what others can see on your network, including information on the OS version, open ports on your AP, and even network shares on wireless clients. Figure 10-4 shows the type of information that can be revealed about an AP on your network, including a missing administrator password, an outdated operating system, and open ports and shares that can be exploited.

Figure 10-4: A LanGuard scan of a live AP.
Encrypted traffic
Wireless traffic can be captured directly out of the airwaves, making this communications medium susceptible to eavesdropping. Unless the traffic is encrypted, it’s sent and received in cleartext just as on a standard wired network. On top of that, the 802.11 encryption protocols, Wired Equivalent Privacy (WEP) — yep, it’s still around — and Wi-Fi Protected Access (WPA), have their own weakness that allows attackers to crack the encryption keys and decrypt the captured traffic. This vulnerability has really helped put Wi-Fi on the map — so to speak.
WEP, in a certain sense, actually lives up to its name: It provides privacy equivalent to that of a wired network, and then some. However, it wasn’t intended to be cracked so easily. WEP uses a fairly strong symmetric (shared-key) encryption algorithm called RC4. Hackers can observe encrypted wireless traffic and recover the WEP key because of a flaw in how the RC4 initialization vector (IV) is implemented in the protocol. This weakness is because the IV is only 24 bits long, which causes it to repeat every 16.7 million packets — even sooner in many cases, based on the number of wireless clients entering and leaving the network.
 Most WEP implementations initialize wireless hardware with an IV of 0 and increment it by 1 for each packet sent. This can lead to the IVs reinitializing — starting over at 0 — approximately every five hours. Given this behavior, Wi-Fi networks that have a lower amount of usage can be more secure than large Wi-Fi environments that transmit a lot of wireless data because there’s simply not enough wireless traffic being generated.
Using WEPCrack (http://sourceforge.net/projects/wepcrack), or Aircrack-ng (http://aircrack-ng.org), attackers need to collect only a few minutes’ up to a few days’ (depending on how much wireless traffic is on the network) worth of packets to break the WEP key. Figure 10-5 shows airodump-ng (which is part of the Aircrack-ng suite) capturing WEP initialization vectors, and Figure 10-6 shows aircrack’s airodump at work cracking the WEP key of my test network.

Figure 10-5: Using airodump to capture WEP initialization vectors.

Figure 10-6: Using aircrack to crack WEP.
Airodump and aircrack are very simple to run in Windows. You just download and extract the aircrack programs, the cygwin Linux simulation environment, and the supporting peek files from http://aircrack-ng.org and you’re ready to capture packets and crack away!
 A longer key length, such as 128 bits or 192 bits, doesn’t make WEP exponentially more difficult to crack. This is because WEP’s static key scheduling algorithm requires that only about 20,000 or so additional packets be captured to crack a key for every extra bit in the key length.
The wireless industry came up with a solution to the WEP problem called Wi-Fi Protected Access (WPA). WPA uses the Temporal Key Integrity Protocol (TKIP) encryption system, which fixes all the known WEP issues. WPA2, which quickly replaced the original WPA, uses an even stronger encryption method called Counter Mode with Cipher Block Chaining Message Authentication Code Protocol (say that fast three times), or CCMP for short, based on the Advanced Encryption Standard (AES). WPA and WPA2 running in “enterprise mode” require an 802.1x authentication server, such as a RADIUS server, to manage user accounts for the WLAN.
 For non-enterprise wireless APs (and there are plenty out there in business), there’s no good reason to not be running WPA2 using pre-shared keys (PSKs).
You can also use aircrack to crack WPA and WPA2-PSK. To crack WPA-PSK encryption, you have to wait for a wireless client to authenticate with its access point. A quick (and dirty) way to force the re-authentication process is to send a de-authenticate packet to the broadcast address. This is something my co-author, Peter T. Davis, and I cover in detail in our book, Hacking Wireless Networks For Dummies.
You can use airodump to capture packets and then start aircrack (you can also run them simultaneously) to initiate cracking the pre-shared key by using the following command-line options:
#aircrack-ng -a2 -w path_to_wordlist <capture file(s)>
WPA key recovery is dependent on a good dictionary. The dictionary files available at www.outpost9.com/files/WordLists.html are a good starting point. Even with a great dictionary chock-full of potential passwords, I’ve often found that dictionary attacks against WPA are futile. Know your limits so you don’t waste too much time trying to crack WPA PSKs that are not crackable.
Another commercial alternative for cracking WPA and WPA2 keys is ElcomSoft Wireless Security Auditor (EWSA). To use EWSA, you simply capture wireless packets in the tcpdump format (every WLAN analyzer supports this format), load the capture file into the program, and shortly thereafter you have the PSK. EWSA is a little different because it can crack WPA and WPA2 PSKs in a fraction of the time it would normally take, but there’s a caveat. You must have a computer with a supported NVIDIA or AMD video card. Yep, EWSA doesn’t just use the processing power of your CPU — it also harnesses the power and mammoth acceleration capabilities of the video card’s graphics processing unit (GPU). Now that’s innovation!
The main EWSA interface is shown in Figure 10-7.

Figure 10-7: Using ElcomSoft Wireless Security Auditor to crack WPA pre-shared keys.
Using EWSA, you can try to crack your WPA/WPA2 PSKs at a rate of up to 173,000 WPA/WPA2 pre-shared keys per second. Compare that to the lowly few hundred keys per second using just the CPU and you can see the value in a tool like this. I always say you get what you pay for!
If you need to use your WLAN analyzer to view traffic as part of your security assessment, you won’t see any traffic if WEP or WPA/WPA2 are enabled unless you know the keys associated with each network. You can enter each key into your analyzer, but just remember that hackers can do the same thing if they’re able to crack your WEP or WPA pre-shared keys by using one of the tools I mention earlier.
Figure 10-8 shows an example of how you can view protocols on your WLAN by entering the WPA key into OmniPeek via the Capture Options window before you start your packet capture.

Figure 10-8: Using OmniPeek to view encrypted wireless traffic.
Countermeasures against encrypted traffic attacks
The simplest solution to the WEP problem is to migrate to WPA2 for all wireless communications. You can also use a VPN in a Windows environment — free — by enabling Point-to-Point Tunneling Protocol (PPTP) for client communications. You can also use the IPSec support built into Windows, as well as Secure Shell (SSH), Secure Sockets Layer/Transport Layer Security (SSL/TLS), and other proprietary vendor solutions, to keep your traffic secure. Just keep in mind that there are cracking programs for PPTP, IPSec, and other VPN protocols as well, but overall, you’re pretty safe, especially compared to no VPN at all.
Newer 802.11-based solutions exist as well. If you can configure your wireless hosts to regenerate a new key dynamically after a certain number of packets have been sent, the WEP vulnerability can’t be exploited. Many AP vendors have already implemented this fix as a separate configuration option, so check for the latest firmware with features to manage key rotation. For instance, the proprietary Cisco LEAP protocol uses per-user WEP keys that offer a layer of protection if you’re running Cisco hardware. Again, be careful because cracking programs exist for LEAP, such as asleap (http://sourceforge.net/projects/asleap). The best thing to do is just stay away from WEP.
The 802.11i standard from the IEEE integrates the WPA fixes and more. This standard is an improvement over WPA but is not compatible with older 802.11b hardware because of its implementation of the Advanced Encryption Standard (AES) for encryption in WPA2.
If you’re using WPA2 with a pre-shared key (which is more than enough for small Wi-Fi), ensure that the key contains at least 20 random characters so it isn’t susceptible to the offline dictionary attacks available in such tools as Aircrack-ng and ElcomSoft Wireless Security Auditor. The attack settings for ElcomSoft Wireless Security Auditor are shown in Figure 10-9.

Figure 10-9: ElcomSoft Wireless Security Auditor’s numerous password cracking options.
As you can see, everything from plain dictionary attacks to combination attacks to hybrid attacks that use specific word rules are available. Use a long, random pre-shared key so you don’t fall victim to someone with a lot of time on their hands!
Keep in mind that although WEP and weak WPA pre-shared keys are crackable, it’s still much better than no encryption at all. Similar to the effect that home security system signs have on would-be home intruders, a wireless LAN running WEP or weak WPA pre-shared keys is not nearly as attractive to a criminal hacker as one without it. Many intruders are likely to move on to easier targets unless they really want to get into yours.
Wi-Fi Protected Setup
Wi-Fi Protected Setup (WPS) is a wireless standard that enables simple connectivity to “secure” wireless APs. The problem with WPS is that its implementation of registrar PINs make it easy to connect to wireless and can facilitate attacks on the very WPA/WPA2 pre-shared keys used to lock down the overall system. As we’ve seen over the years with security, everything’s a tradeoff!
WPS is intended for consumer use in home wireless networks. If your wireless environment is like most others that I see, it probably contains consumer-grade wireless APs (routers) that are vulnerable to this attack.
The WPS attack is relatively straightforward using an open source tool called Reaver (https://code.google.com/p/reaver-wps). Reaver works by executing a brute-force attack against the WPS PIN. I use the commercial version, Reaver Pro (www.reaversystems.com), which is a device that you connect your testing system to over Ethernet or USB. Reaver Pro’s interface, as shown in Figure 10-10, is pretty straightforward.

Figure 10-10: The Reaver Pro startup window.
Running Reaver Pro is easy. You simply follow these steps:
- Connect to the Reaver Pro device by plugging your testing system into the PoE LAN network connection. You should get an IP address from the Reaver Pro device via DHCP.
- Load a web browser and browse to http://10.9.8.1 and log in with reaver/foo as the username and password.
- On the home screen, press the Menu button and a list of wireless networks should appear.
- Select your wireless network from the list and then click Analyze.
Let Reaver Pro run and do its thing.
This process is shown in Figure 10-11.

Figure 10-11: Using Reaver Pro to determine that Wi-Fi Protected Setup is enabled.
If you wish to have Reaver Pro automatically start cracking your WPS PIN, you’ll need to click Configure and set the WPS Pin setting to On. WPS PIN cracking can take anywhere from a few minutes to a few hours, but if successful, Reaver Pro will return the WPA pre-shared key or will tell you that the wireless network is too far away or that intruder lockout is enabled.
I’ve had mixed results with Reaver Pro depending on the computer I’m running it on and the wireless AP that I’m testing. It’s still a worthy attack you should pursue if you’re looking to find and fix the wireless flaws that matter.
Countermeasures against the WPS PIN flaw
It’s rare to come across a security fix as straightforward as this one: Disable WPS. If you need to leave WPS enabled, at least set up MAC address controls on your AP(s). It’s not foolproof, but it’s better than nothing! More recent consumer-grade wireless routers also have intruder lockout for the WPS PIN. If the system detects WPS PIN cracking attempts, it will lock out those attempts for a certain period of time. The best things to do to prevent WPS attacks in the enterprise is to not use low-end wireless routers in the first place.
Rogue wireless devices
Watch out for unauthorized APs and wireless clients that are attached to your network and running in ad-hoc mode.
Also, be sure to educate your users on safe Wi-Fi usage when they’re outside of your office. Communicate to them the dangers of connecting to unknown Wi-Fi and remind them on a periodic and consistent basis. Otherwise, their systems can be hacked or become infected with malware, and guess whose problem it is once they connect back onto your network.
By using NetStumbler or your client manager software, you can test for APs and ad-hoc (or peer-to-peer) devices that don’t belong on your network. You can also use the network monitoring features in a wireless network analyzer, such as OmniPeek and CommView for WiFi.
Look for the following rogue AP characteristics:
- Odd SSIDs, including the popular default ones such as linksys and free public wifi.
- MAC addresses that don’t belong on your network. Look at the first three bytes of the MAC address (the first six numbers), which specify the vendor name. You can perform a MAC address vendor lookup at
http://standards.ieee.org/develop/regauth/oui/public.htmlto find information on APs you’re unsure of. - Weak radio signals, which can indicate that an AP has been hidden away or is adjacent to or even outside of your building.
- Communications across a different radio channel(s) than what your network communicates on.
- Degradation in network throughput for any Wi-Fi client.
In Figure 10-12, NetStumbler has found two potentially unauthorized APs. The ones that stand out are the two with SSIDs of BI and LarsWorld. Notice how they’re running on two different channels, two different speeds, and are made by two different hardware vendors. If you know what’s supposed to be running on your wireless network (you do, don’t you?), unauthorized systems should really stand out.

Figure 10-12: NetStumbler showing potentially unauthorized APs.
NetStumbler does have one limitation: It won’t find APs that have probe response (SSID broadcast) packets disabled. Commercial wireless network analyzers such as CommView for WiFi as well as the open source Kismet look not only for probe responses from APs like NetStumbler does, but also for other 802.11 management packets, such as association responses and beacons. This allows Kismet to detect the presence of hidden Wi-Fi.
If the Linux platform is not your cup of tea, and you’re still looking for a quick and dirty way to root out hidden APs, you can create a client-to-AP reconnection scenario that forces the broadcasting of SSIDs using de-authentication packets. You can find detailed instructions in the book I wrote with Peter T. Davis, Hacking Wireless Networks For Dummies.
The safest way to root out hidden APs is to simply search for 802.11 management packets. You can configure your wireless network analyzer such as OmniPeek to search for 802.11 management packets by enabling a capture filter on 802.11 management packets, as shown in OmniPeek’s options in Figure 10-13.

Figure 10-13: You can configure OmniPeek to detect APs that don’t broadcast their SSIDs.
Figure 10-14 shows how you can use CommView for WiFi to spot an odd network host. For instance, in the example shown in Figure 10-14, Technico and Netgear systems are showing up, but only Ubiquiti hardware is used on this particular network.

Figure 10-14: Using CommView for WiFi to spot wireless systems that don’t belong.
My test network for this example is small compared to what you might see, but you get the idea of how an odd system can stand out.
Wi-Fi set up in ad-hoc (or peer-to-peer) mode enable wireless clients to communicate directly with one another without having to pass through an AP. These types of Wi-Fi operate outside the normal wireless security controls and can cause serious security issues beyond the normal 802.11 vulnerabilities.
You can use just about any wireless network analyzer to find unauthorized ad-hoc devices on your network. If you come across quite a few ad-hoc systems, such as those devices listed as STA (short for station) in CommView for WiFi’s Type column, as shown in Figure 10-15, this could be a good indication that one (or several) person is running unprotected wireless systems or at least has ad-hoc wireless enabled. These systems are often printers and other seemingly benign network systems, but they can be workstations and mobile devices. Either way, they’re potentially putting your network and information at risk, so they’re worth checking out.

Figure 10-15: CommView for Wifi showing several unauthorized ad-hoc clients.
You can also use the handheld Digital Hotspotter I mentioned earlier in this chapter (see “Choosing Your Tools”) to search for ad-hoc–enabled systems or even a wireless intrusion prevention system (WIPS) to search for beacon packets in which the ESS field is not equal to 1.
Walk around your building or campus (warwalk, if you will) to perform this test to see what you can find. Physically look for devices that don’t belong and keep in mind that a well-placed AP or Wi-Fi client that’s turned off won’t show up in your network analysis tools. Search near the outskirts of the building or near any publicly accessible areas. Scope out boardrooms and the offices of upper-level managers for any unauthorized devices. These places may be off-limits, but that’s all the more reason to check them for rogue APs.
When searching for unauthorized wireless devices on your network, keep in mind that you might be picking up signals from nearby offices or homes. Therefore, if you find something, don’t immediately assume it’s a rogue device. One way to figure out whether a device is in a nearby office or home is by the strength of the signal you detect. Devices outside your office should have a weaker signal than those inside. Using a wireless network analyzer in this way helps narrow the location and prevent false alarms in case you detect legitimate neighboring wireless devices.
It’s pays to know your network environment. Knowing what your surroundings should look like makes it easier to spot potential problems.
A good way to determine whether an AP you discover is attached to your wired network is to perform reverse ARPs (RARPs) to map IP addresses to MAC addresses. You can do this at a command prompt by using the arp -a command and simply comparing IP addresses with the corresponding MAC address to see whether you have a match.
Also, keep in mind that Wi-Fi authenticates the wireless devices, not the users. Criminal hackers can use this to their advantage by gaining access to a wireless client via remote-access software, such as telnet or SSH, or by exploiting a known application or OS vulnerability. After they do that, they potentially have full access to your network and you would be none the wiser.
Countermeasures against rogue wireless devices
The only way to detect rogue APs and wireless hosts on your network is to monitor your wireless network proactively (in real time if possible), looking for indicators that wireless clients or rogue APs might exist. A WIPS is perfect for such monitoring. But if rogue APs or clients don’t show up, that doesn’t mean you’re off the hook. You might also need to break out the wireless network analyzer or other network management application.
Use personal firewall software, such as Windows Firewall, on all wireless hosts to prevent unauthorized remote access into your hosts, and subsequently, your network.
Finally, don’t forget about user education. It’s not foolproof, but it can help serve as an additional layer or defense. Ensure that security is always on the top of everyone’s mind. Chapter 19 contains additional information about user awareness and training.
MAC spoofing
A common defense for wireless networks is Media Access Control (MAC) address controls. This is where you configure your APs to allow only wireless clients with known MAC addresses to connect to the network. Consequently, a very common hack against wireless networks is MAC address spoofing.
The bad guys can easily spoof MAC addresses in Linux, by using the ifconfig command, and in Windows, by using the SMAC utility, as I describe in Chapter 9. However, like WEP and WPA, MAC address-based access controls are another layer of protection and better than nothing at all. If someone spoofs one of your MAC addresses, the only way to detect malicious behavior is through contextual awareness by spotting the same MAC address being used in two or more places on the WLAN, which can be tricky.
One simple way to determine whether an AP is using MAC address controls is to try to associate with it and obtain an IP address via DHCP. If you can get an IP address, the AP doesn’t have MAC address controls enabled.
The following steps outline how you can test your MAC address controls and demonstrate just how easy they are to circumvent:
Find an AP to attach to.
You can do this simply by loading NetStumbler, as shown in Figure 10-16.
In this test network, the AP with the SSID of doh! is the one I want to test. Note the MAC address of this AP as well. This will help you make sure you’re looking at the right packets in the steps that follow. Although I’ve hidden most of the MAC address of this AP for the sake of privacy, let’s just say its MAC address is 00:40:96:FF:FF:FF. Also, notice in Figure 10-16 that NetStumbler was able to determine the IP address of the AP. Getting an IP address will help you confirm that you’re on the right wireless network.
Using a WLAN analyzer, look for a wireless client sending a probe request packet to the broadcast address or the AP replying with a probe response.
You can set up a filter in your analyzer to look for such frames, or you can simply capture packets and just browse through looking for the AP’s MAC address, which you noted in Step 1. Figure 10-17 shows what the Probe Request and Probe Response packets look like.
Note that the wireless client (again for privacy, suppose its full MAC address is 00:09:5B:FF:FF:FF) first sends out a probe request to the broadcast address (FF:FF:FF:FF:FF:FF) in packet number 98. The AP with the MAC address I’m looking for replies with a Probe Response to 00:09:5B:FF:FF:FF, confirming that this is indeed a wireless client on the network for which I’ll be testing MAC address controls.
Change your test computer’s MAC address to that of the wireless client’s MAC address you found in Step 2.
In UNIX and Linux, you can change your MAC address very easily by using the ifconfig command as follows:
Log in as root and then disable the network interface.
Insert the network interface number that you want to disable (typically wlan0 or ath0) into the command, like this:
[root@localhost root]# ifconfig wlan0 downEnter the new MAC address you want to use.
Insert the fake MAC address and the network interface number like this:
[root@localhost root]# ifconfig wlan0 hw ether 01:23:45:67:89:abThe following command also works in Linux:
[root@localhost root]# ip link set wlan0 address 01:23:45:67:89:ab- Bring the interface back up with this command:
[root@localhost root]# ifconfig wlan0 up
If you change your Linux MAC addresses often, you can use a more feature-rich utility called GNU MAC Changer (https://github.com/alobbs/macchanger).More recent versions of Windows make it difficult to change your MAC address. You might be able to change your MAC addresses in your wireless NIC properties via Control Panel. However, if you don’t like tweaking the OS in this manner (or cannot), you can try a neat and inexpensive tool created by KLC Consulting called SMAC (available at
www.klcconsulting.net/smac). To change your MAC address, you can use the steps I outline in Chapter 9.When you’re done, SMAC presents something similar to the screen shown in Figure 10-18.
To reverse any of the preceding MAC address changes, simply reverse the steps performed and then delete any data you created.Note that APs, routers, switches, and the like might detect when more than one system is using the same MAC address on the network (that is, yours and the host that you’re spoofing). You might have to wait until that system is no longer on the network; however, I rarely see any issues spoofing MAC addresses in this way, so you probably won’t have to do anything.
Ensure that you are connected to the appropriate SSID.
Even if your network is running WEP or WPA, you can still test your MAC address controls. You just need to enter your encryption key(s) before you can connect.Obtain an IP address on the network.
You can do this by rebooting or disabling/enabling your wireless NIC. However, you can do it manually by running ipconfig /renew at a Windows command prompt or by manually entering a known IP address in your wireless network card’s network properties.
Confirm that you’re on the network by pinging another host or browsing the Internet.
In this example, I could ping the AP (10.11.12.154) or simply load my favorite web browser to see whether I can access the Internet.

Figure 10-16: Finding an accessible AP via NetStumbler.

Figure 10-17: Looking for the MAC address of a wireless client on the network being tested.

Figure 10-18: SMAC showing a spoofed MAC address.
That’s all there is to it! You’ve circumvented your wireless network’s MAC address controls in six simple steps. Piece of cake!
Countermeasures against MAC spoofing
The easiest way to prevent the circumvention of MAC address controls and subsequent unauthorized attachment to your wireless network is to enable WPA2. Another way to control MAC spoofing is by using a WIPS. This second option is certainly more costly, but it could be well worth the money when you consider the other proactive monitoring and blocking benefits such a system would provide.
Physical security problems
Various physical security vulnerabilities can result in physical theft, the reconfiguration of wireless devices, and the capturing of confidential information. You should look for the following security vulnerabilities when testing your systems:
- APs mounted on the outside of a building and accessible to the public.
- Poorly mounted antennas — or the wrong types of antennas — that broadcast too strong a signal and that are accessible to the public. You can view the signal strength in NetStumbler, your wireless client manager, or one of the commercial tools I mention earlier in this chapter.
These issues are often overlooked because of rushed installations, improper planning, and lack of technical knowledge, but they can come back to haunt you. The book Wireless Networks For Dummies provides more details.
Countermeasures against physical security problems
Ensure that APs, antennas, and other wireless and network infrastructure equipment are locked away in secure closets, ceilings, or other places that are difficult for a would-be intruder to access physically. Terminate your APs outside any firewall or other network perimeter security devices — or at least in a DMZ — whenever possible. If you place unsecured wireless equipment inside your secure network, it can negate any benefits you would get from your perimeter security devices, such as your firewall.
If wireless signals are propagating outside your building where they don’t belong, either
- Turn down the transmit power setting of your AP.
- Use a smaller or different antenna (semidirectional or directional) to decrease the signal.
Some basic planning helps prevent these vulnerabilities.
Vulnerable wireless workstations
Wireless workstations such as Windows-based laptops can have tons of security vulnerabilities — from weak passwords to unpatched security holes to the storage of WEP and WPA encryption keys locally. Most of the well-known wireless client vulnerabilities have been patched by their respective vendors, but you never know whether all your wireless systems are running the latest (and usually safest) versions of operating systems, wireless client software, and other software applications.
In addition to using the wireless client, stumbling, and network analysis software I mention earlier in this chapter, you should also search for wireless client vulnerabilities by performing authenticated scans using various vulnerability testing tools, such as GFI LanGuard, Nexpose, and Acunetix Web Vulnerability Scanner.
These programs aren’t wireless-specific, but they might turn up vulnerabilities in your wireless computers that you might not have discovered or thought about testing otherwise. I cover operating system and application vulnerabilities as well as using the tools in the preceding list in Parts IV and V of this book.
Countermeasures against vulnerable wireless workstations
You can implement the following countermeasures to keep your workstations from being used as entry points into your wireless network:
- Regularly perform vulnerability assessments on your wireless workstations, in addition to other network hosts.
- Apply the latest vendor security patches and enforce strong user passwords.
- Use personal firewalls and endpoint security software on all wireless systems where possible, including phones and tablets, to keep malicious intruders off those systems and out of your network.
- Install anti-malware software.
Default configuration settings
Similar to wireless workstations, wireless APs have many known vulnerabilities. The most common ones are default SSIDs and admin passwords. The more specific ones occur only on certain hardware and software versions that are posted in vulnerability databases and vendor websites. Many wireless systems still have WEP and WPA disabled by default as well.
Countermeasures against default configuration settings exploits
You can implement some of the simplest and most effective security countermeasures for Wi-Fi — and they’re all free:
- Make sure that you change default admin passwords and SSIDs.
- At a minimum, enable WPA2. Use very strong pre-shared keys (PSKs) consisting of at least 20 random characters or use WPA/WPA2 in enterprise mode with a RADIUS server for host authentication.
- Disable SSID broadcasting if you don’t need this feature.
- Apply the latest firmware patches for your APs and Wi-Fi cards. This countermeasure helps to prevent various vulnerabilities to minimize the exploitation of publicly known holes related to management interfaces on APs and client-management software on the clients.