
Chapter 4
Open Source Intelligence Gathering
A malicious hacker who is intent on gaining access to an organization's computer network in some way will almost certainly do their homework first; that is, gathering information on that organization and its computer systems. They will research individuals who work for, or are associated with, that organization and compile lists of domain names, hostnames, IP addresses, URLs, email addresses, and potential passwords, all without sending a single packet of data to any device associated with their target.
Think of a malicious hacker as a dedicated, hardworking, and meticulous individual (or a group of such individuals) and purge your mind of any other images associated with the word hacker.
The intelligence gathering process, whether performed by us or them, makes use of freely available, public information accessible to anyone who wants it and knows where to look. It is not protected in any way, and it does not cost anything to obtain. For that reason, it can be called open source. As a penetration tester or ethical hacker, you must at least be as diligent as a malicious hacker and carry out your research thoroughly, building up a picture of your target—your client's company and network—before you actually start doing any active hacking. A malicious hacker may not even visit their target's website, but you will almost certainly do this at the beginning of your engagement. Companies often want an open source intelligence (OSINT) assessment because they need insight into what a bad actor, intent on causing damage and disruption, might learn through the same types of activities. By conducting this kind of assessment, various vulnerabilities and risks can be identified that would otherwise be left undetected. As you will see, gaping holes in an organization's external infrastructure (often made by the employees themselves) can easily be overlooked.
Does Your Client Need an OSINT Review?
Not every client will want or need you to carry out OSINT work for them. When working as an ethical hacker, it is important to remember from the beginning that you are providing a service to a customer. This service should offer good value for their money, providing a thorough and detailed analysis of agreed-upon computer systems as defined within the scope of the project. If a client does not require the additional testing (and time) associated with OSINT, then it should not be falsely sold to them. The majority of engagements will require some level of open source intelligence review, but they often do not require a deep-dive into all employees’ social media postings, for instance, instead limiting the probes to a finite number of common attacks, which we will cover in this book.
In an ideal world, perhaps your client will engage your services for a longer period of time so that you can simulate the efforts of a malicious hacker, who may well spend months gathering information and planning an attack. It is highly unlikely that an organization will pay you to spend large amounts of time searching the Web for information about them.
This chapter assumes that the client (whom we will often refer to as the target) has requested a more comprehensive and explicitly defined OSINT review. OSINT gathering is mostly a passive activity, the purpose of which is to identify valid targets or systems, software types and versions, or people of interest who can be used during subsequent stages of a test. Later, we'll show you how to probe systems and send packets directly to the target, referred to as the active phase of the assessment. For now, you will be gathering information only from public data sources such as search engine results.
If you perform a search with DuckDuckGo, Bing, or Google, you're not actually sending any data to the target company; that is, you're not acquiring information from the target itself, nor are you alerting that target to the fact you're trawling for information. By using a search engine, you are simply querying a database belonging to some other external organization for information about the target. If you are searching using Google, then you are accessing Google's systems, not your client's. To the casual observer, this traffic appears benign, similar in nature to searches conducted in academic or journalistic research. Remember, though, as with any information from a third-party source, there is always a problem with reliability—you cannot blindly trust information that you find, and indeed some of that data may even be falsified to throw attackers off the scent or to alert companies when such attacks are taking place.
What Are You Looking For?
The goal of OSINT is to obtain information that will assist you in carrying out an attack in order to gain access to computer systems without the owner's authority. You should, of course, obtain the required authority before proceeding with any attacks. If you identify information, such as usernames and passwords, then that's great, but you will also need places to enter those credentials. Remember, at this point, you know almost nothing about your target, so you need to find websites and web applications. You need to find hosts (or computers) that are connected to the Internet with a public-facing IP address. You may even find information pertaining to nonpublic computers or internal hosts. This is also useful and will come in handy should you gain access to internal resources. You will be on the lookout for a VPN portal, mail servers, web servers, database servers, Linux machines, UNIX machines, Windows boxes, IoT devices—almost anything that is connected to the Internet and part of the target's network.
You want to build up a list of target IP addresses, hostnames, and domain names. While you do all this searching, you don't want to restrict yourself to just one source of information. You want to scrape content from the company's own websites and from personal social media accounts belonging to individuals at the company through a variety of search engines. You will also find plenty of information in other public databases, such as those belonging to the Internet Corporation for Assigned Names and Numbers (ICANN) and numerous domain name registrars.
You should never limit yourself to a single type of database or resource. For example, it's not as effective to limit your web searches to using only Google, as Google may not store exactly the same information as alternatives such as Baidu or Bing. Individuals’ social media accounts and Internet activity (such as posts on public forums or items listed for sale on an auction site) can yield information such as their preferred choice of software, certifications they hold, or photos of company-related events.
To summarize, you should typically be looking for the following key pieces or types of information:
- Usernames, profile names and/or email addresses
- Passwords (private keys, PINs, and so forth)
- Domain names
- Hostnames
- IP addresses (external and internal)
- Software and operating system types, names, and versions
- Technical documentation, such as user guides for systems
In fact, you should be looking for any piece of information that is related to your target and that may allow a malicious hacker insight into the computer systems and software running at your target. Your job is to find that information, process it, and report the findings to your client in a security-related context.
Where Do You Find It?
The types of places you'll be looking for intelligence have already been mentioned, but here is a convenient nonexhaustive list to summarize:
- Personal websites; for example, blogs
- As many search engines as possible
- Social media; for example, LinkedIn, Facebook, Twitter, and Instagram
- Other common accounts, such as GitHub, forums, newsgroups, and mailing lists
- Public databases (ICANN, wireless registrars, domain name registrars, libraries, and telephone directories)
- Peer-to-peer file sharing networks (accessible with a BitTorrent client)
You will almost certainly visit your client's public website (or sites) too. Strictly speaking, this falls outside the realm of OSINT, but imagine explaining to your client that you omitted such a valuable source of information. While a malicious hacker might avoid this to remain undetected for as long as possible, you should not have this concern.
We're not going to show you how to find information in every one of the places mentioned so far. What we are going to do is to cover some tools and techniques for finding and enumerating information that you can apply in various contexts. We'll now introduce you to a number of tools and applications that can assist you in this process.
OSINT Tools
The following tools are commonplace in most hackers’ OSINT toolkits. We're going to cover them with the exception of DNS-related tools, which we'll cover in the next chapter:
- Search engines (such as Google)
- Goog-mail.py
- Application programming interfaces (APIs) for public databases
- Recon-ng
- TheHarvester
- FOCA
- Metagoofil
- Exiftool
- Maltego CE
- LinkedInt
- Shodan
- Various Domain Name System (DNS) utilities such as Dig, Host, Nslookup, and WHOIS
It may come as a relief to you that almost every tool we recommend in this book is open source (in the software sense), or at the very least, free to obtain and use. In later chapters, you will be using some exploits and tools that were not intended to be freely available but that were allegedly leaked from the National Security Agency (NSA). We're going to start off with some simple tools and techniques to start slowly building up your arsenal.
Grabbing Email Addresses from Google
A typical OSINT review will start with manual browsing the Web, looking for information related to the target. You will have a company name and perhaps a single URL with which to get started. Manual browsing will no doubt produce results, but at some point, you're going to need to automate your information-gathering efforts. It can be painstaking to trawl through thousands of search results, so a number of tools have been released that can make that process easier.
We'll begin with email addresses. Email addresses often double-up as usernames and, if agreed to and authorized by the client, could be used for social engineering purposes and spear-phishing attacks. There is a simple Python script,
goog-mail.py, that can be downloaded from our website (www.hackerhousebook.com/files/goog-mail.py). This simple Python program has been around for a while; you'll often find an author's name in scripts like this, but not in this case—we don't know who wrote it. You can obtain a copy of
goog-mail.py using
wget as follows from a terminal in your Kali Linux virtual machine:
wget --user=student --password=student https://www.hackerhousebook.com/files/goog-mail.pyThere are various scripts, exploits, and utilities available from our website. If you are using scripts like this that you've downloaded from the Web, you're going to want to check the source code and make sure that they're not doing anything you wouldn't want them to do. Don't worry if you're not familiar with reading code; we'll explain a few things, and you may rest assured that the content you download from us—even when we didn't write it ourselves—has at least been reviewed for anything malicious.
Here's an excerpt from
goog-mail.py that highlights the tool's key functionality:
try:while page_counter_web < 50 :results_web = 'http://www.google.com/search?q=%40'+str(domain_name)+'&hl=en&lr=&ie=UTF-8&start=' + repr(page_counter_web) + '&sa=N'request_web = urllib2.Request(results_web)request_web.add_header('User-Agent','Mozilla/4.0(compatible; MSIE 5.5; Windows NT 5.0)')opener_web = urllib2.build_opener()text = opener_web.open(request_web).read()emails_web = (re.findall('([w.-]+@'+domain_name+')',StripTags(text)))for email_web in emails_web:d[email_web]=1uniq_emails_web=d.keys()page_counter_web = page_counter_web +10
Here we have a while loop that sends a web request to www.google.com and submits a search query, specifying a domain name (along with some other options). The script then parses Google's response for strings that look like an email address. In other words, they include the
@ symbol followed by the domain name specified.
If our target was the U.K. arm of IBM, we might run the script as follows, passing in the string uk.ibm.com to be used as the
domain_name variable:
python2 goog-mail.py uk.ibm.comWe are searching a real company now, without their permission—we don't need it since we're only querying public data. Let's take a look at what the script's output may look like:
[email protected][email protected][email protected][email protected][email protected][email protected][email protected][email protected][email protected][email protected][email protected][email protected][email protected][email protected][email protected][email protected][email protected][email protected][email protected][email protected][email protected][email protected][email protected]
All we are doing here is searching Google for email addresses, but this simple approach can often yield useful results. We would save results like this in a text file or a spreadsheet, as we may want to use them later for trying to gain access to systems. We may also come across useful details about these individuals, in which case we would add them to our notes.
Email addresses found in this way will be common targets for spam and malware, as they can be automatically obtained by bots using this same simple technique. We should assume, therefore, that the previous uk.ibm.com email addresses will be receiving a large amount of spam on a regular basis and may in fact no longer be in use! It is important to never rely solely on a tool or script's output. Even in this simple case, we would need to review the results manually and make sure that each of those results actually looks like an email address. (There's at least one in the previous list that does not.) You may well be able to find email addresses belonging to you or your company that have been posted publicly through this method.
Google Dorking the Shadows
Google can be thought of as not just a database to be queried but also as one of the tools in your OSINT toolkit. A search query designed to expose sensitive information from Google is called a Google dork. Google dorking or Google hacking (not to be confused with hacking Google) can be used to identify vulnerable sites and data and can be as easy as typing
inurl:/etc/passwd root:x:0:0:root:/root:/bin/bash into the search box. With that particular search, you may find insecurely configured Linux or UNIX hosts exposing their passwd file (more on these in a moment). The search would return results that contain
/etc/passwd in the URL along with the string
root:x:0:0:root:/root:/bin/bash—a line almost always found in a Linux or UNIX passwd file. If you do this search now, you'll probably find a lot of Linux tutorials, as it is a common example.
A Brief Introduction to Passwd and Shadow Files
While a Linux or UNIX passwd file is usually readable by anyone on the system (and writable only by the root user), if anyone connected to the Internet can see it, then that's not good news. Although the passwd file is unlikely to contain password hashes (you need
/etc/shadow for that), it will contain usernames for that system and may hold additional information in the GECOS field. The term GECOS dates back to an operating system originally developed in the 1960s, but today it refers to additional information stored in this passwd file. This could contain the user's full name and other personally identifiable information.
We'll be referring to passwd and shadow files throughout this book, so it makes sense to take a quick look at a typical example of each and explain the significance and relevance of finding this kind of information exposed publicly. From a terminal in a standard Linux distribution, you can try to view the shadow file like this:
cat /etc/shadowUnder normal circumstances, however, unless you're the root user, you'll see the following message:
cat: /etc/shadow: Permission deniedOnce you're the root user, you have the required permissions to view the file. Here's an extract from a typical passwd file, which typically does not need root permissions to view:
root:x:0:0:root:/root:/bin/bashdaemon:x:1:1:daemon:/usr/sbin:/usr/sbin/nologinbin:x:2:2:bin:/bin:/usr/sbin/nologinsys:x:3:3:sys:/dev:/usr/sbin/nologinsync:x:4:65534:sync:/bin:/bin/syncgames:x:5:60:games:/usr/games:/usr/sbin/nologinmail:x:8:8:mail:/var/mail:/usr/sbin/nologinnews:x:9:9:news:/var/spool/news:/usr/sbin/nologinwww-data:x:33:33:www-data:/var/www:/usr/sbin/nologinbackup:x:34:34:backup:/var/backups:/usr/sbin/nologinnobody:x:65534:65534:nobody:/nonexistent:/usr/sbin/nologinadmin:x:1000:1000:Peter,,,:/home/admin:/bin/bash
Each field in this table is separated by a colon (
:). Here's a little bit of the associated shadow file:
root:$6$qrAgBGFw$rPW5czxgifndygfkKhuwVuDDUg.IfSuo.BnzMBdP9lfcmVWffSK9pdXfhsbCkhs3QH/:17826:0:99999:7:::daemon:*:17826:0:99999:7:::bin:*:17826:0:99999:7:::sys:*:17826:0:99999:7:::sync:*:17826:0:99999:7:::games:*:17826:0:99999:7:::mail:*:17826:0:99999:7:::news:*:17826:0:99999:7:::www-data:*:17826:0:99999:7:::backup:*:17826:0:99999:7:::admin:$6$vu//Vnxn$ae9tWkR4I7KepsfSy6Zg7jmXvFXLMqdt9AyzMFVI8a0cdUMZM3hMmc7l.:17826:0:99999:7:::
We'll be delving further into file permissions and passwords (and hashes) later, so if you're not completely sure about what's going on at this stage, do not worry! Needless to say, it would be pretty bad if some large organization—for example, the Higher Education Commission of Pakistan—had their passwd file exposed and searchable using Google, as illustrated in Figure 4.1.
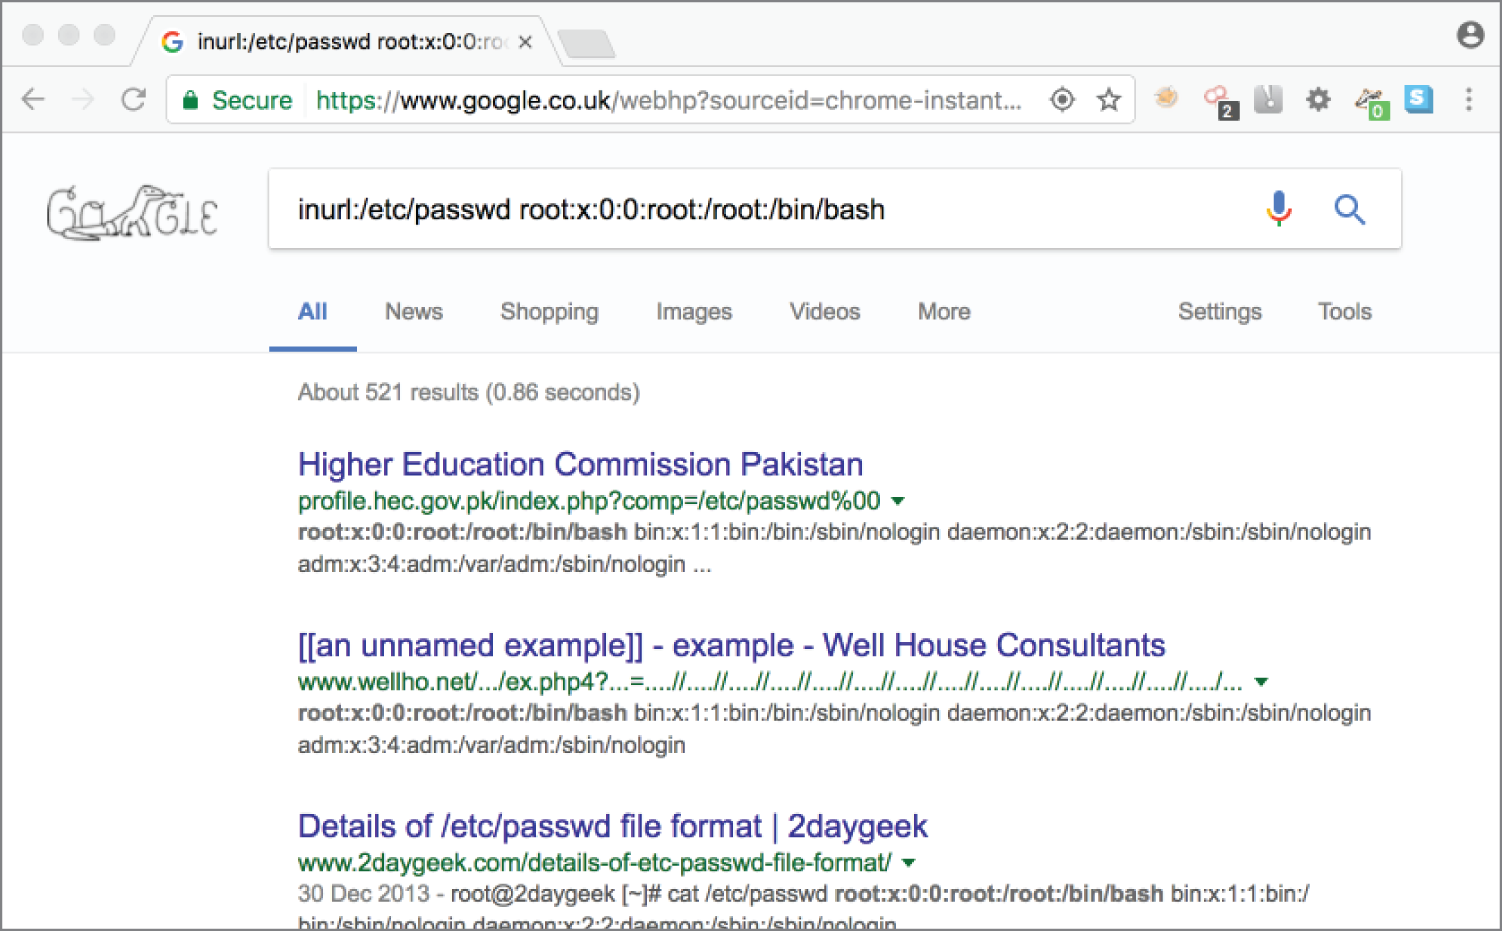
Figure 4.1 Google dorking the Higher Education Commission of Pakistan
As a general rule, don't go searching for random exposures and clicking the results, as doing so is likely to be perceived as an illegal attempt to gain access to a computer, regardless of how tempting it may be or how reckless you think it was that someone made such a mistake. What you should do in this situation is to contact the affected party and let them know (preferably using an email encrypted using OpenPGP). It is absolutely lawful to search and identify these vulnerabilities, but unless you have explicit permission and authority from the system owner to access the resource in question, you'd probably be committing an offense.
Here's a search that returns
.doc file types (you might change this to
.txt or
.pdf) where the URL contains
gov and where the file (or document) contains the text
default password:
filetype:doc inurl:gov intext:"default password"Ideally, this works as well for you as it did for us, and you can see how easy it is to build up a list of default passwords used by various government agencies—all without clicking a single link.
Here are excerpts from the first page of results that were found using that dork while writing this book:
- “The default password is 39pL4q.”
- “The default login is master; the default password is master.”
- “The default password is changeme.”
- “Your default Password is 0 + Your Extension and # sign. Password can be 4–16…”
- “The default password is 123456.”
The Google Hacking Database
You've seen a couple of common Google dorks so far, but there exists an entire database of these specialized Google search queries, which can be found at www.exploit-db.com/google-hacking-database.
The idea of Google dorking is that you will be finding sensitive information that was inadvertently made public and that can be found with nothing more than a Google search. If a computer's passwd file is exposed, there's a chance that other sensitive files are going to be exposed as well. Even if you can't access passwd or shadow files, altering the search terms slightly may allow you to view other sensitive information; for example, configuration files and installation logs.
Browsing through the Google Hacking Database (GHDB) will give you some ideas; each dork searches for something specific, so you could search the database to find a search string for your particular purpose.
Another example of a dork is
inurl:"q=user/password", which is designed to locate Drupal (a popular content management framework) instances. An attacker might use a query like this to locate instances of vulnerable web frameworks that are missing security patches before exploiting as many as possible. When testing a client's infrastructure, you're going to need to tailor your search queries to find relevant information.
Remember not to rely on a single search engine for your information or even limit yourself to only the Web. Some of the best information we've found on clients in the past has come from commonly overlooked data sources, such as public libraries. When starting to think about physical security (the details of which are beyond the scope of this book), you may even find blueprints to the physical buildings themselves. You should be checking sources like Ofcom (U.K.) or the Federal Communications Commission (U.S.), wireless regulators, and any other regulatory bodies that may keep public records of company activity. Remember that you are attempting to research your target thoroughly with the goal of finding as much information as possible that might assist you as an attacker.
Have You Been “Pwned” Yet?
The word pwned comes from hacker/gamer culture, and it is a pun on the word owned. A hacker who gains access to passwords or other information might say that they have “owned” the target, as they have control over information or the systems it came from. It usually means that someone has control over a system, or in gaming culture that they have obliterated their opponent.
If you haven't already, be sure to visit this website: haveibeenpwned.com. Have I Been Pwned (HIBP) is a service offered by Troy Hunt, allowing Internet users to check to see if credentials that they have previously used to access online services have ever been leaked in a data breach. Online services, websites, social media networks, and organizations in general get hacked regularly, and the information is shared online. Sometimes, the attacker responsible for the hack sells (or somehow making available) the contents of the compromised database to the public. The nature of the Web is such that data like this often gets into the hands of lots of people rather quickly. You can find huge text files containing thousands or even millions of usernames and their corresponding password hashes on your favorite peer-to-peer network. HIBP collates this leaked data and allows anyone to check to see whether their credentials are present in any of their collected leaks. The service tries to get ahold of as much of this leaked data as it can, and it makes it available to you to search through for your own accounts to see whether you were included in any of the breached data. If you enter an email address that you use regularly into the correct form on the HIBP site, you might see that this address (and potentially other sensitive information) has been found in multiple datasets, originating from previously breached services, such as Dropbox, LinkedIn, and Adobe. If that is the case, then it's advisable that you change your passwords for all of those sites and any other place where you used the same password. It should then be assumed that the username and password pairs you've used for those services are in the hands of multiple malicious parties.
As hackers, we can use HIBP to check to see whether any of the people working for our target organization have had their details leaked publicly in the past. Better still, we can make use of the HIBP API to automate this process, you will need an API key to use the HIBP API (more detail can be found at haveibeenpwned.com/API/Key). Once you have an API key, you can use the following command:
curl -H "hibp-api-key: <APIKEY>" https://haveibeenpwned.com/api/v3/breachedaccount/<email_address>If you find that
[email protected] and
[email protected] have both been found in leaks, such as the LinkedIn leak of 2016 (where 117 million email and password hash combinations were exposed online), you can then obtain a copy of that leaked data and locate the relevant records and data inside it. You would then attempt to crack the password hashes associated with those emails.
The final piece of the puzzle for an attacker is that we are all human. Humans like to use the same password in a lot of places, and it's our job to promote better security hygiene practices. We can therefore take any email address and password combination uncovered and use them—in our active phase of testing—to attempt to log in to target systems. Although we've barely started our testing, we may already have the key to a company's network in our hands. This has been the case for Hacker House on numerous occasions, often exposing overlooked accounts, such as helpdesk or press with original passwords like helpdesk and press. Passwords are a hacker's best friend—finding one is akin to finding a key to a locked door, yet this key might open more than one door!
Beware that HIBP makes use of API request rate limiting to stop misuse of this fantastic service. Using cURL (a command-line web request tool demonstrated earlier) in a simple script with a loop, but having a pause of a few seconds after each request, should allow you to query the records of many users and determine whether they are contained within any publicly known data breach. You could then use Grep (a pattern searching tool) to locate useful information from the response. If you are unfamiliar with using tools like cURL and Grep, do not worry; you will explore both in future chapters. In fact, downloading and searching through datasets is an exercise that you may want to revisit later. The HIBP website contains guidelines for API usage, so make sure that you read through these and the included examples if you want to explore this process further.
There is a good chance that, if you are targeting a large number of individuals at a company, you're going to find some useful information on at least one of them from this process, just because of the sheer quantity of data that has been leaked over the last decade.
OSINT Framework Recon-ng
You saw some stand-alone tools and scripts that while providing you with great information can become tedious and laborious when handling lots of requests or data. There are lots of tasks to be completed during your intelligence work, many of which are repetitive, and your output data needs to be organized in some way for efficiency. Fortunately, other people realized this and found ways to make the hacker's job easier—not just by writing short scripts for a single purpose but by developing fully fledged hacking frameworks. One of the better tools out there for conducting OSINT is Recon-ng, developed by
LaNMaSteR53. Recon-ng ( https://github.com/lanmaster53/recon-ng) is a module-based framework that provides access to various functions from a single user-friendly command-line interface. You can create workspaces to organize the results from these various functions or modules. The information that you collect is stored in a SQLite database, providing easy access to the data for exporting and using with other tools.
Recon-ng can be used to enumerate some useful information, and the commands that you'll use are similar to those in the Metasploit Framework, with which you'll become familiar in subsequent chapters. Like any powerful tool, there is a relatively steep learning curve for effective use, and some manual configuration is required to get all of the modules in Recon-ng working properly. In particular, if you want Recon-ng to communicate effectively with various websites and online services, you'll need to obtain and import API keys for them.
There's still plenty that you can do without API keys, though, so let's get started. Recon-ng is part of the default Kali Linux install, so launching it is easy, as follows:
recon-ngWhen you first run the tool, you may see some angry-looking messages like this:
[!] 'shodan_api' key not set. shodan_hostname module will likely fail at runtime. See 'keys add'.These are just highlighting the fact that you have not yet set up API keys for the various sites from which you might want to obtain data. If you're going to be using this tool in a serious way, it is recommended that you configure Recon-ng to use the various APIs that it supports. This can be done later, however. You don't need them for our examples.
The best place to start with any new tool is always its help or man page. You can type
? or
help at the prompt to get a list of commands. Recon-ng's starting prompt looks like this:
[recon-ng][default]>You can also type
?
<Command> to find out about the usage for a particular command. For example,
? workspaces will output the following:
Manages workspacesUsage: workspaces <create|delete|list|select> […]
Now let's create a workspace called hackerhouse:
workspaces create hackerhouseWe're now using that workspace, and any intel we gather will be stored within that workspace. You'll see that Recon-ng's prompt changes to reflect the workspace with which you're currently working. You can view workspaces as follows:
workspaces listThere are a number of different modules available for use within Recon-ng, but they will need to be installed. You can install all modules with the following command:
marketplace install allModules can be selected by typing modules load, followed by the name of the module. You may need to specify the module's path in some cases. Once you have a module selected, you can type info to view that module's details. To view the numerous Recon-ng modules, type modules search, and you'll see a list similar to the following:
Discovery---------discovery/info_disclosure/cache_snoopdiscovery/info_disclosure/interesting_filesExploitation------------exploitation/injection/command_injectorexploitation/injection/xpath_bruterImport------import/csv_fileimport/listRecon-----recon/companies-contacts/bing_linkedin_cacherecon/companies-contacts/jigsaw/point_usagerecon/companies-contacts/jigsaw/purchase_contactrecon/companies-contacts/jigsaw/search_contactsrecon/companies-multi/github_minerrecon/companies-multi/whois_minerrecon/contacts-contacts/mailtesterrecon/contacts-contacts/manglerecon/contacts-contacts/unmanglerecon/contacts-credentials/hibp_breachrecon/contacts-credentials/hibp_pasterecon/contacts-domains/migrate_contactsrecon/contacts-profiles/fullcontactrecon/credentials-credentials/adoberecon/credentials-credentials/bozocrackrecon/credentials-credentials/hashes_orgrecon/domains-contacts/metacrawlerrecon/domains-contacts/pgp_searchrecon/domains-contacts/whois_pocsrecon/domains-credentials/pwnedlist/account_credsrecon/domains-credentials/pwnedlist/api_usagerecon/domains-credentials/pwnedlist/domain_credsrecon/domains-credentials/pwnedlist/domain_ispwnedrecon/domains-credentials/pwnedlist/leak_lookuprecon/domains-credentials/pwnedlist/leaks_dumprecon/domains-domains/brute_suffixrecon/domains-hosts/bing_domain_apirecon/domains-hosts/bing_domain_webrecon/domains-hosts/brute_hostsrecon/domains-hosts/builtwithrecon/domains-hosts/certificate_transparencyrecon/domains-hosts/google_site_apirecon/domains-hosts/google_site_webrecon/domains-hosts/hackertargetrecon/domains-hosts/mx_spf_iprecon/domains-hosts/netcraftrecon/domains-hosts/shodan_hostnamerecon/domains-hosts/ssl_sanrecon/domains-hosts/threatcrowdrecon/domains-vulnerabilities/ghdbrecon/domains-vulnerabilities/punkspiderrecon/domains-vulnerabilities/xssedrecon/domains-vulnerabilities/xssposedrecon/hosts-domains/migrate_hostsrecon/hosts-hosts/bing_iprecon/hosts-hosts/freegeoiprecon/hosts-hosts/ipinfodbrecon/hosts-hosts/resolverecon/hosts-hosts/reverse_resolverecon/hosts-hosts/ssltoolsrecon/hosts-locations/migrate_hostsrecon/hosts-ports/shodan_iprecon/locations-locations/geocoderecon/locations-locations/reverse_geocoderecon/locations-pushpins/flickrrecon/locations-pushpins/picasarecon/locations-pushpins/shodanrecon/locations-pushpins/twitterrecon/locations-pushpins/youtuberecon/netblocks-companies/whois_orgsrecon/netblocks-hosts/reverse_resolverecon/netblocks-hosts/shodan_netrecon/netblocks-ports/census_2012recon/netblocks-ports/censysiorecon/ports-hosts/migrate_portsrecon/profiles-contacts/dev_diverrecon/profiles-contacts/github_usersrecon/profiles-profiles/namechkrecon/profiles-profiles/profilerrecon/profiles-profiles/twitter_mentionedrecon/profiles-profiles/twitter_mentionsrecon/profiles-repositories/github_reposrecon/repositories-profiles/github_commitsrecon/repositories-vulnerabilities/gists_searchrecon/repositories-vulnerabilities/github_dorksReporting---------reporting/csvreporting/htmlreporting/jsonreporting/listreporting/proxifierreporting/pushpinreporting/xlsxreporting/xml
To start, let's take a look at the profiler module, which you can use by typing
modules load recon/profiles-profiles/profiler, which is the path to the module as shown in the previous list. In fact, you can just type
modules load profiler in this case, and Recon-ng will know which module you want.
Load that module and then type
info.
modules load profilerinfo
This gives you information about the selected module. In the profiler module, this yields the following:
Name: OSINT HUMINT Profile CollectorAuthor: Micah Hoffman (@WebBreacher)Version: 1.0Description:Takes each username from the profiles table and searches a variety of web sites for those users. Thelist of valid sites comes from the parent project at https://github.com/WebBreacher/WhatsMyNameOptions:Name Current Value Required Description------ ------------- -------- -----------SOURCE default yes source of input (see 'show info' for details)Source Options:default SELECT DISTINCT username FROM profiles WHERE username IS NOT NULL<string> string representing a single input<path> path to a file containing a list of inputsquery <sql> database query returning one column of inputsComments:* Note: The global timeout option may need to be increased to support slower sites.* Warning: Using this module behind a filtering proxy may cause false negatives as some of thesesites may be blocked.
This is a profile collector. It searches the Web for user profiles belonging to target individuals, scrapes information from them, and stores them inside Recon-ng's database. Don't worry if you are not comfortable with databases yet; there is a whole chapter devoted to hacking them in this book.
Notice in the previous screen output that under
Options:, you see
SOURCE, followed by
default under the
Current Value heading. If you look under
Source Options:, you can see that the default option is a Structured Query Language (SQL) query.
SELECT DISTINCT username FROM profiles WHERE username IS NOT NULLThis query will return unique usernames from a table in Recon-ng's SQLite database called
profiles. You can view the data (or records) currently stored in the
profiles table by using the command
show profiles
. Doing this now will result in a
[*] No data returned message because you haven't populated the table or supplied any data yet.
Now let's try adding a profile. Substitute
<UserName> with a username/handle or email address that you've used to access websites as follows:
db insert profiles <UserName>
Wait a minute—that causes an error:
[!] Columns and values length mismatch. This is because you're trying to add a record to a database table without specifying the correct number of columns. This particular table needs us to specify four columns after the username, so we'll try again—this time using a tilde (~) to represent each of the empty columns. We'll use the handle hackerfantastic, but you'll probably have much more fun using a handle of your own or a friend's—maybe they have a cool handle they use online such as ultralazer or doctordoom.
db insert profiles hackerfantastic~~~~Now that you have added a new profile, you can confirm that it exists as follows:
show profilesThis time, the
db insert profiles command should run without error, and the
show profiles command should display a table like the following one:
+---------------------------------------------------------------------+| rowid | username | resource | url | category | notes | module |+--------------------------------------------------------------------+| 1 | hackerfantastic | | | | | user_defined |+--------------------------------------------------------------------+[*] 1 rows returned
Notice the four empty columns after
username. There are also two columns (
rowid and
module) that have been automatically filled in for you. Because we're using the default
SOURCE setting, Recon-ng will take every single username in the table and search for online profiles matching that name. You could therefore add the usernames of multiple targets or people of interest before running this module. Email addresses would work here as well—you should add any email addresses that you have found thus far for your target company (or just the first part of each address, ignoring the
@ and domain).The module takes profile names, and it searches a number of different public sources to see whether a user with that name exists. Note that until you've fully set up Recon-ng, the list of websites searched will be limited. When you're ready to proceed, enter
run.
As the module runs, you'll see the output onscreen checking various sources for information, testing to see whether there is a username matching your target on each site. Once the module has finished running, you can type
show profiles again to see what new information has been added to the table (see Figure 4.2).

Figure 4.2 Recon-ng OSINT HUMINT profile collector results
You can discover a lot about an individual based on the websites they visit, and some of the searches include adult content, such as recreational drug websites or pornography. It can be chilling to identify the number of websites that may also have scraped your data to inflate their user base, often including unsuspecting users on their service without permission.
Recon-ng Under the Hood
Recon-ng is a handy tool, but let's examine where its data is actually being stored. Assuming that you ran Recon-ng as the root user in Kali (this is not recommended—you should always run commands with the least privileges possible), then Recon-ng will store workspaces as directories in
/root/.recon-ng/workspaces. Let's take a look inside one now:
ls ~/.recon-ng/workspaces/hackerhouseYou should find a file called
data.db inside the directory that was created by Recon-ng when you created a workspace. What type of file is this? Use the
file command to find out.
file ~/.recon-ng/workspaces/hackerhouse/data.db/root/.recon-ng/workspaces/hackerhouse/data.db: SQLite 3.x database, user version 8, last written using SQLite version 3021000
If you do this, you'll see where Recon-ng stores its database by default and that this is a SQLite database. In this database's case, the workspace is called hackerhouse. Let's take a look at the database now using the SQLite browser (launched using the command
sqlitebrowser), as shown in Figure 4.3.

Figure 4.3 SQLite browser
Using a GUI, you can now see the schema of this database and explore the data contained within if you want. You could also export this information to add it to a report or share with your client.
Harvesting the Web
Let's examine a Python script called
theHarvester.py now (another tool that is part of the default Kali Linux install). Running the command
theHarvester without arguments presents you with its usage information including an example. Let's try this tool using the example provided (google.com) as the domain and specify Google as the search engine. We'll limit the number of results to 50.
theHarvester -d google.com -b google -l 50We had hoped to find more email addresses, but nevertheless, the results are interesting.
******************************************************************** _ _ _ ** | |_| |__ ___ / /\__ _ _ ____ _____ ___| |_ ___ _ __ ** | __| _ / _ / /_/ / _` | ‘__ / / _ / __| __/ _ ‘__| ** | |_| | | | __/ / __ / (_| | | V / __/\__ || __/ | ** \__|_| |_|\___| / /_/ \__,_|_| \_/ \___||___/\__\___|_| ** ** theHarvester 3.1.0 ** Coded by Christian Martorella ** Edge-Security Research ** [email protected] ** ********************************************************************[*] Target: google.com[*] Searching Google.Searching 0 results.[*] No IPs found.[*] No emails found.[*] Hosts found: 13---------------------account.google.com:172.217.4.110accounts.google.com:172.217.4.77adservice.google.com:172.217.4.34adssettings.google.com:172.217.4.110apis.google.com:172.217.4.46classroom.google.com:216.58.192.142developer.google.com:172.217.4.110maps.google.com:172.217.0.14news.google.com:172.217.4.206ogs.google.com:172.217.4.110policies.google.com:216.58.192.142support.google.com:172.217.4.46www.google.com:172.217.0.4
As you can see,
theHarvester.py was effective at obtaining the hostnames and IP addresses of the domain you specified. Building up a list of hosts like this is crucial, and we haven't done much of it yet. In Chapter 5, “The Domain Name System,” you'll learn more ways to do this effectively.
Document Metadata
A typical company or organization will feel the need (or be compelled) to publish documents, often making these available to various stakeholders or customers via its website. The type of documents we're talking about may be annual reports, quarterly sales figures, newsletters, brochures, job application forms, employee handbooks, and so forth. You'll often find these documents in the form of PDFs, Microsoft Word documents, Excel spreadsheets, and graphic images. Without the knowledge of the originator, these documents often leak information contained in the document's metadata, such as usernames, email addresses, date and time information, and Exchangeable Image File Format (Exif) data, which is usually associated with photographs and can contain camera details, original thumbnails, and GPS coordinates, as well as software type and version information. Even simply downloading images of employees from a site might yield useful information, like the location where the images were taken and the software used to edit them. We're talking about data that is not part of the body of the document; that is, data that many users are unaware even exists. Sometimes, you do not even need to look at metadata, as the content of the document may already be useful to you. You may even find software manuals online that instruct a user how to access a particular service, right down to the username and password that they must enter or the defaults the system has assigned.
One tool designed to obtain documents and analyze their metadata is Metagoofil (tools.kali.org/information-gathering/metagoofil). This tool might not be installed if you're using Kali Linux, in which case, you'll need to run
apt install metagoofil. This tool uses Google to search for documents, and it automatically downloads them to a folder before extracting their metadata. Specify a domain—let's use IBM again—and the types of documents for which you want to search. We're also putting some limits in place and saving our downloaded files to a folder called
ibmfiles.
metagoofil -d uk.ibm.com -t doc,pdf -l 200 -n 50 -o ibmfilesThis tool will download any files that it finds that match the given criteria, and it will parse these files for useful information such as email addresses, and so on. You may find that you don't get great results with this tool, mostly because of its age, but it's included here to show you the type of things that are made possible by pulling documents and reviewing their metadata. An alternative GUI tool that can be used for this process is Fingerprinting Organizations with Collected Archives (FOCA) available at www.elevenpaths.com/labstools/foca/index.html.
You will often find more up-to-date versions of tools that haven't been officially adopted by Linux distributions on the tool's own website. Hackers like to keep certain tools as current as possible or extend their functionality in some way. In the case of Metagoofil, there is a more up-to-date version on GitHub that may work more effectively. You can download it at github.com/opsdisk/metagoofil/.
Some metadata extraction tools can usually be found in your Linux distribution's package repository, and it's worth trying them. An example is Exiftool, which can be run on any JPEG images that you download to extract Exif data. This can yield surprising results and reveal information that the publisher thought had been removed. For instance, at the time of this writing, the following website presented a picture of several police officers at a U.K. university:
www.northampton.ac.uk/news/new-police-team-meets-staff-and-students-at-the-university-of-northampton
By downloading the image at www.hackerhousebook.com/files/image1.jpeg and giving it as an argument to Exiftool, you can learn some additional information about the photograph.
exiftool image1.jpegRunning this command resulted in the following information being output by Exiftool:
ExifTool Version Number : 11.30File Name : image1.jpegDirectory : .File Size : 2.6 MBFile Modification Date/Time : 2018:10:03 09:55:22-07:00File Access Date/Time : 2019:03:28 16:51:00-07:00File Inode Change Date/Time : 2019:03:28 17:03:54-07:00File Permissions : rw-r--r--File Type : JPEGFile Type Extension : jpgMIME Type : image/jpegJFIF Version : 1.01Exif Byte Order : Big-endian (Motorola, MM)Make : AppleCamera Model Name : iPhone 6X Resolution : 72Y Resolution : 72Resolution Unit : inchesSoftware : 11.3.1Modify Date : 2018:09:27 11:21:35Exposure Time : 1/898F Number : 2.2Exposure Program : Program AEISO : 32Exif Version : 0221Date/Time Original : 2018:09:27 11:21:35Create Date : 2018:09:27 11:21:35Components Configuration : Y, Cb, Cr, -Shutter Speed Value : 1/898Aperture Value : 2.2Brightness Value : 9.196232339Exposure Compensation : 0Metering Mode : Multi-segmentFlash : Off, Did not fireFocal Length : 4.2 mmSubject Area : 1631 1223 1795 1077Run Time Flags : ValidRun Time Value : 30645718499916Run Time Scale : 1000000000Run Time Epoch : 0Acceleration Vector : -0.9815188172 0.03043882641 -0.1194911988HDR Image Type : Unknown (2)Sub Sec Time Original : 901Sub Sec Time Digitized : 901Flashpix Version : 0100Color Space : sRGBExif Image Width : 3264Exif Image Height : 2448Sensing Method : One-chip color areaScene Type : Directly photographedCustom Rendered : Unknown (2)Exposure Mode : AutoWhite Balance : AutoFocal Length In 35mm Format : 29 mmScene Capture Type : StandardLens Info : 4.15mm f/2.2Lens Make : AppleLens Model : iPhone 6 back camera 4.15mm f/2.2GPS Latitude Ref : NorthGPS Longitude Ref : WestGPS Altitude Ref : Above Sea LevelGPS Time Stamp : 10:21:34GPS Speed Ref : km/hGPS Speed : 0GPS Img Direction Ref : True NorthGPS Img Direction : 104.5822785GPS Dest Bearing Ref : True NorthGPS Dest Bearing : 104.5822785GPS Date Stamp : 2018:09:27GPS Horizontal Positioning Error : 5 mXMP Toolkit : XMP Core 5.4.0Creator Tool : 11.3.1Date Created : 2018:09:27 11:21:35Current IPTC Digest : d41d8cd98f00b204e9800998ecf8427eIPTC Digest : d41d8cd98f00b204e9800998ecf8427eImage Width : 3264Image Height : 2448Encoding Process : Baseline DCT, Huffman codingBits Per Sample : 8Color Components : 3Y Cb Cr Sub Sampling : YCbCr4:2:0 (2 2)Aperture : 2.2GPS Altitude : 63.3 m Above Sea LevelGPS Date/Time : 2018:09:27 10:21:34ZGPS Latitude : 52 deg 13' 55.19" NGPS Longitude : 0 deg 53' 26.06" WGPS Position : 52 deg 13' 55.19" N, 0 deg 53' 26.06" WImage Size : 3264x2448Megapixels : 8.0Run Time Since Power Up : 8:30:46Scale Factor To 35 mm Equivalent : 7.0Shutter Speed : 1/898Create Date : 2018:09:27 11:21:35.901Date/Time Original : 2018:09:27 11:21:35.901Circle Of Confusion : 0.004 mmField Of View : 63.7 degFocal Length : 4.2 mm (35 mm equivalent: 29.0 mm)Hyperfocal Distance : 1.82 mLight Value : 13.7
The information stored in the photograph's metadata shows that it was taken with an iPhone 6, using the rear camera, at 9:55 a.m. on October 3, 2018. In the previous screen output, you can see the GPS coordinates of where the photo was taken as well as various camera settings. This type of information could be considered sensitive in certain situations. In addition to the information about the camera and location, an image's metadata might contain a thumbnail image that shows the original version of the image before any postprocessing or modification (such as cropping) was performed. If an image file contains a thumbnail, you can extract it using the following command:
exiftool -b -ThumbnailImage <ImageFileName>> <ThumbnailFileName>Maltego
An alternative or complement to Recon-ng is Maltego. Maltego is a commercial tool offering from Paterva (www.paterva.com/buy/maltego-clients/maltego-ce.php). This tool runs transforms (Maltego's term for a script-like instance that performs a particular function) on a remote server, and it allows users to visualize the information in graphical form. Intelligence and threat analysts who conduct a lot of OSINT work as part of their daily investigative job might need the paid professional version of this tool, yet there is a limited community edition bundled with Kali Linux. This tool has a GUI, and it is designed to analyze the relationships between different entities, such as employees, social media accounts, domains, IP addresses, and so on. It queries DNS records, search engines, and various APIs, just like Recon-ng, but it provides this information in a graphical, visual representation. It's certainly worth checking out and seeing whether its features can benefit you in your intended line of work. Figure 4.4 shows an example of a search for emails connected to a domain, as displayed by Maltego.
You'll need to create a free online account to start using Maltego. To provide a quick example of one of its functions, we'll start with a blank graph and then locate the Machines menu. From there, you can select Run Machine, which will display various options. Selecting Company Stalker and providing a domain name will start the machine, which in this case returns email addresses. Once you have some email addresses, you can right-click Entities and select Transform. You could try transforming an email address into a person, which would search for the actual full name associated with this address.

Figure 4.4 Maltego email search
Maltego actually uses its own servers for carrying out these searches, so it isn't your computer doing the work. This means you need to be careful about what information you send to Maltego in the first place, and you shouldn't simply trust it with your (or your client's) data.
Social Media Networks
Business today makes use of social networks. It's often an unavoidable step in career progression or for networking among people in a particular industry. Overwhelmingly, the majority of this business-to-business networking occurs on a site called LinkedIn (www.linkedin.com). Hackers trawl through social media sites such as LinkedIn to find company employees, email addresses, or information that might be of value to an attacker. LinkedInt is a simple yet useful Python script that can be obtained from GitHub. You'll need to set up a LinkedIn account to use it, and you will get the best results when that account has some connections, perhaps even one at your target company. Hacker House often finds that using the picture of an attractive individual and sending contact requests to employees at a company (so-called honey-trapping) will often allow the account to network with employees at a particular company. Once you have a LinkedIn account with several connections, you can launch a tool like LinkedInt to gather intelligence by simply following the prompts.
# python LinkedInt.py██╗ ██╗███╗ ██╗██╗ ██╗███████╗██████╗ ██╗███╗ ██╗████████╗██║ ██║████╗ ██║██║ ██╓╝██╓════╝██╓══██╗██║████╗ ██║╚══██╓══╝██║ ██║██╓██╗ ██║█████╓╝ █████╗ ██║ ██║██║██╓██╗ ██║ ██║██║ ██║██║╚██╗██║██╓═██╗ ██╓══╝ ██║ ██║██║██║╚██╗██║ ██║███████╗██║██║ ╚████║██║ ██╗███████╗██████╓╝██║██║ ╚████║ ██║╚══════╝╚═╝╚═╝ ╚═══╝╚═╝ ╚═╝╚══════╝╚═════╝ ╚═╝╚═╝ ╚═══╝ ╚═╝Providing you with Linkedin IntelligenceAuthor: Vincent Yiu (@vysec, @vysecurity)Original version by @DisK0nn3cT[*] Enter search Keywords (use quotes for more percise results)"International Business Machines"[*] Enter filename for output (exclude file extension)ibm[*] Filter by Company? (Y/N):Y[*] Specify a Company ID (Provide ID or leave blank to automate):[*] Enter e-mail domain suffix (eg. contoso.com):uk.ibm.com[*] Select a prefix for e-mail generation (auto,full,firstlast,firstmlast,flast,first.last,fmlast):auto
What we're doing in the previous screen is telling LinkedInt to search through LinkedIn for all of the accounts where people made it publicly known that they work for International Business Machines, or at least are affiliated with IBM somehow. What usually happens when running this tool, or others like it, is that you end up with a big list of employees and job titles, as well as potential email addresses. The email addresses aren't necessarily correct; LinkedInt generates them using the rule specified. When it comes to email addresses and usernames, our human weaknesses step in again; most organizations have a schema or format for their email addresses, such as
[email protected]. If you see a pattern, you can try to use it to your advantage and predict valid email addresses. Searching LinkedIn usually results in far more results than the previous methods we've reviewed, as companies are less able to control what employees share on business networking sites and forums. The amusing thing is that people surrender this information freely and make their profiles public—often including their job titles. This is true for other social media sites, of course, but LinkedIn is a great data source for OSINT. LinkedIn often updates its interface, and tools such as the one described here may become ineffective in the future. Nevertheless, alternatives appear frequently.
Remember, depending on what you and your client have agreed upon, finding a user's email address is unlikely to be the end of the story. With proper authorization, you could send them malware or other files that may help you to gain access to internal systems. You could use social engineering techniques to pry more information out of the user, such as their passwords. Phone numbers also come in handy here, and it's amazing how often a bogus call from an IT help desk can get someone to disclose sensitive information. If you can social engineer someone via email, convincing them to carry out some action, such as visit a website that you control or run a command to fix that pesky printer problem they had, you've found another way in which the client's network can be compromised.
Shodan
At the start of this chapter, we stated that we'd be looking for anything that is connected to the Internet in some way and that is part of the target's network. If there's one tool that's extremely good at doing this, it's Shodan (www.shodan.io). Shodan is a search engine for IP-connected devices (in other words, the Internet of Things and not just the World Wide Web). It provides historic and on-demand scanning of IP addresses and maintains a database of hosts and their open ports and services. It scans the Internet, and it even has a command-line tool and API. In addition to listing open ports and services, Shodan will collect data from them; for instance, readings from Internet-connected fuel pumps, or even screenshots from unprotected web cameras!
Shodan is a paid-for service charging for queries, yet you can use the service for free and return a limited number of results. You may have been able to determine a list of hostnames and/or IP addresses that you believe to be associated with your client, either through techniques mentioned so far or by some other means. Shodan can be used to go through a list of suspected hosts and see what information is already publicly known about them. Hacker House finds plenty of information in this way, including devices and systems that should never have been connected to the Internet in the first place. Shodan will store SSL certificates when it finds them, and these can help reveal further hostnames.
You can build up a list of computer systems, along with the open ports and services running on them, without ever touching your own port scanning tools. Shodan can also be tasked to scan IP ranges, masking the source of the probes!
When demonstrating Shodan during our training courses, one example we like to use is gasoline. We'll search for that now, and you'll see why. A few results down is a host with the address 50.127.106.97, which has two open ports. One of these is Transmission Control Protocol (TCP) port 10001, which provided Shodan with the following output:
I20100 11-07-18 8:14 AM218449 GASOLINE ALLE3966 SR 37MITCHELL IN 47446IN-TANK INVENTORYTANK PRODUCT VOLUME TC VOLUME ULLAGE HEIGHT WATER TEMP1 UNLEADED 5117 5116 6883 41.25 0.00 60.052 PREMIUM 2140 2131 3860 35.63 0.00 65.673 DIESEL 5641 5614 6359 44.32 0.00 70.544 KEROSENE 1240 1235 1760 31.09 0.00 68.605 AG DIESEL 1836 1826 1164 41.83 0.00 71.796 DEF 1560 1560 764 44.20 59.39
Shodan calls this service an automated-tank-gauge, and that's exactly what it looks like. It appears to have located some readings for a gas station in Mitchell, Indiana. It's a Gasoline Alley, and the gas pump's address is also there. If this were your local filling station, you could make sure that there's enough fuel to meet your needs before setting off. This is a great example of a publicly exposed industrial control system, and it's something that most likely shouldn't have been connected to the Internet in the first place.
You can find Internet-connected smart homes whose owners have unwittingly left administrative interfaces exposed, allowing you to read the temperature of their hot tub, turn lights on and off, and even view their security cameras. Often, you'll find these resources protected only by default passwords or no password at all.
You could, of course, search for domains like uk.ibm.com too. The following search results show some hosts with TCP port 25 open at the time of writing. Here's an excerpt of the output recorded by Shodan:
20 IBM ESMTP SMTP Gateway: Authorized Use Only! Violators will be prosecuted service ready; Tue, 6 Nov 2018 19:09:34 -0000250-e06smtp04.uk.ibm.com250-8BITMIME250-PIPELINING250-SIZE 36700160250 STARTTLS
This looks like an email server running a Simple Mail Transfer Protocol (SMTP) service, belonging to IBM. You'll be looking at such mail services in Chapter 6, “Electronic Mail.” Shodan also has a command-line tool that you can install. Once you've registered and have an API key, you can run commands like
shodan search port:10001 if you wanted to find more fuel gauges or
shodan search port:25 if you wanted to find more SMTP services. Doing it this way means that you get your results on the command line, and from there it's easy to send it to another program, parse it, and find specific information, change the formatting, or do whatever you want to do.
Protecting Against OSINT
There isn't a great a deal that a company can do to protect itself from this kind of passive reconnaissance. Once information is published or leaked via the Internet, it can be difficult to “lock it down.” What companies can and must do is to be more aware of the information that it and its employees are making public in the first place. Companies should constantly be monitoring their public “footprint” so that if a serious data breach is discovered, it can be shut down as quickly as possible. Creating fake employee profiles and posting information alongside it, such as an email address that is monitored closely, can help alert a company when someone undertakes this type of activity.
All companies can benefit from constantly surveying their own perimeter in the ways we've outlined here, checking through the data that is out there in the ether and being aware of how easy it is to obtain this information. Any serious information disclosures should be shut down immediately. This kind of routine self-monitoring will better inform other decisions, such as employee policies on social media, passwords, and so on.
Another key point to remember is that people leak crucial information often without being aware of it whatsoever. Hacker House has discovered entire email logs accidentally left on public servers and configuration files from Cisco routers containing active passwords using OSINT! Sometimes, the information learned at this stage was all that was needed to breach the target company.
We've also seen, thanks to HIBP, the damage that can be done when people reuse passwords, especially if they have already been posted publicly. Malicious hackers rely on this behavior to get easy wins and gain entry to systems using the front door. It should be assumed that any online services you use will be hacked at some point, and you must take measures to mitigate this before it happens. Generate unique passphrases for each online service you use, as demonstrated in the previous chapter, and use a password manager. When a service supports it, enable two-step authentication, two-factor authentication (2FA), or multifactor authentication (MFA).
Summary
You have spent a lot of time in this chapter gathering email addresses and personal information. You've seen the type of things that can be learned through Shodan, Google (and other search engines), social media sites, and document metadata, but you haven't yet made many attempts to find domain names or hostnames associated with a company. You'll be doing that in the next chapter, since this type of information gathering is often performed via DNS.
If you're working for a client, at the end of your OSINT-gathering phase, you will need to confirm findings with them before progressing to test any systems or services that you identify. After all, you don't want to start hacking a website that you thought belonged to your client, but actually belongs to an organization with the same name in a different part of the world. Mistakes like this can and do happen, so ensure that you provide a summary output and confirm that any systems found belong to the network that you are authorized to review, before proceeding onto more active and intrusive techniques.