
CHAPTER 4
Raspberry Pi GPIO Control with an Amazon Echo
IN THIS CHAPTER, I WILL demonstrate how to control some RasPi GPIO pins using an Amazon Echo personal voice assistant. This is similar to what was demonstrated in Chapter 2, except that in Chapter 2 I used the Google Home device. There is a significant difference between the approach used by Amazon and that by Google for connecting to voice assistant devices. I will explain the Amazon approach and point out some pros and cons of the Amazon and Google methods.
Wemo Demonstration
It would be informative and helpful to first demonstrate how the Amazon Echo connects with a commercial smart home device. This demonstration uses a Belkin-manufactured Wemo device that is directly controlled by an Echo unit. This demonstration uses a Wemo mini WiFi Smart miniplug, which is shown in Figure 4-1.

Figure 4-1 Wemo smart miniplug.
This device must first be set up using a smartphone app called the Wemo app. I used an iOS smartphone for app installation. Figure 4-2 shows the smartphone Wemo app screen.

Figure 4-2 Wemo app screenshot.
The Echo device also must be linked to the Wemo device using this spoken command: “Alexa, discover devices.” It typically takes an Echo device about 45 seconds to complete the discovery process. I had previously plugged an AC table lamp into the Wemo device in order to have an easy way to determine when the Wemo device was activated. I did see the table lamp turn on when I spoke this command: “Alexa, turn on the Wemo.”
Parts List
The Wemo device may also be controlled directly from the Wemo app simply by tapping on the On/Off button icon. Turning off the lamp with the Wemo was done using this command: “Alexa, turn off the Wemo.” The lamp turned off after the command was spoken. These actions confirmed that the Echo unit was properly controlling the Wemo device through my local WiFi network. This was an important confirmation that directly leads into how the Echo device can control the GPIO pins on a RasPi. But first I need to introduce the Alexa Skill before describing how to control GPIO pins with an Echo device.
Alexa Skill
Alexa is the name of Amazon’s voice service, just as Google Assistant is the name of Google’s voice service. Alexa is also the alert name that activates voice service for an Echo unit, as I specified in the preceding spoken-command examples. Alexa provides certain functionalities, or skills, as they are preferably called in the voice service. Thousands of skills are presently available, with many provided by companies that manufacture devices for the Echo line of devices or provide complementary services that are integrated with overall Amazon services. Some examples of the latter include Starbucks, Uber, and Capitol One.
The Alexa Skills Kit (ASK) is a collection of APIs, utilities, documentation, and code samples that allow developers to fairly easily create and test new skills. Developers using ASK can take advantage of a powerful infrastructure in designing and building high-quality skills capable of being run on tens of millions of Alexa-enabled devices. ASK is Amazon’s answer to Google’s Voice Assistant API and Cloud Platform infrastructure. I will not comment on which is better or worse but will simply say that I am presenting both in this book for your information and use as you see fit.
There some basic components that make up an Alexa skill you should know about. These are shown in the custom Alexa Skill design screen in Figure 4-3.
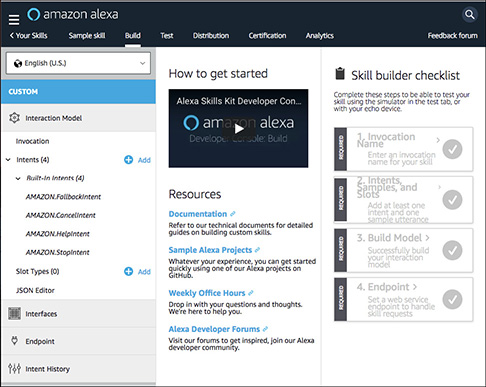
Figure 4-3 Custom Alexa Skill design screen.
The key skill components are
![]() Utterance: Any spoken phrase
Utterance: Any spoken phrase
![]() Invocation: A spoken phrase that starts an action (An action is also known as an intent in the ASK framework.)
Invocation: A spoken phrase that starts an action (An action is also known as an intent in the ASK framework.)
![]() Slot: The objects of the intent, that is, what you want to do
Slot: The objects of the intent, that is, what you want to do
![]() Interaction model: The collection of utterances, invocations, and slots that make up a conversation between a user and an Echo device
Interaction model: The collection of utterances, invocations, and slots that make up a conversation between a user and an Echo device
The spoken command “Alexa, turn on the Wemo” is an utterance that begins a conversation. The word Alexa is the default alert word to an Echo device, arming it to process the utterance that follows. The intent is specified by the phrase turn on, and the slot is Wemo, which is the intent’s object. The intent and object are then transmitted to an Amazon server, which has previously been configured to recognize the Wemo object as well as various intents that could be applied to the object. If you try to apply an intent that was not previously set up, the Alexa service will respond, “Sorry, I am not sure” or “Sorry, I don’t know that one” or some similar response phrase indicating that Alexa has no concept of the spoken intent.
Amazon has made available thousands of prebuilt skills for your immediate use. These skills come mainly from original equipment manufacturers (OEMs) and service providers that use Echo devices. The following is a list of the skills categories that I extracted from https://www.amazon.com/alexa-skills/b?ie=UTF8&node=13727921011 website:
![]() Business and finance
Business and finance
![]() Communications
Communications
![]() Connected cars
Connected cars
![]() Education and reference
Education and reference
![]() Food and drink
Food and drink
![]() Games, trivia, and accessories
Games, trivia, and accessories
![]() Health and fitness
Health and fitness
![]() Home services
Home services
![]() Kids
Kids
![]() Lifestyle
Lifestyle
![]() Local
Local
![]() Movies and TV
Movies and TV
![]() Music and audio
Music and audio
![]() News
News
![]() Novelty and humor
Novelty and humor
![]() Productivity
Productivity
![]() Shopping
Shopping
![]() Smart home
Smart home
![]() Social
Social
![]() Sports
Sports
![]() Travel and transportation
Travel and transportation
![]() Utilities
Utilities
![]() Weather
Weather
However, no prebuilt skill is available for the Raspberry Pi in any of these categories. There is the Wemo skill provided by Belkin in the Smart Home category that I just demonstrated, and a clever developer named Nathan Henrie modified it so that the skill directly controls RasPi GPIO pins. He renamed the skill Fauxmo, which is a clever way of stating that the skill is a false, or faux, version of the original Wemo skill. The skill is directly downloadable from https://github.com/n8henrie/fauxmo/, where n8henrie is Nathan’s user name on Github. However, do not directly download this skill from the Github website because I will demonstrate an easier way to get it in the next section.
Fauxmo
I begin this section by stating that most of the instructions that follow came from an April 2017 Instructables blog, “Control Raspberry Pi GPIO Using Amazon Echo (Fauxmo),” written by Surendra Kane. I found the blog quite useful, although I did have to slightly modify some of the procedures to suit my situation. You will also find if you read the blog that Surendra actually modeled his blog after an earlier one dealing with the same subject. This is what is so great about open-source development: the tremendous support that is so readily available.
You first need to download a copy of the Fauxmo source code from Surendra’s Github website using the following commands:

Next, move to the directory holding the Python script, and execute it with these commands:
![]()
Now you can try asking your Echo device to discover any new devices by using this spoken command: “Alexa, discover devices.”
The Echo device should provide a lengthy response starting with “Starting discovery. This will take 45 seconds....”
I found that this approach did not discover the RasPi. I next tried using the Alexa app on my smartphone and manually began a device discovery in the app’s Smart Home devices section. This approach was successful, with 12 new devices labeled “gpio15” through “gpio26” appearing in the app’s screen, as shown in Figure 4-4.
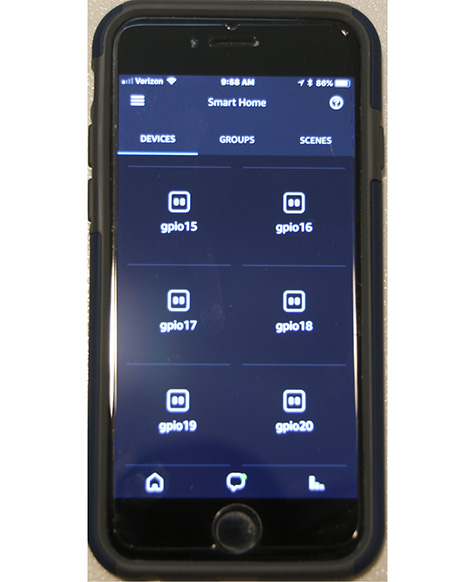
Figure 4-4 Alexa app with new GPIO devices.
I could now individually control the GPIO pins using the app or by speaking commands such as “Alexa, turn on gpio 22” and “Alexa, turn off gpio 22.” The next step in the demonstration involves connecting external peripherals to some GPIO pins for a proof of performance, as was done in previous chapters.
Test Setup
The test peripherals consist of a LED and an AC lamp, which are controlled by a PST2. Figure 4-5 is a Fritzing diagram showing how they are connected to the GPIO pins.
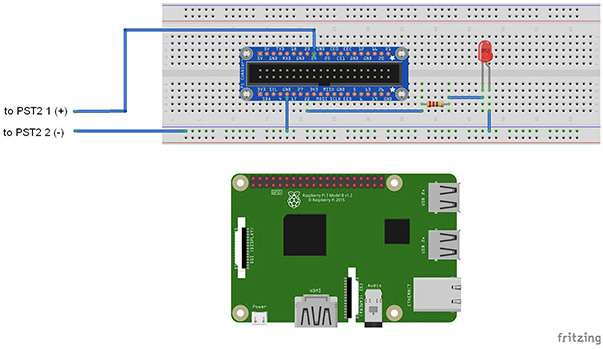
Figure 4-5 Test setup Fritzing diagram.
GPIO pin 22 controls the LED, and GPIO pin 24 controls a PST2, which, in turn, controls an AC table lamp.
Test Run
These next spoken commands successfully controlled the LED:
“Alexa, turn on gpio 22.”
“Alexa, turn off gpio 22.”
Similarly, the following spoken commands successfully controlled the table lamp:
“Alexa, turn on gpio 24.”
“Alexa, turn off gpio 24.”
These commands are binary, meaning that the pin state is either on or off. This is because that is the only intent setup for any specific GPIO pin. Attempting to give some other action to a GPIO pin will only result in the usual “Sorry, I am not sure” or “Sorry, I don’t know that one” Alexa responses. Figure 4-6 is a screenshot of the logger output instantiated by the control script.
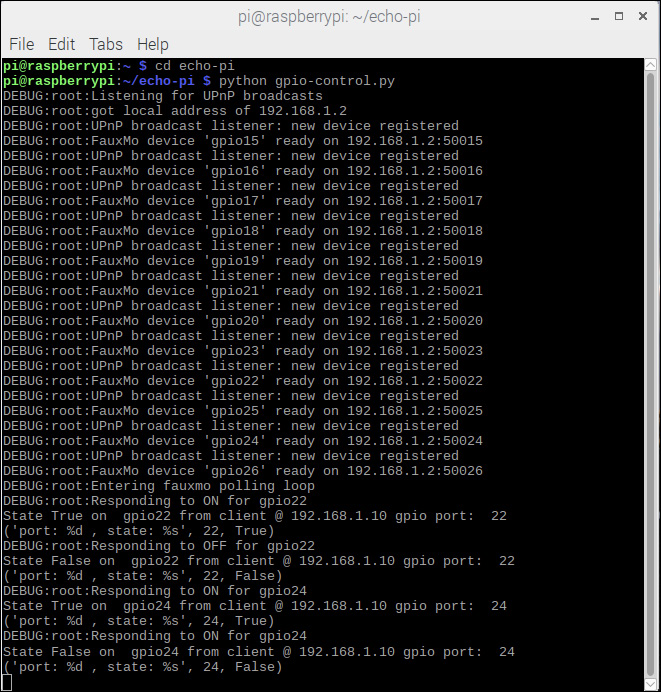
Figure 4-6 Log screen for Fauxmo server and control script.
You can see at the beginning of the log screen all the Fauxmo virtual devices being registered with attached port numbers. I will describe what these port numbers mean in a later section. The last few lines of log output show where I controlled first the LED attached to GPIO 22 and then the AC lamp (PST2), which is attached to GPIO 24. Note that the phrases State True and State False refer to the requested control action of “turn on” and “turn off,” respectively.
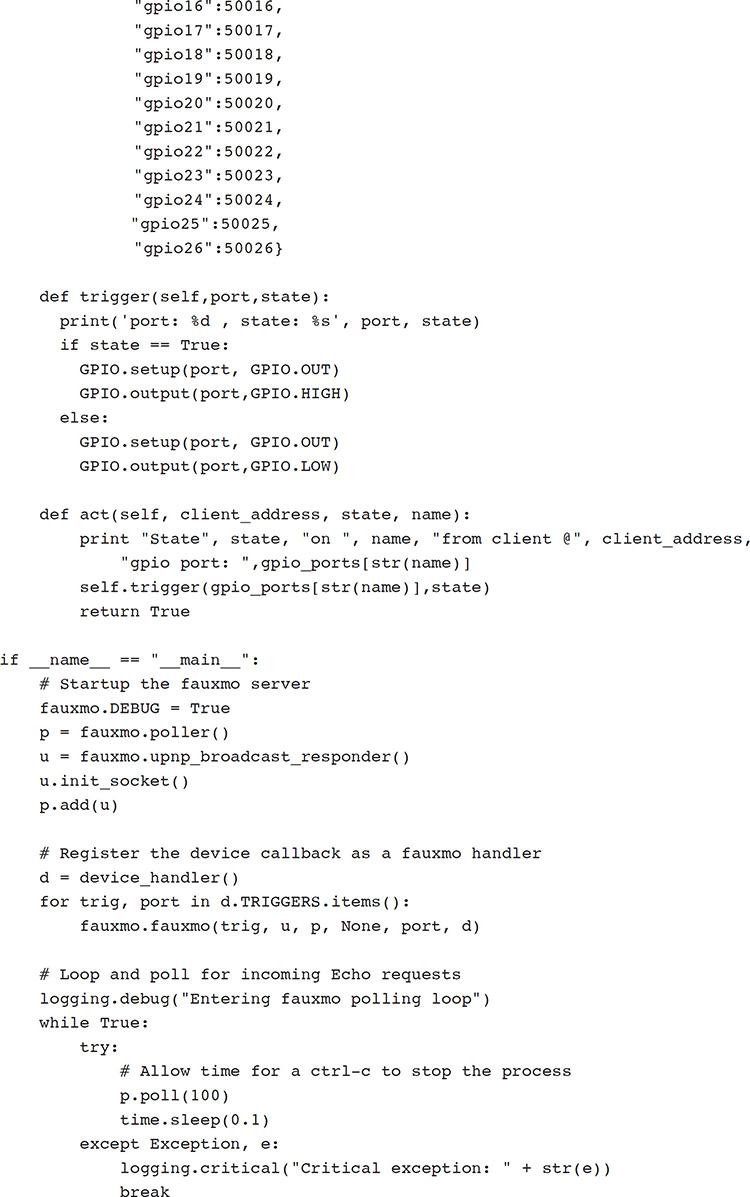
Python Control Script
I think that it is informative to present the Python control script and discuss how it functions. Knowing more about it will likely allow you to further experiment and develop solutions more tailored to your specific needs.
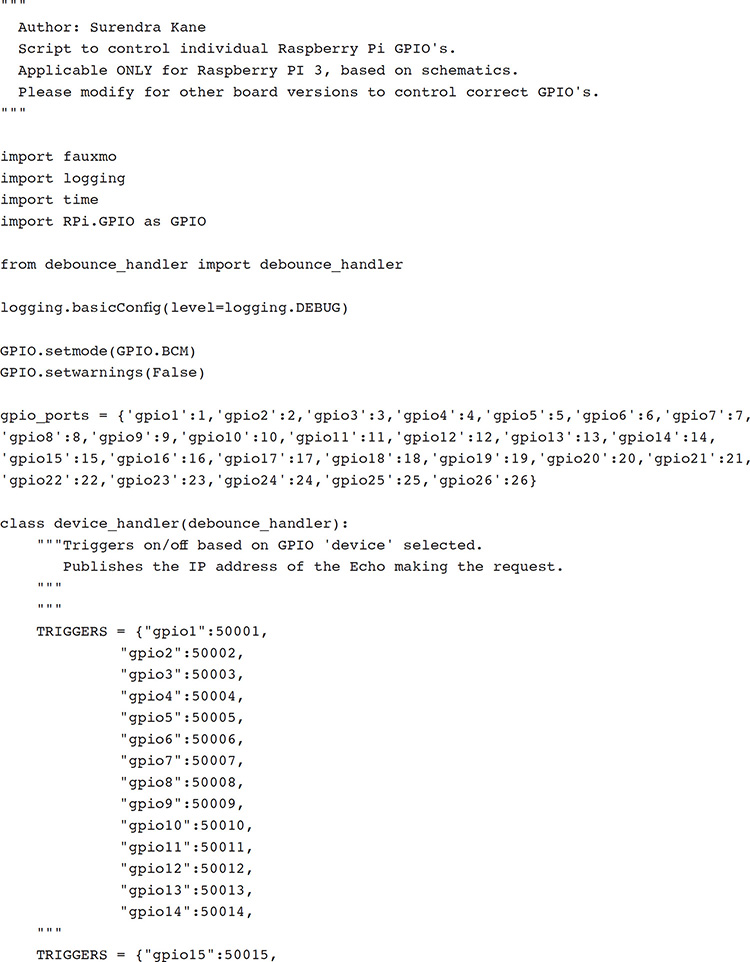
The first thing you should notice is that this version of the script has activated only GPIO pins 15 through 26 as part of a TRIGGER array. I did read in the Fauxmo documentation that problems were encountered when too many GPIO pins were activated at a single time. This script allows you to activate GPIO pins 1 through 14 or 15 through 26 at any given time. You do that by uncommenting the desired TRIGGER array. Just ensure that the unwanted portion of the GPIO pins is also commented out.
Each GPIO pin has a unique port number that is assigned values contained in the active TRIGGER array. That port number, not the actual GPIO pin number, is what is sent to the Fauxmo server.
The Fauxmo server is the key software component that makes this whole project viable. A brief discussion regarding the Fauxmo server along with the underlying software communications protocol follows. You may skip reading the next section without any loss of continuity.
Fauxmo Server
I will like to first give credit to Chris, who publishes the Maker Musings blog. Apparently Chris is the open-source developer who created Fauxmo. The blog I am referencing is entitled, “Amazon Echo and Home Automation,” and was published on July 13, 2015.
The Alexa service has had a Wemo skill for a relatively long time as compared with more recent HA skills. This skill was based on a WiFi-enabled AC mains power switch such as the one shown in Figure 4-1. Wemo devices use the UPnP communications protocol to “advertise” their availability in a local network. The UPnP Protocol is formally known as Universal Plug and Play and was created to allow network devices to seamlessly interconnect with one another. These devices ordinarily include such things as PCs, printers, Internet gateways, WiFi access points, routers, and mobile devices. Additionally, the UPnP Protocol allows for the easy sharing of data among connected devices. UPnP uses the Internet Protocol (IP) as its backbone and also takes advantage of HTTP, SOAP, and XML technologies. Generally speaking, UPnP is best suited for consumer applications such as HA and is often avoided for use in business systems. This is because the protocol uses multicasting, which makes it “too chatty” for deployment in business or enterprise systems.
Figure 4-7 is a sequence diagram depicting how an Echo device communicates with a Wemo device using UPnP. I have found these diagrams to be very useful in explaining complex data communications configurations and interconnections.

Figure 4-7 Echo/Wemo sequence diagram.
Don’t be scared if you find this figure a bit intimidating. It is basically just a timeline showing requests and responses between the Echo and Wemo units. The thing you should note that the same interaction is always happening between the units. I will shortly show you a figure with some actual data illustrating these requests/responses happening in real time between an Echo device and a RasPi. But first I want to continue with the Fauxmo story.
The Fauxmo software is an emulation of the original Wemo server software. The devices controlled in this emulation are known as virtual Wemo devices because they will respond as if they were physical Wemo devices but are something completely different, such as RasPi GPIO pins.
I am not going to discuss the complex functions of the Fauxmo server software other than to list them as they were provided in Chris’s blog:
1. An IP address for each virtual switch
2. A listener for UDP broadcasts to address 239.255.255.250 on port 1900
3. A listener on port 49153 for each switch on its associated IP address
4. Logic to customize the search response and the setup.xml to conform to the UPnP Protocol and give the Echo the right information about each switch
5. Logic to respond to the on and off commands sent by the Echo and tie them to whatever action I really want to perform
Please read the blog if you want to delve deeper into the implementation details. The blog discussion is quite extensive and detailed, and many informative comments are also included with the discussion.
Surendra’s control script imports the Fauxmo server package and sets up a polling service that constantly monitors the local network for any service requests emanating from a virtual Wemo device. The Python control script may be thought of as a wrapper to the Fauxmo software such that RasPi GPIO pins can be configured as virtual Wemo devices. Using this approach makes it quite easy to extend to other devices as desired.
Creating an Alexa Skill from Scratch
Up to this point in this chapter’s discussions, I have relied on using an existing skill created by Belkin to communicate with Belkin-manufactured Wemo devices. This works and is quite useful to quickly implement a scheme to control GPIO pins on a RasPi. However, it would also be very useful to know how to design your own skill in case you want to communicate with a device that cannot emulate Wemo functionalities. This is why I will provide a detailed discussion on how to design and build an Alexa skill. This learning skill will involve a RasPi but not any GPIO pins. The skill itself is centered on the design of a simple memory game. The important point to note is that the skill-development process will be the same when designing for an HA application as it would be for implementing a simple game.
Memory Game Skill
The memory game skill I will be describing was created by John Wheeler, who also created the Flask-ASK package, which is a Flask extension that facilitates designing voice interfaces with the ASK. The memory game is a very simple application in which the Alexa asks you to repeat in reverse order three numbers that it spoke earlier. The application is implemented using Python script and runs on a RasPi. It uses the Flask package, which is a microframework written in Python that essentially supports Web-based applications. In fact, it is the most popular Python Web-development framework among open-source developers. I do not have the space in this book to delve into Flask but will state that many Internet tutorials are available, as well as several books completely devoted to Flask development.
You will first need to install the Flask-ASK package on the RasPi. As a gentle reminder, ensure that the RasPi OS has been updated and upgraded, as I have discussed previously in the book. Enter the following command to install Flask-ASK:
sudo pip install flask-ask
This command will take about a minute or so using a RasPi 3 (likely longer with a Model 2). After the package has been installed, open a nano editor and enter the following Python script. It is named memory_game.py and is also available for download from this book’s website, www.mhprofessional.com/NorrisHomeAutomation.

Flask-ASK also permits the separation of executable code from speech using templates. Therefore, you will need to start another nano editor session and enter the following speech responses into a file named templates.yaml. It, too, is available from this book’s website.

The templates.yaml file must be located in the same directory as the memory_game.py script. I will assume that you will likely put them both in the Home directory.
If you run the script at this point, you will see that it starts a server on http://127.0.0.1:5000, which is the local host at port 5000. Unfortunately, the Alexa service has no way to directly access the local host, and the application cannot run successfully. Fortunately, there is a unique and clever answer to this problem, and its name is ngrok.
ngrok
ngrok is a utility that will open a secure tunnel to the local host, allowing the Alexa service to communicate directly with the RasPi. A secure tunnel is just an https URL that points to the internal Web server set up by Flask. There is no public host name, and you do not need to open any firewall protections. It is exactly what is needed for the skills deployment on a RasPi.
You will need to install ngrok, which is done by going to the website ngrok.com and following the simple set of instructions posted there. You can execute ngrok once it is installed by entering the following command:
./ngrok http 5000
You should see a screen similar to the one shown in Figure 4-8 after you execute the command.
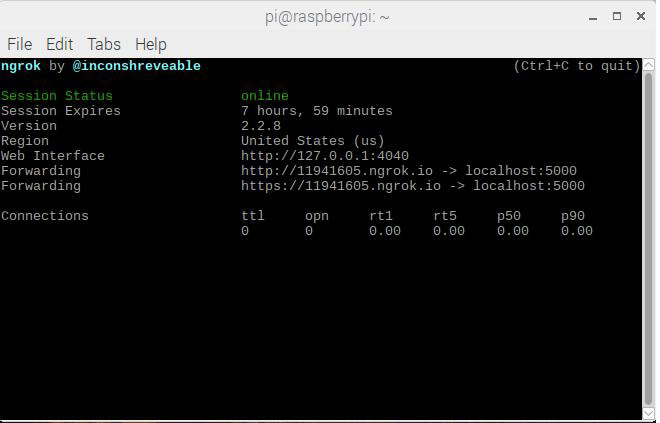
Figure 4-8 ngrok status screen.
The key bit of information that you eventually need is the https URL. The one shown in the figure is https://11941605.ngok.io and is also called an endpoint. Yours will be different. In fact, whatever URL is shown will not be used in the actual connection until you are ready to run the game. The URL created changes each time you start ngrok, and that particular URL must be the one entered into the skill prior to use. The next section discusses how to configure the Memory Game skill.
Building and Configuring the Memory Game Skill
You will need to log onto your Amazon developer account to start the process of building an Alexa skill. Go to https://developer.amazon.com, and either login or create a new account by clicking on the appropriate button. It is fast, free, and absolutely required to proceed with this project. Once logged in, go to your list of Amazon skills. Of course, it will be empty if this is the first skill you are creating. The following steps must be closely followed in the order presented or you will likely not be successful in creating the skill.
1. Click on the Create Skill button. The screen shown in Figure 4-9 should appear.

Figure 4-9 Initial screen for skill creation.
2. Leave the Skill Type set on the Custom Interaction Model.
3. Enter “Memory Game” (without quotes) for both the Name and Invocation Name textboxes.
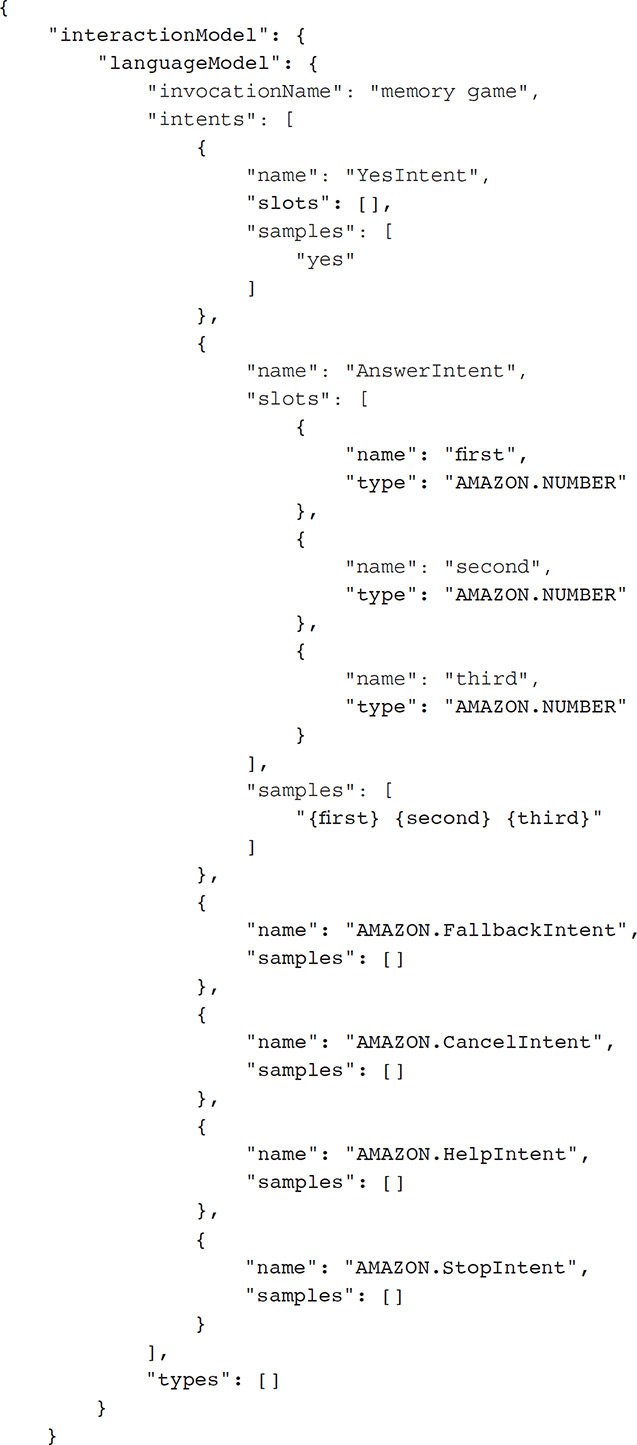
4. Copy the JSON file shown into the JSON editor window. There will already be four standard, prebuilt intents in the Editor window. The listed file includes these, so you can replace the entire existing Editor window contents with this file. This file is also available on this book’s website, www.mhprofessional.com/NorrisHomeAutomation, with the name memory_game.json.
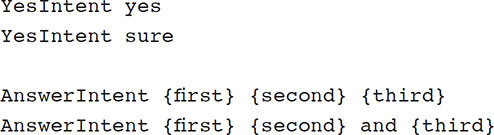
5. Copy the following utterances into the Sample Utterances field:
6. Next, run the ngrok utility and copy the https URL into the Endpoint field. Do not close the ngrok utility because the Alexa skill must use the URL Endpoint just generated.
7. Select the second radio button in the SSL Certificate settings. It states, “My development endpoint is a subdomain of a domain that has a wildcard certificate from a certificate authority.”
8. Finally, you must build the interaction model by clicking on the Build button in the Alexa Skill console website. This will take a bit of time, so be patient.
The skill is ready for testing once it has been built and saved.
Test Run
Open another terminal window, and enter this command:
sudo python memory_game.py
This will start the Python script that was loaded earlier with a Web server running as local host at port 5000. However, the ngrok utility is still running and will have established a virtual tunnel between the Alexa service and the local host Web server. This is why it is so important to enter the current https URL created when you started the ngrok utility. Figure 4-10 shows a ngrok screen as it was running with a Memory Game session.

Figure 4-10 ngrok session in progress.
Now speak the following command to the Echo device: “Alexa, start the memory game.” If all goes well, the response, should be “Welcome to the memory game. I’m going to say three numbers for you to repeat backwards. Ready?” Your response should be “Yes.”
Alexa will then state three random numbers each between 0 and 9. You should repeat them back in reverse order. If you are successful, Alexa will respond, “Good job!” If unsuccessful, the response is “Sorry, that’s the wrong answer.” You may always change the Alexa responses by modifying the templates.yaml file (which contains the utterances).
There is an incredible amount of data flowing between the Alexa service and the RasPi, which you can see captured in the communications log shown in Figure 4-11.

Figure 4-11 Communications log between the Alexa service and the RasPi.
Much of the incomprehensible text I believe is related to establishing and maintaining a secure tunnel between the Alexa service and the RasPi’s local host Web server. In any case, if you do not see this data flow, then it likely means that a secure tunnel has not been created, and the Memory Game cannot work.
You deserve congratulations if you have successfully completed this demonstration. Creating an Alexa skill is moderately difficult, especially one that is implemented using a RasPi. The next demonstration takes the preceding demonstration one step further, where you will create a skill that will control any RasPi GPIO pin.
Building and Configuring the RasPi GPIO Pin Control Skill
In this demonstration, you will be building a skill that will be able to turn on or off any RasPi GPIO pin. For convenience, I will be using the exact same physical setup shown in Figure 4-5, where GPIO pin 22 controlled a LED and GPIO pin 24 controlled an AC lamp using a PST2. However, the skill is equally applicable to any available GPIO pin.
Python Control Script
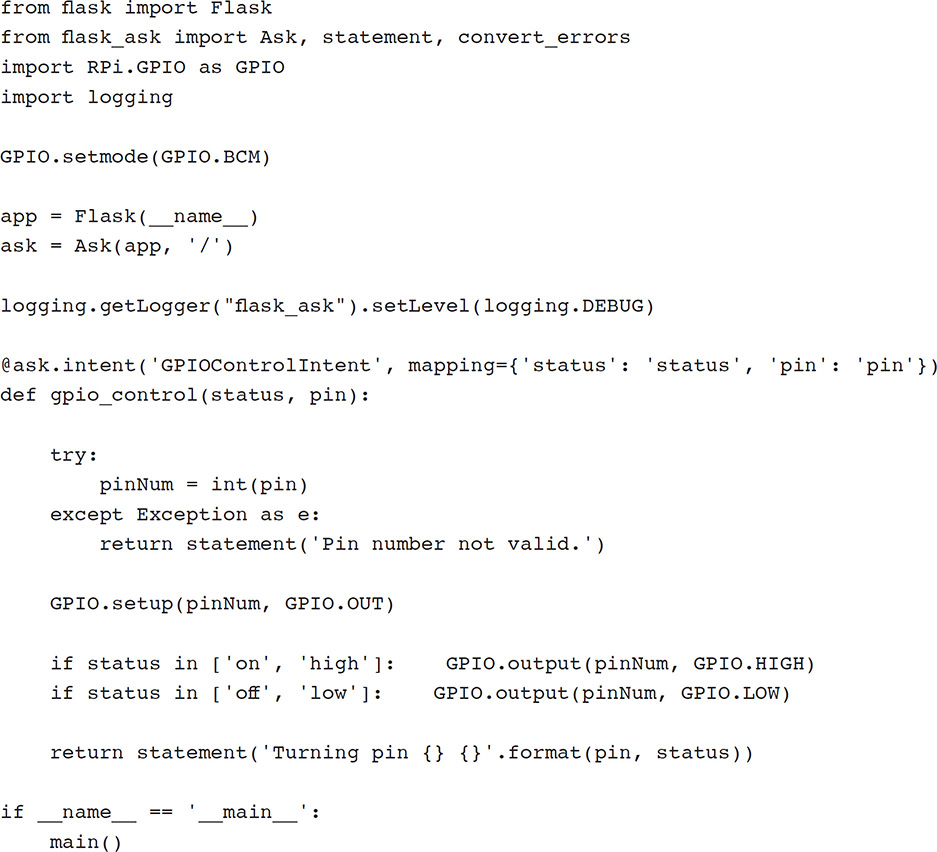
Open a nano editor, and enter the following Python script. It is named gpio_control.py and is also available for download from this book’s website.
Building the Alexa Skill
The same procedure detailed in the preceding Alexa skill-development discussion must be followed. I will not repeat all the steps except to detail the changes and modifications necessary for this particular skill build.
You need to name the skill after you click on the Create Skill button. I used the name Raspberry Pi Control, but you can name it anything you like.
The next item is to enter an invocation phrase. I used the phrase pin control because I felt that it would be natural and easy to say the phrase “Alexa, turn on pin control 22” to turn on GPIO pin 22.
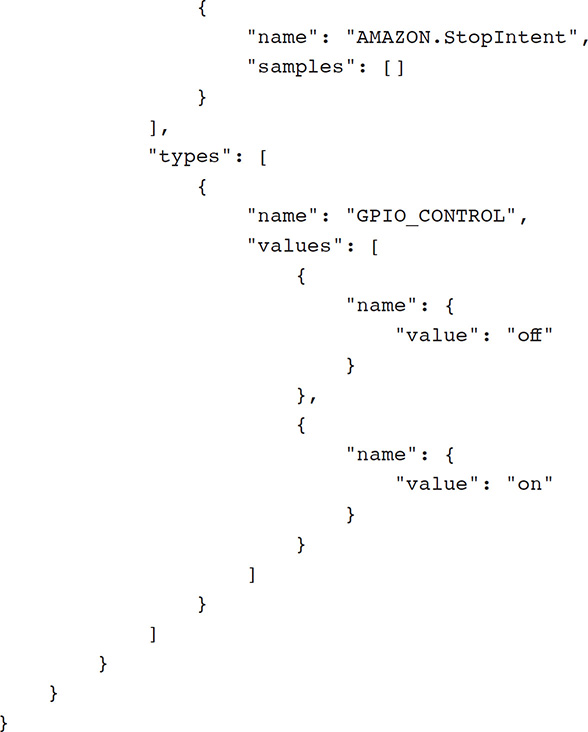
Copy the JSON file shown into the JSON editor window. There will already be four standard prebuilt intents in the editor window. The listed file includes these, so you can replace the entire existing editor window contents with this file. This file is also available on this book’s website with the name raspicontrolintent.json.

At this point, you can save the skill and build it to check that it is viable, but you cannot deploy it until you set the Endpoint URL, as noted earlier.
Run ngrok, get the https URL, and enter it into the skill’s Endpoint textbox. Also, ensure that you preset the proper SSL certificate, as discussed earlier. Now save and rebuild.
Test Run
The test run for this demonstration is run in exactly the same manner as the previous demonstration. Ensure that ngrok is still running, and then open another terminal window and run the Python control script using this command:
sudo python gpio_control.py
At this point, speak the following phrase: “Alexa, turn on pin control 22.” You should now see the LED light up and hear the Alexa response: “Turning pin 22 on.” Similarly, you can turn off the LED and turn the AC lamp on and off with the appropriate phrases.
This last demonstration should convince you that it is entirely possible to create an Alexa skill to control RasPi GPIO pins. I will say that having to set a URL prior to using the skill is a severe limitation that probably would exclude this approach for commercial HA applications. By contrast, using the Fauxmo approach, as was done in this chapter’s second demonstration, is likely acceptable for a commercial HA application or your own efficient project.
NOTE: Chapter 5 was intended to be about how to build an Echo using only the RasPi in much the same way I wrote this chapter for the Google Home device. Unfortunately, after much development and trial and error, I was unable to build such a device. I do not know what to attribute the failure to except think that the Alexa voice service does not seem to be as accepting of open-source development as is Google’s voice service. Hopefully, this will change in the future because voice services are very dynamic.
Summary
The chapter began with a demonstration of how to control a Wemo miniplug HA device using a smartphone app. I did this in preparation for introducing how the Amazon Alexa service functions and how to build a skill that could connect that service with a RasPi.
A short discussion regarding the Fauxmo server software followed. This software is an emulation of the Wemo software, which allows a RasPi to act as if it were a Wemo device. I provided a demonstration in which a LED and an AC lamp connected via a PST2 were controlled by the RasPi using spoken commands to an Echo device.
The ngrok utility was introduced, which makes possible the creation of a secure tunnel between the Alexa service and the RasPi Web server that is running as a local host. This utility was required for the follow-on demonstration.
A detailed discussion of how to create an Alexa skill from scratch followed. This skill involved building a simple Memory Game that was hosted on a RasPi. A user would start a conversation with an Echo device to run the game. This demonstration detailed all the necessary steps to build an Alexa skill.
Finally, another skill was built that directly controlled RasPi GPIO pins, which in truth controlled both the LED and AC lamp.