
CHAPTER 5
Home Automation Operating Systems
THIS CHAPTER EXPLORES the subject of home automation operating systems (HA OSs). It probably seems strange to you to even know that there is such a thing as an HA OS. Most readers are aware of a computer OS, such as Windows 10 for PCs, OSX for Macs, and Linux for the open-source community. The most common and popular OS for the RasPi is Raspbian, which is a distribution within the Debian Linux family. It would be helpful to describe what a computer OS does before attempting to describe the purpose and function of an HA OS.
Computer Operating Systems
The Wikipedia definition of an OS system is as follows:
An operating system (OS) is system software that manages computer hardware and software resources and provides common services for computer programs.
This definition is fairly accurate and is quite similar to those found in computer OS textbooks. I believe that the single most important item to know about an OS is that in itself it is just a program. Admittedly, it is a very large and complex program, but it is nonetheless just a program or, more specifically, a systems-level application. The OS loads automatically when the computer is powered on and eventually displays a friendly graphical user interface (GUI), which allows the user to easily control the whole system. It would be impossible for the average user to interact with a modern computer system without an OS functioning between the user and the hardware and software.
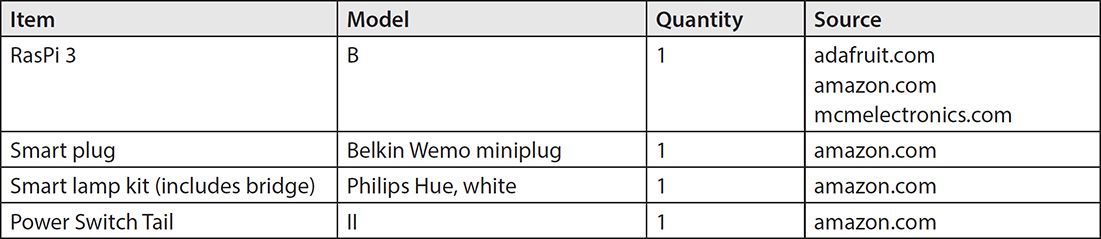
Parts List
I am not going to delve into any OS specifics here because it is really not necessary for this section, and besides, it ordinarily requires taking a one-semester college course to gain a good understanding of how a modern OS functions. The key point to understand about an OS is that it abstracts computer hardware and software to a point where relatively unsophisticated users can easily use a computer system to achieve their goals and objectives. These goals can be as simple as sending and receiving e-mail, using business applications, participating in social networks, and browsing the Internet. Likely 80 to 90 percent of all users match this description. The remaining portion of users is more knowledgeable and can develop applications as well as customize a computer system to meet their specific needs.
A modern OS has a lot of “moving parts” that are necessary for it to meet its goal of controlling a computer system based solely on mouse clicks on icons and small amounts of text input into browsers or dialog textboxes. This approach refers to the abstraction I mentioned earlier. Modern systems would be totally beyond most people’s skills and patience without this abstraction layer present. It is not an understatement to say that the OS is responsible for today’s computer revolution. Having an HA OS is similarly important for establishing and maintaining an HA revolution.
Home Automation Operating Systems
HA software is generally considered to be any type of software that is dedicated to controlling, configuring, or otherwise automating existing items and systems located in modern homes. These items and systems usually include large appliances such as stoves and refrigerators as well as small appliances such as coffee makers, media, and toasters. Home systems often include heating, ventilation, and air-conditioning (HVAC), irrigation, and lighting systems. The tasks implemented in software normally include on/off and timed operations and notifying users when events happen. These events are usually triggered by sensors detecting an abnormal situation such as an unauthorized person in the home or a rapid ambient temperature change, which may be a precursor to an imminent fire.
HA software is often designed to work with multiple interfaces to the external environment, including relay closures, e-mail portals, and Extensible Messaging and Presence Protocol (XMPP), Z-Wave Protocol, and X10 Protocol products. The software structure is often a client-server architecture using a Web-based GUI or a mobile smartphone app. The ability to automate tasks is also built in using custom scripts and similar configuration files and utilities.
Huge concerns for HA device manufacturers and consumers are privacy and security. No one wants cyber intruders to enter private homes and business establishments. Determining who has access to vital systems that control home and business systems, which often record every moment and movement of users’ lives, is of paramount importance. Users need strong assurances that automated devices are only communicating as designed and permitted and are never communicating or disclosing private information or data to unauthorized persons or organizations.
These security concerns are ample reason to use open-source solutions for HA applications. Understanding how an HA program functions is critical to ensuring that it is secure and will not expose you to all the threats that are ever-present whenever you are connected to the Internet. Unfortunately, some of the HA programs used with modern appliances and systems are proprietary and offer little to no understanding of how they are secured and how they can protect you from cyber threats.
The solution to this issue is to use an open-source protection layer in the form of a hub that ties all your devices together and provides a common user interface. This hub also should be designed for both security and ease of use and should be easy to customize to meet specific installations and requirements. This open-source hub is what I refer to as an HA OS, and many choices are currently available that will interoperate with a RasPi.
Open-Source HA OS Solutions
The following is a list of the most popular HA OS solutions currently available at the time of this writing. Of course, this is a very dynamic and fluid technology, and I am sure that some of these solutions will have disappeared by the time you read this. By contrast, new solutions will have also become available, so it will ultimately be up to you to research what is available and choose the solution that best fits your needs and objectives.
The following HA OS solutions are presented in alphabetical order, which means that you should impute no priority or preference based on their order in the list.
Calaos
This is a full-stack HA platform, which includes a server, touchscreen interface, Web interface, and mobile applications supporting both iOS and Android. It runs on a Linux platform. Calaos originated in France, so much of the support forums are in French, but the tutorials and supporting documentation have been translated into English.
This HA OS is licensed under GPL, version 3, and its source code is available from GitHub.
Domoticz
This HA system supports a wide range of devices, including uncommon devices such as weather stations and smoke detectors. Domoticz easily incorporates new communication protocols, which allows it to quickly integrate new devices into its hub. This capability is referred to as a third-party plug-in and is explained in great detail on the Domoticz website (www.domoticz.com). It uses HTML5 to implement its front-end, which makes it easily accessible using browsers and smartphone apps. It is of a lightweight design (meaning small memory footprint) and can be hosted on a RasPi.
It is written in C/C++ and is licensed under GPL, version 3. The source code is available from GitHub.
EventGhost
This is more like a utility program than a full-fledged HA OS. It is a home theater automation tool that is supported only on Microsoft Windows PCs. It allows users to control media PCs and attached hardware by using plug-ins that, in turn, trigger macros. Custom Python scripts also may be written to control the PC.
This HA OS is licensed under GPL, version 2, and its source code is available from GitHub.
Home Assistant
This HA OS is written in Python 3 and can run on any Linux platform that supports that language, including the RasPi. It also uses a Docker container for rapid and trouble-free deployment. This software easily integrates with IFTTT (If This, Then That) and Amazon services, providing for seamless interoperability with many devices. I will be introducing a practical demonstration of Home Assistant in this chapter.
Home Assistant is released to the public under the MIT license, and the source code is available from GitHub.
ioBroker
This is a JavaScript-based framework that can control lights, locks, thermostats, media, webcams, and much more. It will run on any platform that runs Node.js, which normally includes Windows, Linux, and macOS platforms.
ioBroker is released to the public under the MIT license, and the source code is available from GitHub.
Jeedom
This is a French-based open-source HA platform that controls lights, locks, media, and much more. It includes mobile apps for both Android and iOS. It operates on Linux PCs, which include the RasPi. The commercial company behind Jeedom also sells hardware hubs that provide ready-to-use solutions for setting up HA.
This HA OS is licensed under GPL, version 2, and its source code is available from GitHub.
LinuxMCE
This software is a media-based OS that runs on Linux and claims to interconnect all your home’s media devices as well as HVAC, security, and telecommunications devices. It also claims to have the ability to run video games, which I suggest is problematic for a true HA OS–designed application.
It is released under the Pluto open-source license.
MisterHouse
This software uses Perl scripts, which enables it to run on all platforms, including Windows PCs, Macs, and Linux machines. It is voice and speech enabled and can provide many responses such as the current time and weather, warn of open doors and windows, announce phone calls, inform you if your child has been speeding, and so on.
openHab
The name openHab is short for Open Home Automation Bus and is probably the best known HA OS open-source software package used by HA developers and enthusiasts. This software is written in Java and will run on all popular OSs as well as on the RasPi. It supports hundreds of devices and is well suited to be adapted and modified to function with new devices because it is written in Java. openHab also supports device control using both iOS and Android apps. The openHab website (www.openhab.org/docs/concepts/) contains a very comprehensive introduction to the whole HA concept. I recommend that you take the time to read it. It will provide you with an excellent background in HA, well beyond what I can accomplish in this chapter.
This HA OS is licensed under the Eclipse public license, and its source code is available from GitHub.
OpenNetHome
This software will control lights, security devices, appliances, and so on. It’s based on Java and Apache Maven and will operate on Windows, macOS, and Linux platforms including the RasPi.
This HA OS is licensed under GPL, version 3, and its source code is available from GitHub.
OpenMotics
This software is a bit different from other HA OSs described because it focuses mainly on individual device control and much less on the interoperability between devices. As such, it is hard to build a comprehensive HA OS using it, but it does have its place in providing a framework for device interfaces.
This HA OS is licensed under GPL, version 2, and its source code is available from GitHub.
Smarthomatic
This HA OS is an open-source framework that focuses on hardware devices and interface software rather than user interfaces. It is used for such things as controlling lights, appliances, and HVAC systems. It can measure ambient temperature and water house plants, provided that proper sensors and water systems are employed.
This HA OS is licensed under GPL, version 3, and its source code is available from GitHub.
Hass.io
Hass.io is a specialized HA OS that was created solely to ease the installation, configuration, and updating of the Home Assistant HA OS. You may properly consider it as a wrapper application for the Home Assistant because its purpose is to make the experience using Home Assistant as painless as possible while adding some new capabilities to the “wrapped” HA OS. These additional capabilities come in the form of plug-ins, which extend Home Assistant to use both Google Assistant and Let’s Encrypt, as well as some other applications discussed later. Hass.io also allows the user to take Home Assistant configuration snapshots, which will allow for rapid and seamless restoration of an existing configuration.
Hass.io has been ported to run on the RasPi and is a great addition to support the Home Assistant HA OS, which can also be installed on the RasPi. A developer named Pascal Vizeli created Hass.io based on the ResinOS and Docker framework. This wrapper OS is configured using the Home Assistant user interface (UI). However, a Hass.io dashboard UI is also available, as shown in Figure 5-1, that will allow you to install add-ons to extend the Home Assistant capabilities.

Figure 5-1 Hass.io dashboard.
The two add-ons shown in the figure are Mosquito broker and Samba share. The first one easily integrates with Google Assistant, whereas the second add-on makes the Home Assistant configuration accessible on a local network using the Samba/Windows application.
Other available add-ons that were not mentioned previously include
![]() Duck DNS
Duck DNS
![]() Homebridge
Homebridge
![]() InfluxDB
InfluxDB
![]() HASS Configurator
HASS Configurator
![]() AppDaemon
AppDaemon
Hass.io is open source and released under the Apache 2.0 license. Hass.io is and will always be optional. You can still run Home Assistant wherever you can run Python.
Proprietary and Closed-Source Hardware/Software
For the sake of completeness, I have presented the following tables to show some of the proprietary and closed-source HA hardware/software solutions that are currently available. These will change, as is the case with the open-source solutions.
Proprietary Hardware
Table 5-1 details some of the more popular proprietary HA solutions. Listed in the table in most cases is the software that supports the manufacturers’ devices.
Table 5-1 Proprietary Hardware
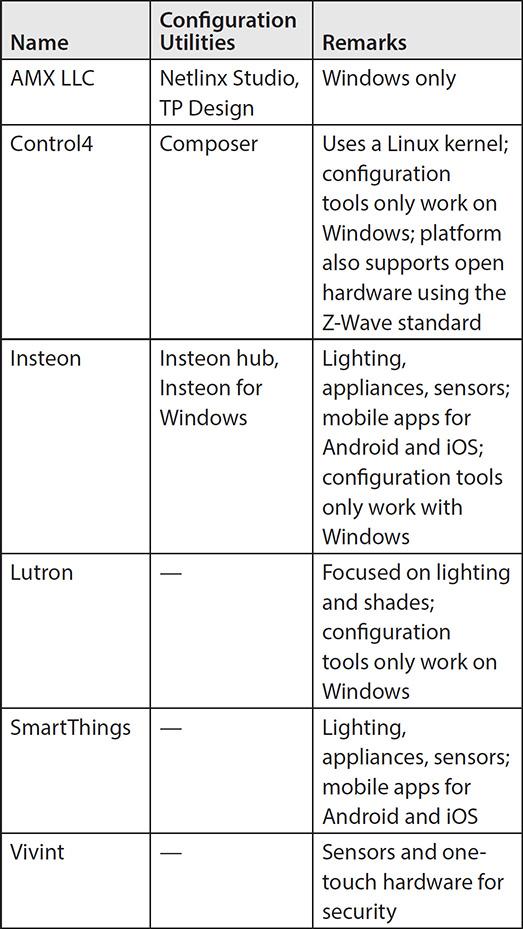
Closed-Source Software
Table 5-2 details two closed-source HA solutions. The applicable computer platforms are also shown.
Table 5-2 Closed-Source HA Software Solutions

Installing the Home Assistant HA OS
I elected to demonstrate the Home Assistant HA OS because it is one of the most popular HA software packages, and its installation and configuration are very easy using the Hass.io software package introduced earlier. The only prerequisite for the installation is to use a RasPi 3, Model B, and not the recently introduced Model B+. I am not quite sure why it is mentioned in the installation other than there hadn’t been sufficient time to try it in the installation process. That restriction may very well be removed by the time this book is published. In any case, just go to the website (https://home-assistant.io/getting-started) and carefully follow the eight steps described to install the Home Assistant software package. You will need a fresh 16- or 32-GB micro SD card as part of the installation. Ensure that it is a class 10 card to minimize the time it takes to write a new image onto the card.
There is a step in the installation process that will require you to edit an existing file on the micro SD card containing WiFi configuration details. This step is required to be accomplished before you insert the card into the RasPi. The edit is needed because the Hass.io automated installation procedure will automatically start to download the “real” Home Assistant software on the initial RasPi boot and will fail if there is no Internet connectivity. Of course, you can skip the edit step if you use a wired Ethernet connection.
The initial RasPi boot will take approximately 20 minutes, and an HA type icon will appear on the monitor screen for a few minutes. However, the icon will disappear, and there will be no indication of a successful installation. The monitor screen will be blank! Don’t despair; the installation has likely been successful. You must now use a browser on another computer connected to your local network and go to this site: http://hassio.local:8123/. You should see something similar to what is shown in Figure 5-2.
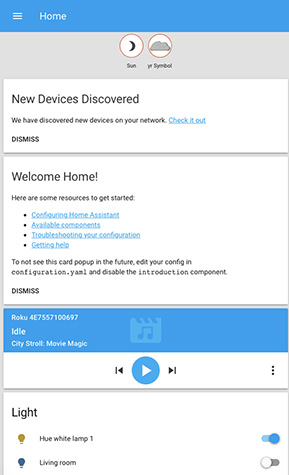
Figure 5-2 Initial Home Assistant welcome screen.
You likely noticed in the figure that the HA OS already discovered that I had a Philips Hue smart lamp connected as well as a Roku streaming device connected to my smart flat-panel TV. In fact, a show started appearing on the TV when I clicked on the Play button. Completing the smart lamp connection required only that I press a button on a Philips Hue bridge device. After that, I had full control of the smart light bulb, as you can see in Figure 5-3.
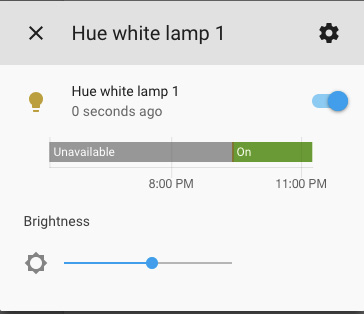
Figure 5-3 Smart light control.
The first thing you should do after connecting to the Home Assistant page is to add a password by editing the configuration file. Follow these steps to accomplish this task:
1. Open Home Assistant by going to http://hassio.local:8123/ using a browser on a computer connected to the home network.
2. Click on the Menu icon located in the top left-hand corner, and select Hass.io in the sidebar, which will appear.
3. Select the ADD-ON Store, which will appear in the Hass.io panel.
4. Install the HASS Configurator from the list of add-ons that appears in the store listing. You will be able to edit your Home Assistant configuration using a Web interface with the HASS Configurator.
5. Next, go to the Add-On Details page for the configurator, where you will be able to change settings, as well as start and stop the add-on. Follow the steps in the Details page to set up the add-on.
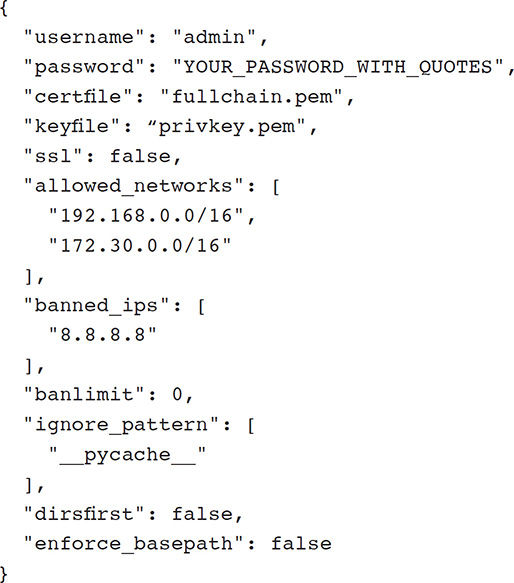
6. Set a password in the Config box, and don’t forget to use quotes surrounding your password. The following listing is representative of what the initial configuration file will look like.
7. Click on SAVE to save your new password.
8. Next, click on START at the top of the Configurator add-on panel.
9. You will now be able to click the OPEN WEB UI link to open the Web UI in a new window.
10. Type your username and password that you recently created in the dialog box, as shown in Figure 5-4. A Web-based editor should now appear, as shown in Figure 5-5. You can modify the Home Assistant configuration using this editor. Do not close this Web page because in the next section I discuss how to make some modifications to the Home Assistant HA OS using the Web editor.
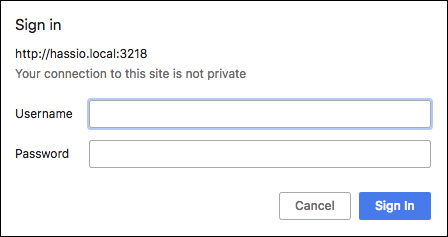
Figure 5-4 Login dialog box.

Figure 5-5 Configurator Web-based editor window.
Modifying the Home Assistant Using the Configurator
The first configuration task I will demonstrate is how to add a new icon into the Home Assistant sidebar, which when clicked will start the Configurator. The following code must be entered into the configuration.yaml file in order to add the new icon:

Click on the Browse Folder icon in the upper left-hand corner of the Web editor to open a list of Home Assistant files that can be edited. Select the configuration.yaml file, as shown in Figure 5-6.
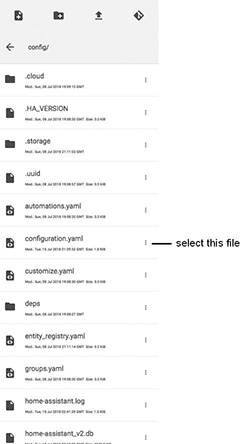
Figure 5-6 Selection of the configuration.yaml file.
Enter the listing at the end of the file, playing particular attention to the indentations in the listing. Save the newly edited file, and exit the Configurator. The Home Assistant must now be rebooted for the new configuration to take effect. I found that I had to power cycle the RasPi to reboot the system. Trying to reboot the RasPi over the Web was ineffective and a wasted effort. You should wait several minutes before attempting to log back into the Home Assistant.
Figure 5-7 shows the new welcome screen after a successful reboot. You can clearly see the new Configurator “wrench” icon in the sidebar, which was not present prior to the preceding configuration file edit.

Figure 5-7 New Home Assistant welcome screen.
Editing the Configuration Using Samba
It is also possible to avoid using the Configurator Web-based editor by installing the Samba add-on. Samba is a Windows application that allows Linux/Unix programs to interoperate with a Windows OS over a network. It is installed in the Home Assistant in the same manner that the Configurator was done. Go into the ADD-ON store and select the Samba share application for installation. Click on the Start button once the Samba application has been installed.
A Hass.io icon should appear in the Networking tab on a Windows computer connected to a local network. Now use any text editor available on the Windows machine to make the edits to the configuration.yaml file, as discussed earlier. Just ensure that the Windows editing program does not insert any special or unique formatting codes, which will render the configuration file invalid. In this context, I strongly recommend that you do not use Microsoft Word to do any editing.
Configuring Integrations
It is now time to show you how to manually configure devices and services. Most HA devices and services will have dedicated instruction regarding how to integrate them into an HA OS. The first step, in most cases, is to locate the device/services manufacturer in the Home Assistant component Web page. This will be at www.home-assistant.io/components/. I chose adding the Belkin miniplug as a simple example for a device integration. Going to the URL shown earlier will reveal the Web page shown in Figure 5-8.
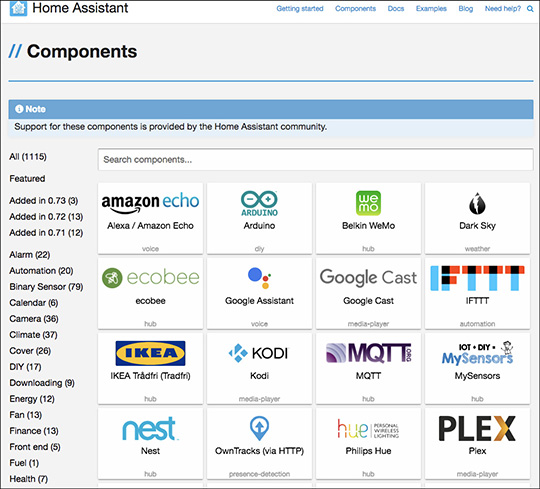
Figure 5-8 Initial Home Assistant components Web page.
You may be a bit startled to find out that more than 1,100 devices and services are referenced by this Web page, which you can see by the total count (All) in the sidebar. I next clicked on the Belkin Wemo icon, and it took me to the Web page that describes how to integrate a Belkin Wemo unit into the Home Assistant. The following discussion is based strongly on the contents from that page, which I like because it explains in simple but clear terms how to integrate a Wemo device.
The Wemo component is used to integrate various Belkin devices with Home Assistant.
Normally, Wemo devices will be automatically discovered if the Home Assistant discovery component service is enabled. However, manually loading the Wemo component will force a scan of the local network for Wemo devices, even if the discovery component service is not enabled.
Every discovered device results in an additional entry into the configuration.yaml file, for example, configuration.yaml entry
wemo:
Alternately, Wemo devices that do not seem to be discoverable may be statically configured. This may be the case if you have Wemo devices on a subnet other than the one where Home Assistant is running or have devices set up in a remote location that is reachable over a virtual private network (VPN). This approach is also useful if you wish to disable discovery for some Wemo dervices, even if they are local. An example of a static configuration is

Note that any Wemo devices that are not statically configured but still reachable via the discovery service will still be added automatically to the Home Assistant configuration file. Also note that if you employ static IP addresses, you may need to set up your router (typically running the Dynamic Host Configuration Protocol [DHCP] service) to force the Wemo devices to use a static IP address. You should check the DHCP section of your router configuration for this capability.
If the device doesn’t seem to work and all you see is the state “Unavailable” on your dashboard, check that your firewall doesn’t block incoming requests on port 8989 because this is the address to which the Wemo devices send their updates.
Emulated Wemo Devices
There are a number of software packages that emulate Wemo devices and often use alternative ports. All static configurations must include the port value, as shown in the next example.

Remember that I discussed the Fauxmo Wemo emulation in Chapter 4. In that demonstration, I used port numbers ranging from 50015 to 50026 along with the RasPi IP address to control individual GPIO pins.
Automating the Home Assistant
Creating automating scripts is a key feature in successfully and effectively using an HA OS. The process of creating a script is called automation, and there a few basics that I need to cover for you to have a good understanding of this process.
Let’s say that Mary arrives home in the evening and desires to have the hallway and living room lights turned on by the Home Assistant. This scenario may be broken down or analyzed as follows:

This scenario has three distinct parts: the trigger, the condition, and the action. Each part is part of an automation rule and has a distinct role. These roles are
![]() Trigger. Describe event(s) that should trigger the automation rule. In this case, “Mary arrives home.” The Home Assistant would need to be aware of the state change of Mary from “not being home” to “being home.”
Trigger. Describe event(s) that should trigger the automation rule. In this case, “Mary arrives home.” The Home Assistant would need to be aware of the state change of Mary from “not being home” to “being home.”
![]() Condition. A condition is an optional test that can limit an automation rule to function only for a specific requirement in your use case. The condition detects current system states. These states might include the current time, weather, sensors, people, and other things such as the sun. In this particular case, the rule should be acted on only after the sun has set. Time would not be a good test because sunset changes constantly. Multiple conditions also may need to be met before the rule is acted on.
Condition. A condition is an optional test that can limit an automation rule to function only for a specific requirement in your use case. The condition detects current system states. These states might include the current time, weather, sensors, people, and other things such as the sun. In this particular case, the rule should be acted on only after the sun has set. Time would not be a good test because sunset changes constantly. Multiple conditions also may need to be met before the rule is acted on.
![]() Action. The action will be performed after a rule is triggered and all conditions are met. In this example, both the hallway and living room lights are turned on after Mary arrives home in the evening. Actions can be a multitude of things including setting the temperature on a smart thermostat or activating a scene, which I describe below.
Action. The action will be performed after a rule is triggered and all conditions are met. In this example, both the hallway and living room lights are turned on after Mary arrives home in the evening. Actions can be a multitude of things including setting the temperature on a smart thermostat or activating a scene, which I describe below.
It is important to differentiate between the various roles. A light being on could very well be a condition or even a trigger, whereas turning a light on likely would be an action. Proper role identification is one key to creating workable automation rules.
Internal HA OS States
Automation rules depend on knowing the internal state of the HA OS. In the Home Assistant, the current state is available by clicking on a Developer Tool icon in the sidebar shown in Figure 5-9.
![]()
Figure 5-9 Icon for current state(s).
All the current HA OS states will be shown as entities. These entities can be anything, ranging from lights to people, even the sun itself. A state has multiple parts that are described in Table 5-3.
Table 5-3 State Components

Changes in state may be used as trigger sources, and the current state can also be used in setting conditions.
HA OS Services
All Home Assistant actions are carried out using services. In the Home Assistant, all current services are available by clicking on a Developer Tool icon in the sidebar shown in Figure 5-10.
![]()
Figure 5-10 Icon for current services.
Services allow the HA to control anything already integrated into the OS, for example, turning on a light, running a script, or enabling a scene. Every service has both a domain and a name. For example, the service light.turn_on is capable of turning on any light registered in the HA system. Services can also pass parameters or arguments, which can set a specific color for a multicolored lamp and/or set a light intensity.
You will have to set an initial state in your automations in order for Home Assistant to enable them on restart. The following is an example of a code snippet to be placed in the configuration.yaml file to turn on automation:

Automation Example
It would beneficial at this point to actually create a working automation example. The automation rule is
Turn on a light after sunset
This rule implicitly defines a trigger that somehow tracks the sunset and will fire the rule when the sun does set. The service is light.turn_on, and if it is called without any parameters or arguments, it will turn on all integrated lights. An example automation rule entry in the configuration.yaml file would be


Starting with Home Assistant, version 0.28, all the automation rules can be controlled with the front-end. Figure 5-11 shows a sample automation rules control panel. Using a control panel in the front-end means that automation rules can be reloaded (or unloaded) without restarting Home Assistant itself.
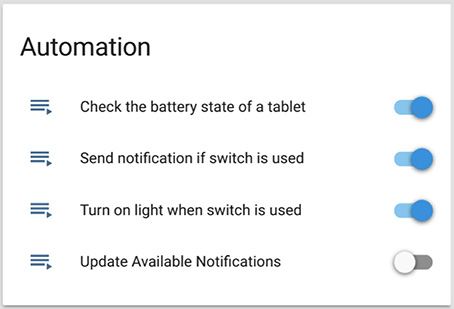
Figure 5-11 Sample automation rules control panel.
If you don’t want to see the automation rule in your front-end, use the statement hide_entity: True to hide it. You can also use the statement initial_state: 'off' or 'false' so that the automation is not automatically turned on after a Home Assistant reboot.
I added the preceding automation rule to the configuration.yaml file and rebooted the RasPi in order to reboot the Home Assistant OS with the modified configuration file. After the Home Assistant was started, I observed that the Hue lamp turned on after I ensured that the sun entity was false or off. This meant that it was sunset.
Modifications to the Automation Example
Let’s suppose that after a few days of using the automation rule you observe that the lights went on after it was already dark and also that the lights went on when nobody was home. This means that it is time for some modifications and conditions to be added to the automation rule. One modification would be to add a time offset to the sunset trigger as well as adding a condition to test whether anyone is home. The following modified rule should replace the existing automation rule in the configuration.yaml file:

I did not test this particular automation script because I had not yet set up presence detection, which I describe in a later section. The preceding script is not the end of this tale of automation. You recently discovered that the bedroom lights also went on when the living room and kitchen lights went on after sunset. What you really want is for only the living room lights to turn on after sunset.
The first thing to do is to check the names of all the light entities that are integrated into the HA system. You can do this by clicking on the Developer Current State icon, Figure 5-9 in the Home Assistant sidebar. Write down the names of all the light entities. Suppose that they are light.table_lamp, light.bedroom, and light.ceiling. A group will be set up in the automation rule that will avoid the issue of hard coding the light entity IDs in the automation rule. This approach will separate the living room lights from all other lights in the automation rule.
The configuration.yaml file is once again modified with this new group to ensure that only the desired light(s) in the group are activated:

The holidays are approaching, and you decide to purchase a remote control switch to control the Christmas tree lights using the Home Assistant. You first integrate the remote switch with the Home Assistant and find the appropriate entity ID using the State Developer tool. In this case, it is switch.christmas_lights. The automation rule must be modified once more to handle the switch, but the action light.turn_on is no longer applicable to the new device, which is a switch. Fortunately, Home Assistant has a service named homeassistant.turn_on that is capable of turning on any entity. The modified automation rule is

Setting Up Presence Detection
Presence detection detects whether people are at home, which is a very valuable input for creating automation scripts. Knowing who is at home or where they are will open a whole range of automation options, including
![]() Sending a notification when a child arrives at school
Sending a notification when a child arrives at school
![]() Turning on the air-conditioning when I leave work
Turning on the air-conditioning when I leave work
The Home Assistant device tracker component provides presence detection. It supports three different methods for presence detection:
1. Scan for connected devices on the local network.
2. Scan for Bluetooth devices within range.
3. Connect to a third-party service.
Scanning for connected devices is easy to set up with options that include using Home Assistant components known as router-based devices/services, a portion of which is shown in Figure 5-12.

Figure 5-12 A few of the Home Assistant presence-detection devices/services.
The second approach uses the Nmap utility. The Web page www.home-assistant.io/components/device_tracker.nmap_tracker/ describes how to set up the Nmap utility on the RasPi. This approach does have its limitations, but it will only be able to detect whether a device is at home, and modern smartphones may show as not home inaccurately because they disconnect from WiFi if idle after a certain time period.
You can also scan for Bluetooth and Bluetooth LE (light energy) devices. Fortunately, modern smartphones don’t turn off Bluetooth automatically, although the range is smaller than with WiFi.
Home Assistant currently supports many third-party services for presence detection, such as OwnTracks over MQTT, OwnTracks over HTTP, GPSLogger, and Locative. Overall, a wide range of options is available, both for scanning the local network and for third-party services.
Home Assistant will know the location of your device if you are using a device tracker that reports a GPS location (such as OwnTracks, GPS Logger, the iOS app, and others). You will also be able to add names to the locations of devices by creating zones. In this way, you can easily locate on the state page where the people in your house are and use it both for triggers and conditions for automation scripts.
There is one caution in that if you’re looking at the map view, then any devices in your home zone won’t be visible. The Home Assistant map view is part of the front-end and is designed to display the location of all tracked devices, except those located in the home zone. You add the map by including the following simple entry in the configuration.yaml file:
# Example configuration.yaml entry
map:
Summary
This chapter described what an HA OS is and how it operates. I began it with a brief description of how a regular computer OS works and proceeded to extend that discussion to how the HA OS functions and how it differs from a computer OS.
A detailed list regarding a dozen open-source HA OSs was next presented. I also included a discussion of the Hass.io OS, which is a wrapper-type OS for the Home Assistant HA OS addressed throughout the remainder of the chapter.
A through discussion on how to install and configure the Home Assistant HA OS on a RasPi 3, Model B, was next. A brief demonstration of using the Home Assistant with a Philips Hue smart bulb also was included.
I next showed how to modify the Home Assistant configuration file using a Web-based editor provided by a Home Assistant add-on named the Configurator. A Belkin Wemo miniplug was manually integrated into the Home Assistant using the Configurator.
I next demonstrated how to create an automation script that used both states and services. An extensive discussion followed about modifying the automation script three times to optimize its operation. The chapter concluded with a brief discussion of presence detection and how to implement it in the Home Assistant.