

Manipulating z/OS resources
by using File Manager
by using File Manager
By using the File Manager Base component you can manipulate data that is stored in data sets, UNIX System Services files, WebSphere MQ queues, and various CICS resources1. You can edit and browse such resources by using File Manager’s editor. You can also specify those various types of resources as a target to start File Manager utility functions online and batch. Currently, the following utility functions provide support:
•Find/Change (FCH)
•Data set create (DSG)
•Data set copy (DSC)
•Data set print (DSP)
•Data set compare (DSM)
•Data set update and data set edit batch (DSU/DSEB)
File Manager provides a set of useful capabilities when you are manipulating data that is stored in different resource types in a z/OS environment. The following example scenarios illustrate these capabilities:
•Edit and browse data that is stored in WebSphere MQ queues and CICS resources. You can format data by using a template.
•Copy test data that is stored in a data set to a WebSphere MQ queue.
•Copy test data that is stored in a data set to a CICS file, Transient Data queue, or Temporary Storage queue.
•Edit or browse a CICS resource or WebSphere MQ queue and save a copy of the data to a data set by using the SAVE AS action.
•Compare data that is stored in a CICS resource of a CICS system (such as a development environment) to a corresponding CICS resource in another CICS system (such as a test environment).
In this chapter, we demonstrate how to use File Manager to perform these scenarios under ISPF/batch environment, and how to use the File Manager plug-in for Eclipse.
8.1 Data manipulation by using File Manager on the host
This section describes the use of File Manager for data manipulation.
8.1.1 Edit or browse resources by using File Manager editor
A File Manager editor entry panel is shown in Figure 8-1. You specify the name of the resource that you want to edit or browse along with other File Manager options. You can specify a data set name or a UNIX System Services file.

Figure 8-1 File Manager editor entry panel - specify different types of resources
You also can specify the following WebSphere MQ queue names and CICS resources:
•Specifying the WebSphere MQ:
MQ:manager-id:queue-name
– MQ: A prefix for specifying the WebSphere MQ queue.
– manager-id: The WebSphere MQ manager that is to be used. If you specify a generic name, File Manager displays a list of matching managers to select from (such as MQ:*, which looks up all queue managers).
– queue-name: The queue that is to be used. If you specify a generic name, File Manager displays a list of queues to select from (such as MQ:MQ72:*, which looks up all queues that are defined to queue manager MQ72).
•Specifying a CICS resource:
RT:APPLID:RNAME
– RT: Identifies CICS resource type. The following values are valid:
• FI: CICS file
• TD: Transient Data Queue
• TS: Temporary Storage Queue
– APPLID: VTAM applid for the CICS system. You can specify a generic name to display a list of CICS systems if an FMNCICS DD that is describing CICS applids is allocated to the ISPF session (such as FI:*, which looks up all CICS systems that are described by FMNCICS DD).
– RNAME: Name of the resource. If you specify a generic name, File Manager displays a list of resource to select from (such as FI:C62D2FM5:*, which looks up all CICS files that are defined in CICS system C62D2FM5).
After the name of a resource is specified, the rest of the File Manager editor options work the same. For example, you can specify a template to format the data in the specified resource. An edit session for a CICS temporary storage queue with a template is shown in Figure 8-2.
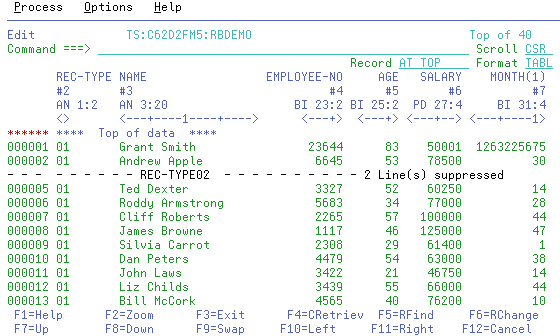
Figure 8-2 Edit session for CICS temporary storage queue with a template
When you are in an edit session, the File Manager editor behaves the same. For example, you can change SHOW and SHADOW settings to restrict the set of records for display, and issue various editor commands, such as Find/Change.
By using the SAVEAS command you can save a copy of the currently edited resource to a different resource. For example, if you are browsing a CICS resource or a WebSphere MQ queue and discovered something wrong in the live data, you can choose to save the data to your data set so that you can keep a copy of problematic data permanently for your own use. You might want to update your application to cope with the problematic data by using the saved data. You can specify different types of resource as a target resource of the SAVEAS command by using the resource identification convention that is described here.
8.1.2 Copying data by using File Manager copy utility function
By using the File Manager copy utility function (DSC), you can copy some data from a resource to another resource. You can specify any combination of data sets, UNIX System Services files, WebSphere MQ, and CICS resource as a TO/FROM target for the utility function. You can run the copy function online under ISPF or run it as a batch job.
When the File Manager copy utility function is started with a template, it gives you flexibility in terms of how you want to copy your data by using one of the following methods:
•Select fields to copy.
•Specify a scrambling option so that sensitive data is masked.
In the following example, we demonstrate how to copy a subset of data from a CICS temporary storage to a WebSphere MQ queue by using a template:
1. Prepare a template. Example 8-1 and Example 8-2 are the source code for creating templates, which describe data that is stored in the source and destination.
Example 8-1 Copybook for describing data source
01 People1.
03 PersonID PIC S999.
03 FirstName PIC A(10).
03 Surname PIC A(10).
03 Phone PIC X(14).
03 Postcode PIC X(5).
03 Country PIC X(44).
Example 8-2 Copybook for describing data destination
01 People2.
03 PersonID PIC S999.
03 Surname PIC A(10).
03 Phone PIC X(14).
03 Country PIC X(44).
2. Create templates by using File Manager’s Template Workbench (option 7.1). Figure 8-3 shows the Template Workbench while a template is created from a copybook. The template ‘KEEPER.TEMPLATE(PEOPLE1)’ is created by using a copybook ‘KEEPER.COPYBOOK.COBOL(PEOPLE1)’.
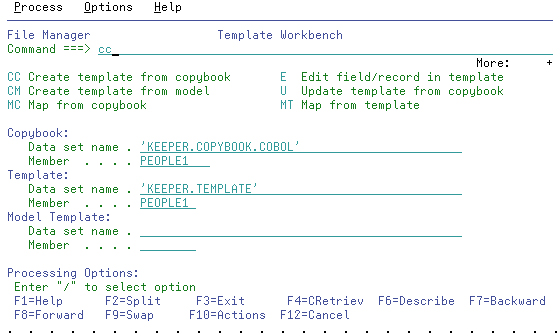
Figure 8-3 Template Workbench for creating template from copybook
3. Specify field mapping so that the subsets of fields are copied from the source to its destination. You start the field-mapping editor by completing the following steps:
a. Specify the FROM template (‘KEEPER.TEMPLATE(PEOPLE1)’).
b. Execute the MT command from the Template Workbench.
c. Specify the TO template (‘KEEPER.TEMPLATE(PEOPLE2)’).
d. Execute the GE command.
Figure 8-4 shows the Field-Mapping editor with the generated default mapping. Only a subset of fields is mapped. That is, only the mapped fields are copied when the File Manager copy function copies data by using those templates.
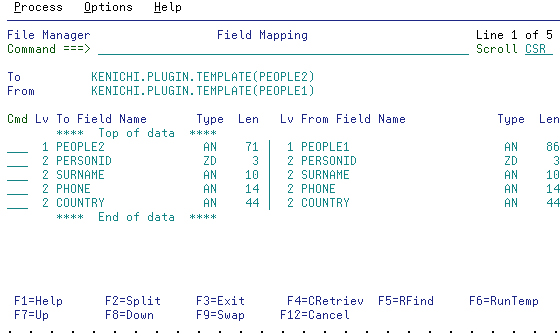
Figure 8-4 The default mapping that is generated by File Manager
To make the scenario more interesting, we use the following procedure to specify the scrambling option for the phone number field to protect the privacy of people if you are working with the real production data:
a. Specify “e” next to the PHONE field.
b. In the field attributes panel, specify the 1. Random option under the scramble option.
c. Exit the panel.
d. Exit and save the template.
All field-mapping information is stored in TO template (‘KEEPER.TEMPLATE(PEOPLE2)’ in the example).
4. Open the File Manager copy function panel (option 3.3).

Figure 8-5 Copy utility data source specification panel (FROM)
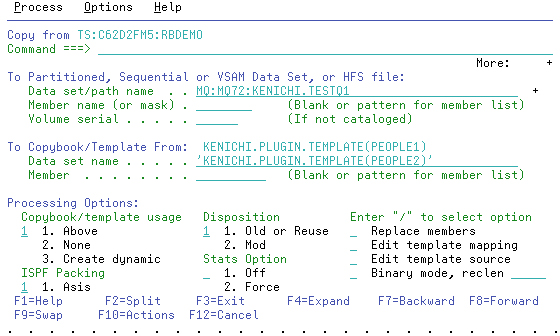
Figure 8-6 Copy utility data destination panel (TO)
7. Execute the copy utility function. If you select the Batch execution option, it generates a sample JCL. Otherwise, the File Manager copy function is executed online.
You can specify any combination of different resources when you are preparing to execute the File Manager copy utility function.
8.1.3 Comparing data by using File Manager compare utility function
In this section, we demonstrate how to compare two CICS resources in two CICS regions. You can always specify any combination of different resource types as you see fit for your task.
Complete the following steps to compare data by using the File Manager compare utility function:
1. Start the Compare Utility (option 3.11).

Figure 8-7 Compare utility: OLD resource specification panel
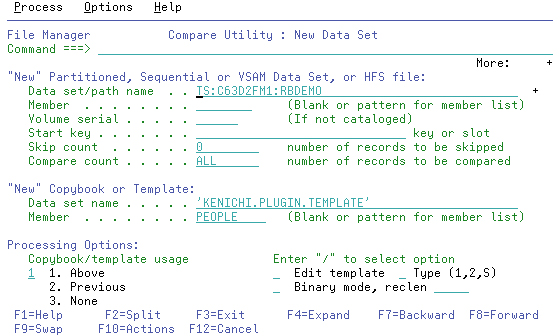
Figure 8-8 Compare utility - NEW resource specification panel
4. Specify various compare options.
Execute online or batch.
The key point here is that you can compare two CICS resources from different CICS regions by using the File Manager compare utility function.
8.2 Data manipulation by using File Manager plug-in for Eclipse
In this section, we describe various types of data manipulation by using File Manager.
8.2.1 Edit or browse resources by using File Manager editor
Figure 8-9 shows the Systems Information view, which is provided by the File Manager plug-in for Eclipse. As you can see, all of the resources that are available on your system are represented as a tree in the view2.

Figure 8-9 File Manager Systems Information presents all accessible resources in one view
All File Manager actions, such as the following edit and utility functions, are available from this view that is based on the current selection:
1. Browse CICS Systems: If you expand this node, you see a list of CICS Systems that are known to the File Manager server3. By using this ability you can browse to a different CICS resource.
2. Query a CICS resource: You can create a specific query to look up a specific CICS resource (such as CICS files that start with the name A: “FI:applid:A*”). Such queries are grouped by the CICS System.
3. Browse Data Sets: If you expand this node, you can see all of the data sets with your user name as their high-level qualifier.
4. Browse WebSphere MQ Manager: If you expand this node, you see all of the WebSphere MQ queue managers that are known to File Manager server.
5. Query queues: You also can create a specific query to look up queues for a queue manager. Such queries are grouped by their queue manager name.
To start an edit/browse session, you must browse to a resource in the view and start the File Manager editor from the context menu. Complete the following steps to start the session:
1. Create a connection to your z/OS system and right-click the CICS node.
2. Select Add query from the context menu.
3. In the Add CICS resource query window, specify the CICS application ID, resource type, and resource name pattern (as shown in Figure 8-10). You can type the application ID of your CICS system or click Lookup to look up CICS systems. In this example, we are looking up all temporary storage queues that are defined to a CICS system.
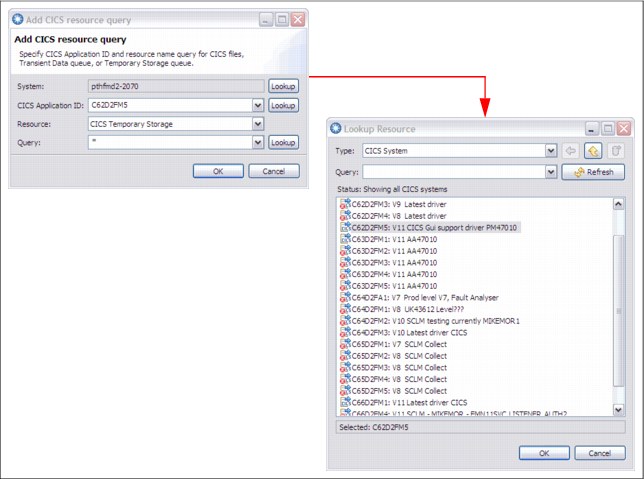
Figure 8-10 Lookup Resource dialog for looking up the CICS system name
4. Select OK and expand the query node in the Systems Information view.
5. Select a temporary storage queue and open the context menu. Select Formatted Editor from the context menu, as shown in Figure 8-11.
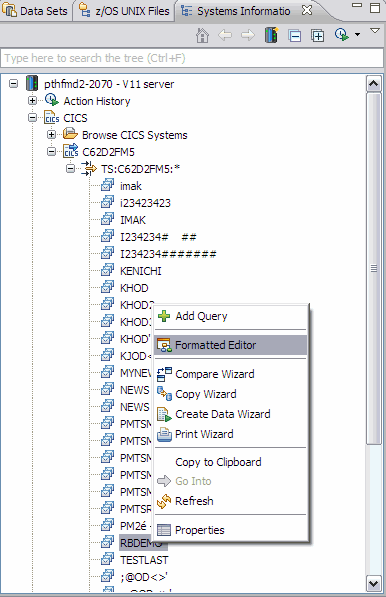
Figure 8-11 Invocation of File Manager editor from Systems Information view
6. Specify a File Manager editor option (such as specifying a template) and click Edit or View to start the editor session for the selected resource (as shown in Figure 8-12).

Figure 8-12 Editor options window
7. When you are in an edit session (as show in Figure 8-13), all actions behave the same regardless of which resource is being edited.
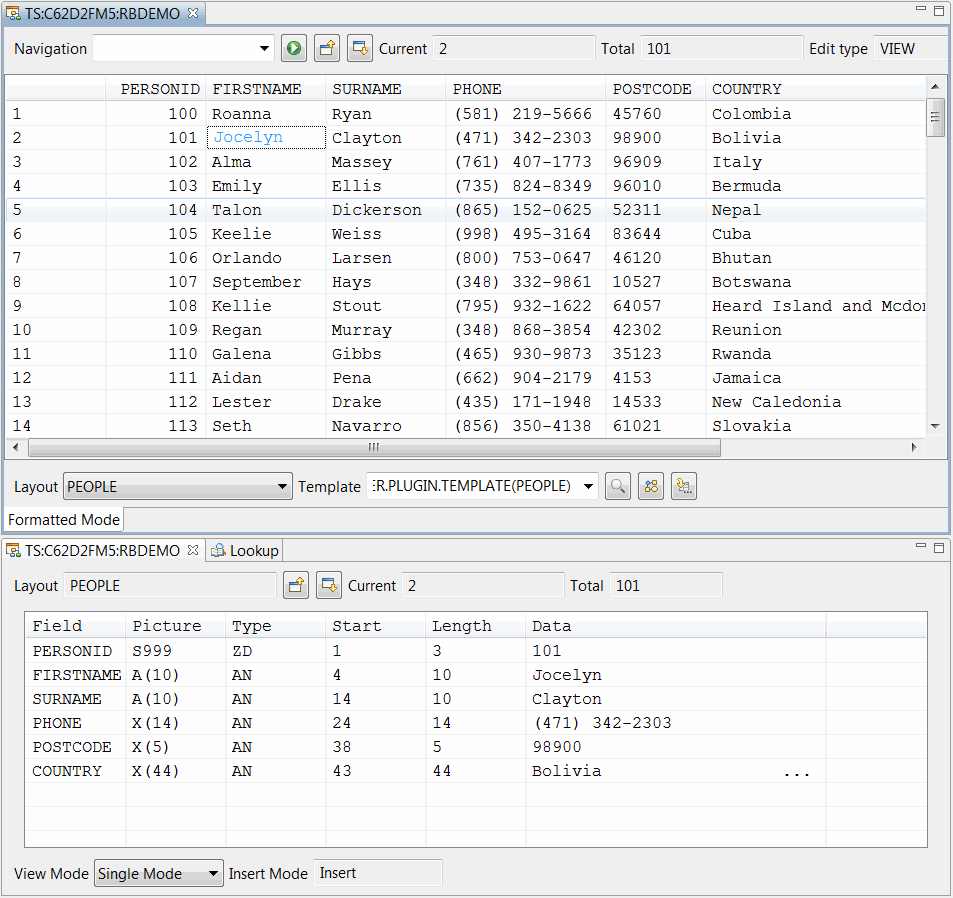
Figure 8-13 Editor session of CICS temporary storage
Alternatively, you can change the resource to edit dynamically while you are in the editor’s options window (as shown in Figure 8-12 on page 275). The Resource name is filled in with the name of resource that was selected in the Systems Information view when you started the editor. You can specify a different resource by using one of the following options:
•If you know the name of the resource that you want to edit, then overwrite the resource name. The same naming conventions apply as described in 8.1.1, “Edit or browse resources by using File Manager editor” on page 264.
•You can click Lookup, which brings up the Lookup Resource window (as shown in Figure 8-10 on page 273). By using the window, you can interactively select the target resource.
•You can enter the name of resource while you are using the content assist4. You can start the content assist by pressing Ctrl+Spacebar while you are in the resource name field. Depending on what you specified in the field, the content assist looks up the resources that are available on your system. The following examples can be used:
– Enter nothing and press Ctrl+Spacebar: Looks up all of the HLQ that is available on your system.
– Enter TS: and press Ctrl+Spacebar: Looks up all of the CICS systems.
– Enter TS:C62D2FM5:* and press Ctrl+Spacebar: Looks up all temporary storage queues that are available on a CICS system called C62D2FM5.
– Enter MQ: and press Ctrl+Spacebar: Looks up all of the WebSphere MQ queue managers that are on your system.
SAVE AS action is available, with which you can save data in the current edit session to another resource. You can choose to save data from any resource type to any resource type5.
8.2.2 Copying data by using the File Manager copy utility function
In the following scenario, we walk through the same copy data scenario that was described in 8.1.2, “Copying data by using File Manager copy utility function” on page 266. However, we now use the Eclipse plug-in:
1. Create a query to look up your copybooks and locate the copybooks in the Systems Information view.
2. Select two copybooks (PEOPLE1 and PEOPLE2) and select Template Editor from the context menu, as shown in Figure 8-14. This method creates a template dynamically from the selected copybook.
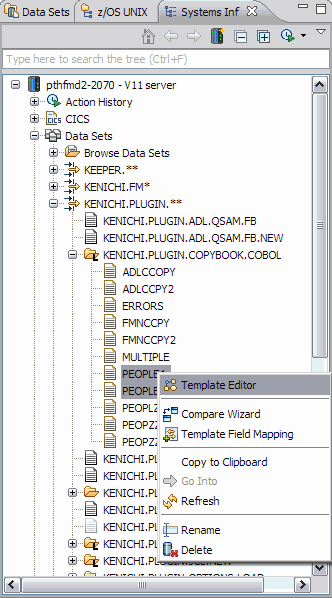
Figure 8-14 Invocation of Template Editor from Systems Information view
3. When you see two instances of Template Editor opened in your workspace, save them to a suitable data set (such as KEEPER.TEMPLATE). You must choose the SAVE AS option so that you can use them as a template and change later.
4. Create a query and select the PEOPLE2 template that you created in the previous step.
5. Select Template Field Mapping from the context menu. The Template Field Mapping Editor window appears, as shown in Figure 8-15.
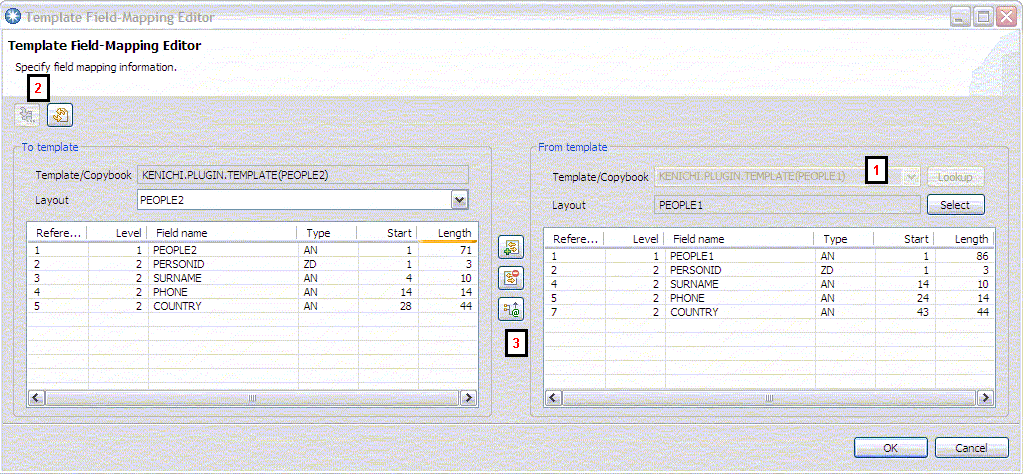
Figure 8-15 Template field-mapping editor
6. The TO and FROM templates are pre-populated with PEOPLE2 template. Change the FROM template to PEOPLE16 (Number 1 in Figure 8-15).
7. Click Load (in the upper left of the window) to start the field-mapping session
(Number 2 in Figure 8-15).
(Number 2 in Figure 8-15).
8. Select a row for the Phone field. Click Attributes (Number 3 in Figure 8-15) to open the window for specifying attributes for the selected field.
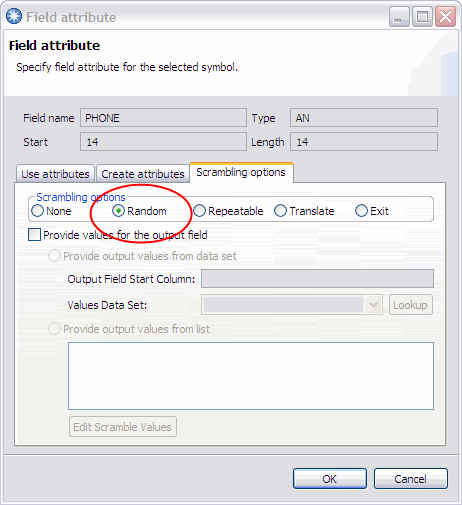
Figure 8-16 Field attribute dialog for specifying attributes for a field in a template
10. Close the field-mapping editor window.
11. Create a query for the CICS resource that you want to copy from (for example, TS:C62D2FM5:RB*). Expand the query node and select the resource to copy from.
12. Right-click the resource and select Copy Wizard from the context menu. You see the Copy Wizard. The selected resource must be selected as the source.
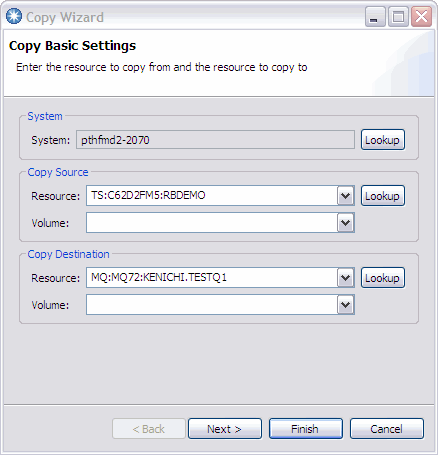
Figure 8-17 Copy wizard resource specification page
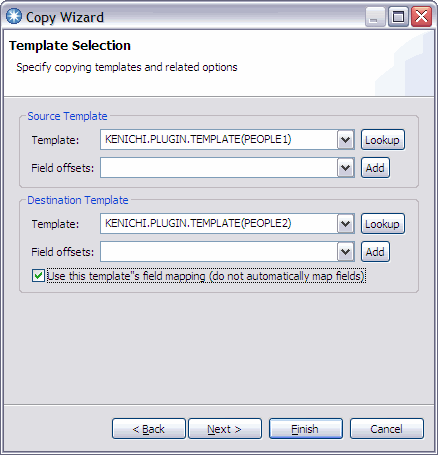
Figure 8-18 Copy wizard template specification page
15. Follow the rest of wizard to specify other File Manager copy utility function parameters.
Now the data from the selected CICS TS queue must be copied to the specified WebSphere MQ queue.
8.2.3 Comparing data by using File Manager compare utility function
In this section, we demonstrate how to start File Manager’s compare utility function to compare two CICS TS queues from different CICS systems as described in 8.1.3, “Comparing data by using File Manager compare utility function” on page 270. Complete the following steps to specify different sets of resources to compare:
1. Create a query to look up a TS queue from a CICS region (such as TS:C62D2FM5:RB* for looking up TS queues with a name that starts with RB at CICS system called C62D2FM5).
2. Create another query to look up a TS queue from a different CICS region (such as TS:C63D2FM1:RB* for looking up TS queues with a name that starts with RB at CICS system called C63D2FM1).
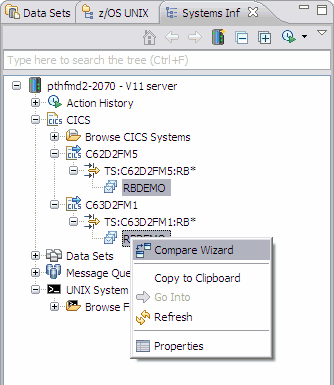
Figure 8-19 Starting the compare wizard against two CICS TS queues from different CICS systems
4. Select Compare Wizard from the context menu.
5. The selected resources must be used as NEW and OLD resources to compare in the wizard. Follow the wizard to specify various File Manager compare utility function parameters.
6. Click Finish to start the compare utility function. The result is displayed in your local text editor.
1 Support for CICS resources was added to File Manager Base component via APAR PM47010.
2 You can make a connection to multiple systems from the Systems Information view.
3 You must customize and allocate FMNCICS DD in your server job.
4 Content assist for looking up a resource is provided throughout the File Manager plug-in, where applicable.
5 You cannot choose a CICS file as a target for SAVE AS action.
6 You can select two templates and start the field-mapping editor. The first selection is used as the TO template. The second selection is used as the FROM template. In this scenario, the order is wrong, hence we selected only the PEOPLE2 template.
..................Content has been hidden....................
You can't read the all page of ebook, please click here login for view all page.