

Introduction to the IBM Problem Determination Tools Plug-ins
In this section, we present an overview of the IBM Problem Determination Tools Plug-ins, which are available in the following formats:
•The IBM Problem Determination Tools Studio
This format is a stand-alone application that contains all of the PD Tools plug-ins, which you can download and use without installing any other software.
•The IBM Problem Determination Tools SDK (P2)
This format is a compressed file that contains all of the PD Tools plug-ins. You can install the plug-ins by using Eclipse P2 installer. However, you must select a shell Eclipse environment to install the plug-ins, such as IBM CICS Explorer and IBM IMS Explorer.
•The IBM Problem Determination Tools SDK (Installation Manager)
This format is a compressed file that contains all of the PD Tools plug-ins. You can install the plug-ins by using IBM Installation Manager into Rational Developer for System z.
The choice of format depends on your circumstance. If you are interested in getting started with the PD Tools plug-in, IBM Problem Determination Tools Studio is the easiest option.
If you are interested in taking advantage of the system administrative functionality that is available in CICS Explorer or IMS Explorer, IBM Problem Determination Tools SDK (P2) is the best choice.
If you are interested in advanced application development, IBM Problem Determination Tools SDK (Installation Manager) is the best choice.
2.1 The IBM Problem Determination Tools Studio
The IBM Problem Determination Tools Studio is a self-contained application that contains all of the PD Tools plug-ins in a basic Eclipse 3.6.2 platform. If you are interested in using the PD Tools plug-ins capabilities as quickly as possible, this option is best for you. The following plug-ins are included in the studio:
•Application Performance Analyzer for z/OS plug-in
•Debug Tool for z/OS plug-in, including Debug Tool Startup Profile (DTSP) and Debug Tool for Console (DTCN) plug-ins
•Fault Analyzer for z/OS plug-in
•File Manager for z/OS plug-in
•Workload Simulator for z/OS plug-in
2.1.1 Installation instructions
Complete the following steps to install the IBM Problem Determination Tools Studio:
1. Download the PD_Tools_V12xxxx.zip file from this website:
2. Extract the compressed file into a folder of your choice (you can delete the compressed file after the files are extracted).
3. In the folder, you see an executable file called PD_Tools.exe. Double-click the file to start the studio.
4. You see the splash window. Wait for the application to load, as shown in Figure 2-1.

Figure 2-1 The IBM Problem Determination Tools Studio splash window
5. Specify the directory in which you want the studio to store projects and files, as shown in Figure 2-2.

Figure 2-2 Workspace selection dialog
6. A welcome window provides an overview of the PD Tools plug-ins, as shown in Figure 2-3.
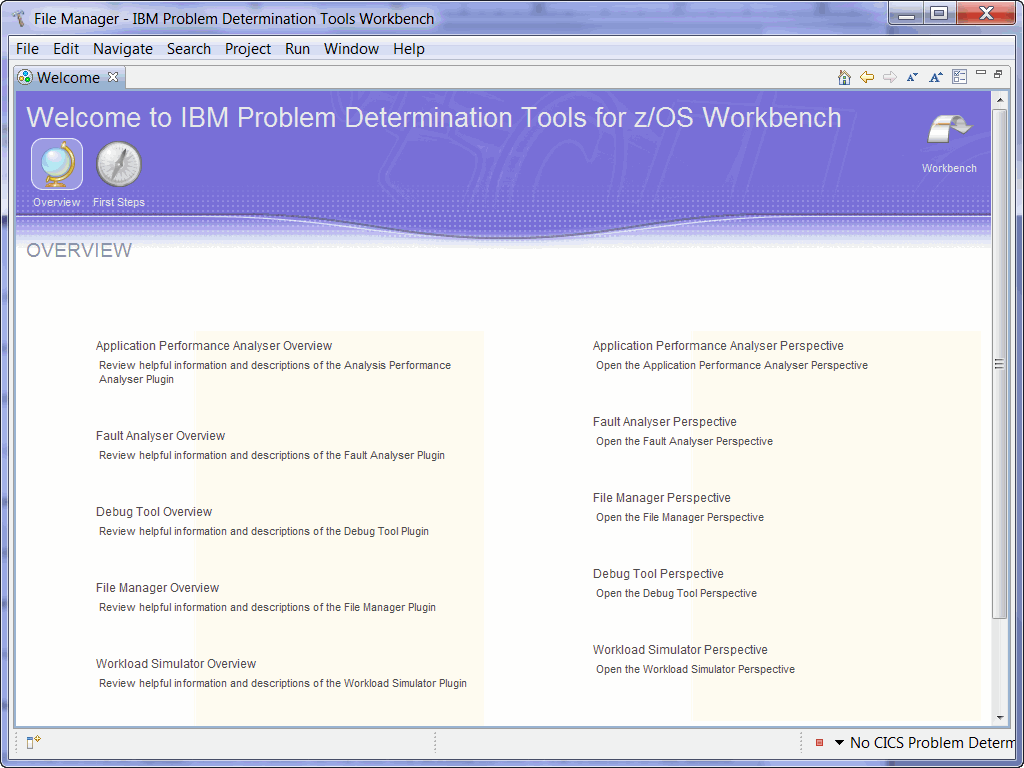
Figure 2-3 IBM Problem Determination Tools Studio Welcome window
The welcome window gives you a quick overview of the IBM Problem Determination Tools Studio and links to more information about individual product pages. From the individual product welcome windows, links are provided to access the corresponding online documentation and for opening their perspectives.
2.1.2 Updating the IBM Problem Determination Tools Studio
You have two options to use to update the IBM Problem Determination Tools Studio:
•IBM Problem Determination Tools SDK (P2)
•Eclipse update facility
These options are described next.
Update plug-ins by using the IBM Problem Determination Tools SDK (P2)
The IBM Problem Determination Tools Studio includes the Eclipse P2 installation feature, which you use to add and update plug-ins that are installed in the environment. You can update the PD Tools plug-ins that are installed in your studio environment by using the IBM Problem Determination Tools SDK (P2) which is described in 2.2, “IBM Problem Determination Tools SDK (P2)” on page 32.
Complete the following steps to update the plug-ins:
1. Download the PD_Tools_SDK_V12xxxx.zip file from this website:
2. Select Help → Install New Software...
4. Select the plug-ins to install/update, as shown in Figure 2-8 on page 34.
5. Click Next to review the installation information.
6. Click Next again to review the license agreement.
7. Click Finish to complete the installation/update.
Update plug-ins by using Eclipse update facility
The IBM Problem Determination Tools Studio is pre-configured with our update site. You can check for updates by completing the following the steps:
1. Select Help → Check for Updates.
2. If any updates are found, an option to update the plug-in is presented.
All known plug-in update sites are now connected through your studio environment, including the PD Tools plug-ins update site. After the updates are found, you can choose to update the plug-ins.
2.1.3 Extending the capability of the IBM Problem Determination Tools Studio
After you start to use the IBM Problem Determination Tools Studio, you might want to expand the capability of the studio by installing more Eclipse plug-ins. The studio is equipped with Eclipse P2 Installation and Update facility, with which you can expand these capabilities. In this section, we describe the steps that are used to add the CICS Explorer capabilities.
Complete the following steps to install the CICS Explorer capabilities:
1. Download a copy of CICS Explorer SDK from this website:

Figure 2-4 CICS Explorer download window: Select CICS Explorer for download
After the download is complete, you see a compressed file called cicsts_explorer_sdk_v1.1.x.x.zip.

Figure 2-5 CICS Explorer download window: Select CICS Explorer SDK for download
4. Open the IBM Problem Determination Tools Studio.
5. Select Help → Install New Software... from the drop-down menu.
6. Click Add to specify the location of the compressed file that contains CICS Explorer SDK.
7. Select all of the CICS Explorer SDK features in the installation window, as shown in Figure 2-6.

Figure 2-6 Specify a file that contains CICS Explorer SDK and install CICS Explorer features
8. Click Next to review the installation details.
9. Click Next to review and accept the license agreement.
After you accept the license agreement, click Finish to install CICS Explorer SDK capabilities.
2.2 IBM Problem Determination Tools SDK (P2)
You install the PD Tools plug-ins into a shell Eclipse environment of your choice by using IBM Problem Determination Tools SDK (P2). The IBM Problem Determination Tools SDK (P2) is not a stand-alone application. It is a set of the Problem Determination Tools plug-ins, which can be installed into your Eclipse environment. IBM recommends CICS Explorer V1.1.1 or later or IMS Explorer V2.1.1.2 or later tools for accessing views, data, and methods. In this section, we describe the steps that are used to install the PD Tools plug-ins into CICS Explorer and a stand-alone Eclipse environment.
The IBM Problem Determination Tools SDK (P2) contains the following plug-ins:
•Application Performance Analyzer for z/OS plug-in
•Debug Tool for z/OS plug-in (including DTSP and DTCN plug-ins)
•Fault Analyzer for z/OS plug-in
•File Manager for z/OS plug-in
•Workload Simulator for z/OS plug-in
2.2.1 Installation instructions for CICS Explorer
Complete the following steps to install the PD Tools plug-ins into a CICS Explorer environment:
1. Download a copy of CICS Explorer V1.1.1 or later from this website:
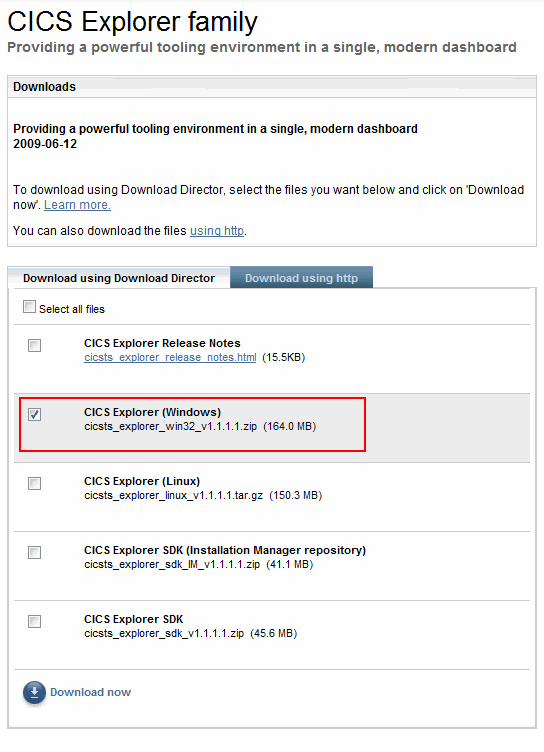
Figure 2-7 CICS Explorer download window
3. After CICS Explorer is downloaded, you see a compressed file called cicsts_explorer_win32_v1.1.x.x.zip. Extract this file into your folder of choice. After the file is extracted, you can delete the compressed file.
4. Start your CICS Explorer by double-clicking the cicsexplorer.exe file.
5. Download the IBM Problem Determination Tools SDK (P2) from this website:
After the file is downloaded, you see the PD_Tools_SDK_P2_V12xxxx.zip file.
6. In your CICS Explorer, select Help → Install New Software... from the drop-down menu.
7. Click Add and specify the compressed file.
8. You see a list of the PD Tools plug-ins to install. Select the plug-ins to install and click Next, as shown in Figure 2-8.

Figure 2-8 IBM Problem Determination Tools SDK (P2) installation window
9. Review the installation details and click Next.
10. After you review and agree to the license agreement, click Finish to complete the installation.
2.2.2 Installing IBM Problem Determination Tools SDK (P2) into your Eclipse environment
IBM recommends the use of CICS Explorer, IMS Explorer, or Rational Developer for System z as a shell to deploy the Problem Determination Tools plug-ins. Complete the following steps to add the PD Tools plug-ins into your own Eclipse environment:
|
Important: If you encounter a problem with the PD Tools plug-ins in your custom Eclipse environment, the problem must be able to be reproduced in one of the officially supported Eclipse environments to receive support.
|
1. Download a copy of the CICS Explorer SDK V111 or later from this website:
After the download is complete, you see a compressed file called cicsts_explorer_sdk_v1.1.x.x.zip.
4. Start your Eclipse environment.
5. Select Help → Install New Software... from the drop-down menu.
6. Click Add to specify the location of the compressed file that contains CICS Explorer SDK.
7. Select all CICS Explorer SDK features in the installation window, as shown in Figure 2-6 on page 31.
8. Click Next to review the installation details.
9. Click Next to review and accept the license agreement.
10. After you accept the license agreement, click Finish to install CICS Explorer SDK capabilities.
After the installation finishes, Eclipse restarts to complete the installation process.
11. Download the IBM Problem Determination Tools SDK (P2) from this website:
After the download is complete, you see the PD_Tools_SDK_P2_V12xxxx.zip file.
12. In your Eclipse environment, select Help → Install New Software... from the drop-down menu.
13. Click Add and specify the compressed file.
14. You see a list of the PD Tools plug-ins to install. Select the plug-ins to install and click Next, as shown in Figure 2-8 on page 34.
15. Review the installation details and click Next.
16. After you review and agree to the license agreement, click Finish to complete the installation.
2.2.3 Updating the IBM Problem Determination Tools SDK
The steps that are used to update the PD Tools SDK (P2) are the same steps that are described in 2.1.2, “Updating the IBM Problem Determination Tools Studio” on page 28.
2.3 The IBM Problem Determination Tools SDK (Installation Manager)
Rational Developer for System z is another supported environment for the Problem Determination Tools plug-ins. To install the PD Tools plug-ins, you must download a copy of the IBM Problem Determination Tools SDK (Installation Manager) and complete the steps that are shown in “Installation Instructions”. In the IBM Problem Determination Tools SDK (Installation Manager), the following plug-ins are included:
•Application Performance Analyzer for z/OS plug-in
•Fault Analyzer for z/OS plug-in
•File Manager for z/OS plug-in
•Workload Simulator for z/OS plug-in
2.3.1 Installation Instructions
You install the PD Tools plug-ins into a Rational Developer for System z V8.5 or later environment by using the IBM Problem Determination Tools SDK (Installation Manager). Complete the following steps to install the PD Tools plug-ins:
1. Download a copy of the IBM Problem Determination Tools SDK (Installation Manager) from this website:
2. After the file is downloaded, you see a compressed file called PD_Tools_SDK_IM_V12xxxx.zip.
3. Start IBM Installation Manager.
4. Select File → Preferences from the drop-down menu.
5. In the Repositories tab, select Add Repository and specify the location of the compressed file on your computer.
6. Ensure that the repository location is selected, as shown in Figure 2-9.
Figure 2-9 Installation Manager preference window for specifying repository locations
7. Click OK to close the Preference window.
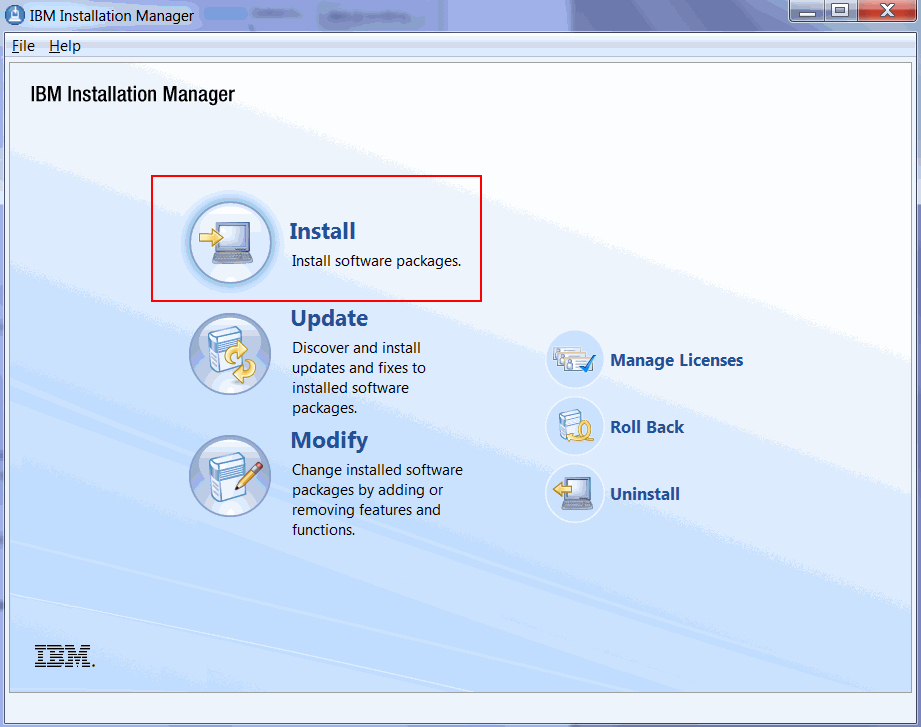
Figure 2-10 Selecting the Install option in the IBM Installation Manager window
9. Select the packages (PD Tools plug-ins) to install into your Rational Developer for System z environment, as shown in Figure 2-11.
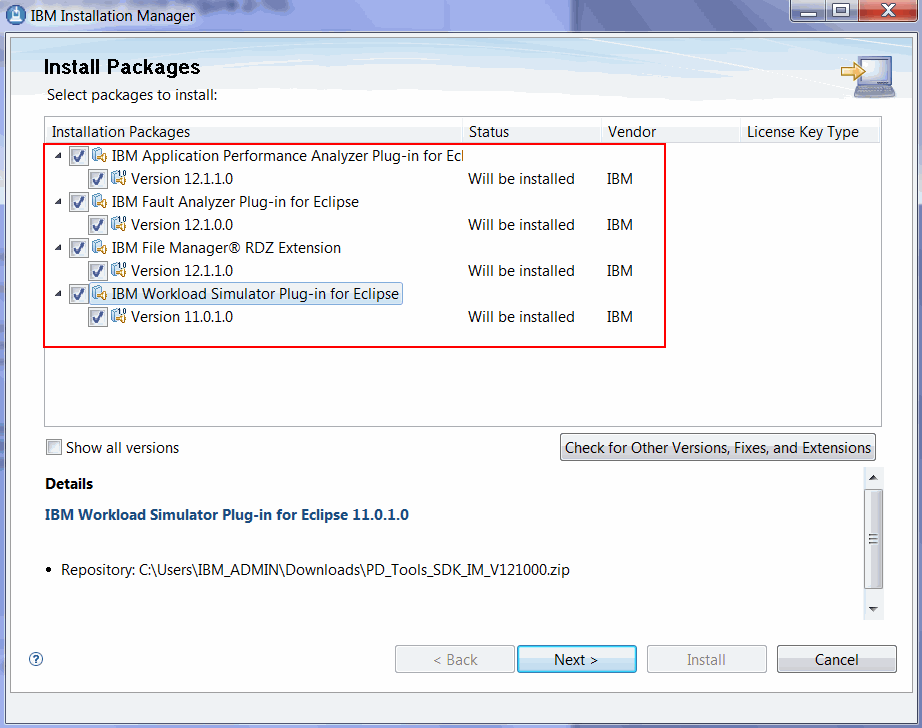
Figure 2-11 Selecting packages to install in the IBM Installation Manager window
10. Click Next to review and accept the licenses.
11. Click Next to identify the target environments in which the PD Tools plug-ins can be installed.
12. Select a target environment to install and click Next.
13. Review the list of packages to install and click Next.
14. Review the summary information and click Install to install the PD Tools plug-ins.
2.3.2 Updating the IBM Problem Determination Tools SDK (Installation Manager)
When a newer version of the IBM Problem Determination Tools SDK (Installation Manager) is available, you can update the installed plug-ins in your Rational Developer for System z environment by completing the following steps:
1. Download a copy of the IBM Problem Determination Tools SDK (Installation Manager) from this website:
2. After the file is downloaded, you see a compressed file called PD_Tools_SDK_IM_V12xxxx.zip.
3. Start IBM Installation Manager.
4. Select File → Preferences from the drop-down menu.
5. In the Repositories tab, select Add Repository and specify the location of the compressed file on your computer.
6. Ensure that the repository location is selected, as shown in Figure 2-9 on page 37.
7. Click OK to close the Preference window.
Figure 2-12 Selecting Update option in the IBM Installation Manager window
9. In the next window, select a target Rational Developer for System z environment on which you want to update the PD Tools plug-ins, as shown in Figure 2-13.

Figure 2-13 Selecting a target environment on the IBM Installation Manager window
10. Click Next. A process begins to determine whether any installed PD Tools packages require updates.
If any packages require an update, follow the remaining steps that are a part of this process to update the PD Tools plug-ins that are installed in your Rational Developer for System z environment.
2.4 Introduction to the Problem Determination Tools Common Component and z/OS Explorer Host Connection framework
An overview of the components that makes the PD Tools plug-ins work is shown in Figure 2-14.

Figure 2-14 Overview of the IBM Problem Determination Tools plug-ins and the host configuration
The z/OS Explorer is a common feature that is available in various IBM products, such as CICS Explorer and IMS Explorer. This feature provides fundamental functionality to interact with z/OS systems from an Eclipse environment. Among many features of the z/OS Explorer, the PD Tools plug-ins relies on its Host Connections framework to manage connections, user IDs, and passwords.
As shown in Figure 2-14, the PD Tools plug-ins define the following connection types on the host connection framework:
•Problem Determination Tools for z/OS connection type for connecting the Fault Analyzer plug-in, File Manager plug-in, Workload Simulator plug-in, and Debug Tool DTSP plug-in.
•Application Performance Analyzer connection type for connecting the APA plug-in.
•Debug Tool DTCN connection type for connecting the DTCN plug-in.
Figure 2-15 shows the z/OS Explorer’s Host Connections view in which you find three connection types that are required by the PD Tools plug-ins.

Figure 2-15 z/OS Explorer’s Host Connection view
Problem Determination Tools Common Server is a stand-alone application that runs on a z/OS system. The server is extensible, which means that you can extend the functionality of the server by modifying the configuration file of the server, depending on which PD Tools plug-ins are required. As shown in Figure 2-14 on page 42, Debug Tool for z/OS, Fault Analyzer for z/OS, File Manager z/OS, and Workload Simulator for z/OS provide extensions to this server to serve their corresponding Eclipse plug-ins.
Application Performance Analyzer’s (APA) plug-in and server are required to use the APA plug-in.
DTCN plug-in and DTCN TCP/IP Service are required to use the DTCN plug-in.
2.4.1 Establishing a connection to the PD Tools server
Complete the following steps to establish a connection to the PD Tools server:
1. Select a connection type and click Add... (for example, Problem Determination Tools for z/OS).
2. Specify the host name and the port number of the server, as shown in see Figure 2-16 on page 44.
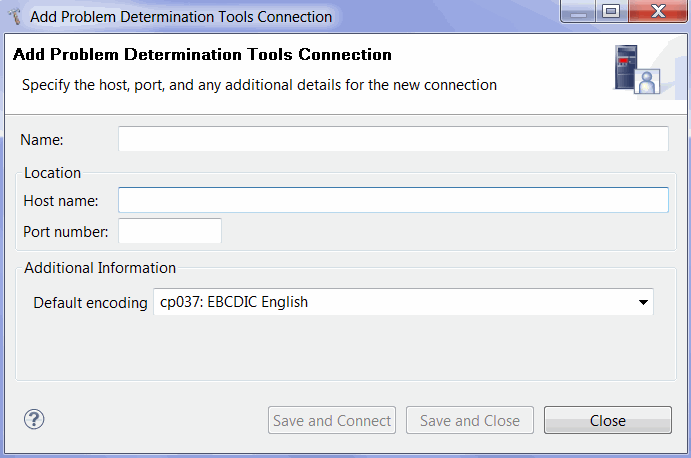
Figure 2-16 Host Connections dialog for specifying connection details
3. After the connection information to a server is created, you must specify your user name for the connection. As shown in Figure 2-17, you can create your credential (USER1 in the figure) in the Credentials section.
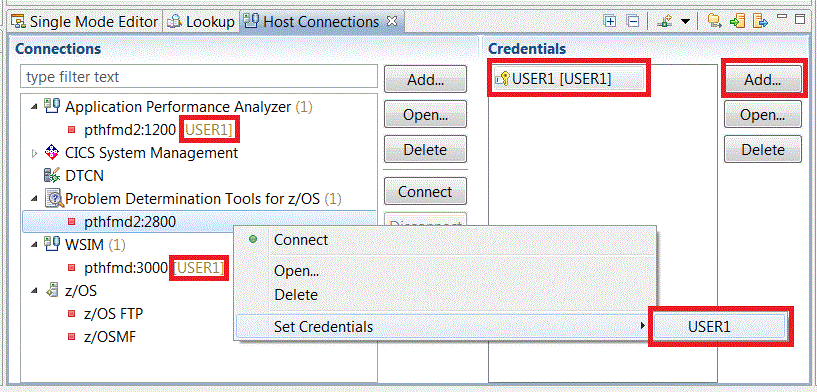
Figure 2-17 Setting a password for a connection in the Host Connections views
After your credential is created, you can associate the credential to any connections that are defined in the Host Connections view. For example, USER1 user ID is assigned to an instance of the APA connection type, the PD Tools connection type, and the DTCN connection type.
2.4.2 Sharing Host Connections information
The steps that are described in “Establishing a connection to the PD Tools server” on page 44 require individual users to establish connection-required servers manually, which can be time-consuming and error-prone. Instead, the Host Connections framework provides a mechanism for sharing connection information easily among users.
Complete the following steps to share connection information:
1. Click Load Connections, which is at the upper right corner of the Host Connections view, as shown in Figure 2-18.
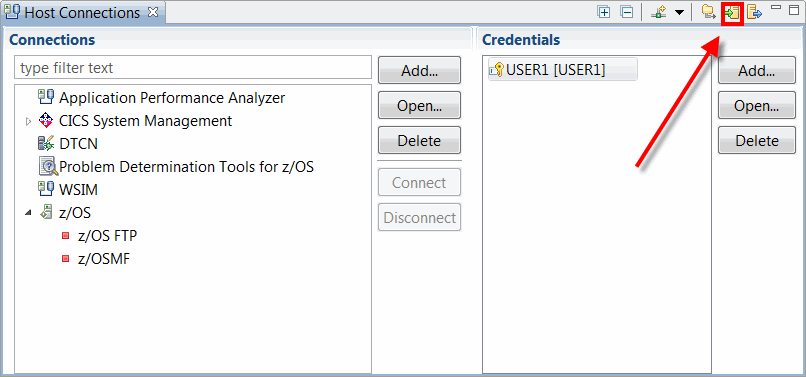
Figure 2-18 Invoke the Host Connections import connection information window
2. In the Load Connections dialog, specify the location of a file that contains the connections information. This file often is maintained by a system administrator. The file can be found in a local file or on a remote server, as shown in Figure 2-19.
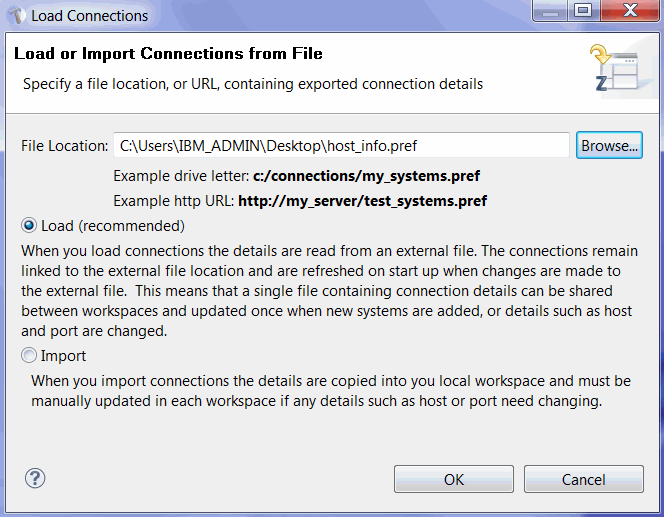
Figure 2-19 Load Connections window for importing the connections information
3. Click OK to load the connections information. As shown in Figure 2-20, several pieces of connection information (highlighted in red) are loaded into the view.
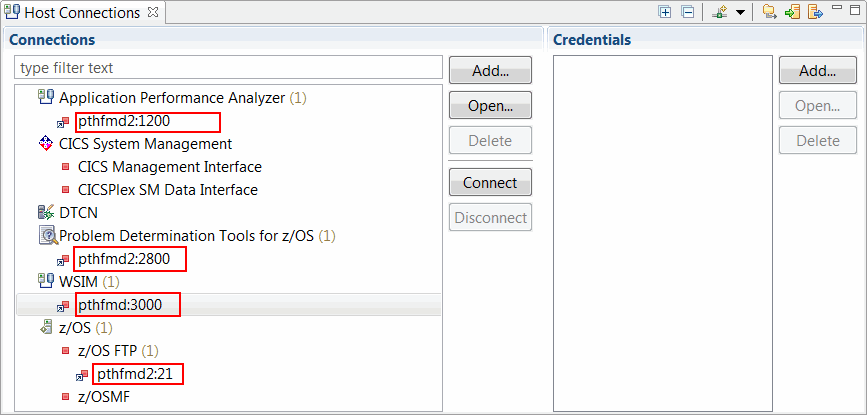
Figure 2-20 Imported connection information
..................Content has been hidden....................
You can't read the all page of ebook, please click here login for view all page.