


Migration
This chapter explains aspects of migrating to a TS7700 environment from an IBM Virtual Tape Server (VTS) or from other tape drive technologies. It presents various options that can be tailored to your current environment.
Guidance is provided to help you achieve the migration scenario that best fits your needs. For this reason, methods, tools, and software products that can help make the migration easier are highlighted.
New models that were introduced with TS7700 Release 4.2 are also described in this section.
This chapter includes the following topics:
8.1 Migration to a TS7700
This section covers various aspects of migrating from an existing tape technology to the TS7700. Migration methods are roughly divided into Host-based Migration and Tape-based Migration. Host-based Migration is used to move customer data from older technology or other vendor tape solutions to the TS7700 using host-based programs. Tape-based Migration is used to port the physical tape volumes belonging to the older IBM 3494 VTS to the TS7740 or TS7700T using an outboard process that is independent from the host. However, it must be kept in mind that IBM 3494 VTS supports 3592 J1A tape drives only (TS1120 E05 tape drive in J1A emulation mode is also available). TS1150 E08 tape drive cannot read tape cartridges written by 3592 J1A.
The most efficient approach will depend on the source configuration, which can be an IBM 3494 B10/B20 VTS, or IBM or original equipment manufacturer (OEM) native tape drives, and the target configuration which can be tape attached or disk only. Table 8-1 lists which Migration Method is available in which case.
Table 8-1 Available migration methods based on migration source and target configurations
|
|
Migration Target
|
||
|
IBM TS7700D
|
IBM TS7740 or TS7700T
|
||
|
Migration
Source
|
Native Tape Drives (IBM or OEM)
|
•Host-based Migration
|
•Host-based Migration
|
|
IBM 3494 B10/B20 VTS
|
•Host-based Migration
|
•Host-based Migration
•Tape-based Migration
– See Table 8-2
|
|
|
Other Vendor
Virtual Tape Solutions
|
•Host-based Migration
|
•Host-based Migration
|
|
Table 8-1 lists which combinations are available.
Table 8-2 Available combinations of source tape media and target tape drives for tape-based migration
|
|
Tape Drive attached to Target TS7740 or TS7700T
|
|||||
|
3592 J1A
|
TS1120
E05
|
TS1130
E06
|
TS1140
E07
|
TS1150
E08
|
||
|
Tape Drive attached to Source IBM VTS is
3590 Tape Drive
|
J or K media
(3590 format)
|
No
|
No
|
No
|
No
|
No
|
|
Tape Drive attached to Source IBM VTS is
3592 J1A tape drive
or
TS1120 E05 tape drive (J1A emulation mode)
|
JJ or JA media
(J1A format)
|
Yes
|
Yes
|
Yes
|
Yes
|
No
|
For more information about host-based migration, see 8.1.1, “Host-based migration” on page 305. For more information about tape-based migration, see 8.1.2, “Tape-based migration” on page 306.
Hardware migration from existing tape technology to the TS7700 has the following aspects:
•Software changes in storage management subsystem (SMS), hardware configuration definition (HCD), tape configuration database (TCDB), and tape management system (TMS)
|
Tip: The TMS can be Removable Media Management (DFSMSrmm) or other products from other vendors.
|
•Connectivity for the new configuration
•Migration of the Library Manager database from an existing tape library to the TS7700
•Physical swap of the B10/B20 VTS to the TS7700 hardware
•Migration of the database from B10/B20 VTS to TS7700
Information is provided about the TS7700 family replacement procedures that are available with the new hardware platform and the TS7700 R4.2 Licensed Internal Code (LIC) level. With the availability of the new generation hardware, an upgrade path is provided for existing TS7700 users to migrate to this new hardware.
This section covers upgrading tape drive models in an existing TS7740 or TS7700T to get more capacity from your existing media, or to provide encryption support. It also details the hardware upgrade procedure and the cartridge migration aspects.
8.1.1 Host-based migration
Host-based Migration is a migration method using host programs. It is mainly used in the following cases:
•There is no data compatibility between the physical tape media used by migration source and target solutions:
– No physical tape media compatibility between IBM 3590 tape drives and IBM 3592 tape drives (TS7700 only supports IBM 3592 series of tape drives).
– No internal data format compatibility between physical tape media written by native tape drives and ones written by TS7700.
•Migration target does not have any attached back-end tape drives.
Even though both migration source and target have physical tapes, migration from VTS with 3590 tape drives or native tape drives to a TS7740 or TS7700T always requires host-based migration to copy the data into the TS7700. This requirement is because there is no data compatibility between the physical tape media used by migration source and target solutions.
Migration to a TS7700D can be performed only by using host-based migration because the TS7700D does not have any attached back-end tape drives. Therefore, data must be copied into the TS7700D by using host programs.
For more information about the methods you can use for host-based migration, see 8.3, “Methods to move data for host-based migration” on page 313.
Host-based migration is also available for migration from VTS with 3592 tape drives to a TS7740 or TS7700T. However, TS7740 and TS7700T have attached back-end tape drives so tape-based migration might be a choice. see 8.1.2, “Tape-based migration” on page 306.
8.1.2 Tape-based migration
Migration of VTS Model B10 or B20 hardware to a TS7740 or TS7700T, also called outboard VTS migration, is possible depending on the target configuration. It provides an upgrade path for existing B10 or B20 VTS models to a TS7740 or TS7700T if the VTS system contains only 3592-formatted data. The outboard migration is offered as IBM Data Migration Services for Tape Systems. Outboard migration provides the following functions:
•Planning for migration, including consideration related to hardware and z/OS
•Project management for this portion of the project
•Assistance with the integration into a complete change plan, if required
•The actual migration of data from a 3494 VTS B10 or B20 to the TS7740 or TS7700T
Work with your IBM service support representative (IBM SSR) for more details about IBM Migration Services for Tape Systems. These services are available from an IBM migration team and can assist you in the preparation phase of the migration. The migration team performs the migration on the hardware.
When migrating data from a VTS to a new TS7740 or TS7700T installed in the same tape library, the process is called data migrate without tape move. If a source VTS is attached to one tape library and the new target TS7740 or TS7700T is attached to another tape library, the process is called data migration with tape move. When a source VTS is migrated to an existing TS7740 or TS7700T, or two VTSs are migrated to the same target TS7740 or TS7720T, the process is called merge.
8.2 Migration between TS7700s
Release 4.2 provides the following methods for data migration between TS7700s. The user should select the most efficient approach, depending on the case:
•Host-based migration
Uses host cycles and operation involvement for data movement.
•Join and Copy Refresh processing:
– It is used for data migration to empty TS7700 inside the same grid.
– It does not involve host for data movement.
– It does not use physical tape volumes.
•Copy Export and Copy Export Recovery/Merge:
– It is used for data migration from one TS7740 or TS7700T to another TS7740 or TS7700T cluster.
– Target TS7740 or TS7700T can be a stand-alone or part of a different grid.
– It does not involve host for data movement.
– It uses physical tape volumes to export data to target TS7740 or TS7700T.
•Grid to Grid Migration:
– It is used for data migration from a grid to another grid.
– It does not involve host for data movement.
– It does not use physical tape volumes.
Host-based migration is also available for data migration between TS7700s. However, TS7700 provides other methods which does not need to involve a host for data movement. Following sections explain about them.
If data will be moved inside the same grid (after a join of a cluster, or a merge), COPYRFSH is the preferred method. For more information, see “Population of a new cluster (COPYRFSH)” on page 293.
8.2.1 Join and Copy Refresh processing
If you want to move to a new data center, or do a technical refresh, use this method to migrate the data to a new cluster without using host-based migration. This method can be used only when the data migration is done inside a grid. Inside a grid, it is the fastest and proven method. Complete the following steps.
1. Join a new cluster to a grid.
For more information about how to join a new cluster to a grid, see 7.4, “Adding clusters to a grid” on page 288.
2. Change the Copy Mode in Management Class (MC) to allow copies to the new cluster.
MC can be configured from MI. For more information, see 9.3.8, “Constructs icon” on page 455.
For more information about Copy Mode, see 4.2.2, “Defining grid copy mode control” on page 161.
3. Generate a list of logical volumes which need to be copied to new cluster.
A user can list the status of logical volumes by following the Bulk Volume Information Retrieval (BVIR) command. A user can process its ouptput and create a list of logical volumes that must be copied to new cluster by using VOLUME STATUS.
The following IBM Tape Tools are available. Combination of the tools can list logical volumes which need to be copied to new cluster and generate Copy Refresh commands list for them easily:
• BVIRMES
• VESYNC
• BVIRVTS
• COPYRFSH
4. Run Copy Refresh to each logical volume in the list that was created in Step 3 to produce a new copy of the data in the new cluster. Copy Refresh can be run by using the LI REQ COPYRFSH command.
5. Check if there is no valid copy which exists only on an old cluster if you want to remove the old cluster from the grid after necessary logical volumes are copied to the new cluster.
A user can ensure if there are logical volumes whose copies are only on the old cluster to be removed by following Bulk Volume Information Retrieval (BVIR) command (do not specify COPYMODE to certainly detect volumes which exists only on specified cluster) by using COPY AUDIT INCLUDE <Old Cluster Lib ID>.
6. Remove the old cluster from the grid If you want to remove it. For more information about how to remove the old cluster from the grid, see 7.5, “Removing clusters from a grid” on page 299.
While the Copy Refresh command is submitted from a host, the data is copied internally through the gridlinks. There is no Host I/O through the FICON adapters, and all data in the TCDB and tape management remain unchanged. This method can be used only if the data migration is inside a grid. The BVIR AUDIT parameter provides an easy method to ensure that all data is copied.
For more information about the available tools, see 11.16, “IBM Tape Tools” on page 709.
See the white paper IBM TS7700 Series Bulk Volume Information Retrieval Function User's Guide for more details about commands aforementioned:
See the white paper IBM TS7700 Series z/OS Host Command Line Request User's Guide for more details about LI REQ COPYRFSH command aforementioned:
Generating Copy Refresh commands list
IBM Tools BVIRMES, VESYNC and BVIRVTS can help the user to build a list of logical volumes which should be copied over to the new cluster, generating a COPYRFSH command list to automate the process.
Complete the following steps:
1. Make sure Management Class values are in place.
2. Run BVIRMES to the new cluster which was joined to an existing grid to get output of BVIR VOLUME STATUS to all logical volumes on the cluster. The output is stored in MESFILE.
3. Run VESYNC to get the list of logical volumes which needs to be copied to the new cluster from MESFILE gotten at step 1.
4. If the copy source cluster is tape attached model (TS7740 or TS7700T), run BVIRVTS (TYPE=VOL) to get VOLFILE. It is needed only for tape attached source.
5. Run BVIRVTS (TYPE=CACHE) to the copy source cluster to get CACHEFILE. If CACHEFILE is also used for tape attached source, then TVC resident logical volumes are grouped together so a physical volume does not need to be mounted to recall them to cache for Copy Refresh.
6. Run COPYRFSH to generate Copy Refresh commands list from information of logical volumes gotten at step 3, 4 and 5.
7. Run Copy Refresh commands in the list and wait for them to complete.
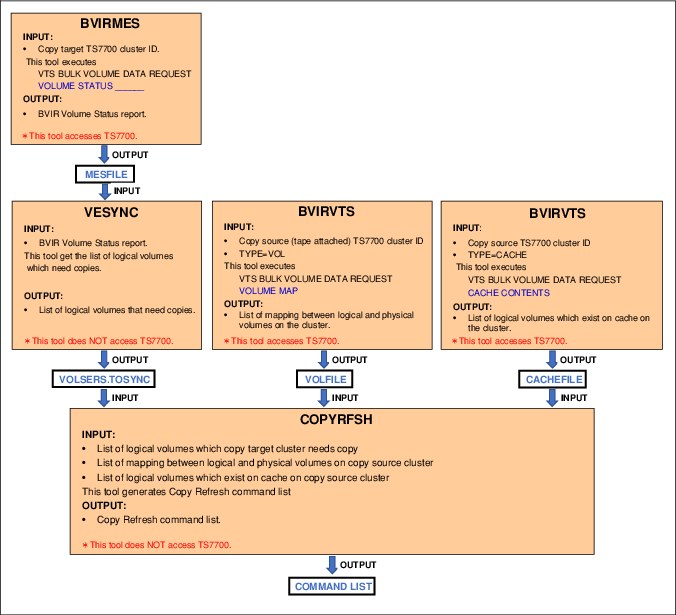
Figure 8-1 How to generate Copy Refresh command list by using the IBM Tape Tools
8.2.2 Copy Export and Copy Export Recovery / Merge
Copy Export function can export a copy of the selected logical volumes stored in physical tapes on TS7740 or TS7700T. Exported physical tapes can be removed from TS7740 or TS7700T and taken offsite. Typically, exported data stored in physical tapes is used for disaster recovery. However, user can move data into another TS7740 or TS7700T by using exported data.
To restore exported data, the TS7700 or TS7740T must have physical tape drives that are capable of reading the exported physical tape volumes. Therefore, it must be kept in mind that when the target TS7740 or TS7700T cluster has TS1150 tape drives only, source TS7740 or TS7700T must use JK or JC cartridge with TS1140 or TS1150 tape drives for export. The user can restore exported data into another TS7740 or TS7700T using one of the following methods:
•Copy Export Recovery
Can move exported data into stand-alone empty TS7740 or TS7700T.
•Copy Export Merge:
– Can merge exported data into another active TS7740 or TS7700T that has existing data.
– Target cluster can be stand-alone or part of a grid.
– Is only available as a service offering.
Copy Export Merge is only available through a service offering, which provides an IBM storage specialist to help planning and implementing the merge of logical tape volumes copy-exported from another IBM TS7740 or TS7700T cluster.
For more information about Copy Export and Copy Export Merge, see Chapter 12, “Copy Export” on page 747.
8.2.3 Grid to Grid Migration
The GGM tool is a service offering from IBM. You can use it to copy logical volumes from one grid to another grid while both grids have a separated grid network. After the GGM is set up by an IBM SSR, the data from the logical volumes is transferred from one grid to the other grid through the existing IP addresses for the gridlinks (see Figure 8-2). Much like Join and Copy Refresh processing, there is no host I/O with the FICON adapters.
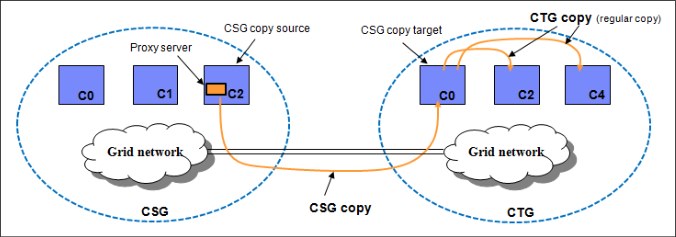
Figure 8-2 TS7700: Grid to Grid Migration overview
The following main components are shown in the GGM overview that is shown in Figure 8-2:
CSG Copy Source Grid
CTG Copy Target Grid
Proxy server A binary program that is installed in the CSG through vtd_exec, which enables the CTG to communicate with the CSG
The GGM tool should be considered if the following situations are true:
•There are already six clusters installed in the grid.
•The Join and Copy Refresh processing cannot be used (there are floor space requirements, microcode restrictions, or other considerations).
•CSG and CTG are maintained by different providers.
General information for GGM
GGM includes the following information:
•GGM is based on LI REQ commands. All commands are run on the Cluster Target Grid (CTG). The CTG must have at least R3.3 installed.
•It is single logical volume-based. Commands need to be run for each logical volume that needs to be copied.
•A volume to be copied by GGM must reside in the Cluster Source Grid (CSG). If no copy resides in this cluster, the logical volume cannot be copied, even if other clusters in the source grid have a copy. The minimum microcode level for a CSG is R2.1.
•The logical volume serial number is kept during the copy process, so all volume ranges that are copied must be unique in the grids.
•The CTG pulls a copy of the logical volume from the CSG. When this copy is pulled, depending on the MC content in the CTG, further copies might be produced in the CTG.
•After a logical volume is successfully copied to all clusters in the CTG, a broadcast message can be issued to all attached LPARs. Depending on the logical scenario, the customer needs to run actions manually then.
•After a logical volume is accessed for update (either by an append or a housekeeping process), the logical volume cannot be copied again.
•GGM has no automatic interaction to the TMS. Depending on the scenario, the workload profile, the amount of data, and the used TS7700 models, IBM recommends using different approaches to select the sequence of the copies.
•GGM is based on a deferred copies mechanism. Therefore, for the CTG, you need to review your CPYCNT parameter, because the Cluster Source Grid (CSG) might throttle the GGM copies using the values defined for DCOPYT and DCTAVGTD. The throttling might have an effect on the performance of the GGM copies.
•The data placement in the CSG has an effect on the performance of GGM. Recalls from physical tape can slow down the process of GGM. Whenever possible, we suggest using a TS7700D as the CSG.
•The GGM tool also provides several different options, such as how the new data (new device categories) and the old data (keep or delete the data in the source grid) is treated.
•GGM from any grid to the grid that supports the new compression method is allowed. In such a case, CTG can read logical volumes written by R4.1.1 or lower code level in addition to ones that are written by R4.2 code level.
•On the other hand, GGM from the grid that supports the new compression method to the grid that does not support it is not allowed. In such a case, CTG cannot read logical volumes migrated from CSG.
In general, we distinguish between two major logical scenarios for GGM.
Data movement with GGM
The actual goal is to move the data from one grid to another, while the same LPARs with the origin TCDB and TMS are used. After a single volume is copied, the information in the overlying TCDB and TMC needs to be changed after a successful migration of the single logical volume. These changes are the responsibility of the customer, and must be processed manually. In this scenario, you need to consider that a multivolume file can be accessed only if all logical volumes belonging to the multivolume file are located in the same grid.
We suggest switching the production workload to the new grid before you start the GGM process. This has several benefits:
•The CSG is not subject to Deferred copy throttling, because no host I/O is processed.
•If the CSG is a TS7740 or a TS7700T CPx, prestaging of the data speeds up the GGM copy processing, and the cache (especially in a TS7740) is no longer needed for host I/O.
•Data with a short lifecycle can expire in the source grid without being copied at all to reduce the amount of data that needs to be copied.
Data duplication with GGM
This scenario is mainly applicable if dedicated LPARs or workload of an LPAR needs to be separated from an existing environment. This is usually necessary if a customer decides to change to a different service provider, or if a company sells a subsidiary. In this case, the data is copied over to a new grid. However, production is still running to the existing grid until a time called cutover time.
In this case, normally the TCDB and TMS are not changed during the copy process, but need to be adjusted at cutover time, or before if cutover tests are made.
Also, it is necessary to copy the same logical volume multiple times, because the lifecycle processing of “create - expire - delete - create” is running in the origin system.
In this case, you should consider using the lifecycle information (expiration, retention) as input to avoid data with a short lifetime being copied.
To ensure that during tests of the new environment the original copied data to the new grid is only read but not modified, you should put all clusters in the target grid in write protect mode for the origin categories and use different logical volume ranges and categories for the testing. While the cluster is in write protect, no GGM copies can be performed.
Cluster Source Grid considerations
Whenever possible, you should use a TS7700 disk-only model or the CP0 in a TS7700T as the CSG. This simplifies the migration project, because you all data is in cache, and you do not need to take care about your back end resources.
Using a CSG where all data resides in cache enables you to concentrate to copy the data by lifecycle information, or if needed by application purposes, especially for multivolume data sets.
If only a TS7740 or a TS7700T can be chosen, you also need to consider the backend resources and the available cache for the GGM copy processing. In this case, we strongly advise you to do a prestaging of the data, and copy the data based on physical volume, to avoid too many back end movements. Consider that this approach might not match with the TMS selection for retention or application purposes.
If the data will be recalled by the GGM process itself, the recall process might take much longer, and affect your overall GGM performance. Prestaging the data helps you to improve this performance. Consider changing your RECLPG0 value to allow recalled data to reside with the original Storage Class settings in the cluster. Otherwise, recalled data might be migrated before GGM can begin copy processing.
For more information, see the IBM TS7700 Series Grid To Grid Migration User's Guide. It contains a detailed description of the GGM process, requirements, and user setup and preparation, and examples and LI REQ commands that are used in GGM process:
In addition, several supporting tools to create the necessary input control statements, and the necessary TCDB entry changes and TMC entry changes, are provided at the IBM Tape Tool website:
For more information, ask your local IBM SSR.
8.3 Methods to move data for host-based migration
When moving data into the TS7700, it is not possible to simply move the cartridges out of a 3494-Bxx VTS and insert them into a stand-alone cluster TS7700 and copy the control data sets (CDSs). This migration approach is supported only for the scenarios that are described in the hardware migration scenarios for the TS7740 or TS7700T, which are described in previous TS7700 IBM Redbooks publications (R1.7, R2.0, R3.0, R3.1, R3.2, R3.3, R4.0, and R4.1), which are still available at this website:
In all other scenarios, migrating data into the TS7700 requires that the TS7700 and the existing environment remain installed in parallel until the data has been migrated through the host attached to them.
Examples of this type of configuration are native tape drives, VTS with 3590 Tape Drives, or other vendor tape solutions. Although they can all be migrated to a TS7700, the process requires host involvement to copy the data into the TS7700.
This section describes techniques for moving data into a TS7700. You can start using the TS7700 by moving data into it. The best method depends on the application you want to manage with the TS7700.
The following methods are available:
Phased method This method consists of using the TS7700 with new allocations. The migration of data takes longer, but it can be more controlled and flexible.
Quick method Use this method when you want to move existing data into the TS7700. It is considered a quick method because it swiftly puts all the data that you want to move under TS7700 control.
Hints about how to move data out of the TS7700 are provided in 8.4, “Moving data out of the TS7700” on page 319. However, the TS7700 is a closed-storage method, so you must be careful about selecting data to move into it. You do not want to store a large amount of data in the TS7700 that must be moved back out.
8.3.1 Phased method of moving data
The techniques to move data outlined here depend more on changing parameters or adjusting routines and procedures to meet the objectives rather than a straightforward data movement.
Selecting the data
If you select DFSMShsm-owned data, you can group your data as listed according to any or all of the items in the following list:
•Migration data (DFSMShsm level 2)
•Backup copies (user data, CDS data, or both)
•Dump copies
You can select data based on data set name, by application, or by any other variable that you can use in the automatic class selection (ACS) routines. You can also select data based on type, such as System Management Facilities (SMF) data or DASD DUMP data.
Updating the applicable parameters
If you select DFSMShsm-owned data, review the ARCCMDxx member according to the guidelines in 8.5, “Migration of DFSMShsm-managed data” on page 321 and update the following definitions:
•Data Class (DC) ACS routines (if used)
•Management Class (MC) ACS routines (if used)
•Storage Class (SC) ACS routines (required)
•Storage Group (SG) ACS routines (required)
•For Basic Tape Library Support (BTLS), the unit parameter in the JCL
For DFSMSdss, update the following definitions:
•DC ACS routines (if used)
•MC ACS routines (if used)
•SC ACS routines (required)
•SG ACS routines (required)
•For BTLS, the unit parameter in the JCL
If you use database data, such as logs or image copy, direct new allocations into the TS7700 by updating the following definitions:
•DC ACS routines (if used)
•MC ACS routines (if used)
•SC ACS routines (required)
•SG ACS routines (required)
For data other than DFSMShsm and DFSMSdss, if you are using SMS tape, update the ACS routines to include the data that you want to move. You decide which data to filter and how you write the ACS routines. You can also migrate based on the UNIT parameter in the JCL to reflect the applicable unit for the TS7700.
Updating the tape management system
Although you are not overtly copying data in this option, ensure that you update the TMS catalog or CDS to reflect the changes that you expect. Check the retention rules and limits, and update as needed. If you change data set names when moving to TS7700, you must validate changes against retention rules in your TMS. See 8.6, “DFSMSrmm and other tape management systems” on page 329 for more information.
Watching the data move to the TS7700
Data movement that uses this option does not involve deliberate actions such as COPY, RECYCLE, or DUMP. When you activate the ACS routines that contain the code for the TS7700, all new data allocations for the data that you selected are written to the TS7700. Verify that data is going where you expect it to go, and add code to the ACS routines to manage more data as you see fit.
You can select data types that create large quantities of data, such as SMF records or DASD DUMPS, and you can also select data types that create many small data sets. By observing how the TS7700 handles each type of data, you become familiar with the TS7700, its functions, and capabilities.
8.3.2 Quick method of moving data
The steps that are outlined in this section involve specific actions on your part to move data into the TS7700. As with the techniques that are outlined in 8.3.1, “Phased method of moving data” on page 313, you choose the data that you want to move to the TS7700.
Selecting the data to copy
The data that you select influences all the subsequent steps in this process. If you select DFSMShsm-owned data, the process for moving the data to the TS7700 differs from the process that you use for moving DFSMSdss data. You can select data based on the data’s attributes, such as the expiration date. For example, you can select data that you keep for seven years. Probably the best method for selecting data to copy in the TS7700 is based on the data set name, application by application.
Certain applications have knowledge of the VOLSER where the data is stored. There are special considerations for these applications. If you change the VOLSER on which the data is stored, the application has no way of knowing where the data is. For more information about this topic, see “Implementing Outboard Policy Management for non-z/OS hosts” on page 837.
An easy method is to obtain information from the TMS database. Reports can give you details about the data you have in the tape shop, which helps you select the input volumes.
If you are using DFSMSrmm, you can easily acquire data from a Removable Media Management (RMM) EXTRACT file, which is normally created as part of the regular maintenance. Then, using a REXX EXEC or ICETOOL JCL program, you extract the needed information, such as data set name, VOLSER, and file sequence of the input volumes.
Moving data to a new TS7700
Although you must use the Tape Copy Utility Tool to move data to TS7700, not all z/OS data can be moved by using this tool. In general, this tool is able to move any data on tape, except those products that manage their own data, for example, DFSMShsm, DFSMdfp object access method (OAM), or IBM Tivoli Storage Manager.
When using SMS tape, the first step is to update the ACS routines to direct all new data to the TS7700. With this change, new data on tapes gets created in the TS7700 so that moving it again later is not necessary.
If you move OAM-owned data, you can use the OAM recycle process, OAM Storage Management Component (OSMC), or the OAM MOVEVOL utility to move the data to the TS7700. If you move DFSMShsm-owned data, you have to use RECYCLE command to move incremental backup and migration volumes. Use a COPYDUMP job to move DFSMSdss data to the TS7700. The utility to use depends on the data selected. In most cases, it is sequential data that can be copied by using the IEBGENER utility, DITTO/ESA. If you have DFSORT, ICEGENER and ICETOOL perform better.
You must use a specific utility when the input data is in a special format, for example, DFSMSdss dump data. DFSMSdss uses blocks up to 256 KB blocksize and only the proper DSS utility, such as COPYDUMP, can copy with that blocksize. Be careful when copying multifile and multivolume chains.
In general, all other data (except data that is owned by an application, such as DFSMShsm) belongs to batch and backup workloads. Use EXPDT and RETPD from the DFSMSrmm EXTRACT file to discover which tapes have a distant expiration date, begin moving these tapes, and leave the short-term retention tapes to the last phase of data movement. They likely will be moved by the everyday process.
Updating the tape management system with the correct retention information
When the manual copy operation has been successful, it might be necessary to update the TMS catalog. The following data must be updated on the output volume:
•File sequence number
•Creation date and time
•Last read and last write date
•Jobname
Optionally, you can also update the following items:
•Stepname
•DDname
•Account number
•Device number
In RMM, this step can be done with a CHANGEDATASET command that has special authority to update O/C/EOV recorded fields. For detailed information about this command, see z/OS DFSMSrmm Managing and Using Removable Media, SC23-6873.
To avoid this time-consuming process, use a tape copy tool because they can make all the necessary changes in a TMS.
Updating the ICF catalog with the correct output volume
The next step is to uncatalog the input data sets (if they were cataloged) and recatalog the output data sets with the new volume information. This can be done with IDCAMS DELETE NOSCRATCH or within TSO with the U command followed by DEFINE NONVSAM. For more information, see z/OS DFSMS Access Method Services Commands, SC23-6846.
Tape copy tools recatalog tapes during movement without the need for manual intervention.
Releasing the input volume for SCRATCH processing
This final step must be done after you are sure that the data has been correctly copied. You must also verify that the retention and catalog information is correct.
Using this quick-method sequence, you can copy every kind of tape data, including generation data groups (GDGs), without modifying the generation number.
In an RMM environment, you can use RMMCLIST variables, RMM REXX variables, or both, and RMM commands, listing data from the input volumes and then using the RMM REXX variables with the CD command to update the output. Then, call IDCAMS to update the integrated catalog facility (ICF) catalog. For more information, see z/OS DFSMS Access Method Services Commands, SC23-6846.
When the operation completes and all errors are corrected, use the RMM DELETEVOLUME command to release the input volumes. For more information about RMM commands and REXX variables, see z/OS DFSMSrmm Managing and Using Removable Media, SC23-6873. If you are using a TMS other than RMM, see the appropriate product functions to obtain the same results.
Migrating data inside the TS7700 can be made easier by using products, such as DFSMShsm or IBM Tivoli Storage Manager. If you are planning to put DFSMShsm or IBM Tivoli Storage Manager data in the TS7700, see the following sections:
With DFSMShsm, you can change the ARCCMDxx tape device definitions to an esoteric name with TS7700 virtual drives (in a BTLS environment) or change SMS ACS routines to direct DFSMShsm data in the TS7700. The DFSMShsm RECYCLE command can help speed the movement of the data.
A similar process can be used with IBM Tivoli Storage Manager, changing the device class definitions for the selected data to put in the TS7700 and then starting the space reclamation process.
If you are moving DB2 data into the TS7700, ensure that, when copying the data, the DB2 catalog is also updated with the new volume information. You can use the DB2 MERGECOPY utility to speed up processing, using TS7700 virtual volumes as output.
In general, DB2 image copies and Archlog are not retained for a long time. After all new write activity goes to the TS7740 or TS7720T, you can expect that this data is moved by the everyday process.
8.3.3 Products to simplify the task
You might want to consider using a product that is designed to copy data from one medium to another. The first choice is the IBM offering that interacts with DFSMSrmm called Tape Copy Tool (see Table 8-3 on page 318). The Tape Copy Tool function of the internal IBM ADDONS package is designed to copy all types of MVS tape data sets from one or more volumes or volume sets to a new tape volume or tape volume set. This tool supports any tape media that are supported by DFSMSrmm. The input tape media can be different from the output tape media.
Do not use the tool to copy tape data sets owned by Hierarchical Storage Manager (DFSMShsm), IBM Tivoli Storage Manager, or similar products, where information of old VOLSERs is kept within the product and not reflected after a copy is made. This challenge typically applies to products where tapes are not cataloged in an ICF catalog, but kept in the product’s own database.
The DFSMSrmm Tape Copy Tool cannot be used when you have a TMS other than DFSMSrmm. You must choose another Tape Copy Tool from Table 8-3 on page 318.
Consider the following factors when you evaluate a tape copy product:
•Interaction with your TMS
•Degree of automation of the process
•Speed and efficiency of the copy operation
•Flexibility in using the product for other functions, such as duplicate tape creation
•Ease of use
•Ability to create a pull list for any manual tape mounts
•Ability to handle multivolume data sets
•Ability to handle volume size changes, whether from small to large, or large to small
•Ability to review the list of data sets before submission
•Audit trail of data sets already copied
•Ability to handle failures during the copy operation, such as input volume media failures
•Flexibility in filtering the data sets by wildcards or other criteria, such as expiration or creation date
Table 8-3 lists several common tape copy products. You can choose one of these products or perhaps use your own utility for tape copy. You do not need any of these products, but a tape copy product can make your job easier if you have many tapes to move into the TS7700.
Table 8-3 Selection of tape copy tools
|
Product name
|
Vendor name
|
For more information
|
|
Tape Copy Tool/
DFSMSrmm
|
IBM
|
Contact your IBM SSR for more information about this service offering. Do not confuse this with the Tape Analysis Tools that are mentioned in 11.16.2, “Tools download and installation” on page 711, which can be download from IBM for no extra fee.
|
|
Tape Optimizer
|
IBM
|
|
|
Beta55
|
Beta Systems
Software AG |
|
|
CA-1/TLMS
Copycat
|
Computer Associates
International, Inc. |
|
|
Tape/Copy
|
Rocket Software
|
|
|
TelTape
|
Cartagena Software
Ltd. |
|
|
Zela
|
Software Engineering
of America |
|
|
FATScopy
|
Innovation
|
In addition to using one of these products, consider using IBM Global Technology Services (GTS) to assist you in planning and moving the data into the TS7700.
8.3.4 Combining methods to move data into the TS7700
You will most likely want to use a combination of the phased and quick methods for moving data into the TS7700. One approach is to classify your data as static or dynamic.
Static data is information that will be around for a long time. This data can be moved into the TS7700 only with the quick method. You must decide how much of this data will be moved into the TS7700. One way to decide this is to examine expiration dates. You can then set a future time when all volumes, or a subset, are copied into the TS7700. There might be no reason to copy volumes that are going to expire in two months. By enabling these volumes to go to SCRATCH status, you can save yourself some work.
Dynamic data is of a temporary nature. Full volume backups and log tapes are one example. These volumes typically have a short expiration period. You can move this type of data with the phased method. There is no reason to copy these volumes if they are going to expire soon.
8.4 Moving data out of the TS7700
There are many reasons why you might want to move data out of the TS7700. The most common reason is for disaster recovery or data interchange. You can move data out of the TS7700 in three ways:
8.4.1 Host-based copy tools
You can use a host-based tool to copy the data from the TS7700 to the target.
With this method, the data is reprocessed by the host and copied to another medium. This method is described in 8.3.1, “Phased method of moving data” on page 313. The only difference is that you need to address the TS7700 as input and the non-TS7700 drives as output.
8.4.2 Copy Export and Copy Export Recovery / Merge
You can use the Copy Export function to export a copy of the selected logical volumes stored in physical tapes on TS7700. Exported physical tapes can be removed from TS7700 and taken offsite. Typically, exported data is used for disaster recovery, but it can also be used for data migration between TS7700s. It is described in 8.2, “Migration between TS7700s” on page 306.
You can find more details about Copy Export and Copy Export Merge in this book in Chapter 12, “Copy Export” on page 747.
8.4.3 DFSMShsm aggregate backup and recovery support
The third way is to copy the data with the DFSMShsm aggregate backup and recovery support (ABARS) function.
ABARS is the command-driven DFSMShsm function that backs up a user-defined group (called an aggregate group) of data sets (usually for recovery purposes) at another computer site or at the same site. ABARS can be used to back up and recover both SMS-managed and non-SMS-managed data cataloged on DASD, migration level 1, migration level 2, and tape.
Using the DFSMShsm ABARS function, group the data you want to move outside the TS7700. Then, start addressing other tape drives outside the TS7700, or use the Copy Export function. In this way, you obtain an exportable copy of the data that can be put in an offsite location.
You can use this process to perform these tasks:
Creating a selection data set
Before you can run an aggregate backup, create one or more selection data sets. The selection data set lists the names of the data sets to be processed during aggregate backup.
You can identify the data set names in a single selection data set, or you can divide the names among as many as five selection data sets. You can specify six types of data set lists in a selection data set. The type that you specify determines which data sets are backed up and how they are recovered.
An INCLUDE data set list is a list of data sets to be copied by aggregate backup to a tape data file where they can be transported to the recovery site and recovered by aggregate recovery. The list can contain fully qualified data set names or partially qualified names with placeholders. DFSMShsm expands the list to fully qualified data set names.
Using a selection data set with the names of the data sets you want to export from the TS7700, obtain a list of files on logical volumes that the ABARS function copies to non-TS7700 drives.
You can also use the Copy Export function to move the ABARS tapes to a data recovery site outside of the library.
Defining an aggregate group
Define an aggregate group and related MC to specify exactly which data sets are to be backed up.
Define the aggregate group and MC used for aggregate backup to DFSMS through ISMF panels.
The aggregate group lists the selection data set names, instruction data set name, and extra control information that is used by the aggregate backup to determine which data sets to
back up.
back up.
Running the ABACKUP VERIFY command
You can use the ABACKUP command to verify the contents of the aggregate backup without backing up any data sets. This is the same as performing a test run of aggregate backup. The following example shows the ABACKUP command:
HSEND ABACKUP agname VERIFY UNIT(non_TS7700_unit) PROCESSONLY(USERTAPE)
With the PROCESSONLY(USERTAPE) keyword, only tape data sets are processed. In this way, you can be sure that only the input data from TS7700 logical volumes is used.
Running the ABACKUP EXECUTE command
When you are ready, start the actual backup by using the following command:
HSEND ABACKUP agname EXECUTE UNIT(non_TS7700_unit) PROCESSONLY(USERTAPE)
When you enter the ABACKUP command with the EXECUTE option, the following tape files are created for later use as input for aggregate recovery:
•Data file: Contains copies of the data sets that have been backed up.
•Control file: Contains control information that is needed by aggregate recovery to verify or recover the application’s data sets.
•Instruction/activity log file: Contains the instruction data set, which is optional.
Summary
At the end of this process, you obtain an exportable copy of the TS7700 data, which can be used for disaster recovery and stored offsite using other physical tapes. Consider using the Copy Export function, which enables you to move a copy of the original logical volumes to an offsite location without reading the tape data twice. The Copy Export function operates on another Physical Volume Pool in the library and creates the copy in the background without any process being required on the host. However, Copy Export requires an empty TS7700 at your disaster site.
For more information, see the following resources:
•For Copy Export, see 12.2, “Implementing and running Copy Export” on page 761.
•For Copy Export Recovery, see 12.3, “Using Copy Export Recovery” on page 771.
•For using the DFSMShsm ABARS function, see the z/OS DFSMShsm Storage Administration, SC23-6871.
8.5 Migration of DFSMShsm-managed data
DFSMShsm is an application that can use the full cartridge capacity, but for various reasons, you might want to consider using the TS7700 rather than native physical drives for DFSMShsm data. For example, when writing Migration Level 2 (ML2) data onto a cartridge with an uncompressed capacity of 300 GB, chances are higher that a recall request needs exactly this cartridge that is being written to by a space management task. This incident is known as recall takeaway.
The effects of recall takeaway can be a real disadvantage when writing Migration Level 2 data onto native, high-capacity cartridges, because the space management task must set aside its output tape to make it available to the recall task. Although the partially filled output tape remains eligible for subsequent selection, the next time that space management runs, it is possible to accumulate several partial tapes beyond DFSMShsm needs if recall takeaway activity occurs frequently.
Excess partial tapes created by recall takeaway activity result in poor use of native cartridges. In addition, because recall takeaway activity does not cause the set-aside tape to be marked full, it is not automatically eligible for recycling, despite its poor utilization.
High-capacity cartridges are more likely to experience both frequent recall takeaway activity, and also frequent piggy-back recall activity, in which recalls for multiple data sets on a single tape are received while the tape is mounted. However, piggy-back recalls have a positive effect by reducing the number of mounts that are required to run several recalls. You must also consider that multiple recalls from the same tape must be performed serially by the same recall task.
If those same data sets are on separate tapes, the recalls can potentially be performed in parallel, given enough recall tasks. In addition, the persistence of the virtual tape in the Tape Volume Cache (TVC) after it has been unmounted enables DFSMShsm to run ML2 recalls from the disk cache without requiring that a physical tape be mounted.
Other reasons also exist for directing DFSMShsm data into a TS7700. The number of native drives limits the number of DFSMShsm tasks that can run concurrently. With the large number of up to 496 virtual drives in a stand-alone cluster configuration or 992 virtual drives in a two-cluster grid configuration, you can dedicate a larger number of virtual drives to each DFSMShsm function and enable higher throughput during your limited backup and space management window.
When increasing the number of DFSMShsm tasks to take advantage of the large number of virtual drives in a TS7700, consider adding more DFSMShsm auxiliary tasks (MASH), rather than simply increasing the number of functional tasks within the existing started tasks. Each DFSMShsm started task can support up to 15 AUTOBACKUP tasks.
Other reasons for using the TS7700 with DFSMShsm are the greatly reduced run times of DFSMShsm operations that process the entire volume, such as AUDIT MEDIACONTROLS and TAPECOPY.
DFSMShsm can benefit from the TS7700 tape drive’s high throughput and from its large TVC size, which enables long periods of peak throughput.
DFSMShsm data is well-suited for the TS7700 because of the appropriate tailoring of those parameters that can affect DFSMShsm performance. The subsequent sections describe this tailoring in more detail.
For more information, see the z/OS DFSMShsm Storage Administration Guide, SC23-6871.
8.5.1 Volume and data set sizes
The size of user data sets is important when you choose between a TS7700 and native drives, such as 3592. DFSMShsm migration, backup, and recycle use only single file format to write to tape cartridges.
z/OS supported data set sizes
Different data set sizes are supported for disk and tape data sets, based on the data set organization and the number of volumes that a single data set can span:
•DASD data sets are limited to 59 volumes, except for partitioned data sets (PDS) and partitioned data set extended (PDSE) data sets, which are limited to one volume.
•A data set on a virtual I/O (VIO)-simulated device is limited to 65,535 tracks and to one volume.
•Tape data sets are limited to 255 volumes, but the limit for data sets that are backed up and migrated with DFSMShsm is 254.
Table 8-4 lists the maximum data set sizes that are supported by DFSMShsm in z/OS environments.
Table 8-4 Maximum supported data set sizes
|
Storage medium
|
Maximum volume size
|
Maximum number of volumes
|
Maximum
Data set size |
|
DASD: IBM System Storage DS8000®
|
Standard volumes of 54 GB, EAV sizes are user determined
|
59
|
3.18 TB
|
|
Tape: TS1120 z/OS V1.13
|
700 GB x 2.5 compression
|
40
|
70 TB
|
|
Tape: TS1120 z/OS V2.1 and higher
|
700 GB x 2.5 compression
|
254
|
444.5 TB
|
|
Tape: TS1140 / JC z/OS V2.1
|
4 TB x 2.5 compression
|
254
|
2540 TB
|
|
Tape: TS7700 z/OS V1.13
|
25 GB x 2.5 compression
|
40
|
3.81 TB
|
|
Tape: TS7700 z/OS V2.1 and higher
|
25 GB x 2.5 compression
|
254
|
15.875 TB
|
DFSMShsm supported data set sizes
Single-file format, as used by DFSMShsm, reduces I/O and system serialization because only one label is required for each connected set (as opposed to multiple file format tapes that require a label for each data set). The standard-label tape data set that is associated with the connected set can span up to the allocation limit of 255 tapes. This standard-label tape data set is called the DFSMShsm tape data set. Each user data set is written in 16 K logical blocks to the DFSMShsm tape data set.
|
Important: A single DFSMShsm user data set can span up to 40 tapes (with z/OS V2R1, this limit is now 254). This limit is for migration, backup, and recycle.
|
After DFSMShsm writes a user data set to tape, it checks the volume count for the DFSMShsm tape data set. If the volume count is greater than 215, the DFSMShsm tape data set is closed, and the currently mounted tape is marked full and is de-allocated.
The number 215 is used so that a data set spanning 40 tapes fits within the 255-volume allocation limit. DFSMShsm selects another tape, and then starts a different DFSMShsm tape data set. Data set spanning can be reduced by using the SETSYS TAPESPANSIZE command.
DFSMShsm and large logical volumes
The TS7700 supports logical volume sizes of 400, 800, 1000, 2000, 4000, 6000, and 25000 MiB. In z/OS V1.13, with a maximum of 40 volumes that are supported and assuming a compression ratio of 2.5:1, the maximum user data set size for 800 MiB volumes is 80 GiB:
800 MiB x 2.5 x 40 = 80000 MiB
In z/OS V2.1 and higher, the limit is 254 volumes for HSM user data sets, so the maximum user data set becomes 508,000 MiB:
800 MiB x 2.5 x 254 = 508000 MiB
Assume that you have a very large data set of 300 GiB. This data set does not fit on
40 volumes of 800 MiB each, but it can fit on 6000 MiB large virtual volumes, as shown in the following example:
40 volumes of 800 MiB each, but it can fit on 6000 MiB large virtual volumes, as shown in the following example:
6000 MiB x 2.5 x 40 = 600000 MiB
However, in z/OS V2.1 and higher, this data set can fit on 800 MiB volumes. Any single user data set larger than 3.81 TiB at z/OS 1.13 or 15.875 TiB in z/OS 2.1 and higher, is a candidate for native 3592 tape drives. Assuming a compression rate of 2.5:1, they might not fit onto the supported number of volumes. In this case, consider using native 3592-E06 (TS1130) or 3592-E07 (TS1140) tape drives rather than TS7700.
IDCAMS DCOLLECT BACKUPDATA can be used to determine the maximum size of backed-up data sets in DFSMShsm inventory. MIGRATEDATA can be used to determine the maximum size of migrated data sets in DFSMShsm inventory.
|
Important: DFSMShsm can consist of more than one address space on a single LPAR (Multi-Address Space HSM or MASH), or you can have multiple HSMs sharing a single set of CDSs, called an HSMplex. In either case, you can define commands in the ARCCMDxx member of your DFSMShsm parmlib to apply only to specific DFSMShsm hosts by using the ONLYIF statement, or you can have commands apply to all HOSTs in an HSMplex.
Each instance of DFSMShsm can have a unique MIGUNIT specified. For instance, one host can specify MIGUNIT(3590-1) and another MIGUNIT(TS7700). The same is true for BUUNIT.
The DFSMShsm host that has 3590-1 specified as a migration or backup unit should process only space management or automatic backup for the SGs where your large data sets, such as z/FS, are. The other DFSMShsm hosts can then migrate and back up SGs containing the smaller data sets to the TS7700.
To direct a command to a specific instance of DFSMShsm, you can use an MVS MODIFY command with the started task name of the instance of DFSMShsm that you want to process the command. For example, “F DFSMS2, BACKDS...” or “F DFSMS2, BACKVOL SG(SG)...”.
The following commands affect which output device is used by a specific function:
•SETSYS TAPEMIGRATION(ML2TAPE(TAPE(unittype))
•SETSYS RECYCLEOUTPUT(MIGRATION(unittype))
•SETSYS BACKUP(TAPE(unittype))
•SETSYS RECYCLEOUTPUT(BACKUP(unittype))
|
Migration to a different logical volume size
To ensure that DFSMShsm starts using larger data sets, you must mark as full any empty or partially filled tapes that are written by using the previous logical volume size. To identify these tapes, enter the following DFSMShsm command:
LIST TTOC SELECT(NOTFULL)
Each tape that is identified as being empty or partially filled must be marked full by using one of the following DFSMShsm commands:
DELVOL volser MIGRATION(MARKFULL)
DELVOL volser BACKUP(MARKFULL)
As DFSMShsm migrates data and creates backup copies, it prefers to add to an existing migration/backup volume. As the volume nears full, it handles spanning of data sets, as described in “Tape spanning” on page 326. If a data set spans across DFSMShsm volumes, it becomes a connected set in DFSMShsm terms.
However, a key point is that if the data set spans, DFSMShsm uses Force end-of-volume (FEOV) processing to get the next volume mounted. Therefore, the system thinks that the volume is part of a multivolume set regardless of whether DFSMShsm identifies it as a connected set. Because of the end-of-volume (EOV) processing, the newly mounted DFSMShsm volume uses the same DC and other SMS constructs as the previous volume.
With the DFSMShsm SETSYS PARTIALTAPE MARKFULL option, DFSMShsm marks the last output tape full, even though it has not reached its physical capacity. By marking the last volume full, the next time processing starts, DFSMShsm will use a new volume, starting a new multivolume set and enabling the use of a new DC and other SMS constructs. If the volume is not marked full, the existing multivolume set continues to grow and to use the
old constructs.
old constructs.
Use the SETSYS PARTIALTAPE MARKFULL option because it reduces the number of occasions in which DFSMShsm appends to a partial tape. This results not only in the need to mount a physical tape, but also in the invalidation of the existing virtual tape, which eventually must be reclaimed by the TS7700.
This is relevant to Outboard policy management and the implementation of different logical volume sizes. If all volumes have been marked full, you can simply update your ACS routines to assign a new DC and other SMS constructs. From then on, each new migration or backup volume uses the new size.
8.5.2 TS7700 implementation considerations
This section summarizes DFSMShsm implementation considerations regarding the TS7700.
Mount wait time
You can direct DFSMShsm data into a TS7700 (TS7760, TS7720, or TS7740). For a TS7740 or TS7700T, modify your DFSMShsm mount wait timer to be 12 minutes. This modification enables possibly needed extra time on specific mounts for the TS7740 or TS7700T to stage the data back into cache. Member IECIOSxx is in PARMLIB. Consider defining a special missing-interrupt handler (MIH) value that is named MIH MOUNTMSG=YES,MNTS=10:00 to ensure mount-pending messages if delays in specific mounts occur. The value of 10 can be adjusted to your specific value.
Logical volume size
Consider using large logical volumes, such as 6000 MiB or 25000 MiB, for backup and smaller logical volumes for migration, especially if you are using the TS7740 or TS7700T. If you have a high recall rate from ML2, you might not even want to use the entire capacity of a MEDIA1 or MEDIA2 virtual volume.
Installations in which recalls from ML2 are rare, and installations in which very large data sets are migrated that might result in reaching the 40 or 254-volume limits, should use the maximum capacity of the virtual volume. Write your ACS routines to select a different SMS DATACLAS for backup and migration activities that is based on the optimum volume size.
See Table 8-5 on page 327 when you customize the ARCCMDxx SETSYS parameters. HSM is aware of the large virtual volume capacity; it is not necessary to use high PERCENTFULL values to tune capacity of tapes from a DFSMShsm point of view. The maximum PERCENTFULL value that can be defined is 110% but it is no longer necessary to go above 100%.
Other applications might have a similar existing TAPECAPACITY-type specification or a PERCENTFULL-type specification to enable applications to write beyond the default volume sizes for MEDIA1 (cartridge system tape) and MEDIA2 (enhanced capacity cartridge system tape).
In OAM’s Object Tape Support, the TAPECAPACITY parameter in the SETOAM statement of the CBROAMxx PARMLIB member is used to specify the larger logical volume sizes. Because OAM also obtains the size of the logical volume from the TS7700, defining TAPECAPACITY in the CBROAMxx PARMLIB member is not necessary. For more information about Outboard policy management, see the z/OS DFSMS Object Access Method Planning, Installation, and Storage Administration Guide for Tape Libraries, SC23-6867.
Multisystem considerations
If multiple TS7700 tape drives are eligible for a request, also consider that the same logical volume size is used for the request across all libraries. When you view the volumes through your TMS, the TMS might continue to display the volume capacity based on the default volume size for the media type. However, the volume usage (or a similar parameter) shows how much data has been written to the volume, which reflects its larger capacity.
Scratch volumes
The default volume size is overridden at the library through the DC policy specification, and is assigned or reassigned when the volume is mounted for a scratch mount or rewritten from load point as a specific mount. Using a global scratch pool, you benefit from a fast mount time by establishing your scratch categories, as explained in “Defining scratch categories” on page 553. Consider using the following definitions to benefit from the fast scratch mount times:
•SETSYS SELECTVOLUME(SCRATCH): Requests DFSMShsm to use volumes from the common scratch pool.
•SETSYS TAPEDELETION(SCRATCHTAPE): Defines that DFSMShsm returns tapes to the common scratch pool.
•SETSYS PARTIALTAPE(MARKFULL): Defines that an DFSMShsm task will mark the last tape that it used in a cycle to be full, avoiding a specific mount during the next cycle.
When you use the MARKFULL parameter, the stacked volume contains only the written data of each logical volume that is copied, and the same applies to the TVC.
Tape spanning
You can use the optional TAPESPANSIZE parameter of the SETSYS command to reduce the spanning of data sets across migration or backup tape volumes, for example:
SETSYS TAPESPANSIZE(4000)
The value in parentheses represents the maximum number of megabytes of tape (ML2 or backup) that DFSMShsm might leave unused while it tries to eliminate the spanning of data sets. To state this in another way, this value is the minimum size of a data set that is allowed to span tape volumes. Data sets whose size is less than the value do not normally span volumes. Only those data sets whose size is greater than or equal to the specified value are allowed to span volumes.
This parameter offers a trade-off: It reduces the occurrences of a user data set spanning tapes in exchange for writing less data to a given tape volume than its capacity otherwise enables. The amount of unused media can vary 0 - nnnn physical megabytes, but roughly averages 50% of the median data set size. For example, if you specify 4000 MiB and your median data set size is 2 MiB, on average, only 1 MiB of media is unused per cartridge.
Installations that currently experience an excessive number of spanning data sets need to consider specifying a larger value in the SETSYS TAPESPANSIZE command. Using a high value reduces tape spanning. In a TS7700, this value reduces the number of virtual volumes that need to be recalled to satisfy DFSMShsm recall or recover requests.
You can be generous with the value because no space is wasted. For example, a TAPESPANSIZE of 4000 means that any data set with less than 4000 MiB that does not fit on the remaining space of a virtual volume is started on a fresh new virtual volume.
8.5.3 DFSMShsm task-related considerations
To better understand the use of DFSMShsm with TS7700, this section summarizes the DFSMShsm functions that use tapes and analyzes the benefit of tape virtualization for these functions.
Backups of DFSMShsm control data sets
DFSMShsm CDSs can be backed up easily in a TS7700 by using virtual volumes rather than physical volumes, which might otherwise be underused.
Volume dumps
When using TS7700 as output for the DFSMShsm AUTODUMP function, do not specify the following parameters:
DEFINE DUMPCLASS(dclass STACK(nn))
BACKVOL SG(sgname)|VOLUMES(volser) DUMP(dclass STACK(10))
These parameters were introduced to force DFSMShsm to use the capacity of native physical cartridges. If used with TS7700, they cause unnecessary multivolume files and reduce the level of parallelism possible when the dump copies are restored. Use the default value, which is NOSTACK.
Migrate or recall (DFSMShsm Migration Level 2)
When using a TS7740 or TS7700T as DFSMShsm Migration Level 2, consider the number of simultaneous recall processes. Consider how many recall tasks are started at the same time, and compare that number with the number of physical drives that are assigned to your TS7740 or TS7700T.
For example, if your installation often has more than 10 tape recall tasks at one time, you probably need 12 back-end drives to satisfy this throughput request because all migrated data sets might already have been removed from the TVC and need to be recalled from tape.
Backup and recovery
Unlike the DFSMShsm RECALL operation, RECOVERY usually has a lower frequency in an DFSMShsm environment. Therefore, using TS7700 for DFSMShsm backup and recovery functions benefits you without affecting DFSMShsm performance. However, review your DFSMShsm performance requirements before moving DFSMShsm BACKUP to the TS7700.
TAPECOPY
The DFSMShsm TAPECOPY function requires that original and target tape volumes are of the same media type and use the same recording technology. Using a TS7700 as the target for the TAPECOPY operation from an original volume that is not a TS7700 volume might cause problems in DFSMShsm because TS7700 virtual volumes have different volume sizes.
Use the information in Table 8-5 to tailor your TAPECOPY environment.
Table 8-5 TAPECOPY usage
|
ORIGINAL volume unit name
|
ALTERNATE volume unit name
|
Percent full to be defined (assuming 2:1 compression)
|
|
TS7700 (CST): 400 MB
|
3490E (CST)
|
100%
|
|
TS7700 (ECCST): 800 MB
|
3490E (ECCST)
|
100%
|
|
3490E (CST): 400 MB
|
TS7700 CST: 400 MB
|
45%
|
|
3490E (ECCST): 800 MB
|
TS7700 (ECCST): 800 MB
|
45%
|
|
TS7700 (CST): 400 MB
|
TS7700 (CST): 400 MB
|
100%
|
|
TS7700 (CST): 1 GB
|
TS7700 (CST): 1 GB
|
100%
|
|
TS7700 (CST): 2 GB
|
TS7700 (CST): 2 GB
|
100%
|
|
TS7700 (CST): 4 GB
|
TS7700 (CST): 4 GB
|
100%
|
|
TS7700(CST): 6 GB
|
TS7700 (CST): 6 GB
|
100%
|
|
TS7700 (ECCST): 800 MB
|
TS7700 (ECCST): 800 MB
|
100%
|
|
TS7700 (ECCST): 1 GB
|
TS7700 (ECCST): 1 GB
|
100%
|
|
TS7700 (ECCST): 2 GB
|
TS7700 (ECCST): 2 GB
|
100%
|
|
TS7700 (ECCST): 4 GB
|
TS7700 (ECCST): 4 GB
|
100%
|
|
TS7700 (ECCST): 6 GB
|
TS7700 (ECCST): 6 GB
|
100%
|
For example, if you are planning to put DFSMShsm alternative copies into a TS7700, a tape capacity of 45% might not be enough for the input non-TS7700 ECCST cartridges. TAPECOPY fails if the (virtual) output cartridge encounters EOV before the input volume has been copied completely.
However, using TS7700 logical volumes as the original and 3490E native as the TAPECOPY target might cause EOV at the alternative volume because of the higher LZ data compression algorithm, IBMLZ1, compression seen on the virtual drive compared to the improved data-recording capability (IDRC) compression on the native drive.
For special situations where copying from standard to enhanced capacity media is needed, the following patch command can be used:
PATCH .MCVT.+4F3 BITS(.....1..)
DUPLEX TAPE
For duplexed migration, both output tapes must be of the exact same size and unit type. A preferred practice is to use a multi-cluster grid and the new Synchronous mode copy support, and enable the hardware to run the duplex rather than the DFSMShsm software function. This method also enables you to more easily manage the disaster side. You can use Geographically Dispersed Parallel Sysplex (GDPS) and switch to the remote DASD side and the tape VOLSER itself does not need to be changed. No TAPEREPL or SETSYS DISASTERMODE commands are needed.
When HSM writes ML2 data to tape, it deletes the source data as it goes along, but before the RUN is sent to the TS7700. Therefore, until the copy is made, only one copy of the ML2 data might exist. The reason is because the TS7700 grid, even with a Copy Consistency Point of [R,R], makes a second copy at RUN time.
By using the appropriate MC settings in SMS, you can ensure that a data set is not migrated to ML2 before a valid backup copy of this data set exists. This way, there are always two valid instances from which the data set can be retrieved: One backup and one ML2 version. After the second copy is written at rewind-unload time, two copies of the ML2 data will exist in the grid.
Another way to ensure that two copies of the ML2 data exist is to use hierarchical storage management (HSM) duplexing or the new Synchronous copy mode option support in the TS7700. Both ways create two separate copies of the ML2 data before HSM deletes it. Ideally, with a multi-cluster grid, you want one copy of the data in one cluster and the second copy in another cluster to avoid loss of data if one of the clusters experiences a disaster. You can use the Copy Consistency Points to ensure that each copy of the duplexed data is sent to a separate cluster.
RECYCLE
The DFSMShsm RECYCLE function reduces the number of logical volumes inside the TS7700, but when started, it can cause bottlenecks in the TS7740 or TS7700T recall process. If you have a TS7740 or TS7700T with four physical drives, use a maximum of two concurrent DFSMShsm RECYCLE tasks. If you have a TS7740 or TS7700T with six physical drives, use no more than five concurrent DFSMShsm RECYCLE tasks.
Select the RECYCLEPERCENT and consider the following information:
•You will free logical volumes on a stacked volume with hundreds of other logical volumes.
•The space that is occupied by the logical volume is freed up only if and when the logical volume is used (overwritten) again, unless you are using Expired Volume Management.
•To RECYCLE, the TS7700 must load the input volumes into the TVC.
Use a RECYCLEPERCENT value that depends on the logical volume size, for example:
•5 for 1000 MiB, 2000 MiB, 4000 MiB, or 6000 MiB volumes
•10 for 400 MiB or 800 MiB volumes
You can use the following commands to limit which volumes can be selected for DFSMShsm RECYCLE processing. For instance, you might want to limit RECYCLE to only your old technology, and exclude the newer tape technology from RECYCLE until the conversion is complete. You can use the following commands to limit which tape volume ranges are selected for RECYCLE:
•RECYCLE SELECT (INCLUDE(RANGE(nnnnn:mmmmm)))
•RECYCLE SELECT (EXCLUDE(RANGE(nnnnn:mmmmm)))
You can also use the SETSYS RECYCLEOUTPUT to determine which tape unit to use for the RECYCLE output tapes. You can use your ACS routines to route the RECYCLEOUTPUT unit to the wanted library by using the &UNIT variable.
See IBM z/OS DFSMShsm Primer, SG24-5272 for more information about implementing DFSMShsm.
8.6 DFSMSrmm and other tape management systems
No changes are required to any TMS to support basic TS7700. You review only the retention and movement criteria for the data in the TS7700. You must check your daily tape management process to delete any step that relates to EJECT activities.
DFSMSrmm accepts logical volume capacity from an open close end-of volume (OCE) module. DFSMSrmm can now always list the actual reported capacity from TS7700.
To start the low-on-scratch procedure, DFSMSrmm uses these messages:
•CBR3660A
•CBR3792E
•CBR3794A
|
Note: Prior to APAR OA49373, the CBR3660A message was deleted when the scratch count was 2X+1 above the threshold. With this APAR (z/OS V2R1 and later), when the CBR3660A is deleted it can be customized using the CBROAMxx PARMLIB member and the SETTLIB command.
|
When you direct allocations inside the TS7700, the vital record specifications (VRSs), or vault rules, indicate to the TMS that the data set will never be moved outside the library. During VRSEL processing, each data set and volume is matched to one or more VRSs, and the required location for the volume is determined based on priority. The volume’s required location is set.
The volume is not moved unless DSTORE is run for the location pair that includes the current volume location and its required location. For logical volumes, this required location can be used to determine which volume must be exported. For Copy Export, the required location is only used for stacked volumes that have been Copy Exported.
Other TMSs must modify their definitions in a similar way. For example, CA-1 Tape Management must modify their RDS and VPD definitions in CA/1 PARMLIB. Control-M/Tape (Control-T) must modify its rules definitions in the Control-T PARMLIB.
The DFSMSrmm return-to-scratch process has been enhanced to enable more parallelism in the return-to-scratch process. EDGSPLCS is a new option for the EDGHSKP SYSIN file EXPROC command that can be used to return to scratch tapes in an asynchronous way. With the most recent software support changes, EDGSPLCS can be used to run scratch processing in parallel across multiple libraries, or in parallel within a library.
The only necessary step is to run different instances of CBRSPLCS. For more information about the enhanced return-to-scratch process, see z/OS DFSMSrmm Implementation and Customization Guide, SC23-6874.
Stacked volumes cannot be used by the host; they are managed exclusively by the TS7740 or TS7720T. Do not enable any host to either implicitly or explicitly address these stacked volumes. To indicate that the stacked VOLSER range is reserved and cannot be used by any host system, define the VOLSERs of the stacked volumes to RMM.
Use the following PARMLIB parameter, assuming that VT is the prefix of your stacked TS7700 cartridges:
REJECT ANYUSE(VT*)
This parameter causes RMM to deny any attempt to read or write those volumes on native drives. There are no similar REJECT parameters in other TMSs.
You do not need to explicitly define the virtual volumes to RMM. During entry processing, the active RMM automatically records information about each volume in its CDS. RMM uses the defaults that you specified in ISMF for the library entry values if there is no existing RMM entry for an inserted volume. Set the default entry status to SCRATCH.
When adding 1,000,000 or more virtual volumes, the size of the RMM CDS and the amount of secondary space available must be checked. RMM uses 1 MB for every 1,000 volumes defined in its CDS. An extra 1,000,000 volumes need 1,000 MB of space. However, do not add all the volumes initially. See “Inserting virtual volumes” on page 552 for more information.
To increase the size of the RMM CDS, you must quiesce RMM activities, back up the CDS, and then reallocate a new CDS with a larger size and restore the CDS from the backup copy. To calculate the correct size of the RMM CDS, see z/OS DFSMSrmm Implementation and Customization Guide, SC23-6874. You should consider using VSAM extended format in your CDS. Extended format and Multivolume support almost any growth rate in the Configuration data set.
Other TMSs, such as BrightStor, CA-1 Tape Management Copycat Utility (BrightStor CA-1 Copycat), and BrightStor CA-Dynam/TLMS Tape Management Copycat Utility (BrightStor CA-Dynam/TLMS Copycat) must reformat their database to add more volumes. Therefore, they must stop to define more cartridges.
Additionally, some TMSs do not enable the specification of tape volumes with alphanumeric characters or require user modifications to do so. See the correct product documentation for this operation.
In both RMM and the other TMSs, the virtual volumes do not have to be initialized. The first time that a VOLSER is used, TS7700 marks the virtual volume with VOL1, HDR1, and a tape mark, as though it had been done by EDGINERS or IEHINITT.
8.7 IBM Spectrum Protect
IBM Spectrum™ Protect (Tivoli Storage Manager family) provides backup, snapshot, archive, recovery, space management, bare machine recovery, and disaster recovery capabilities. Throughout this publication, the Tivoli Storage Manager name will be referenced. IBM Tivoli Storage Manager, like DFSMShsm, can automatically fill a native 3592 cartridge. It can use the tape up to EOV, independent of the media type.
Tivoli Storage Manager 6.1, released in 2009, had no Tivoli Storage Manager Server support for z/OS. IBM Tivoli Storage Manager for z/OS Media V6.3 and IBM Tivoli Storage Manager for z/OS Media Extended Edition V6.3 are replacement products for Tivoli Storage Manager V5.5 and Tivoli Storage Manager Extended Edition for z/OS V5.5, with new functions available in Tivoli Storage Manager V6, while maintaining the ability to access Fibre Channel connection (FICON)-attached storage on a z/OS system.
IBM Tivoli Storage Manager for z/OS Media and IBM Tivoli Storage Manager for z/OS Media Extended Edition, introduced with Version 6.3, are designed to enable IBM Tivoli Storage Manager V6.3 servers that are running on IBM AIX and Linux on z Systems to access various FICON-attached tape libraries on z/OS, including the TS7700 family.
|
Tip: Beginning with Version 7.1.3, IBM Tivoli Storage Manager is now IBM Spectrum Protect™. Some applications, such as the software fulfillment systems and IBM License Metric Tool, use the new product name. However, the software and its product documentation continue to use the Tivoli Storage Manager product name. For more information about the rebranding transition, see the following website:
|
For more information about the current Tivoli Storage Manager supported levels for Linux on z Systems, see IBM Knowledge Center:
Figure 8-3 shows a high-level drawing of the data flow in a Tivoli Storage Manager for z/OS Media environment.
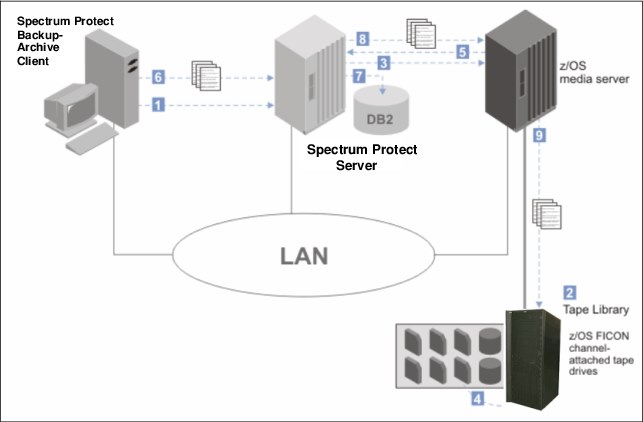
Figure 8-3 Data flow from the backup-archive client to z/OS media server storage
The following numbers correspond to the numbers that are shown in Figure 8-3:
1. The Tivoli Storage Manager backup-archive client contacts the Tivoli Storage Manager server.
2. The Tivoli Storage Manager server selects a library resource and volume for the backup operation.
3. The Tivoli Storage Manager server contacts the z/OS media server to request a volume mount.
4. The z/OS media server mounts the tape volume.
5. The z/OS media server responds to the Tivoli Storage Manager server that the mount operation is complete.
6. The backup-archive client begins sending data to the Tivoli Storage Manager server.
7. The Tivoli Storage Manager server stores metadata in the database and manages the data transaction.
8. The Tivoli Storage Manager server sends the backup-archive client data to the z/OS media server.
9. The z/OS media server writes the data to z/OS storage.
If you plan to store IBM Tivoli Storage Manager data in the TS7700, consider the following suggestions for placing data on your TS7700:
•Use TS7740 or TS7700T for IBM Tivoli Storage Manager Archiving for archiving and backing up large files or databases for which you do not have a high-performance requirement during backup and restore. TS7740 or TS7700T is ideal for IBM Tivoli Storage Manager archive or long-term storage because archive data is infrequently retrieved. Archives and restorations for large files can see less effect from the staging.
Small files, such as individual files on file servers, can see performance effects from the TS7740 or TS7700T staging. If a volume is not in cache, the entire volume must be staged before any restore can occur.
•Set IBM Tivoli Storage Manager reclamation off by setting the reclamation threshold to 100%. IBM Tivoli Storage Manager, like DFSMShsm, has a reclamation function to consolidate valid data from tapes with a low valid data percentage onto scratch tapes so that tapes can be freed up for reuse. IBM Tivoli Storage Manager reclamation with TS7740 or TS7700T can be slower because all volumes must be staged to the cache.
Periodically, set IBM Tivoli Storage Manager reclamation on by setting the threshold to a lower value to regain the use of TS7700 volumes with a small amount of valid data that will not expire for a longer period. IBM Tivoli Storage Manager reclamation must be scheduled for off-peak hours.
•Use collocation to reduce the number of TS7700 volumes required for a full restore. IBM Tivoli Storage Manager has a collocation function to group IBM Tivoli Storage Manager client data onto a minimum set of tapes to provide a faster restore and to provide separation of client data onto separate physical tapes. Collocation with TS7740 or TS7700T does not minimize the physical tapes that are used, but minimizes the number of logical volumes that is used.
Collocation with TS7740 or TS7700T can improve the restore time for large amounts of data. TS7740 or TS7700T does not ensure physical tape separation when collocation is used because separate logical volumes can be on the same physical tape.
•Use TS7740 or TS7700T for IBM Tivoli Storage Manager database backups that are to be used for recovery from local media, and use TS7740 or TS7700T at a recovery site or native drives for backups that are to be used for recovery from offsite media. IBM Tivoli Storage Manager requires a separate tape for every backup of the IBM Tivoli Storage Manager database, so many logical volumes with less data is created.
When using the TS7700, you do not have to worry about the unused capacity of logical volumes.
•Use TS7740 or TS7700T for backups of primary pools, noting that similar considerations apply to copy storage pools. If only one copy pool is used for local backups, that storage pool must not be in the TS7740 or TS7700T, because there is no guarantee that data in the copy storage pools is on separate physical volumes.
If storage pools for local and offsite backups are used, the copy storage pools for local backups can be in the TS7740 or TS7700T. The copy storage pools for offsite backups must use native drives or a TS7740 or TS7700T at the recovery site.
•Use TS7700 in server-to-server configurations for multiple IBM Tivoli Storage Manager server implementations. If you are using an IBM Tivoli Storage Manager server-to-server configuration, the data from your remote IBM Tivoli Storage Manager servers is stored as virtual volumes in the TS7700, which appear as sequential media volumes on the source server and are stored as archive files on a target server. These are ideal candidates for a TS7700.
8.7.1 Native or virtual drives
When only one stand-alone TS7740 or TS7700T is available, you might choose native drives for data that will be used for frequent individual file restores or require high performance for backup and restore without any delays because of staging activity. IBM Tivoli Storage Manager uses the EXPORT function to move data from one IBM Tivoli Storage Manager server to another.
This way requires that both servers have compatible devices for the EXPORT media. Use native drives for IBM Tivoli Storage Manager EXPORT unless you have multiple TS7740 or TS7700T tape drives and can IMPORT/EXPORT between the TS7740 or TS7700T tape drives.
8.7.2 IBM Tivoli Storage Manager parameter settings
The settings for the following parameters can affect the performance of IBM Tivoli Storage Manager with TS7700:
•MAXSCRATCH (storage pool definition). As for DFSMShsm, IBM Tivoli Storage Manager must use a scratch pool for tapes because you do not have to predefine tapes to Tivoli Storage Manager, and you can benefit from the faster TS7700 scratch mounts.
•MOUNTLimit (device class definition). With one TS7700, you have up to 496 virtual drives available. The number of drives available for IBM Tivoli Storage Manager use can probably be increased, considering TS7700 performance. Set the MOUNTLimit high enough so that the number of available drives does not limit the performance of IBM Tivoli Storage Manager tape operations.
•MOUNTRetention (device class definition). When storing data in the TS7700, you can set this parameter to zero because you have a greater chance of finding the virtual volume still in the TVC when IBM Tivoli Storage Manager needs it. This avoids the need to keep the virtual volume mounted and frees a virtual drive for other users.
•MAXCAPacity (device class definition). With this parameter, you can tailor the size of the data that is written in a virtual volume. Having smaller virtual volumes can speed up recall processing. Using the full capacity of the virtual volume can limit the number of volumes that are used by Tivoli Storage Manager.
•Backup DB (database backup). Use SCRATCH=YES to use tapes from the Tivoli Storage Manager scratch pool and benefit from the faster TS7700 scratch mounts.
For more information about setting up Tivoli Storage Manager, see the following web page:
8.8 DFSMSdss
This section describes the uses of DFSMSdss with the TS7700.
8.8.1 Full volume dumps
DFSMSdss full volume dumps can use the TS7700. Ensure that you can achieve the required throughput. A DFSMSdss full volume physical dump can easily provide a data transfer rate of 10 MBps and higher for a single job. However, with today’s TS7700 throughput capabilities, the TS7700 throughput capabilities most likely will not be a limiting factor. In the past, the data rate was often limited by the bandwidth of the DASD subsystem as the weakest part in the chain.
With TS7740 or TS7700T, you fill the stacked cartridge without changing JCL by using multiple virtual volumes. The TS7740 or TS7700T then moves the virtual volumes that are created onto a stacked volume.
The only problem that you might experience when using TS7700 for the data set Services (DSS) volume dumps is related to the size of the virtual volumes. If a single dump does not fit onto five logical volumes, you can use an SMS DATACLAS specification, Volume Count nn, to enable more than five volumes. A better method is to choose a 25000 MiB logical volume through your SMS DATACLAS. This method prevents unneeded multivolume files.
Using the COMPRESS keyword of the DUMP command, you obtain a software compression of the data at the host level. Because data is compressed at the TS7700 before being written into the TVC, host compression is not required unless channel use is high already.
8.8.2 Stand-Alone Services
DFSMSdss Stand-Alone Services provide a stand-alone restore function that enables you to restore vital system packs without needing to rely on an IBM Z environment.
Stand-Alone Services support the 3494 and 3584 (TS3500) tape library and the VTS. You can use it to restore from native and virtual tape volumes in a TS7700. With Stand-Alone Services, you specify the input volumes on the RESTORE command and send the necessary mount requests to the tape library.
You can use an initial program load (IPL) of the Stand-Alone Services core image from a virtual tape device and use it to restore dump data sets from virtual tape volumes.
Stand-Alone Services are provided as a replacement to the previous DFDSS V2.5 and DFSMS V1 stand-alone functions. The installation procedure for Stand-Alone Services retains, rather than replaces, the existing stand-alone restore program so you do not have to immediately change your recovery procedures. Implement the procedures as soon as you can and start using the enhanced Stand-Alone Services.
To use Stand-Alone Services, create a stand-alone core image suitable for IPL by using the new BUILDSA command of DFSMSdss. Create a new virtual tape as non-labeled and then put the stand-alone program on it.
For more information about how to use the TS7700 MI to set a device in stand-alone mode, see “Modify Virtual Volumes window” on page 417.
Complete these steps to use an IPL of the Stand-Alone Services program from a virtual device and restore a dump data set from virtual volumes:
1. Ensure that the virtual devices you will be using are offline to other host systems. Tape drives to be used for stand-alone operations must remain offline to other systems.
2. Set the virtual device from which you will load the Stand-Alone Services program in stand-alone mode by selecting Virtual Drives on the TS7700 MI of the cluster where you want to mount the logical volume.
3. Follow the sequence that is described for stand-alone mount in “Virtual tape drives” on page 400.
4. Load the Stand-Alone Services program from the device you set in stand-alone mode. As part of this process, select the operator console and specify the input device for entering Stand-Alone Services commands.
5. When the IPL is complete, enter the Stand-Alone Services RESTORE command from the specified input device. Example 8-1 shows a group of statements for using this command.
Example 8-1 RESTORE command
RESTORE FROMDEV(TAPE) FROMADDR(0A40) TOADDR(0900) -
NOVERIFY TAPEVOL((L00001),(L00002))
L00001 and L00002 are virtual volumes that contain the dump data set to be restored. 0A40 is the virtual device that is used for reading source volumes L00001 and L00002. And, 0900 is the device address of the DASD target volume to be restored.
Stand-Alone Services request the TS7700 to mount the source volumes in the order in which they are specified on the TAPEVOL parameter. It automatically unloads each volume, then requests the TS7700 to unmount it and to mount the next volume.
6. When the restore is complete, unload and unmount the IPL volume from the virtual device by using the TS7700 MI’s Setup Stand-alone Device window.
7. In the Virtual Drives window that is shown in Figure 9-44 on page 401, click Actions → Unmount logical volume to unload the virtual drive and finish the Stand-alone Mount operation.
Stand-Alone Services send the necessary mount and unmount orders to the library. If you are using another stand-alone restore program that does not support the mounting of library resident volumes, you must set the source device in stand-alone mode and manually instruct the TS7700 to mount the volumes by using the Setup Stand-alone Device window.
For more information about how to use Stand-Alone Services, see the z/OS DFSMSdss Storage Administration, SC23-6868.
8.9 Object access method
Tape cartridges provide a low-cost storage medium for storing primary and backup copies of OAM objects.
Enabling objects to be stored on tape volumes with DASD and optical media provides flexibility and more efficiency within the storage management facility.
OAM stores objects on a TS7700 as they are stored in a normal TS3500 tape library, with up to 496 virtual drives and many virtual volumes available.
When using the TS7740 or TS7700T, consider using the TAPEPERCENTFULL parameter with object tape data because the retrieval time of an OAM object is important. The recall time for smaller logical volumes can be reduced considerably.
The OAM TAPECAPACITY parameter is no longer needed when you use the TS7700 with OAM because OAM now obtains the capacity of the logical volume from the library.
Virtual volumes in a TS7700 can be used to store your object data (OBJECT or OBJECT BACKUP SG data). With the data in cache, the TS7700D (or TS7700T CP0) can be ideal for your primary OBJECT SG needs. Your OBJECT BACKUP SGs can then be in a TS7700 or TS7700T CPx, depending on your recovery needs.
As with DFSMShsm, the Synchronous mode copy option can be used to replicate your data to other clusters in the grid. This replicated copy (and others in the grid) is then managed by the TS7700. The replication capabilities in the grid can be used in addition to any OAM-managed backup copies.
A virtual volume can contain multiple OAM objects. To optimize the use of TS7700 storing OAM object data, consider the following suggestions:
•Review the MOUNTWAITTIME parameter when using TS7740 or TS7700T CPx to store OAM object tape data. The default (5 minutes) probably needs to be increased. Twelve minutes is a better number in case you must recall a logical volume to read object data and there are other recall requests queued at the time. The TS7740 or TS7700T CPx might need to stage the data back into cache, which accounts for the extra mount time.
•Review the MAXTAPERETRIEVETASKS and MAXTAPESTORETASKS parameters when using TS7700 because you have more virtual tape drives available.
•Other parameters, such as DEMOUNTWAITTIME, TAPEPERCENTFULL, and TAPEFULLTHRESHOLD, also might need to be reviewed when using TS7700 to store OAM data.
8.10 Database backups
Using a TS7700 as output confers several advantages to database backups. This section provides a detailed description of these benefits for database products, such as DB2.
8.10.1 DB2 data
DB2 uses tapes for storing archive logs and for storing image copies. Either one can be created in multiple copies to be stored both onsite for local recovery purposes and offsite for disaster recovery purposes. To use DB2 tape data with the TS7700, use the approaches that are described in this section.
Archive logs
DB2 tracks database changes in its active log. The active log uses up to 31 DASD data sets (up to 62 with dual logging) in this way: When a data set becomes full, DB2 switches to the next one and automatically offloads the full active log to an archive log.
Archive logs are sequential data sets that are allocated on either DASD or tape. When archiving to tape, a scratch tape volume is requested each time.
Archive logs contain unique information necessary for DB2 data recovery. Therefore, to ensure DB2 recovery, make backups of archive logs. You can use general backup facilities or the DB2 dual archive logging function.
When creating a Dual Copy of the archive log, usually one is local and the other is for disaster recovery. The local copy can be written to DASD, then moved to tape, by using Tape Mount Management (TMM). The other copy can be written directly to tape and then moved to an offsite location.
With TS7700, you can write the local archive log directly inside the TS7700. Avoiding the use of TMM saves DASD space, saves DFSMShsm CPU cycles, and simplifies the process. The disaster recovery copy can be created by using Copy Export capabilities in the TS7740 and TS7700T, or by using native tape drives, so that it can be moved offsite.
The size of an archive log data set varies from 150 MB to 1 GB. The size of a virtual volume on a TS7700 can be up to 25000 MiB, so be sure that your archive log is directed to a virtual volume that can hold the entire log. Use a single volume when unloading an archive log to tape. The size of a virtual volume on a TS7700 can be up to 75000 MiB, assuming a 3:1 compression ratio.
Tailoring the size and number of active log DASD data sets enables you to obtain an archive log on tape whose size does not exceed the virtual volume size.
Limiting data set size might increase the frequency of offload operations and reduce the amount of active log data on DASD. However, this is not a problem with the TS7700 because it requires no manual operation. Even with the TS7740 (or TS7700T), the archive logs stay in the TVC for some time and are available for fast recovery.
One form of DB2 recovery is backward recovery, typically done after a processing failure, where DB2 backs out uncommitted changes to resources. When doing so, DB2 processes log records in reverse order, from the latest back toward the oldest.
If the application that is being recovered has a large data set and makes only a few commit operations, you probably need to read the old archive logs that are on tape. When archive logs are on tape, DB2 uses read-backward channel commands to read the log records. Read-backward is a slow operation on tape cartridges that are processed on real IBM 3480 (if improved data-recording capability (IDRC) is enabled) and IBM 3490 tape drives.
On a TS7700, it is only about 20% slower than a normal I/O because data is retrieved from the TVC, so the tape drive characteristics are replaced by the random access disk characteristics. Another benefit that TS7700 can provide for DB2 operations is the availability of up to 496 (stand-alone cluster) or 2976 virtual drives (six-cluster grid configuration) because DB2 often needs many drives concurrently to run recovery or backup functions.
Image copies
Image copies are backup copies of table spaces in a DB2 database. DB2 can create both full and incremental image copies. A full image copy contains an image of the whole table space at the time the copy was taken. An incremental image copy contains only those pages of a table space that changed since the last full image copy was taken. Incremental image copies are typically taken daily. Full image copies are typically taken weekly.
DB2 provides the option for multiple image copies. You can create up to four identical image copies of a table space, one pair for local recovery use and one pair for offsite storage.
The size of the table spaces to be copied varies from a few megabytes to several gigabytes. The TS7700 solution is best for small-sized and medium-sized table spaces because you need a higher bandwidth for large table spaces.
When a database is recovered from image copies, a full image copy and the subsequent incremental image copies need to be allocated at the same time. This can potentially tie up many tape drives and, in smaller installations, can prevent other work from being run. With one TS7700 and 496 virtual drives, this is not an issue.
The large number of tape drives is important also for creating DB2 image copies. Having more drives available enables you to run multiple copies concurrently and use the MERGECOPY DB2 utility without effect. An advisable solution is to run a full image copy of the DB2 databases once a week outside the TS7700, and run the incremental image copies daily by using TS7700. The smaller incremental copy fits better with the TS7700 volume sizes.
8.10.2 CICS and IMS
As with DB2, IBM CICS® and IMS use tapes to store logs and image copies of databases.
CICS is only a data communication product. IMS has both the data communication and the database function (IMS-DL/1). CICS uses the same DL/1 database function to store its data.
CICS journals and IMS logs
CICS tracks database changes in its journal data sets. IMS tracks database changes in its online log data sets. After these data sets become full, both CICS and IMS offload the logs to tape.
CICS and IMS logs are sequential data sets. When offloading these logs to tape, you must request a scratch volume every time.
The logs contain the information necessary to recover databases and usually those logs are offloaded, as with DB2, in two copies, one local and one remote. You can write one local copy and then create the second for disaster recovery purposes later, or you can create the two copies in the same job stream.
With TS7700, you can create the local copy directly on TS7700 virtual volumes, and then copy those volumes to non-TS7700 tape drives, or to a remote TS7700.
Having a local copy of the logs that is written inside the TS7700 enables you faster recovery because the data stays in the TVC for some time.
When recovering a database, you can complete back out operations in less time with the TS7700 because when reading logs from tape, IMS uses the slow read backward operation (100 KBps) on real tape drives. With the TS7700, the same operation is much faster because the data is read from TVC.
Lab measurements do not see much difference between read forward and read backward in a TS7700. Both perform much better than on physical drives. The reason is not just that the data is in the TVC, but the TS7700 code also fully buffers the records in the reverse order that they are on the volume when in read backwards mode.
Another benefit TS7700 provides to recovery operations is the availability of up to 496 virtual drives per cluster. This configuration enables you to mount several logs concurrently and to back out the database to be recovered faster.
The IMS change accumulation utility is used to accumulate changes to a group of databases from several IMS logs. This implies the use of many input logs that will be merged into an output accumulation log. With the TS7700, you can use more tape drives for this function.
Image copies
Image copies are backup copies of the IMS databases. IMS can create only full image copies. To create an image copy of a database, use a batch utility to copy one or more databases
to tape.
to tape.
With the TS7700, you do not have to stack multiple small image copies to fill a tape cartridge. Using one virtual volume per database does not waste space because the TS7700 then groups these copies into a stacked volume.
IMS, unlike DB2, has a batch function that works with databases through an IMS batch region. If you do not use logs when running an IMS batch region, you must use an image copy that is taken before running the batch job to recover the database. Otherwise, you can use logs and checkpoints, which enable you to restart from a consistent database image that was taken during the batch execution processing. Using TS7700, you can access these image copies and logs at a higher speed.
The TS7700 volume stacking function is the best solution for every database backup because it is transparent to the application and does not require any JCL procedure change.
8.10.3 Batch data
The following applications write to tape and benefit from using the TS7700:
•VSAM REPRO
•IEBGENER/IEBCOPY/ICETOOL
•DSS data set COPY or DUMP
•DFSMSrmm Tape Copy Tool (an IBM service offering)
•IBM Tivoli Tape Optimizer
•Any other tape copy utility
The amount of data from these applications can be huge if your environment does not use TMM or if you do not have DFSMShsm installed. All of this data benefits from using the TS7700 for output.
With TS7700, the application can write one file per volume, by using only part of the volume capacity. The TS7740 or TS7700T takes care of completely filling the stacked cartridge for you, without JCL changes.
The only step that you must remember is that if you need to move the data offsite, you must address a device outside the local TS7700, or use other techniques to copy TS7700 data onto other movable tapes, as described in 8.4, “Moving data out of the TS7700” on page 319.
..................Content has been hidden....................
You can't read the all page of ebook, please click here login for view all page.