


Installing the 2017 Sysplex Extensions
|
Important: This chapter is not intended as an introduction to z/OS sysplex concepts or operation. It assumes that readers understand the basic concepts and terminology that are involved with z/OS sysplex use. For more information about Parallel Sysplex, see Chapter 1, “Introduction” on page 1.
|
This chapter describes the installation of the zPDT 2017 Sysplex Extensions package, which you can download from the IBM Redbooks site.
For more information about downloading the additional material for this book, see Appendix E, “Additional material” on page 153.
This document provides step-by-step instructions to help you use the package to turn your single-system ADCD into a Parallel Sysplex.1
This chapter includes the following topics:
4.1 Implementing a sysplex under zPDT
|
Important: This chapter is based on the May 2017 ADCD z/OS 2.2 system. If your base is an older ADCD release, use zPDT 2016 Sysplex Extensions, SG24-8315, rather than this book.
|
Having described in Chapter 3, “Sysplex configurations” on page 17 the reasons why you might want to use a sysplex under zPDT and several of the benefits of sysplex, this chapter helps you combine your ADCD monoplex system with the 2017 Sysplex Extensions package to create your multi-system Parallel Sysplex.
The following target configurations are supported:
•A Parallel Sysplex that is running under IBM z/VM
•A base sysplex that is running under z/VM
•A base sysplex that is running “native” under z/PDT, spread over two PCs
It is assumed that most people who are interested in running a sysplex under zPDT want a Parallel Sysplex. Therefore, the primary installation path covers all of the required steps to turn your ADCD monoplex system into a two-way Parallel Sysplex.
However, that path also includes most of the steps that are required for a base sysplex. Therefore, all users who are interested in any form of sysplex under zPDT should follow the installation steps that are described in 4.2, “Implementation overview” on page 36 and 4.3, “Set up steps for Parallel Sysplex” on page 40.
If your objective is to have a base sysplex, complete the steps that are described in 4.5, “Additional steps to create a base sysplex under z/VM” on page 77, or in 4.6, “Implementing a base sysplex without z/VM” on page 79, as appropriate.
4.2 Implementation overview
One of the objectives of this package is to make its installation as easy as possible while also delivering significant sysplex-unique functions. It is not intended as a vehicle to help you learn how to set up a sysplex. Rather, it is intended as a tool to help you create a data sharing Parallel Sysplex environment quickly and with as little specialist knowledge as possible. The intent is also to make it easy for you to easily switch back to a standard ADCD environment if you need to.
Therefore, the package is as self-contained as possible and minimizes the number of changes you must make to your existing ADCD environment to get this sysplex up and running. This approach also contributes to the objective of making it easier to revert to a standard ADCD monoplex environment.
|
Note: For more information about zPDT and ADCD, see IBM zPDT Guide and Reference, SG24-8205.
Review and become familiar with the contents of that book before you start the implementation of the 2017 Sysplex Extensions. It contains a wealth of information that will prove valuable when customizing and fine-tuning the environment to your specific requirements.
|
Before you start the installation, an overview of the start-to-end process is valuable. The implementation steps are summarized in this section. For more information about each step, see 4.3, “Set up steps for Parallel Sysplex” on page 40. Unless otherwise noted, all of the new PDS members that are described are created in USER.Z22D.PARMLIB, USER.Z22D.PROCLIB, and so forth.
|
Installation checklist: An installation checklist is provided in Table 4-4 on page 75. You can use the checklist to track your progress through the implementation steps. It is also helpful in ensuring that you do not miss any steps. You might want to print that table now so that you can keep notes on it as you go along.
|
The following list is a summary of the tasks needed to install the 2017 Sysplex Extensions:
1. Install the base ADCD z/OS system.
You must be familiar with the operation of a z/OS system before you move to a sysplex configuration. If you do not have an ADCD system up and running, you must implement a standard ADCD monoplex system.
|
Note: This chapter covers the basic z/OS sysplex environment only. The implementation of the DB2 data sharing group is described in Chapter 5, “Sample DB2 data sharing environment” on page 97. The CICSplex environment implementation is described in Chapter 6, “Sample CICSplex” on page 105.
|
2. Install z/VM if your objective is to create a Parallel Sysplex or a base sysplex that is running under z/VM. To gain some experience with running z/OS under z/VM, you can run your z/OS system under z/VM before moving to sysplex mode.
3. Download the volumes that are provided as part of the zPDT 2017 Sysplex Extensions package from the IBM Redbooks site.
Table 4-1 lists the volume serial numbers, the virtual addresses that are used for them, and a brief description of the contents of each volume.
Table 4-1 Volumes that are delivered by the zPDT 2017 Sysplex Extensions package
|
VOLSER
|
Device Number
|
Use
|
|
CF0001
|
A9E
|
Couple data sets (CDSs) for base and Parallel Sysplex.
PDSs containing sample JCL, Parmlib, Proclib, and other required data sets.
|
|
D2PAGX
D2PAGY
D2PAGZ
|
AB8
AB9
ABA
|
Local, COMMON, and PLPA page data sets for the second z/OS system.
|
|
D2SYS2
|
ABB
|
System-specific data sets for the S0W2 system.
|
|
CICS01
|
AB5
|
SMS-managed volume containing data sets required by the CICSplex subsystems that are provided by this package.
|
|
DB2001
|
AB6
|
SMS-managed volume containing the data sets required by the DB2 data sharing group that is provided by this package.
|
|
WORK01
|
AB7
|
Work volume.
|
|
Note: Appendix A, “Sample definitions” on page 113 contains a complete list of the volumes that are used in the example sysplex and the device number used for each one. Additionally, Table A-1 on page 124 contains a list of all the device numbers and device types defined in the ADCD-provided IODF.
|
The D2PAGX/Y/Z, D2SYS2, and WORK01 volumes are provided as empty volumes. In later steps, the relevant data sets will be allocated on those volumes.
|
Tip: If you experience PGT004 wait states in z/VM, it might be that you need more z/VM paging volumes. For information to help you add the new paging volumes to z/VM, see IBM Knowledge Center.
In our testing, we encountered HCPPGT400I and HCPPGT401I messages on the VM OPERATOR console when we started all of the CICS address spaces on both systems. These messages are precursors to z/VM wait states that are caused by lack of paging space.
|
4. Before you change your working system, it is a good idea to create a known restart point. For more information about creating that point, see 4.3.4, “Establishing a known restart point” on page 43.
5. After you download and extract the 2017 Sysplex Extensions volumes, update your zPDT device map (devmap) file to add the new DASD volumes.
You can add commands to your devmap file to start more x3270 sessions automatically. Because you are running z/VM and another z/OS instance, it is likely that you will need more 3270 sessions than you have now.
You must also set up the Open Systems Adapter (OSA) definitions that will be used to communicate between the z/OS guests and Linux, and between the z/OS guests and the rest of your network.
6. The Parallel Sysplex environment provided with this package uses two z/OS virtual machines, called S0W1 and S0W2, and two coupling facility virtual machines, called CFCC1 and CFCC2. All of these virtual machines are included in the VM directory that is provided with the ADCD z/VM package. A small change to the VM directory might be required to identify the volumes that contain the CDSs.
7. Most of the data sets on the volumes that you download are cataloged in user catalogs. To make those catalogs and the data sets that they reference available to your systems (in monoplex mode and when running in sysplex mode), IMPORT CONNECT the new user catalogs and create ALIASes for those catalogs.2
8. Create the system-specific system data sets for system S0W2, such as paging, virtual I/O (VIO), System Management Facilities (SMF), and LOGREC.
9. Clone zFS system-specific file systems for the second (S0W2) system.
10. Create trace and output message data sets for zFS.
11. Starting with z/OS 2.1, the z/OS Health Checker is started automatically. It also uses a data set to carry information from one IPL forward to the next. In this step, allocate the S0W2 copy of that data set to avoid a JCL ERROR when the Health Checker is started on S0W2.
12. The 2017 Sysplex Extensions package provides a new set of CDSs to be used in place of the CDSs that are provided by the standard ADCD deliverable. Although CDSs that are not cataloged in the Master catalog can be used, this option is not the preferred option. In this step, you recatalog the 2017 Sysplex Extensions-provided CDSs in your Master catalog. Also, recatalog the VSAM RLS Share Control Data Sets in this step.
13. The ADCD-provided SMS configuration needs to be updated to add these items:
– The name of the second system and the sysplex name.
– A cache set and a cache structure for VSAM RLS.
– A lock set and second lock structure for VSAM RLS.
– Two data classes for system logger (LOGR) data sets, plus one for DB2.
– A new storage class for CICS and DB2 runtime data sets (logs, journals, and so on) and a new storage class for the VSAM data sets that will be accessed in RLS mode.
– New storage groups for the CICS and DB2 volumes.
In addition to the changes to the SMS configuration, you also must update the ACS routines to assign the appropriate SMS objects to each data set.
In this step, we use NaviQuest in a batch job to make as many of the changes as possible.
14. The JES2 parameters must be altered to define a Multi-Access Spool (MAS) system with two members (S0W1 and S0W2).
|
Tip: In this step, you update the JES2PARM member that is used by your driving system. Therefore, you must be especially careful not to create any syntax errors that would stop your current system from starting.
|
15. To provide flexibility to switch back and forth between sysplex mode and monoplex mode, an attempt was made to isolate all Parmlib changes to a new set of members in USER.Z22D.PARMLIB, rather than changing any of the members in the ADCD.xxxx.PARMLIB or SYS1.PARMLIB data sets. In this step, you copy the 2017 Sysplex Extensions-provided Parmlib members to USER.Z22D.PARMLIB or to SYS1.IPLPARM (in the case of the LOADxx member). In general, there is only one new member for each type. In cases where different values were required, this package uses the following suffixes:
BS Base sysplex under z/VM
PS Parallel Sysplex under z/VM
ST Base sysplex spread across two or more PCs
16. Create PROCLIB members for SHUTSYS, VTAMPS, TCP/IP, and TFSPROC.
17. Copy and customize TCPPARMS members as described in 4.3.19, “Creating TCPPARMS” on page 69.
18. Create VTAMLST members for ATCCONPS, ATCSTRPS, and OSATRLx.
19. Complete the IPL process for the first member of your new sysplex (S0W1).
20. Submit jobs to define the log streams for LOGREC, OPERLOG, Health Checker, Resource Recovery Services (RRS), and SMF.
21. Create a mount point in the UNIX file system for the system-unique files for system S0W2.
22. Complete the IPL process for the second member of your new sysplex.
Complete the following additional steps if your objective is to have a base sysplex environment that is running under z/VM:
1. Because a base sysplex does not have a coupling facility (CF), it uses channel-to-channel (CTC) for inter-system cross-system coupling facility (XCF) communication. For ease of operation, define the CTCs in the VM directory.
2. Another aspect that is related to the lack of a CF is global resource serialization (GRS). Because there is no CF, GRS must run in Ring mode rather than Star mode. The IEASYSxx member must be updated to reflect this different mode.
3. When RRS is running in a Parallel Sysplex, all of the RRSs in the sysplex normally are in the same RRS group, meaning that they all share a set of log streams. In a base sysplex, it is not possible to share log streams across systems. Therefore, the Start command for RRS must be changed to specify a different RRS group name for each system.
For a base sysplex that spans more than one PC, the following steps are required (in addition to those steps for a base sysplex running under z/VM):
1. Create a Linux shared file environment.
2. Create a second zPDT system (on another PC) with basic Linux and zPDT.
3. Create a devmap that points to the shared files on the “first” Linux system for all of the 3390 volumes.
4. Add CTC definitions to the devmaps on both systems.
5. Add STP definitions to the devmaps on both systems.
6. Remember to start the zPDT STP function on each Linux system before starting zPDT. zPDT fails if the devmap includes STP definitions and the STP function is not running when zPDT is started.
4.3 Set up steps for Parallel Sysplex
This section provides detailed descriptions of the steps that are required to use the 2017 Sysplex Extensions to create a Parallel Sysplex or a base sysplex. Most of the steps are common to both types of sysplexes (when run under z/VM). A few extra steps are required to enable the base sysplex under z/VM. Those steps are described in 4.5, “Additional steps to create a base sysplex under z/VM” on page 77.
4.3.1 Installing the base ADCD system
The information presented here assumes that you are familiar with ADCD and likely have an ADCD-based z/OS system running in monoplex mode. If you do not, create one by using the standard ADCD documentation.
|
Note: All the documentation and samples provided in this edition of SG24-8386 are based on the May 2017 version of the ADCD z/OS 2.2 deliverable. Ensure that you are using that version before proceeding with the steps described in this book.
|
You also should be familiar with the operation and configuration of that system before extending it to a sysplex (by using this package).
To answer zPDT questions that might arise during the installation, use the IBM zPDT Guide and Reference, SG24-8205.
|
Available resources: If you encounter problems and cannot resolve them using the information in the resources listed here, contact the zPDT forum for help in determining the nature of the issue.
The forum is a simple discussion group that is supported on a best efforts basis. It is intended for discussions about zPDT itself and ADCD questions. It is not intended as a vehicle for more complex “how to” issues related to IBM Z operating systems and software products.
|
This package uses the ADCD May 2017 z/OS 2.2 release as the base. We downloaded the following subset of the ADCD-provided volumes:
•D2RES1
•D2RES2
•D2SYS1
•D2USS1
•D2USS2
•D2PAGA
•D2PAGB
•D2PAGC
•D2PRD1
•D2PRD2
•D2PRD3
•D2CFG1
•D2C521
•D2DBB1
•D2DBB2
These volumes provide z/OS and the common products, such as compilers.3 Install the single-pack z/OS system (volume SARES1). This system can prove invaluable if you make a mistake and end up with a system that does not complete the IPL process.
Also, if you expect to need to install service on z/OS, restore the two DLIB volumes (D2DIS1 and D2DIS2). We also installed the volumes that are used by CICS V5.2 (D2C521) and DB2 V11 (D2DBB1 and D2DBB2). However, these volumes are not strictly necessary unless you want to use the associated subsystems.
For more information about all of the volumes that are provided by the ADCD deliverable, see the standard ADCD documentation.
4.3.2 Installing z/VM
If your target environment is to run your sysplex under z/VM (it can be a base or a Parallel Sysplex), install the ADCD z/VM package now.
For our Parallel Sysplex, we used the ADCD z/VM 6.4 release.4 We downloaded the following volumes:
•640RL1
•M01RES
•M01P01
•M01S01
•M01W01
•VMCOM1
Ensure that you update your devmap file with the statements for the z/VM volumes. You can find a sample devmap file on the download site where you obtain the ADCD z/VM volumes. However, to save you time, we used the following statements (for simplicity, you should also use these device numbers):
device 0200 3390 3990 M01RES
device 0201 3390 3990 VMCOM1
device 0202 3390 3990 M01W01
device 0203 3390 3990 M01S01
device 0204 3390 3990 M01P01
device 0205 3390 3990 640RL1
For more information about the use and maintenance of the z/VM system, see the z/VM product documentation.
For information about getting z/VM up and running under zPDT, see the chapter called “Other System z Operating Systems” in IBM zPDT Guide and Reference, SG24-8205.
The following process can be used to load z/VM under zPDT. You can start VM now to get some experience with it if you want, but you must shut it down again to complete some of the later steps in this process.
1. Issue the zPDT LOADPARM 0700 command to define 3270 device 700 as the VM IPL console.
2. Issue the zPDT IPL 0200 command to IPL z/VM. 200 as the device number of the M01RES volume.
3. On the x3270 session that corresponds to device 700, specify the device number of the VMCOM1 volume on the PDVOL parameter on the z/VM IPL panel. The sample devmap statements provided with this package assign device number 201 to the VMCOM1 volume. Then, press PF10 to proceed with loading z/VM.
You do not need to be a z/VM expert to use it to host your sysplex. However, you must be familiar with the following tasks:
•Loading and shutting down z/VM under zPDT
•Logging on and off virtual machines
•Autologging the CF virtual machines
•Updating the VM directory and using the DIRECTXA command to activate the updated directory
•DIALing to a virtual 3270 device so that you can log on to z/OS applications, such as TSO or CICS
If you are not familiar with z/VM, install z/VM and run your ADCD z/OS system in monoplex mode under z/VM. This approach allows you to get experience using z/VM without the added complexity of running multiple z/OS guests. This experience is valuable later when you are ready to move to a Parallel Sysplex environment.5
4.3.3 Downloading and creating volumes
Now that z/VM is installed and you are familiar with the mechanics of running z/OS under z/VM, the next step is to download the volumes that are provided by the 2017 Sysplex Extensions.
The zPDT 2017 Sysplex Extensions uses the following volumes:
CF0001 This volume contains CDSs, sample JCL, and sample definitions.
CICS01 This volume contains the user catalog and data sets for the CICSplex regions as well as the data sets for the PSTE sample CICS application.
DB2001 This volume contains the data sets for the DB2 data sharing subsystems.
D2PAGX This starts as an empty volume. It will contain page data sets for the second z/OS system (S0W2).
D2PAGY This empty volume will contain page data sets for the second z/OS system.
D2PAGZ This empty volume will contain page data sets for the second z/OS system.
D2SYS2 This empty volume will contain system and work data sets that are used by the second z/OS system.
WORK01 This volume also starts as an empty volume. It is used to contain work data sets only and is mounted as a STORAGE volume in the VATLSTPS member.
CF0001 is defined as a 3390-1. To maintain consistency with the ADCD strategy of using 3390-9s for all the volumes they provide, all the remaining volumes that are provided by the package are 3390-9s.
All volumes are provided in a single .gz file called Syspext_8386-01_tar.gz, which is created using the Linux tar command. The volumes can be downloaded from this website. Download the .gz file into the directory that contains your ADCD z/OS files. The .gz file requires 142 MB of disk space, and the extracted files require 57 GB of disk space.
After the download completes, use the following command to extract the Sysplex Extension volume files:
tar -xzvf Syspext_8386-01_tar.gz
You now have the eight volumes that are provided by this package.
4.3.4 Establishing a known restart point
When you have a working z/OS system running under z/VM and before you change z/VM or z/OS to add sysplex support, create a clean restart point that you can fall back to if your changes result in a system that does not initialize successfully.
One way to create this restart point is to ensure that the zPDT environment (z/OS and z/VM) is stopped and then to take a copy of the Linux files that contain the z/VM and z/OS volumes. If there are problems, you can then restore those volumes.
An alternative method is to use the disk versioning support that is provided by zPDT. This support is an attractive option if you expect to be performing repetitive testing and want to repeatedly return to a known restart point. For more information about this capability, see the chapter “CKD versioning” in IBM zPDT Guide and Reference, SG24-8205.
To help you get started with the disk versioning function, a basic Linux script is included to enable versioning support for the z/OS and z/VM disks. The script is shown in “zPDT Disk versioning sample script” on page 128. You can customize this script to include more volumes (your own z/OS volumes, for example), or you can create a corresponding script to accept the outstanding changes and create a new restart point or to discard the changes and return to your known restart point. The z/OS and z/VM systems must be shut down at the time these scripts are run.
If you do not want to back up all of your volumes, at a minimum you need to create a backup of the following data sets:
•ADCD.Z22D.PARMLIB (or the corresponding data set for your level of ADCD)
•USER.Z22D.PARMLIB
•USER.Z22D.PROCLIB
•USER.Z22D.TCPPARMS
•USER.Z22D.VTAMLST
|
System restart: Your z/VM and z/OS system likely is down at this point. Therefore, make a note to run this job after you restart your z/OS system.
|
Apart from providing the ability to back out any changes, having a “before” copy of the data sets that you are changing helps you to more easily visualize the differences between the system that you started with (the ADCD monoplex) and the sysplex with which you end up.
Finally, backups are like umbrellas, in that you likely need a backup only when you do not have one. Therefore, taking a few minutes to create a backup now is a good investment of your time. To make it even easier, you can use the JCL that is shown in Example 4-1. The only required changes to this example should be to replace the high-level qualifier (HLQ) of the output data sets with the HLQ that you want to use for those data sets.
Example 4-1 Sample JCL to back up key ADCD-provided system data sets
//BACKUP JOB CLASS=A,MSGCLASS=X,NOTIFY=&SYSUID
//BACKUP EXEC PGM=IEBCOPY
//SYSPRINT DD SYSOUT=*
//SYSUT3 DD UNIT=SYSDA,SPACE=(3120,(20,10))
//SYSUT4 DD UNIT=SYSDA,SPACE=(3120,(20,10))
//*
//IN1 DD DISP=SHR,DSN=ADCD.Z22D.PARMLIB
//OT1 DD DISP=(NEW,CATLG),DSN=userid.Z22D.PARMLIB.BKUP,
// UNIT=SYSDA,
// LIKE=ADCD.Z22D.PARMLIB
//IN2 DD DISP=SHR,DSN=USER.Z22D.PARMLIB
//OT2 DD DISP=(NEW,CATLG),DSN=userid.USER.Z22D.PARMLIB.BKUP,
// UNIT=SYSDA,
// LIKE=USER.Z22D.PARMLIB
//IN3 DD DISP=SHR,DSN=USER.Z22D.PROCLIB
//OT3 DD DISP=(NEW,CATLG),DSN=userid.USER.Z22D.PROCLIB.BKUP,
// UNIT=SYSDA,
// LIKE=USER.Z22D.PROCLIB
//IN4 DD DISP=SHR,DSN=USER.Z22D.TCPPARMS
//OT4 DD DISP=(NEW,CATLG),DSN=userid.USER.Z22D.TCPPARMS.BKUP,
// UNIT=SYSDA,
// LIKE=USER.Z22D.TCPPARMS
//IN5 DD DISP=SHR,DSN=USER.Z22D.VTAMLST
//OT5 DD DISP=(NEW,CATLG),DSN=userid.USER.Z22D.VTAMLST.BKUP,
// UNIT=SYSDA,
// LIKE=USER.Z22D.VTAMLST
//*
//SYSIN DD *
COPY INDD=IN1,OUTDD=OT1
COPY INDD=IN2,OUTDD=OT2
COPY INDD=IN3,OUTDD=OT3
COPY INDD=IN4,OUTDD=OT4
COPY INDD=IN5,OUTDD=OT5
/*
Ensure that the job ends with return code 0 before you make changes to these data sets.
Starting over
If you find yourself in a position where you want to go back to the beginning and start the installation of the 2017 Sysplex Extensions over again, delete (or rename) all of the following volumes. Then, run the tar -xvzf command against the downloaded .gz file again to re-create the following volumes:
•CF0001
•CICS01
•DB2001
•D2PAGX
•D2PAGY
•D2PAGZ
•D2SYS2
•WORK01
4.3.5 Updating the devmap file to add new volumes
Before any volume can be used by a system that is running under zPDT, the device and the associated Linux file must be defined in the devmap file. This requirement means that you must update your devmap file by adding the new volumes to your definitions.
z/VM automatically generates a virtual device for any device that you define in the devmap file. However, on the z/OS side, you must make sure that the device numbers that you use are defined in the input/output definition file (IODF). (For more information about the devices and associated device numbers that are defined in the ADCD-provided IODF, see Table A-1 on page 124.)
You can use the following devmap statements as examples to help you add the new volumes to your devmap. All of the following addresses are defined as 3390 disks in the ADCD z/OS IODF file:
device 0a9e 3390 3990 CF0001
device 0ab5 3390 3990 CICS01
device 0ab6 3390 3990 DB2001
device 0ab7 3390 3990 WORK01
device 0ab8 3390 3990 D2PAGX
device 0ab9 3390 3990 D2PAGY
device 0aba 3390 3990 D2PAGZ
device 0abb 3390 3990 D2SYS2
The last value in each line is the Linux file name for the respective volume. If your devmap file includes a directory list in the file name (for example, frank/z/D2RES1), you must adjust the device statements accordingly.
When you are updating the devmap, take a note of the device number that you assign to the new volumes. You can enter the file information in Table 4-2. The devmap file points only to a Linux file. The file name does not necessarily have to match the VOLSER of the volume contained in the file. However, it is strongly preferred that the name of the Linux file matches the VOLSER of the z/OS or z/VM volume that is in that file. For example, the Linux file D2SYS2 should contain the z/OS volume that is called D2SYS2. Failing to use this naming convention can lead to confusion and much wasted time later on.
Table 4-2 zPDT 2017 Sysplex Extensions volumes
|
z/OS VOLSER
|
Linux file name
|
Device number
|
Notes
|
|
CF0001
|
|
|
|
|
CICS01
|
|
|
|
|
DB2001
|
|
|
|
|
D2PAGX
|
|
|
|
|
D2PAGY
|
|
|
|
|
D2PAGZ
|
|
|
|
|
D2SYS2
|
|
|
|
|
WORK01
|
|
|
|
While you are updating the devmap file to add the new volumes, take the opportunity to add some commands to the devmap file to start some x3270 sessions automatically. When you are running z/OS under z/VM, you are likely to need the following x3270 sessions:
•One session for the z/VM console (OPERATOR normally is logged on that session)
•One session for each z/OS system console
•Two sessions with which you can log on to TSO without requiring TCP access
•Two sessions for logging on to various z/VM virtual machines
To support these sessions, consider adding the following statements after the processors statement in the [system] section of the devmap file:
command 2 x3270 localhost:3270
command 2 x3270 localhost:3270
command 2 x3270 localhost:3270
command 2 x3270 localhost:3270
command 2 x3270 localhost:3270
command 2 x3270 localhost:3270
command 2 x3270 localhost:3270
You also must update the devmap file to add the definitions of the Open Systems Adapter (OSA) devices to connect your systems to the network. For more information about using the statements, see 4.3.17, “Network definitions” on page 65. For now, add the following definitions:
[manager]
name awsosa 0023 --path=A0 --pathtype=OSD --tunnel_intf=y
device 400 osa osa
device 401 osa osa
device 402 osa osa
device 408 osa osa
device 409 osa osa
device 40A osa osa
[manager]
name awsosa 0024 --path=f0 --pathtype=OSD
device 404 osa osa
device 405 osa osa
device 406 osa osa
device 40C osa osa
device 40D osa osa
device 40E osa osa
|
Note: The device numbers and the distinction between which devices are used for a tunnel to the underlying Linux system are important. The values that are used here match the values in the default ADCD-provided VM directory. Those values in turn match the values in the VTAMLST and TCPPARMS members. Unless you are experienced with VTAM and TCP, use these values exactly as they are provided here.
The exception is the value on the path= parameter, which must be tailored to match the value from your PC. For more information, see 4.3.17, “Network definitions” on page 65.
|
If your z/OS system is running, shut it down after you apply the changes to the devmap file. Then, run the awsstop command, followed by the awsstart command to load the new devmap file information. Devices that are not defined in the devmap file at the time the awsstart command is issued cannot be added dynamically. Therefore, you must stop and restart zPDT to make them known to zPDT.
When the new devmap file is loaded successfully by using the awsstart command, the next step is to complete an IPL for z/VM. The VM IPL address is 0200 and the console address (which is specified on the loadparm) should be 0700. The console is written to quickly, but you might need to minimize some of the other x3270 windows to see the VM console.
When z/VM completes the IPL, verify that the device numbers that you assigned to your new volumes are known to the system. In z/VM, you can issue the Q nnnn command where nnnn is the device number that you used in the devmap file. The volumes that were delivered by the zPDT 2017 Sysplex Extensions should be online. The output from the Q command displays something that is similar to DASD 0A9E CF0001, where 0A9E is the device number, and CF0001 is the VOLSER of the volume that is mounted on that device.
4.3.6 Configuring z/VM guests
The Parallel Sysplex requires four virtual machines (also known as guests):
•Two coupling facility virtual machines, called CFCC1 and CFCC2
•Two z/OS virtual machines, called S0W1 and S0W2
If you want to run the ADCD system as a monoplex under VM, use a virtual machine called BASEAD. The z/VM 6.4 ADCD package includes the definitions for all these virtual machines in the supplied VM directory. The source for the ADCD-supplied directory is stored in the USER DIRECT C file on the MAINT user ID. The initial password for these user IDs matches the user IDs.
|
Important: The BASEAD guest should not be used at the same time as the S0W1 or S0W2 guests.
|
To make it easier to share the disks between multiple guests and to add guests if you need a sysplex with more than two members, all of the z/OS disks are defined as belonging to a virtual machine called MVSDUMMY. The S0W1, S0W2, and BASEAD user IDs are all defined to link to the MVSDUMMY-owned disks. The VM directory statements that we used for these four IDs are described in “Sample z/VM Directory entries” on page 116.
The sample definitions contain more DASD (MDISK and LINK) statements than you need for the basic ADCD systems. This configuration is used to make it easier to add volumes to your systems in the future.
If you place the CF0001 volume on a device number other than A9E, you need to make a small change to the ADCD VM Directory. The WRKALLEG option after an MDISK statement controls how z/VM segments channel programs. If you specify WRKALLEG for a device, z/VM does not segment channel programs for that device. This configuration ensures that any working allegiance is not severed by z/VM ending the channel program “early.” Any program that performs atomic I/Os needs working allegiance. In general, it should be allowed to default to OFF because OFF allows z/VM to better manage channel programs from guests. However, the WRKALLEG option must be present for any volumes that contain CDSs.
If you plan to use the System-Managed CF structure duplexing function, you need to define links between the two coupling facility virtual machines. Add the following line to the entries for the CFCC1 and CFCC2 user IDs, immediately after the CONSOLE statements:
SPECIAL MSGP 1600 targid
where targid is the name of the CF that you want to connect to. So, for example, when you add this line to the CFCC1 entry, you would specify SPECIAL 1600 MSGP CFCC2.
After you make any required changes to the directory entries, close the file and run the DIRECTXA USER DIRECT C command. Running this command updates the VM directory from your source file. You must perform this update before you log on to the z/OS virtual machines.
4.3.7 Completing the IPL for the z/OS driver system
The next step is to start the z/OS system that will be used to perform most of the remaining customization steps.
Log on to the BASEAD user ID on z/VM (make sure that the S0W1 system is not up when you log on to BASEAD). When you do, you see many DASD 0Axx offline messages. Those messages probably relate to the spare devices referred to in 4.3.6, “Configuring z/VM guests” on page 47, so they can be ignored.
Now complete the IPL for z/OS by issuing the following commands:
TERM CONMODE 3270
IPL A80 LOADP 0A8200M1
Your system will start in monoplex mode and uses the x3270 session in which you entered the commands as the z/OS console.
The next step is to log on to TSO using the IBMUSER or ADCDMST user IDs. To get to the z/OS TSO logon window, enter the DIAL BASEAD command in the COMMAND area of any of the available VM screens.
4.3.8 Importing user catalogs
Most of the data sets that are provided by the zPDT 2017 Sysplex Extensions are cataloged in user catalogs on the 2017 Sysplex Extensions-provided volumes. To make those user catalogs and the data sets they reference available to your system, run an IDCAMS IMPORT CONNECT to make them known to your existing Master catalog.
|
Note: The 2017 Sysplex Extensions assumes that you use the same Master catalog for the Parallel Sysplex, base sysplex, and your monoplex configurations. Having separate Master catalogs complicates matters and provides no additional benefit.
|
Job IMPCONN in data set SYSPLEX.PARALLEL.CNTL on the CF0001 volume performs the IMPORT CONNECTs and defines the related aliases for you.
Submit the IMPCONN job now and verify that it ends with return code 0.
4.3.9 Creating system-specific system data sets
Several system data sets cannot be shared between systems. In this step, you allocate those data sets for the S0W2 system. Figure 4-1 shows the contents of the D2PAGA/B/C/X/Y/Z and the D2SYS1 and D2SYS2 volumes at the start of this step.

Figure 4-1 System volumes and system data sets
Figure 4-2 shows the contents of those volumes after you complete this step. You see that there are data sets for the S0W1 and S0W2 systems when running in sysplex mode. The same S0W1 data sets can also be used when running in monoplex mode.

Figure 4-2 System volumes and system data sets
Data set SYSPLEX.PARALLEL.CNTL (you can access it by using the normal catalog search order after you run the IMPCONN job) contains a job called DEFPAGE to define the Paging, VIO, SMF, and LOGREC data sets for system S0W2. The page data sets are allocated on the D2PAGX/Y/Z volumes. The other data sets are allocated on the D2SYS2 volume. All of these data sets are cataloged in the Master catalog.
Submit the DEFPAGE job now. This job formats all of the page data sets. It might appear that nothing is occurring, but be patient. On our system, it took nearly 10 minutes and then ended with a return code 0. Also, you might see various messages related to I/O delays while the new page data sets are being formatted. These messages can include Missing Interrupts, “waiting to access JES2 chkpt”, and possibly similar messages on the z/VM console. These messages are caused by the high level of disk write activity caused by the DEFPAGE job. You can ignore these messages, and they should stop when the DEFPAGE job completes.
The IEASYSxx and IEASYMxx Parmlib members that are provided with this package support any number of systems if you use the same naming convention for your system-specific data sets that are used by the DEFPAGE job.
4.3.10 Creating zFS file systems for system S0W2
A subset of the zFS data sets is system-specific. The 2017 Sysplex Extensions package provides a job called OMVSCLON in SYSPLEX.PARALLEL.CNTL to create a copy of these data sets for system S0W2 and place them on volume D2SYS2.
|
Note: The names of many of the zFS data sets provided with the May 2017 ADCD release were changed to make them much better suited to a sysplex environment, while also being perfect for a single-system environment. This change will mean making a one-time change to any processes you have to mount or unmount files. However, ongoing management and use of those files should be much easier as a result of the changes.
|
This new naming convention allows you to have a single BPXPRMxx member that uses system symbols to specify the correct files for each system. Additionally, the file names indicate how the file is being used by simply looking at the data set name.
The OMVSCLON job allocates and formats a system root data set for the S0W2 system. It then uses DFSMSdss to create a second copy of the system-specific zFS files. Submit the OMVSCLON job now.
4.3.11 Creating data sets for zFS started tasks
The zFS started tasks use two data sets each to record information about their activity (messages and trace activity). Submit the ZFSLOGS job in SYSPLEX.PARALLEL.CNTL now to create those data sets.
4.3.12 Creating Health Checker persistent data file for S0W2
The z/OS Health Checker persistent data file (called HZSPDATA) provides the Health Checker with the ability to carry information over from one IPL to the next. This capability is powerful because the Health Checker can identify changes that were introduced by the IPL that you might otherwise be unaware of.
The ADCD system includes a data set called ADCD.S0W1.HZSPDATA that is used by the Health Checker started task on system S0W1. This step allocates a corresponding data set for the S0W2 system. If you do not run this step, Health Checker fails with a JCL error on system S0W2.
Submit the HZSALLCP job in SYSPLEX.PARALLEL.CNTL to allocate the ADCD.S0W2.HZSPDATA data set.
4.3.13 Recataloging Master catalog data sets
A few data sets (the new 2017 Sysplex Extensions-supplied CDSs and the VSAM RLS SHCDS data sets) are provided on the 2017 Sysplex Extensions-supplied CF0001 volume and must be cataloged in the Master catalog. Job RECATLG in SYSPLEX.PARALLEL.CNTL contains the IDCAMS statements to add those data sets to your Master catalog.
The sysplex CDS data sets have a high-level qualifier of PARALLEL. Ensure that an alias of PARALLEL is not already defined in your Master catalog. Then, submit the RECATLG job and ensure that it completes with return code 0.
4.3.14 Making the necessary SMS changes
There are an increasing number of cases where software products require that data sets are placed on SMS-managed volumes. For this package, some of the DB2 data sets must be SMS-managed. The VSAM RLS data sets also must be SMS-managed. In addition, for ease of management and to make them self-contained, the entire CICSplex environment is packaged on an SMS-managed volume (CICS01).
As a result, multiple changes to the standard ADCD SMS configuration are needed. You already have an SMS SCDS and ACDS (they are provided by ADCD) and might have made changes to them. For that reason, replacement SMS control data sets are not included because their use would regress your changes. Also, there is no mechanism to merge two sets of SMS control data sets.
However, NaviQuest was used to update the SMS configuration using batch jobs. The jobs are packaged so that each job submits the subsequent job, meaning that you need to submit only the first job in the sequence.
The following jobs are provided in the SYSPLEX.PARALLEL.CNTL data set:
SMS0 Allocates an ISPF table data set that is used by all the subsequent jobs.
SMS01 Changes the share options of the ADCD-supplied SMS control data sets to 3,3 to support cross-system sharing.
SMS1 Adds the second z/OS system (S0W2) and the sysplex name (ADCDPL) to the SMS configuration.
SMS1011 Adds a lock set and associated lock structure for use by VSAM RLS.
SMS1012 Adds a cache set and associated cache structures for use by VSAM RLS.
SMS201 Adds a storage group called CICFILES for use by CICS.
SMS2011 Adds the CICS01 volume to the CICFILES storage group.
SMS202 Adds a storage group called DB2FILES for use by DB2.
SMS2021 Adds the DB2001 volume to the DB2FILES storage group.
SMS3011 Adds a data class for the Logger staging data sets (which must have a 4 K CI Size).
SMS3012 Adds a data class for Logger offload data sets (which have a recommended CI Size of 24 K).
SMS3013 Adds a data class for extended format data sets for use by DB2.
SMS4011 Adds a storage class (PSADDON) for any data sets that must be SMS-managed.
SMS4012 Adds a storage class for VSAM RLS data sets.
Submit the SMS0 job now and ensure that all the subsequent jobs are submitted and complete successfully.
|
Note: For more information about NaviQuest, see Chapter 22 of z/OS DFSMS Storage Administration, SC23-6860. You will find sample NaviQuest jobs in the SYS1.SACBCNTL data set, and the NaviQuest REXX execs are available in the SYS1.DGTCLIB data set.
|
Updating ACS routines
The SMS data class, storage class, and storage group ACS routines must be updated to reflect the new storage classes and storage groups.
The ADCD-provided SMS ACS routines are kept in data set SYS1.SMS.CNTL. The following members contain the source for the active ACS routines:
Data class ACSSTORD
Storage class DB2STORC
Storage group DB2STORG
You can find the location of the source of the currently active ACS routines by selecting option 7 (Automatic Class Selection) from the ISMF Primary Option menu, and then selecting option 5 (Display). You are presented with a list of routines and their location, as shown in Figure 4-3.

Figure 4-3 ISMF Display of ACS routines information
|
Note: If you have not modified the ADCD-provided ACS routines, submit the COPYACS job in SYSPLEX.PARALLEL.CNTL and skip to “Activating all your SMS changes” on page 56. This job takes a backup of the current ACS routines and replaces them with ones that include the changes added by the Sysplex Extensions.
|
Data class ACS routine
|
Note: Skip this step if you submitted job COPYACS in SYSPLEX.PARALLEL.CNTL.
|
The data class ACS routine must be updated for the new DB2 subsystems that are provided with this package. Make the following changes:
1. Save a copy of the current data class ACS member (ACSSTORD in this case) in case you need to fallback to the standard ACS routine.
2. Add the following lines near the end of the member:
IF &DSN(1) = 'DSNDPDG' THEN
DO
IF &DSN(2) = 'DSNDBC' THEN
DO
IF &DSN(3) = 'DSNDB01' THEN
DO
SET &DATACLAS='DPDGDC'
END
IF &DSN(3) = 'DSNDB06' THEN
DO
SET &DATACLAS='DPDGDC'
END
END
IF &DSN(2) = 'DSNDBD' THEN
DO
IF &DSN(3) = 'DSNDB01' THEN
DO
SET &DATACLAS='DPDGDC'
END
IF &DSN(3) = 'DSNDB06' THEN
DO
SET &DATACLAS='DPDGDC'
END
END
END
END
These statements are in the ACSDB2DC member of SYSPLEX.PARALLEL.CNTL, so you can copy them from that member to save you from creating them manually. However, that member does not contain a full replacement for the data class ACS routine. Instead, it contains only the additions that are related to the 2017 Sysplex Extensions.
We found in our testing that the END statements in the provided ACSSTORD member are incorrect. Review the member after you add the DB2 data class statements to ensure that every DO statement has a corresponding END statement.
|
Tip: The ACSSTORD member of SYSPLEX.PARALLEL.CNTL contains the corrected member that we used for our testing. If you have not changed the ADCD-delivered data class ACS routines, you could replace the ACSSTORD member in the SYS1.SMS.CNTL data set with the corresponding member from the SYSPLEX.PARALLEL.CNTL data set.
|
3. Press F3 to save your changes.
Storage class ACS routine
|
Note: Skip this step if you submitted job COPYACS in SYSPLEX.PARALLEL.CNTL.
|
The ADCD-provided storage class ACS routine (DB2STORC) should be edited and the following changes made:
1. Save a copy of the current storage class ACS member (DB2STORC in this case) in case you need to fall back to the standard ACS routine.
2. Add the following lines to the FILTLIST section at the top of the member:
FILTLIST DB2USER INCLUDE('DSNDPDG')
FILTLIST DB2UCAT INCLUDE(‘UCAT.DB2USER’)
FILTLIST CICSUCAT INCLUDE('UCAT.CICSUSER')
FILTLIST CICSUSER INCLUDE(‘CTSLOGR’,‘CTS52’)
FILTLIST CICSRLS INCLUDE(ZPDT.PST.**)
3. Add the following lines after the SELECT line:
WHEN (&DSN = &CICSUCAT)
DO
SET &STORCLAS = 'PSADDON'
EXIT
END
WHEN (&HLQ = &CICSUSER)
DO
SET &STORCLAS = 'PSADDON'
EXIT
END
WHEN (&HLQ = &DB2USER)
DO
SET &STORCLAS = 'PSADDON'
EXIT
END
WHEN (&DSN = &DB2UCAT)
DO
SET &STORCLAS = 'PSADDON'
EXIT
END
WHEN (&DSN = &CICSRLS)
DO
SET &STORCLAS = 'VSAMRLS1'
EXIT
END
These statements are also provided in the ACSDB2SC member of SYSPLEX.PARALLEL.CNTL. That member contains only the extra statements for the storage class ACS routine. It is not a complete replacement for the entire member.
4. Press F3 to save your changes.
Storage group ACS routine
|
Note: Skip this step if you submitted job COPYACS in SYSPLEX.PARALLEL.CNTL.
|
Finally, the storage group ACS routine must be edited and the following changes made:
1. Save a copy of the current ACS member (DB2STORG in this case).
2. Add the following lines to the FILTLIST section at the top of the member:
FILTLIST DB2USER INCLUDE('DSNDPDG')
FILTLIST DB2UCAT INCLUDE('UCAT.DB2USER')
FILTLIST CICSUCAT INCLUDE('UCAT.CICSUSER')
FILTLIST CICSUSER INCLUDE(‘CTSLOGR’,‘CTS52’)
FILTLIST CICSRLS INCLUDE(ZPDT.PST.**)
3. Add the following lines after the SELECT line:
WHEN (&DSN = &CICSUCAT)
DO
SET &STORGRP = 'CICFILES'
EXIT
END
WHEN (&HLQ = &CICSUSER)
DO
SET &STORGRP = 'CICFILES'
EXIT
END
WHEN (&DSN = &DB2UCAT)
DO
SET &STORGRP = 'DB2FILES'
EXIT
END
WHEN (&HLQ = &DB2USER)
DO
SET &STORGRP = 'DB2FILES'
EXIT
END
WHEN (&DSN = &CICSRLS)
DO
SET &STORGRP = 'CICFILES'
EXIT
END
These statements are also provided in the ACSDB2SG member of SYSPLEX.PARALLEL.CNTL. That member contains only the extra statements for the storage group ACS routine. It is not a complete replacement for the entire member.
4. Press F3 to save your changes.
Activating all your SMS changes
Having updated the ACS routines (either manually, or by using the provided COPYACS job), you are now ready to translate them and then activate the new routines and the SMS base configuration changes. Complete the following steps:
1. Go to the ISMF panel in ISPF.
2. Select option 7 (Automatic Class Selection).
3. Set CDS name to SYS1.S0W1.SCDS.
4. Select option 2 (Translate) and press Enter.
5. Ensure that the SCDS Name is set to ‘SYS1.S0W1.SCDS’.
6. Set the ACS Source Data Set line to ‘SYS1.SMS.CNTL’.
7. On the ACS Source Member line, enter the name of your updated data class member (the default is ACSSTORD).
8. On the Listing Data Set line, enter the same member name as on the previous line (the data set will be created if it does not exist).
9. Press Enter.
10. Scroll to the end of the listing to ensure that the translation process ended with a return code of 0.
11. Repeat these steps for the other ACS members that you updated (DB2STORC and DB2STORG).
12. Press F3 to return to the primary ISMF menu.
13. Select option 8 (Control Data Set) and option 5 (Activate the CDS) to activate the modified CDS. Remember to place a forward slash (/) beside Perform Activation. Press Enter.
The SMS-related changes are now complete.
4.3.15 Configuring the JES2 MAS
|
Important: The installation of the 2017 Sysplex Extensions makes only two changes that might affect your current ADCD system. The change that is described in this section is one of those changes. Therefore, you must be careful that this change does not conflict with any customization that you might have performed on your JES2PARM member and that the changes you make do not inject any syntax errors.
|
JES2 must be changed to a MAS configuration with two members. This change does not affect the usability of the JES2 parameters for “normal” ADCD use.
The 2017 Sysplex Extensions package makes the following change to the JES2PARM member in the ADCD PARMLIB data set. Although it attempts to avoid making changes to the ADCD data sets, moving the JES2PARM member to the USER.Z22D.PARMLIB data set necessitates several other changes, which increases the complexity with little benefit in return.
Also, the change made to the JES2PARM member is compatible with running the system in monoplex mode, which means that you can switch back and forth between monoplex and sysplex mode without making any further JES-related changes.
|
Tip: Because you are changing a member that is used by your running system, ensure that you create a backup of the member before it is changed.
|
The whole JES2PARM member is not shown here. Only the changed lines that are related to the MAS definition are shown. We also changed the number and classes of started initiators, but this change is optional. There is already a MASDEF statement in the JES2PARM member, so you must scroll down to find that statement, delete it, and then insert the following statements:
/* *--------------------------------------*
* Multi-Access Spool *
*--------------------------------------*
*/
MASDEF SHARED=CHECK,
RESTART=YES,
CKPTLOCK=ACTION,
DORMANCY=(25,300),
HOLD=10,
LOCKOUT=500
MEMBER(1) NAME=S0W1
MEMBER(2) NAME=S0W2
These statements are included in member JES2MASD in SYSPLEX.PARALLEL.CNTL if you want to copy them from there to the JES2PARM member.
To ensure that you have not introduced any syntax errors, restart JES2 at this point by using the following commands:
•$PJES2,ABEND
•Reply END to the $HASP198 message
•S JES2,PARM=NOREQ
The first time that you start JES2 after you make this change, you will see messages $HASP865 and $HASP870. These messages prompt you to confirm that you want to add member S0W2 to the JES2 MAS. Reply Y to this message.
JES2 Dynamic Proclib
While updating the JES2PARM, we took the opportunity to implement JES2 dynamic proclib support. This support consists of adding the JES2 proclib definitions to the JES2PARM member. The following statements are used:
/*********************************************************************/
/* */
/* Dynamic JES2 proclib definitions */
/* */
/***************** ***************************************************/
PROCLIB(PROC00) DD(1)=(DSN=USER.Z22D.PROCLIB),
DD(2)=(DSN=FEU.&SYSVER..PROCLIB)
DD(3)=(DSN=ADCD.&SYSVER..PROCLIB),
DD(4)=(DSN=CEE.SCEEPROC),
DD(5)=(DSN=CSQ800.SCSQPROC),
DD(6)=(DSN=IOE.SIOEPROC),
DD(7)=(DSN=EOY.SEOYPROC),
DD(8)=(DSN=HLA.SASMSAM1),
DD(9)=(DSN=CBC.SCCNPRC),
DD(10)=(DSN=SYS1.PROCLIB)
These statements are included in member JES2PRCL in SYSPLEX.PARALLEL.CNTL if you want to copy them from there.
To confirm that your changes are successful, shut down and restart JES2 without removing the proclib definitions from the JES2 JCL. When you are satisfied that your change was successful (use the $D PROCLIB command), you can remove the PROC00 DD statements from the JES2 PROC.
The use of this capability delivers the following advantages:
•Simplified JES2 PROC JCL because all of the DD statements for your procedure libraries can be removed from the JES2 JCL.
•The JES2 proclib concatenation can now be changed dynamically, with no need to stop and restart JES2.
•If you have a syntax error in your JES2 proc JCL, JES2 will not start. However, if you have a syntax error in the PROCLIB definitions in the JES2PARM member, you are presented with a $HASP469 message. This message gives you the option of correcting or bypassing the invalid statement.
If a proclib concatenation (PROC00, for example) is specified in both the JES2 JCL and the JES2 parm member, the parm definitions are used rather than those from the JCL. For more information about dynamically changing your proclib concatenations, see the section “Using dynamic PROCLIB allocation” in z/OS JES2 Initialization and Tuning Guide, SA32-0991.
4.3.16 Creating Parmlib members
Many of the attributes of how your system and sysplex work are controlled by using Parmlib members. When this deliverable was designed, we wanted to make the installation as simple and automated as possible.
In particular for the Parmlib member changes, we wanted to minimize your manual intervention and avoid situations in which we provide a parameter change that clashes with values that are used for your base ADCD monoplex system. We also tried to optimize the use of system symbols to minimize the number of members and the administrative effort to keep multiple duplicate or near-duplicate members in sync.
Many (but not all) Parmlib members support the ability to concatenate members. If you use concatenated members, the values that are obtained from the first member of the concatenation are overridden if the same parameter is encountered in a later member. For example, assume that you specify SYSPARM(00,PS) in your IEASYMxx member. That specification indicates that IEASYS00 is read first, followed by IEASYSPS. If any parameter is specified in both members, the value from IEASYSPS is used. If any parameter is not specified in IEASYSPS, the system uses the value from IEASYS00.
This capability allows us, where possible, to provide Parmlib members that contain only the parameters that must be overridden for the sysplex environment. We use a suffix of PS (for Parallel Sysplex), BS (for base sysplex under z/VM), or ST (for base sysplex spread across two PCs) for our members. The members that we provide and the changes that are in each member are listed in Table 4-3.
Table 4-3 Parmlib members supplied by zPDT 2017 Sysplex Extensions
|
Member
|
Supports concatenation?
|
Changed parms
|
|
AUTORPS
|
Yes
|
Added a rule to automatically reply to IGGN505A messages.
|
|
BPXPRMPS
|
Yes
|
Changed /dev and /tmp to use temporary file systems.
Point both systems at the same USERS file system.
Changed /web to mount in the $SYSNAME directory.
Adjusted the AUTOMOVE settings of some file systems.
Changed the MOUNT attribute from RDWR to READ for some file systems.
|
|
CLOCKPS
CLOCKST
|
Yes
|
Added SIMETRID value.
Changed STPMODE to YES.
|
|
COMMNDPS
|
Yes
|
Changed VTAM start command to specify that ATCSTRPS should be used rather than ATCSTR00.
Changed VTAMAPPL started task name to VTAMPS.
|
|
CONSOLPS
|
No
|
Replaced entire member.
Changes are to NAME parm on console definition and to enable OPERLOG.
|
|
COUPLEPS
|
No
|
Replaced entire member. Nearly all parameters changed.
|
|
DEVSUPPS
|
Yes
|
Added extended TIOT support for non-VSAM data sets.
|
|
GRSRNLPS
|
Yes
|
Convert all reserves to ENQs.
|
|
IEASYMBS
IEASYMPS
IEASYMPT
IEASYMST
|
Yes
|
Replaced entire member.
Adds IEASYSBS and IEASYSST sysparms.
|
|
IEASYSPS
IEASYSBS
IEASYSST
|
Yes
|
Updated to point at the members that require changes for the sysplex environment.
Changed GRS to TRYJOIN.
Changed CLOCK to enable STP.
|
|
IEFSSNPS
|
Yes
|
Added definitions for our CICSplex and data sharing DB2 subsystems.
|
|
IGDSMSPS
|
No
|
Start VSAM RLS and set sizes for RLS buffers.
|
|
IOEPRMPS
|
Yes
|
This member contains the parameters that are required by the zFS subsystem.
|
|
LOADPS
LOADBS
LOADST
|
No
|
Set appropriate IEASYM parameter.
|
|
LPALSTPS
|
Yes
|
Add CICS 5.2 to LPALST.
|
|
PROGPS
PROGLD
|
Yes
|
Added SDSNEXIT library.
Modified the ADCD-supplied PROGLD to refer to the DB2 V11 library, rather than DB2 V12.
|
|
SHUTS0Wn
|
No
|
Add system-specific system shutdown commands for VTAMAPPL.
|
|
SMFPRMPS
SMFPRMBS
|
No
|
Added log stream definitions.
|
|
VATLSTPS
|
Yes
|
Added work volume definition.
|
|
VTAMPS
VTAMBS
|
No
|
Tailored VTAM00 for sysplex.
Similar to VTAM00 except in how RRS is started.
|
To copy our Parmlib members to the SYS1.IPLPARM and USER.Z22D.PARMLIB data sets, submit the COPYPARM job in SYSPLEX.PARALLEL.CNTL.
|
Important: All of the Parmlib members that are described in this section are provided as part of this package. They do not require manual changes unless you must make an adjustment to allow for something that is specific to your configuration.
|
For more information about the specific changes that we made to the Parmlib members, see the next sections. Otherwise, skip to 4.3.17, “Network definitions” on page 65.
LOADPS member
This member is copied to the SYS1.IPLPARM data set rather than USER.Z22D.PARMLIB. However, it is included here because it is logically related to the members of the USER.Z22D.PARMLIB data set.
We wanted to consolidate to a single IEASYMxx member that can be used by multiple systems when running in a Parallel Sysplex. We also wanted the ability to control the IEASYSxx concatenation at the system level without having to have system-specific LOADxx members. Therefore, we used the LOAD00 member as a base and changed the IEASYM parameter to point at IEASYMPS.
The LOADBS, LOADST, and other base sysplex-related members are described in 4.5.2, “Changes in Parmlib” on page 77 and 4.6.4, “Required Parmlib changes” on page 83.
|
Important: If you use a member other than LOAD00 when you load your ADCD system, you must update the supplied LOADPS member to reflect the changes that you made when creating your LOADxx member.
|
IEASYMPS member
The original ADCD-supplied IEASYM00 member was designed for a single system environment. We wanted the ability to use a single IEASYMxx member for multiple systems, so we created an IEASYMPS member. Any symbols that are common to all members of the sysplex are at the top of the member in the common area. We then added filter statements that use the VM user ID that is associated with the z/OS system to set some system-specific symbols.
There is one section for user ID S0W1, and one for S0W2. If you want to add more systems later, add sections that are based on these examples. For more information about the IEASYMPS member, see “Sample IEASYMxx member for sysplex” on page 124.
IEASYSPS member
A number of Parmlib members must be changed for the sysplex environment. Therefore, an IEASYSPS member was created that is concatenated to the standard IEASYS00 member. The IEASYSPS member contains only the parameters that you need to override for the sysplex environment.
In addition to pointing at the other changed members, the IEASYSPS member overrides the GRS parameter to specify that GRS is used. The standard single-system ADCD environment specifies GRS=NONE because there is no other system with which it can share resources.
The standard ADCD system overrides the automatic startup of the z/OS Health Checker by specifying HZS=*NONE in the IEASYS00 member. Because one of the objectives of this deliverable is to help vendors and customers create a more resilient environment that adheres to IBM best practices, the IEASYSPS member specifies that you start the Health Checker automatically and use the ADCD-provided HZSPRMAD member.
AUTORPS member
It is possible that the ADCD-provided Parmlib members might refer to data sets on volumes that you have not installed. This configuration can result in WTOR IGGN505A during NIP processing, which delays the IPL process until you see and reply to the message. To avoid this delay, an auto reply rule is added in the AUTORPS member to indicate that the system should reply with CANCEL to the IGGN505A message if no response is entered within 30 seconds.
Note that the auto reply rule does not have any knowledge of which data set or volume is missing. If you want to disable this rule, delete the AUTOR=(00,PS) line from the IEASYSPS member.
BPXPRMPS member
The ADCD-provided BPXPRM00 member is copied into BPXPRMPS and includes a number of changes to reflect that the systems are running in a sysplex and to adhere to recommendations provided in z/OS Distributed File Service zSeries File System Implementation z/OS V1R13, SG24-6580. Specifically, the following changes are included:
•The VERSION file system is mounted read only.
•The FONTS file system MOUNT command is changed to specify AUTOMOVE.
•The ZOSMF file system MOUNT command is changed to specify AUTOMOVE.
•The /dev file system is changed to be a temporary file system.
•The /tmp file system is changed to be a temporary file system.
•The USERS file system is shared by the systems in the sysplex and uses AUTOMOVE.
•System-specific versions of the SYSTEM, VAR, VARWBEM, ETC, USR.MAIL, WEB, and WEB.CONFIG.ZFS file systems were created for the S0W2 system.
•ZFS now uses an IOEPRMPS member created in USER.Z22D.PARMLIB. This member is pointed to from the IOEZPRM DD statement in the ZFS proc in USER.Z22D.PROCLIB.
•A new procedure called TFSPROC was created in USER.Z22D.PROCLIB for the temporary file system.
CLOCKPS member
One of the requirements for systems in a sysplex is that they have a common time source. z/VM provides this capability, but the CLOCKxx member must be updated to inform z/OS of the ID of the simulated external time source. This feature required a new parameter, SIMETRID, to be added. No changes were made to the ADCD-provided CLOCK00 member.
COMMNDPS member
The ADCD-provided COMMNDxx members start VTAM by using the ATCSTR00 member of ADCD.Z22D.VTAMLST. We did not want to change that member because our objective is to make it easy to switch back to monoplex mode. Therefore, we set up a new ATCSTRPS member. However, that change required a change to the S VTAM command to point at that member instead.
If we created a COMMNDPS member that contains only the S VTAM command and concatenated it to the COMMNDWS member, the S VTAM command would be issued twice: Once from the COMMNDWS member and again from the COMMNDPS member. Therefore, we copied the contents of COMMNDWS into COMMNDPS, changed the S VTAM command, and point at the ATCSTRPS member in VTAMLST.
CONSOLPS member
One of the requirements of being in a sysplex is that every console must have a name that is unique within the sysplex. The ADCD-supplied CONSOL00 member uses a fixed name for its consoles: L700 and C908. If two systems are loaded with the CONSOL00 member, you have two consoles that are named L700 in the sysplex, which is not permitted.
Therefore, we copied the contents of CONSOL00 into CONSOLPS and changed the NAME keyword on the console definition to &SYSNAME.L700. Therefore, on system S0W1, the local console is named S0W1L700, and on system S0W2, its console is named S0W2L700.
We also enabled OPERLOG by adding the OPERLOG keyword to the HARDCOPY DEVNUM parameter. We also added the HOLDMODE(YES) parameter to the DEFAULT statement so that you can hold the flow of messages on the console by pressing Enter. This change is useful if you are trying to debug errors during the early phases of an IPL before you can log on to TSO to review the syslog. To restart the flow of messages, press Enter again.
COUPLEPS member
Because we are using unique CDSs for the sysplex environment, we needed a new COUPLExx member. We also took this opportunity to create a more robust XCF signaling infrastructure, so there are more transport classes and more signaling paths than in previous releases.
We also added definitions for the full set of CDSs (ARM, BPXMCDS, CFRM, LOGR, SFM, Sysplex, and WLM) and included definitions for CTC connections between the systems. These connections are primarily intended for a base sysplex environment, where CF structures are not available. However, you can also use the CTCs in a Parallel Sysplex, alongside the XCF CF structures if you want.
|
Important: The ARM CDS is formatted to support the longer system symbols that are supported by z/OS 2.2. If you try to access the ARM CDS from a pre-z/OS 2.2 system, that system must have toleration PTFs applied to support the new ARM CDS format.
|
DEVSUPPS member
We added a DEVSUPPS member with a single statement to enable the use of extended TIOTs for non-VSAM data sets. This addition is in line with IBM preferred practices and eliminates an exception in the z/OS Health Checker.
GRSRNLPS member
Because all z/OS systems that are sharing your zPDT z/OS volumes are in the same sysplex, it is better to use GRS than RESERVE/RELEASE to protect the integrity of those volumes. To avoid problems with RESERVEs locking out volumes, we updated the GRS Resource Names List to indicate that all RESERVEs must be converted to ENQs.
IEFSSNPS
The new CICS and DB2 subsystems that are provided by the Sysplex Extensions must be defined to the system. This definition could be done dynamically by issuing a command after the system has initialized. However, we felt that it would be simpler to define a new IEFSSNPS member and concatenate that to the supplied IEFSSN00 member.
IGDSMSPS member
The IGDSMSxx member does not support the use of concatenation. Therefore, we copied the ADCD-provided IGDSMS00 member to a new IGDSMSPS member and added these parameters:
•Start the restartable PDSE address space (SMSPDSE1) in line with IBM best practices. Enabling the restartable PDSE address space requires that PDSE Sharing is changed to EXTENDED, so we changed that parameter as well.
•Automatically start VSAM RLS at IPL time.
•Set the size of the buffers that can be used by VSAM RLS.
•Specify that VSAM data set of any CI Size can use VSAM RLS.
LPALSTPS member
Because we restored the volume for just one release of CICS (CICS TS 5.2), we created an LPALSTPS member to add the LPA data set for only that one release of CICS.
PROGxx members
The load library that contains the DB2 subsystem parameters (SDSNEXIT) must be APF-authorized, so we created a PROG member with only that one entry and concatenated it to the ADCD-provided PROG members.
Additionally, the May 2017 ADCD release updated the PROGLD member of ADCD.Z22D.PARMLIB to refer to the DB2 V12 SDSNLINK library. Because the Sysplex Extensions are still based on DB2 V11, we created a PROGLD member of USER.Z22D.PARMLIB that refers to the DB2 V11 SDSNLINK library.
SHUTS0W1 and SHUTS0W2 members
To make it easier to stop the system, we created system-specific versions of the SHUTALL member that is provided by ADCD. To shut down a system, run the S SHUTSYS command on the console of the system you want to shut down.
|
Note: The SHUTSYS started task automatically uses the SHUTSOWn member that is appropriate for the system where SHUTSYS is run. The SHUTS0W1 and SHUTS0W2 started tasks are no longer supplied.
|
SMFPRMPS member
Unfortunately, the SMFPRMxx member does not support concatenation. Therefore, we copied the SMFPRM00 member, updated the SMF data set names, and added the system ID (SID) parameter. We also added definitions for two SMF log streams and two of the new SMF Streaming in-memory buffers. These definitions are commented out until you are ready to use them.
VATLSTPS member
Rather than update the ADCD-provided VATLST member, we created a member that contains one entry (for the WORK01 volume) and concatenated that to the ADCD-provided VATLST00 member.
VTAMPS member
This member is used by the VTAMAPPL program to start selected address spaces after the IPL completes. The VTAMPS member is based on the ADCD-provided VTAM00 member, with the exception that it uses the &SYSNAME. system symbol where appropriate to tailor commands to the system on which they run.
4.3.17 Network definitions
Before describing PROCLIB, TCP, and VTAM changes, this section describes the network setup and the relationships between the definitions.
Our configuration featured a single network adapter on our PC. Linux and the two z/OS guests use it to communicate to the outside world. For simplicity, we did not have TCP set up on z/VM. Therefore, our configuration is similar to the configuration that is described in the chapter titled “Multiple guests in one instance” in IBM zPDT Guide and Reference, SG24-8205.
We used VNC to log on to the Linux desktop remotely. This VNC can be used to log on to VM from a remote window if necessary. As a result, we did not find the absence of TCP on z/VM to be an inhibitor for us.
The various definitions feature the following relationships:
•The devmap file contains the definition for the OSA addresses and points the control units at the respective actual adapters (one for the tunnel to Linux, and one for the connection to the outside world). For more information, see the sample devmap file that is shown in Example A-1 on page 114.
•The VM directory entries for each z/OS guest contain DEDICATE statements for three OSA addresses for each connection (three each for the tunnel and real network adapter). The addresses that are used for each system must be unique. Each system must have access to two sets of three consecutive OSA devices, and the first device number must be an even number. The device numbers must match the corresponding numbers that are specified in the devmap file. For more information, see the sample directory entries for S0W1 and S0W2 that are shown in Example A-4 on page 119 and Example A-5 on page 121.
•The USER.Z22D.VTAMLST data set contains one TRLE member for each system. Each member contains two TRLE definitions: One for the tunnel to Linux, and one for the real network adapter. Each definition includes a port name.
•The USER.Z22D.TCPPARMS data set contains the TCP PROFILE members (one per z/OS). The DEVICE and LINK statements use the port names that were defined for the OSA in the TRLE definitions in VTAMLST.
|
Tip: For this configuration to work, all of the systems that share a specific network adapter MUST use the same port name.
|
•To keep our VTAMLST simple, we use a system symbol (&TRLNAM) for the name of the member that contains the OSA definitions. The value of the symbol is set in the IEASYMxx member and depends on the system. This configuration allows us to have a single ATCCONPS member that can be used by all of the systems in the sysplex.
The OSA section of our devmap file is as follows:
[manager]
name awsosa 0023 --path=A0 --pathtype=OSD --tunnel_intf=y
device 400 osa osa
device 401 osa osa
device 402 osa osa
device 408 osa osa
device 409 osa osa
device 40A osa osa
[manager]
name awsosa 0024 --path=f2 --pathtype=OSD
device 404 osa osa
device 405 osa osa
device 406 osa osa
device 40C osa osa
device 40D osa osa
device 40E osa osa
To determine the correct value for the path parameter on the name awsosa statement, run the Linux find_io command. The output from the command on our PC resembles the following example:
Interface Current MAC IPv4 IPv6
Path Name State Address Address Address
------ ---------------- ---------------- ----------------- ----------------
F2 enp13s0 UP, RUNNING 00:14:5e:57:c5:6a 192.168.1.99 *
F1 enp24s0 UP, NOT-RUNNING 00:14:5e:57:c5:6c * *
A0 tap0 DOWN 02:a0:a0:a0:a0:a0 * *
A1 tap1 DOWN 02:a1:a1:a1:a1:a1 * *
A2 tap2 DOWN 02:a2:a2:a2:a2:a2 * *
A3 tap3 DOWN 02:a3:a3:a3:a3:a3 * *
A4 tap4 DOWN 02:a4:a4:a4:a4:a4 * *
A5 tap5 DOWN 02:a5:a5:a5:a5:a5 * *
A6 tap6 DOWN 02:a6:a6:a6:a6:a6 * *
A7 tap7 DOWN 02:a7:a7:a7:a7:a7 * *
End of FIND_IO
In this example, you can see that path F2 is the path that includes a status of UP, RUNNING.Therefore, F2 is specified on the path= statement in the devmap.
The VM directory entry for S0W1 contains the following statements:
DEDICATE 0400 0400
DEDICATE 0401 0401
DEDICATE 0402 0402
DEDICATE 0404 0404
DEDICATE 0405 0405
DEDICATE 0406 0406
The directory entry for S0W2 contains the following statements:
DEDICATE 0408 0408
DEDICATE 0409 0409
DEDICATE 040A 040A
DEDICATE 040C 040C
DEDICATE 040D 040D
DEDICATE 040E 040E
The VTAMLST TRLE definition for S0W1 contains the following statements:
OSATRL1 VBUILD TYPE=TRL
OSATRL1E TRLE LNCTL=MPC,READ=(0400),WRITE=(0401),DATAPATH=(0402), X
PORTNAME=PORTA, X
MPCLEVEL=QDIO
OSATRL2E TRLE LNCTL=MPC,READ=(0404),WRITE=(0405),DATAPATH=(0406), X
PORTNAME=PORTB, X
MPCLEVEL=QDIO
You can see that the device numbers from the VM directory entry are used for each entry, for example, 400 (READ), 401 (WRITE), and 402 (DATAPATH). The port name for that TRLE is PORTA. In this example, devices 400 - 402 are used for the tunnel to Linux. Devices 404 - 406 are used for the real network interface.
The TCP Profile member for S0W1 contains the following statements:
DEVICE PORTA MPCIPA
LINK ETH1 IPAQENET PORTA
HOME 10.1.1.2 ETH1
;
DEVICE PORTB MPCIPA
LINK ETH2 IPAQENET PORTB
HOME 192.168.1.80 ETH2
You can see that the same port name (for example, PORTA) that was specified on the TRLE definition is used on the DEVICE and LINK statements.
The TRLE definition for S0W2 contains the following statements:
OSATRL2 VBUILD TYPE=TRL
OSATRL2E TRLE LNCTL=MPC,READ=(0408),WRITE=(0409),DATAPATH=(040A), X
PORTNAME=PORTA, X
MPCLEVEL=QDIO
OSATRL3E TRLE LNCTL=MPC,READ=(040C),WRITE=(040D),DATAPATH=(040E), X
PORTNAME=PORTB, X
MPCLEVEL=QDIO
You see that although S0W2 uses different device numbers, the port names are the same as the definition for S0W1. The Profile member for S0W2 contains the following statements:
DEVICE PORTA MPCIPA
LINK ETH1 IPAQENET PORTA
HOME 10.1.1.3 ETH1
;
; This second device is optional
DEVICE PORTB MPCIPA
LINK ETH2 IPAQENET PORTB
HOME 192.168.1.90 ETH2
|
Tip: If you use different port names on the two systems, the adapter does not activate on the second system. To our knowledge, this information is not documented elsewhere.
|
4.3.18 Creating PROCLIB members
A few changes are required to PROCLIB members for the base system. Many new procs are available for the 2017 Sysplex Extensions-provided CICS regions and DB2 subsystems. Those changes are described in Chapter 6, “Sample CICSplex” on page 105, and Chapter 5, “Sample DB2 data sharing environment” on page 97. All changes and additions are made in the USER.Z22D.PROCLIB data sets.
Submit the COPYPROC job in SYSPLEX.PARALLEL.CNTL now to copy the MVS and CICS procs. The DB2 procs are copied in a separate job that will only be run if you follow the steps in 5.1, “Setting up the 2017 Sysplex Extensions DB2 data sharing environment” on page 98. For more information about the changes that we made, continue reading this section. Otherwise, you can skip to 4.3.19, “Creating TCPPARMS” on page 69.
VTAMAPPL started tasks
VTAMAPPL is a basic automation tool that can be used to issue system commands and insert pauses when the commands are issued. The supplied VTAMAPPL proc provides the ability to override the member name, but not the data set name.
We created a VTAMPS member in USER.Z22D.PROCLIB because the ADCD-supplied VTAM00 member points at ADCD.Z22D.PARMLIB and we did not want to place any of our members in that data set. VTAMPS is started by using a command, such as S VTAMPS,M=&VTAMAPPL, where &VTAMAPPL is a system symbol that indicates which VTAMAPPL member of USER.Z22D.PARMLIB is to be used.
The SHUTSYS proc also uses VTAMAPPL to shut down started tasks in an orderly and phased manner. The SHUTSYS proc uses the &SYSNAME. system symbol to select the correct SHUTS0Wx Parmlib member for that system.
The VTAMPS and the SHUTSYS procs are generic and can be used to start or stop either system.
TCP/IP procedure
The ADCD-supplied TCP/IP procedure references the ADCD TCPPARMS data set, so we created a TCP/IP proc in USER.Z22D.PROCLIB to point to the USER.Z22D.TCPPARMS data set. This change also affects the non-sysplex AD system. The same PROFILE and DATA members are used by system S0W1, regardless of whether it is in monoplex or sysplex mode.
|
Note: The TCP/IP member that is provided (and copied into your USER.Z22D.PROCLIB data set) by the 2017 Sysplex Extensions is set up to use PROFILE and TCPDATA members with names that match the system name (S0W1P and S0W1D). The ADCD-provided members use a different naming convention (PROFILE and TCPDATA) because they were not intended for a sysplex environment.
|
TFSPROC procedure
The use of temporary file systems for some UNIX file systems requires that the TFS proc be started. This proc is started automatically based on parameters specified in the BPXPRMPS member, and uses JCL in the TFSPROC member of USER.Z22D.PROCLIB.
ZFS procedure
The ADCD-supplied ZFS started task JCL references a basic IOEFSPRM member in ADCD.Z22D.PARMLIB. The easiest way to override that with our IOEPRMPS member was to copy a slightly modified version of the ZFS JCL to the USER.Z22D.PROCLIB data set.
CICS procedures
The various CICS-related started tasks are described in 6.3, “Controlling your CICSplex environment” on page 109.
4.3.19 Creating TCPPARMS
|
Important: We mentioned in 4.3.15, “Configuring the JES2 MAS” on page 57 that the implementation of the 2017 Sysplex Extensions includes two steps in which you must make changes that might affect your current, running ADCD system. This step is the second of those instances.
Because network implementations can vary greatly from one system to another, it is not possible to provide a set of definitions that work in every configuration. This step copies the members that we used to get our systems to work in a sysplex configuration. However, it should be treated as an example. You will likely need to make adjustments based on your specific network setup.
If there is an error in your TCP definitions, you can still log on to the system by using one of the local z/VM windows and fix the problem from there.
|
The COPYTCPP job in SYSPLEX.PARALLEL.CNTL copies four members to your USER.Z22D.TCPPARMS data set. You likely must adjust these parameters to match your LAN configuration. If you change the member names, make corresponding changes to the TCP/IP JCL in USER.Z22D.PROCLIB.
The following examples show the TCP/IP DATA members for the two systems. If you connect your z/OS systems to an external network, the DOMAINORIGIN values in these members must be changed. If you intend to use a name server, the NSINTERADDR values must be provided.
Example 1: MEMBER S0W1D
The S0W1D member is used by base and Parallel Sysplex systems, as shown in the following example:
TCPIPJOBNAME TCPIP
S0W1: HOSTNAME S0W1
DOMAINORIGIN XXX.YYY.COM
DATASETPREFIX TCPIP
;NSINTERADDR xx.xx.xx.xx
RESOLVEVIA UDP
RESOLVERTIMEOUT 10
RESOLVERUDPRETRIES 1
ALWAYSWTO NO
Example 2: MEMBER S0W2D
The S0W2D member is used by base and Parallel Sysplex systems, as shown in the following example:
TCPIPJOBNAME TCPIP
S0W2: HOSTNAME S0W2
DOMAINORIGIN XXX.YYY.COM
DATASETPREFIX TCPIP
;NSINTERADDR xx.xx.xx.xx
RESOLVEVIA UDP
RESOLVERTIMEOUT 10
RESOLVERUDPRETRIES 1
ALWAYSWTO NO
Submit the COPYTCPP job in SYSPLEX.PARALLEL.CNTL now.
Other network-related changes
Certain products use the TCP Resolver service to determine the system IP name and IP address. For more information, see the section “z/OS Resolver” in IBM zPDT Guide and Reference, SG24-8205.
The ADCD system does not supply a /etc/hosts file or a /etc/resolver file. In the absence of a resolver file, the Resolver service gets its information from the members pointed to by the GBLRESOL member of ADCD.Z22D.TCPPARMS. For simplicity, we replaced the GBLIPNOD member of that data set with the identically named member from the SYSPLEX.TCPPARMS data set. That member was modified to reflect the IP addresses that we use for our two systems, 192.168.1.80 and 192.168.1.90, which means that both systems can use the same member.
If you use products that require IP name resolution (DB2 DDF or the TSO HOMETEST command, for example), use our sample GBLIPNOD member as an example of the changes that are required. We also updated the GBLIPDAT member to point it at the Google Name Server, using ‘NSINTERADDR 8.8.8.8’. We changed the supplied GBLRESOL member to point at the GBLIPNOD member rather than the ZPDTIPN member.
|
Note: To be clear, we do not provide a job to replace the GBLIPNOD member of ADCD.Znnn.TCPPARMS with our version. If you require RESOLVER support, then you need to replace their ADCD-provided GBLIPNOD member of the ADCD TCPPARMS data set with your own version.
|
4.3.20 Creating VTAMLST members
We added several members to USER.Z22D.VTAMLST. We provide sample VTAMLST members in SYSPLEX.VTAMLST. We updated the ATCSTRPS, ATCCONPS, and OSATRLx members. You might need to customize these members, depending on which VTAM applications you want to automatically activate at VTAM startup, and on the device numbers that you used for your virtual OSA adapters.
|
Tip: If you change the VTAMLST members, the X symbols on the right side of some lines are continuation characters and must be in column 72 of the statement.
The naming convention (the two-letter suffix) is not carried into the TRL names.
|
Make any required changes to the members in the SYSPLEX.VTAMLST data set, and then submit the COPYVTAM job.
We also added members for CICS and DB2. Those changes are described in Chapter 6, “Sample CICSplex” on page 105, and Chapter 5, “Sample DB2 data sharing environment” on page 97.
4.3.21 Customization for Parallel Sysplex complete
You have now completed nearly all of the changes that are required to start the systems in Parallel Sysplex mode. Two steps are left that cannot be carried out until after the first system completes IPL in Parallel Sysplex mode. If this configuration is your target, proceed to 4.4, “Starting your Parallel Sysplex” on page 71. If your objective is to have a base sysplex under z/VM, some extra steps must be completed.
For more information about those steps, see 4.5, “Additional steps to create a base sysplex under z/VM” on page 77. If your target environment is a base sysplex spread over two PCs, see 4.6, “Implementing a base sysplex without z/VM” on page 79.
4.4 Starting your Parallel Sysplex
Before you start the first system in Parallel Sysplex mode, shut down and then reload the z/OS system that is running under the BASEAD user ID. This process verifies that you still can fall back to monoplex mode if necessary. It should be possible to load your system in the same way as you did previously by using the same IPL address and load parm.
|
Important: Do not complete an IPL on the S0W2 system until you have completed the steps in this section.
|
After verifying that your current system still initializes successfully, the next step is to start your Parallel Sysplex:
1. Shut down the BASEAD system and log off that virtual machine.
2. Run the following commands from the OPERATOR or MAINT user IDs to initialize the two coupling facility virtual machines:
XAUTOLOG CFCC1
XAUTOLOG CFCC2
If you want to see the messages that are issued by the CFs, log on to the z/VM CFCONSOL user ID. The messages from both CFVMs are directed to that user ID.
Wait a couple of minutes to give the CFs a chance to initialize.
3. Log on to the S0W1 virtual machine. Check that you see messages, such as HCPMFC2804I Message devices 1400-1403 defined and coupled to CFCC1, for each of the two CFs. These messages confirm that the CFVMs finished initializing. If you do not see these messages, log off and wait for a few minutes, and then log on again. After you see the messages about coupling to the CFs, run the following commands:
TERM CONMODE 3270
IPL A80 LOADP 0A82PSM1
This IPL command assumes that the sysres is on device A80 and the D2SYS1 volume is on device A82. The ‘PS’ in the load parm refers to member LOADPS in SYS1.IPLPARM.
Depending on the speed of your PC, it might take a few minutes for the NIP messages to start appearing on the console. After the messages start, you might be prompted to confirm that you want to Initialize the sysplex (reply R 00,I to that WTOR). You might also see an ILR030 PAGE DATASET MAY BE IN USE.....REPLY DENY OR CONTINUE message. This message is because a different userid (S0W1) is trying to use the page data set than was using it previously (BASEAD). You can reply r 00,CONTINUE to the message, assuming that the BASEAD system has been shut down.
Sometime later, you might be prompted with WTOR IGGN505A, which indicates that a link library is not accessible. If you see that message and you do not need that data set, reply r 00,CANCEL. If you do not reply to the IGGN505A message within 30 seconds, the z/OS Auto Reply function will automatically reply with R 00,CANCEL.
|
Tip: The ADCD-provided PROGxx members will try to allocate data sets on volumes D2BLZ1, D2C521, D2C531, and D2DBB1. If you have not restored one or more of those volumes, you will receive the IGGN505A message. If you need the product associated with the missing volume, shut down the system (both z/OS and z/VM), restore that volume, update your devmap file, and IPL the system again. If you do not need that product, the system automatically replies to that message after 30 seconds and the IPL continues without that data set.
|
The system should not present any more WTORs.
When the IPL completes, move to one of the other z/VM screens and enter ‘DIAL S0W1’ on the COMMAND line to get the VTAM logon panel.
4.4.1 Defining required log streams
You might notice some messages about failures to connect to log streams (specifically for RRS and OPERLOG). The reason for these messages is described in 3.4, “System logger” on page 29. To define the log streams and eliminate those messages, run the following jobs in data set SYSPLEX.PARALLEL.CNTL:
LOGREREP This job defines the log stream for LOGREC data. For information about enabling the use of this log stream, see 3.4.2, “LOGREC” on page 32.
LOGRHC This job defines the log stream that can be used by the z/OS Health Checker.
LOGROPR This job defines the OPERLOG log stream. For information about activating OPERLOG, see 3.4.3, “OPERLOG” on page 32.
LOGRRRS This job defines the RRS log streams for Parallel and base sysplex modes. For more information about RRS and considerations for its log streams, see 3.4.1, “Resource Recovery Services” on page 30.
LOGRSMF This job defines the SMF log stream. For more information about the use of SMF log streams, see 3.4.4, “System Management Facilities” on page 33.
|
Tip: All of these jobs end with a return code of 12 the first time they are run, which is acceptable. The jobs are set up to delete and redefine the respective log streams. Because the log streams do not exist the first time that the job is run, the DELETE LOGSTREAM statement fails, but the other statements complete successfully.
|
Shut down the system by running the S SHUTSYS command, then restart it. See 4.7.5, “Shutdown” on page 88 for more information about the preferred system shutdown process.
After the restart, the system should automatically start using the OPERLOG and RRS log streams.
If you want to use LOGREC in DATASET mode, update the VTAMPS member to remove the SETLOGRC LS command. The ADCD-provided IEASYS00 member sets LOGREC to DATASET mode, so removing the SETLOGRC command from the VTAMPS member leaves it in DATASET mode.
If you want to use the SMF log stream, edit the SMFPRMPS member in USER.Z22D.PARMLIB and change the first line to say ACTIVE rather than NOACTIVE. The member is set up to run SMF in LOGSTREAM mode automatically as soon as you switch from NOACTIVE to ACTIVE. Then, activate the updated member by running the SET SMF=PS command.
If you want Health Checker to send its output to a log stream, run the F HZSPROC,LOGGER=ON,LOGSTREAMNAME=HZS.HEALTH.CHECKER.HISTORY command. You can also update the HZSPRMAD member of the ADCD.Z22D.PARMLIB data set so that the log stream is enabled automatically. For more information about the use of the HZSPRMxx member, see IBM Health Checker for z/OS User’s Guide, SC23-6843.
Now all the log streams should be defined and in use. The quickest way to check is to run the D LOGGER,L command. Check that all of the log streams that are shown in Example 4-2 are defined in your system.
Example 4-2 Log streams defined by LOGRxxx jobs
ATR.ADCDPL.ARCHIVE RRS_ARCHIVE_1 000001 IN USE
ATR.ADCDPL.DELAYED.UR RRS_DELAYEDUR_1 000001 IN USE
ATR.ADCDPL.MAIN.UR RRS_MAINUR_1 000001 IN USE
ATR.ADCDPL.RESTART RRS_RESTART_1 000001 IN USE
ATR.ADCDPL.RM.DATA RRS_RMDATA_1 000001 IN USE
ATR.ADCDPL.RM.METADATA RRS_RM_META_1 000001 IN USE
ATR.S0W1.ARCHIVE *DASDONLY* 000000 AVAILABLE
ATR.S0W1.DELAYED.UR *DASDONLY* 000000 AVAILABLE
ATR.S0W1.MAIN.UR *DASDONLY* 000000 AVAILABLE
ATR.S0W1.RESTART *DASDONLY* 000000 AVAILABLE
ATR.S0W1.RM.DATA *DASDONLY* 000000 AVAILABLE
ATR.S0W1.RM.METADATA *DASDONLY* 000000 AVAILABLE
ATR.S0W2.ARCHIVE *DASDONLY* 000000 AVAILABLE
ATR.S0W2.DELAYED.UR *DASDONLY* 000000 AVAILABLE
ATR.S0W2.MAIN.UR *DASDONLY* 000000 AVAILABLE
ATR.S0W2.RESTART *DASDONLY* 000000 AVAILABLE
ATR.S0W2.RM.DATA *DASDONLY* 000000 AVAILABLE
ATR.S0W2.RM.METADATA *DASDONLY* 000000 AVAILABLE
HZS.HEALTH.CHECKER.HISTORY HZS_HEALTHCHKLOG 000000 AVAILABLE
IFASMF.GENERAL IFASMF_GENERAL 000000 AVAILABLE
IFASMF.S0W1 *DASDONLY* 000000 AVAILABLE
IFASMF.S0W2 *DASDONLY* 000000 AVAILABLE
SYSPLEX.LOGREC.ALLRECS SYSTEM_LOGREC 000000 AVAILABLE
SYSPLEX.OPERLOG SYSTEM_OPERLOG 000000 AVAILABLE
If a log stream is missing, see the output from the associated job and search for the corresponding DEFINE LOGSTREAM NAME(log_stream_name) statement. An example of the part of the output from the LOGRRRS job is shown in Example 4-3.
In this case, the IXG007E message indicates that an error was encountered while processing the previous statement (#116). Also, statement 116 was a DEFINE LOGSTREAM for ATR.ADCDPL.RESTART. The IXG007E message indicated that the DATACLAS definition in the DEFINE LOGSTREAM referred to a data class that was not defined.
Example 4-3 Sample LOGRRRS job output
LINE # CONTROL CARDS
116 DEFINE LOGSTREAM NAME(ATR.ADCDPL.RESTART)
117 STRUCTNAME(RRS_RESTART_1)
118 LS_DATACLAS(LOGR24K)
119 HLQ(LOGGER)
120 LS_SIZE(10240)
121 MODEL(NO)
122 LOWOFFLOAD(20)
123 HIGHOFFLOAD(80)
...
...
IXG005I LOGR POLICY PROCESSING LINE# 116
IXG007E A STORAGE MANAGEMENT SUBSYSTEM (SMS) ATTRIBUTE CLASS IS UNDEFINED.
IXG447I LOGR POLICY PROCESSING FOUND AN ERROR BUT CONTINUES. RETCODE=00000008 RSNCODE=00000838
IXG003I LOGR POLICY PROCESSING ENCOUNTERED AN UNEXPECTED ERROR. DIAGNOSIS INFORMATION: 00000004 000003F6 0107001B 00000000
The CICS log stream staging and offload data sets are allocated in the CICS SMS storage group (CICS01). The OPERLOG, LOGREC, Health Checker, SMF, and RRS log stream data sets (all with a high-level qualifier of LOGGER) are allocated on the volumes that are mounted with the storage attribute (D2SYS1 and WORK01, if you use the provided VATLST00 and VATLSTPS members).
4.4.2 Define USS mount point for S0W2
The ADCD-provided system’s UNIX file systems are designed for a single-system environment. Before you IPL the S0W2 system, submit the MKDIR job in SYSPLEX.PARALLEL.CNTL. This job performs these functions:
1. Creates a mount point for the system-specific file system for S0W2.
2. Creates mount points for the S0W1 system-specific subdirectories.
3. Mounts the SYSTEM file system for S0W2.
4. Creates the mount points for the S0W2 system-specific subdirectories.
5. Unmounts the S0W2 SYSTEM file system so that it can be mounted on S0W2 when you IPL that system.
4.4.3 IPL second system
You are now ready to start the S0W2 system, complete the following steps to start the second sysplex member:
1. Log on to S0W2 (the initial password is S0W2).
2. Run the following commands to load the S0W2 system:
TERM CONMODE 3270
IPL A80 LOADP 0A82PSM1
The S0W2 system comes up with no further intervention required.
You might see some messages about XCF being unable to start the CTC paths to system S0W1. We included the CTC definitions in the COUPLEPS member to cater for base sysplex configurations. When running in Parallel Sysplex mode, those messages can be ignored.
You will also notice a number of messages like this example:
BPXF237I FILE SYSTEM ZFS.Z22D.VERSION 063
WAS ALREADY MOUNTED ON PATHNAME
/Z22D.
These messages are for file systems that will be shared between all the systems in the sysplex. All systems use a common BPXPRMPS member, so every system will try to mount those file systems when they are coming up. Because file systems can only be mounted on one system, the message is simply an informational message, indicating that that system has already been mounted on another system in the sysplex. These messages can be ignored.
The first time that you start the S0W2 system, you might see IOE messages that say the system is waiting to see whether there are any other system using those file systems. Those messages are issued because the S0W2 file systems were created by copying the S0W1 file systems, so ZFS is waiting to ensure that S0W1 is no longer using those files. The ZFS start will pause for 65 seconds after each of those messages. However, you should only see these messages the first time you start S0W2. Subsequent starts will be a lot faster.
4.4.4 Parallel Sysplex implementation checklist
Because the implementation of the 2017 Sysplex Extensions Parallel Sysplex requires many steps and it is important that the steps are completed in the correct sequence, we provide the checklist in Table 4-4. You can use this checklist to track your progress and ensure that you do not accidentally omit any steps.
Table 4-4 2017 Sysplex Extensions Parallel Sysplex implementation checklist
|
Task
|
Description
|
Done?
|
|
1
|
Install base ADCD z/OS system
|
|
|
2
|
Download and install the base ADCD z/VM system
|
|
|
3
|
Download and gunzip the 2017 Sysplex Extensions volumes
|
|
|
4
|
Create a backup of z/VM and z/OS volumes before making changes
|
|
|
5
|
Add 2017 Sysplex Extensions volumes to devmap
|
|
|
6
|
Add commands to devmap to start x3270 sessions
|
|
|
7
|
Add OSA definitions to devmap file
|
|
|
8
|
Restart zPDT and IPL z/VM
|
|
|
9
|
Update VM Directory to add the WRKALLEG keyword if necessary
|
|
|
10
|
Log on to BASEAD and IPL z/OS in monoplex mode
|
|
|
11
|
Run IMPCONN job to IMPORT CONNECT user catalogs
|
|
|
12
|
Run DEFPAGE job to create S0W2 System VSAM data sets
|
|
|
13
|
Run OMVSCLON job to create S0W2 copies of the OMVS file systems
|
|
|
14
|
Run ZFSLOGS job to create data sets for the zFS subsystem
|
|
|
15
|
Run HZSALLCP job to allocate the S0W2 Health Checker data set
|
|
|
16
|
Run RECATLG job to recatalog the 2017 Sysplex Extensions CDSs and VSAM RLS Share Control Data Set in Master catalog
|
|
|
17
|
Run SMS0 jobs to update SMS config
|
|
|
18
|
Update ACS routines to assign new data, storage classes, and storage groups
|
|
|
19
|
Activate all SMS changes
|
|
|
20
|
Update MASDEF and PROCLIB statements in the JES2PARM member
|
|
|
21
|
Run COPYPARM job to copy 2017 Sysplex Extensions Parmlib members to USER.Z22D.PARMLIB and SYS1.IPLPARM
|
|
|
22
|
Run COPYPROC job to copy 2017 Sysplex Extensions Proclib members to USER.Z22D.PROCLIB
|
|
|
23
|
Run COPYTCPP to copy TCP PROFILE and TCPDATA members to USER.Z22D.TCPPARMS
|
|
|
24
|
Run COPYVTAM job to copy VTAMLST members to USER.Z22D.VTAMLST
|
|
|
25
|
Reload BASEAD system in monoplex mode to ensure that everything still works as before
|
|
|
26
|
Log off BASEAD
|
|
|
27
|
AUTOLOG CF Virtual Machines from CFCONSOL user
|
|
|
28
|
Log on to S0W1 and perform an IPL using the new Parallel Sysplex LOADPS member
|
|
|
29
|
Run the LOGREREP job to define the LOGREC log stream
|
|
|
30
|
Run the LOGROPR job to define the OPERLOG log stream
|
|
|
31
|
Run the LOGRRRS job to define the RRS log streams
|
|
|
32
|
Run the LOGRSMF job to define the SMF log stream
|
|
|
33
|
Run the LOGRHC job to define the Health Checker log stream
|
|
|
34
|
Run the MKDIR job to create zFS mount points for system S0W2
|
|
|
35
|
Log on to S0W2 and perform an IPL
|
|
4.5 Additional steps to create a base sysplex under z/VM
If your target environment is a base sysplex under z/VM, some other steps are required. Some messages can be ignored when you start a base sysplex under z/VM. This section lists those messages and describes the reasons why you are receiving them.
4.5.1 Changes to z/VM directory
Add definitions for virtual CTCs that are used for XCF communication between the members of the sysplex.
You can define these definitions dynamically in each virtual machine that is connected through the CTCs (S0W1 and S0W2 in this case) by running the VM DEFINE command.
However, we believe that it is less work in the long run to add the definitions to the VM directory. To add these definitions, add the following statements to the directory entries for S0W1 and S0W2 (use the same definitions for both virtual machines):
SPECIAL E20 CTCA
SPECIAL E21 CTCA
SPECIAL E40 CTCA
SPECIAL E41 CTCA
SPECIAL E42 CTCA
SPECIAL E43 CTCA
After you make these changes, save the USER DIRECT C file and run the DIRECTXA USER DIRECT C command to update the directory.
These statements do not provide information about which CTC devices are connected to which other devices. For more information, see 4.5.3, “Bringing up your base sysplex” on page 78.
4.5.2 Changes in Parmlib
From a Parmlib perspective, the only thing that must be different in a base sysplex compared to a Parallel Sysplex is that GRS Star cannot be used in a base sysplex. The GRS parameter in IEASYSxx must specify something other than STAR.
This section describes the members that must be used when running in base sysplex mode under z/VM.
LOADxx member
Because you use the same z/VM virtual machines for base and Parallel Sysplex, you need some way to differentiate between base and Parallel Sysplex. This distinction is made by using a different LOADxx member when running in base sysplex mode. The LOADBS member points at IEASYMBS.
The LOADBS member is copied into SYS1.IPLPARM when you run the BASPARM job in SYSPLEX.PARALLEL.CNTL.
IEASYMBS member
The IEASYMBS member is identical to the IEASYMPS member, with the following exceptions:
•The IEASYMBS member sets the VTAMAPPL symbol to be VTAMBS, which is used by the START VTAMPS command in COMMNDPS.
•The IEASYMBS member adds one more member (IEASYSBS) to the sysparm concatenation.
The IEASYMBS member is copied into USER.Z22D.PARMLIB when you run the BASPARM job.
IEASYSBS member
The IEASYSBS member contains one parameter (the GRS=TRYJOIN statement). All of the other IEASYSxx parms are picked up from IEASYS00 in ADCD.Z22D.PARMLIB or IEASYSPS in USER.Z22D.PARMLIB.
SMFPRMBS
The SMFPRMBS member is identical to the SMFPRMPS member with the exception that it specifies system-unique log streams rather than a single log stream that is shared by both systems.
The SMFPRMBS member is copied into USER.Z22D.PARMLIB when you run the BASPARM job.
VTAMBS member
The VTAMBS member starts each RRS with a different group name.
Now, run job BASPARM in SYSPLEX.PARALLEL.CNTL to copy these members into USER.Z22D.PARMLIB and SYS1.IPLPARM.
4.5.3 Bringing up your base sysplex
You must make some small changes to the IPL process if you are bringing up the systems in base sysplex mode.
Because the same virtual machines are used for Parallel and base sysplex modes, the systems automatically use the CFs if they are running and connected to the S0W1 and S0W2 machines. Therefore, you must ensure that the coupling facility virtual machines are not logged on. To do this, use the OPERATOR or MAINT ID and run a Q N command. If CFCC1 or CFCC2 appears in the list, run the following commands to stop them (having first shut down any z/OS systems that might be using them):
FORCE CFCC1
FORCE CFCC2
When running in a base sysplex under z/VM, the S0W1 and S0W2 systems communicate by using the CTCs that you defined in 4.5.1, “Changes to z/VM directory” on page 77. Before they can be used, you must connect the CTCs to each other. Although this connection must be done only from one of the virtual machines, S0W1 and S0W2 must be logged on before you can issue these commands. After both machines are logged on, run the following commands in S0W1:
COUPLE E20 S0W2 E21
COUPLE E21 S0W2 E20
COUPLE E40 S0W2 E41
COUPLE E41 S0W2 E40
COUPLE E42 S0W2 E43
COUPLE E43 S0W2 E42
You are now ready to start the systems in base sysplex mode. To start the system in this mode, run the following command in one of the systems:
TERM CONMODE 3270
IPL A80 LOADP 0A82BSM1 (this loads the system by using the LOADBS member of SYS1.IPLPARM)
As with any time you load the first system in a sysplex, you might receive a WTOR (IXC405D) asking if you want to initialize the sysplex. If you see that message, reply R 00,I. Expect to see messages when the system is initializing that indicate it cannot access CFs CFCC1 or CFCC2. You see these messages because the base sysplex is using the same CDSs (including the CFRM data set) as the Parallel Sysplex. Because you are coming up in base sysplex mode, you can ignore those messages.
When the first system finishes initializing, log on to TSO and browse back through syslog to verify that everything started as expected. If everything is OK, submit job LOGRRRS in SYSPLEX.PARALLEL.CNTL to allocate the DASDONLY log streams that are used by RRS on each system.
The OPERLOG and LOGREC log streams include fixed names. Base sysplex supports only DASDONLY log streams, and DASDONLY log streams cannot be shared across systems. In a base sysplex, a maximum of one system can use OPERLOG or LOGREC, which negates much of the value of those two functions. As a result, we did not provide jobs to create DASDONLY versions of the OPERLOG or LOGREC log streams.
Address any unexpected messages, then load the other system by using the same IPL address and load parameters. When that system is initializing, you should see messages that indicate that XCF is connecting to the other system by using the CTC addresses that you specified in the COUPLE commands.
4.6 Implementing a base sysplex without z/VM
The other option for running a base sysplex is more complex because it involves two PCs, cross-PC file sharing, Server Time Protocol (STP), and the use of a network to connect the PCs.
Base sysplex operation does not involve z/VM, but it does involve other details that must be set up correctly.
The base sysplex configuration involves multiple Linux machines. A Linux file sharing function, such as NFS, provides coordinated DASD functions at the Linux cache level. z/OS uses GRS functions, through the CTC links among z/OS systems, to coordinate data set sharing and other serialization. A synchronized time-of-day function is provided by the zPDT STP function.6
In the configuration shown in Figure 4-4, all of the emulated DASD for all z/OS partners are placed on one Linux machine (PC2), which becomes the Linux file server. In practice, the emulated DASD can be spread over several Linux machines, all of which can work as file sharing servers and clients. The solid lines between the PCs and the switch represent the physical connections between the PCs. The dotted lines represent logical connections. In practice, all of the traffic (STP, XCF, NFS, and so on) goes over the Ethernet connections.
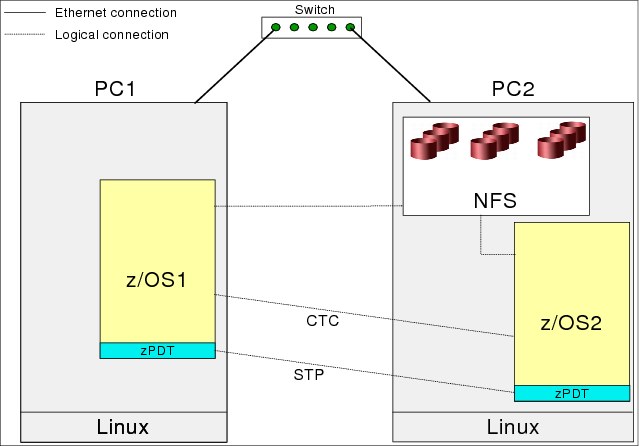
Figure 4-4 Base sysplex without z/VM
4.6.1 Setting up and starting STP
One of the most basic requirements of any sysplex is that all of the systems in the sysplex must have a common time source. When running a Parallel or base sysplex under z/VM, z/VM provides the common time source. However, if the sysplex is spread over more than one PC, you need some other mechanism for keeping the IBM Z clocks in sync: STP.
The zPDT implementation of STP timer facilities is described in the STP chapter of IBM zPDT Guide and Reference, SG24-8205.
To use STP, you must edit and configure the /usr/z1090/bin/CCT_data file on each PC. This file differs slightly on each member of the base sysplex because the IP address (or domain name) differs for each member.
In addition to updating the CCT_data file, you must update the devmap file to add the [stp] section. The STP chapter of IBM zPDT Guide and Reference, SG24-8205, includes clear, step-by-step instructions for setting up these files. An example of the definitions from our devmap is shown in Example 4-4.
Example 4-4 Sample [stp] definition statements from devmap file
[stp]
ctn 00000000F1F0F9F0
node 1 W520 * # For the W510 system, the asterisk is
node 2 W510 # moved to the second node statement
After configuring this file on each sysplex member, verify that all of the members of the base sysplex have TCP/IP connectivity to each other. This connection can be verified by using simple ping commands. Now, run the zPDT stpserverstart command on each member. In principle, running this command causes the STP functions to be started automatically whenever you start Linux. The stpserverquery command can be used to verify that STP is functioning as you expect.
4.6.2 Defining CTCs for XCF communication
Another requirement for a base or Parallel Sysplex is that XCF in the systems in the sysplex must communicate with each other. If a system is trying to join the sysplex but cannot communicate over XCF to the other sysplex members, it is not allowed to join the sysplex.
Because a base sysplex does not have CF structures for XCF communication, it uses CTCs to communicate. In a zPDT sysplex that does not use z/VM, zPDT emulates the CTC function by using TCP/IP to communicate between the PCs. You can find all of the information that you need with sample configurations in the channel-to-channel chapter of IBM zPDT Guide and Reference, SG24-8205.
When z/VM is used to emulate the CTC function, you use the COUPLE command to tell which two CTC devices to connect. Similarly, with zPDT, you need to tell each zPDT the following information:
•Device number for each CTC device
•The remote CTC to connect to
Because TCP/IP is used for the CTC communication, you use the IP address of the remote CTC by using the IP address of the remote Linux. Specify the IP address of the Linux system, not the address of the z/OS system. Sample definitions for two PCs are shown in Example 4-5 and Example 4-6 on page 82.
Example 4-5 Sample devmap CTC definitions on PC1
[manager] #CTC definitions for PC1 in base sysplex
name awsctc 0088
device E40 3088 3088 ctc://192.168.1.99:4000/E41
device E41 3088 3088 ctc://192.168.1.99:4001/E40
Example 4-6 shows the devmap for PC2.
Example 4-6 Sample devmap CTC definitions on PC2
[manager] #CTC definitions for PC2 in base sysplex
name awsctc 0088
device E40 3088 3088 ctc://192.168.1.230:4001/E41
device E41 3088 3088 ctc://192.168.1.230:4000/E40
As described in 4.5.3, “Bringing up your base sysplex” on page 78, the VM COUPLE commands connected CTC E40 in S0W1 to E41 in S0W2. XCF CTCs are unidirectional, so each CTC is a PATHIN (meaning that XCF messages are received on that device) or a PATHOUT (meaning that XCF messages are sent on that device). Therefore, you must always connect a PATHIN device to a PATHOUT device. The CTCs are defined by using the following statements in the COUPLEPS member:
/* DEFINE XCF TRANSPORT CLASS PATHS FOR BASE SYSPLEX */
PATHIN DEVICE(E20) /* DEFAULT TC */
PATHIN DEVICE(E40) /* DEF8K TC */
PATHIN DEVICE(E42) /* DEF61K TC */
PATHOUT DEVICE(E21) CLASS(DEFAULT)
PATHOUT DEVICE(E41) CLASS(DEF8K)
PATHOUT DEVICE(E43) CLASS(DEF61K)
On system S0W1, you connect E20 (a PATHIN) to E21 (a PATHOUT) on S0W2, and E21 (a PATHOUT) to E20 (a PATHIN) on S0W2. Therefore, the devmap file should connect the CTC devices to the opposite type of CTC on the target system. In the statements that are shown in Example 4-5 on page 81, E40 on this system is connected to E41 on the remote system. Also, the port number for this connection is 4000.
If you review the definition of device E41 on the other PC, you see that it specifies device number E40 as the target CTC device. It also specifies the same port number as the E40 definition on PC1. Similarly, E41 on PC1 is connected to E40 on PC2. However, this connection is using a different port number (4001) in this case. If you have multiple CTC connections, each one must use a different port number.
When you run the awsstart command on the second PC, you do not see any messages about the CTC connection unless there is a problem. If you want to check that the two PCs are connected, run the zPDT awsstat command.
4.6.3 Sharing zPDT DASD across PCs
Our base sysplex configuration requires shared DASD operation for all of the emulated 3390 volumes. Setting up Linux shared directories is beyond the scope of this book.
The process that is used to share zPDT DASD across PCs includes the following steps on an openSUSE 13.1 system:
1. On our openSUSE Linux system that holds all of the emulated 3390 volumes, we used YaST functions to create an NFS server with the following parameters:
– NFS server: Start
– Firewall: (firewall is disabled: You might request opening a port in your firewall)
– Enable NFSv4: yes
– Enable GSE security: no
– Directories to export: /z (this directory contained all our emulated volumes)
– Host wildcard: 192.168.1.230 (the address of our second system Linux)
– Options: fsid=0,crossmnt,rw,root_squash,sync,no_subtree...
2. On our second Linux system, we defined mount point /z2 (owned by user ibmsys1) with read and write access by everyone. We selected this mount point to be different from the /z mount point that we normally use for local volumes. We did not want there to be any confusion about which PC’s disks that we were referring to. We then used YaST services to define an NFS client with the following parameters:
– NFS shares:
Server remote-directory mount-point NFS type options
192.168.1.99 /z /z2 nfs rw,defaults
– Enable NFS4: yes
– NFSv4 Domain Name: localdomain (use default value unless you know better)
– Enable GSS Security: no
– Firewall settings: (firewall is disabled)
3. In principle (perhaps after rebooting both systems), you should see the shared volumes from the second Linux system by running a command, such as ls /z2. In practice, we ran the following command on the second system (working as root) to see the shared volumes from the second system:
# mount -t nfs4 192.168.1.80:/ /z2
We are not NFS experts and considerable experimentation at times was needed to make the sharing work. Be certain that the rw (read/write) option is present on the NFS server and client.
4. Be certain the --shared option is present on the awsckd device manager statements in the devmaps on both systems. This statement enables RESERVE/RELEASE emulation. Be certain the devmap for the second system contains the correct mount points (/z2 in our example) for all of the emulated disk volumes.
When the cross-PC file sharing is working, update the devmap file for the second PC to change the file names to include the z2.
|
Note: Although functional and sufficient for function testing, this configuration might not deliver the levels of performance that you require. If you can make a larger financial investment in improving the performance of a multi-PC zPDT configuration, see Appendix C, “Alternative disk configuration” on page 145.
|
4.6.4 Required Parmlib changes
In addition to the infrastructure changes (STP, CTCs, and shared DASD) that are required to span the base sysplex across more than one PC, a few changes to Parmlib are required. The systems must be told to use STP for their time synchronization, meaning that the CLOCKxx member must be updated. The ADCD default is to disable ETRMODE and STPMODE. You also need to configure GRS for Ring mode rather than Star mode. Also, each RRS must be started with a different group name to stop them from trying to share log streams.
LOADST member
You need some way to tell the system that it is to come up in base sysplex, not under z/VM mode. You also need a way to set system-specific system symbols. When running under-z/VM, you can use the VM user ID as a filter in the IEASYMxx member. However, this sysplex is not running under VM so that method is not an option.
However, you can use the ‘LPAR Name’. When running under zPDT, the instance name (which is set to the Linux user ID that started zPDT) is loaded into the LPAR name field. Therefore, you can filter by using the LPARNAME field in your IEASYMxx member.
|
Important: When running a base sysplex that spans two PCs, you must start zPDT with a different Linux user ID on each system. Failing to use this configuration can result in problems because it appears that the same system is being loaded twice into the same sysplex.
|
Consider the following points:
•The LOADST member is identical to LOADPS, except that it points at IEASYMST.
•The LOADST member is copied into SYS1.IPLPARM when you run the STPPARM job.
IEASYMST
IEASYMST is identical to IEASYMPS with the exceptions that it filters based on the Linux user ID. It specifies that the system uses IEASYS00, IEASYSPS, and IEASYSST when initializing.
|
Note: It is likely that you must customize the IEASYMST member. It is set up on the assumption that the two z/OS systems include instance names of IBMSYS1 and IBMSYS2. If the Linux user IDs that you use to start zPDT have different names, you must adjust this member.
|
The IEASYMST member is copied into USER.Z22D.PARMLIB when you run the STPPARM job.
IEASYSST
The IEASYSST member contains only the following parameters:
CLOCK This parameter is set to ST to use the CLOCKST member.
GRS This parameter is set to TRYJOIN because it is a base sysplex.
The IEASYSST member is copied into USER.Z22D.PARMLIB when you run the STPPARM job.
CLOCKST member
The ADCD-provided CLOCK00 member specifies NO for STPMODE and ETRMODE. Because a sysplex that spans more than one PC requires STP, you must use a CLOCKxx member that specifies STPMODE YES. Consider the following points:
•The CLOCKST member is a complete replacement for the CLOCK00 member.
•The CLOCKST member is copied into USER.Z22D.PARMLIB when you run the STPPARM job.
SMFPRMBS
The SMFPRMBS member is identical to the SMFPRMPS member with the exception that it specifies system-unique log streams rather than a single log stream that is shared by both systems.
The SMFPRMBS member is copied into USER.Z22D.PARMLIB when you run the STPPARM job.
VTAMBS
The VTAMBS member is similar to the VTAMPS member with the exception that it starts each RRS with a different group name. This technique avoids both RRSs trying to share the log stream (cross-system log stream sharing is not possible in a base sysplex).
Run the job STPPARM in SYSPLEX.PARALLEL.CNTL to copy these members into USER.Z22D.PARMLIB and SYS1.IPLPARM.
4.6.5 Loading the systems
All of the pieces that are required to start a base sysplex without z/VM should be in place now. Allow the first system to complete the entire startup process before you load the second system. Also, load the system that is in the same PC as the NFS server first.
With Linux sharing enabled, some operations are slower. For example, starting the second system (NFS client) with network connection to the NFS server causes the IPL to be much slower. Loading the local system first might load the Linux cache with data that is used by the IPL, which provides a small benefit for later loads by remote systems. Even allowing for that benefit, a load of the second system will be much slower than the load of the first system.
Both systems can be loaded by using the ipl a80 parm 0A82STM1 command.
As with any time you load the first system in a sysplex, you might receive a WTOR asking if you want to initialize the sysplex. If you receive that message, reply R 00,I. You can expect to see messages when the system is initializing that indicate that it cannot access CFs CFCC1 or CFCC2. You are seeing these messages because the base sysplex is using the same CDSs (including the CFRM data set) as the Parallel Sysplex. Because you are coming up in base sysplex mode, you can ignore those messages.
When the first system finishes initializing, log on to TSO and browse back through the syslog to verify that everything started as expected. If everything is OK, submit job LOGRRRS in SYSPLEX.PARALLEL.CNTL to allocate the DASDONLY log streams that are used by RRS on each system.
The OPERLOG log stream has a fixed name. Base sysplex supports only DASDONLY log streams, and DASDONLY log streams cannot be shared across systems. In a base sysplex, a maximum of one system can use OPERLOG, which negates much of the value of this function. As a result, we did not provide a job to create a DASDONLY version of the OPERLOG log stream.
Address any unexpected messages. Then, load the other system by using the same IPL address and load parameters. When that system is initializing, you should see messages that indicate that XCF is connecting to the other system by using the CTC addresses that you specified in the devmap file.
4.7 Operating your sysplex
After your sysplex finishes initializing, operating the systems should be similar to running in a normal monoplex environment, except for all the extra functions that are available. For example, when you have a single system, there always is a concern that the system might not come back up after a change is made. When you have a sysplex, you can stay logged on to one system while you load the other system. If there is a problem, you still have a running, fully functional system that you can use to address whatever is stopping the system from loading.
4.7.1 Managing your x3270 sessions
At least five 3270 sessions are needed for the sysplex. If you try to squeeze all sessions onto the one window, the cluttered window makes it easy to enter commands in the wrong 3270 session.
We suggest using two Linux desktop workspaces with the arrangement that is shown in Figure 4-5.7 The 3270 windows that are related to the S0W2 system are in the second workspace, which helps prevent confusion when the multiple 3270 windows are used. The 3270 addresses that are shown in Figure 4-5 correspond to the 3270 device addresses that are defined in the devmap file. An example of the interactions with the various x3270 sessions is provided in Appendix D, “Sample IPL flow for sysplex under z/VM” on page 149.

Figure 4-5 Sample layout for x3270 sessions
4.7.2 Post-IPL messages
If you switch back to running the S0W1 system in monoplex mode after it has been running in a multi-system sysplex, you might see unusual messages during start.These messages are issued because it appears to z/OS that systems in different LPARs are trying to use the same page data sets, as shown in the following example:
ILR030A PAGE DATA SET MAY BE IN USE
ILR031A REPLY 'U' TO PREVENT ACCESS, 'CONTINUE' TO ALLOW USE OF SYS1.....
r 00,continue <---your reply
In this case, ensure that only one system is using those page data sets. If it is, reply continue, as shown in the example.
4.7.3 SMF considerations
The default mode of operation for an ADCD system is for SMF collection to be disabled. In a purely development system (especially with one or a few users), you might find that you rarely use the SMF data. However, if you want to collect SMF records, the following options are available, depending on how you are running your systems:
•In a Parallel Sysplex, you can share a single log stream between both systems. This configuration is convenient because all of your SMF records are in a single location. You can leave the records in the log stream and have system logger automatically delete them after a retention period that is specified on the log stream. The SMF log stream that is delivered with the 2017 Sysplex Extensions has a retention period of 14 days. However, you can change this setting at any time by updating the log stream definition. The log stream for Parallel Sysplex mode is called IFASMF.GENERAL.
•In a base sysplex, a log stream cannot be shared across multiple systems. However, you can still write the SMF data from each system to its own log stream. This configuration provides most of the benefits of the single log stream, with the exception that you no longer have a single repository of all SMF data. The log streams that we defined for base sysplex mode are called IFASMF.S0W1 and IFASMF.S0W2.
•In any mode (monoplex, base sysplex, or Parallel Sysplex), you can use the traditional SYS1.MANx VSAM data sets.
The 2017 Sysplex Extensions provides two SMFPRMxx members: SMFPRMBS and SMFPRMPS. Both members contain definitions for SYS1.MANx data sets with data set names that contain the system name (for example, SYS1.S0W1.MAN1). The SMFPRMBS member is used when the system is undergoing IPL using a LOADxx member that indicates that it is to come up in base sysplex mode.
The SMFPRMBS member contains definitions for the system-specific log stream name. The SMFPRMPS member is used when the system is brought up in Parallel Sysplex mode, and it contains a definition for the shared log stream.
By default, SMF recording is disabled. If you need to enable recording, update the SMFPRMxx member to say ACTIVE rather than NOACTIVE.Then, issue the SET SMF=xx command to get SMF to use the parms in the named member. Note that you cannot use the SETSMF command to change the ACTIVE|NOACTIVE setting.
4.7.4 Sysplex policies
The sysplex policies that are provided by the 2017 Sysplex Extensions are sufficient to get the sample Parallel Sysplex (complete with CICSplex and DB2 data sharing) up and running. Nevertheless, it is likely that you will want to make changes to these policies over time. Create a local copy of the provided jobs and make any changes that you want in those local copies. The sources for the provided policies are in the following members in SYSPLEX.PARALLEL.CNTL:
POLARM1 Automatic restart manager policy
POLCFRM1 Coupling facility resource management policy
POLSFM1 Sysplex failure management policy
LOGRCICS Defines CICS model log streams
LOGREREP Deletes and redefines the LOGREC log stream
LOGRHC Deletes and redefines the z/OS Health Checker log stream
LOGROPR Deletes and redefines the OPERLOG log stream
LOGRRRS Deletes and redefines the RRS log streams
LOGRSMF Deletes and redefines the SMF log streams
If you want to change the ARM, CFRM, or SFM policies, give the new policies a different name from the active policy. The policy name is specified on the NAME parameter on the DEFINE POLICY statement in the policy. When you activate the new policy, the policy name is specified in the SETXCF START,POLICY command. By using a different name, you can fall back to the old policy if there is a problem with the new policy.
The sources for the policies that are provided by the 2017 Sysplex Extensions are in Appendix B, “Sysplex couple data sets and policies” on page 131.
4.7.5 Shutdown
Although you might be tempted to shut down your system by simply killing it, this process can result in data loss and unexpected messages the next time that the system is loaded. For these reasons, take the time to complete an orderly shutdown of your system. This suggestion applies to any system, but especially to a system in a zPDT Parallel Sysplex because of the multiple levels of virtualization that are being used.
Buffering is used in both z/OS and Linux to improve performance. If you simply kill the system, I/Os that appear to be complete might not be written to disk yet. By performing an orderly shutdown of z/OS, then z/VM, then zPDT, and then Linux, you decrease the risk of data loss.
ADCD provides the VTAMAPPL tool to automate the startup and shutdown of your system. The ADCD-supplied proc for this process is called SHUTALL. We created a slightly modified version called SHUTSYS. The SHUTSYS JCL is in USER.Z22D.PROCLIB. It points at members SHUTS0W1 or SHUTS0W2 in USER.Z22D.PARMLIB, depending on which system is being stopped.
Depending on which started tasks are running on your systems, you might want to customize these members to remove commands for started tasks that you do not use and add commands for your started tasks that are not included in the provided members.
The example shows how you perform an orderly shutdown of both systems (the numbers in parentheses at the start of some lines refer to the device numbers that are used in Figure 4-5 on page 86):
logoff of all TSO sessions
(703) S SHUTSYS (start shutdown script for S0W2)
(IMPORTANT - wait for the $HASP250 ZFS PURGED and $HASP099 ALL AVAILABLE FUNCTIONS COMPLETE messages - it might take a few minutes, and there might be a pause in messages after VTAM stops and before you see the messages about ZFS stopping.)
(700) V XCF,S0W2,OFFLINE
nn IXC371D CONFIRM REQUEST TO VARY SYSTEM S0W2 OFFLINE, REPLY
SYSNAME=S0W2 TO REMOVE S0W2 OR C TO CANCEL
(700) nn,SYSNAME=S0W2
nn IXC102A XCF IS WAITING FOR SYSTEM S0W2 DEACTIVATION. REPLY DOWN
WHEN MVS ON S0W2 HAS BEEN SYSTEM RESET
(Do NOT reply DOWN to this message. z/VM will automatically put S0W2 into a wait state when the vary offline processing has finshed)
(wait for console activity to stop; usually after a CONSOLE
PARTITION CLEANUP COMPLETE message.)
(703) LOGOFF after the system enters a wait state
(to log off the S0W2 virtual machine)
(700) S SHUTSYS (start shutdown script for S0W1)
(IMPORTANT - wait for the $HASP250 ZFS PURGED and $HASP099 ALL AVAILABLE FUNCTIONS COMPLETE messages - it might take a few minutes, and there might be a pause in messages after VTAM stops and before you see the messages about ZFS stopping.)
(700) V XCF,S0W1,OFFLINE (this allows PDSE, etc, to stop cleanly)
(700) nn,SYSNAME=S0W1
(700) LOGOFF after the system enters a wait state
(to logoff the S0W1 virtual machine)
(CFCONSOL) FORCE CFCC1
(CFCONSOL) FORCE CFCC2
(CFCONSOL SHUTDOWN (shutdown z/VM)
(Linux 1) $ awsstop
The V XCF command and the response to the WTOR can be issued on either system, but must name the system that is being stopped. It is important to complete this step. During the shutdown processing for S0W1, you might see a number of BPX messages stating that the file system cannot be automoved. Those messages can be ignored. Because S0W1 is the last system in the sysplex, there is no alternate system available to move those file systems to. You might also see the following message:
BPX1070E USE SETOMVS ON ANOTHER SYSTEM TO MOVE NEEDED FILE SYSTEMS, THEN REPLY WITH ANY KEY TO CONTINUE SHUTDOWN
This message is also related to the attempts to automove those file systems. Because the last system in the sysplex is being stopped, there is no other system to move the file systems to. Reply Rnn,U (or any character string) to the message to allow the shutdown to proceed.
If you do not complete this step, the other members of the sysplex might think that you are loading another system with a duplicate name (because you never cleanly removed it from the sysplex) the next time you attempt to load the system.
4.7.6 Useful commands
A few commands can be entered directly on a CFCC console. Because we use a common z/VM interface to the CFCC virtual machines, we must use the z/VM SEND command. The following examples direct CFCC commands (these are entered on the CFCONSOL terminal window) can be used:
SEND CFCC1 DISPLAY MODE
SEND CFCC2 DISPLAY RESOURCES
SEND CFCC1 DISPLAY CHPIDS
SEND CFCC2 HELP
Another VM command that can be helpful is TERM HOLD OFF. VM sends a message to all logged on virtual machines at midnight informing them of the new time and date. If your z/OS console is logged on when this message is issued, it goes into a CP HOLDING state. If this state is not cleared, the console buffers will eventually fill and the system will go into a wait state. Issuing the TERM HOLD OFF command on the S0W1 or S0W2 console before you run an IPL on z/OS stops the console from going into the HOLDING state.
Several z/OS commands are directly related to CF usage. In principle, the following commands are issued through the MVS operator console. In practice, some of the commands produce too much output to be useful on the MVS console panel and are best used through the SDSF LOG interface:
D CF Best use SDSF interface
D XCF Brief XCF status
D XCF,CF More detailed information
D XCF,COUPLE Lots of output, use SDSF interface
D XCF,POLICY
D XCF,STR List defined structures
D XCF,STR,STRNAME= ISGLOCK Details about specific structure, use SDSF
D LOGREC LOGREC status
D LOGGER ,L LOGGER status
V OPERLOG,HARDCPY If not already using LOGGER for some reason
SETLOGRC LOGSTREAM Change LOGREC recording
SET SMF=xx Switch to new SMFPRMxx member
The following z/OS commands are not directly related to CF usage, but are helpful in determining the state of the system:
D C,HC Hardcopy log status
D ETR External timer mode status
D C MVS console status
D IPLINFO
D M=CPU
D IOS,CONFIG
D M=STOR
$D MASDEF
$D MEMBER
The following Linux commands might be useful for base sysplex setup:
$ cat /etc/exports Used on an NFS server system
# showmounts -e Used on an NFS client system
4.7.7 Defining new CDSs
There might be situations where you want to move to new CDSs. For example, the supplied CDSs are formatted for a sysplex that contains up to four systems. If you want to have more than four systems in your sysplex, you must create a set of CDSs that are formatted with an appropriate MAXSYSTEM value.
The following basic mechanisms are available for moving to a new set of CDSs:
•Define the new CDSs (by using the DEFCDSS job in SYSPLEX.PARALLEL.CNTL as a model). Then, use the SETXCF ACOUPLE and SETXCF PSWITCH commands to copy the contents of the current CDSs to the new CDSs.
•Shut down the sysplex, start the original ADCD monoplex system (which has its own set of CDSs), delete the CDSs, define new (empty) data sets (by using the DEFCDSS job in SYSPLEX.PARALLEL.CNTL as a model), and bring the sysplex back up again.
|
Important: Most CDSs contain information that is constantly updated by the systems in the sysplex. In addition, some CDSs contain information (policies) that you create and place in the appropriate CDS, such as ARM, SMF, or CFRM. If you delete and redefine the primary and alternative CDSs, all of that information is lost.
|
The first mechanism is almost always used in a production environment or any environment in which a sysplex-wide outage is unacceptable. It also has the advantage that all of the information (policies and status information) in the CDSs is carried forward to the new CDSs.
If you decide to use the first mechanism, the process includes the following steps:
1. Create a copy of the DEFCDSS job that allocates the data sets you require, along with the changes that you want to make (for example, larger MAXSYSTEM value).
2. Run a SETXCF ACOUPLE command to replace the alternative data set with the data set that becomes the new primary.
3. Run a SETXCF PSWITCH command to replace the current primary data set with your new primary data set.
4. Run another SETXCF ACOUPLE command to add the new alternative CDS.
5. Update the COUPLEPS member of USER.Z22D.PARMLIB to specify the new CDS names. This step ensures that the sysplex uses the correct data sets the next time that you load a system or the entire sysplex.
At the end of this process, you are running on the new CDSs, and all of the status and policy information from the corresponding old CDSs are carried forward.
However, if your objective is to discard all of the contents of the CDSs and start with a clean sheet, the process is more complex. It is especially important to understand that if you use the second mechanism to replace the System Logger CDSs, all of the information in the existing log streams will be inaccessible.
The process that is used to replace the CDSs by using the second mechanism includes the following steps:
1. Shut down the Parallel Sysplex and z/VM.8
2. Load the basic ADCD system (not under z/VM) with an IPL parameter, such as 0A82CS.
3. Using ISPF option 3.4, delete all of the Parallel Sysplex CDSs on volume CF0001.9 Those data sets have names beginning with PARALLEL.ADCDPL. Do not delete the CDSs that are used by the basic ADCD system. These data sets have names beginning with SYS1.ADCDPL, and are on other volumes.
You might also want to delete the Logger offload data sets, as described in “Logger data sets” on page 93. Failing to delete these sets can result in confusing messages in the future because Logger attempts to allocate new staging and offload data sets with names that are duplicates of existing data sets.
4. Change whatever parameters you want in the coupling definitions in the DEFCDSS and POLaaaa jobs in PARALLEL.SYSPLEX.CNTL.
5. Run job DEFCDSS to create the CDSs and verify that the job ends with return code zero.
6. Update the COUPLEPS member of Parmlib to specify the new CDS names, if necessary.
7. Run the POLaaaa jobs to install your policies into the new CDSs.
|
Important: The default action when you run the IXCMIAPU utility to create a policy is to install that policy in the corresponding in-use CDS. However, you are running with the ADCD-provided CDSs in this case, but you want to install your new policies into the CDSs that you just created. Therefore, it is vital to ensure that the POLaaaa jobs include the name of the target CDS on the DEFINE POLICY statement, as shown in Example 4-7.
This method can be used only with the ARM, CFRM, and SFM policies. It is not possible to update the LOGR policy in anything other than the active LOGR CDS.
|
Example 4-7 Sample IXCMIAPU statements
//POLARM1 JOB (0,0),CLASS=A,MSGCLASS=X,NOTIFY=&SYSUID.
//ARMPOL EXEC PGM=IXCMIAPU
//SYSPRINT DD SYSOUT=*
//SYSOUT DD SYSOUT=*
//SYSIN DD *
DATA TYPE(ARM) REPORT(YES)
DEFINE POLICY NAME(ARM1) DSN(SYSPLEX.ADCDPL.NEW.ARM.CDS01) REPLACE(YES)
8. If you created CFRM CDSs, update the COUPLEPS member to add the CFRMPOL(aaaaaa) statement. This step is necessary if you want to start in GRS Star mode and the CFRM CDSs being used for the IPL were not used previously.
9. Complete any other tasks that are easier in an unshared system.
10. Shut down the basic ADCD system.
11. Start z/VM, the two coupling facility virtual machines, and load the S0W1 system (with IPL parameter 0A82PS).
Several unexpected error messages might appear in the log. These messages occur because the various log streams are not yet defined.
12. Run the following jobs from the SYSPLEX.PARALLEL.CNTL data set:
– LOGRCICS for the CICS model log streams
– LOGREREP for the LOGREC log stream
– LOGRHC for the z/OS Health Checker log stream
– LOGROPR for the OPERLOG log stream
– LOGRRRS for the RRS log streams
– LOGRSMF for the SMF log streams
Use the z/VM command DIAL S0W1 to access a VTAM session.
13. Edit the COUPLEPS Parmlib member again and remove the CFRMPOL statement.
The extra CF structures are now available, but your S0W1 system is not using the structures that were added by the LOGRaaaa jobs. You can use the structures immediately by running the following MVS commands:
V OPERLOG,HARDCPY (starts OPERLOG operation)
SETLOGRC LOGSTREAM (moves LOGREC to the log stream)
SETSMF RECORDING(LOGSTREAM) (change SMF to use log stream mode)
S RRS,SUB=MSTR (restart RRS to use CF structures)
D XCF,STR (display the allocated structures)
The next time that you perform an IPL (with load member LOADPS), these log streams will be used automatically.
Logger data sets
Be aware that the CDSs might contain data that is needed across IPLs. The most obvious case involves Logger staging and offload data sets. In normal use, Logger automatically deletes its offloaded data sets when the retention period for all of the records in the data set expires. If you delete and re-create the CDSs, this retention period information for Logger data sets is lost. The data sets remain on your disks until they are explicitly deleted. These sets are VSAM data sets and are slightly more difficult to delete than simple sequential or partitioned data sets.
The Logger data sets normally have the high-level qualifier IXGLOGR (but have a HLQ of LOGGER or START1 for the CICS log streams in our parallel Sysplex system) and have full names, as shown in the following example:
IXGLOGR.IFASMF.GENERAL.A0000000 <==base cluster name
IXGLOGR.IFASMF.GENERAL.A0000000.DATA
IXGLOGR.SYSPLEX.LOGREC.ALLRECS.A0000000 <==base cluster name
IXGLOGR.SYSPLEX.LOGREC.ALLRECS.A0000000.D
or
LOGGER.IFASMF.GENERAL.A0000000 <==base cluster name
LOGGER.IFASMF.GENERAL.A0000000.DATA
LOGGER.SYSPLEX.LOGREC.ALLRECS.A0000000 <==base cluster name
LOGGER.SYSPLEX.LOGREC.ALLRECS.A0000000.D
The A0000000 qualifiers in these examples are for the first LOGGER data set in each group. This number is incremented when subsequent offload data sets are created.
4.7.8 Adding 3390 volumes in Parallel Sysplex
You might want to add emulated 3390 volumes to one or both z/OS systems. The z/VM directory for the z/OS guests that is described in this chapter has directory definitions for z/OS 3390 volumes at addresses A80 - ABF, which might be sufficient for your extra volumes.
Complete the following steps:
1. Create (or restore) the volumes. Creating a volume involves the use of the zPDT alcckd command as described in 4.3.3, “Downloading and creating volumes” on page 43.
2. Add the new volume to the devmap. The devmap file used in our examples is called devmapp. Use an address in the A80 - ABF range, if possible. If this range cannot be used, complete the following steps to modify the z/VM directory:
a. Start zPDT (run the awsstart devmapp command) and IPL z/VM (run the ipl 200 parm 0700 command).
b. Log on as user MAINT (initial password is ZVM64010).
c. Edit the VM directory (run the xedit user direct c command).
d. Scroll to the section that begins with user ID MVSDUMMY.
e. For more information about the devices that are defined in the ADCD-provided IODF, see “Devices that are defined in the ADCD-provided IODF” on page 124. If possible, use an address that is defined to avoid having to update the IODF.
f. By using the patterns for user IDs MVSDUMMY, BASEAD, S0W1, and S0W2, add lines for your new volumes, if needed. Add these lines to all four user IDs.
g. Exit from Xedit (run the file command).
h. Update the z/VM directory (run the directxa user direct c command).
3. Start one of the z/OS systems. If you created 3390 volumes (instead of restoring the volumes from a DVD or a download), you must submit an ICKDSF job from TSO to initialize the volumes. z/OS automatically varies offline any uninitialized volumes it finds during IPL. After you initialize the volumes with ICKDSF, you can vary them online to z/OS.
4.7.9 Adding 3270 terminals in Parallel Sysplex
You can add more 3270 sessions for z/VM or for each z/OS. Consider the following points:
•z/VM must know about the extra local 3270 devices. This process is completed by adding 3270 definitions in the devmap. z/VM recognizes 3270 terminals, regardless of the addresses that are used. That is, it is not necessary to use addresses in the 7xx range (although our z/VM customization requires a local 3270 session at address 700 for the initial operator session). Remember that a maximum of 32 terminals can be defined for the aws3274 device manager. You might need to run a z/VM enable all command to obtain a logon logo on the new terminals.
•After you define the extra z/VM 3270 sessions, you can use these sessions to DIAL to a z/VM guest. For example, DIAL S0W1 connects to our first z/OS system.
•The z/VM user ID definition for a guest (S0W1, S0W2, and BASEAD) must have sufficient SPECIAL statements for all of the 3270 sessions (except the session at address 700 that is used for the MVS console). You can add SPECIAL statements for these user IDs by editing the z/VM directory, as described in 4.7.8, “Adding 3390 volumes in Parallel Sysplex” on page 93. These SPECIAL connections are hardware connections between a 3270 session and the guest z/OS virtual machine.
•z/OS must recognize the 3270 session. The current ADCD systems recognize local 3270 connections at addresses 701 - 73F. However, the A0600 member in VTAMLST allows only 10 TSO sessions through local 3270 connections. You must modify VTAMLST to increase this number if you need more than 10 local 3270 sessions.
•You can connect 3270 sessions to z/OS TCP/IP. The current ADCD systems allow up to 30 such connections through definitions in the TCPIP PROFILE and in VTAMLST. These sessions11 do not require any modifications to z/VM or the devmap.
4.7.10 Scaling up in Parallel Sysplex
Some of the limitations of the starter system that we described are important to understand. It is a relatively small configuration and various steps are required to expand it to a larger, more robust configuration. In particular, consider the following points:
•Our two z/OS systems are defined (in the z/VM directory) with a modest amount of memory for each. Depending on the products that are used in the system and the volume of work that is processed, the system might require much more memory.
•Our sample devmap defines a 10 GB zPDT system. The memory size is specified on the memory keyword. This value must be increased to accommodate larger z/OS systems.
•Larger z/OS systems often require larger paging data sets. If large virtual memory applications (such as DB2 applications) are used and if SVC memory dumps might be expected, considerably larger paging areas are required for each z/OS. The MVS command D ASM is useful for determining the amount of paging space that is used. Under SDSF, the DA function can be used to informally sample dynamic paging rates.
•Larger z/VM and z/OS memory should have correspondingly larger PC server memory.
•Our z/VM system has one volume for paging. More z/VM paging volumes might be needed. Monitor for HCPPGT401I and HCPPGT400I messages on the VM OPERATOR console. These messages can precede a VM wait state. If you encounter these messages, add more paging volumes to z/VM before you add more work to z/OS.
•Our CFs (in the z/VM directory) are defined with 5000 MB each. Depending on the number and size of your coupling structures, these CFs might need to be larger. Run a D CF command on z/OS to determine how much free space you have in each CF. Generally, aim for each CF not being more than 50% full to allow for moving all of the structures into one CF if you must restart the other CF.
•Our z/OS systems have limited STORAGE disk space (as defined in the VATLST00 members in PARMLIB). You might need to add disk volumes that are defined as STORAGE volumes.
•SVC memory dumps are directed to D2SYS1 and D2SYS2. You might want to direct them to any larger volumes that you add.
•You should monitor paging and swap space in your base Linux. The xosview program is convenient for this process if you installed it with Linux.
Paging (by the base Linux, z/VM, or z/OS) often is a poor use of the limited disk I/O resources in a zPDT system. More PC memory, combined with a small amount of monitoring to best balance memory usage, can be the most effective way of improving the performance of the zPDT systems. Despite these efforts, you are likely to see base Linux swap activity. This activity appears to be mostly because of a strong Linux preference to use real memory for the disk cache. An effective disk cache is important for zPDT performance.
1 In theory, it should be possible to use the 2017 Sysplex Extensions with some small modifications to create a Parallel Sysplex that is based on an appropriately licensed zD&T environment.
2 These installation instructions assume that you will use your existing Master catalog for both monoplex and multi-system sysplex environments. The Sysplex Extensions do not provide a new Master catalog.
3 The D2PRDn volumes contain various products, and you might not need all of them. See the ADCD documentation for more information about the contents of each volume.
4 If you are using zPDT release 7, you must use z/VM 6.3, or z/VM 6.2 with the APARs that are required to support IBM z13®. These APARs are required even though you are not running on a real z13. If you are using zPDT release 8, you must use z/VM 6.4 with the APARs to support z14.
5 All of the z/OS parts of the 2017 Sysplex Extensions installation can be done in a z/OS that is running natively under zPDT rather than under z/VM. However, that configuration eliminates the opportunity to gain experience with z/VM before starting your sysplex. It also means having to go back through all of the steps in this chapter and performing the z/VM-related steps separately. However, if your target environment is a base sysplex that spans multiple PCs, it is not necessary to use z/VM, so you can skip the z/VM-related steps.
6 The zPDT STP function requires zPDT GA6 or later.
7 Another option is to use a separate PC for the 3270 sessions that are related to the S0W2 system.
8 This step also can be done by using the BASEAD guest under z/VM. When this approach is used, you must stop the two coupling facility virtual machines after you stop and log off the S0W1 and S0W2 virtual machines.
9 Our installation example in this chapter uses this VOLSER, but other volumes can be used.
10 This password is the password for the z/VM 6.4 ADCD system. Other z/VM implementations feature their own passwords.
11 There is a limit of 30 because of TN3270 and VTAM definitions. These limits can be increased, if needed.
..................Content has been hidden....................
You can't read the all page of ebook, please click here login for view all page.