Storyboarding
Above drawing and the rest, the greatest single attribute of a successful story artist is imagination. Applying imagination to storyboarding is easier said than done but ultimately the imaginative storyteller will see more of their work on the screen. Movies, comics, graphic novels, and Manga are great starting points to see what others are doing, but the goal is originality.
—Barry Cook, Animator, former Disney Story
Development artist, and Director of Disney’s Mulan
Storyboards are a way for the filmmaker to pre-visualize the film-story as a series of still drawings in order to chart visual flow and continuity as well as to plan for stylistic integrity and story clarity. Storyboarding is a blueprint and a way of visualizing the whole of your film by depicting its individual shots. In larger productions, this blueprint is an essential form of communication to the many artists and technicians who need to know what is expected in the film. The storyboards for a film are not usually seen by the public, but their importance in making a story idea visual for film is vital. Storyboards need to capture the essence of an image’s storytelling power. Learn to recognize powerful storytelling images.

I saw this situation on my way home from work one day. I didn’t see the accident but I did not have to ask, “What happened?” The image tells the whole story.
Drawing
Storyboards are created to plan one’s own film. Other times they are created in collaboration with story teams to “work out” and realize how a film is going to play. These “process boards” can be simple thumbnails one creates to keep things ordered. Scribbles, stick figures with words, diagrams, and arrows may suffice as long as everyone who needs to know what is going on can understand their meaning. “Presentation storyboards,” on the other hand, are made to show others how the film is expected to look. Presentation boards may need to be drawn well enough to be understood by people who are not artists or filmmakers.
Presentation boards carry information about style and content of the film. One may need to create a sense of volume, structure and weight in the drawing but detail is not usually important. Simplicity and clarity are important. Frank Gladstone, a 35-year animation veteran, Producer and Training Director at several major animation studios including Disney, DreamWorks and Warner Brothers said, “I actually find that finely detailed boards are often difficult to read. Better to be clear than polished.”

Visual Imagination
Those who have learned to draw well have not trained their fingers so much as they have trained their minds. Drawing requires heightened visual powers. Those who draw well are usually more able to visualize and imagine images and are obviously more capable of communicating their vision to others. Those who struggle with drawing sometimes struggle with visual ideas and have difficulty illustrating those ideas clearly.
It is important that the storyboard artist can show form and descriptive detail with clarity. The ability to draw varied perspectives and spatial relationships is also critical. Storyboard drawings need to communicate specific and often complex angles and action. Drawings of humans and other characters must move and act and be believable. Drawings of landscapes, architecture, machines, props and natural elements such as wind and water may be required. It certainly helps if you love to draw and are fairly good at it.
Animation Storyboards
Despite the advances in technology for animation production, animation is usually a slow, labor-intensive process. Shots lasting a few seconds can take months to execute. Unlike live-action films, animation editing is mostly done up front. Animation shots need to be carefully planned so you know what you want to see in the film before many hours are invested in creating it. Storyboarding is how this planning is done. Good animation storyboards also propel the entire process by inspiring the other artists in the production pipeline. Storyboard drawings of action poses, facial expressions, and environments may become the first “key poses” of an animator’s scene or suggest background and layout possibilities.
Animation, Action and Exaggeration
Pushing action is the essence of animation and of storyboarding. The drawing has to “emote” as much as the animation and more since it doesn’t move around.
—Jim Story, former Disney Feature Animation story artist and instructor of story, University of Central Florida
Much more than live-action, animation storyboard drawings often need to show exaggeration and caricature. Animated characters can move at lightning speed or have their eyes pop out of their heads, perform impossible physical feats and defy gravity. The storyboard artist is bound only by his or her imagination and ability to draw. Animators have been making animals talk and characters fly long before the live action guys figured out how to do it. Even something as primitive as Pat Sullivan’s first animated short of Felix the Cat (1919, Feline Folies) shows Felix pulling musical notes out of the air and making them into a scooter in which he rides away. Today and in the future, digital film technology will be providing more choices to every aspect of film, so limitations keep disappearing for the filmmaker. This is where the storyboard artist’s creative vision can excel.
Professional Story Artist
Can you express a series of thoughts visually? To be a successful storyboard artist, you need an overworking brain and plenty of imagination—you need to understand acting and staging, mood and lighting. You must be able to write dialogue and create characters. A storyboard artist creates the blueprint for the film. Storyboarding is the foundation of a film—a building will not stand without a solid foundation.
—Nathan Greno, Walt Disney Feature Animation Storyboard Artist and Story Supervisor
Professional storyboard artists are a rather small group. However, there is always a need for good storyboard artists because the heart of a good animated film and many live-action films comes from the visual telling of the story by the hands and imagination of a storyboard artist. Putting the story idea into visual form requires the skills and sensitivities of a filmmaker, a graphic artist, a storyteller and an actor. Of course it doesn’t hurt to have a fair understanding of animation, layout and set design, music, dance, comedy and psychology. Large studios will invest many millions of dollars to make an animated film. These studios need good story artists and storyboard artists. All the money will not guarantee a good film. It requires a great story and a great telling of the story and that’s what the story artists help to do.
Film Language and Cinematography
Even though you may be drawing with a pencil or on a computer tablet you are working to create a film (or a film-like video, digital or computer game story). This requires that you know how films and film-stories are constructed. The thousands of existing films, advertisements, music videos and video games form a library of good, bad and so-so filmmaking. It is important to learn how and why the most effective films work. Learn how filmmakers make the viewers understand complex plots and actions as well as the flow and timing of simpler scenes. Analyze what the filmmaker has done to make you feel the tension and fear, joy and triumph, so that you laugh, cry and squirm in your seat in all the right places. It is not only the fact that the evil zombie is hiding in the closet but it is how the director chooses to reveal this information to the audience that can make us shudder, snicker or yawn.
A novelist may want you to hear the voice inside a character’s head telling us how jealous and irrational he is. A filmmaker may choose to convey the same thing through lighting and camera angle. An animator can use deep and shallow space, strong poses and maybe symbolic or referential images such as blazing fire or strong colors. All of these types of images and the way they are put together are the “language” of the film.
Become a student of film. Analyze the filmmaker’s choices. Imagine what changes you would make. See if the film has storyboard examples and other useful information in the supplements section of a DVD. Start a journal, do quick drawings of shots and make other notes as you notice interesting things while watching movies. You will not be able to see a film in quite the same way you did before you undertook this journey. However, you will be a better storyboard artist and you will probably find even more reasons to enjoy the films you watch.
Cinematography refers primarily to the photographic camera work of filmmaking. In live-action the cinematographers are responsible for getting the right shot for the director. Similarly, the storyboard artist needs to “get the right shot” or at least draw the best approximation of that shot so that it becomes clear how that shot will work in the film. In animation, a bright sunny day, a diffused light, depth of field, the focus or a lens’ flare may be painted, drawn or created through digital devices. The more aware you are of the possibilities of photography and cinematography the better storyboard artist you will be.
Single Shot to Sequence of Shots
A single image or shot possesses a certain amount of energy. A series of images will manipulate the flow of that energy. It can build to a crescendo or stop us in our tracks. It can tease us, irritate us, make us feel the monotony of a long wait or the excitement of an unexpected surprise. This kind of energy comes from the kind of pictures you create and the sequence and pace at which they are presented.
A picture that shows something we recognize will carry a large portion of the message and the energy of your story, such as a crying face, a hand reaching for a gun or an empty chair. Beyond the subject, the storyboard artist must also consider how the subject is presented in each shot and sequence of shots. I am referring to the visual design. Balance, shape, line, space, tone, color and texture are elements of visual design and are tools of the storyboard artist. These formal, abstract elements speak more directly to our emotions and cause us to feel a certain way about any subject. The evolution of design elements through a sequence can echo the thematic and emotional changes in your story. It can start with a single image, perhaps an empty chair. After all, an empty chair can make us feel like we are lonely and miss someone who is not there or it can be inviting us to sit down and join in on the activities. It may say someone has just left or that someone is expected. A storyboard artist needs to consider what idea is being communicated and create a design for the shot that sends that message to our emotions. The juxtaposition of one shot to the one before and after can reshape the idea and further condition our reaction. It is the art of knowing what to show and how you show it.
Formal Elements of Visual Design
If you create a scene that shows a landscape with rolling hills and slow undulating horizontal curves, it may suggest a feeling of peacefulness. A shot of a rocky mountain cliff with jagged, pointed shapes might make us feel danger and tension. Certain colors can evoke excitement. Deep and shallow space can make us feel free or claustrophobic. The juxtaposition of these elements can provoke even more heightened emotional responses. There are many good art books about design. Find some and study the principles of design for their own sake. However, it is important to understand how to use these principles to tell stories in film. One of my favorite books on this topic is Bruce Block’s The Visual Story. Remember that you cannot separate what you are showing us from the way you use the formal elements of design to convey an image’s emotional content.

Soft rounded shapes may seem inviting and comfortable, while straight harsh edges may seem cold and impersonal
Thumbnailing
Pre-Visualizing the Pre-Visualization
Every storyboard artist I have interviewed, without exception, said they do thumbnails in the early stages of the boarding process. Most every designer or graphic artist uses small thumbnail drawings as the first step to arriving at an image. Why, because they are quick and rough. You may have several versions of an image in mind so you need to “get them out” and down on a piece of paper to compare and evaluate. In other cases, an artist may have no clear image in mind so he or she develops it on the paper, maybe even placing things randomly at first in order to start to see the possibilities for a shot and to consider how a series of shots work together.
Approaches to Thumbnailing
During thumbnailing, one can be experimental, daring, and perhaps even careless. They can let their mind and vision flow without feeling restrictions or the stifling influence of practical concerns. Sometimes the most creative ideas come when you are not worried about being sensible or pragmatic. These early investigations usually have to be adjusted or even thrown out but they can help you conjure up possibilities. Another approach would be to start arranging basic images in an order that seems to follow the simplest and most direct depiction of the narrative. This approach may not produce the most exciting and adventurous results at first, but it may disclose to the storyboard artist a kind of “skeleton structure” upon which more innovative solutions may be built. It is important to be open-minded, imaginative and flexible. No matter how rough, primitive or even ugly these drawings may be, they are the first step toward realizing your film.
Thumbnails
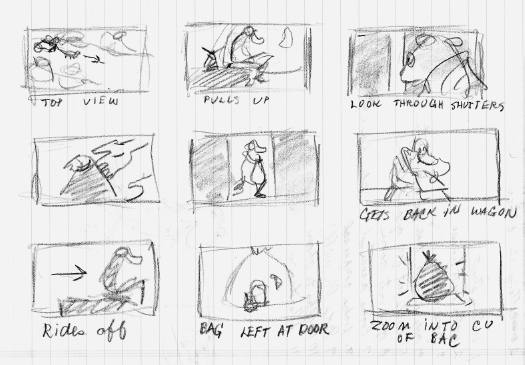
A beat is one of the smallest elements of a film. It is a single event, action or visual image. Story artists and filmmakers often choose to write out a beat-by-beat description of what will happen in a scene. This is a good way to let the narrative concepts of a story start to form pictures and shots in the imagination of the storyteller.
- A shot of the outside of a grass hut village.
- A wagon and driver comes down the road.
- He stops in front of one of the huts.
- Inside the house, a mouse is looking out of a gap in the shuttered window.
- Wagon driver takes a sack from the back of his wagon.
- Driver leaves the bag on the doorstep and rides away.
Shot List
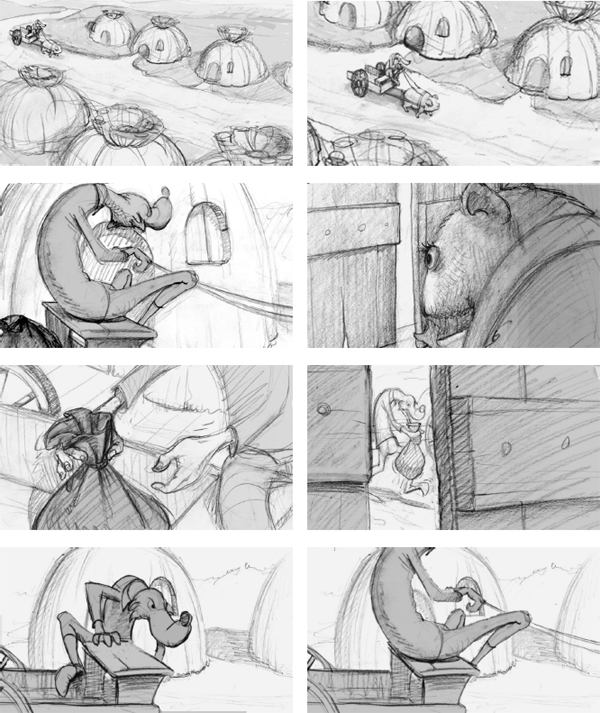
In addition to a beat sheet, you may also have a shot list. A shot list takes the beat sheet to the next level; it starts to anticipate the cinematic form the beats will take. The shot list will explain how it will look on film by describing every individual shot. A beat, say, a wagon and driver comes down the road, could be one shot or a half-dozen different shots depending on how the filmmaker wanted to present this action.
- Extreme long high-angle shot of village with a driver and wagon already in scene.
- Cut to closer shot from same camera angle as wagon slows in front of a particular hut.
- Medium over-shoulder shot of wagon driver looking at chosen hut.
- Close-up, three-quarter back view as mouse cracks open shutters and looks through the gap.
- Close-up of a hand reaching for a dark cloth bag in the back of the wagon.
- Handheld camera shot from mouse’s point of view through the shutters of the driver carrying the bag toward the house.
- Front view medium shot of driver getting back in his wagon.
- Same view driver grabs reins and motions to go.
- Same view of wagon leaving frame, revealing bag at front door.
- Camera zooms slowly toward the bag.
- Close-up of bag.
A filmmaker may choose to develop beat sheets and shot lists for the entire film. If you are doing a short this may be a very good idea. These devices can be used to help realize your vision and can be very valuable, but these lists do not necessarily represent the final version of the film. You should approach them as preliminary plans, subject to change.
Draw and Change
If you give a beat sheet to ten people you are probably going to have at least ten different versions of how these shots will look. Written and spoken words are not specific enough. You need to make drawings. Imagine your images playing like a film. Ask yourself, “Can they be made better, more interesting?” “How do I want the audience to feel: worried, suspicious or indifferent?” “Who or what is the center of attention in this shot?” The answers to some of these questions may evolve as a series of images develop.
You may be many hours into a project before the best solutions begin to reveal themselves. Revisions will certainly be needed. From shots to scenes to sequences to acts to a finished film, it is important to see the flow of images as malleable and open to reinvention.

Finished Boards
Continuity refers to the logical flow and consistency of the images. Your audience’s suspension of disbelief will be lost if it notices a continuity problem. This can pertain to a number of things such as the appearance of objects, the lighting or direction of movement. The viewer will be confused if things are changed too much or are changed illogically from one cut to the next. If the light is casting shadows to the left in the first shot, don’t switch them to the right when returning to the original camera angle. If a baseball dugout is left of the batter’s mound, do not show the batters coming up to home plate from the right. The storyboards serve as a guide for the film; they need to be correct to prevent later problems. It is advisable for artists to create diagrams and floor plans of a space in order to keep the position of things from various angles clear and logical. If it is not completely clear for the storyboard artist, it may not be clear for the viewer.
180-Degree Rule
Steve Gordon, professional storyboard artist for Disney and DreamWorks said:
I’ve seen some student storyboards and some test storyboards from non-students. What seems to be most lacking is the understanding of basic cinematography, screen direction and why a scene should cut. Don’t get me wrong, I also see some of these things in professional boards as well. The most important thing to learn is the 180-degree rule and how to work around it.
A common “slip-up” in storyboarding and film planning is continuity of movement or screen direction. If a train is moving from left to right on the screen, that train needs to continue moving left to right and not switch direction. If one were to do a cut where the camera appeared to have moved to the other side and the train was now moving from right to left, this could be disorienting for the audience. The audience may feel that it is now looking at a different train or perhaps this is now another time and place. This kind of cut is said to be breaking the 180-degree rule. The 180-degree rule is a guide to maintain a consistent positioning within the two-dimensional frame of the movie.

Eric Drobile’s Environment Plans
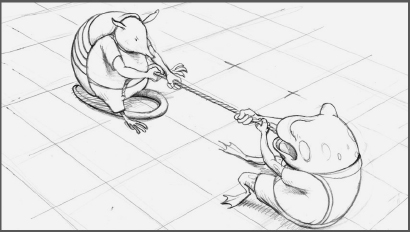
If two characters, say an armadillo and a frog, are playing “tug-o-war,” a frog may be seen on the right facing left pulling on the rope. An armadillo may be seen on the left facing right pulling on the rope. The rope represents the 180-degree line. If the camera stays on the same side of that line, the frog will always be on the right and the armadillo will always be on the left even if the camera is shooting down the rope from one end of the action. If the camera crosses the 180-degree line and starts filming from the other side it will reverse the position of the frog and armadillo. The armadillo will then be on the right and the frog will be on the left. Again, this kind of reversal can confuse the audience. So the camera should not cross the 180-degree line or, to put it another way, you should avoid reversing the position or direction of your characters.

Yes
Yes
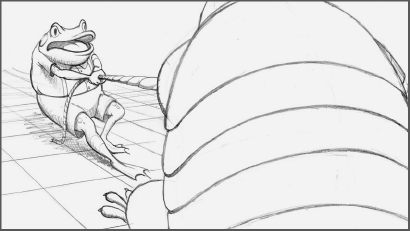
This is Breaking the 180-degree Rule
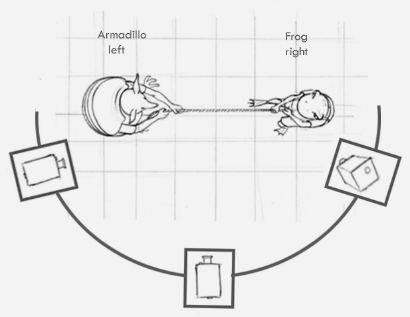
Diagram of Cameras
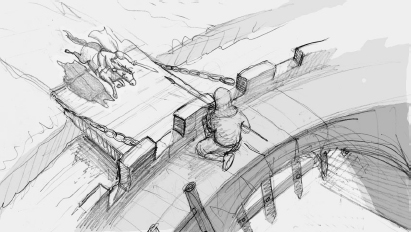
During a fast-action chase or other action scene concerns about screen direction may seem expendable but it is probably not. One could have an overhead shot of a horseman running over a drawbridge and into a fortress, disappearing under the ramparts moving from left to right. The next shot could have the camera inside the walls and at a lower angle as he passes through the gate and across the screen. It is important to realize that this second shot should also have the character moving from the left side of the screen to the right.
Yes

Yes

No
As we all know, there are exceptions to all rules and times when other factors govern one’s choices but usually the orientation of even stationary objects in a shot should remain consistent with other adjoining shots. There is nothing to be gained by confusing the audience or breaking the 180-degree rule when the purpose is to tell your story clearly.
Continuity of Content
Continuity of content is a general expression of the idea of story clarity. It is important for the storyboard artist to remember that the audience does not know the logic of your story until you show them. This sounds simple but problems often arise because we know our own story and we forget that the audience does not know what we know. The audience will be seeing your shots for the first time and then only for a few seconds. If information is not simple and clear, the audience will miss important story points and end up confused for the rest of the film. There are many ways to confuse an audience. Although I cannot discuss every possibility in this chapter, I would like to point out a couple of common storyboard shortcomings.
Disjointed Shots
Scenes depicting bad drug trips and nightmares, earthquakes, pillaging barbarians and general chaos may show extremely different shots together to instill in the audience a sense of what it felt like to be disoriented. However, the rest of the time you need to provide an uncomplicated flow of visual information to the viewer. Continuity of content requires that you show us all the “pieces” we need to see, usually in a natural, chronological order. It is important that you do not make the viewer work too hard in order to know what is going on. It is your story that should engage the audience. Make the story easy to understand. Storyboards help you to establish both visual continuity and continuity of content. However, since storyboard artists are inherently “too close” to the storyboards to see them objectively, show your boards to others who do not know the story you are working on to see if it makes sense to them. Ultimately, the success of your film will not only depend on whether you understand and like what you see, but rather on whether you have communicated well to others.
Visual continuity also requires the story artist to build an appropriate evolution of shape, color, space, lighting and other formal elements of design as the story develops. The visual design elements can either harmonize or contrast from one shot to the next. Harmonious or similar shapes and colors suggest small changes in the story. Contrasts, big changes in the design or composition, usually suggest more extreme shifts in content, emotion or action. Filmmakers often will show a film for several minutes with fairly constant, harmoniously designed images until the moment when something that will change the story happens, like when the villain appears. When the villain appears his color may be different, the shapes and tones in the background could go from horizontal to diagonal, the camera angle may be very low for the first time in the film and the lighting might be harsh with strong shadows after having been soft and even in earlier shots. It is important to avoid making strong changes in the design from one shot to the next if the story does not have a strong thematic or emotional shift on that shot.
Too Big of a Gap
Story clarity and continuity can fall apart if there is not enough information. Let’s say a character is walking down the street and then the scene cuts to that character inside a house sitting in a chair. This could work if the audience believes that time has passed and we are now in some new place. However, if you want us to know that the character went into a particular house that belongs to someone he knows, who the character discovers is not at home, you will have to explain these things. The character may need to be seen walking up to and perhaps into the house, searching for the other character, looking into several rooms and then sit down in the chair. As this character is looking for someone you may need to show him walking through a bedroom door and then cut to a reverse shot showing the character’s face looking around inquisitively. Then you may need to show the character’s point of view revealing what he sees and does not see as he looks. After that it may be necessary to show the character’s face again so the audience knows that the character is surprised or confused and has recognized that no one is there. Then you may need to show him walk over to the chair and sit down. Keep reminding yourself that the audience does not know what’s going on in your story or in the character’s mind until you show them.


Shot types: Establishing Shot; Reverse Shot; Cut on the Look; POV; and Reaction Shot
The opening shot in a scene can be used to show the viewer where the story will be taking place: in the woods, in a castle, at the circus or in this case in a middle-class suburb. This is often a long shot that gives a lot of general information about the location or event, the time of day and weather conditions. The establishing shot can also give us a feeling for the story. It could show bright houses with trimmed hedges and a bicycle on the lawn or there could be a dark, ramshackle mansion with an iron gate and dead trees. The feeling of peacefulness or peril could be suggested through the shapes, patterns and lighting. The visual style of the film can be revealed. All of these things set a visual context for all other relationships in the scene making the establishing shot very important.
Reverse Shot and Over the Shoulder
A reverse shot points the camera back in the opposite direction from a previous shot. If we watch our character walk through a doorway and we are looking at his back, the next shot may show a camera view from inside the room he’s just entered from a front view. This is often used if two characters are facing each other having a conversation. The camera will show a “front on” shot of one character talking and then reverse the camera and show the other person listening or responding. This kind of shot may also be done “over the shoulder.” As the name implies, the camera is behind the character. The character’s shoulder and/or part of his head can be seen in the foreground as the audience sees what the character is facing or looking at. Many filmed conversations will use a combination of these shots.
Sometimes students confuse these camera reversals with violating the 180-degree rule but that is different. The 180-degree rule requires that you keep your subjects oriented to either the right or left side of the screen but it does not prohibit you from reversing the position of the camera. However, even when reverse shots are used, as in a conversation, it is often advisable to shift one character more to the left side of the screen instead of in the center and the other person more to the right and to keep these relative positions consistent throughout the conversation. It is also important to keep the camera angled up or down if one character is higher or lower than the other.
Cut on the Look and Point of View (POV)
When a filmmaker shows the character looking at something and then shows the audience what the character has seen just as if we are seeing it through the character’s eyes, this is called a point of view or POV shot. So, if a character is looking up at the second-floor bedroom window of a house, the next shot will show the window as that character sees it from that low angle and at that distance. If the character then looks down at his watch, the camera may show the character looking at his wrist and then cut to show a down angle shot of the arm and the wristwatch. It is important when your character sees something to show the audience first, that he is looking at something or in some direction and then what he sees. If the audience does not see what the character has seen it will not know what the character has experienced. If the audience does not know what the character has experienced, the plot and the audience’s identification with the character’s emotions may be lost. The storyboard artist may also want to show us how the character reacts to what he has seen, so that we understand what the character is thinking and feeling.
Thinking, Deciding, Reaction Shots
While the animator or actor is responsible for the final version of the character’s performance, the storyboard artist initiates this process by drawing the iconic poses and facial expressions that are appropriate for this point in the story. As Barry Cook, an animator, story artist and Director of Disney’s Mulan, put it, “I would not advise leaving the acting to the animators for a simple reason, if it is not clear in boards, what your characters are feeling, the scene will never get to the animators.” If a storyboard were to show a character looking into an empty room, the following shot could be the character’s POV (point of view) of the empty room. Then the next shot should show a close-up of the character’s face looking confused and thinking, “Why is there no one here?” This is the reaction shot. Reaction shots are often overlooked by beginners. Beginning story artists often only show what is happening—the action—and leave out showing the character’s response to what is happening—the acting.
Without the acting you do not have a dramatic story. You only have a description, a report. Drama requires emotion. We need to know what the character thinks and feels about what he has experienced. The storyboard artist does this by showing the audience the reaction shot. These reactions reveal our character’s attitude, personality and motivations, his internal dialogue and understanding of the situation. Reaction shots are indispensable to good storytelling.

Although this image may be a bit corny, it would be preferable to having no representation of your character’s mood or state of mind
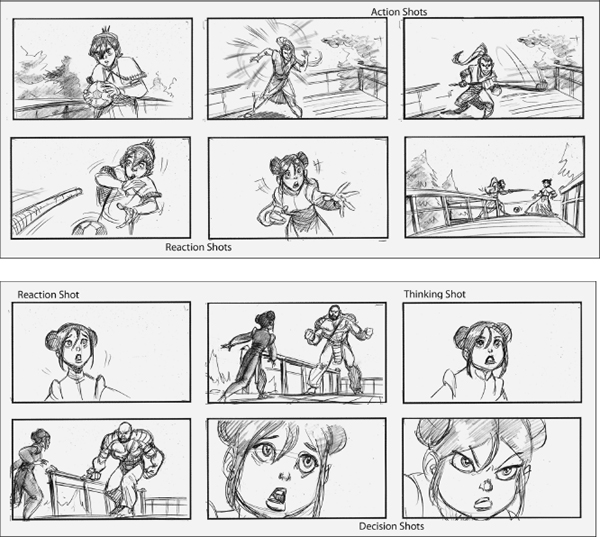
Storyboard Drawings by Steve Gordon
Insert, Cut Away, Cut on the Action, Cross Cutting
In the early days of film, filmmakers often had a camera running continuously from a single location as the action moved in front of the lens, much the way we would see a play being performed on a stage. With experience and artistic vision, filmmakers soon realized that the possibilities of cinematography offered many more exciting choices. Complex angles, multiple views, and simultaneous actions could be shown in a way that the audience could follow when the shots were edited together effectively.
Insert
An insert shot is cut into the flow of an action and is usually designed to show the audience some specific piece of information, often in a close-up, sometimes a still image. If a character looks at his watch you may see an insert that shows a close-up of the watch so the audience knows it is five minutes until midnight. An insert could also be something that the director wants the audience to see but the main character is unaware of. In live action, these shots are usually added, or inserted, during the editing process.
Cut away refers to shots that show images that are not in the main action but are usually happening at the same time. If a knight is fighting a dragon you may see the camera “cut away” to the damsel in distress as she shields her eyes when her hero appears to be faltering in the battle. In a cut away you can show the actions and reactions of these other participants without stopping the main action. The knight and dragon could be fighting near the edge of a rocky cliff and a cut away may show small rocks that have been kicked loose during the battle rolling off the edge of the cliff and falling down into an abyss. Sometimes a cut away is used to reveal the environment to create atmosphere and a sense of what a place is like and feels like. During the knight and dragon battle, a cut away shot may show a pile of human bones and armor telling us that many other knights have tried and failed to defeat the dragon.
Cut on the Action
If an outlaw is going to be hanged in a Western town, a distant shot may show the outlaw’s body start to drop through the trap door. A cut away may show a close-up of the rope pulled straight and tight where it is attached at the top of the gallows. Then the camera may return to the distant shot of the outlaw dangling at the end of the rope. This cutting away from the main action to show a detail is sometimes called cut on the action. It suggests to the audience that the main action is continuing while the detail was being shown. This same “cut on the action” could happen the opposite way, starting with a detail shot, cutting away to a distant shot and then returning to the original close-up.
Cross Cutting
Another editing device which is similar to the cut away is cross cutting. Cross cutting is used to show two actions that are happening at the same time. This becomes particularly important if the two actions or events are gopping to come together and create one major action. In the storyboard segment of the pirate rabbit by student, Maria Clapsis (pp. 177–8), a lizard captain is above deck and a pirate rabbit is below deck entering a doorway leaving a gunpowder trail on the floor. Later, the rabbit has an encounter with a hanging skeleton that causes him to get frightened and drop his cigar. In the storyboards shown, cross cutting allows the audience to see that the cigar has started a fire that keeps growing next to the gunpowder. At the same time the pirates, oblivious to the fire, are preparing to shoot a cannon ball at a passing ship. In the end, the cigar fire near the gunpowder and the attempt to shoot the cannon simultaneously reach a climax and the pirate ship blows up. The passing ship is unharmed but the pirate ship is sunk.

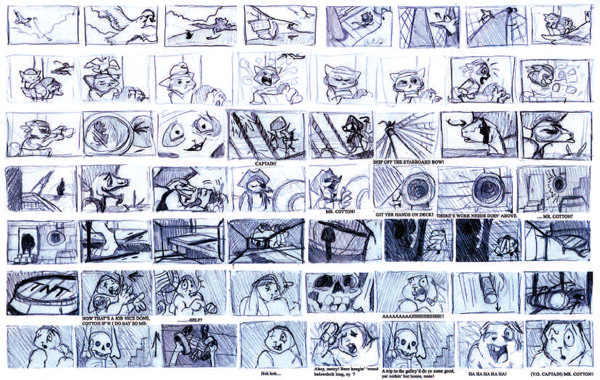
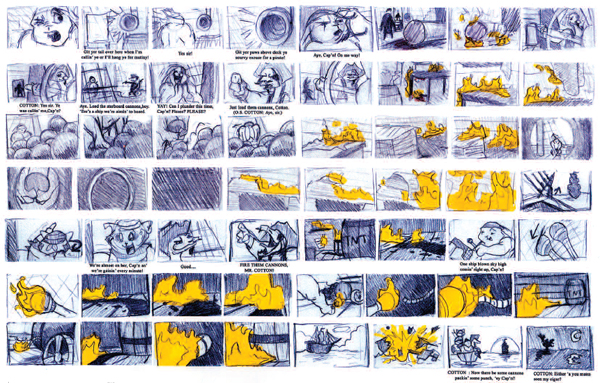
Storyboard by Maria Clapsis
Split Screen, Collage, Superimposition, Etc.
In order to clarify simultaneous events or images, filmmakers have tried a number of ways to show two or more pictures on the screen at the same time. These devices can be very effective if used correctly. The problem is that they tend to draw a lot of attention to themselves and may seem artificial or contrived. A split screen is often used when two characters are talking on the phone. The two shots of the two characters are simply shown, each in their own location, on a divided screen.

Split Screen
A similar effect is sometimes created when we see a side view of a character outside of a door and another character on the other side of the door or wall. The cross-section of the wall serves as a natural device to split the screen. A collage technique may show two or more images on the screen together or in quick succession perhaps with cross dissolves as in a montage. Superimposition, another technique, usually refers to a semitransparent image overlaying a primary image. Superimposition is often used to show a memory. A picture-in-picture may have a new rectangle appear on the screen revealing a second image. There are a myriad variations and rare types of shots used in films that I will not cover in this chapter. Books such as Setting Up Your Shots, by Jeremy Vineyard, and From Word to Image, by Marcie Begleiter, cover types of shots and terminology in greater depth.
Transitions
Beyond the types of shots, storyboarding also involves transitions between cuts. When I refer to transitions, I am speaking of two kinds. One kind is technical and refers to the mechanical process of film or digital editing, the resulting visual effect and its meaning for the viewer. The other kind is pictorial and refers to the types of pictures you are putting next to one another and how they move the ideas along. These transitions can expand time, compress time and enhance the mood and energy of a sequence. Although this is more apparent in the animatic or final editing stage, the planning and anticipation of transitions is part of the blueprint of any film. As Nathan Greno, Disney story artist and Story Supervisor for Disney’s feature, Bolt, put it, “I try to keep editing transitions in mind if they help to tell the story I am boarding— otherwise I let the editor worry about the editing. The more you can do up front, the better it will help everyone else … .” If you are making your own film, you may be the story artist and the final editor. So it is a good idea to start planning how you will use transitions to help tell your story.
Technical Editing Transitions
Every change from one shot to the next is called a transition. If the filmmaker decides to put some black frames or white frames between shots or fade one shot out as the other simultaneously fades in, the shots will read differently. Common technical transitions are the standard cut, the cut or fade to black or to white, and the cross dissolve. There are many others, like the iris, that are used for special reasons, which I will not go into in this chapter. A fade to black can suggest that time has passed between the end of one shot and the beginning of the next. This can happen quickly or very slowly and the effect is a sense of duration. A cross dissolve will show one shot becoming progressively transparent and fading away as it is simultaneously replaced by the next shot fading in. Such transitions may suggest we are in another place perhaps at another time. Variables such as the type of image, duration of transitions and the story context will have an effect on the way that our audience reacts to our film transitions. However, these transitions will dramatically affect your story so you must often consider your story and the technical transitions in tandem. You can choose to draw these transitions or it may be enough to simply write, fade or cross dissolve, on your storyboards. If you produce an animatic, you can show the transitions between your story panels and reveal the effect more completely.

Cross Dissolve

Fade to Black

Fade to White

Iris in
Pictorial Transitions, Match Cuts
Unlike a single painting or sculpture, most narrative film is made of a continuous series of changing images. One can put very different images next to each other or very similar images next to each other. When one cuts to an image that is noticeably similar to the previous image, it can be called a match cut. If a character is eating and begins to move a spoon toward his mouth and then the camera cuts to a close-up of him completing the action and putting the spoon in his mouth, this is a match cut even if the camera has moved. The two shots are tied visually and thematically together by the action.

Match cut
Match cuts like this can be used to create a natural flow of images so the cuts are barely noticed. Match cuts can also be used to relate two different kinds of images. A pair of shots could cut from an image of the round glowing sun to an image of a round glowing light bulb in a room at night. This will not only create a comfortable transition between two similar-looking objects but it may communicate to the viewer that the passage of time has caused the daylight of the sun to be replaced by the nighttime light of the electric bulb. In this case, the two images are matched by content, shape and perhaps even color.

Match cut
One could also match images by movement, such as a car racing down a road transitioning to a train going down a railroad track. A match cut of a female scientist holding up a test tube in a laboratory dissolving to the same woman holding up a baby bottle just before she feeds her baby could tell the story of a woman giving up her career to be a stay-at-home mother. Match cuts like these are a way of slicing through time and complex details to force relationships between images and ideas. They can often allow us to move through a great deal of story time in a very small amount of movie time. They can often make changes that would otherwise seem harsh or discordant seem more visually agreeable and harmonious.
Clean Entrance/Exit
A clean entrance happens when you show a place and then without a camera cut you see a character or a car or a dog enter the scene. The clean exit will show a character leave a scene and the shot will remain on the place he has departed from for a bit before the camera cuts to the next shot. To show the location before the character arrives or after the character departs, changes the viewer’s reading of the passage of time. If you see a girl riding away on a bicycle and the camera cuts before the bike leaves the frame and the next shot is another view of the girl on the bike, the audience can usually assume that the cuts are instantaneous, that no time has elapsed between the two shots.

If the character rides completely off the screen and the camera shows the empty school yard she was previously riding by and then cuts to a shot of the girl’s house and the bicyclist comes riding into the screen, the audience may assume that some time had passed between the time she rode by the school yard and the time she arrived at her house.

We will be convinced that these scenes are not taking place in the uninterrupted time of the film, but represent the beginning and end of a journey from which the middle has been extracted, perhaps for the sake of expediency or to more quickly get to the important parts of the story. Showing the girl spending 20 minutes riding from the school yard to her house might be very boring and insignificant to the story. You should not let your story get bogged down with inconsequential information. However, other times the story may require that you show someone doing something that takes a long, long time.
The boredom or weariness of a long drawn-out action may be a central point in the story. Rather than show the camera on someone as they are in the act of waiting all night you may show jump cuts. Technically, a jump cut is simply a cut where the same character or image moves abruptly from one shot to the next sometimes breaking the flow of time and space. If a person is waiting, there may be a shot of them sitting in a chair. Then the camera cuts to the character slouched back in the chair. A third cut may have them bent over with their elbows on their knees or up walking around in the room. This would create the feeling that we are seeing short excerpts from a long boring period of time. Jump cuts could be used to speed up the portrayal of the duration of time while the audience still understands that this represents a long wait.

Jump cuts to show passage of time
A film that lasts one minute may tell a story that takes place over many years or even centuries. Storytellers can speed up time, slow down time, move forward and backward in time. The passage of time is manipulated to allow the storyteller to move to the important story points and cut through the less significant events. A storyboard artist makes choices about how the story’s time and reality will be communicated to achieve the clearest and most effective telling of the story.
Visualizing Time and Movement
Another aspect of revealing the passage of time is the representation of movement. From the earliest cave paintings to the most recent animated film, artists have been trying to create still images that embody an expression of movement. This is because most living things move and to embody movement will bring the artist closer to embodying life. And all great art embodies a sense of life. The history of art is filled with images of flying angels and battling soldiers on running horses. Some modern artists such as the Futurists and Cubists created abstracted representations showing multiple aspects of humans and objects suggesting the images were moving or that the viewer was moving around the objects. When filmmaking came into existence many secrets were revealed about the nature of movement. One of the earliest and still the greatest documentations of the movement of people and animals was conducted by Eadweard Muybridge. In 1877, his technique of creating a series of still images of a horse trotting proved that all four of a horse’s hooves were off the ground at some points during the action. The experiments by scientists such as Harold Edgerton in the mid-twentieth century using special lighting devices and high-speed cameras were able to capture shots of a bullet passing through an apple with the clear image of the bullet suspended in air. Some of the photos Edgerton made had shutter speeds of one one-hundred-millionth of a second. So the question is, “What can we learn from this, what do things look like when they move and how do we capture this impression of movement in a still image?”
No Movement

Movement
Storyboard by Steve Gordon
Graphic Representation of Movement
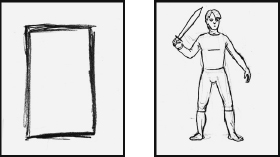
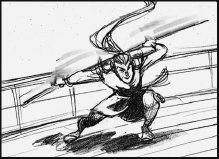
There are devices of graphic representation that can suggest movement or restrict movement. Buildings are designed to not move. They are typically made of straight lines based on horizontals and verticals like a soldier standing to attention. Therefore, horizontals and verticals may restrict movement. Movement is suggested by diagonals and curves. Humans and animals tilt and turn and bend. We move through space in paths that define arcs and can spin creating serpentine patterns. Drawings of moving things require the application of these elements. A running character may have its feet completely off the ground like Muybridge’s horse. He may be leaning forward with his hair and clothing flapping in the wind behind him. Speed lines and multiple images can be used creating a sort of “comet’s tail” effect following an object. Storyboard drawings need to look alive. They need to move and act and feel in order to overcome their static reality and to communicate the heightened action that animation requires.

Principles of Movement: Anticipation, Squash and Stretch, Arcs, Follow through and Overlapping Action
Animators have discovered over the years that certain predictable principles can be applied to animated characters and other moving forms. These help to bridge that gap between the time-based dynamics of real-world physics and static reality of the drawn or virtual image. The following five of “the twelve principles of animation” pertain particularly to movement.
Anticipation
Before a character can jump off a box he must anticipate. That means he must contract his muscles, squat down, bend his knees, and maybe bring his arms and elbows up behind him. He may even scrunch up his facial features. Anticipation is the way the character builds up the energy to jump. Through this action, he will also be communicating to the audience that he is preparing to jump. Anticipation is both psychological and physical. One usually anticipates in the opposite direction of the main action.
Squash and Stretch
The principle of squash and stretch is an exaggerated sense of elasticity applied to show how things distort when they move and when they stop. When a character jumps off a box, he will stretch as he falls through the air and squash as his legs absorb the weight of the body collapsing onto itself. Even the head of a hammer may squash when it strikes a board. Though it may not be necessary to apply extreme exaggeration on each movement you depict, the effects of squash and stretch in your still, storyboard drawings may have to be overstated to communicate the force and energy of the movement.
Arcs
Mechanical things such as cars and rockets are distinguished by the fact that they appear to travel in a straight path. However, when most things, especially organic forms, move through space they move in arcs. When a character swings his arm or lifts his head or jumps off a box the path of action will almost always be an arc. If you are showing speed lines, they should reflect the curved movement.
Follow-Through and Overlapping Action
Follow-through suggests that something will keep moving in the direction of its force until some resistance causes it to stop. When a baseball player hits a ball his bat keeps swinging around in its arc until it stops behind his head. If a rider’s horse stops suddenly the rider may go flying over the top of the horse. This is closely related to overlapping action, which suggests that different parts of the main body of a character or an object will move or stop at different times. If a person jumps off a box his coat tails may not come down until after the character’s feet have hit and perhaps not until the character is starting to stand upright. Follow-through explains that a form keeps moving in its designated path until something stops it like friction or hitting another object. Overlapping action describes the way these different parts may move at different times. So if you draw a character landing from a jump, his knees may be bending from the squash but his coat tails may still be up in the air.
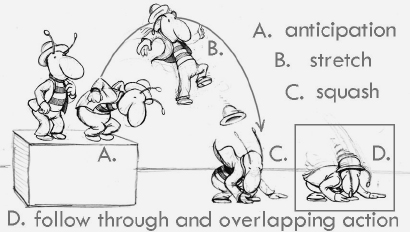
If a character needs to move through a scene in a particular way, the storyboard artist can either show several panels that represent different stages of the action or one shot that shows multiple, staggered images to describe different positions. The choice is determined by the need for clarity. The goal should be to have one idea in each board so there may need to be many panels to show a shot from a single camera position if, for instance, a squirrel was walking across the counter in a candy store continually searching for goodies. The squirrel may be lifting this and looking under that as he makes his way across the counter. One should probably do a drawing for each action, for each idea.

If, on the other hand, the squirrel is simply walking across the counter, the boards may want only to show the path he takes. In this case a beginning and end drawing with an arrow connecting them in one storyboard panel may suffice. Arrows pointing left and right, up, down, forward, backward and following arcs can “stand in” for movements in the still images of a storyboard and can be very helpful to the direction and clarity of actions.
Camera Moves
One can hold a camera in their hand, put it on a car or an airplane, or push it around on a dolly. Cranes and trucks that ride on tracks have been used to move the audience’s vantage point to wherever the filmmaker wants it to be. Digital technology allows cameras to follow bullets into the bodies of victims, be plunged into molten lava and to see through the eyes of an erratically moving dragonfly. Advancements in lenses and internal camera technology also create many options. A storyboard artist should know when and what kind of camera moves to use.
Trucks and Zooms
Truck-in and a zoom-in will produce similar results, but they are not the same. A zoom on a face in a crowd of characters will cause the size of the face to be “blown up” on the screen along with everything else in the frame. In the truck, the rest of the crowd will not grow but the foreground people will be seen passing by as the camera moves toward the face. A truck-in on that character’s face will be closer to the experience of walking through the crowd until you are physically close to them and their face is close to you. This is because the zoom is done with the camera lens and magnifies the light coming through, whereas the truck actually moves the camera through the crowd toward the main character. This difference will make a difference in the way you are allowing the audience to experience the action. This physical difference evokes a different emotional response and represents a significantly different way of telling your story.

Zoom

Truck
Representing Camera Moves: Pans, Tracks, Zooms and Extended Frames
If you have decided that it is necessary to show the camera moving as part of your story idea, there are some standard ways to represent this in the storyboard. If a dog sees something good to eat like a pie but the baker is standing guard, the camera may choose to show the character’s POV as he looks at the pie and then at his obstacle, the baker. Instead of a cut, you may want the camera to swing or rotate from one view to the other. This type of shot needs to be shown by indicating the movement of the camera. The storyboard artist can draw framing boxes around each of the views focusing on one and then the other view with arrows or lines that connect the two boxes.

This technique can be used for a zoom shot as well. The panel would show the whole scene with framing boxes corresponding to the film’s aspect ratio used to show close-up and overview areas with lines or arrows connecting them.
Sometimes the camera moves over such a great distance that it cannot be contained within one standardsized frame. If the camera follows beside a cat as it walks across a floor and jumps onto a window sill, this is referred to as a tracking shot. It may be necessary to show the distance covered as a storyboard panel that is wider or higher than normal. The character can be shown at two or more positions along the way. A framing box would be shown around several character positions to explain how the camera is framing the character at different points during the action. Once again, these framing boxes can be connected by arrows or lines.
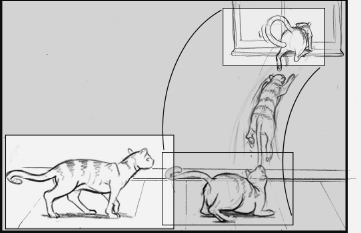
Sometimes zooms and pans or zooms and dollys, called zollys, happen at the same time. If camera moves are important to telling your story then you are responsible for showing them. You may choose to show it with framing boxes and arrows or as a series of individual drawings on different panels. You must be clear about what you are trying to show so the storyboards depict how the film version of your story is going to read.
Camera Placement
Where you put the camera is where you are visually and emotionally putting the audience. You can either keep it at a distance watching the action or, make it see and feel like it is in the midst of the events like participants. There is a right time and a wrong time for both of these approaches. It is essential to how you tell a story and a decision you must make on nearly every board. Beginner story artists often do not exploit their options in camera placement. As story artist and teacher, Jim Story, said, “One of the most prominent stumbling blocks in student boards is a tendency to ‘lock down’ the camera and to view everything at the same size as if it were on stage.”
Many boxing movies show the actor swinging punches directly at the camera or waking up from the floor with an up angle of the ceiling lights and the referee counting to ten. This can make us feel as though the experience is happening to us.

Other times we are in the audience looking over the tops of other people’s heads. Sometimes the camera takes us completely out of the action and we are looking down from above like a scientist might look at specimens through a microscope. The purpose is not to be fancy with the camera for its own sake. Too many, unnecessary camera moves are surely as problematic as locking the camera down. Your story’s appropriate feelings of mystery, intimacy, or indifference can be induced by carefully choosing your audience’s vantage point through good camera placement.

How Much Information
Students often ask, “How many panels will I need and how finished should they be?” The answer depends on your story and how you are telling it. A filmmaker can show a character going through a door with one shot or ten shots if the situation calls for it. Each board should represent one idea. The camera may cut back and forth between the inside and outside if, for instance, someone is inside watching the door open. If the character hesitates or struggles with the door the boards may be quite involved. If value and light are critical to the telling of your story or something’s color is an important element then you may need to show that in your boards. Otherwise, simple line drawings may do the job. If a character comes walking out of the fog then you need to show the fog in the environment where the shots take place. Other times atmosphere and weather conditions may not be a concern.
Clarity
Nearly every storyboard artist, director and producer I’ve interviewed mentioned the need to be clear in your storyboards. We cannot go back and re-tell the story in our short film; it has to work the first time. Shots need to be unambiguous and so should your storyboards. Find a simple, clear drawing style. Avoid unnecessary details. Too much detail can actually make the idea harder to read but be complete with the ideas you are portraying. Be bold. Faint graphite pencil drawings that are too weak to see will not work. Use a felt tip or china marker or at least a soft, broad-tipped pencil. More and more often, artists are scanning their drawings into Photoshop or some similar program—or working completely in the digital environment—to enhance the clarity. Contrast can be boosted, tones can be added, cropping and re-framing are easy and layers can allow one to use the same character or background drawing over several times keeping them consistent without re-drawing.
Boarding Dialogue, Acting
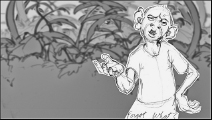
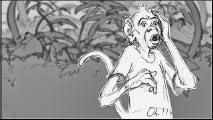
It is often said that dialogue should be like background music. You should be able to turn the sound off and still know what is happening in the story. This is mostly true and it suggests that it is the visual information, a character’s gesture, facial expressions and environment that do the communicating. Imagine a wife is waiting for her philandering husband, who is three hours late for supper. She may say, “Oh, I’m so glad you decided to join us.” Of course what she really means is, “You thoughtless jerk, you don’t care how much inconvenience you cause me.” The words are only part of the story and sometimes a fairly insignificant part. Your storyboard panels need to show us that a character’s body language communicates their true mood or state of mind as the words are being spoken. Animation tends to use exaggerated body gestures and facial expressions.
Make a video of yourself or another actor delivering the lines or get a mirror and try to find the primary facial expressions you need and then caricature them. In animation all the acting is created on paper, in the computer or with clay, and so forth. As Frank Gladstone, producer and animation artist said,
This is one of the reasons many board artists were animators first. Like animators, storyboard folks have to understand acting … and how acting choices help to establish both narrative context and subtext. Of course, like actors and animators, board artists should develop good and consistent observation skills.
Observation skills mean paying attention to real life and how people behave. Watch how a parent scolds a child. Watch two children negotiate over a toy. Watch someone talking on a phone. Become a student of acting, become a student of human behavior.

What?
Forgot What?
Oh!!!

Hee hee …
Pitching is the process where storyboard artists show and explain the boards to others. During the pitch, the storyboard artist will point to individual panels and tell us what is going on, often making sound effects or speaking in the different voices of the characters with the appropriate expression. The pitch will indicate the pace of events by going through the boards faster or slower. It requires that one is not shy and perhaps even has a bit of acting ability. The pitch is presented to inform other members of a story team or the director and clients. A pitch can help “sell” the storyboards and get them approved for animation. Not because they have been made to seem more entertaining than they actually are but because they have been brought to life a bit more. In story teams, such as the major studios have, you can expect that your pitch will result in your story being changed, rearranged and even thrown out sometimes. As Nathan Greno, supervising story artist at Walt Disney Feature Animation put it,
A successful storyboard artist is one that is open to new ideas. You can’t fall in love with your boards. Your boards are not the final film—they won’t be on the screen. Don’t spend too much time on your boards—they will most likely be completely thrown out at some point. If that sounds too depressing, you best find another department to work in.
Story is subjective. Your director is going to ask for changes. To be a great story artist; you will have to be open-minded to throwing your work away. Even if you completely disagree with your director, you are going to have to make the changes. It doesn’t matter if you think the director is crazy.
Stories can be told many different ways. Be willing to change your plan often while searching for the best solutions.
Pacing
Pacing defines the rate of the action and the cuts. A dry, flat story presentation may have the cuts at even intervals. A stronger presentation may linger lazily on some images and present others in rapid-fire succession. The number of film cuts may increase as the tension and action build. The audience will feel a sense of urgency even if it is not aware that the cuts are coming quicker. The best way to know if the pacing is working is to see the images change during the pitch or to make the boards into an animatic or progression reel. However, from the very beginning you must anticipate the pacing of your film and imagine the timing of the cuts.
Progression/Story Reels
In large studios, the animators will see what is called a story or progression reel at several points during the production of the film. The first version would be made almost entirely of the storyboard drawings with a scratch track, a substitute dialogue and/or sound effects track. This is how the hundreds of people working on the film can be kept informed about the kind of film they are making. As the project progresses, artists see updated versions of the reel. The next version may have some of the storyboards replaced by animation.
Perhaps a few color scenes would be cut in. Maybe some of the actors’ recorded dialogue would be inserted to replace the scratch track and some of the final music score may be heard.
Animatic
Digital technology has provided nearly every story artist with a number of computer programs that allow them to make a progression reel from their storyboards. This digital, video version of a storyboard is usually called an animatic. One can photograph or scan their drawings and play them back with the correct timing and many of the editing transitions that will be used in the final film. Sound can be added as well as text and even some camera moves and simulated effects. This is very useful for the independent filmmaker. The process brings one that much closer to the full realization of how the film is going to play before making the final version. During the animatic stage, it is easier to see if transitions are working, and if rhythm and pacing feel correct for the story. One can coordinate the soundtrack with the images and generally have a clearer vision of the film. How far one goes with the animatic varies. Some of the animatics on the website that comes with this book show a basic skeleton of the shots, while others are nearly films in their own right.
Digital Storyboards
Some video game studios are doing all their storyboards and story presentations digitally. Feature animation studios are beginning to change as well. As Paul Briggs, a relatively new member of the Walt Disney Feature Animation story team said,
I personally start out by thumbnailing on paper and figuring out the major beats in the sequence. I’ll then work all digital on a Cintiq, drawing all my boards in Photoshop. I usually work straight ahead but once I’m done with the sequence, I’m always going back into it and reworking it. Whatever you feel comfortable using and best conveys your ideas is what’s important though. A lot of artists still draw on paper and use chalk, crayon, marker, pens, etc. Others work all digital using Photoshop or Painter.
Paul Briggs also said that he presents his work to the directors by projecting the drawings using a computer program which allows him to move and delete boards as well as change dialogue. This will surely become more prevalent in the future, so it is a good idea to become familiar with these programs and the digital drawing tablet.
Summary
- Storyboards plan and communicate the shots and transitions of a film.
- Drawing skill and versatility are essential to professional storyboard artists.
- Knowledge of film language and cinematography is essential.
- Design elements embody the emotional messages in a film.
- Thumbnailing is how we start the visual process.
- One must work to achieve continuity of direction, content, and design.
- There are a number of standard shots and transitions that are used most often.
- One can manipulate the passage of time with the right cuts and transitions.
- Storyboards can represent both the movement of objects and of the camera.
- Camera placement can help determine the audience’s emotional attachment.
- Boarding dialogue involves special issues.
- Pitching is how storyboards are often presented to others.
- Animatics reveal the pacing and transitions as a filmed version of the boards.
- The storyboarding process is becoming progressively more digital.
Additional Resources: www.ideasfortheanimatedshort.com
- Films and animatics
- Industry Interviews on Storyboarding with Steve Gordon, Paul Briggs, Jim Story, Barry Cook and Frank Gladstone
Recommended Reading
- Don Bluth, Don Bluth’s Art of Storyboard
- John Canemaker, Paper Dreams
- Wayne Gilbert, Simplified Drawing for Planning Animation
- Will Eisner, Comics and Sequential Art
- Frank Thomas and Ollie Johnston, The Illusion of Life
- Walt Stanchfield, Drawn to Life
Storyboarding: An Interview with Nathan Greno, Walt Disney Feature Animation
Nathan Greno attended Columbus College of Art and Design and later completed a Disney Animation Internship in Orlando, Florida. Nathan began working full time as a clean-up artist in the Disney traditional animation studio in 1996 and in the Disney story department in 1998. He served as Story Supervisor at Walt Disney Feature Animation on Bolt and was co-director and voice actor on Tangled.
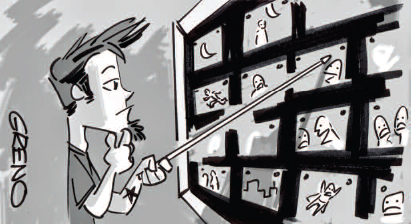
Q: What background skills do storyboard artists need to be successful? What would you tell a student?
Nathan: To be a successful storyboard artist, you need an overworking brain and plenty of imagination. You need to be able to express your thoughts visually. You need to understand acting, staging, mood and lighting. You must be able to write dialogue and create characters. A storyboard artist creates the blueprint for the film. Storyboarding is the foundation of a film.
Q: How can one become a better storyboard artist?
Nathan: You get better at drawing by practice! Board your own ideas and pitch them to friends. Find a script of a movie you haven’t seen and draw a sequence from it—then watch the movie and see what choices the filmmakers made. You will get better—and your drawing skills will quickly improve. Draw different kinds of sequences. If you feel you are better at action—board a sequence with subtle acting and dialogue. If you are better at subtle acting—board a chase sequence. Challenge yourself.
One thing to avoid: “stock” expressions. Unless your project calls for it, stay away from 1930s hammy acting. Act out your sequence before you draw it. Have a mirror sitting on your drawing table. Natural expressions are an amazing tool to have in your belt. The trick to drawing natural expressions: Less is usually more.
Q: Are there special characteristics that you find professional story artists have in common? What makes the successful ones successful?
Nathan: A successful storyboard artist is one that is open to ideas. You can’t fall in love with your boards. Be willing to change. Your boards are not the final film. Don’t spend too much time on your boards—they will likely be thrown out at some point. If that sounds too depressing, you best find another discipline to work in. Story is subjective. Your director is going to ask for changes. To be a great story artist, you will have to be ready to throw your work away. Even if you disagree and you think the director is crazy. At the end of the day you must respect your position. It’s your job to make the project as great as it can be. But it’s not “your” project.
Q: Have you looked at any student storyboards? What do you think is most often lacking in them?
Nathan: Recently we had a student portfolio review. Many had a similar problem: it was hard to follow their boards. Many students don’t like to draw backgrounds, they don’t set their characters in an understandable environment. You should be able to follow boards without reading the dialogue. Try this: watch a movie with the sound off. Usually you will still be able to tell what is going on because of the environment, staging and lighting—and expressions! Your boards should work this way. At a portfolio review there will not be enough time to look through every single panel of your boards, and read every single line of your dialogue. Within a dozen drawings a reviewer should be able to know what is going on in your boards.
There’s a series of graphic novels that I can’t recommend enough: Bone by Jeff Smith. They have started coloring them—but they were originally printed in black and white. Buy the black and white editions. It’s amazing how much mood Smith can get without the use of color or gray tones. His acting is incredible—learn from what he’s doing.
Q: Can you describe your process?
Nathan: There is no “right way” to storyboard a sequence. I always start with thumbnails. Sometimes I “straight ahead” my sequences and sometimes I board a bunch of key shots (that usually helps me with a big action sequence). What works best for you is the way to go.
Q: What do you find are the main obstacles you have to overcome when you are storyboarding a scene?
Nathan: A good thing to keep in mind is one new idea/action per drawing. Don’t have too much going on in one panel or you’ll confuse people. Clear simple drawings are a good thing.
Q: How would you describe the difference between storyboarding for film and other kinds of sequential artwork like comic books or book illustration?
Nathan: Comic books and storyboards are cousins—not brothers. I have learned a lot of shorthand drawing tools from comics (rain, simple cityscapes, thunder and lightning, blizzards, underwater or splashing effects, characters or object moving very fast, outer space sequences, etc.), but comics follow different rules than storyboards. The “camera” jumps around a lot in comics. What works for a comic book story will not work for a storyboarded sequence.
Q: Do you re-draw your panels many times?
Nathan: Don’t fall in love with your drawings and don’t sweat over them—they need to read clearly, but they are not the final image you will see on the screen. Make sure you are getting your sequences done on time—and make sure they read clearly.
Q: Do you think of yourself as actor, cameraman, editor, designer and/or all of these things in your job? Have I left anything out?
Nathan: A storyboard artist is an actor, cameraman, editor and designer—but you also must remember you are a collaborator. You work with others.
Q: How important is presentation? Do you refine your drawings a lot before they are presented to the bosses?
Nathan: That depends on a number of factors. You might throw in a few clean drawings if you’ve never worked with the director before—you want them to know what a “final” looks like. Rough is usually a good idea if you are exploring a sequence. Tighter, prettier drawings will help sell your sequence—directors like nice drawings. Each case is different—talk to your director and find out what they are looking for. Look at the kind of drawings the other artists are doing on their first passes.
Q: Do you find you have to overstate the action, acting, etc. in order for it to read in the storyboard or do you leave that problem to be solved by the animator?
Nathan: The more you “leave to the animator” or the layout artist or whoever—the less you’ll see “you” in the film. You are making the blueprint of a building—if you don’t design the windows, someone else will. You have a deadline so there will only be so much you can accomplish—but the more info you can give, the better the final film will be. People will take your boards and run with them—if the process works correctly, the film will improve with each department. It all starts with the storyboard artist—you are creating the map that everyone else will follow. You better make sure it’s a damn good map!
