Staging
Staging in film refers to the way we present an image or an action for our audience. We plan how something is seen and experienced so that the audience gets the story point. You have probably heard people say that something was “staged.” This may refer to planning something so it happens a certain way or that something is not a genuine incident, it is artificial. If something happens on stage—as in the live theater—it is art, but it is still artificial. Film is also art—and artificial—so it is important for the filmmaker to offer the audience a moving aesthetic experience, while providing the essential storytelling images. It is this marriage of the aesthetic and the narrative that should guide our decisions about staging.
Directing the Eye
Directing the eye refers to using visual devices to get the audience to look where you want it to look in the shot. When an image comes on the screen, the audience may be looking at the lower corner, the center or the upper third. Perhaps if an object is in the center the audience will look at that. However, if everything is placed in the center all the time it will get monotonous. Sometimes a moving image will draw more attention to itself than a stationary one. A strong color or anything that has greater visual attraction can direct the audience to look at that place on the screen.
Because our images may show for only a short time, we must make sure the audience sees what we need it to see while making the visual experience captivating. We have all seen group-shot photographs where someone would put a circle around someone or draw an arrow to get us to look at a certain person in the group. A spotlight is used on a live stage to accomplish the same thing. Spotlighting solutions are used in many films as well. In addition to light, graphic shapes, lines, and alignments can similarly lead the viewer’s eyes to see what you want them to see.
Place a character in front of the vanishing point in a one-point perspective shot of a room and the receding lines of the vertices toward the vanishing point can direct our eyes to that person, even if there are other people in the room. A case in point is Leonardo Da Vinci’s “The Last Supper.” Shapes and lines created by foreground objects, shadow patterns, tone and color patterns can point to the place that you want the audience to see, thereby controlling the viewer’s attention.
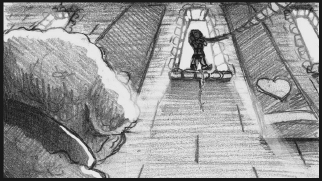
Storyboard by Maria Clapsis Uses Leading Lines to Direct the Viewer’s Eye to the Man in the Window

Leading Lines Created by Shadows and Objects
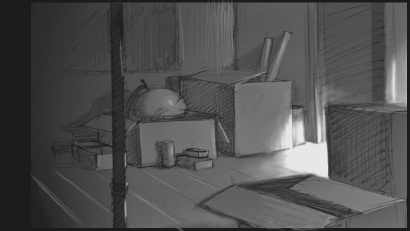
Spotlight Effect to Get Us to Look in the Right Place
Aspect Ratio, Symmetry, the Golden Section and Rule of Thirds
Aspect ratio is the proportions of your screen. Early television screens were about one foot high and one foot, four inches wide. This is expressed as a 1 : 1.33 aspect ratio. Over the years, the ratio has generally changed to make the screen wider relative to its height. There are a number of reasons for this, one of them being to fill our peripheral vision more completely and approximate the experience of seeing things in real life. All good designs need to relate to the rectangle’s proportions and the framing edge.

Various Aspect Ratios: Most Images in this Chapter are 1:185
Over the centuries, painters have worked inside of rectangles to build their compositions. The objective has always been to keep the images looking fresh but appropriate to the theme or subject, just like filmmaking. Dynamic images of battles would be designed very differently than portraits. But the search for the best design has led the artist to discover that some relationships seem to work very well and others not so well.
It has already been mentioned that things in the center are boring. Centered things can tend to lack vitality and look inert. It is advisable that you never divide your rectangular frame down the middle either horizontally or vertically unless the purpose is to express division, symmetry, and monotony. The golden section or golden mean is a proportion that would have you divide an eleven-inch rectangle at a place that would split it into two shapes, approximately seven and four inches each. This is a ratio of about 1 : 1.618 and is based on a geometric formula that relates the division to the proportion of the whole rectangle. Artists, architects and other designers had discovered that many things in nature adhere to this proportion so it was considered to be divinely conceived. The golden section is a comfortable, asymmetrical method of organization and is followed by many painters and filmmakers.

Golden Section: BC is to AB as AB is to AC

Rule of Thirds: The Intersections of the Horizontal and Vertical Divisions are Hot Spots Where We Should Focus the Viewer’s Attention
Many filmmakers use the rule of thirds for compositional choices. The rule of thirds says that if you divide your screen into thirds vertically and horizontally, the intersection of these lines mark critical locations or “hot spots” on the screen. These hot spots are where the filmmaker should put the important information. This is a comfortable place to focus the audience’s attention. If you watch almost any well-made film, you’ll see the director using the rule of thirds extensively.

Maria Clapsis, Rule of Thirds

Eric Drobile, Golden Section
In the section on storyboarding, we saw how filmmakers can split the screen to show two things happening at two different places at the same time. Montage, superimposition, and picture-in-picture techniques have allowed directors to restructure the film’s framing rectangle. Today’s relatively widescreen films create special problems for filmmakers as they work to present strong, meaningful visual presentations. It can work to one’s advantage to find ways to reshape the area within the larger rectangle to create new and different compositional solutions. We are all familiar with a shot that shows the POV of someone looking through binoculars. This effect is called “mask shot.” It effectively changes the shape of the area of interest. “Frame-in-frame” is a similar compositional device that can allow one to reshape their area of interest and provide focus and variation for the audience. If a camera shoots between the limbs of a tree or into the rearview mirror of a car, the shape of the tree limbs or the edges of the mirror will become a new frame inside the overall shot composition. Sometimes these kinds of shots can make the audience feel like voyeurs looking through gaps in foreground objects as if unseen by the main characters. Other times it can make the audience feel that it is intimate and close up, immersed in an environment where one can reach out and touch the foreground elements. Frame-in-frame shots like any compositional device should not be used arbitrarily, but the use of foreground to reshape your area of interest and realign the audience to its experience is an important option.

Frame-in-Frame Compositions by Maria Clapsis
Redesigning with Tone
Silhouette
We are often trying to create the illusion of a three-dimensional world in our films. Therefore, we sometimes lose sight of the fact that the film is two-dimensional. Films usually happen on a flat screen. A character that in the story has three dimensions is only an illusion of light and actually has only two dimensions. It is only a two-dimensional shape on the screen and a three-dimensional form in our minds. This is why we often talk about a character’s silhouette. If you fill a character’s image in with a solid black, you will see only its shape, its silhouette. We should design our character, its pose, and its placement within the composition considering its two-dimensional interpretation.
Light and Patterns
Light patterns provide a way for an artist to break through the object contours and arrange the best shapes for telling a story. Any picture can be thought of as a puzzle pattern of two-dimensional shapes. There are dark, light and various colored shapes. The shapes of negative space between objects also form part of the puzzle. Sometimes the shapes of the darks and lights do not reveal an object’s contours but cut across the contours and background to create different shapes and new design possibilities. A strong light may place the shaded side of a character’s face into black shadow, if the background is also black then the head will merge with the background and some of the outside edge will be lost. The outer contour of the character’s head will be less apparent than the light pattern on the face. Light and shadow patterns can create varied shapes regardless of the original contours of the objects. Filmmakers, photographers, and artists of all kinds have realized that lighting can redesign your world and create many compositional choices and dramatic possibilities.

Frame-in-Frame Composition by Gary Schumer
Visual contrast means that one thing in the image looks different from everything else. It may be the one window light that is on in a big house with many windows, a small red fish swimming in a school of blue and gray fish. It may be the one person who gets up and leaves in an auditorium of seated, stationary people. Our eyes are drawn to things that stand out against the sameness of their surroundings. You can direct the viewer’s eye by making something stand out visually. It is always important to consider where you want your audience to be focused in any shot. Don’t give the audience too many things to focus on or it may not see what you need it to see. Upstaging is a term used to suggest that the wrong thing is stealing the attention away from where it is supposed to be. Don’t let the wrong thing “upstage” your main area of focus. There should be one idea per storyboard and one main thing to focus the audience’s attention on in each shot.

Directing the Eye with Contrast
Camera Focus
The depth of field in a camera can be used to “blur out” the background while the foreground is in focus, and then to reverse the effect and let the foreground become out of focus, while the background becomes clear. This is called rack focus and represents a way that the live-action cameraman keeps the audience looking at the right thing.
Contrast of Scale
One way to think about scale is the distance of the main subject from the viewer. The distance of the subject is determined by the distance of the camera from the subject or the way the zoom is set on the lens. The standard categories are close-up, mid shot and long shot. There are also extreme close-up, medium long shot, etc. to describe intermediate variations. Of course, close-up shots are more intimate and can show the audience subtleties of facial expression or beads of sweat on someone’s upper lip. Distance shots can make the character look small and vulnerable in their environment.

Rack Focus

Close-up
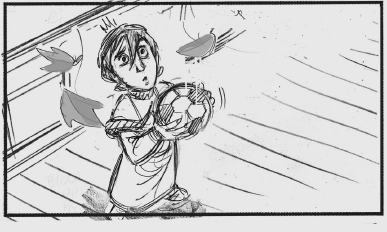
Medium Shot
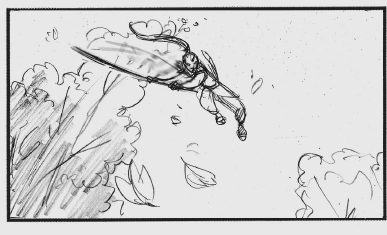
Long Shot, Storyboards by Steve Gordon
Many beginners tend to keep their camera at the same distance from the subject throughout a scene. You should use a range of shots to give your film visual variety and to take advantage of the emotional or psychological message that each type of shot can convey. You may want to avoid a medium-to-medium shot unless you change camera angle. It is often better to use a medium to close-up shot if the angle stays the same. Another aspect of scale relates to the comparative size of one shape or area of the screen to another shape or area. Since we are attracted to visual contrast, we tend to notice the shape that is biggest. In a cowboy movie gunfight, the camera may be behind one cowboy’s holstered gun as his hand twitches in anticipation. This silhouette may fill 80% of the screen making his opponent look small and distant. This kind of shot is surely more dynamic then simply filming the entire gunfight in profile with the camera the same distance from each cowboy. Compose your shots with consideration to a variety of shape sizes. The visual richness that shape size variation brings to your shots can translate into a more powerful telling of your story.

Pictorial Space
There is a great scene in the live-action film The Abyss (1989, 20th Century Fox). The screen is shown as if we are looking through the side of an aquarium. The aquarium is filling with water and our human character is drowning. The camera keeps moving closer, the water keeps rising and the ceiling keeps dropping until there is only a narrow strip of air space. Our character struggles to push her mouth into the narrow airspace to stay alive. The audience is watching, often with their necks fully extended and their chins pushing up, as they feel the space filling up and the anguished character fighting for her last breath. This is a great example of how the director makes the audience feel and on some levels experience the anguish of drowning through the manipulation of pictorial space.

Drowning Scene from the Film, Abyss
The way we use the real space of the screen and the illusion of space that the character moves in are important elements of staging. A character may be staged to look open and free or trapped and claustrophobic. A feeling of submission or dominance can be attained if one character is up looking down at another character who is down looking up. A tracking shot could have the camera follow a character walking to the right but the character is on the right side of the screen. This draws attention to the space behind him and may suggest he is being followed. If this same scene has the character on the left, we may feel that he has a comfortable amount of space for the character to move forward into, so we may simply feel that he is moving merrily along his way. There are many ways to change the staging and as a result, change the story.

Character has Space to Move Into

Character is Possibly Being Followed
Nose Room
If a character looks to the right and speaks to someone, you may want to put the character on the left third of the composition so he has some room to look and speak into on the screen. When you show who he is speaking to, you may want to put that person on the right third for the same reason. You can keep the space feeling fluid and dynamic by considering the attraction of the empty space around the subject.
Shallow, Flat, Deep, and Ambiguous Space
A scene that takes place in a small room could be considered shallow space if the back wall is parallel to the screen shots will be considered in a flat space. The camera may follow a character down a long hallway and then the flatness will be lost and a deeper space results. A film that runs for 30 minutes in a shallow space could suddenly transport the viewer to the top of a mountain looking out over a vast panoramic landscape. This contrast may cause a very strong emotional reaction in the viewer. We can use the range of restrictions of shallow space to the illusion of nearly infinite space to affect our story ideas in different ways. Your story may require the depiction of a world from a bug’s point of view or through the eyes of an eagle. Sometimes the story requires that the audience be kept uncomfortable or unsure about the space. Dreams and memories may be more effective if we are not entirely grounded in a familiar space. Other kinds of poetic solutions may require a more surreal departure from common experience of space. A film can make the audience feel the sensation of a type of space and the psychological associations that come with that experience.
Good staging will require a careful consideration of the type of space a shot is using in order to put the audience in the right emotional state.
Research
There is one sure way to learn and explore staging possibilities, and that is to study the choices of other filmmakers. Watch a film and notice the filmmaker’s staging decisions. Watch for the lighting and placement of important information and ask yourself, “How did the filmmaker get me to see what I needed to see?” Think about how the filmmaker may have considered the emotional aspects of the story when making staging decisions. Most importantly, make drawings of what you see. Simple thumbnails showing placement and tonal distribution can help you understand how grandeur and intimacy or pathos and comedy can be presented to an audience in the best way. Learn how the masters achieve that magical experience we all recognize when we are truly moved by a great film.

Studies of Staging for Akira Kurosawa’s Ran by Storyboard Artist Paul Briggs
How do you know if your storyboards are doing everything they need to do to captivate and inform your audience? We are often trying to consider many issues at once when planning a film. This checklist may prevent you from missing important choices.
- What is the important storytelling information in this frame? What exactly needs to be seen?
- Does the image convey the emotion of story as well as the specific data of the narrative?
- Does the image tell what is happening clearly? Is my craftsmanship effective? Is there any chance someone could be confused or unsure about what they are seeing?
- Are there “gaps” in my storyboard? Do I need more panels to make the story complete and to keep the flow of action and ideas working?
- Will the viewer look where I want them to look? Have I chosen the best camera angle? Do I need lighting or color to direct the audience’s eye?
- Is this panel too predictable? Do I need to spice things up? What are some other options?
- Should I consider putting foreground elements between the camera and the main subject of my shot? Should I use “frame-in-frame” for this composition?
- Do the drawings flow visually and stylistically from the panels before and after?
- Should I move the camera to change this shot from the shot before and after; where and why?
- Have I put the audience “in the action” by using POV and other more intimate shots or have I kept the audience observing at a distance? Which is more appropriate at this point in the story?
- Will the storyboards that I am doing now require that I go back and re-evaluate, and then redraw some of my earlier story panels?
- Have I captured the most telling pose, gesture, action or facial expression? Does the body language convey what my character is thinking, feeling or doing? Do I need more reference, research?
- Does the character appear to be moving, in action, when action is required or does it look like a frozen pose? Do I need speed lines, arrows, or multiple images? Can I represent the essence or totality of this action in one drawing, or will I need to break it down into several panels?
- Is the light and atmosphere an important part of telling my story, setting its mood or emotional climate?
- What kind of space is right for this scene: flat, shallow, deep, ambiguous? Which best reinforces this aspect of the story? Is it important that my audience know of the season, time of day or weather conditions?
- Have I shown my boards to other people for a fresh perspective?
Summary
- Staging refers to the way you show us things in a film.
- The design of the shot can direct the viewer to see what you want them to see.
- The frame shape is your first design element.
- Some subdivisions of the frame are more effective.
- You can re-design the composition with lighting and framing devices.
- Contrast of movement, color, tonal value, scale and texture can direct the eye.
- Illusionistic space in a shot and the two-dimensional space of the screen can both be manipulated for emotional effect.
- The empty space around things helps to tell the story.
- Learn good staging by studying good filmmakers.
Recommended Reading
- Marcie Begleiter, From Word to Image Storyboarding and the Filmmaking Process
- Nancy Beiman, Prepare to Board
- Bruce Block, The Visual Story
- Mark T. Byrne, Animation: The Art of Layout and Storyboarding
- Jeremy Vineyard, Setting Up Your Shots
On Staging: An Interview and Shot Analysis with Steve Hickner, DreamWorks Animation Studios
Steve Hickner has worked in animation for over 30 years. He started in TV animation, working on shows like Fat Albert and He-Man, then went to Disney for five years and worked on The Black Cauldron, The Little Mermaid and Who Framed Roger Rabbit? Since 1994 he has been with DreamWorks in their art department, directing The Prince of Egypt and Bee Movie.
Q: Take me through your process of directing.
Steve: Usually the script will be interpreted through storyboard artists. Occasionally, I will board something myself. I guard that tremendously because I’m not Orson Welles, who can do it all. I like the addition of other people’s ideas.
Animation is incredibly iterative. You do it again and again. So the first stab at a blank sequence is something I guard tremendously because you never get that chance again. After the first storyboard pass, everyone will have seen something already. So you really want to give other people enough direction to give them the idea of what you’re thinking of for the movie, but not too much so that you stifle them or you’ll never find out what other ideas they might have. I want to give less direction at the start; I’m going to have plenty of bites of the apple throughout the process of making the film. So at the very beginning, I’ll talk about the objective of the sequence, not how to do it. I never tell them shots.
When you put your trust in others, the process of making a movie for everybody else is much more fun.
Q: Can you give us an example?
Steve: Let’s say you were going to do this scene in the movie. I wouldn’t talk in terms of how to shoot that sequence because then the story artist is just “a wrist.” You reduce your artist to a pair of hands and that is the absolute worst thing you can do because people will mentally check out and won’t want to work on the picture anymore. So instead, I would ask, “What is this scene about? What is the character feeling? And what do you hope to achieve from them?” You talk about the emotional underpinnings just like you would to an actor in a live action film. And then you let them go and see what they come up with.
Q: Based on that, when you look at the storyboards, are you looking to see if the drawings communicate the note of the scene? And then also if the sequences/shots together describe the essence of the movie?
Steve: They should. You know, it’s all “wheels and wheels” as they say. Everybody and everything should be servicing the one big idea. You want to ask, “What is the objective of this? That’s what we’re all going to be working on.” It’s a common goal and it’s how each person brings their craft to it that makes it a rich, great movie.
Q: These are the type of things that make the difference between a good film and a great film. Why do so many films not get this?
Steve: Because it’s damn hard. People ask me, “Why aren’t there any good movies?”
I tell them, “Go make one.” It’s really, really hard. It’s why I try not to ever bash another filmmaker because I’ve been there and I know how hard it is. Everybody’s trying to make a good movie.
Sometimes you get it, sometimes you don’t. Even some of the great people—Billy Wilder, Hitchcock, John Ford—everyone has a bad movie. Except Pixar.
Q: In storyboards, what are the most important things to think about?
Steve: Think about reactions. There is power in the reaction shot. Hal Roach, when working with Laurel and Hardy, would always get three or four laughs from one joke. When Ollie goes up the ladder with a bucket of paint, the audience is laughing in the anticipation of what is going to happen. Then it falls on Ollie and it gets a laugh. Then when he wipes the paint off his face and looks up they get a laugh. Then Stanley reacts to Ollie and you get a fourth laugh. It wasn’t just the joke but the three or four laughs you get from the reaction shots.
Q: When you’re looking at your film how do you know which parts are necessary and which should be cut?
Steve: When I put together a story reel I first do it the way that I want it. I then tell the editor to save it, and then I say, “Now let’s break it.” Let’s do an aggressive cut. Once I see the aggressive cut, the other one feels so slow. Sometimes I’ll make two versions, other times I just have the editor make the aggressive cut. I don’t fall in love with anything that I have done. I like a lean movie—especially if I’m trying to be funny.
The thing I learned is that every sequence/shot should have a purpose, if it doesn’t it shouldn’t be in there. If there isn’t a reason for it, get rid of it.
Q: How do you approach a sequence from a storyboarding point of view?
Steve: I want to get through it as fast as I can, almost as if I’m watching it. When you pitch a sequence it should be about the length of the time that ends up on screen when it’s finished. So when I thumbnail, I work on them very fast. Sometimes I’ll write ideas when I’m reading the script.
Steve Hickner: Storyboards and Analysis
Steve agreed to storyboard a portion of the script for A Good Deed, Indeed! which is one of the case studies on the web.
In this story, a pirate has been buried to the neck in the sand by his mutinous crew and left to die. Wrongly believing that the pirate is a squid, two crabs try to help him. We enter the story after the crabs have found him, determined that he is still alive and are trying to pull him by his beard (tentacles) back toward the water.
Shot 1: Evelyn has been trying to push the creature toward the sea as Herschel pulls. Evelyn scampers onto the top of the pirate’s head and addresses Herschel: “It’s not working! What do we do?!”

“It’s not working!”

“What do we do?”
Steve: Since this is the first shot of the series, I am establishing the geography between all the characters, and the environment. Note the hint of ocean in the bottom left corner.
Because Evelyn, the female crab, has dialogue, I have decided to favor her by shooting over the shoulder of Herschel, the male crab.
Shot 2: Herschel listens to Evelyn and thinks about the problem.

Once again, I am shooting wide to made sure the audience understands the geographical relationship between all the characters—and the ocean; which will become an essential part of the later story.
By choosing a downshot that is over Evelyn and the pirate, I allow the audience to be “close camera” to Herschel. (By “close camera”, I mean that the character is more frontal to the face of the audience.)
Shot 3: Herschel begins to pull a tentacle around the head with all his might.
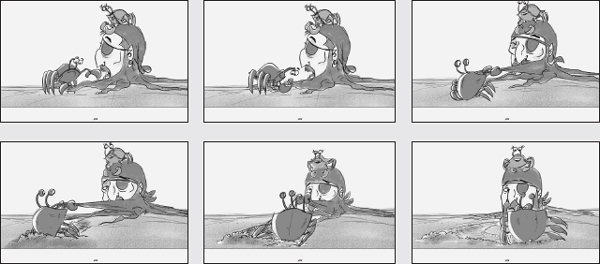
Steve: This is the third shot in a row that I have chosen to go with a wide shot, and that is because, up to now, the dialogue has been more expositional and not intimately personal to the character speaking. Therefore, I do not need to be too tight on any of the characters.
This shot is designed to be side-on so that the audience can easily see the faces of all the characters simultaneously. You will notice that as Herschel tugs on the beard into camera, the characters turn to follow him.
Shot 4: Herschel is determined.

Steve: In this shot, I am cutting on the action from Shot 3. Shot 3 leads the character from left to right, and Shot 4 is the reverse and deliberately creates a “counter dolly” by having Herschel move right to left—this will create a seamless cut and a strong dynamic of action in the scene montage.
Shot 5: Evelyn gasps! She has seen the trench that is forming under Herschel’s feet and has an idea. “Gasp! Herschel!”

Evelyn: “Gasp!”

“Herschel!”
Steve: Once again, I am using a counter dolly to accentuate the action. The start of the shot has Evelyn looking left but framed to the right. As she begins to look right, the counter dolly moves her to screen left.
In both Shots 4 and 5, I have now moved in closer so the audience can better experience what the character is thinking and feeling. (By withholding my closer shots until this point, they will have more impact.)
Shot 6: Herschel looks at the trench.
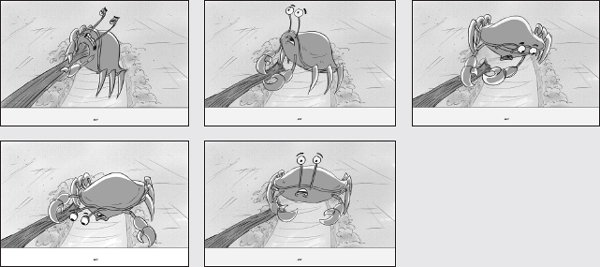
Steve: Again, I am tighter on Herschel because he will have important acting to do in this shot. This is the shot where Herschel will begin to understand Evelyn’s plan.
You will notice that at the most important point in the shot, where Herschel looks at the groove he has created in the sand, and then sees the ocean, he is very “close camera.” By being close camera on Herschel, I allow the audience to connect better with him—as a person would if they were looking directly at their companion in conversation.
Shot 7: Herschel looks toward the goal (the water).
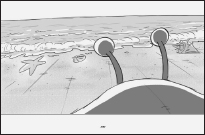
Steve: Even though this shot represents Herschel’s Point-of-View, I have elected to include the character in the shot—which, of course, is impossible. In classical cinema, the way to shoot this shot would be to eliminate the character from the shot and just show what he is seeing.
Filmmaking in the past three decades has become more aggressive, and there is less of a tendency for today’s moviemakers to conform to classical styles of cinema. Because I want to re-establish the geographical relationship between the crab and the ocean, I am including Herschel in his own point of view shot.
Sometimes you will see a hybrid of these two techniques. The shot will start classical-looking, with a point of view shot that does not include the character, only to have the filmmaker allow the character enter into his own point of view later in the shot.
Shot 8: Herschel understands, “Oh yeah! I gotcha!”

Herschel: “Oh yeah. I gotcha!”
Steve: This shot will serve two purposes: it will be a “cut back” to the character we have been following, and then to become a slam truck-back which will become the widest geographical shot for the whole scene of action.
By combining both of these ideas into one shot, I am reducing my shots so that the scene does not become too cut heavy, and—more importantly—I am allowing the audience to discover Evelyn’s plan at the same time that Herschel does on screen. Having the audience come to a realization at the same time as the character does allows the audience to live vicariously through the on-screen personas.
Shot 9: The pirate believes the irritating crabs are finally going away. “Good riddance, you scurvy little sand rats … “
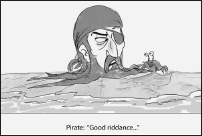
Pirate: “Good riddance …”

“… you scurvy little sand rats …”
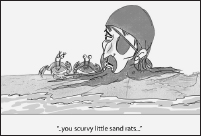
“… you scurvy little sand rats …”
Steve: This story has an inherently unique staging situation. For most films, if you want to show a close-up of the lead character, you have to move in with the camera, and usually that means sacrificing being able to see other characters. But because we are only seeing the head of the lead character for this story, and the other characters are small in size, I can stage this shot as if it were a close-up of the pirate’s face and still get all the characters in the same frame.
By staging the shot as I have, I can get close in on the pirate’s expressions, and still include the geography of the two crabs.
Shot 10: Evelyn and Herschel meet and begin to dig the trench.

Steve: Another unusual aspect of the way I have staged this film so far is that I haven’t yet shown a classic close-up of two of the three characters—the crabs. Because the crabs are so small, and their faces are built into their bodies, they work best in a wider, full-figure shot. Even though I am framing the shot wider than is standard for a closer dialogue shot, we still have no trouble seeing the acting performances from the crabs, and we can also see clearly that they are grabbing the pirate’s beard “tentacles.”
Shot 11: Pirate realizes they are digging a trench. “Aye! They is diggin’ me out!”

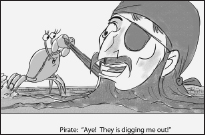
Pirate: “Aye! They is digging me out!”

Pirate: “Aye! They is digging me out!”
Steve: For this action, I have chosen to cover it from the side so that I can see the pirate’s face as he delivers his dialogue as well as show the female crab pulling on his beard and digging a trench as she moves.
Shot 12: Pirate is talking as crabs are digging. “Holy Jehoshaphat! Keep on going! Yeah! Yeah!”
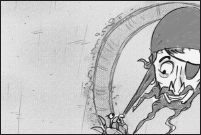
Pirate: “Holy Jehoshaphat! …”

“… Keep on going ….”
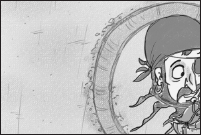
“… Yeah. Yeah. Yeah.”

“… Yeah. Yeah. Yeah.”
Steve: We’ve had a few lower angle shots in a row, but now I need to reveal the fact that the crabs are digging a trench around the pirate’s head. In order to show the action from the best angle, I raise the camera almost directly upwards—so that there is very little perspective on the ground plane. I want this action to be seen almost as it would if you were drawing a diagram on a piece of paper.
Shot 13: The crabs find a way to bring the water to the trench.


Steve: Now, I need to introduce the ocean and the starfish in the shot—but still allow the audience to watch the pirate’s face as the events start to take a turn for the worse. By placing the camera just above the sand, in front of the pirate, I can get all the key story elements in the shot together.
Note: There is nothing in the script that specifically says how the crabs get the water to the trench. This is where the creativity of the board artist comes in.
Shot 14: Crabs are using the starfish to help dig a path from the water to the trench.
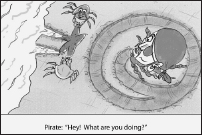
Pirate: “Hey! What are you doing?”
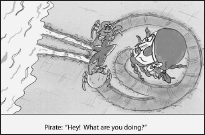
Pirate: “Hey! What are you doing?”
Steve: You may have noticed that previously when I created a downshot, I placed the water at the bottom of the frame, and that allowed me to better see the pirate’s face and the action of the crab.
For this shot, I need to show the action of the sea water moving towards the pirate, and for this reason, I need as much horizontal space in the film frame as possible.
By placing the pirate at the right of the frame, and the ocean at the left, I also get a very clear “read” of the crabs pulling the starfish along the sand, creating a trough for the sea water to follow.
Shot 15: The starfish reaches the trench.

Pirate: “Keep digging me out! …”

Pirate: “Keep digging me out! …”

Pirate: “Noooooooo! …”
Steve: I dropped the camera low to the sand here because I want the pirate to be “close camera” as he sees the crabs pulling the starfish towards him, creating a trough full of water. This way I can tell two story points in the same shot: the crabs digging the trough and the pirate reacting to the impending jeopardy. As a note, I am starting the shot with the starfish filling most of the frame, so I can make a dramatic reveal of the pirate’s horror when the crabs raise the starfish out of shot.
Shot 16: The water begins to fill in around the pirate.

Steve: Once again I want to be high above the pirate so that I can show the complete action of the sea water filling in the trough and heading toward the pirate. By placing the water source at the bottom of the frame, the pirate is facing towards camera, and we can easily see his expression while, at the same time, we can see the water.
Shot 17: The crabs climb on top of the pirate’s head as the water engulfs him.

Steve: This shot is all about seeing the water level rising, as the pirate begins to drown. By raising the camera slightly off the ground, we can see the ground level and all the characters in the same shot.
Shot 18: Herschel and Evelyn are checking on the condition of the pirate. Herschel: “How’s he doing?” Evelyn (patting the top of the pirate’s head): “Good. He’s going to be fine now.”

Herschel: “How’s he doing?”

Evelyn: “Good. He’s going to be fine now.”
Steve: I am deliberately coming in tight on the crabs because I don’t want to show what is happening with the pirate. Since the crabs are oblivious to the danger they have foisted onto the pirate, I want the audience to be following the story through their eyes.
Shot 19: Herschel: “Oh, he looks much happier under the water.”
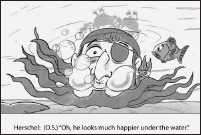
Herschel: (O.S.) “Oh, he looks much happier under the water.”
Steve: This is the visual payoff of the joke of the crabs thinking that all is well when, in fact, the pirate is drowning. In order to emphasize the comedy, I have chosen to shoot this action under water where I can show a fish looking at the action as the crabs speak nonchalantly above the waterline. Since this is a visual gag, I don’t need to show the characters speaking. Consequently, the fact that the crabs are distorted from the water ripples is fine.
Shot 20: Evelyn: “He sure does.” Herschel: “Building that trench was such a good idea.”

Evelyn: “He sure does.”
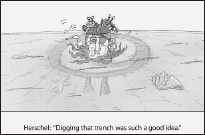
Herschel: “Digging that trench was such a good idea.”
Steve: The story is wrapping up now, so I want to show one last image of the whole disaster. In order to show the entire tableau, I am pulling back with the camera and shooting it wide and as a slight downshot. The camera here is an objective one, just recording the events for the audience as they happen.
Shot 21: Herschel: “You’re a genius.” Evelyn: “We did a good thing.”
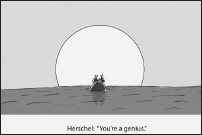
Herschel: “You’re a genius.”

Evelyn: “We did a good thing.”
Steve: I wanted this to be a beauty shot, so I have chosen to shoot into the setting sun. I want to contrast the serenity of the crab’s situation with the ironic fate of the drowned pirate.
Additional Resources: www.ideasfortheanimatedshort.com
See a complete preproduction case study of this piece:
- Final script
- Alternate scripts
- Production notes
- Character and Environment designs
- Animatic and additional shot analysis by storyboard artist, Nilah Magruder.
