In This Chapter
Discovering why the world loves to draw with the Pencil tool
Generating paths with the Pencil tool
Editing existing paths
Using the Pencil tool preferences settings
Smoothing out bumpy paths easily
Deciding when to use the Pen or Pencil tool
Using the Line Segment tool
Creating and editing an arc
Drawing amazing spirals
In the beginning, there was the Pen tool. And users said that the Pen tool was good. But the users also said that the Pen tool was too hard. And too frustrating. And inefficient for quickly creating paths. And the users griped. And behold! Adobe gave them the Pencil tool — the wondrous, magical Pencil tool that makes creating paths as easy as drawing with a, well, pencil. And there was great rejoicing. But Adobe wasn't content to stop there, blessing users with three other tools: the Line Segment, Arc, and Spiral tools.
In this chapter, you find out all about the Pencil tool and its buddies, theSmooth, Path Eraser, Line Segment, Arc, and Spiral tools. You discover how to create and modify paths as well as customize these tools to match your personal drawing style. And then you can join in the rejoicing!
The whole idea behind the Pencil tool is to let you draw exactly what you want — as quickly or slowly as you want. Regardless of the speed at which you draw, the resulting path appears the same (a nice thought for those of us on a deadline).
The Pencil tool can create smooth lines even when you're jittering around. (Unless you don't want it to — in which case it makes funky, jittery lines.) The Pencil tool is also intuitive. Not only does looks like a pencil, but when you click and drag with it, it creates a line that more or less follows where you dragged, pretty much like using a real pencil. (For contrast, look at the Pen tool. It looks like a pen, and yet it does nothing even remotely penlike!) And it allows you to fix your mistakes without ever having to push or pull a point or a handle.
The following steps (deftly illustrated in Figure 8-1) show you how to use the Pencil tool:
Choose the Pencil tool from its slot in the Tools panel.
Your cursor changes into (surprise!) a pencil.
Click and drag in the Document window. As you drag, a dotted line appears.
Think of these dots as breadcrumbs that show you where you've been.
Release the mouse button after you amass a nice little trail of breadcrumbs (dots).
A path forms where the breadcrumbs were. (If Hansel and Gretel had used the Pencil tool, that poor witch would be alive today.)
Warning
You're right. Using the Pencil tool does sound too easy. Although the Pencil tool is undeniably wonderful, it can cause frustration (or at least uncertainty) in the unwary. Here are instances to watch out for (and avoid if possible):
You can't continue your path. You need to select a path in order to add to it. For example, if you stop drawing, do something that deselects the path, and then return to drawing your path, you create a second path instead of extending the first one. To continue the path you were originally working on, you must select it before you start drawing again with the Pencil tool. Press the

Note
To get to the selection cursor right away, hold down
You accidentally edit an existing path. If you start a new Pencil path near a selected path, you can edit the selected path instead of creating a new one. In fact, you can do so with any path that was created with the Pen, Pencil, Line Segment, Arc, Spiral, Star, or any other tool in Illustrator. You can edit any of them with the Pencil tool. (So is the Pencil versatile or overzealous? Your call.)
You create a path that's too lumpy or too smooth. You can set up the Pencil tool to be very smooth or very accurate. (In this case, accurate really means that it follows all the skittles and bumps you make as you draw). If someone you love changes the Pencil tool preferences (which you can access by double-clicking the Pencil tool), the Pencil retains those settings. Pencil tool preferences are loyal to the most recent user; they never return to their original settings unless you manually change them.
You get a wacky fill or stroke while you draw. This situation really isn't the Pencil tool's fault, but it's not exactly unknown to habitual Pencil tool users. If, before you start to draw, a nameless somebody sets the fill or stroke to something a little odd, boom! you get a mess. Fortunately, you can change the fill or stroke back to the default settings by pressing D. Before you know it, you're back to normal. (Well, at least the path is. . . .)
You can't close a path. Often when you use the Pencil tool in an attempt to create a closed path (by ending the path where you started), you wind up with two points that are very close to one another without actually being joined. For some reason, the Pencil tool has a hard time making a closed path if you draw the entire path with one continuous stroke. When you near the end of the path, hold down the Option key (Mac)/Alt (Windows) and then release the mouse with Option/Alt still pressed when the end of the line you're drawing is near the beginning. The two ends of your path will be joined.
You can't draw a straight line. In Illustrator, pressing the Shift key doesn't keep the Pencil tool on a horizontal or vertical plane. Just about every other tool in Illustrator draws or moves in straight lines at 45° angles. In fact, just about every other tool in every Adobe product moves or draws in straight lines when you hold down Shift! But the Pencil tool can't even think straight! Fortunately, you can switch over to the Pen tool to draw straight lines and then switch back to the Pencil tool to create the rest of the drawing.
If you ever had one of those pocketknives with enough blades to do or fix anything, you can appreciate how much more the Pencil tool does than a mere pencil! Use the amazing Pencil tool to edit existing paths, create new paths, append one path to another, and close existing paths.
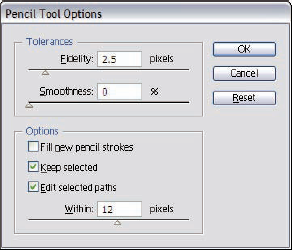
Set preferences for the Pencil tool by double-clicking the Pencil tool in the Tools panel; this opens the Pencil Tool Options dialog box, as shown in Figure 8-2. Straight out of the box, the Pencil tool works pretty well. To be honest, although it's really set up to work reasonably well for everyone, it might not be set up to work as well as it possibly can for you.
The first slider under Tolerances (at the top of the dialog box; refer to Figure 8-2) is Fidelity. Nope, nothing to do with divorce courts. This kind of fidelity affects how closely the path follows where you drag the Pencil tool. A high setting (slider toward the left) means that the path matches precisely what you drew with the Pencil, adding as many points and corners as necessary. A low setting (slider toward the right) means that the path loosely follows what you drew, making a smoother line with fewer points. Paths created with the Fidelity slider all the way to the left appear more natural and bumpy; paths drawn with the slider all the way to the right appear smoother but more computer-like.
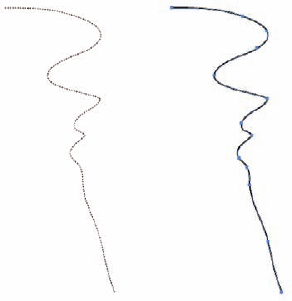
Compare the images shown in Figure 8-3. The path on the left was drawn with a Fidelity setting of .5 pixel; the path on the right was drawn with a Fidelity setting of 20 pixels. This Fidelity setting isn't just an arbitrary special effect; it's a way to make the Pencil tool match your personal drawing style.

Tip
Fidelity is measured in pixels. A pixel can mean many things as a unit of measurement. In this case, a pixel refers to a distance on your screen. (For more information, see the sidebar "Just how big IS a pixel?")
Drawing with a mouse is about as easy as drawing with a brick; the lines you make tend to be pretty shaky. The Fidelity slider determines how shaky your hand can be and still produce a smooth line. When you use the Pencil tool, you create a breadcrumb trail (a dotted line). After you release the mouse button, your computer pauses for a split second to create an imaginary line that's the average of all the movement you just made with the mouse. Then Illustrator compares that imaginary line with your breadcrumb trail and creates the actual path based on the Fidelity slider's setting.
Suppose that your Fidelity setting is 20 pixels — the highest Fidelity setting possible. As you draw your naturally shaky line, you move away from the imaginary average line. With a setting of 20 pixels, Illustrator assumes that everything less than 20 pixels away from that imaginary line is unintentional shaking, induced by the unwieldy nature of the mouse (or by too much caffeine), so Illustrator just ignores that stuff when it creates the path. Everything more than 20 pixels away is considered intentional, which prompts Illustrator to put in a curve or a corner point.
All this is just an extended way of saying that if you're at one with yourself and the Universe and are a Zen master of mouse movement, you want to keep your Fidelity settings high. That way, you move the mouse only to exactly where you want the path, and you don't have Illustrator second-guessing what you really intended. However, if you have really shaky hands (as most of us do when we get too much caffeine and not enough sleep), you probably want to use a low Fidelity setting. More than likely, you fall somewhere between these two extremes. So just double-click the Pencil tool and set the Fidelity slider to match your style!
The second slider of the Pencil Tool Options dialog box (refer to Figure 8-2) is a little harder for most people to figure out. After all, it's named Smoothness — but didn't the first slider (Fidelity) smooth out the image?
Note
Here's the difference. Because drawing with the mouse can be pretty shaky, this setting helps compensate for the shakiness in a slightly different way from the Fidelity setting. The Fidelity setting helps Illustrator determine whether you drew the path because you meant to or because you had a shaky mouse. Comparatively, the Smoothness setting helps Illustrator figure out what kind of corner you meant to create when you deliberately changed the direction of the path.
When you change the direction of a path, you can make a sharp corner point or a smooth, curving point. When Illustrator converts your breadcrumb trail into a path, it must determine which of these points you truly intended to use. A low Smoothness setting (say, 0%) makes the Pencil tool use a corner point almost everywhere that the path changes direction. A high Smoothness setting (say, 100%) makes the Pencil tool use a smooth point in all but the most extreme path direction changes.
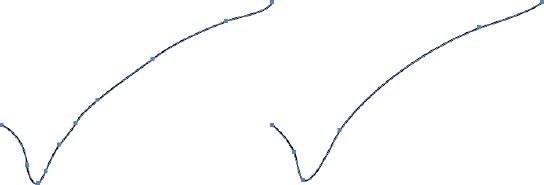
The setting that works best for you is a matter of your personal style. If your lines are as shaky as a balloon vendor at a porcupine convention, set your Smoothness setting to 100%. If your hands are as steady as a gunslinger in a Western movie, leave it set to 0%. Experiment until you find the right setting for you. Figure 8-4 shows the same image created with different Smoothness settings. Note how the settings change the way the drawings look.

At first glance, the differences between the drawings on the right in Figures 8-3 (low Fidelity) and 8-4 (high Smoothness) appear minimal. However, looks can be deceiving. The Smoothness and Fidelity settings are actually two distinct approaches to making a path: A low Fidelity setting creates a simplified curve by following the path you draw more loosely and using fewer points; a high Smoothness setting creates a smoother curve by using different types of points (smooth points as opposed to corner points) to create the path. Which is better? It really depends on your drawing style — and some experimenting!
Under the Options section of the Pencil Tool Options dialog box, you find three options: Fill New Pencil Strokes, Keep Selected and Edit Selected Paths. These settings determine what happens to the path after you draw it and how the Pencil tool interacts with that path (or with other selected paths).
With Fill New Pencil Strokes checked: You end up with the fill color specified in the Tools panel as a fill for any path you draw with the Pencil tool. Uncheck this and your Pencil-drawn paths will have a fill of None.
With Keep Selected checked: The path you just created with the Pencil tool stays selected after you finish drawing and release the mouse button.
With Keep Selected unchecked: The path you just created doesn't stay selected. (But you knew that.)
The Keep Selected option also determines how the Pencil tool affects selected paths, as follows:
Edit Selected Paths: When you use the Pencil tool near any selected path (with the Keep Selected option checked), the path you just drew with the Pencil tool replaces the previous path. You can even adjust how close you need to be to that path to edit it; just tweak the Within setting, located just beneath the Edit Selected Paths option.
Note
When the Edit Selected Paths option is not checked, the Pencil tool works the same regardless of whether Keep Selected is checked or unchecked. When the Edit Selected Paths option is checked, it changes the way the Pencil tool works. Instead of moving on to create a new path when you draw near a selected path, you linger over the old one to modify it.
With Keep Selected checked: You can start drawing a path, stop, and then continue where you left off. If you decide to replace the path, you can place the Pencil tool near the path you just drew and start drawing a new one. (Poof. The old one disappears.) But beware: You have forbidden the Pencil tool to draw multiple paths that are close together.
With Keep Selected and Edit Selected Paths checked: Every stroke you make that's close to another selected stroke replaces the old stroke with the new stroke.
With Keep Selected unchecked: The Pencil tool can change only the paths you tell it to change (by first using a selection tool). By removing the check mark from Keep Selected, you enable the Pencil to draw hair or grass (for instance) with utter abandon. With Keep Selected unchecked you can also edit hair or grass, but don't forget to select the part you want to edit (by first using a selection tool).
A really amazing attribute of the Pencil tool is that you can use it to edit any path, and not just the paths created with it. For example, you can edit a circle, star, or path drawn with the Pen tool. You can replace any portion of any path with the Pencil tool, provided that the path is selected and the Edit Selected Path option is checked in the Pencil Tool Preferences dialog box. (See "Making the Pencil tool work just for you" earlier in this chapter.) Just make sure that the path is selected, and then click and drag near the path to reshape it. The following steps walk you through the process of editing an existing path:
Using any selection tool, select the path you want to modify.
The path need not have been created with the Pencil tool.
Select the Pencil tool.
Click near the part of the path you want to modify.
Tip
When the little X at the bottom right of the Pencil tool disappears, you know that you're close enough to click.
Click and drag a new shape for the part of the path.
You can create any shape you want, but it must start and end near the existing path; otherwise, the new path won't reconnect with the old path.
Release the mouse button.
The path reshapes itself into the new path you just drew.
Use the Illustrator Smooth tool (found in the Pencil toolslot) to make your paths, well, smoother. (Not that you need me to tell you that, huh?) Use the Smooth tool to change how a path looks after it's drawn, in the same way that the Pencil tool lets you change the way a path looks while it's being drawn.
Drag the Smooth tool over any selected path to smooth it. You aren't limited to smoothing paths drawn with the Pencil tool; you can smooth any path in Illustrator. Your results, however, depend on the path that you're smoothing (for example, if you try smoothing a path that's already smooth, you aren't going to see much difference) and on the Smooth tool preferences.
You access the Smooth tool preferences by double-clicking the Smooth tool. The only two settings are Fidelity and Smoothness. These settings function identically to the settings in the Pencil Tool Options dialog box. (See the earlier section, "Making the Pencil tool work just for you.") The only difference is that you apply these settings to lines that are already drawn. Just sweep over them with the Smooth tool, and the result is as if you drew those paths by using different Pencil tool preferences settings.
As you may expect, using the Smooth tool is pretty smooth. Here's the drill (or is it a sander?), as shown in Figure 8-5:
Using any selection tool, select the path that you want to smooth.
Drag the Smooth tool on or near the path that you want to smooth.
Et voilà! The path is smooth.
Tip
The Path Eraser tool (also found in the Pencil toolslot) is so basic that it doesn't even warrant its own section. To use the tool, simply click and drag the tool over the portion of the path you want to remove. It might take a couple of swipes to eliminate what you want, so be patient. The Path Eraser tool also works with any path — not just those created with the Pencil tool. Also, with the Path Eraser tool, you don't have to set preferences.
In addition to the Path Eraser tool, there is also a regular Eraser tool in Illustrator. It's easy to get them confused, but they do quite different things. The Eraser tool works more like a real eraser, erasing away portions of your artwork regardless of the paths below it. The Path Eraser tool just erases paths.
The Pen and Pencil tools are the primary tools for drawing in Illustrator, and they work really well together. As you gain a knack for knowing which tool to use when, your work flows more smoothly, and your illustrations look more and more how you want.
A common technique that's useful for combining the Pen and Pencil tools is to switch between them while drawing. You could click each tool whenever you decide to change from one to the other, but the really zippy way to do this is to press the key that corresponds to each tool. Just press the P key (on your keyboard) to switch to the Pen tool, and press N to switch to the Pencil tool.
As your drawing changes from free-flowing curves to precise straight lines and back, you want to change between the two tools: Just click the endpoint of the path you were previously drawing with the other tool and then continue drawing.
Tip
Watch those icons! Working with the Pen and Pencil tools together is much easier if you pay attention to what the icons are doing. When the Pen tool is over an endpoint, a little slash (/) appears to the lower right of the pen icon. When you're about to close a path, a hollow circle appears beside the tool. When you have the Pencil tool in position to edit a path, its icon doesn't have anything beside it. Both tools, however, get Xs beside them when they're about to create a new path.
Keep in mind the types of shapes and paths that are best drawn with each tool. Here's a breakdown of the shapes and paths each tool draws best.
To draw anything with straight lines, choose the Pen tool because the Pencil tool really can't draw a straight line. To create a path or shape that has a smooth curve, you choose the Pen tool because the line the Pencil tool creates is just an average of the total strokes you make, which means absolute precision is impossible. Finally, to trace a logo or other scanned art that requires precision and accuracy, you're better off choosing the Pen tool because it offers you precision down to the thousandth of a millimeter.
When speed is more important than accuracy in your drawing — when you need to put a lot of hairs onto your lovely kiwi-fruit illustration, for example, and the precise length and position of each and every hair doesn't matter — choose the Pencil tool. For quick sketching, such as doodling an insulting picture of your favorite co-worker, choose the Pencil tool because you don't have to worry about each and every point and handle the way you do with the Pen tool. The Pencil tool lets you focus on creating the lines where they should be — and lets Illustrator do the rest of the work for you. (Ah, progress.)
If you've read this chapter to this point, you know you can't draw a straight line with the Pencil tool, and you've seen how tedious using the Pen tool can be. So, you're probably thinking that drawing a line would be easier with that gloppy rapidograph pen and a metal ruler. Don't fret! The powers-that-be at Adobe have bestowed yet another tool for pen-phobic users: the Line Segment tool. With the Line Segment tool, you can make lines quickly and easily.
Like most things that are super easy, the using Line Segment tool has its drawbacks. For example, you're limited to creating a single line, as shown in Figure 8-6. You can't create connecting lines like you can with the Pen or Pencil tools. You can, however, create lines that are perfectly vertical, horizontal, or at 45° angles. Just press the Shift key while you draw. You'll discover that when you drag your cursor, your line constrains to a 45° angle. After you create your line, you can edit it by selecting and moving either endpoint with the Direct Selection tool.
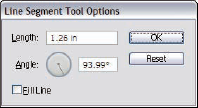
Double-clicking the Line Segment tool in the Tools panel brings up the Line Segment Tool Options dialog box, shown in Figure 8-7. Not exactly one of the feature-rich dialog boxes out there, the Line Segment Tool Options dialog box offers only three options: Length, Angle, and Fill Line. When you deselect the Fill Line option, the line appears with only a stroke, regardless of whether you have a fill selected in the Tools panel or the Color panel. After you complete the drawing of your line, the Fill swatch in both the Tools panel and the Color panel automatically reverts to None.
In Chapter 7, I tell you how to create a curve with the Pen tool — a sometimes painful two-step click-and-drag process. With the Arc tool (found in the Line Segment toolslot), all you do is just click and drag. The longer you drag, the larger the arc. The angle you drag affects the angle of the arc. That's it. If only everything in life were so simple. To edit your arc, treat it is as you would any other curve. Use the Direct Selection tool to select and move either of the anchor points or direction points on the curve. See Chapter 6 for the complete editing lowdown.
Maybe you're the finicky type and not completely satisfied with the arc created by using the default settings. Fortunately, the options in the Arc Segment Tool Options dialog box are numerous. Double-click the Arc tool to bring up the dialog box shown in Figure 8-8. The best thing about this dialog box is that it gives you a preview of the settings as you adjust them.
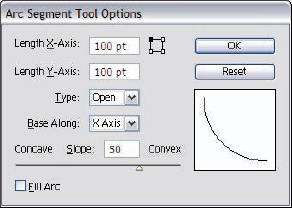
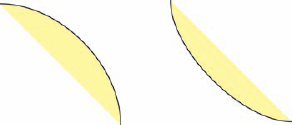
The preview thumbnail gives a nice visual representation of what happens to the arc as you change the lengths of the X (horizontal) and Y (vertical) axes. You have the choice of the type of arc — open (like a rainbow) or closed (think a slice of pizza). You can also choose where the base of your arc is anchored — either the X or Y axis. The slope slider allows you to adjust how concave (pushed in) or convex (pushed out) your curve appears. Figure 8-9 shows examples of both concave and convex closed arcs. Deselect the Fill Arc option to create arcs with no fill, regardless of whether a fill is selected. The small square to the left of the OK button is a proxy box, which allows you to specify the point of origin for the arc.
Tip
When you select the Arc tool and click your Artboard, the Arc Segment Tool Options dialog box appears (just like it did when you double-clicked the Arc tool). When you click OK, an arc is drawn with the settings you established in the dialog box . . . no dragging required!
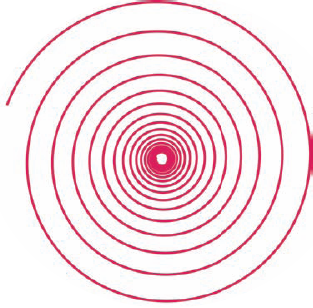
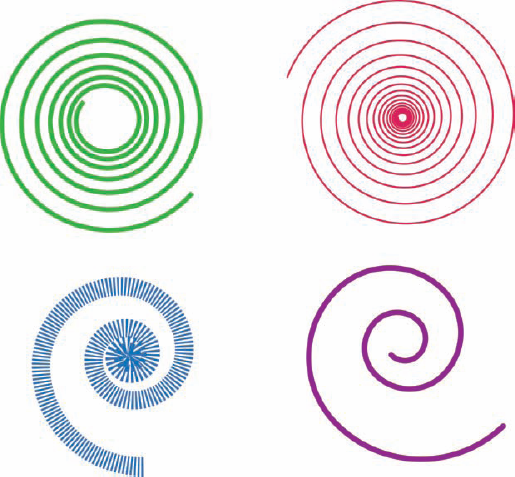
Spirals are notoriously hard to draw — that is, without using the Spiral tool. With the Pen tool, you have to set up a complex grid and align points and direction points until the cows came home, had a good night's rest, went to work for the day, and then came home yet again. It's really, really hard. But the Spiral tool (found in the Line Segment toolslot) allows you to quickly create all sorts of snazzy-looking spirals from a loose-looking galaxy or whirlpool to the super-tight grooves on a 45 rpm record (ask your grandparents, kids). Figure 8-10 shows some spirally artwork created primarily with the Spiral tool.
To customize a spiral, hold down one of the following keys while you drag:
Up/Down Arrow: Adds or deletes the winds of the spiral as you're drawing it.
Spacebar: Allows you to move the spiral around with the mouse while you draw it.
Tilde (~): Creates multiple spirals while you draw.
Click the Artboard with the Spiral tool selected (instead of clicking and dragging) to open the Spiral dialog box, as shown in Figure 8-11. Here are the options:
Radius: This option sets the distance from the center of the spiral to its outermost point.
Decay: This option determines how much larger or smaller each coil of the spiral is from the previous coil. Values close to 100% result in a tight spiral, and 100% results in a perfect circle. Figure 8-12 shows a spiral with a decay of 75% and one with 95%, with the exact some radius and segments.
Segments: This option determines how many coils make up the spiral. Each wind of the spiral is made of four segments; thus, if you want five coils in your spiral, type 20 in the Segments field.
Style: The Style options control whether the spiral is clockwise or counterclockwise.