
Designing for the Web in Illustrator
Differentiating between raster and vector formats on the Web
Saving JPEG, GIF, and PNG for the Web
Exporting Flash and SVG
Creating slices
Illustrator is the perfect tool for creating and designing graphical elements for Web pages. That statement might surprise you seeing as how most Web graphics are pixel-based, whereas Illustrator is a vector-based graphics tool. In Illustrator, however, the big advantage to creating Web graphics is in the resolution independence of vector-based graphics (as I discuss in Chapter 1). You can create a graphic once, scale it to be any size you need it to be (even use it for print in addition to the Web), and it will always be a high-quality rendition of your creation.

In this chapter, you peer into the myriad ways of preparing Illustrator graphics for the Web and see how to determine the options that best meet the needs of individual graphics. You also find out about how vector-based file formats, such as Flash and SVG, help you put vector-based graphics on the Web while preserving the advantages of vector-based graphics (such as small file size and maximum quality, no matter at what size you view or print the graphics) in the process.
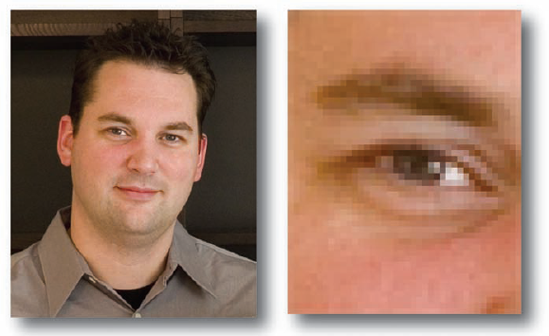
When you create a graphic in a pixel-based program, such as Photoshop, you have to decide upfront how big you want the graphic. If you want to enlarge the graphic, you add pixels; if you want to make the graphic smaller, you throw away pixels. Either way, messing with the size means you end up with a blurry, lower-quality image like the zoomed-in eye section of the otherwise incredibly handsome face on the left in Figure 17-1. With Illustrator, though, you don't have these problems. Even though you ultimately create pixel-based graphics, your graphics don't become pixel-based until you save or export them. You can save the Illustrator file many times at different sizes, and each one will be at the best possible quality!
The differences between creating for the Web and creating for print happen when you save your graphic. Whenever you create artwork in Illustrator for the Web, you work like you always would. The key difference is in how you save your work after you create it. The only other difference that you might find is in the color choices whenever you create a graphic for the GIF file format. (More on that in a moment.) Otherwise, the creative processes for Web and print are identical.
Because you view Web graphics on-screen, you have a much better idea of how they will look after you put them on a Web site than you would if you were going to print them. Colors on-screen (and on the Web, which is always displayed on a screen) consist of red, green, and blue (RGB) pixel combinations. So if you create graphics just for the Web, RGB documents are your best bet. If you create things for both screen and print, RGB gives you the greatest flexibility. (For more on RGB, see Chapter 1.)
Suppose you're in a room full of Web designers, and you hear them talk about Web-safe color space and the Web panel. You look around discreetly. A dapper man in a dark suit steps out from behind the potted plant and tells you, "You're traveling through another dimension . . ." and a weird piano riff starts to play.
Granted, Web design can seem pretty weird. At least the number of colors is relatively small. Web-safe color refers to a set of 216 colors that look the same in all Web browsers and on all computer platforms. If you've been creating for print for any length of time, you might be used to using an almost unlimited range of colors. Comparatively speaking, a mere 216 colors might seem limited at first, but there's method in the madness.
One key benefit of the GIF file format is that you can specify exact colors to use in your artwork after the artwork is created. The catch is that you can only choose from the 256 colors that the GIF format supports. (Other modes, such as RGB support up to 16.7 million colors. Yikes!) So how do you get 216 out of 256? Well, unfortunately, only 216 colors actually display the same on all Web browsers and computer platforms. That's what makes them Web safe.
So, what happens if you use a color outside of those 216? Whenever a computer encounters a color it can't display, it dithers the colors. The computer takes the colors that it can display and tries to emulate the missing color, putting alternating squares of the colors that it can display close together. If you look at the monitor from a distance and squint, you see a color that looks very similar to your original color.
Dithering is especially noticeable in large areas of solid color. The effects vary from computer to computer and browser to browser. Sometimes the effects aren't noticeable at all. Sometimes you get an obvious plaid or striped pattern. Other times, you get plaids and stripes together (and that is such a fashion faux pas).
Note
Bottom line: If it's critical that your colors display consistently (and without dithering) to as many viewers as possible (as in the case of a corporate logo on a home page), use Web-safe colors. Use these Web-safe colors when you save your Illustrator graphic for the Web or when you first create your graphic in Illustrator. You can change the colors in your previously created Illustrator artwork by choosing File
Just click any color in this panel and add it to your Swatches panel so that you can use it just as you do any other color. If you use colors only from this panel, you ensure that your artwork uses only Web-safe colors. However, many Illustrator features (such as blends, color filters, and transparencies) can quickly turn even these colors into unsafe colors. Illustrator likes millions and millions of colors . . .
Don't let all this talk of Web-safe colors make you gun-shy. In some situations, Web-safe colors are vital: in logos and large on-screen areas of solid color, for example. In other situations, though, they just don't matter. Dithering is most obvious in large areas of solid color; if your graphic comprises many small parts, the dithering won't really be noticeable.
Using the Save for Web command enables you to decide at any time whether to use Web-safe colors when you save your illustration. (See the section later in this chapter, "Creating Web-Specific Pixel Graphics.")
The majority of graphics created for the Web are pixel-based. The two most widely supported graphics file formats on the Web are JPEG and GIF, and these formats save only pixel data, not vector data. (See Chapter 2 for more on this crucial distinction.) When your graphics are in either of these formats, the majority of Internet users will be able to view your graphics. Fortunately, Illustrator can save graphics as both JPEGs and GIFs. Because pixel-based and vector-based images can look quite different, Illustrator has a special preview mode designed for when you're creating graphics for the Web: Pixel Preview mode. In Pixel Preview mode, you can see what your vector artwork will look like when it's turned into pixels for display on the Web. That way, you get a better idea of what the final artwork will look like on the Web (rather than waiting to be surprised when you see it in the browser for the first time).
To turn on Pixel Preview mode, choose View
This approach is much more convenient than using the File
Deciding what file format to use is almost as perplexing as picking between paper and plastic in the checkout line. Annoyingly, no single correct answer exists when you have to decide which file format to use for the Web. What works best for your purpose normally turns out to be a compromise between what you want and what you can have.
Well, okay, what can you have? You can choose from five file formats to put your graphics on the Web: GIF, JPEG, PNG, Flash (SWF), and SVG. The basic difference is in how each format presents your artwork. Consider this thumbnail comparison:
GIF, JPEG, and PNG require that vector-based files be converted to pixel-based artwork. The results look sketchier but load faster since the files are compressed.
Flash (SWF) and SVG preserve the paths you create in Illustrator even though sometimes they come with gigantic file sizes.
Each format has unique benefits and drawbacks. And here they come now.
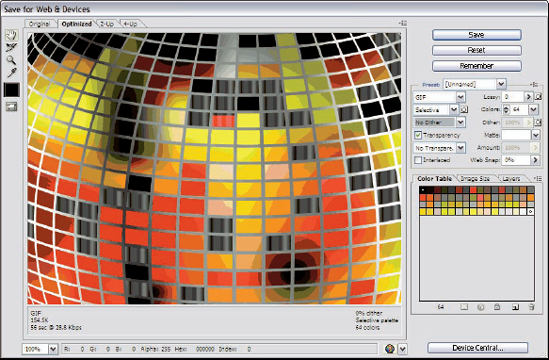
GIF is a great format for traditional Illustrator graphics — which means almost no gradients, blends, or fine details. GIF (Graphics Interchange Format) uses a maximum of 256 colors, but typically, you want to use even fewer. The fewer colors you use, the smaller your files.
GIF works best with simple graphics that have large areas of solid color. GIF compression encodes an area of solid color as if it were one big pixel. The more solid colors you have (almost regardless of how much on-screen area they cover), the smaller the file size. If you use gradients, soft drop shadows, or really complex graphics, you introduce more instructions into the file, and the file gets a lot bigger.
In the process of compressing all the different colors in your image (sometimes thousands or millions) down to 256 or fewer, you can get banding and dithering. Banding happens when a range of different colors gets compressed into one solid color and looks like a big stripe in your image where you didn't intend to put one. Dithering is Illustrator's way of simulating missing colors by putting tiny squares of the remaining colors close together, as shown in Figure 17-4. This type of dithering is separate from any additional dithering that happens when you don't use Web-safe colors; see the previous section, "Using Web colors only."
GIF files differ from JPEG files in two important ways: GIFs can have transparent areas, and you can specify the exact colors you want (such as Web-safe colors) when you save the file.
Note
GIF is one of the most widely recognized graphics formats for the Web. If you use a GIF file, you virtually guarantee that all your site's visitors can open it in their browsers.
JPEG is among the most widely recognized graphics formats for the Web. Anything that you save in JPEG format can be viewed by almost everyone. The JPEG format (created by the Joint Photographic Experts Group) provides the best compression possible for digitized photographs by throwing information away. Don't fret too much about this situation. JPEG does so intelligently: examining the image and removing data where the human eye is least likely to notice the absence. What this amazing feat of mathematics means to you as an artist, however, is that your graphics files should start out with a lot of information — so that if you have to throw out a lot of the information, you still have a lot left. Unlike GIFs, JPEGs can't have transparent areas and offer no way to specify exact colors.
Tip
Complex images with lots of gradients, blends, and soft shadows make good JPEGs. Alas, this format is really lousy for graphics that have big areas of solid color. You can't hide the loss of information. Basically, if the image looks good as a GIF, it might look bad as a JPEG — and vice versa. Fortunately, you can decide which format works best by using the Save for Web command.
PNG (Portable Network Graphics) format has a split personality — PNG-8 and PNG-24. The graphics quality that you can get with simple GIFs is also available with PNG-8 graphics. PNG-24, on the other hand, is as adept at handling complex images as JPEG. PNG-8 and PNG-24 files can have transparent areas. Also, PNG-24 compression is lossless, which means no reduction in image quality. Lossy compression actually has less detail, substituting pixels when it is shown on screen; lossless keeps each pixel intact and simply uses math for the compression.
Why don't you just use PNG for everything? Well, first, PNG offers no way to control how much compression is applied to the image; you can't make the image smaller (like you can with a JPEG). More importantly, PNG isn't as universal as JPEG and GIF; you don't see PNG format nearly as often on the Web. If you use this format, not all your visitors can view the graphic on their browsers. Some visitors with older browsers might need to install a special piece of software (a plug-in) so their browsers can read PNG graphics. This situation creates enough hassle that some visitors turn away from Web pages using PNG graphics to avoid downloading and installing the PNG plug-in.
Tip
If your primary concern is image quality, use PNG-24. If you want the maximum number of people to view your work on the Web and the maximum control over file size, use GIF or JPEG.
The Flash (or SWF) file format, created by Macromedia, is one of the cooler things that happened on the Web. Flash (now owned by Adobe) is the current standard for vector graphics on the Web. Not only does it support vector-based graphics, but it also supports animation, sound, and interactivity. Of course (as per Murphy's Law of Innovation), something so cool can't be perfect, and Flash has its blemishes, too. Nearly every browser requires a plug-in to view a Flash file, which limits your audience from the start. Last, Flash files don't play well with others. If you try to tie the Flash files into other non-Flash aspects of your Web site, you might run into difficulty.
Sorry, but I can't tell you which file format is the best choice for you to use. That answer depends on what you need the file format to do and what trade-offs you're willing to live with. That's the most practical answer for now. However, a summary can help ward off the Too-Many-Choices headache, so here goes:
Maximum compatibility: Use GIFs and JPEGs if you want maximum compatibility with as many people as possible.
Simplicity: Use GIFs for simple graphics with large, solid colors or for transparency.
Complexity: Use JPEGs for more complex graphics with gradients and images and so forth.
Maximum quality: Use PNG for maximum-quality complex graphics and transparency when compatibility isn't an issue.
Web considerations: Use Flash when you need to publish vector-based graphics on the Web and want as much compatibility as possible (but don't require as much compatibility as with GIFs and JPEGs).
La vida loca: Use SVG when you want as many bells and whistles as possible and are willing to throw compatibility to the wind.
If we're all lucky, everyone will eventually adopt SVG as the standard, and we won't have to worry about issues, such as which file format to use. (Of course, you gotta ask yourself: Do I feel lucky?) Until then, choosing the right file format is a juggling act that balances features, quality, and compatibility.
Most graphics on the Web are not vector-based but pixel-based because of compatibility issues due to different browser versions and different platforms (Mac, Windows, etc) out there. Regardless of which pixel format you use, Illustrator gives you the same dialog box from which to export your artwork. Choosing File
Even if the Save for Web & Devices dialog box appears a bit intimidating at first, it's actually quite easy to use. Although you do have to wade through a lot of settings, the dialog box provides you with a preview of the image so you can see how the settings affect the image's quality. The dialog box also gives you the file size and an estimate of how long the graphic will take to download — both important considerations when creating graphics for the Web.
The dialog box is slightly different, depending on the file format you're working with, but the following few features remain consistent in any format you use:
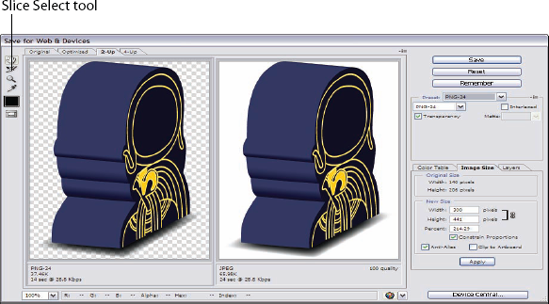
Original, Optimized, 2-Up, 4-Up: These tabs let you view the image at different settings. Click the Original tab to view the image before any settings are applied. Click the Optimized tab to see how the image will look after you save it with the current settings. Click the 2-Up and 4-Up tabs to see the image at multiple settings at once. These last views are the most useful. Your goal when saving your image, no matter what format you use, is always to come up with a version that resembles the original as closely as possible while maintaining the smallest file size (and lowest download time). The ability to compare the image at different settings with the original is vital to achieving this goal. To use the 2-Up and 4-Up settings, click either of the tabs. Then click one of the images to select it. Any settings you make apply only to that selected image. Click a different image to apply different settings. Illustrator saves whatever image is selected (at whatever settings) after you click OK.
File Size and Download Time: These features tell you how large your file is and how long that file will take to download over different connection types. This information is very important. Think of every second required for a graphic to download as another second the viewer has to get bored and click away from your page. Weigh this download time against the quality of the graphic and ask yourself whether having those extra colors, a little less banding, or a better-looking graphic is worth the download time.
File Format: This drop-down menu is where you choose the format — GIF, JPEG, PNG-8, PNG-24, SWF, or SVG.
The remainder of the settings: The remainder of the fields around the File Format menu deal with the file settings and the unique settings of that format. After you choose a format, the remainder of the settings change to match the features of that format. These settings are covered in depth under each file format in the next few sections of this chapter.
Color Table: This tab shows you the exact colors used when you save the file in GIF or PNG-8 format. Here you can delete colors (or shift non-Web-safe colors to Web-safe colors).
Image Size: This tab lets you set the size (in pixels) of the image as you save it. This setting is the actual physical size of the image as it displays in the browser, not the file size.
Layers: Illustrator allows you to export your file as Cascading Style Sheet (CSS) layers. An advanced feature, CSS layers, enables you to selectively hide or show layers on your Web page. They also allow for transparent overlapping slices.
Slices: The Slice Select tool, located below the hand on the left side of the Save for Web & Devices dialog box, enables you to select slices you made to your object in Illustrator. Slicing your artwork divides your artwork into individual pieces allowing your file to load in sections on your Web page. Slices also enable you to assign features, such as rollovers and links, to individual slices.
To save your graphic as a GIF, follow these steps:
Choose File

The Save for Web & Devices dialog box appears.
Select GIF from the File Format drop-down menu (refer to Figure 17-3).
Click the 2-Up or 4-Up tab at the top of the graphic.
After you choose either 2-Up or 4-Up, the first graphic is your original image and the second is selected as the Optimized image. As you change your file settings, this graphic updates to preview those changes. Clicking the third or fourth graphic (in 4-Up view) lets you make different settings and simultaneously compare and contrast them to find the best settings. Adjust your settings to find the best balance of small file size and best image quality. Every setting you change affects both of those things. Watch the image carefully to see how the changes affect it.
Adjust the settings for the graphic, as shown in Figure 17-6:
Color Reduction Algorithm: This delightfully descriptive setting (the drop-down menu beneath the File Format menu) simply means that you take the many colors in your image and reduce them to 256 or fewer colors. How do you want to do that? Your choices are Perceptual, Selective, Adaptive, Web, or Custom. The first three are pretty much the same. The Perceptual setting makes the colors as close as possible to whatever colors the human eye perceives in the original image (so they say). The Selective setting does the same thing but uses as many Web-safe colors as possible. The Adaptive setting makes the remaining colors as mathematically close to the original as possible. The Web setting uses the closest Web-safe colors to the colors that are in the image. The Custom setting is for power users who want to create their own color-reduction algorithms.
Note
Your choices are really between the Perceptual and Web settings. The Perceptual setting gives you an image as close as possible to your original creation. The Web setting gives you an image that looks the same no matter what computer or Web browser it's on. Unfortunately, the Perceptual setting usually looks great, whereas the Web setting dithers things substantially. But look at the Web choice this way: This is as bad as the image is going to look. With any other setting, the graphic is going to look better or worse unpredictably. With the Web setting, you know exactly how much dithering is going on, and nothing more will happen to the image — and the file size is definitely a little smaller.
Dithering algorithm: This is the actual shape of the dithering pattern. The No Dither setting won't dither the image at all. The Diffusion setting randomizes the dithering pattern to make it less noticeable. The Pattern setting dithers in a fixed grid. The Noise setting is even more random than the Diffusion setting, making any dither even less noticeable. Sadly, the settings that produce the least noticeable dithering also create the highest file sizes. The Noise setting produces the largest files, and the Diffusion setting the second largest. The Pattern setting produces small files with noticeable stripes. The No Dither setting produces obvious bands of color in the image. Notice the weird curved shapes in Figure 17-6. A No Dither setting causes these to appear. Here again, your goal is to strike a balance between the smallest size and the best quality.
Transparency: How do you want to treat the parts of your image that have no graphics? Do you want them to be transparent or filled with the Matte color (explained later in this list)? Check this box to make them transparent.
Interlaced: This setting makes the file larger so that it seems to be downloading faster, which seems like a contradiction. When a graphic is interlaced, it first loads a very low-resolution version to the Web browser, and then the full-resolution version. Graphics seem to load faster, but the Interlaced setting is just soothing the user by showing something useful happening. Without interlacing, the whole page has to download before you can look at it. (The page actually loads faster this way; it only seems to take forever.) Impatient people may want to select this box (unless, of course, they already skipped this list).
Lossy: This setting reduces file size by as much as 40 percent by eliminating pixels (at the expense of image quality). Use as much Lossy as you can get away with, but don't ruin your image.
Note
The Lossy setting won't work with the Interlacing setting turned on.
Colors: This setting is the total number of colors used in the image. Sometimes, reducing the number results in a smaller image, but doing so doesn't usually have as much effect as the Dither and Lossy settings.
Dither: If you select the Pattern, Noise, or Diffusion settings for a dither method, you can use this setting to turn down the amount of dithering. Lower amounts result in smaller graphics with more noticeable dithering patterns.
Matte: If you don't choose the Transparency box, the Matte color fills areas of your image where there are no graphics. If you're using transparency and know what color you plan to use for the background of the Web page, you can set the Matte color to the background color, and the pixels at the edge of your graphic will blend with the background, creating a more visually appealing image. If you don't know what the background color will be, set the Matte color to None. Otherwise, the edge pixels might blend to a different color from your background, producing an obvious fringe around the graphic as if it were snipped hastily out of a different background.
Web Snap: If you aren't using the Web setting for your color reduction algorithm, you can use the Web Snap setting to convert some of the colors (starting with those used most in the image) to Web-safe colors. This setting is a great way to achieve a balance between quality and compatibility. By changing just the largest areas of color to Web-safe colors, you can avoid the dithering problem in places where it will be most noticeable. The higher the setting, the more colors Illustrator converts to Web-safe colors.
After you make your settings on several images and decide which image works best for you, click that image, and then click OK. The graphic saves as a GIF, ready for you to use on your Web page.
In Illustrator, JPEGs are easier to make than GIFs. You need to worry about only one setting: Quality. Of course, quality can be specified in two ways. (Simplicity? Well, almost.)
To save your artwork as a JPEG, follow these steps:
Choose File
The Save for Web & Devices dialog box appears.
Choose JPEG from the File Format drop-down menu.
Click the 2-Up or 4-Up tab at the top of the graphic.
For more on viewing options, see the earlier section, "Saving a graphic as a GIF file."
Choose a Quality setting.
You can choose the Quality setting in two ways, but the effects are identical: by choosing it from the Quality drop-down menu, or by entering a number into the Quality field.
The Quality drop-down menu: The menu offers you a choice of four preset values: Maximum, High, Medium, and Low. These options refer to the quality level of the image, not the amount of compression applied. A Maximum quality level produces (as you may expect) the largest file sizes and the highest-quality images.
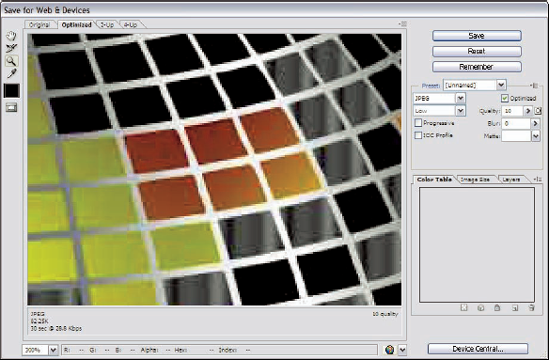
The Quality field: In this field, just to the right of the drop-down menu, you type in any value from 100 (maximum quality) to 0. Use the lowest Quality setting possible that doesn't destroy your image. You might notice that the loss of quality in your image shows up as weird patterns that weren't there before. These patterns are especially noticeable where two large areas of different colors meet. Notice the weird horizontal and vertical bands (artifacting) in Figure 17-7. A little of this is tolerable in the name of smaller files, but too much becomes distracting.
Tip
Note: Entering settings in the Quality field is identical to choosing values from the Quality drop-down menu. In the menu, the values of Maximum, High, Medium, and Low correspond (respectively) to settings of 80, 60, 30, and 10 in the Quality field.
Adjust the other settings.
Progressive: Like interlacing for GIFs, the Progressive setting creates the illusion that the image loads faster on Web browsers by loading a low-resolution version of the graphic first and then turning it into a higher-resolution image. In actuality, the image takes longer to load because Progressive files are larger, but viewers feel as though the download is going faster because they see things happening while they wait, rather than waiting for the whole download before they see anything.
Blur: Blur is a fairly useless setting. The goal is to reduce the artifacting in the image by blurring it. Unfortunately, the setting blurs the whole image, not just the artifacts, creating problems where none existed before. Leave this set to 0 (zero) and ignore it. (Unless, of course, you're feeling a little misty.)
Matte: JPEGs can have no transparent areas, so wherever no graphic exists, Illustrator fills in with this color. A setting of None fills in with white.
The settings for PNG-8 are identical to those for GIF except you don't get a Lossy option. (Read through the earlier section, "Saving a graphic as a GIF file.") Put PNG-8 wherever you see GIF. No settings exist for PNG-24, except Transparency, Interlacing, and Matte options; what you get is what you get. Choose the PNG-24 file format, and the compression scheme does its thing. Either you like the result (and click OK), or you don't (and choose GIF or JPEG instead).
Vectors have several advantages over pixels. One of the chief advantages is their small file size, especially for basic graphics such as logos and buttons. Another advantage is their ability to be scaled without any loss of quality.
Flash is a very versatile format developed by Macromedia (which Adobe acquired, so it's now Adobe Flash). Not only can you use Flash to show vector graphics on the Web, but you can also animate and add sound and interactivity to them. In Illustrator, you can create the graphic and do limited animation with it. Beyond that, you have to use another application (such as Adobe Flash or Adobe After Effects) to take full advantage of the format. For this reason, the Flash (SWF) setting in the Export dialog box is really intended to prepare artwork for export to one of these other applications, rather than to create artwork to go directly to the Web. Not that you can't put a Flash file created in Illustrator directly on the Web. You certainly can, but then you're tapping into just a fraction of what Flash can do.
Still, if you want your Illustrator artwork on the Web as vector data, Flash is the way to go. The one drawback to the format is the need for a browser plug-in in order for people to see your graphic in their browsers. This situation can make your graphic inaccessible to some people. However, Flash is such a popular format that most people have the plug-in installed in their browsers. Chances are quite good that many people will be able to see your work without problems.
If your primary concern is that your graphic appears on the Web with no-holds-barred top quality (and print with the best possible quality to boot), use the Flash format.
To save a graphic in Flash format, just follow these steps:
Choose File
The Export dialog box appears.
Specify a name, location, and file format for your document.
In this case, choose Flash (SWF) from the file format drop-down menu.
Click OK.
The SWF Options dialog box appears.
After you complete all your settings, click OK to save your file in Flash format.
Tip
You can export Flash (SWF) files that include symbols. When opened in a Flash application, the symbols are included in the Symbol library of the application.
SVG files, once heralded as the Next Big Thing by Adobe have faded away at this time, as Adobe focuses on supporting their Flash format. However, some mobile devices and most browsers with the required plug-ins support SVG. Here are the steps for saving a graphic as an SVG file:
Choose File
The Save dialog box appears. The SVG file format can be saved directly rather than exported. You can also open an SVG file directly into Illustrator. And if that isn't enough, Illustrator lets you open SVG files that were created in other SVG-savvy applications.
Choose SVG (SVG) from the Format drop-down menu. Specify a name and location for your document.
Click Save.
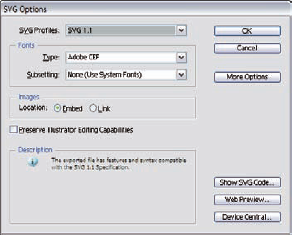
The SVG Options dialog box appears, as shown in Figure 17-8.
Establish your desired settings and click OK to save your file in SVG format.
If you're an avid Web surfer, you've probably encountered a site or two where the graphics appear on-screen in separate chunks. In the Web world, these chunks are referred to as slices.
Figure 17-9. Dragging the Slice tool around objects in your illustration results in an onscreen display of slices.
When you save via the Save for Web & Devices dialog box, the slices will be saved with your image.