
Making holes in objects
Avoiding using Photoshop filters in Illustrator, and why
Getting gradients to print properly
Making complex graphics simpler
Hiding elements you aren't using
Using the ToolTips
Changing your units of measurement on a whim
Moving brushes, swatches, and styles between documents
Placing documents within documents within documents
Making type easier to select
If you can picture something, you can probably create it in Illustrator. The only trick is knowing how to create it. People who use Illustrator rely on thousands of little tricks to make their lives easier, make production faster, avoid unnecessary hassle and expense, and generally make their world a better place to live. Well, those thousands of tricks might not all fit in one book, but here are ten simple ways to jazz up your use of Illustrator.
Take a close look at the two blue circles in Figure 18-1. The hole in the center of the left circle is actually a white circle that obscures the background. In Illustrator, white is a color that is really "there" — and it blocks anything behind it. In the circle on the right, the hole in the center really is a hole, revealing the image behind it.
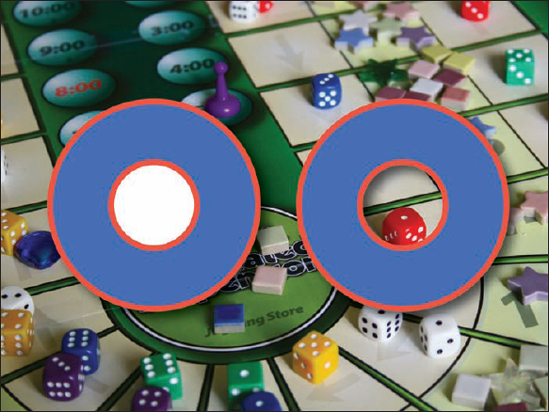
How do you accomplish this remarkable feat? If you set the fill color for the white circle to None, just the little circle becomes transparent, revealing the blue circle behind it — so that won't work. The trick is to use compound paths. The Compound Paths command joins two or more paths in such a way that wherever the paths overlap, you get a hole revealing whatever lurks behind the paths. Incidentally, this is how the holes in letters, such as O and P, are created so that when you run type over an object, you see the object through the holes.
All you need to create a compound path is two objects — one to serve as a cutting tool and the other to serve as a place to put the hole. Then follow these handy do-it-yourself steps (no safety goggles required):
Place the object that you'll be using to make a hole in front of the object in which you want to cut the hole.
In my example, the white circle is the cutter, and the blue circle is the cuttee.
Choose Object

Where the paths overlap, you get a see-through area — you know, a hole.
Tip
To make the paths behave normally again, select the objects and choose Object
Tip
Perform the same feat by using the Pathfinder panel and choosing the Subtract from Shape Area command from the Shape Modes section. For more details, see Chapter 4.
Photoshop Effects (accessed at the bottom of the Effect menu) are always "live" in Illustrator, meaning that you can change them at any time. In addition, you can always change the attributes of your Illustrator artwork, making the artwork fully editable. If you were to take that same artwork into Photoshop, it would be difficult to maintain the same level of editability and scalability as you have in Illustrator.
Double negatives aside, here's a little tip that can save youbeaucoup bucks whenever you use gradients and spot colors in artwork you're creating for print.
If you work with print publishing, you come to think of the color white as beingnothing. In most of the familiar printing techniques, specifying the color white meansdon't put down any ink (or toner, or dye, or any of the methods for putting color on paper) for anything colored white. White ink doesn't exist except in rare situations (and no, correction fluid doesn't count). The white that you see in print publications is just the white of the paper.
Tip
This approach depends on an actual, tangible piece of paper to provide the white for the image. To save yourself untold woe, don't use the technique I describe here if your artwork is destined to live on the Web. It's strictly a hard-copy issue.
Suppose you're creating a two-color publication using black ink and a nice blue Pantone 9344 ink. The publication might be pretty dull in only two colors, but that's all you have a budget for, so you decide to spice things up by using gradients. You create lovely gradients by blending Pantone 9344 into white (assuming that white meansno ink). Unfortunately, in terms of gradients, Illustrator thinks of a blend as a whole new CMYK (cyan, magenta, yellow, black) color (see Chapter 1), so the blend between white and a spot color (such as Pantone 9344) involves much more complicated instructions to the computer than you might have intended.
Sure, your graphics lookperfect, but unbeknownst to you, your job has mutated from a two-color job to a five-color job. Usually, you discover this after your job is already at the printer, and then you have to pay hundreds of extra dollars for a mistake you didn't even know you made.
The trick is to use the same Pantone color for all steps of the gradient (see Figure 18-2). Just follow these steps:
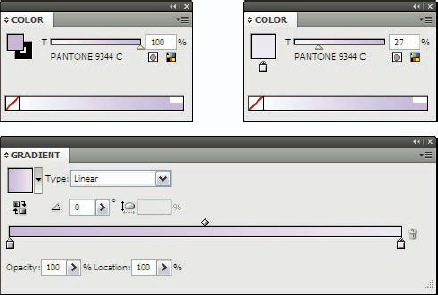
Figure 18-2. The same color is used at two different tint percentages, specified in the Color panel.
Choose Window
The Gradient panel appears.
Choose Window
The Pantone swatch library opens.
Click the color of your choice in the Pantone library and drag the color from the Library onto a color stop in the Gradient panel.
Acolor stop is the icon that looks like a little house; it represents a color in the gradient.
Repeat this until all color stops in the Gradient panel are the same color. (See Chapter 10 for more information on gradients.)
At this point, the gradient is one solid color. Not a gradient at all, really. But wait!
Double-click a color stop in the Gradient panel.
The Color panel opens, showing the Pantone color set to 100%.
Set the tint of the Pantone color to 27%.
This action gives you true, one-ink spot-color gradients that use the paper as "white" in that good old traditional way. See Chapter 10 for more info on gradients.
If you piled on the effects to some artwork, sometimes making adjustments to the end result is hard. If you're absolutely sure that you'll never need to go back and edit the original artwork, you canexpand the artwork into "traditional" artwork that includes all the pieces necessary to create the appearance you see on-screen.
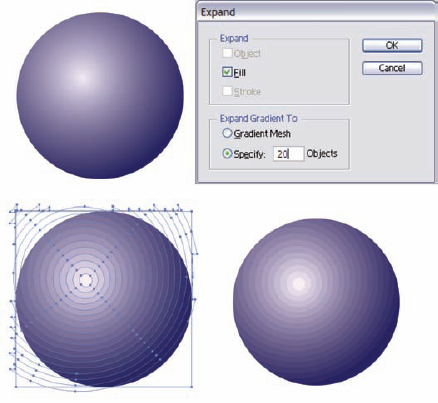
To expand an object, follow these steps and examine Figure 18-3, which shows the original object with a gradient fill (top left) is expanded (bottom left) to 20 objects (with paths showing) and the final object (bottom right):
Select the object with any selection tool.
Choose Object
In the Expand dialog box that opens, choose to expand the fill, the stroke, and the object (if you selected an object blend) by selecting those check boxes.
Select the Fill check box to expand the fill and simplify gradients. Select the Stroke box to create custom brushes, and select the Fill or Stroke box to create patterns — or just leave all three selected to cover all your bases. You can also specify what the gradient is expanded to: either a gradient mesh object or individual path objects.
Simply hiding things can greatly improve your productivity in Illustrator. Otherwise, you might have a hard time seeing your current creation with all the floating panels and interface elements in the way.
You can hide all open panels and the Tools panel by pressing the Tab key (unless the Type tool is selected and a blinking I-beam cursor is on your page — then you just insert a Tab into your text). Press the Tab key again to bring everything back.
If you're creating exclusively for the Web, hide the Artboard and the Page Tiling feature. These features show you the size of the page you're printing to and the printable area on that page. This information is useless if you're never going to print! Choose View
Have you ever made an object that contains so many points that after you select it you can't tell what the objectis anymore for all the highlighted points and lines? You can hide these, too, while keeping the object selected. Choose View
You can hide everything you have open on your computer (including your desktop) except for the current Illustrator document by clicking the Full Screen Mode with Menu Bar button in the Tools panel. To hide everything including the Menu bar, click the Full Screen Mode button. (You can toggle through these modes by pressing the F key on your keyboard; this works for both PCs and Macs.) To get a completely unobscured view of your artwork, switch to the Full Screen Mode view and press the Tab key to hide your panels. Real power-users work this way, using keyboard shortcuts to access all the tools and menu items.
Illustrator offers ToolTips as a very helpful feature. Hover your cursor over a tool for a moment, and a little yellow box of text pops up telling you what the tool is. If the tool has a keyboard shortcut, that shortcut appears in parentheses after the name.
ToolTips, despite their name, don't work with tools alone. (And they don't give you tips — just the names of things. Go figure.) They work just about anywhere in Illustrator that you can position a cursor. Hover over a color swatch, and the ToolTip tells you the name of that color. Hover over a brush, and it tells you the name of the brush. Not sure what a cryptic icon in the Pathfinder panel means? Just let the ToolTip tell you.
ToolTips are invaluable whenever you're using the program because there are just too many things to remember. With ToolTips, you don't have to!
Tip
To toggle ToolTips off or on, choose Edit
Do you feel that no matter what you do, your units of measure seem to be wrong? Are they always set to points, for example, when you really want inches? (Sometimes centimeters are easier to work with.) Fortunately, Illustrator lets you change your mind on the fly.
To see your measurement options, choose View
Tip
You can reposition rulers by clicking and dragging out from where the rulers meet at the upper-left corner. To reset them, double-click that corner.
However, you don't have to change your unit of measurement to use a different one. In any field where you specify an amount (such as the Height and Width options in the Rectangle dialog box), just type in the amount you want, followed by the abbreviation of the unit of measurement that you want to use. If you don't know the abbreviation, just use the whole name. Illustrator makes the conversions for you.
Tip
Want to impress your friends with a great power-user tip? You can cycle through the different measurement units by pressing Ctrl+Alt+Shift+U (
Has this ever happened to you? You go through the trouble to create custom brushes, beautiful colors, and outstanding appearances; save them in the Styles panel; and later discover that they're all specific to the document that you created them in. Rats! To prevent that from happening to you again, you can open the swatches, brushes, and styles that you created in one document in any other document.
For example, to get the brushes from another document, choose Window
Have you ever seen those cute Russian dolls? You know, the hollow doll that you open to find another smaller doll inside? And then you open that one to find an even smaller doll inside? And then you openthat doll. . . .
Illustrator enables you to create the digital equivalent of those Russian dolls. You place a Photoshop image into Illustrator, rotate the image, add text over the image, and save the whole thing as an Illustrator file. To add more, create a new document in Illustrator, placing the previously created Illustrator graphic (which also contains within it a Photoshop file) into the new document by using the File
Although nothing prevents you from creating the digital equivalent of a Russian doll, editing the file is very difficult. A better method is to open Illustrator files and then copy and paste them into a document rather than placing them, especially if you want to do edits later on.
Note
Subscribe to the KISS method: Keep It Simple, Silly Goose! Avoid going more than three places from the original file (such as a Photoshop file placed inside an Illustrator file, placed inside an InDesign document, with scaling happening in only one of those places). Two places are even better if you can limit yourself. If you need to bring Illustrator data from one Illustrator document to another, open both documents and copy and paste the info rather than place it.
If you work with type and objects, you might discover how annoying it is to select an object that's lurking behind type. Even when you click where there's obviously no type, you still select the type instead of the object behind it. This happens because one of Illustrator's most annoying features is turned on. The Type Area Select feature automatically selects type when you click anywhere in its area — not just when you click directly on the type or its path.
Turn off this (ahem) feature by choosing Edit