The previous chapter explained how to extend the libraries to retrieve data from Office 365 through the Microsoft Graph. This chapter goes into detail about how to connect that data to the force-directed graph code and run it on a Microsoft HoloLens 2 device.
Include the Libraries
We already added both libraries, ImmersiveOffice365Hub and ImmersiveOffice365Stub, to the Unity project in the folders WSA and WSA/Plugins. ImmersiveOffice365Stub contains only the definitions of the same classes and methods defined in ImmersiveOffice365Hub. Any newly added class and/or method in the hub is required to have a definition without any code in the stub.
Make sure that ImmersiveOffice365Hub and ImmersiveOffice365Stub both are compiled against Any CPU or x86.
The functionality in the ImmersiveOffice365Hub library is extended by accessing Office 365 data through the Microsoft Graph API. Therefor we need to add several packaged through the NuGet packages system. When the ImmersiveOffice365Hub library is compiled from Unity, those packages will be missing. This causes two major challenges.
The first challenge is to include the packages in the same Unity project. The packages are nothing more than the dynamic linked libraries (DLLs). We need to copy these libraries into the same Plugins/WSA folder.
Libraries can easily be found under the following path:
C:Users[Username].nugetpackages[Name of the package][version]lib
etstandard2.0[name of the DLL]
You will need to fill in your username, the name of the package, and the name of the DLL you are looking for. Always select the netstandard version.
The solution found in GitHub, also contains an ImmersiveOffice365HubTestApp project. This is a project that allows you to test the different methods in the ImmersiveOffice365Hub project. When the test application is built for x86, all required assemblies with the correct version are found in that projects output folder bin/x86/debug or bin/x86/release.
We are using the following main libraries from the packages.
Microsoft.Identity.Client.dll
Microsoft.Graph.dll
But including these main libraries from those packages will not be enough. These libraries have dependencies on other libraries. The dependency libraries depend on the use of the classes and methods from the main libraries. Based on our requirements, we need the following additional libraries:
Microsoft.Graph.Core.dll – Several classes are used by the Microsoft Graph API, like Microsoft.Graph.DerivedTypeConverter.
Newtonsoft.Json.dll – JSON is used to serialize and deserialize the results from calls through the Microsoft Graph API.
Make sure you copy all the main and additional libraries to the Plugins/WSA folder under Assets, as can be seen in Figure 10-1.
Figure 10-1
Adding all main and additional libraries to the plugins folder
Drag the libraries into the Plugins/WSA folder. We need to configure each of them when Unity has processed the import. We need to set the Auto Reference and Validate Reference to true by checking both checkboxes. Make sure that only the WSAPlayer platform is selected. This will include the code only for the generated Microsoft HoloLens 2 project. And finally, uncheck the Don’t process checkbox to prevent Unity from serializing the classes. Press the Apply button to process the changes for Unity.
The second challenge is making sure that the code of the libraries is included in the outcome of the project. That sounds weird, but I will explain it. As explained earlier, deploying a Unity project results in a Visual Studio project using IL2CPP. The problem with that is that each part of the script files is converted to native code running in your project. What happens with your libraries? The libraries are included as assets into your project and loaded during the startup of the application. Unity creates native code files that can be compared with stub files to access the functionality in each library.
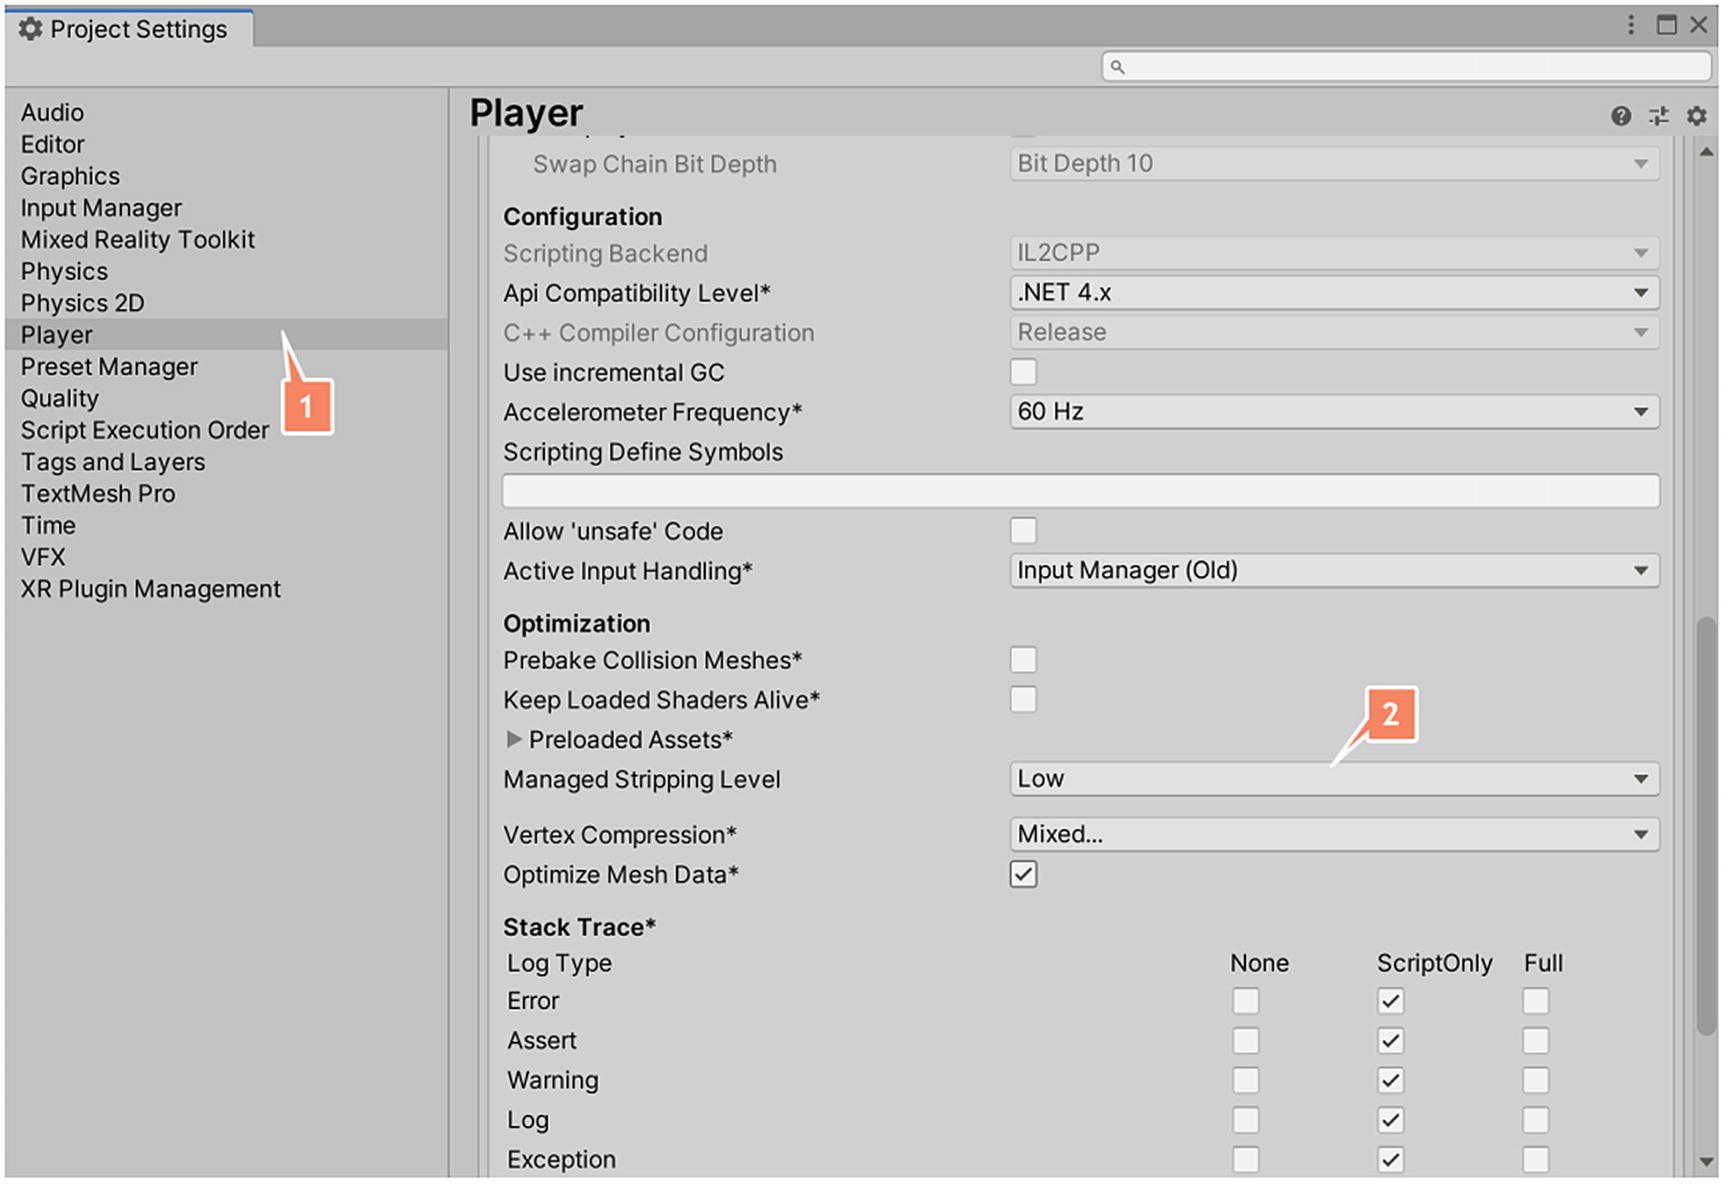
Since Unity nowadays compiles to IL2CPP, which generates native code, it has several ways to optimize the performance of your application. One of those optimizations is stripping of code to a certain level. Stripping code means removing code that is not used by the application from any call. And that will cause issues because Unity is not able to view which functions are called within the libraries and will therefor unfairly remove code that is required.
When Unity is optimizing code by stripping, it can only recognize functions being used by the scripting code in the project. References from libraries to other libraries are not seen. While the compiler will finish successfully, running the app on your device will generate errors due to missing classes, methods, and properties.
The level can be adjusted through Project Settings ➤ Player ➤ Other settings ➤ Optimization using the property Managed Stripping level. This can be seen in Figure 10-2.
Figure 10-2
Changing the managed stripping level of the application
Unfortunately, we have only the options Low, Medium, and High for this property. If we didn’t strip the code, you would get an incredible amount of generated native code. That is not what we want. There is another solution. This solution requires adding a link.xml file to the Assets folder. It can be placed anywhere in the Assets folder.
This file describes which assemblies, namespaces, classes, and even methods need to be included in the build without using the stripping optimization. In our file we have added definitions for all the libraries we require. This makes sure that all code is included in the build. The Microsoft.Graph library uses a lambda to return results of calls to Office 365. To prevent the LightLambda class being excluded through optimization, it is added as a type of the assembly System.Core.
At the time of writing this book, the following assembly versions were used:
Microsoft.Graph.dll – Version 3.8.0.0
Microsoft.Graph.Core.dll – Version 1.20.1.0
Microsoft.Identity.Client.dll – Version 4.16.1.0
Microsoft.Diagnostics.DiagnosticsSource.dll – Version 4.700.19.46214
Newtonsoft.Json.dll – Version 9.0.1.19813
Visual Studio 2019 version 16.6.4 and Microsoft Windows 10 OS Build 19041.388 were used.
Data Queue
The data queue is an important part of getting the entities into our 3D model. Data is retrieved in a separate thread created in the ImmersiveOffice365Hubassembly. GameObjects are only allowed to be created on the Unity thread, hence a data queue.
The data queue is like an intermediate system transporting entities and their relationships to other entities from Microsoft Graph into the Unity scene. Add a new folder Model under Assets/Apps/Scripts. Create a script called DataQueue.cs in the folder Model. Copy the following code in the file:
using Office365DataHub.Entities;
using System.Collections.Generic;
public class DataQueueItem
{
public BaseEntity Root;
public BaseEntity Refering;
}
We start with a DataQueueItem class. This class contains two entity references, since our 3D model is all about relationships. The relationship is represented between a Root entity and its relation to the Referring entity. Copy the following code into the same file just under the DataQueueItem class:
public class DataQueue: List<DataQueueItem>
{
public bool GetFromQueue(out BaseEntity root, out BaseEntity refering)
{
if (this.Count > 0)
{
root = this[0].Root;
refering = this[0].Refering;
this.RemoveAt(0);
return true;
}
root = null;
refering = null;
return false;
}
}
The second class, called DataQueue, is derived from a List collection based on the DataQueueItem class. It contains a method GetFromQueue that returns the first DataQueueItem on the stack. Copy the method AddToQueue into the class DataQueue as follows:
public class DataQueue: List<DataQueueItem>
{
public void AddToQueue(BaseEntity root, BaseEntity refering)
The second method, called AddToQueue, allows us to put a new DataQueue item on the stack. The new item is always added at the end.
Data Model
The first step is using the build functionality to retrieve data from Office 365, available from the ImmersiveOffice365Hub library. A separate class DataModel is created for retrieving the entities and putting them into the queue. Create a new script file called DataModel in the Assets/App/Scripts/Model folder. Copy the following code into the DataModel file:
using Office365DataHub.Data;
using Office365DataHub.Services;
using Office365DataHub.Entities;
public class DataModel : IDataModel
{
private DataQueue queue = new DataQueue();
public DataQueue Queue
{
get
{
return queue;
}
}
}
The class contains an instance of the DataQueue class, which incorporates the queue for our model. The second property is used to retrieve the queue. This is necessary to allow the GraphController class to access the queue. Add the following method to the DataModel class:
private void InitializeConnection()
{
AuthenticationHelper.Instance.UseBetaAPI = false;
AuthenticationHelper.Instance.UserLogon = true;
AuthenticationHelper.Instance.RedirectUri = "<A redirect URL as specified in your app registration>";
AuthenticationHelper.Instance.Authentication = new Office365DataHub.Authentication
{
ClientId = "<the client id of your app registration>",
Scopes = new string[] {
"User.Read",
"User.Read.All",
"People.Read",
"People.Read.All" },
};
}
The class contains several methods. The first method is called InitalizeConnection. In this method, we will initialize the AuthenticationHelper with the values from the App registration in Microsoft Azure done in the previous chapter. Since we didn’t set any of the scopes in the App registration, we need to do this in code. In the preceding example you will see that we ask for permissions to access users and people. People access is needed for getting related people from a specific user.
The next method creates sample data, which is used when testing in the Unity editor. The method CreateSampleData shows how easy it is to create entities and their relationships. In this case I am using the names of my family and friends.
private void CreateSampleData()
{
PersonEntity p1 = new PersonEntity { Id = "1", FullName = "Alexander" };
PersonEntity p2 = new PersonEntity { Id = "2", FullName = "Colin" };
PersonEntity p3 = new PersonEntity { Id = "3", FullName = "Owen" };
PersonEntity p4 = new PersonEntity { Id = "4", FullName = "Tessa" };
PersonEntity p5 = new PersonEntity { Id = "5", FullName = "Terry" };
PersonEntity p6 = new PersonEntity { Id = "6", FullName = "Micheal" };
PersonEntity p7 = new PersonEntity { Id = "7", FullName = "Jordy" };
Queue.AddToQueue(null, p1);
Queue.AddToQueue(p1, p2);
Queue.AddToQueue(p1, p3);
Queue.AddToQueue(p1, p4);
Queue.AddToQueue(p3, p4);
Queue.AddToQueue(p2, p3);
Queue.AddToQueue(p1, p5);
Queue.AddToQueue(p5, p6);
Queue.AddToQueue(p6, p7);
}
The relationships are defined by putting them into the Queue. The first one has the Root entity set to null. This will only create the Referred entity without a relationship to another entity, and is used for the first entity put into the 3D model.
The next method is called LoadData. This method determines, by using a precompiler directive UNITY_EDITOR, if the app is started in the editor or on a device. The CreateSampleData is called when the app runs in the editor. Copy the following method into the DataModel class:
The GetCurrentUser method is called when the app is running on the device. The first call will call the AuthenticationHelper class to authenticate against Microsoft Azure Active Directory. This will show a popup dialog asking for credentials, and is explained later in this chapter. The call to GetCurrentUser requires a delegation or callback method. This method is called OnGetPersonCompleted. The method checks the returned PersonRequest object for the exception.Error to check if there are any errors. Errors are handled accordingly and can be shown through, for example, a dialog or through a debug window. Copy the following method in the DataModel class:
public void OnGetPersonCompleted(PersonRequest request)
{
if (request.expection.Error != Office365DataHub.ServiceError.NoError)
The returned current user is added to the queue using the AddToQueue method. Subsequently a call to GetRelatedPeople based on the current user is executed. That method uses two delegates or callbacks to return the related people data. In this example, only the OnGetRelatedPersonCompleted method is used to add entities on the queue. Copy the following method in the DataModel class:
public void OnGetRelatedPersonCompleted(RelatedPeopleRequest request)
public void OnGetRelatedPeopleCompleted(RelatedPeopleRequest request)
{
}
Relationships between entities are added by AddToQueue with both entities.
Extend the GraphController
Since we moved all the code for getting entities into separate classes like DataModel and DataQueue, we need to do extend the GraphController class using these classes. A reference to a DataModel instance is added to the GraphController class, which will be used to initialize, load, and access the entities. Add the properties model and nodes to the GraphController class as follows:
public class GraphController : MonoBehaviour
{
private DataModel model = new DataModel();
private Dictionary<string, Node> nodes = new Dictionary<string, Node>();
}
We also require a dictionary to store all created nodes and edges based on their identification. This allows us to quickly identify if a node or edge is already created. A node represents an entity, while an edge represents the relationship between two nodes. Add the following code to the Start method of the GraphController class:
void Start()
{
Initialize();
model.LoadData();
}
The Start method only requires calling the LoadData method of the DataModel property. This will initialize the connection and start the process of getting the current user and the related people. Add the following code to the Update method in the GraphController class:
void Update()
{
HandleQueue(model.Queue);
graphRenderer.Draw(NodeUpdate);
}
The Update method does two things. It retrieves and handles the next first item in the queue by calling the HandleQueue method with DataQueue object in the DataModel class. Second, it calls the graph renderer to draw the force-directed graph model based on the created nodes and edges. Add the following method to the GraphController class:
The HandleQueue method creates the actual GameObjects based on the NodePrefab and the EdgePrefab. This method executes based on several rules, which are described as follows:
The method checks if there is an item in the queue.
Both root and referring nodes are checked if they already exist.
A node and corresponding GameObject are created for the root if not yet present. The root is set and stored in the created nodes list.
A node and corresponding GameObject are created for the referring if not yet present. The referring is set and stored in the created nodes list.
An edge and correspondingGameObject are created when both root and referring are available.
Extend the Node
The current node prefab only contains a GameObject, which represents the node as a cube. We want to extend the prefab in such a way that shows the full name of the person. Open the prefab by double-clicking it. This will show the prefab and its contents as in Figure 10-3.
Figure 10-3
Extending the node with a TextMesh
Create an empty GameObject as a child object under the node by right-clicking the Node GameObject and select Create Empty. Make sure that it is placed in front of the cube by setting the Position to (0, 0, -0,75) in the Transform component. Add a TextMesh component to that new child GameObject. Set the following values to configure the text:
Character Size= 0.05
Font Size = 100
Anchor= Middle center
Alignment= Center
Keep in mind that the text is not occluded by other objects and will therefore seemly appearing through the cubes if you look from another site. We have left out occlusion to simplify the model. Update the script in the NodeInformation class by replacing it with the following code:
In the Start method, we retrieve the TextMesh component. We need to use the GetComponentInChildren to retrieve it, since the TextMesh is one level deeper.
We need to add the Update method. The text is set to the FullName of the person when the TextMesh is found and the entity property is correctly set. The entity property is set by the HandleQueue that was described earlier.
Result in HoloLens
The final step is getting it all to work on a Microsoft HoloLens 2 device. The first step is building a Visual Studio solution via Unity. Open the Build Settings dialog via File ➤ Build Settings. You will notice that I have selected ARM64 in the settings, as shown in Figure 10-4. But it does not matter which target architecture you choose. The solution will be built again in Visual Studio.
Figure 10-4
Build a Visual Studio solution using the Build settings dialog
Using the right target, architecture, Target SDK, and platform version inside Unity will give you more confidence that the solution compiles without any errors when building the solution in Visual Studio.
Press the Build button to start the build. This will create a Visual Studio solution with native CPP code.
Build the solution against ARM64 in Visual Studio and deploy it to your Microsoft HoloLens 2 device. Use the x64 build if you are using the HoloLens 2 emulator.
Start the application on your device or emulator. The application will request you as a user to authenticate against Microsoft Azure Active Directory. It requires a username and password of a work or school account, as is shown in Figure 10-5.
Figure 10-5
Authenticate against Microsoft Azure Active Directory
The application requires several permissions to access certain parts of the Microsoft Graph. In our example, we need to have access to users and related people. For that, we define the following Scopes property in the DataModel class:
Scopes = new string[] {
"User.Read",
"User.Read.All",
"People.Read",
"People.Read.All" };
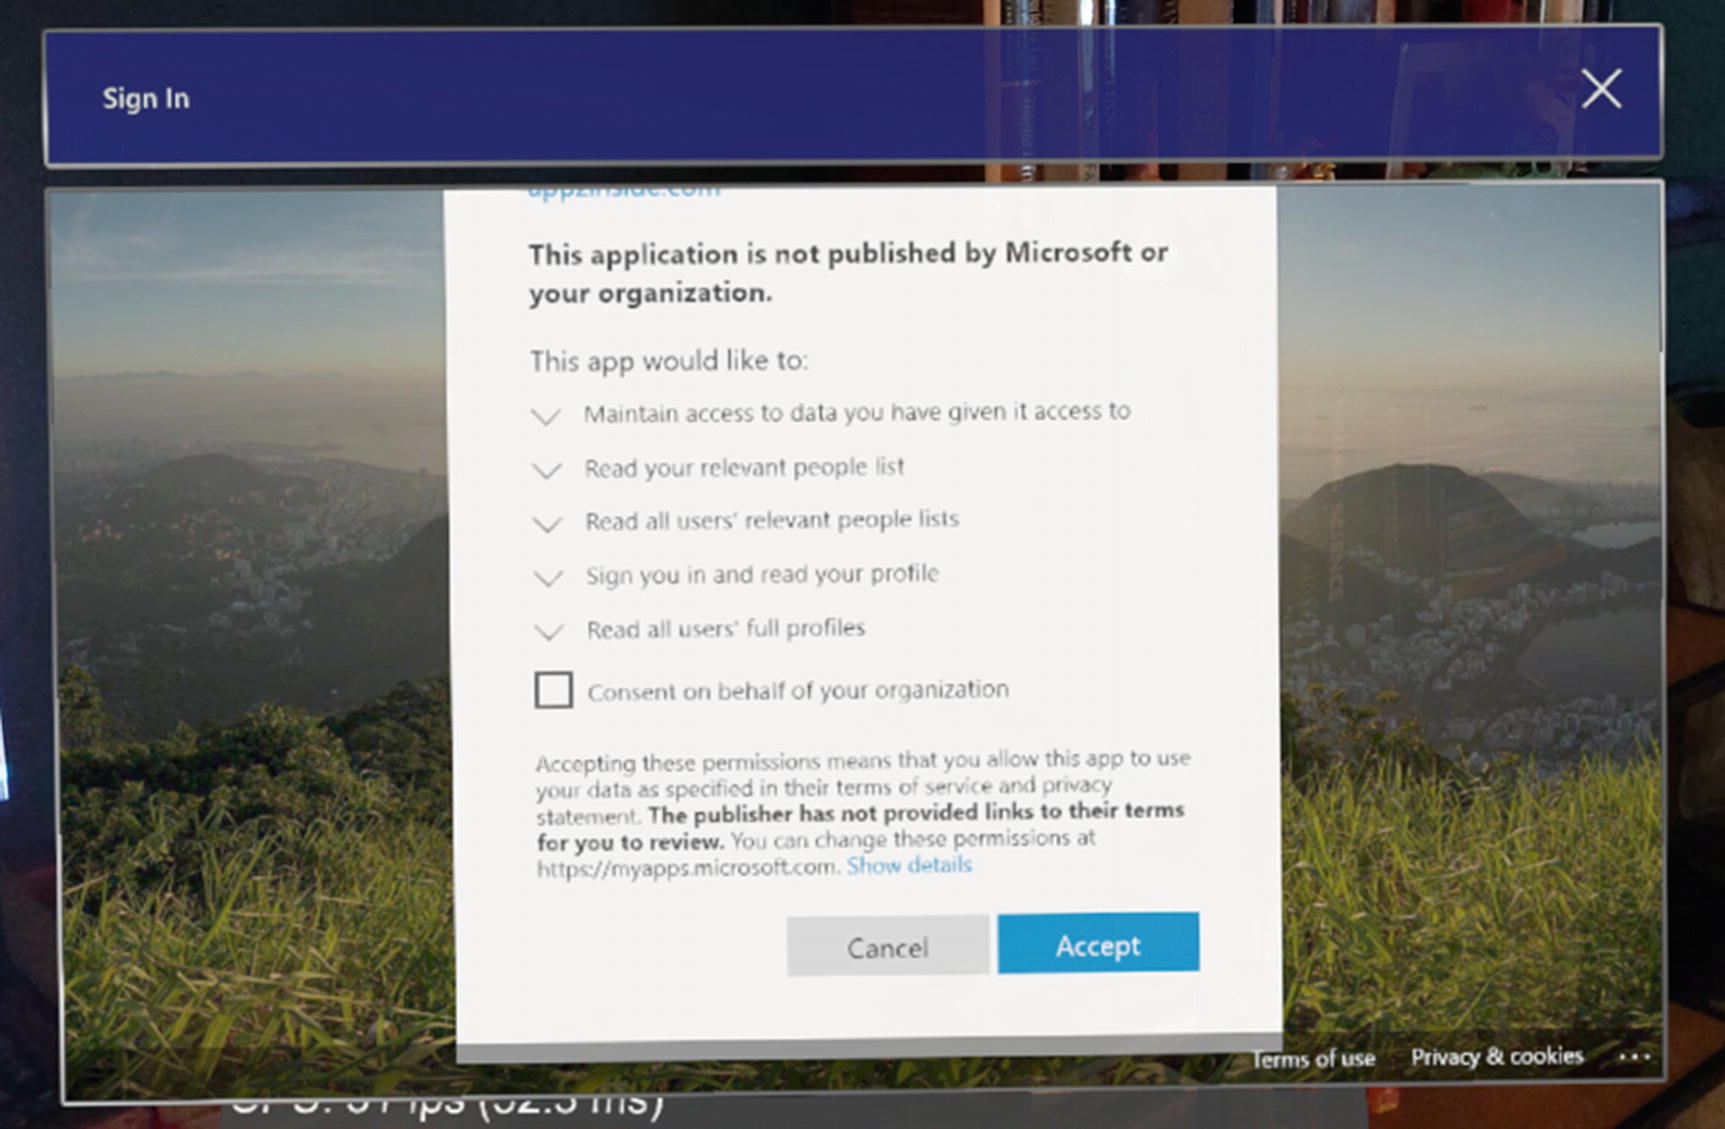
The application will request the user to give consent to those permissions, as you can see in Figure 10-6. These permissions are more readable than the ones we defined in the Scopes property. To use the application, the user needs to give consent. It is also important to understand that the user needs to have those permissions in the first place.
Figure 10-6
Give the application consent as a user
If the user has an administrative role, the user can consent on behalf of their organization. This will prevent other users from being presented with the same consent question.
The application will now access the Office 365 data via the Microsoft Graph API on behalf of the logged-on user. The information is stored in the DataQueue via the DataModel class. The GraphController will update itself based on the items stored in the DataQueue. This will build the 3D model, as shown in Figure 10-7.
Figure 10-7
The application gets data from Office 365 and builds the 3D model
The next chapter will expand the application by primarily focusing on interacting with the model based on gestures.