© Alexander Meijers 2020
A. MeijersImmersive Office 365https://doi.org/10.1007/978-1-4842-5845-3_5

5. Unity Advanced

Alexander Meijers1 
(1)
RIJSWIJK, The Netherlands
 

Now that we have learned to master Unity to develop an application for HoloLens, we get to the more advanced scenarios. In this part, we go into threading and the use of plugins.

Threading

I was very surprised when I started developing for mixed reality devices like the HoloLens using Unity. Unity is a single-threaded computing application. For me, working mostly with multithreaded application development, it was like going back in time. Why on earth is this application single-threaded? Are there even benefits to using such a system? Yes, there are! There is a very good reason for it.

Multithreaded applications take advantage of the capabilities of the CPU of your computer system and use parallelism. It allows you to process many different threads to execute all kind of different tasks. Because these threads run in parallel, programming applications using that are somewhat different than normal. Running multiple threads allows you to divide different tasks in your application at the same time. The main thread from which those threads are started gets the results returned. Because you never know which thread is finished first, you must consider that when handling the results of those threads, especially when tasks or results are depending on each other. There are several advantages of having different threads running parallel. Your main thread, which mostly runs your user interface, will perform when, for example, a thread is executing a lot of calculations or retrieving some information and is depending on the speed of the current connection. Another advantage is the improvement in performance by simultaneously executing the computation and I/O operations. Also, when correctly used in code, it minimizes the number of system resources used. Finally, it allows simplifying of programming structure. Since threads run a specific task, the code is written in the context of the task and its used objects. This creates better and more readable code.

Using multithreading works well if the number of tasks is low and manageable overseen. Code written for game development mostly contains a great number of small tasks to be executed at once. Using multithreading, a thread per task, would cause many threads with a short lifetime running simultaneously. That can push your processor capacity to its limits and will result in performance loss. This is caused by something called context switching. Context switching is the process of saving the state of an executing thread, switching forward to another thread to give it computing power, and switching back again to the saved thread. In other words, multiple threads are sharing the same computing space.

For that reason, Unity as a game development platform is based on a single-threaded principle compared to concurrency. Single-threaded means that the execution of all your running tasks is shared by the same thread. For each running task, an instruction goes in and a result comes out at a time. The more running tasks, the more work needs to be performed by the CPU. That means you need to look very closely at which tasks are needed at the current context and which tasks are not. Because tasks are built within scripts used on GameObjects, the execution of the void Update() method is called for each active GameObject. Having long-term operations running within this method can cause the application to run slow and even freeze for some time. There are two options for you as a developer:
  • Coroutines : These methods can be executed in pieces by borrowing time from the main thread.

  • Plugins : Plugins allow you to create additional UWP libraries, which can be included in your project and can execute multithreaded tasks.

Based on the preceding theory of single-threaded versus multithreaded, you can divide the following type of tasks into one of these two options.

Type of task

Option

Complex calculations and algorithms

Plugin

Machine learning & AI services

Plugin

Game related code

Coroutines

Small tasks within the user interface like animations, changing values over time and other

Coroutines

File operation access

Plugin

Accessing web services depending on network communication and service provider

Plugin

Coroutines

As explained earlier, the void Update() method of each active GameObject is called for each frame displayed by Unity. With normal behavior, this method is called approximately 30 times per second. A coroutine can pause and continue its execution over each of those frames displayed by Unity. This allows a coroutine to spread the complete run of a method across multiple frames, which are also used by Unity in its messaging system to call each void Update() method of each active GameObject. This allows coroutines to run their execution concurrent to the system. But keep in mind that this is still running in a single main thread and is not comparable to multithreading.

Coroutines are particularly useful when doing, for example, animations in the user interface. Let’s say we have a method that changes the position of a GameObject one meter in distance forward. The method will look like the following:
protected void MoveForward()
{
    Vector3 initialPos = gameObject.transform.position;
    for(float posZ = 0; posZ <= 1f; posZ += 0.01f)
    {
        gameObject.transform.position = initialPos + new Vector3(0, 0, posZ);
    }
}

If we run the method at once from the void Update() method, it would be completely executed within a single frame update. That means that we wouldn’t see the actual animation and we are holding up other GameObjects that need to be updated too in that same frame update. Hence there is the possibility of freezing objects.

To implement the same method that can be used as part of a coroutine, we need to change the declaration of the method. The return values become an IEnumerator object . Then we specify within the for loop a yield return null . At that point, the method will pause. At the next frame update, it continues from that same location.
protected IEnumerator MoveForward()
{
    Vector3 initialPos = gameObject.transform.position;
    for (float posZ = 0; posZ <= 1f; posZ += 0.01f)
    {
        gameObject.transform.position = initialPos + new Vector3(0, 0, posZ);
        yield return null;
    }
}

All the values of properties are kept in the same state during the pause of the method. This allows you to spread the execution of the code in the for loop of that same method across multiple frame updates.

The following is a code example that shows you how to start this method via a coroutine by hitting a key on the keyboard during runtime.
void Update()
{
    if (Input.GetKeyDown("m"))
    {
        StartCoroutine("MoveForward");
    }
}
But it is also possible to run the animation as soon as the GameObject is created by calling StartCoroutine("MoveForward") in the void Start() method. A coroutine can be stopped in different ways. These are as follows:
  • When the method that is called from the Coroutine is finished without a yield

  • Calling the method Monobehaviour.StopCoroutine with the name of the specific coroutine

  • Calling the method Monobehaviour.StopAllCoroutines will stop all running coroutines for that GameObject

  • When the MonoBehaviour object is destroyed

  • When the attached GameObject is disabled

Normally, a coroutine will pick up the method in the next frame update. But it is also possible to postpone the continuation of the method by using WaitForSecondsRealtime(.1f) in the yield call. This will postpone the time set in that method.
protected IEnumerator MoveForward()
{
    Vector3 initialPos = gameObject.transform.position;
    for (float posZ = 0; posZ <= 1f; posZ += 0.01f)
    {
        gameObject.transform.position = initialPos + new Vector3(0, 0, posZ);
        yield return new WaitForSecondsRealtime(.1f);
    }
}

In the preceding example, we wait a tenth of a second before we continue the method. Keep in mind that this is in the next frame update after that specified time.

Plugins

Normally you would use scripting in Unity to create all different types of functionalities. But Unity also allows you to include external written code using plugins. A plugin is also called a dynamic-link library or DLL. Unity has two distinct types of plugins that can be used in your application:
  • Managed plugins : These plugins are managed .NET assemblies. They only support features that are supported by the .NET framework against which they are compiled. There are different forms of these plugins depending on for what platform you are building an application.

  • Native plugins : These plugins are platform-specific libraries using native code. This allows you to call operating system- or platform-specific functionalities. Native plugins will perform better than managed plugins, since they are optimized for the specific platform you are developing for.

This book focuses primarily on managed plugins for our application.

Since Unity version 2019.2.x and higher, only IL2CPP scripting backend is supported for building projects. Unity has stated that it is almost impossible to maintain two different platforms, and therefore decided that scripting used in Unity is always compiled to IL2CPP. That means that building and deploying the solution from Visual Studio to a HoloLens device will optimize the application, since it is using C++. But it also means that debugging is not easy anymore as when you normally would debug .NET code in Visual Studio. Making any changes to the code requires you to fully generate the Visual Studio solution before you can run it on the HoloLens device.

It is common to use managed plugins when building applications for the Universal Windows Platform. In the past, we had plugins on .NET scripting backend. Nowadays we are encouraged to use plugins on IL2CPP scripting backend. But the latter requires extensive knowledge of C++ and is much more difficult to implement. While the first, plugins on .NET scripting, is part of the legacy documentation, it does not necessarily mean that you are not allowed to use them. For Unity, it shouldn’t matter which platform and computer language are used for building your plugin. And indeed, it is still possible to use these .NET scripting backend plugins. The classes and methods from these plugins can still be used from scripting in Unity.

In our application, we will be using a plugin based on a .NET DLL. This plugin will contain code that will not run within the Unity Editor. Therefore, we need an additional placeholder plugin. This placeholder requires the following:
  • The placeholder plugin is also based on a .NET DLL.

  • The placeholder plugin should have the same name as the first plugin.

  • The same namespace needs to be used.

  • The same classes and methods need to be used, but they can contain dummy code.

Both plugins need to be placed at specific locations within the assets folder of your Unity project. The plugin needs to be placed in the following folder:
Assets/Plugins/WSA
The placeholder plugin needs to be placed in the following folder:
Assets/Plugins
Some additional settings need to be set per file, which is explained later in this chapter. In the following steps, I will explain what is needed for both plugins for your project. Let’s start with the plugin:
  1. 1.

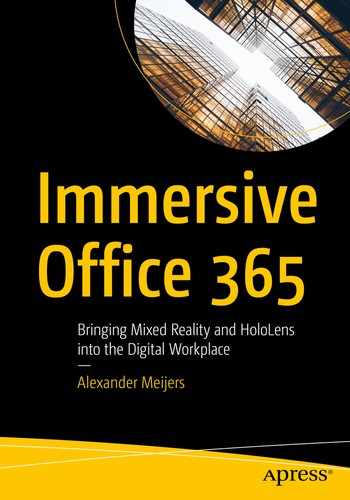
    Start Visual Studio 2019. The dialog as shown in Figure 5-1 will appear. If Visual Studio does not show the dialog, open it via the main menu FileNewProject.

     
  2. 2.

    Type Class Library in the search field to find the project template for .NET standard related projects.

     
  3. 3.

    Select the project template called Class library (.NET standard).

     
  4. 4.

    Press the Next button to continue to the next step.

     
../images/486566_1_En_5_Chapter/486566_1_En_5_Fig1_HTML.jpg
Figure 5-1

Create a new class library (.NET Framework) project.

In the next step, as seen in Figure 5-2, we need to configure the project settings.
../images/486566_1_En_5_Chapter/486566_1_En_5_Fig2_HTML.jpg
Figure 5-2

Configure your new project

  1. 1.

    Fill in a Project Name. Enter Office365DataHub as the project name.

     
  2. 2.

    Select a location for your project. Since we will have multiple projects, it would be wise to put them all under the same folder. In my case this is the ImmersiveOffice365 folder. The solution name will be filled in automatically.

     
  3. 3.

    Press the Create button to create the project.


Now let’s start writing some code. We are going to create a manager class. But we need to have only one instance of that class present in our project. Therefore we start creating a templated singleton class. The singleton pattern restricts the instantiation of a class to one true single instance. This allows us to always get the same instance of that manager.

You will notice that the project contains a generated Class1.cs file. We remove this file from the project before we start adding our own classes.

Create a new code Class file via the solution explorer using right-click the project and select AddNew Item. Call the new class Singleton.cs.

The following code describes a singleton. It contains a static method that returns the single instance of class T. An instance of class T is created if there are not yet any present. The constructor of the class is set to protected to prevent instantiating the class T from outside the Instance method.
namespace Office365DataHub
{
    public class Singleton<T> where T : new()
    {
        private static T instance;
        protected Singleton()
        {
        }
        public static T Instance
        {
            get
            {
                if (instance == null)
                {
                    instance = new T();
                }
                return instance;
            }
        }
    }
}
Create another new code Class file via the solution explorer using right-click the project and select AddNew Item. Call your new class Manager.cs. This class will contain the actual code accessing the Office 365 data. But for now, to explain the part about using plugins in Unity, we will keep it to access a certain web page through an HttpClient using asynchronous code. Copy the following code to your newly created class file. It contains the right namespaces needed and the basic frame of the class using the earlier created Singleton template class.
using System.Net.Http;
using System.Threading.Tasks;
using Windows.Foundation;
namespace Office365DataHub
{
    public class Manager : Singleton<Manager>
    {
    }
}

Accessing a web service can take some time. It depends on the web service itself if any security handshake needs to be done and the amount of data to be transferred. Therefore, calling a web service is best done by using asynchronous calls. That means that we are going to call our method from a new thread. Since our method needs to pass some results back, we are going to use a callback method. Using a callback method allows us to pass a method as a property to another method. The definition of such a method is done by using the keyword delegate in the method definition.

Add the following code to define a callback by using a delegate definition. The callback will return the result as a string.
public delegate void OnGetSomeInformationCompleted(string result);
Now we need to define the actual method retrieving our information from a web call using HttpClient. The method is defined as an asynchronous method returning nothing. The property url contains the URL we will request through the HttpClient class . The property onGetSomeInformationCompleted is called with the result coming from the request. Add the following method to the Manager class:
protected async Task GetSomeInformationAsync(string url, OnGetSomeInformationCompleted onGetSomeInformationCompleted)
{
    string result = "";
    using (var client = new HttpClient())
    {
        HttpResponseMessage response = await client.GetAsync(url);
        if (response.IsSuccessStatusCode)
        {
            result = await response.Content.ReadAsStringAsync();
        }
    }
    onGetSomeInformationCompleted(result);
}

We need to implement one more method called GetSomeInformation. This is the method that will call the GetSomeInformationAsync method from a new thread. This is also the method that will be publicly accessible and called from the scripting in Unity.

The method has the same properties that are passed along to the second method. We use the Windows.System.Threading.ThreadPool.RunAsync to create a work item on a new thread. This work item calls the GetSomeInformationAsync method. Copy the following method to the Manager class:
public void GetSomeInformation(string url, OnGetSomeInformationCompleted onGetSomeInformationCompleted)
{
    IAsyncAction asyncAction = Windows.System.Threading.ThreadPool.RunAsync(
        async (workItem) => { await GetSomeInformationAsync(url, onGetSomeInformationCompleted); });
}
The result is shown in Figure 5-3. We now have two classes, Singleton and Manager, defined in our project. The next step is compiling the project and producing a DLL, which can be imported into Unity. Make sure you have Debug and Any CPU selected from the top dropdowns. Then build the project to generate the DLL.
../images/486566_1_En_5_Chapter/486566_1_En_5_Fig3_HTML.jpg
Figure 5-3

Build a debug version of the plugin

In this next step, we are going to create the placeholder plugin. This plugin is based on a .NET standard DLL:
  1. 1.

    Start Visual Studio 2019. The dialog will appear, as shown in Figure 5-4. If Visual Studio does not show the dialog, open it via the main menu FileNewProject.

     
  2. 2.

    Type Class Library in the search field to find the project template for .NET standard related projects.

     
  3. 3.

    Select the project template called Class library (.NET standard).

     
  4. 4.

    Press the Next button to continue to the next step.

     
../images/486566_1_En_5_Chapter/486566_1_En_5_Fig4_HTML.jpg
Figure 5-4

Create a .NET standard library

In the next step, as seen in Figure 5-5, we need to configure the project settings.
../images/486566_1_En_5_Chapter/486566_1_En_5_Fig5_HTML.jpg
Figure 5-5

Configure the .NET standard library project

  1. 1.

    Fill in a Project Name. Enter Office365DataHubStub as the project name.

     
  2. 2.

    Select a location for your project. Since we will have multiple projects, it would be wise to put them all under the same folder. In my case this is the ImmersiveOffice365 folder. The solution name will be filled in automatically.

     
  3. 3.

    Press the Create button to create the project.


You will notice that the project contains a generated Class1.cs file. We remove this file from the project before we start adding our own classes.

The placeholder plugin needs to have the same name as the UWP plugin. It also needs to have the same methods and classes defined in the same namespace. This means that we need to configure the project settings, as can be seen in Figure 5-6.
../images/486566_1_En_5_Chapter/486566_1_En_5_Fig6_HTML.jpg
Figure 5-6

Configure project settings of the .NET standard library project.

  1. 1)

    Right-click the project and select properties.

     
  2. 2)

    Change both the Assembly Name and Default namespace to Office365DataHub.

     
Just like the previous project, we need to add the same classes to this placeholder plugin. Create a new code Class file via the solution explorer using right-click then project and select AddNew Item. Call your new class Singleton.cs Copy the following code to that file. The code for the Singleton template class will stay the same.
namespace Office365DataHub
{
    public class Singleton<T> where T : new()
    {
        private static T instance;
        protected Singleton()
        {
        }
        public static T Instance
        {
            get
            {
                if (instance == null)
                {
                    instance = new T();
                }
                return instance;
            }
        }
    }
}
Create another new code Class file via the solution explorer; right-click the project and select AddNew Item. Call your new class Manager.cs. This class would normally contain the code for accessing the web service. But since this will be a placeholder, also called a stub, the code will be somewhat different. Copy the following code to create the framework of the class:
namespace Office365DataHub
{
    public class Manager : Singleton<Manager>
    {
    }
}
We need to add the same definition of the callback as we have in the other plugin. Copy the following code into the class Manager:
public delegate void OnGetSomeInformationCompleted(string result);
The second method that is called from the scripting in Unity is GetSomeInformation . In this example, we return the given parameter url to the callback method. Add the following method to the class Manager:
public void GetSomeInformation(string url, OnGetSomeInformationCompleted onGetSomeInformationCompleted)
{
    onGetSomeInformationCompleted(url);
}
The result is shown in Figure 5-7. We now have two classes, Singleton and Manager, defined in our project. The next step is compiling the project and producing a DLL, which can be imported into Unity. Make sure you have Debug and Any CPU selected from the top dropdowns. Then build the project to generate the DLL.
../images/486566_1_En_5_Chapter/486566_1_En_5_Fig7_HTML.jpg
Figure 5-7

Build a debug version of the plugin

Open the Unity project that was created in the previous chapter. Create two new folders under Assets. The first folder is called Plugins. Create the second folder WSA as a subfolder under Plugins. WSA stands for Windows Store Apps. Drag the UWP DLL named Office365DataHub into the folder Assets/Plugins/WSA. Drag the placeholder DLL named Office365DataHubStub into the folder Assets/Plugins. The result is shown in Figure 5-8.
../images/486566_1_En_5_Chapter/486566_1_En_5_Fig8_HTML.jpg
Figure 5-8

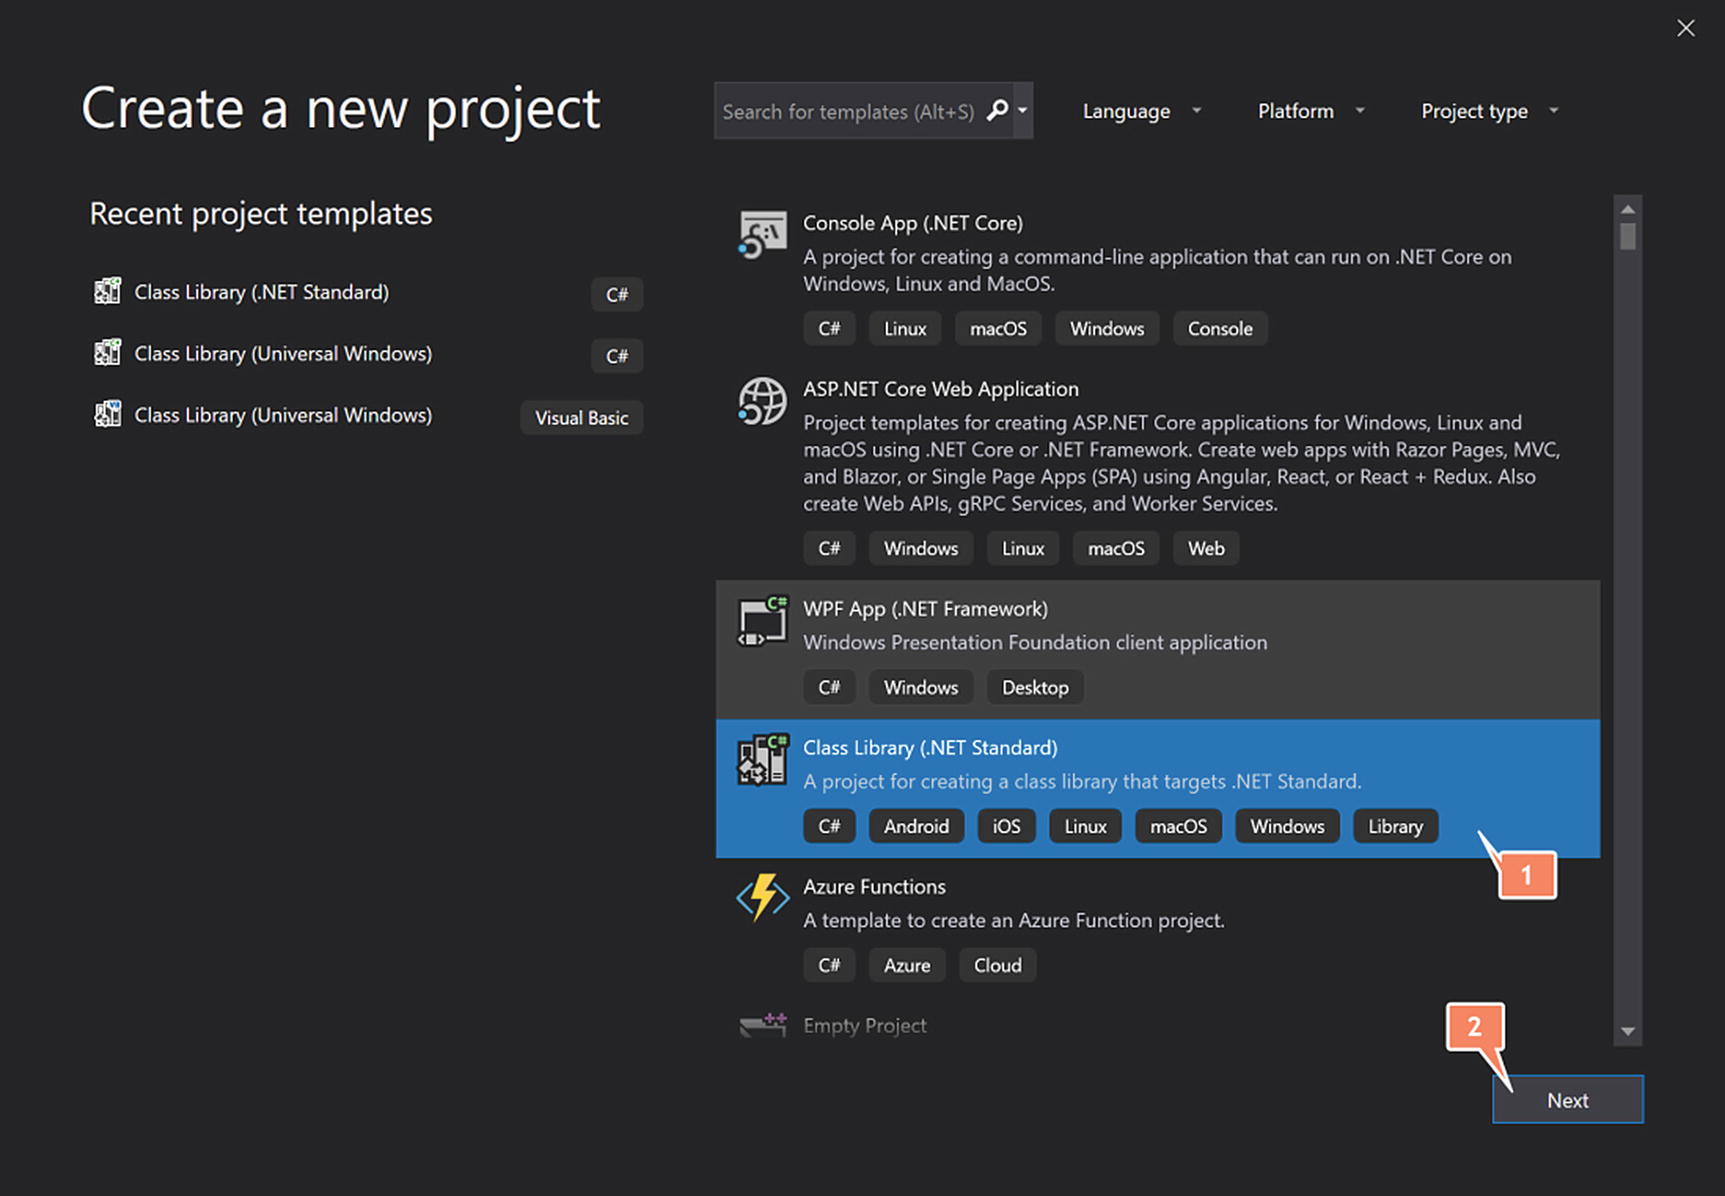
Add the plugins in the assets folder to your Unity project

Select the placeholder DLL, the one in the Assets/Plugin folder, in the Project tab. The properties of that file will appear in the Inspector window, as seen in Figure 5-9. Make sure that the following settings are met for the plugin:
  • Include platforms – This defines which platforms the DLL is available too. Since it is a placeholder DLL, only the option Editor should be checked.

  • CPU – Any CPU

  • OS – Any OS

../images/486566_1_En_5_Chapter/486566_1_En_5_Fig9_HTML.jpg
Figure 5-9

Configure the settings of the placeholder plugin

When the changes are made, press the Apply button to acknowledge the settings for the plugin.

Select the UWP DLL, the one in the Assets/Plugins/WSA folder, in the Project tab. The properties of that file will appear in the Inspector window, as seen in Figure 5-10. Make sure that the following settings are met for the plugin:
  • Include platforms – Only the option WSAPlayer Is checked.

  • SDK – Any SDK

  • ScriptingBackend – Any scripting backend

  • Don’t Process – This option needs to be unchecked. Otherwise you will receive compiler errors when you build the solution from Unity.

  • Placeholder – Select the previously configured placeholder. It will be found, since it uses the same name as this .NET standard DLL.

../images/486566_1_En_5_Chapter/486566_1_En_5_Fig10_HTML.jpg
Figure 5-10

Configure the settings of the UWP plugin

When the changes are made, press the Apply button to acknowledge the settings for the plugin. Now both plugins are configured and ready for use.

Let’s use the Manager class from a scripting file in Unity. Create a new C# scripting file in Unity called SomeInformation, which we will add to the HelloWorld! GameObject. The scripting file will call GetSomeInformation method on the Manager class and outputs the result onto the TextMesh in the HelloWorld! GameObject.
using UnityEngine;
public class SomeInformation : MonoBehaviour
{
    string text = "";
    private TextMesh mesh = null;
    // Start is called before the first frame update
    void Start()
    {
        mesh = gameObject.GetComponent<TextMesh>();
    }
    // Update is called once per frame
    void Update()
    {
        if (mesh != null)
        {
            mesh.text = text;
        }
    }
}

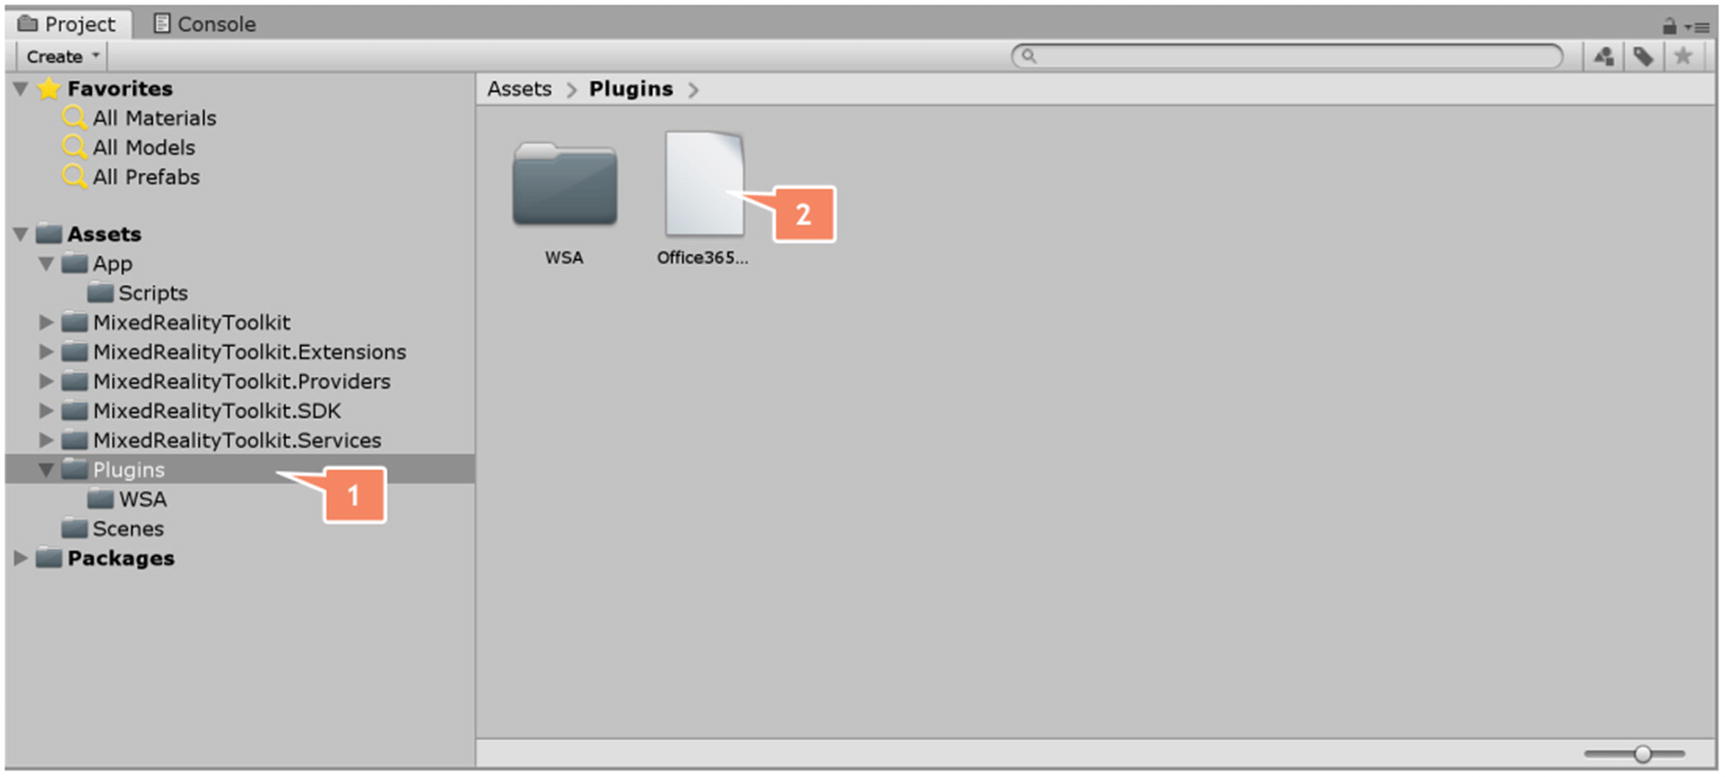
The TextMesh from the HelloWorld! GameObject is retrieved in the Start() method and the text property of the TextMesh is updated in the Update() method.

The main thread used by Unity is not thread-safe. This means that all calls to the Unity API need to be done from the main Unity thread. Synchronizing data back from a separate thread requires another form of implementation.

For that reason, we define a separate property called text in the class. The result returned from the callback method is stored in that property. The application would fail if we tried to set the text property of the TextMesh directly from the callback. Copy the following method in the SomeInformation class:
private void OnGetSomeInformationCompleted(string result)
{
    if (result.Length > 100)
    {
        text = result.Substring(0, 100);
    }
    else
    {
        text = result;
    }
}
Add the following code in the Start() method just below the row that retrieves the mesh from the GameObject:
Office365DataHub.Manager.Instance.GetSomeInformation("https://www.microsoft.com", OnGetSomeInformationCompleted);
}

This row will instantiate the Manager from the Office365DataHub namespace and calls the GetSomeInformation method. The result is returned in the OnGetSomeInformationCompleted.

Now drag the scripting file onto the HelloWorld! GameObject or use the Add Component button in the Inspector window. The result would be the same as seen in Figure 5-11.
../images/486566_1_En_5_Chapter/486566_1_En_5_Fig11_HTML.jpg
Figure 5-11

Add the script to the HelloWorld GameObject

When you start the scene in Unity, the placeholder plugin is used. You will see that, since the Hello World! text is replaced by the URL specified in the call to the Office365DataHub.Manager.Instance.GetSomeInformation method. If you build the solution to a Visual Studio solution, deploy it to a HoloLens device, the UWP plugin is used. This will show the first 100 characters of the page requested by the URL.

Using a plugin can be very useful, since you have a lot of functionality present that is normally not present in Unity. The downside is that you are not able to test such functionality from the play mode of Unity. On the other hand, you can test the UWP plugin extensively using a UWP test application outside Unity and the HoloLens device. It also allows you to still use C# code in the backend because Unity does not compile the UWP DLL.

..................Content has been hidden....................

You can't read the all page of ebook, please click here login for view all page.
Reset
18.118.120.109