Chapter 10
Breaking (and Not Breaking) Words, Lines, Paragraphs, and Pages
An important aspect of typography is controlling how words, lines, and paragraphs break — or are kept together — to enhance the meaning of the text and to facilitate easier reading. At the micro level, hyphenation determines how words are allowed to break — or are prevented from breaking — across a line. In addition, certain combinations of words, most commonly proper nouns, can be prevented from breaking over a line with the No Break attribute. On a macro level, Keep Options serve a variety of related purposes. They can be used to prevent paragraphs from breaking over a column or page, to keep heads and subheads with the lines that follow them, and to make sure that certain classes of paragraph always start in a new column or on a new page.
Hyphenation
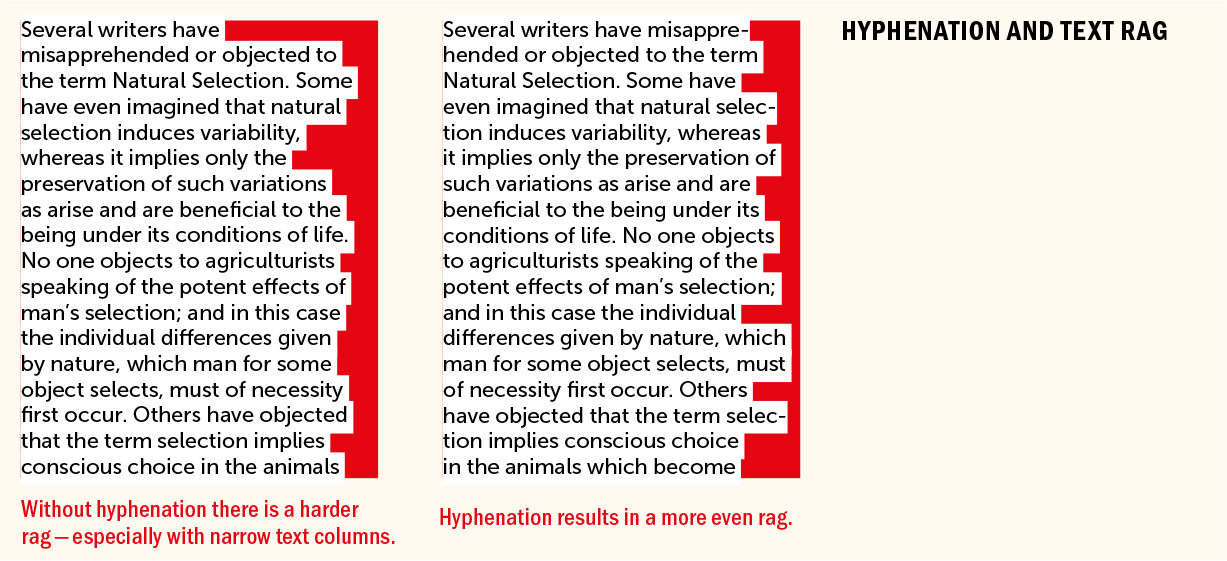
There’s a lot of prejudice against hyphens. Some designers regard them as ugly and to be shunned, as if broken words, like broken cookies, were somehow inferior. Hyphenation happens and you need to control it. That doesn’t necessarily mean turning it off, although for some categories of text that’s preferable. For body text, good hyphenation settings, in tandem with Justification settings and Optical Margin Alignment, are key to achieving even type color. Hyphenation should be avoided in centered or right-aligned type, but in left-aligned or justified type, when used appropriately, hyphenation is a compromise that is sometimes necessary for good typography. By allowing words at the ends of lines to be broken, hyphenation minimizes the amount of leftover space on a line. As long as the breaks make sense, and are infrequent, hyphenation is preferable to the bad word spacing that might otherwise occur in justified type or the uneven rags that might otherwise occur in left-aligned type. We’re used to reading hyphenated text. We do it without thinking, rarely if ever pausing to consider the hyphen’s service to the cause of readability.
Good hyphenation can be labor-intensive. Appropriate hyphenation settings address most issues, but InDesign can’t read your mind. There will be times when you need to intervene to make sure words break the way you want. The manual adjustment of hyphens should be included in the fine-tuning of your publication; text invariably gets edited throughout the production cycle, causing line endings to change, so there’s no point investing time in the hyphenation until you know exactly what you’re working with. Try to get the client to sign off on the text content before you start manually tweaking. And — an obvious point — start at the beginning of the story and work forward.
Language Dictionaries
Hyphenation rules vary from one style manual to another and from one language to another. The dictionary that is applied to your type determines how that type is hyphenated and spell-checked. If you’re working on a multilingual document, make sure you apply the correct language dictionary to the appropriate passages of text. Even if you have only an excerpt — a single paragraph in a second language, for example — choose the appropriate language dictionary for that content so that the text is hyphenated and spell-checked in the right language.
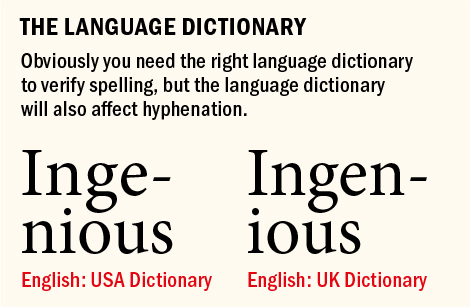
Obviously, we’d expect the Latvian dictionary to break words differently than the English:USA dictionary; less expected, though, is that the English:UK dictionary hyphenates some words differently than the English:USA dictionary. The UK dictionary breaks words by etymology, while the USA dictionary breaks them according to pronunciation. So make sure you have the appropriate language dictionary selected. This applies not just on a paragraph level, but also on a character level, when quoting phrases or passages in a different language. For example, if your English text contains a passage of French, make sure the French dictionary is applied to that passage so that the words hyphenate correctly and so that they are not flagged by the English spell checker. If you have multiple such passages, it’s worth making a character style for this purpose.
TIP: If you want a specific instance of a word or phrase to never hyphenate — and to be ignored by the Spell Checker — select the word(s) and choose [No Language] in the Language drop-down menu in the Control panel or Character panel. If you plan on doing this more than once, make a No Language character style. This can be useful for long web addresses, where a hyphen might be ambiguous.
To see how a word might hyphenate differently depending on the language dictionary applied, select the word, then choose Edit > Spelling > User Dictionary. Click Hyphenate to see the hyphenation points. Now choose a different language from the Language drop-down menu, and click Hyphenate again to see how the hyphenation points may differ.
Hyphenation Options
I love InDesign, so my next statement may sound harsh. But really, there’s no other way to say it: InDesign’s default hyphenation settings suck. They will result in two-character stubs before and after hyphens, create ladders running down the right edge of the frame from consecutive hyphens, and allow words to be broken at the end of a paragraph and across a column. The good news is that these setting are easy to change, and taking charge of these options will have a profound impact on the appearance of your type. Combined with Justification settings and Optical Margin Alignment, appropriate Hyphenation settings are essential components of professional typesetting. The Hyphenation dialog is accessible via the Control panel menu, the Paragraph panel, or, most usefully, as part of Paragraph Style Options.
Varieties of Hyphens
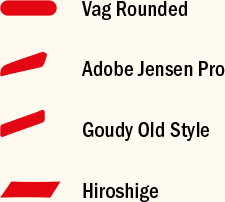
Typically 1⁄3 of an em, the hyphen in most fonts is nasty, brutish, and short, and it could easily be swapped with the hyphen from another font without anyone noticing. Certain fonts, however, have very distinctive — and beautiful — hyphens. To quote Robert Bringhurst, “In the republic of typography, the lowliest, most incidental mark is also a citizen” [Elements of Typographic Style, p. 77].
Words with at Least refers to the minimum number of characters necessary for a word to be a candidate for hyphenation. I prefer to set this at 7, which results in fewer hyphens. Even though I’m an advocate of the hyphen, I like them best in small numbers. Words of five characters don’t look good hyphenated. Having only two characters before the hyphen break is disruptive and potentially confusing. Hyphenating words of six characters is best avoided because words don’t divide comfortably into two three-character fragments.
After First and Before Last: These confusingly named options refer, respectively, to the size of the word fragment (in characters) that is left behind and the size of the word fragment that is carried down to the next line. When hyphenating words with a minimum of seven characters, leave at least three characters behind and take at least four forward. Like all rules of thumb, this has its exceptions. For example, when the first two letters are a prefix, it may be best to break the word at the prefix. Words like “realign” or “reappear” would look confusing if they were broken after “rea.”
A firm but flexible approach is best when it comes to hyphenation settings. Two-letter fragments after the hyphen are always best avoided, but in rare cases even these may be the lesser of two evils. Ultimately, it comes down to two things: how it looks, and whether it makes sense.
TIP: If you’re creating an accessible PDF, avoid hyphenation altogether because it interferes with Acrobat’s ability to read the text aloud.
Hyphen Limit determines the maximum number of hyphens that can appear on consecutive lines. Consecutive hyphens create a ladder effect on your column edge, so you’d never want more than two. Somewhat confusingly, a hyphen limit of 0 actually allows an unlimited number of hyphens. Set this option to 1 to prevent consecutive hyphens.
Here are some options for minimizing the number of hyphens:
Rewrite, if you have the authority and it’s appropriate.
Find a better break a few lines above and insert a discretionary hyphen — press Cmd+Shift+– (Ctrl+Shift+–).
Tighten the letterspacing with tracking.
Take the tightest hyphenated line and set the last word to No Break. This will turn the word over to the next line.
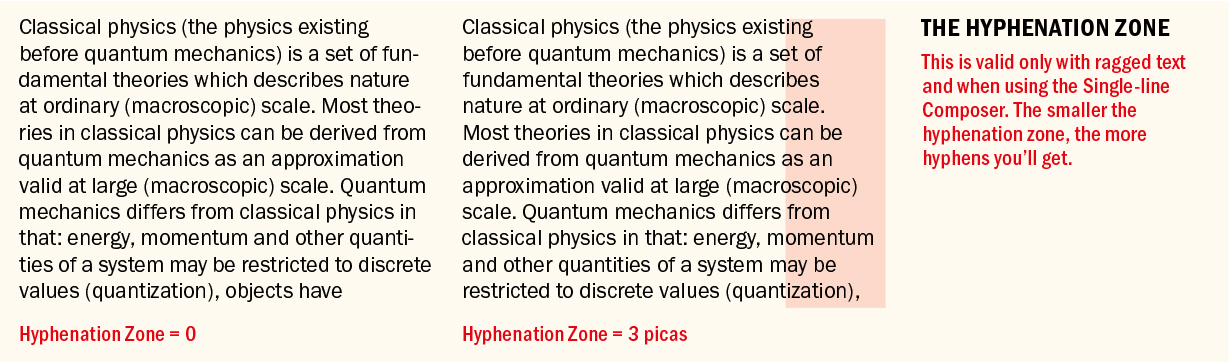
Hyphenation Zone: Despite the alluring name, this is just an invisible boundary on the right side of the frame. The value you choose is the maximum amount of white space you want InDesign to allow before it begins to apply hyphenation. A larger hyphenation zone allows more words to be carried down to the next line, thus resulting in fewer hyphens and a harder rag. A smaller hyphenation zone results in more hyphenated words and a softer rag. However, the Hyphenation Zone setting applies only to ragged text composed with the Adobe Single-line Composer.
The Hyphenation slider: There’s always a trade-off between good spacing and hyphenation, especially when working with justified text. Nothing demonstrates this more clearly than the Hyphenation slider. Better spacing or fewer hyphens: pick one, or leave the slider in the middle for a happy medium.
Hyphenate Capitalized Words: Generally, you want to avoid breaking capitalized words, but if your text contains a lot of them, selecting this option yields better word spacing. If you opt to break capitalized words, avoid breaking someone’s name the first time it appears — after that, do whatever looks best in terms of type color. A name that is familiar to the English-speaking reader more easily lends itself to being broken than one that is not.
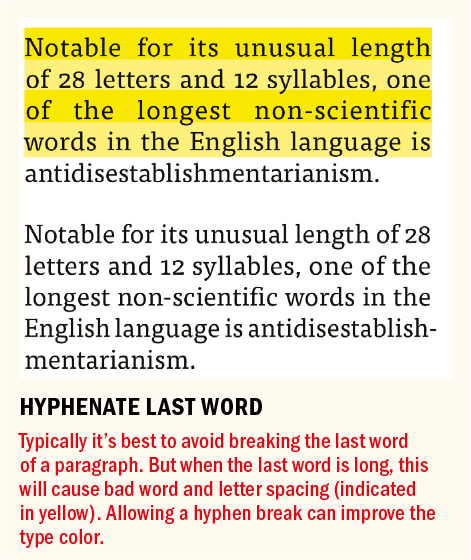
Hyphenate Last Word: Deselect this option to prevent last words of paragraphs being hyphenated. However, if the last word in a paragraph is very long, then consider breaking it. If you turn this off in your paragraph style and need to make an exception, inserting a discretionary hyphen won’t work. You will first need to manually override the style definition. With the paragraph selected, go to the Hyphenation dialog and select Hyphenate Last Word.
Hyphenate Across Column: Deselect this option to prevent the last word of a column or page from being hyphenated. Hyphenating across facing pages, while best avoided, isn’t as bad hyphenating across a page turn, from a right page to a left page.
Discretionary Hyphens and Nonbreaking Hyphens
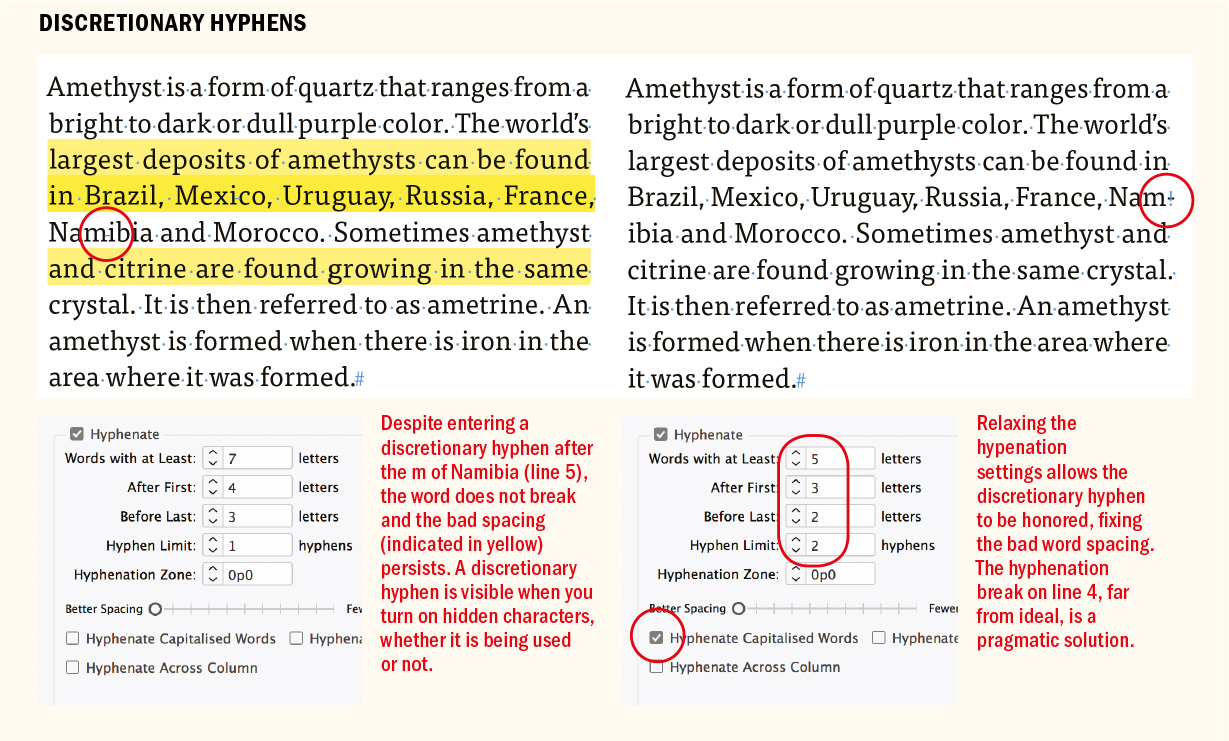
Discretionary hyphens are entered at the insertion point by pressing Cmd+Shift+Hyphen (Ctrl+Shift+Hyphen). They allow a word to hyphenate at that point. They’re intended for when a word at the end of a line is not in your hyphenation dictionary, or when you want to break a word somewhere other than where the language dictionary recommends. Discretionary hyphens are just that — discreet. If the text is edited so that the word no longer needs hyphenating, the discretionary hyphen becomes invisible and lies dormant until needed.
The problem with discretionary hyphens is that unless you’re entering them one or two characters on either side of what InDesign considers an acceptable break, they are ignored. This is because the discretionary hyphen is being overruled by the Paragraph Composer and/or your Hyphenation settings — the “discretion” is InDesign’s, not yours. A better option is to relax the Hyphenation settings for the paragraph in question. For example, reduce the Words with at Least setting or increase the number of consecutive hyphens, or allow capitalized words to hyphenate. Do this with H&J Violations (see page 173) turned on and with the Preview box selected in the Hyphenation Settings dialog so you can evaluate how the changes are affecting the text. This will either more readily allow discretionary hyphens or cause the paragraph to recompose in a way that makes the hyphen unnecessary. When you do this, make sure that what you gain in improved spacing is worth what you lose by having more word breaks.
A discretionary hyphen, inserted in front of the word, prevents a word from hyphenating. But if you’re using a discretionary hyphen to prevent a URL from breaking and you intend to export the result as an interactive PDF, there’s a problem. The discretionary hyphen prevents Acrobat’s Auto-Create web links feature from recognizing the text as a URL. For this reason, use a No Break style (see below) instead.
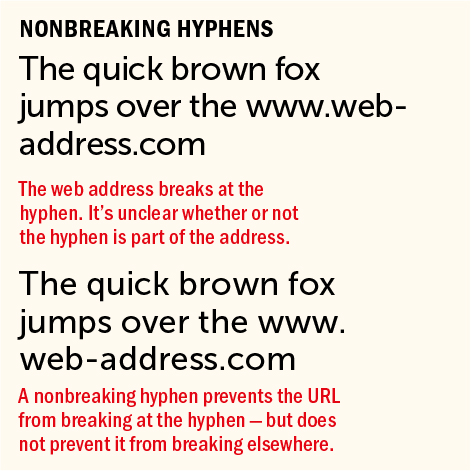
Nonbreaking hyphens prevent a line from breaking at the hyphen but allow it to be broken elsewhere. They are used to prevent compound words from breaking at the hyphen, as well as in phone numbers and web addresses.
Hyphenation and User Dictionaries
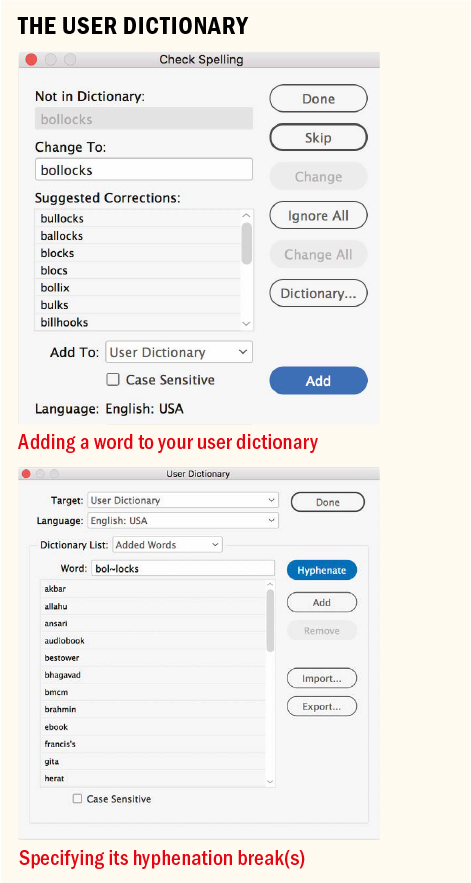
When a word isn’t found in your language dictionary, you can add it. Right-click the word and choose Spelling > User Dictionary. Optionally, to specify the word’s hyphenation, click Hyphenate to view suggested hyphenation points. You can add your own hyphenation points by inserting tildes, ranking them as you go: One tilde indicates the best break, two tildes the second best, and so on. To prevent the word from ever being hyphenated, insert a tilde before the first character. Click Add to add the word (and its hyphenation) to your user dictionary. To change the hyphenation points for a word already in the dictionary, right-click the word and choose Spelling > User Dictionary > Hyphenate. Insert the hyphenation points where you want them, then click Add.
Because hyphenation exceptions can be stored in your document and your user dictionary, make sure Compose Using (Dictionary preferences) is set to User Dictionary and Document to compose text using both possible sets of exceptions.
Sharing or Merging User Dictionaries
In addition to adding words and hyphenation exceptions to your user dictionary, you can create a custom dictionary that can be shared with others in your workgroup. This ensures that the same spelling and hyphenation rules are applied to a document regardless of who’s working on it.
In Dictionary Preferences, click New User Dictionary. Give your new dictionary a name, and save it on your file server where others can access it. The file will have a .udc extension. Click OK to exit Preferences.
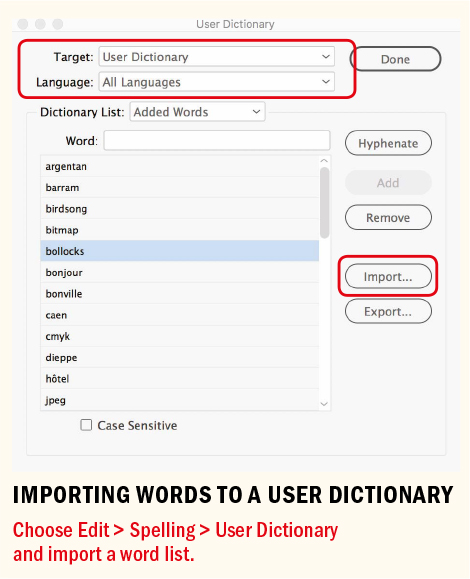
To quickly add words to the custom dictionary, create a plain text file that is a list of words you wish to add. You can separate the words with spaces, tabs, or paragraph returns. Note that you can’t add phrases, because each word in a phrase is treated as a separate entry.
Select Edit > Spelling > User Dictionary. Choose your custom dictionary from the Target menu, then click Import to load the text file. If the words are capitalized, select the Case Sensitive checkbox before you import the words. Thereafter, words can be added on a case-by-case basis.
Each member of your workgroup can load the custom dictionary by choosing Preferences > Dictionary, clicking the plus symbol to add a dictionary, and navigating to the server to select the custom dictionary file.
From now on, words will be spell-checked and hyphenated using both the default dictionary and the custom dictionary. However, although multiple people can use the same custom dictionary, only one person can add or edit words. To everyone else, that dictionary will be locked. For this reason, you’ll need to assign one person responsibility for the custom dictionary.
NOTE: Many dictionaries ship with InDesign, of which Hunspell is the default dictionary. You can also download additional spelling and hyphenation dictionaries from the OpenOffice website (extensions.openoffice.org).
As an alternative to sharing a user dictionary, you can merge it into the InDesign document. To do this, in Dictionary Preferences select Merge User Dictionary into Document. When another user (who doesn’t have access to your custom dictionary) opens the document, they’ll see your custom words in their Edit > Spelling > Dictionary dialog (with the name of the document selected as the Target dictionary). The custom words appear only within your document, not in any other documents on their system or in any documents that they create.
Merging the user dictionary into the document means one less thing to worry about. The downside is that the user dictionary is not available across multiple documents.
H&J Violations
Using appropriate Hyphenation and Justification settings increases the likelihood of achieving good-looking type, but it’s not a guarantee. InDesign can’t do the impossible, and when you’re working with justified type, there will be places in your text where it can’t honor the settings you’ve chosen. Choose Preferences > Composition and select H&J Violations to highlight in three shades of yellow any lines that violate your H&J specs. The darker the yellow, the worse the problem. As with the Custom Tracking/Kerning Composition preference, this is distracting while you’re designing pages, but very useful when fine-tuning a layout.
Break Characters
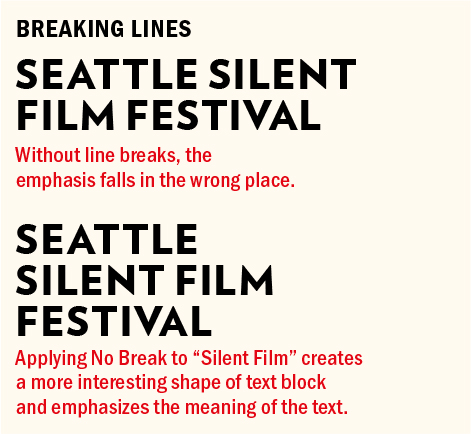
Among our responsibilities, as designers with type, is to ensure that the lines break in a way that facilitates, rather than obstructs, the meaning of the text — and in a way that looks good. Line breaks should not be arbitrary, especially in headlines and subheads. Read the text and, where necessary, break the lines where you would logically pause when reading it aloud.
The forced line break (Shift+Return/Shift+Enter) carries the text to the right of the cursor down to the next line without starting a new paragraph. This avoids taking on any unwanted indent and spacing attributes of the paragraph that it came from. The forced line break is also used for contouring paragraphs of ragged text and for breaking lines for sense, especially in display text.
The problem with a forced line break is that if your text reflows, you could be left with awkward breaks in the middle or even at the beginning of a line.
Cue the discretionary line break, which will disappear when the word is not at the end of the line. This sounds like the answer to the problem of lines breaking inappropriately. However, when you insert a discretionary line break, the line doesn’t actually break until you add to the text that precedes it or increase the type size. So if you’re adjusting the rag of text that’s already written, this feature isn’t much help.
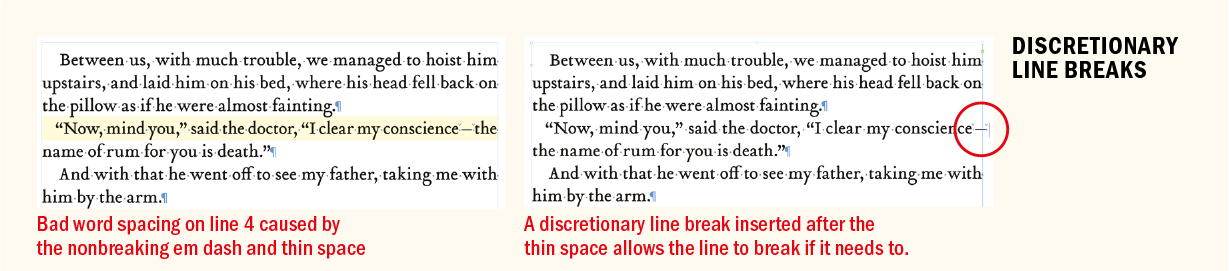
Nevertheless, discretionary line breaks have their uses. I like to put thin spaces around my em dashes. White space characters and em and en dashes are nonbreaking. And most of the time, that’s a good thing, but occasionally it causes H&J violations. In a long document, turn on the H&J Violations option to highlight where the word spacing or letter spacing is less than optimal. If the cause of the problem is an em dash at the end of the line, insert a discretionary line break after the dash to allow the word that follows to move down to the next line. Should the text reflow so that the break is no longer needed, it goes away.
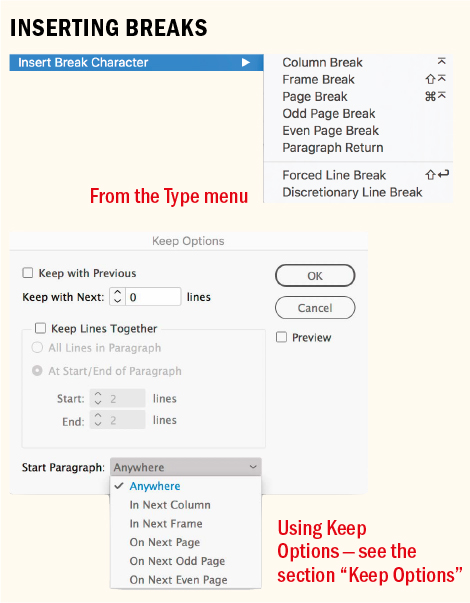
The other breaks are self-explanatory and are inserted at the position of your cursor, introducing an invisible character into the text. These invisible characters can be seen when you have hidden characters shown or viewed in the Story Editor. When you insert one of these characters, text is forced to the next column in the current frame, to the next threaded frame, to the next page, or to the next odd or even page.
Where you can predict the break — for example, if all chapter heads should start on a new right-hand page — it is preferable to use Keep Options to incorporate this attribute into the paragraph style definition.
No Break
TIP: Because No Break is tucked away under the Control panel menu, save yourself time by creating a character style that has this single attribute. Assign a keyboard shortcut to the character style so that you can apply it quickly.
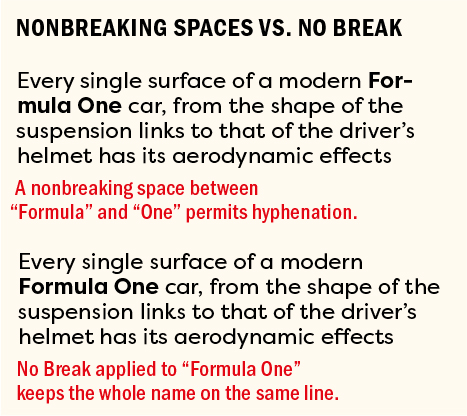
To prevent a word or a phrase from breaking, select it and choose No Break from the Control panel menu. Whereas a nonbreaking space will permit hyphenation, using No Break guarantees that the selected word(s) will always remain intact.
In addition to proper nouns and product names, No Break can also be used for the following:
To prevent single-letter words such as “I” and “a” from occurring at the end of a line. Finishing a line on a short word leaves a dangling thought and interrupts the reader’s comprehension.
To prevent short words like “An,” “The,” and so on from occurring at the end of a line when they are part of a title, such as The Bell Jar.
To keep together numerical expressions like “May 31” or “8 inches,” or phrases like “Chapter 9.”
To prevent two or more consecutive lines from starting with the same word.
TIP: There is no Composition preference to show at a glance where No Break has been applied. It would be useful to have a check box like those for Custom Kerning/Tracking and H&J Violations, to highlight all the No Breaks in a document. Until that feature arrives, if you’ve applied No Break as a character style, you can temporarily redefine the style to include an underline. That way, you can easily spot all instances of No Break.
Some designers prefer to use a nonbreaking space (Type > Insert White Space, or Cmd+Option+X/Cmd+Alt+X), which inserts a nonprinting character into the text, making it easier to spot when editing text at a later date. For me, No Break has the edge over nonbreaking spaces and discretionary hyphens because it can be incorporated into a character style and, by extension, can be applied automatically as a GREP style to proper nouns, product names, text strings, and so on, that you never want broken across a line.
Here’s how:
Make a No Break character style: From the Character Styles panel menu choose New Character Style, name it “No Break,” and in Basic Character Formats select No Break.
Define the GREP style for the paragraph style where you want No Break applied. Right-click the style name in the Paragraph Styles panel and choose Edit. From the list on the left, choose GREP Style.
Click the New GREP Style button. From the Apply Style drop-down menu, select the No Break character style and click to the right of the To Text field, then type the name or text string you want to prevent from breaking across a line. To apply No Break to multiple text strings, separate each one with a vertical pipe ( | ).
Don’t be overzealous with your application of No Break. Apply it too much and you’ll create more problems than you solve. With fewer places to break the line, you might end up with an outbreak of bad word spacing or overset text.
Balance Ragged Lines
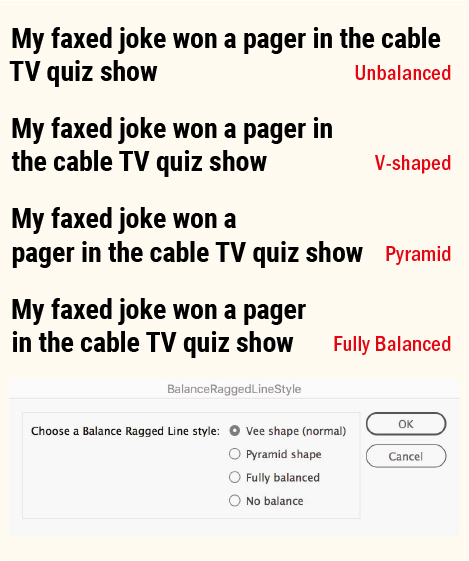
This easy-to-apply feature is a checkbox in the Indents and Spacing dialog of Paragraph Style Options, and, for applying locally, it can be found on the Control panel menu. It will attempt to give you lines of equal length; more than 50 percent of the time it does a good job; for the rest, you’ll need to manually break the lines for sense. Balance Ragged Lines works only on text that has the Paragraph Composer applied.
What’s not obvious is that Balance Ragged Lines, by default, favors a V shape for the text, with a longer first line and a shorter second line. There’s a free script by InDesign guru Keith Gilbert that you can use to favor a shorter first line and a longer second line, or to try to make all lines the same length. You can download the script from www.gilbertconsulting.com/resources-scripts.html.
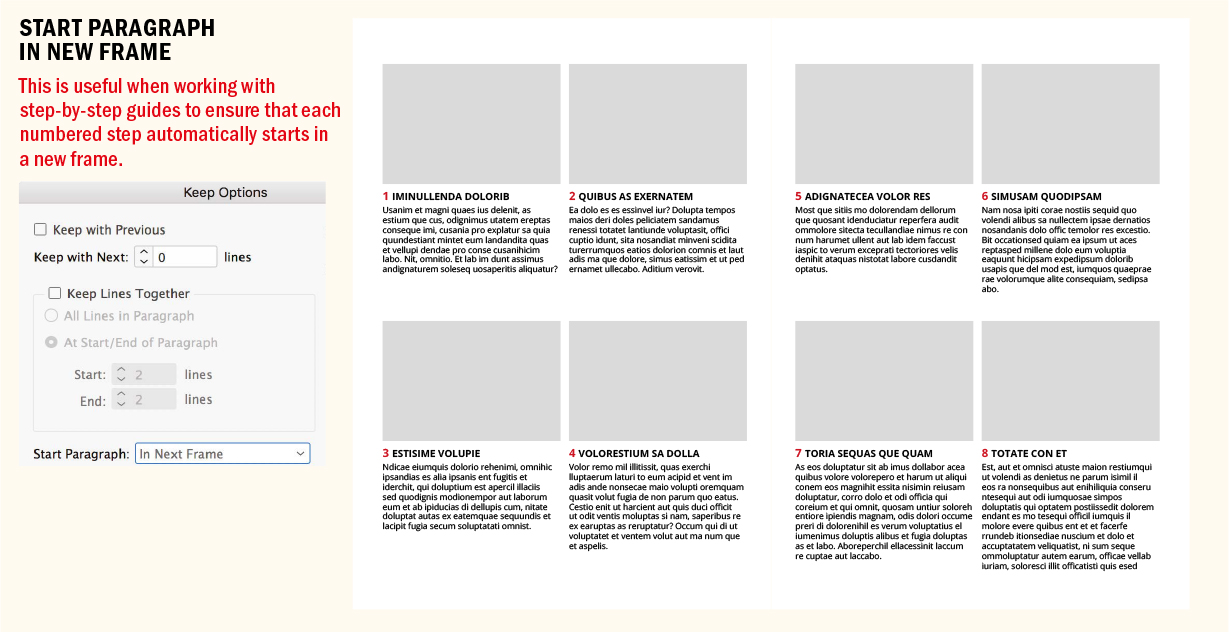
Keep Options
As well as keeping related paragraphs together in a way that makes sense, Keep Options also control how a paragraph flows between text frames. When incorporated into paragraph style definitions they can make light work of long, complex documents, preventing widows and orphans and ensuring that headlines and the text that follows them are inseparable. On the other hand, they can also be confusing if you are working with a document you didn’t create and don’t know why your text seemingly has a will of its own, jumping from one frame to the next. So you need to know how to control Keep Options, or they might end up controlling you.
Keep with Previous attaches the first line of the selected paragraph with the last line of the previous paragraph. Applying Keep with Previous to body text will carry a head at the bottom of a column or page over to the next column or page so that it stays with the body text.
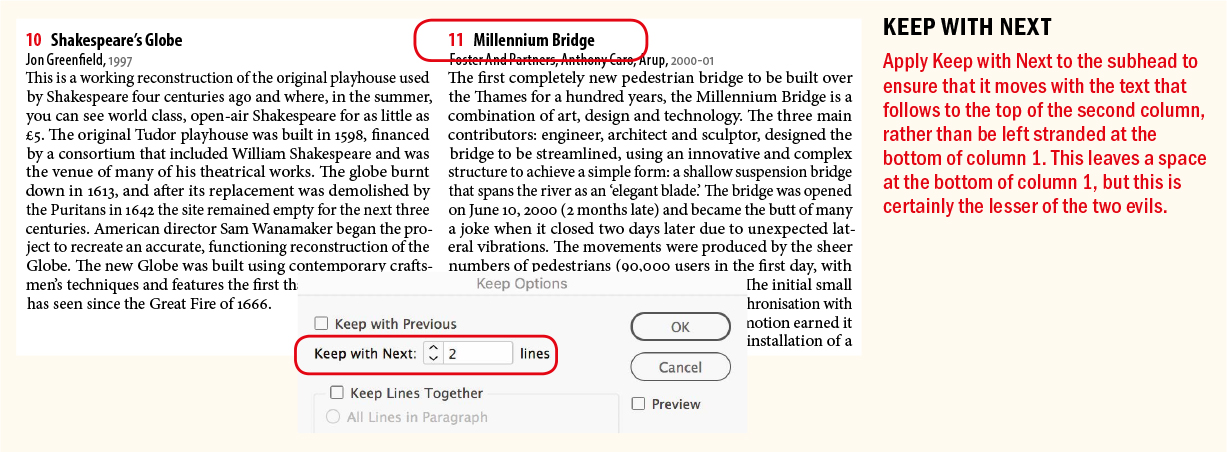
Keep with Next can also be used to ensure that heads and subheads aren’t separated from the body text that follows them. You can specify how many lines of the following paragraph must be kept with the head or subhead.
With Keep Lines Together, you can make sure all the lines of a paragraph move together or that a specified number of lines move together at the beginning of the paragraph, the end of the paragraph, or both. This prevents widows and orphans, as discussed in Chapter 6. Inevitably this results in columns of varying depths, so it’s not a viable solution if you’re working with multiple columns that should extend to the bottom margin.
The Start Paragraph options ensure that certain top-level paragraphs always begin on a new page or in a new column or frame. These are especially useful for chapter or section heads.
Obviously, your paragraphs must break somewhere. Asking the impossible by setting too many Keep Options results in keep violations or — more likely — in overset text. Like H&J violations and custom tracking/kerning, keep violations can be seen by turning on the Composition preference (Preferences > Composition). The highlight color is bright yellow, but it’s rare to see it because InDesign will more likely honor your settings, no matter how unreasonable, and overset your text frames.
▄
Determining when and how your text breaks and when and how it should be kept together is about making aesthetic decisions informed by common sense and pragmatism. As always, use a light touch, be consistent, and automate where possible, but don’t rely on InDesign (or any software) to always get it right. The buck stops with you, so be prepared to intervene manually where necessary.