Chapter 15
Styles
Styles have been around since the dawn of desktop publishing, continually evolving in their ease of use and range of capabilities. A bedrock feature of any page layout program, styles enable better design and a more efficient workflow. No matter how good your conceptual grasp of typography, it won’t amount to much unless you apply type formatting consistently and efficiently using styles.
Defining Our Terms
Paragraph and character styles are collections of attributes that can be applied to text with a single click or keystroke. Paragraph styles can incorporate both character and paragraph formats — font, font size, alignment, paragraph spacing, color, you name it. Character styles can incorporate character formats only. As the name suggests, paragraph styles are applied to whole paragraphs; character styles are applied to a selected range of text within a paragraph.
Object styles are applied to frames — text frames or picture frames — and include such attributes as fill color, stroke color and weight, text frame options, picture fitting options, and many more.
Table and cell styles are applied to tables. Table styles cover the attributes of the overall table, such as whether it has a border or uses row or column strokes. Cell styles refer to the attributes of the individual cells — like text insets — that make up a table.
Things get more complicated when you nest character styles within paragraph styles, which in turn can be incorporated into object styles. Add into the mix GREP styles (which automatically apply character styles to predefined ranges of text within paragraph styles) and sequential styles (which let you apply styles to a cascade of paragraphs), and the possibilities are mind-boggling.
Collectively, I will refer to the paragraph, character, and object styles in a document as a style sheet.
Why Use Styles?
The difference between using styles and not using styles is the difference between you controlling InDesign and InDesign controlling you. Here are some reasons to use styles:
Styles ensure consistency in formatting throughout a document, allowing readers to find with ease the section or subsection they wish to read.
Styles enable you to easily change the formatting of your entire document, no matter how large or complex, by changing your style definitions.
Styles save you hours and hours of drudgery.
Despite these irrefutable facts, many designers either underutilize styles or avoid them altogether. I’m frequently amazed by the number of designers — many of whom should know better — who don’t use styles or who use them in a half-assed way. What’s up with you people? Do you like the grind of repetitive work? Are you masochists?
I’ve had designers tell me “I don’t like to use styles because I like to experiment with different designs” or “I don’t want my pages to all look the same.” These are exactly the reasons you should use styles. Far from stifling creativity, styles enhance it by making experimentation quick and easy. And just because your style names may be the same or similar from one document to the next doesn’t mean the style definitions can’t be completely different.
Creating Paragraph Styles
Time spent creating style sheets is an investment that will repay you many times over throughout the lifespan of a publication. You can set up your styles at the beginning of the design process or add and edit your styles as your document evolves. If you’re like me, a style sheet is never finished but is always being refined and improved.
[Basic Paragraph]
By default, the [Basic Paragraph] style is applied to text you type. You can’t rename or delete this style, but you can edit it: Ctrl-click (right-click) the style name and choose Edit to bring up the Paragraph Style Options, where you can change its properties. Alternatively, you can designate a different style to be the default: simply choose that style when you have no text or text frame selected. The best advice I can give about [Basic Paragraph] is to ignore it. This is because if you’re copying and pasting text between documents that have different definitions of [Basic Paragraph] you can get some nasty surprises.
Another special class of style is [No Paragraph Style]. Sometimes for the sake of expediency you will format text locally and want this text to remain independent of any changes to its style definition. To do so, choose Break Link to Style from the Paragraph Styles panel menu. Thereafter, (No Styles) appears at the top of the Paragraph Styles panel when the text is selected.
Creating the Style “Blind”
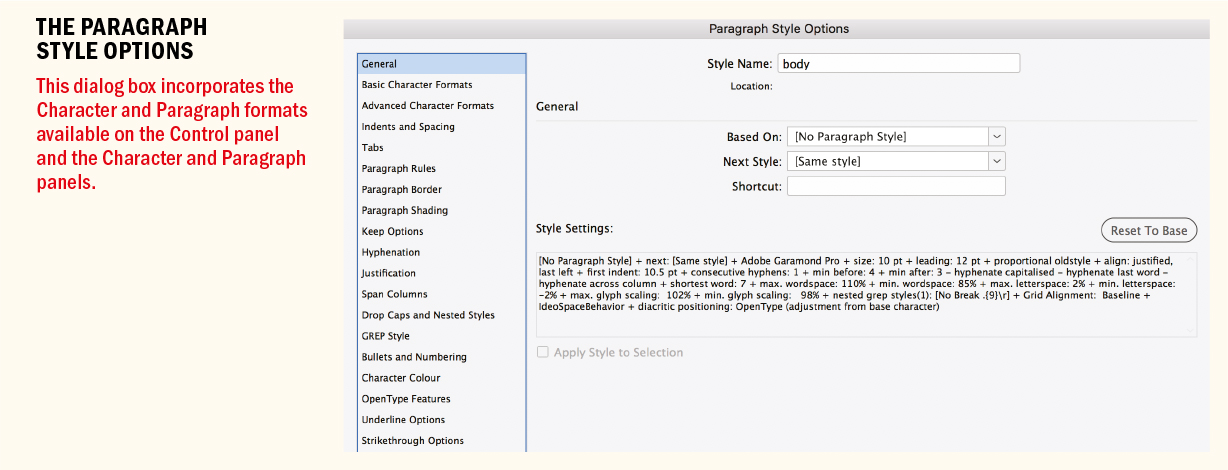
Using the Paragraph Style Options dialog, you can create as many styles as you need without having a single character on your page. With experience, you can visualize what a style will look like without needing to see it realized on your page, which makes setting up a style sheet much faster.
Basing Styles on a Parent Style
In this example head 3 is based on head2, head2 on head1. This means you can edit the parent style and cause all the styles based upon it to change.
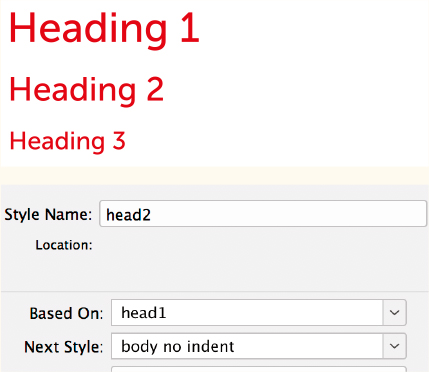
Basing styles on other styles is a beautiful thing when you’re fully aware of what you’re doing; when used unintentionally, the Based On feature might leave you scratching your head about why your styles seemingly have a mind of their own. If you don’t want your new style based on anything, choose [No Paragraph Style] from the Based On pop-up menu.
Basing Styles on Other Styles
Hierarchy is a big concept in typography. Hierarchy gives a document structure and aids effective communication by clearly signaling to the reader what is most important. The Based On option helps establish hierarchy in your styles. Typically, though not exclusively, hierarchy is established through size. Take a simple example: your headings and subheadings will probably use the same font — Head1 will be bigger than Head2, which in turn will be bigger than Head3.
By basing one style on another, you create more than just a visual link between the styles; when you edit the base, or “parent,” style, the attributes that it shares with its “offspring” styles also change. This lets you effect changes across a range of styles with a single edit to the parent style. For example, if you want to switch the font of your heads from Helvetica to Univers, change Head1 (the parent style) and all the styles that are based on it will change too (except for attributes like the font size, which are unique to the individual styles).
To create related styles and establish hierarchy using the Based On option:
Adjust the Character and Paragraph settings on the Control panel to format the paragraph the way you want it to look.
With your cursor in the newly styled paragraph, open the Paragraph Styles panel and choose New Paragraph Style from the menu. The Style Settings window will reflect your choices. (If you don’t want the local formatting, click the Reset to Base button.)
Name the style and (optionally) specify a shortcut keystroke. If you want to add additional formatting, click the attributes list on the left and specify the options you want to add to your style. To apply your new style to the text you are basing the style on, select Apply Style to Selection. With Preview selected, you can see your formatting changes added to the selected paragraph.
Click OK.
Applying Styles
When you select text, the style applied to that text is highlighted in the Paragraph Styles panel, the Character Styles panel, or both. If you select a range of text covering multiple styles, no style is highlighted — (Mixed) appears at the top of the panel.
To apply a paragraph style, place your type cursor anywhere inside the paragraph — there’s no need to select the whole paragraph — and then click the style name in the Paragraph Styles panel. To apply a paragraph style to more than one contiguous paragraph, drag your cursor through those paragraphs. Again, you don’t need to select the whole paragraph; you just need to make contact with at least one character of each paragraph.
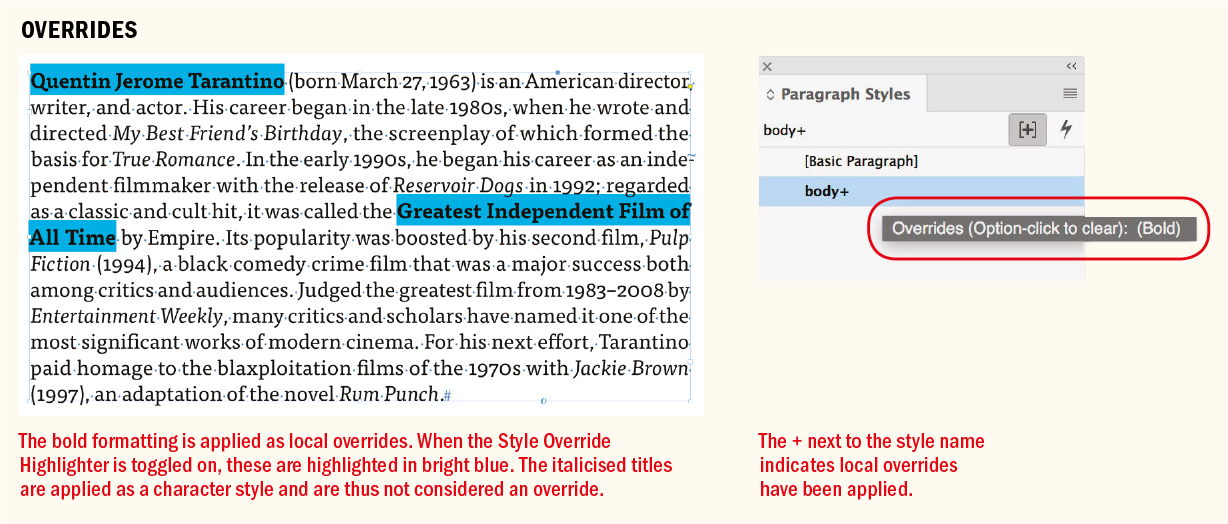
Applying a paragraph style doesn’t remove any existing character formatting when a character style has been applied to any text in that paragraph — unless you clear any overrides (see the “Clearing Overrides” section). When you apply a style, if the text has additional formatting that’s not part of the style definition, a plus sign (+) appears next to the style name in the Paragraph Styles panel.
Assign a keyboard shortcut to your styles and you’ll be able to apply them even faster. Shortcuts must be a combination of Shift, Option/Alt, and Cmd/Ctrl and a keypad number. Letters and non-keypad numbers will not work, nor will function keys, so if you’re working on a laptop, the key combinations are unwieldy.
For text-heavy documents, it may be quicker to apply styles in the Story Editor (with or without shortcuts) simply because you can scroll through long passages of text faster than in Layout view.
Quick Apply
When you have many styles, you often need to scroll through long lists and manage multiple panels to get to the one you’re after. To speed things up, use Quick Apply to find a style by typing the first few characters of its name. Here’s how:
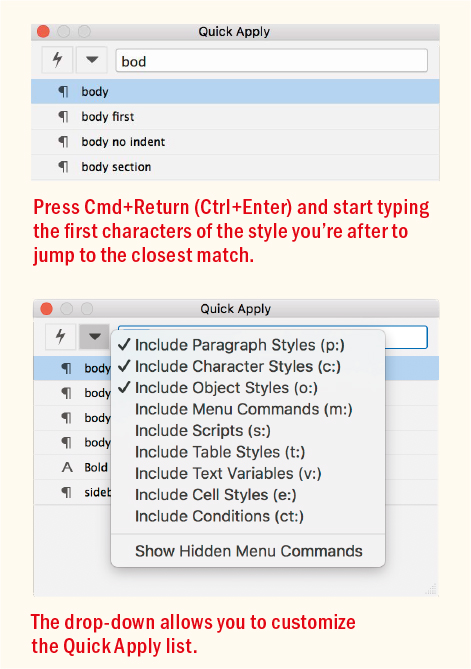
Select the text or frame to which you want to apply the style, and press Cmd+Return (Ctrl+Enter) to bring up the Quick Apply list.
Start typing the name of the style. InDesign takes you to the closest match.
Use the Up Arrow and Down Arrow keys on the keyboard to move through the list.
Press Return/Enter to apply the style.
Quick Apply remembers the style you just used and returns to its name in the list of styles when you return to the Quick Apply panel.
Clearing Overrides
When you add formatting to text that already has a paragraph or character style applied, you override the style definition. To put it another way: you’ve defined a paragraph style, applied it to a piece of text, and then contradicted your style definition by adding additional formatting. You can identify text with overrides by the plus sign (+) next to the style name. You can also choose Toggle Style Override Highlighter from the Paragraph Styles panel menu to highlight, in cyan, where overrides have been applied. Hover the cursor over the style name in the Paragraph Styles panel and a tool tip pops up with details of the local formatting.
Maybe this local formatting is what you want; maybe it’s not. Maybe you’ve inherited the document from someone else — someone who hasn’t used styles as effectively as you would like — and you want to clear the overrides.
There are several ways to approach this:
To clear local formatting but retain any character styles applied to the paragraph, Option/Alt-click the style name in the Paragraph Styles panel. Alternatively, click the Clear Overrides button in the Control panel.
To remove only the local character formatting (retaining any local paragraph formatting), Cmd/Ctrl-click the Overrides button (the Paragraph icon) at the bottom of the Paragraph Styles panel.
To remove only the local paragraph formatting (retaining the character formatting), Cmd+Shift-click (Ctrl+Shift-click) the Clear Overrides button.
To clear all local formatting and character styles, Option+Shift-click (Alt+Shift-click) the style name in the Paragraph Styles panel.
To clear overrides while using Quick Apply, press Cmd+Return (Ctrl+Enter) and then press Option/Alt as you click the style name.
Editing and Adapting Styles
The beauty of styles is that you can change their definitions at any time. Changing a style definition means that all text formatted with that style changes. This has been a staple feature of page layout programs since the Stone Age.
Styles allow unprecedented flexibility in experimenting with the appearance of your document. A few simple clicks and you can totally transform the appearance of your pages. It’s a beautiful thing.
The safest way to edit a style is to Ctrl-click (right-click) the style name in the appropriate Styles panel and choose Edit from the menu. This is preferable to double-clicking the style, which also works but risks inadvertently applying the style.
Once you’re in the Styles Options dialog box, make as many or as few changes as you want, click OK, and Bob’s your uncle.
Redefining Styles
InDesign is flexible about how you manage your styles. As an alternative to editing styles, you can redefine them. If you apply local overrides to a paragraph and then decide that’s actually how you want the style to look, you can incorporate those overrides into the style definition. When your cursor is in text with local overrides, open Paragraph Styles, Ctrl-click (right-click) the style name, and choose Redefine Style from the menu. The same approach works for redefining character styles. If you’d prefer, use these shortcuts: to redefine a paragraph style, press Cmd+Option+ Shift+R (Ctrl+Alt+Shift+R); to redefine a character style, press Cmd+Option+Shift+C (Ctrl+Alt+Shift+C).
Loading Styles from Another Document
Every publication, be it the National Enquirer or the New York Times, whether it be destined for print or screen, follows a similar structure: heads of different levels of hierarchy, subheads, captions, callouts or pull quotes, and several closely related variants of body text. When you set up styles, it’s important to establish the relationship between them — that is, which styles are based on (and thus inherit their properties from) other styles. Once the relationships have been established, changes to a “parent” style will affect all other styles based on it. With such a style sheet, you can effect a dramatic transformation in the appearance of the document with just a few moves.
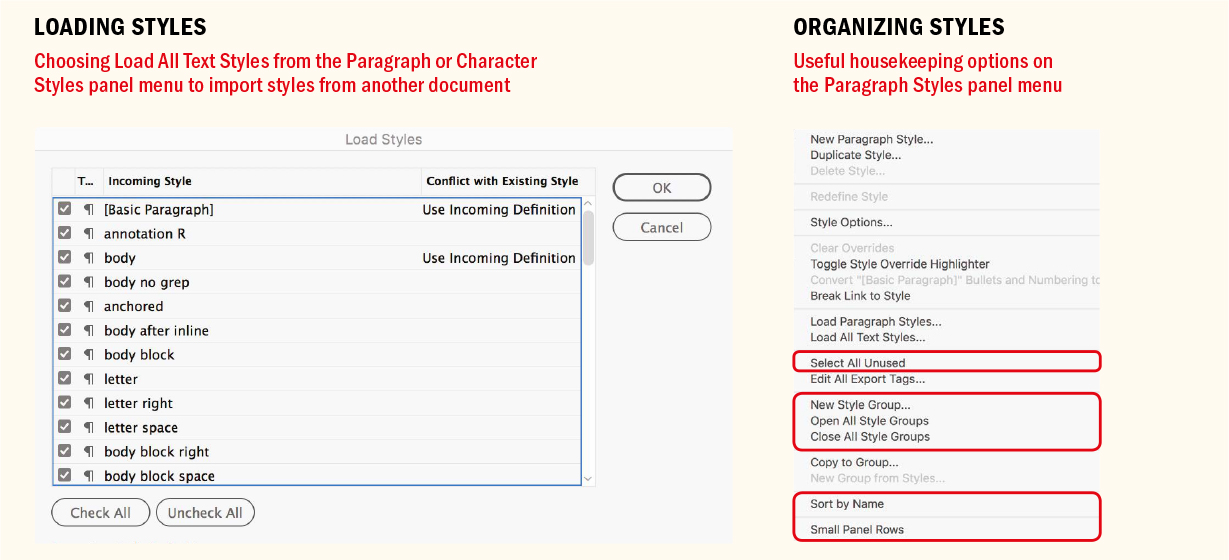
You can reuse and repurpose styles from one document in any other document. The same is also true of master pages and color swatches. Choose Load Paragraph Styles (or Load All Text Styles if you also want character styles), navigate to the document containing the styles you wish to import, and then click Open. You can import all styles or specific styles and determine how to deal with any style-name conflicts: if the style name is the same in both documents, you can use the incoming style definition or rename the incoming style, which will have “copy” appended to its style name. (You can later rename it if you wish.)
Loading Styles from a CC Library
Every time you create a style, you can select the Add to CC Library check box in the bottom left of the Paragraph Style Options. Frankly, this is annoying when you forget that you have the box selected and feels like Adobe pushing their new(ish) CC Library feature down your throat. More useful, however, is the ability to add a group of selected styles to your current CC Library by clicking the cloud icon at the bottom left of the Paragraph Styles panel (the same option exists for other styles). To add these styles to another document, select them in the CC Library panel, Ctrl-click (right-click), and choose Add to Paragraph Styles.
Organizing Styles
A well-organized style sheet is a boon to productivity. Here are some tips and personal preferences.
NOTE: Be precise when naming your styles, or you may end up with two versions of a style and no idea which is the real one. Style names are case-sensitive; for example, Body Text and body text are two distinct styles.
Naming: Keep in mind that you might revisit a document months or even years from now, so you’ll want a style-naming strategy that’s transparent. Alternatively, you may need to hand over your document to someone else to finish. So that you don’t have to waste time explaining why you named your styles after your favorite Radiohead songs, keep them logical and follow established conventions: body, head, subhead, caption, and so on. Rather than have the style names describe their formats — for example, “Helvetica 18 pt Bold” — it is preferable to have them describe their function: say, “Head2.” That way, you won’t have to rename the styles when you want to change from Helvetica.
Sorting: When you choose Sort by Name from the Paragraph Styles, Character Styles, or Object Styles panel menus, InDesign lists your styles in alphanumeric order. For this reason, you might consider putting a two-digit identifier — such as 01_head for a first-level head — in front of your most commonly used styles to force them to the top of the panel. Unfortunately, this option is not “sticky.” New styles won’t be sorted alphanumerically, so you may find yourself having to periodically revisit this option.
Style Groups: These folders on the Styles panels allow you to group related styles together. This visually reinforces the relationship between those styles but also allows you to more easily manage long lists of styles by hiding and disclosing the contents of the style groups as necessary. To create a style group, click the Style Group icon at the bottom of the style panel, name the group, and then drag the styles into the folder. Alternatively, Shift-click to select the styles you want to group together (Cmd-click/Ctrl-click to make a noncontiguous selection), then choose New Group from Styles from the panel menu to move your selection to a new folder.

As well as their housekeeping role, style groups also help avoid style conflicts when copying text from one document to another. When you copy text from one document to another, the style definitions in the destination document take precedence. For example, if you copy text in the “body” style to another document where there’s already a “body” style with a different definition, you’re in for a nasty shock.
To prevent this, in the source document, move the styles into a style group. Do this not just for the paragraph styles but also for the character, object, table, and cell styles. For example, the figures for this book were prepared in a separate document using many paragraph styles, some of which conflicted with the style names in the main chapter documents. To avoid conflicts, the styles in the figures document were moved into a style group named Figures. This had the added benefit of keeping these styles separate from the styles used for the running text.
The Mother of All Styles: The Book Feature
InDesign’s Book feature lets you apply one set of styles to a group of documents. Choose File > New > Book to open the Book panel. Add documents to the book by clicking the Add button or by dragging files (or even folders of files) into the panel. Use the Up Arrow and Down Arrow keys to change the order of the documents. Once the book is set up, you can synchronize the styles and color swatches in your “booked” documents all at once or one at a time. The Book feature also provides a fast way to add the styles from one document to a group of others.
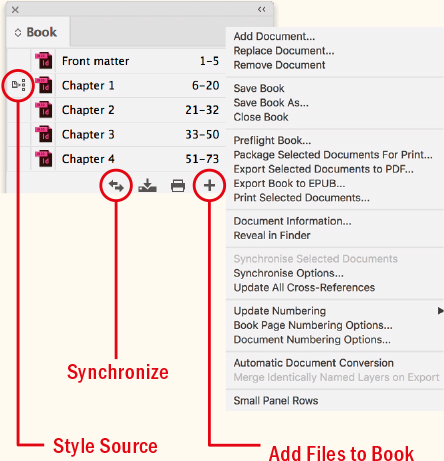
Specify a style source, or “master” document, by clicking in the leftmost column of the Book panel, and then synchronize the documents in the book. Styles and swatches are copied from the style source to all the documents in the book, replacing any that have identical names.
You can synchronize the book while its documents are closed. InDesign opens the closed documents, makes any changes, and then saves and closes the documents. Documents that are open when you synchronize are changed but not saved. To synchronize selected documents, Cmd-click (Ctrl-click) the document icons (or Shift-click for a contiguous selection). If no documents are selected, the whole book will be synchronized. Synchronizing documents adds styles and changes the definition of styles with the same names as those in the style source; it does not remove styles from book documents.
Whether or not you choose to use the Book feature depends upon the kind of documents you are creating, whether you’re working solo or as part of a team, and your personal preference. If you’re the only designer working on the project, unless the InDesign document is hundreds of pages in length and contains many graphics I would keep it as one document. If you’re working as part of a team, the benefit of the Book feature is that you can split the project into bite-sized chunks, and different people can work on the different parts simultaneously.
Small Panel Rows: This option is accessed through the flyout menu and is useful if you have many styles (and very good eyesight) and want to see more of them on the Styles panel without scrolling.
Select All Unused: Throughout the lifecycle of a project you may end up with several unwanted styles. Leaving these around is apt to create confusion — either for you or for anyone else working on the document. You can delete them on a case-by-case basis, but it’s quicker to choose Select All Unused from the menu in any of the Styles panels and then click the Delete icon at the bottom of the panel.
In web design, CSS (Cascading Style Sheets) is based on the model originally developed for desktop publishing applications. If you’re coming to InDesign from a web design background, a key difference you’ll find between InDesign styles and CSS is that InDesign doesn’t allow multiple paragraph styles to be applied to a single paragraph. To achieve the same result, you can apply a character style in addition to the paragraph style. Attributes specified in the character style overwrite those attributes in the paragraph style. As in CSS, any item can be overwritten manually. For example, you can apply a paragraph style with a font size of 10 points but manually change this size at any time.
Character Styles
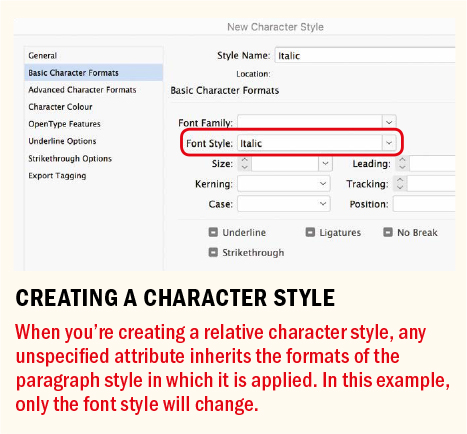
Character styles are for applying formats to specific ranges of text within paragraphs. Rather than apply a character style to an entire paragraph (that’s what paragraph styles are for), apply it to selected words, phrases, or titles. Character styles are for the exceptions to the formatting — for example, italics for emphasis. They work best when they are simple. With character styles, it’s most often the font style (italic, bold, and so on) that varies; it’s usually not necessary or desirable to specify the font, leading, size, and other formats, because these attributes are inherited from the paragraph style. Not specifying a font for the character style means that the same character style can be applied within multiple paragraph styles. It will change the selected range of text relative to the paragraph style formats.
A common usage of character styles is to give emphasis. Here’s how to create an italic character style:
Open the Character Styles panel and select New Character Style from the menu.
Name the new style and click Basic Character Formats to open the Character Style Options dialog box.
Type Italic for Font Style, but leave the other attribute fields blank.
NOTE: Unfortunately, not everyone received the memo about not applying character styles to whole paragraphs. If you haven’t already, at some point you’ll inherit an InDesign document in which the user has mistakenly used character styles instead of paragraph styles. When this time comes, roll up your sleeves and use Find/Change to search for specific character formats and convert them to paragraph styles. Once you’ve done that, you can remove the overrides from the paragraph styles and delete the character styles. Here’s a link to a useful article by Anne-Marie Concepcion on InDesignSecrets.com that addresses the issue: indesignsecrets.com/convert-character-styled-text-to-paragraph-styled-text.php.
When you apply this character style to text within a paragraph styled in Garamond 10 pt, it becomes Garamond Italic 10 pt; apply it to another paragraph style that is Caslon 11 pt, and it will be Caslon Italic 11 pt. If, however, you want your emphasis to always be Centaur Italic 10 pt, then make sure you include all these attributes in the Character Style Options. Unlike paragraph styles, character styles replace local formatting. Because you can’t apply two character styles to the same text, as soon as you apply a new character style, the old one is removed.
There is sometimes a flaw in this otherwise logical method, and that is when using a typeface that deviates from standard naming conventions. For example, if you create an italic character style, as outlined above, and apply it to body text in Tisa Pro, you will end up with the pink highlight that indicates a missing font. This is because the italic style in Tisa Pro is called “Regular Italic” rather than Italic. In such a case, you would need to specify the font style of the character style explicitly as Regular Italic. Hopefully one day, InDesign will offer fallback choices when the font style you’re requesting is not found.
Creating Default Styles
Because you tend to use the same styles for most projects, it saves time to create a set of default styles that are available in every new InDesign document. As well as the above list of paragraph styles, my default set also includes character styles for bold and italic, as well as styles that take advantage of OpenType features like superior and inferior, small caps, and fractions. I’ll also include a “No break” character style that can be applied to a phrase or product name that I don’t want separated by a line break.
To use these styles as your default styles, create them with no InDesign document open. Any preferences you set — as well as any styles you make (or load) — when there is no active document will become the defaults for every document you create thereafter. With a set of default styles, you’re ready to hit the ground running every time you start a project. Just because the names are the same doesn’t mean the styles have to look the same. How they look is entirely up to you. What’s important is the hierarchy of the styles.
Alternatively, create a CC Library to hold the styles. In the document containing the styles, select the styles on the Paragraph Styles panel and click the cloud icon at bottom left to add them to your current library. To add these styles to another document, Control/right-click their selected thumbnails in the CC Libraries panel and choose Add to Paragraph Styles Panel.
Importing Styles from a Microsoft Word Document
When you place a Word or RTF document in InDesign, the Word styles are added to your Paragraph Styles panel — and distinguished with a disk icon. This is nothing to worry about. As soon you make a change to the style definition, the icon disappears. If a Word style has the same name as the InDesign style, InDesign’s style takes precedence and the style is considered a “native style” from the outset.
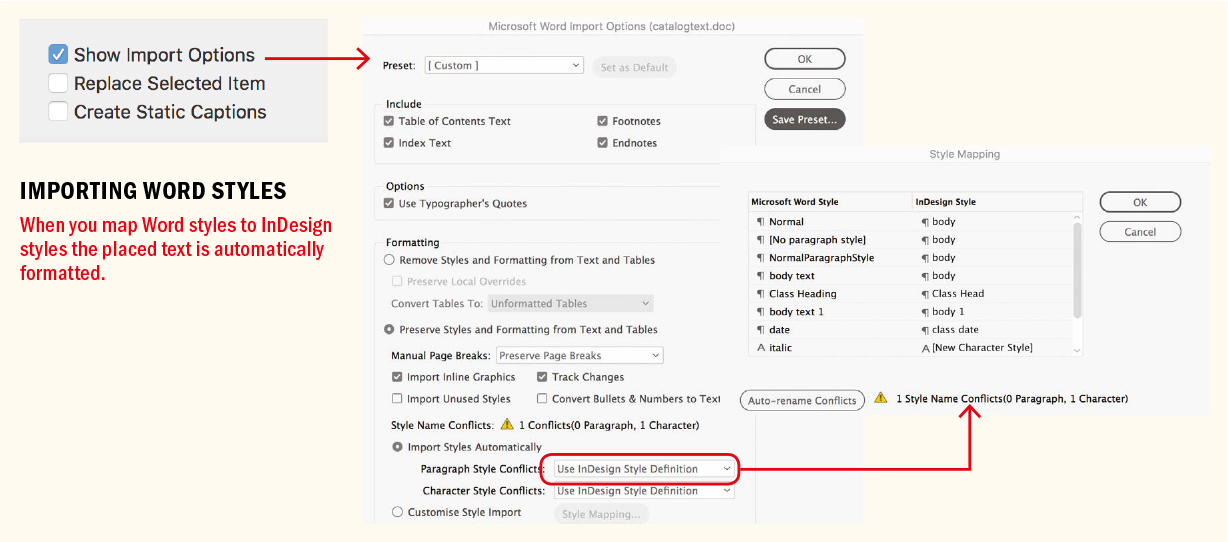
You can choose to preserve or remove the styles and formatting in a Word or RTF document by selecting Show Import Options in the Place dialog box. The most appropriate choice depends on the quality of the formatting in the Word document. If the Word operator has done a good job, there’s no reason to duplicate their efforts. On the other hand, if there’s so much dodgy formatting that it’s causing you to have murderous thoughts, opt to remove everything and start with a blank slate. A less drastic approach would be to remove styles and formatting but preserve local overrides — that way, you can convert these to character styles.
As a best-case scenario, select Customize Style Import in Microsoft Word Import Options and choose Style Mapping to map incoming Word styles to styles in the InDesign document. If the Word styling has been implemented logically and consistently, it’s merely a question of going through the list of styles and deciding what gets mapped to what. When you click OK to place the document, it immediately takes on the appropriate formatting and you get to leave work early. Even better, if the names of the Word styles are identical to the InDesign styles, then the InDesign styles take precedence and you don’t need to worry about mapping styles.
Preserving Character Styling in an Imported Microsoft Word Document
Microsoft Word documents commonly contain much egregious formatting that you’ll want to zap immediately before you start designing your layout. The problem is, along with all the rubbish, there may be some useful information — typically text with emphasis — that you want to preserve. So before you apply styles and clear overrides, you may need to convert local formatting to character styles.
TIP: Power Styles, part of the Blatner Tools suite, is a plug-in from DTP Tools (dtptools.com) that helps you manage documents designed without a consistent use of styles. You can create styles with a generic name based on the document’s local formatting. This makes identifying the document’s structure easier. All you have to do is consolidate and rename the styles to fit your naming convention.
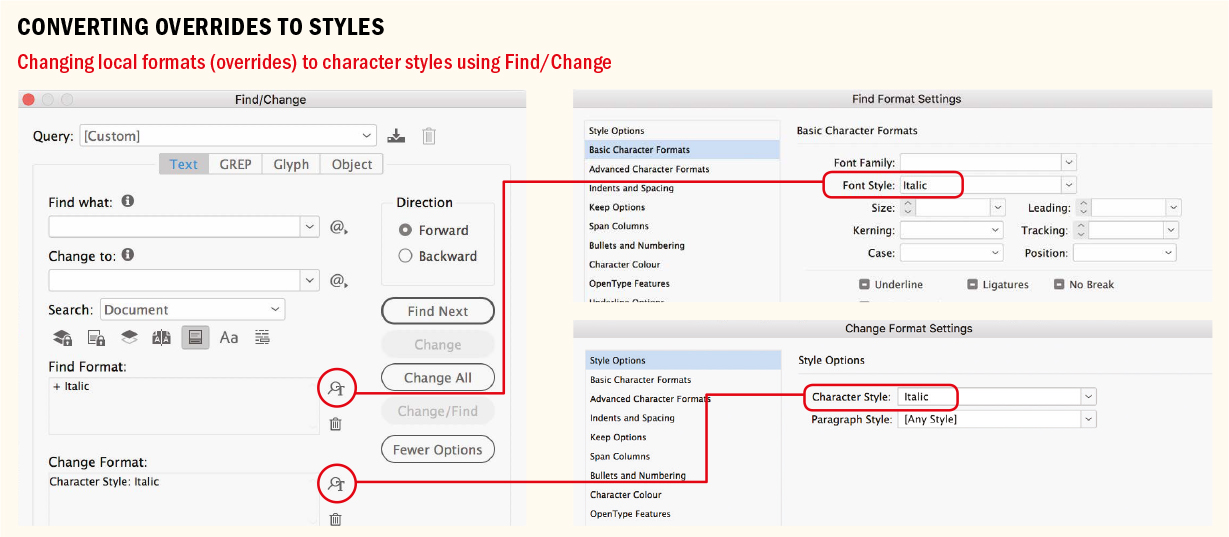
For example, let’s say you need to preserve the italicizing in an imported document:
Go to Find/Change and enter Italic in the Find Format field.
In the Change Format field, click the magnifying glass to the right and select your italic-only character style (if you don’t have one, open the Character Style pop-up menu to create a new one).
Click Change All.
Now all the italic text is isolated as a character style. You can press Cmd+A (Ctrl+A) and Ctrl-click (right-click) to select the Clear All Overrides option. This wipes out the unnecessary formatting but keeps the italics, which are now in a character style and immune to Clear Overrides. What’s more, you can now control the appearance of your emphasis text — say, for example, you wanted to use boldface instead of italic — by editing its character style definition. It’s the difference between making one change and having to make many.
Using the Eyedropper to Apply Styles
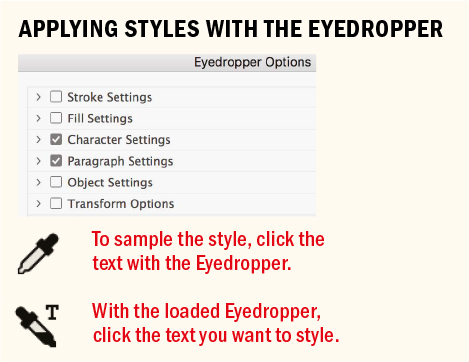
The Eyedropper lets you sample the character and paragraph styles from one piece of text and apply them elsewhere. Choose the Eyedropper tool and click the paragraph containing the style you want to sample. With the Eyedropper now “loaded,” click the paragraph you want to format. If you’re using the Eyedropper to apply character styles, drag to select a range of text. The Eyedropper remains “loaded” so you can apply the style multiple times.
You can set the Eyedropper behavior by double-clicking the tool and specifying which settings to include. If you’re concentrating on text formatting, turn off all options apart from Character Settings and Paragraph Settings.
Object Styles
Object styles take the concept of paragraph and character styles and apply it to frames as well as to lines and pen paths. Object styles can incorporate such attributes as fill color, stroke weight, stroke color, the number of columns in the frame, drop shadow, and the size and position of a frame. You can also specify the Frame Fitting Options, which make object styles massively time saving when incorporating images into your layout.
Formatting Callout Boxes
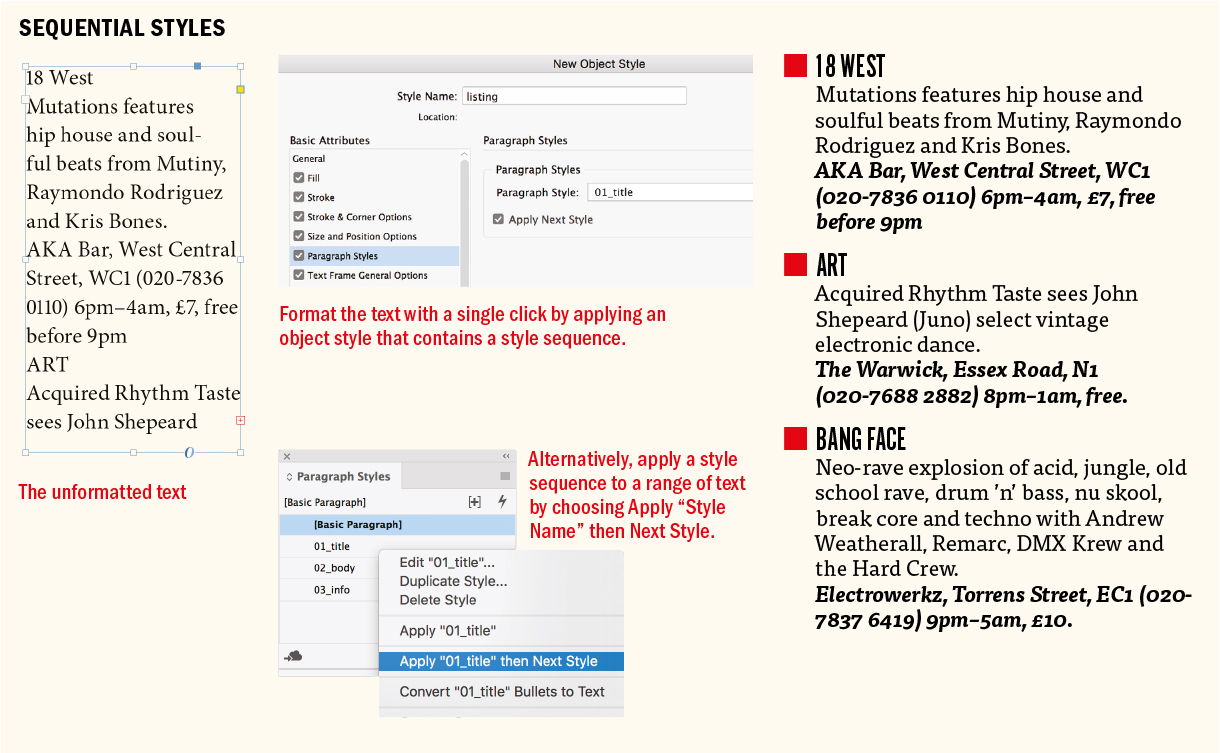
You can specify, as part of an object style, a paragraph style to be applied to the text content, allowing you to apply frame and text attributes with a single click. This makes object styles useful for formatting single-paragraph stories, like captions or photo credits.
Taking automation to the next level, if you include the Apply Next Style option, the application of an object style can trigger a style sequence. This can be useful in a number of instances.
For example, let’s say you’re designing a journal where all the articles follow the same format: head, strapline, byline, body first, body. Start by setting up the Next Style specifications for each of these paragraph styles:
Open the Object Styles panel and choose New Object Style from the menu.
Name the new style and click Paragraph Styles in the Basic Attributes list of the Object Styles panel.
Choose the head style from the menu and select the Apply Next Style option.
Now when you apply this object style to a frame, you format multiple paragraphs with a single click.
Using Object Styles with Anchored Objects
If you’ve ever positioned a graphic, a caption, or a pull quote next to its associated story only to have to reposition it when the story is edited, you’ll appreciate anchored objects and inline graphics.
Inline graphics are a subset of anchored graphics and have been around for years. If you want a graphic inserted into the text flow, cut it to the Clipboard, insert your cursor into the frame where you want the graphic to go (usually on a separate line), then paste it. Alternatively, hold Shift and drag from the blue square in the top corner to where you want the graphic positioned. Thereafter the graphic moves with the text, remaining relative to its position in the text flow. This has always been a necessary approach when it’s important that the graphic keep pace with the text flow. For example, if the text says, “see image below,” you’d better be certain that the image stays below and doesn’t get left behind when the text is edited. Because ebooks require that your text and graphics be in a continuous flow, anchored objects are essential when preparing documents for EPUB export.
Custom anchored objects take this approach a step further by allowing you to position a graphic relative to a portion of text, as well as potentially outside the text frame.
In facing-pages documents you can also position anchored objects relative to the spine so that they are outside the text frame they are anchored to — in the left margin for left pages, the right margin for right pages.
An anchored object can be a text frame, a picture frame, or any combination of grouped objects.
To convert a frame into an anchored object, position it where you want it to go, then drag the blue square in the top corner of the frame into the text to anchor it relative to that position. So that you can more easily manage your anchored graphics thereafter, drag the cursor to the start or end of a paragraph. You can also cut the object, insert your cursor into the main story, and paste the frame as an inline graphic.
Using either approach, if you need to adjust the object’s placement, Ctrl-click (right-click) the object and choose Object > Anchored Object > Options. Alternatively, Option-click (Alt-click) the anchor widget (blue square) in the top corner of the frame.
Positioning an anchored object exactly where you want it can be a bit fussy, which is why, when you get it right, you’ll want to capture the settings as an object style. Select the object, open the Object Styles panel, and choose New Object Style from the panel menu. Name the style and save it. Thereafter, you can apply the object style to other frames you want to anchor. The frames won’t snap into place immediately — but as soon as you drag them or cut and paste them into the text frame, they will be positioned correctly relative to the text frame.
Just as with paragraph and character styles, you can base one object style on another, creating a parent–child relationship so that when you change the base, or parent, style, the shared attributes of the child style also change.
Each document begins its life with the [Basic Text Frame] and [Basic Graphics Frame] object styles. By default, these styles are applied to any text or graphics frames you create. You can edit these basic styles, but you can’t delete them. To change the default text or graphics frame, choose the style from the Default Text Frame Style or Default Graphics Frame Style flyouts on the Object Styles menu, or just click the desired style with nothing selected in the layout.
Just as with text styles, you can import object styles from another document. From the Object Styles panel menu choose Load Object styles, navigate to the document containing the styles you want to import, and click Open.
Pertinent to EPUBs, you can map object styles to specific tags and classes in your CSS, the same way you can with paragraph styles and character styles. Ctrl-click (right-click) the object style and choose Edit from the context menu. At the bottom of the list of Basic Attributes are the Export Tagging options, where you choose what tag and what class the object style maps to.
Table and Cell Styles
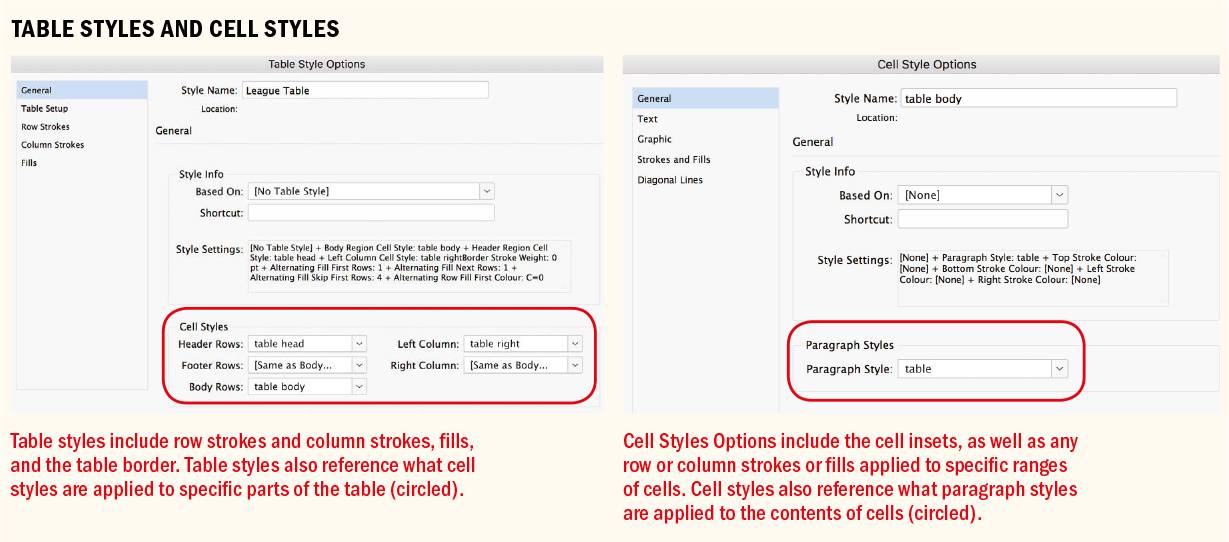
Table and cell styles continue the automated, do-it-once-reuse-it-again-and-again approach. While a boon to any sort of table-heavy document, they are not a total solution. Table styles include such attributes as table borders and row and column strokes that are applied to the whole table. Cell styles include formatting such as cell insets, paragraph styles, and strokes and fills applied to specific cells.
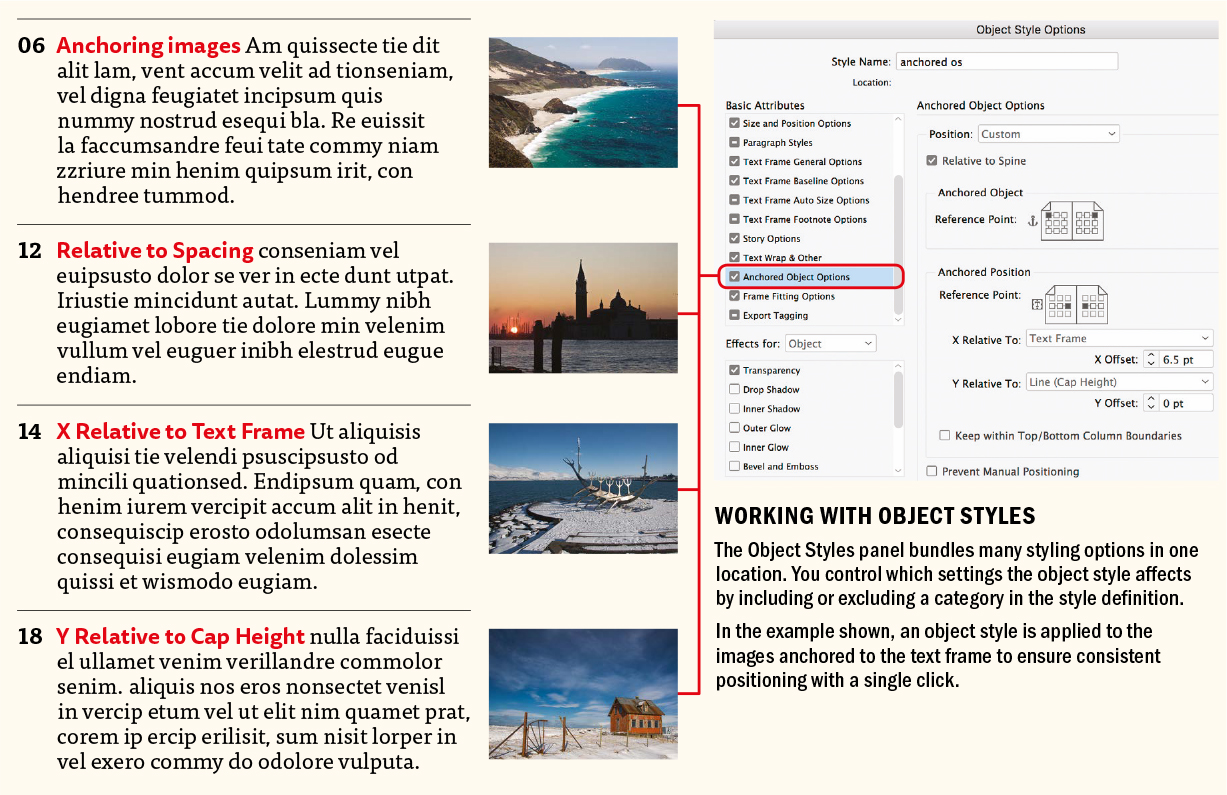
Table and cell styles have their limitations, and you might want to calibrate your expectations accordingly. Neither allows you to set the column width, the row height, or the relative width of the columns. Table styles don’t know what cells you want to merge (how could they?), nor do they specify which rows should be converted to header rows or footer rows. Therefore, once a table style is applied, you’ll still need to adjust column widths, merge appropriate cells, and convert, if required, your first and last rows to headers and footers, respectively. That said, you might be tempted to avoid them. And this is possible if you have only the occasional table to format, but if your documents contain lots of tables, you’ll be tearing your hair out without table and cell styles.
A table style is built like a Russian nesting doll. Inside a table style you can include cell styles, and inside cell styles you can include paragraph styles. For example, when you create a table style, you specify which cell styles are applied to which parts of the table: header and footer rows, left and right columns, and body rows. If you don’t specify the cell style for a particular element, InDesign assigns the default Same as Body Rows style.
Cell styles don’t necessarily include all the formatting attributes of a selected cell. When you create a cell style, you can determine which attributes are included. That way, applying the cell style changes the desired attributes only, such as the fill color, and ignores all other cell attributes.
As with other styles in InDesign, you can load table styles and cell styles from other documents, either taking all table and cell styles or cherry-picking just those that are relevant.
If you plan to convert tables to EPUB, make sure you’re using table styles and cell styles rather than local formatting, both to retain as much of the formatting as possible and to make editing of the CSS easier thereafter.
If your table is complex, consider simplifying — or linearizing — the table. This means breaking it down into bite-sized chunks that are more EPUB-friendly. If this isn’t possible, consider converting the table to a graphic using Object Export Options. Choose Keep the Size Relative to Page Width so that the table will fit regardless of the size of screen.
Features Related to Styles
Beyond the top-level items, there are a number of features that work in conjunction with — and extend the capabilities of — styles. Once your basic styles are set up, these additional options can really turbo-charge and personalize your use of styles.
Nested Styles
Nested styles allow you to embed a character style — or multiple character styles — in a paragraph style definition. These, in turn, can be incorporated into object styles. Potentially you can apply multiple formats with a single click or keyboard shortcut, eliminating hours of repetitive drudgery and freeing you up to be more creative.
TIP: When you create nested styles, you may not be the only person who uses them. To avoid other members of your team being confused by nested styles, adopt a naming convention that is transparent. For example, append “_ns” to the style names.
Maybe you’ve seen nested styles demonstrated by an InDesign pro — one click and the document’s formatted, the laundry folded, and everyone goes to the beach. In real life, it doesn’t work like that. Although it’s possible to construct amazingly powerful nested styles, what you’re not seeing is that it probably took longer to create the nested style than it would have to format the document “normally.”
Complicated nested styles are fun party tricks but can confuse people and go awry in the hands of anyone but their Dr. Fran–ken–stein. Keep it simple — especially if you’re working as part of a team. When you create styles, you may not be the only person using them. Or you may find yourself returning to documents that you created weeks, months, or even years before.
The best nested styles are those that are easy to set up and that you use frequently. Look at just about any newsstand magazine and you’ll find a host of examples of simple nested styles in action: styles that took just seconds to create and over the course of a publication’s lifetime save hours of tedium (and ensure consistency). To create a nested style, first create the character styles you will add to a paragraph style definition, and then follow these steps:
Ctrl-click (right-click) the paragraph style you want to edit.
Select Drop Caps and Nested Styles from the list on the left side of the Paragraph Style Options dialog.
Click New Nested Style and choose from your list of available character styles. (If these aren’t already set up, you can choose New Character Style to create them here.)
Character styles applied as part of a nested style remain “on” for a specified number of words, characters, or sentences, or until a “delimiter” is entered in the last field in the row. As well as choosing from the drop-down list, you can also type a specific character, such as a colon (:), in this field. Without a delimiter, the character style never gets turned off and will affect the whole paragraph.
TIP: Use a custom keyboard shortcut to insert the End Nested Style Here character. Create your own custom keyboard shortcut to quickly place this character in your text. I use Ctrl+Cmd+Option+X (on a Mac).
TIP: It’s possible to accommodate just about any kind of variation by entering multiple characters in the delimiter field of a nested style. If you enter all the possible characters that could end a sentence — .?! — InDesign uses the first one it encounters to turn off the nested style.
Choosing Through includes the character that ends the nested style, while choosing Up To formats only those characters that precede the designated character.
If you have more than one nested style, you can use the Up button or Down button to determine the order in which the formatting is applied. The formatting of the second style begins after the formatting of the first.
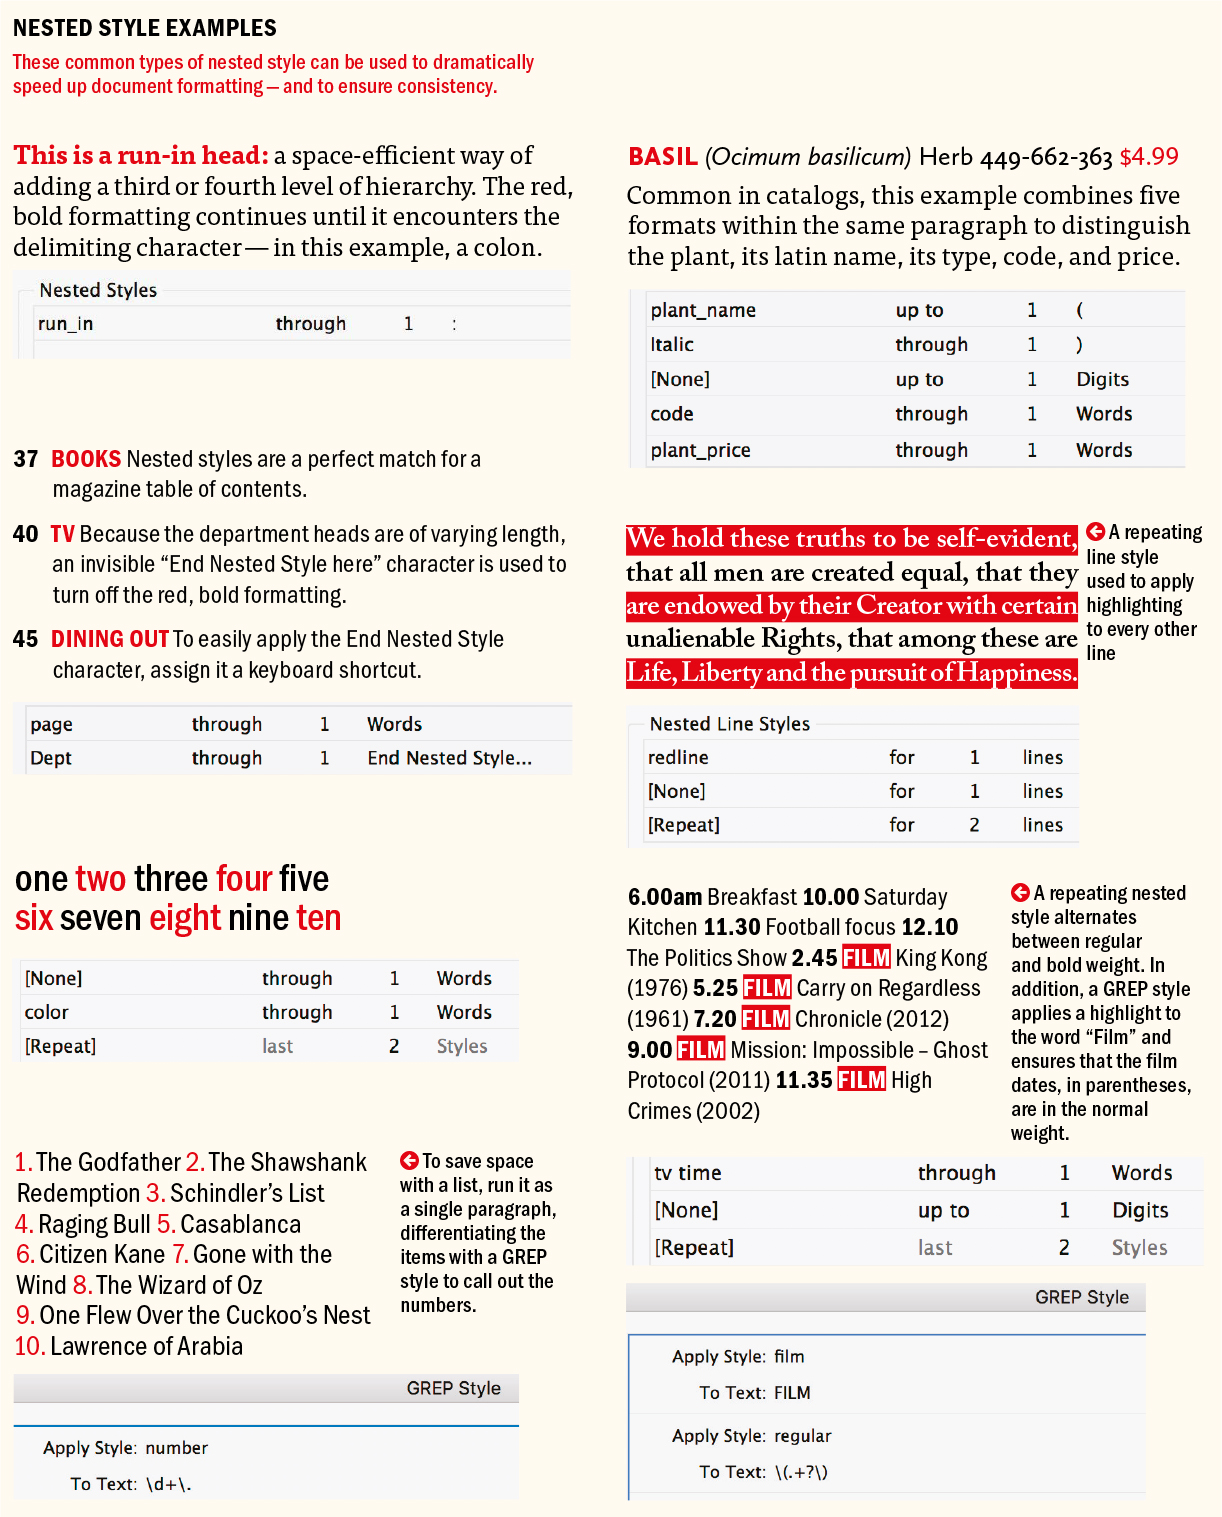
Here are some examples of nested styles that offer a high return on the investment it takes to set them up.
Chapter or Section Openings. For chapter openings with a drop cap, it’s common to style the drop cap in a contrasting font, perhaps also in a different color, and to transition to the upper- and lowercase of the body text with a specified number of words in small caps. Fiddly stuff to be sure — but it’s all possible with a single click once you’ve set up a nested style. Note that if you want to apply small caps to a whole line rather than to a specified number of words, you can use a nested line style. See Chapter 13, “Drop Caps.”
Run-in Heads. Run-in heads are usually third-level subheads that have the heading on the same line as the body text that follows, thus making them space efficient. The heading is distinguished from the body text with a contrasting font. The key with run-in heads — as for all nested styles — is an identifiably consistent element. For example, this could be a colon or an en space that separates the subhead from the body text.
Contents Pages. Contents pages often use a page number as a run-in head. Additional run-in elements can include identifying tags like “Cover Story” or “Feature Article,” which can be added as GREP styles — see below.
Repeating Styles. To repeat a sequence of nested styles — effectively creating a loop of styles — choose [Repeat] from the Nested Style drop-down menu and specify the number of styles to repeat. This can be used to give alternating contrast to a list of names in a single paragraph.
TIP: The Treasures of GREP Facebook group is the place for helpful advice and useful tips on using GREP. If you have a Lynda.com/LinkedIn Learning subscription, I also recommend Michael Murphy’s “InDesign CS4: Learning GREP.”
GREP Styles
A GREP style applies a character style to consistent patterns within the text, regardless of where they occur in the paragraph. To create a GREP style, specify a GREP expression that matches the text you’re looking for — and choose a character style to apply to that text. An obvious application of GREP styles is for a product name or publication name that you want formatted with specific character styling — bold, italic, a certain color, whatever. Any time you type that combination of characters, it automatically takes on the desired appearance. To apply a GREP style to multiple text patterns, separate each with a vertical pipe ( | ). For example, to apply a character style to the words “red” and “blue,” type red|blue in the To Text field.
Nested Styles at the End of a Paragraph
A nested style typically starts at the beginning of a paragraph and continues until stopped by a delimiter. Using the None character style, it’s possible to position a nested style at the end of a paragraph.
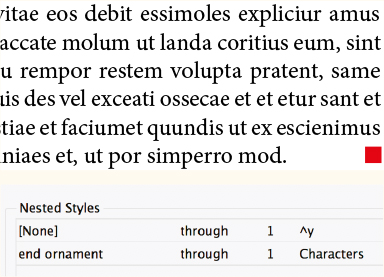
Such a nested style can be used for the last paragraphs of articles that conclude with an end ornament or dingbat. To do this, apply None to the beginning of the paragraph. This means that the normal formatting for the paragraph is used until the delimiter — in this case, a right-indent tab — is encountered. A character style is applied to the text that follows the right-indent tab. This particular nested style can be incorporated into the Body style, where it will lie dormant until invoked by the right-indent tab. Because a right-indent tab does not appear in the drop-down list of delimiters, you’ll need to type in its metacharacter: ^y.
At the end of the story, press Shift+Tab to insert the right-indent tab, then type the end character (for example, n is a solid square bullet in Wingdings or Zapf Dingbats). This will be automatically formatted by the character style.
Sequential Styles
Because it’s common for one particular style to always follow another style, you can use Next Style to define a sequence of styles that can be applied with one click. In documents where the text styling follows a consistent pattern — a large proportion of documents — this can save hours of donkey work as well as ensure consistency. A simple example of a style sequence might be a subhead style that is always followed by a Body No Indent style. For more of a wow factor, sequential styles can be applied to listings text — like a directory listing — to make fast work of what might otherwise be an arduous task.
Five Useful GREP Styles
Beyond the obvious, but very useful, application of GREP styles to apply specific formatting to a text string, GREP styles can be used to maintain stylistic consistency in small details and to preempt spacing problems. Here are some of my favorites.
To fix runts (short last lines). I mentioned this in Chapter 6, but it’s so useful it’s worth repeating here:

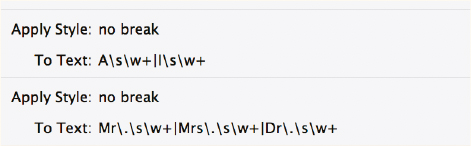
To avoid single words — such as I and A, and salutations like Mr., Mrs., or Dr. — from occurring at the end of a line:
To fix a specific kerning pair. If you find that there are certain kerning pairs that need attention, you can create a GREP style to adjust the tracking for those pairs. For example, in Gill Sans, to my eye there should be more space to the left of a capital A and less space on either side of the number 1. (If you find yourself doing this to a significant number of letter pairs, you might question whether you made a good font choice.)
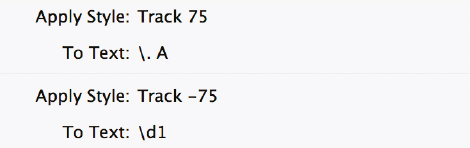
To change the width of an em dash. In some fonts, the em dash is just too wide. Make a character style with a 75% (or whatever) horizontal scale. Then apply it to the em dash character.

To make OpenType fractions. Make a fractions character style (select Fractions in the OpenType Features of the Character Style Options). Apply this character style to the GREP expression d+/d+ (one or more digits, followed by a slash, followed by one or more digits).

Imagine, for example, an event listing where the date style is followed by the title style, which in turn is followed by the description style. Define date’s Next Style as title, and define title’s Next Style as description. Select the full sequence of text. In the Paragraph Styles panel, Ctrl-click (right-click) date (the first style in the sequence), and then choose Apply “Style Name” then Next Style from the pop-up menu to style three paragraphs in one. Note that you have to choose at least two paragraphs to bring up the Apply “Style Name” then Next Style option. If the text sequence repeats, you can define the next style for description (the last style in the sequence) as date (that is, the first style in the sequence). This will make a repeating loop of styles.
Using this approach, you can theoretically format pages of text with a single click. I say “theoretically” because for this looping approach to work, your text has to adhere rigidly to the style sequence — one paragraph out of place, or one piece of information that runs to more than a single paragraph, and the whole thing comes tumbling down like a house of cards. If there are some blocks of information that run to multiple paragraphs, you can replace the paragraph marks with line breaks (Shift+Return) so that the lines break visually but are technically part of the same paragraph. However, if you have to spend a lot of time massaging your text in this way before applying your spiffy automation techniques, you might question how automated those techniques really are.
Next Style also has another function, and that’s to determine the style you get when you press Return (Enter) for a new line. This is useful if you’re writing your text in InDesign, but otherwise underwhelming. When typing, Next Style has no effect on text that is already on the page.
Rules, Borders, and Shading
There was a time, not so long ago, when to apply a color highlight to a line or word, the only options available were paragraph rules and getting creative with the underline options. If you wanted shading behind a whole paragraph, you were in the land of workaround, which is often a precarious place to be. Thankfully, recent versions of InDesign have added paragraph shading and paragraph borders as bona fide features. But before we get to those, let’s look at some old-school techniques for working with paragraph rules, which still have their place.
If you’ve ever drawn a rule above a line of text only to have the text reflow and leave the rule in the dust, you’ll find paragraph rules (Cmd+Option+J/Ctrl+Alt+J) useful. The simple premise of a paragraph rule, be it above or below your text, is that it moves with the text. The rule(s) can be incorporated into a paragraph style. It is associated with the text, faithfully following it wherever it goes.
Paragraph rules are useful for differentiating blocks of information. As well as changing the weight, style, and color of the rule, you can also set its width: to either the width of the column or the width of the line of type itself. These two options can be customized with the addition to the rule of a left indent, a right indent, or both.
Creating Reverse-Out Heads
You can use paragraph rules to make type reverse out of a solid bar. This takes a few moments to set up, but once you’ve done so, you can create a paragraph style based on the text.
Whether it’s a rule above or a rule below, the rule starts on the baseline of the type. Specifically, the bottom of a rule above and the top of a rule below align on the baseline. For a rule above, a positive offset moves the rule up; for a rule below, a positive offset moves it down. But don’t worry about trying to memorize that: just make sure Preview is selected, put your cursor in the Offset field, and press the Up Arrow or Down Arrow key to dial in the amount of offset you want. Specify a color for the rule other than (Text Color). For best results, set the weight of the rule to the size of your type, or possibly a point or two less, depending on how tightly you want the rule fitted around the text. I prefer to use all caps so that the spacing above and below the type is optically even. I also favor a bold or semibold sans serif font because fine serifs don’t fare well reversing out of a solid color at small type sizes.
Here are some pointers for working with paragraph rules:
Paragraph rules are not an either/or proposition; you can have both a rule above and a rule below attached to a paragraph.
The Keep in Frame option causes the type to move down rather than stick up above the top of the frame. This is useful when using a reverse out head at the top of an info box.
While paragraph rules are great for single-line paragraphs, they don’t work for multi-line paragraphs. That’s where paragraph borders and paragraph shading come in.
Paragraph Borders
Paragraph borders enable you to create a border around one or more paragraphs, which will move with the text and grow and shrink as necessary as the text is edited. You can customize the corners and offset the borders. You can even make the borders behave as intercolumn rules. Hold Option/Alt as you click the Border icon on the Control panel (Paragraph Formatting Controls) to open the Paragraph Borders and Shading dialog.
Things get messy when the paragraph splits across multiple columns. Selecting Display Border if Paragraph Splits Across Frames/Columns will give you two intact borders, but that’s a dubious improvement.
To apply a border around multiple paragraphs, select the Merge Consecutive Borders and Shading with same Settings checkbox at the bottom of the Borders dialog box.
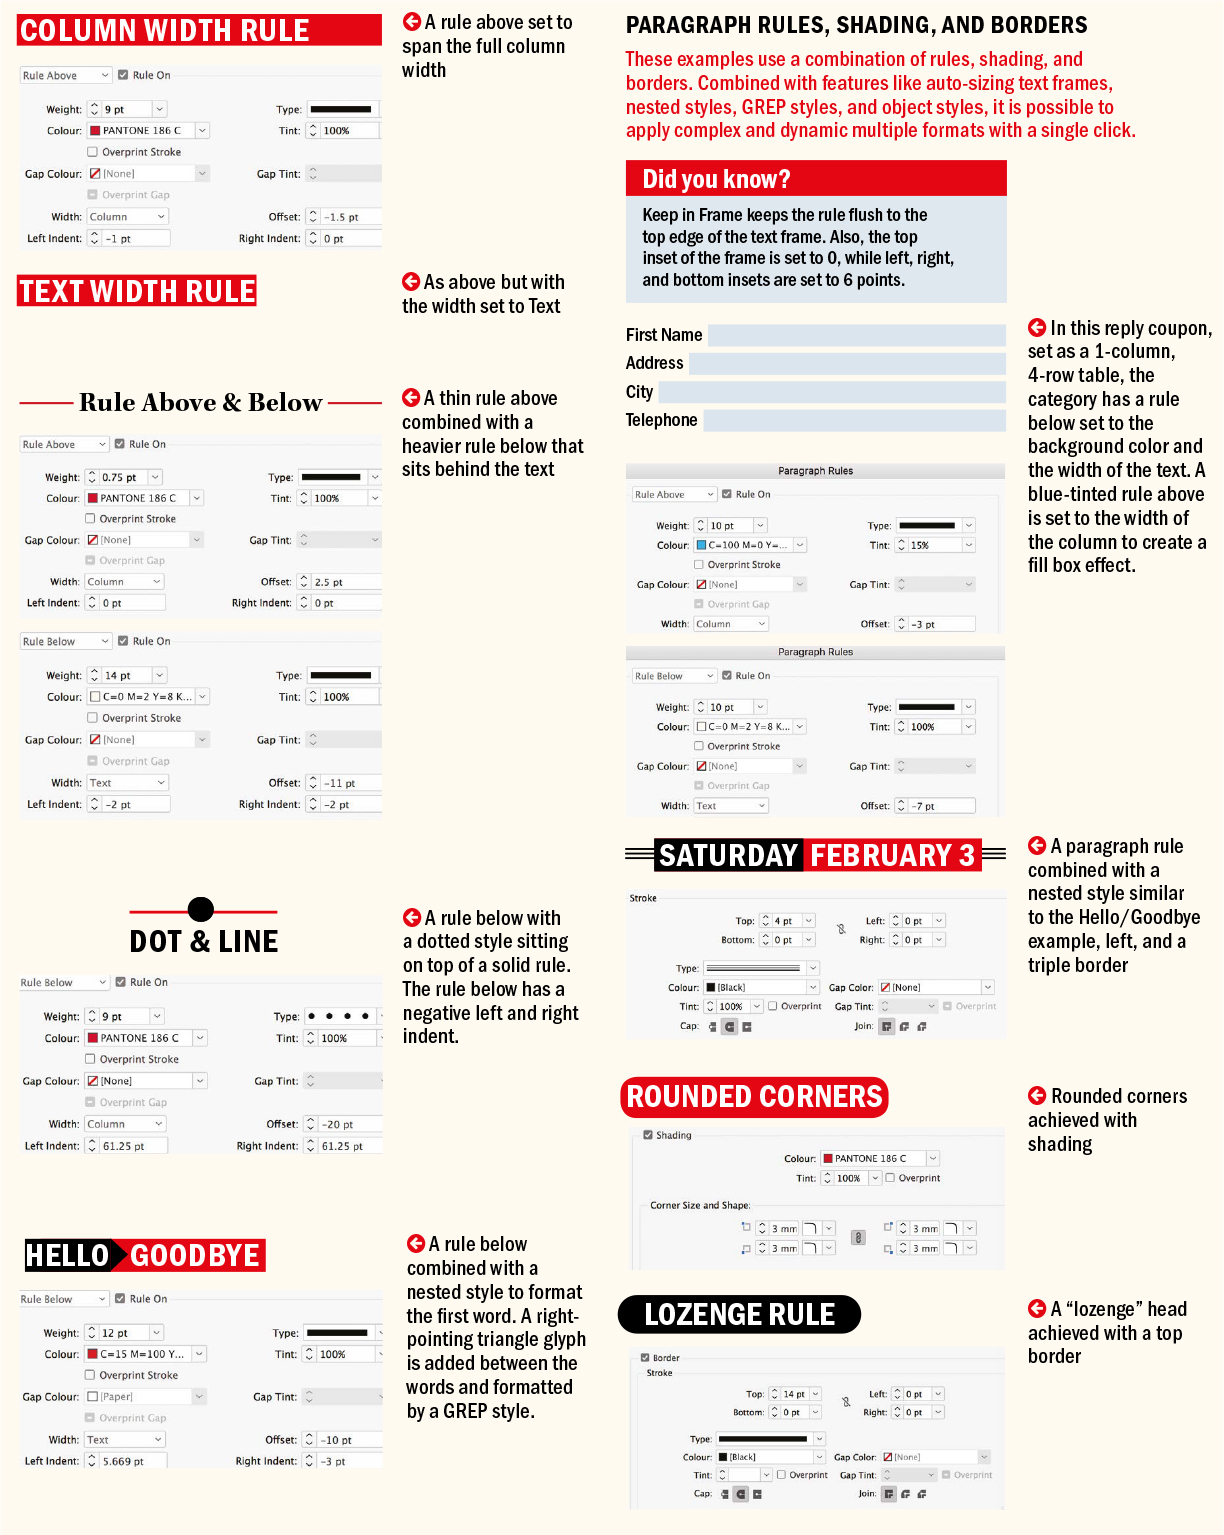
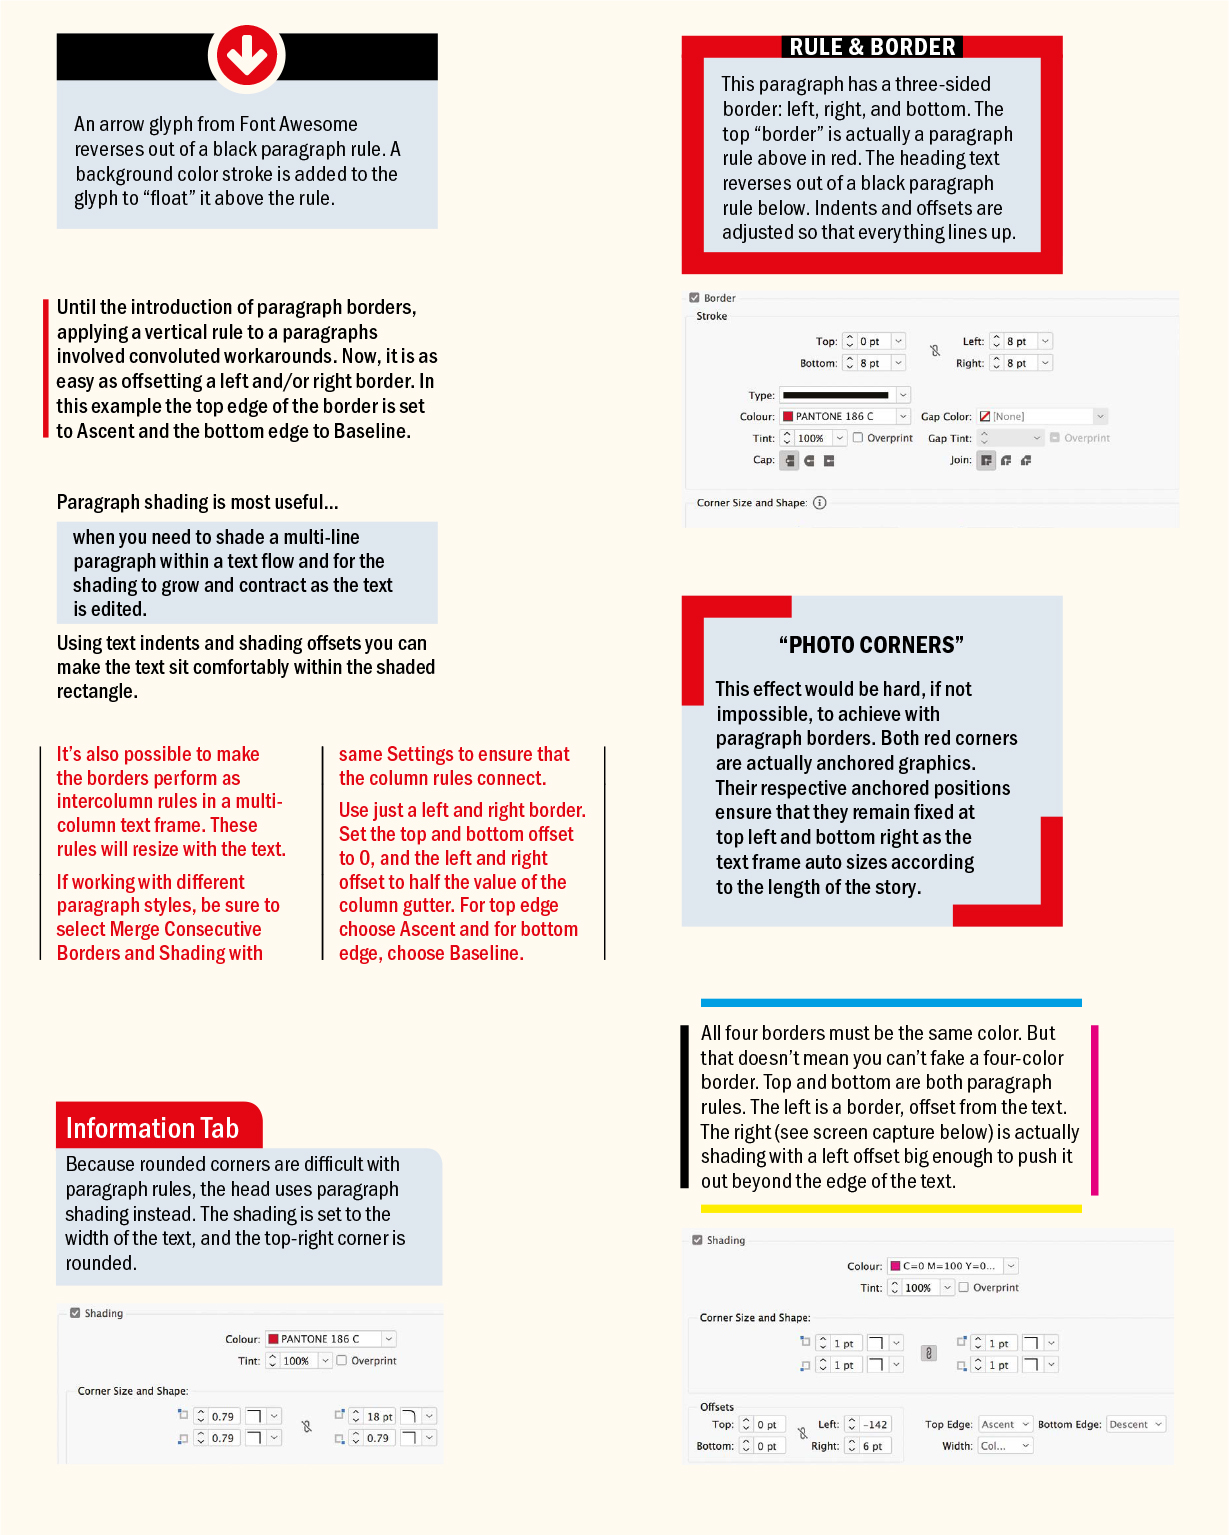
Paragraph Shading
The Paragraph Shading feature lets you create a shade (or color) behind a paragraph. The shade resizes and moves along with the text. Hold Option/Alt as you click the Shading icon on the Control panel (Paragraph Formatting Controls) to open the Paragraph Borders and Shading dialog.
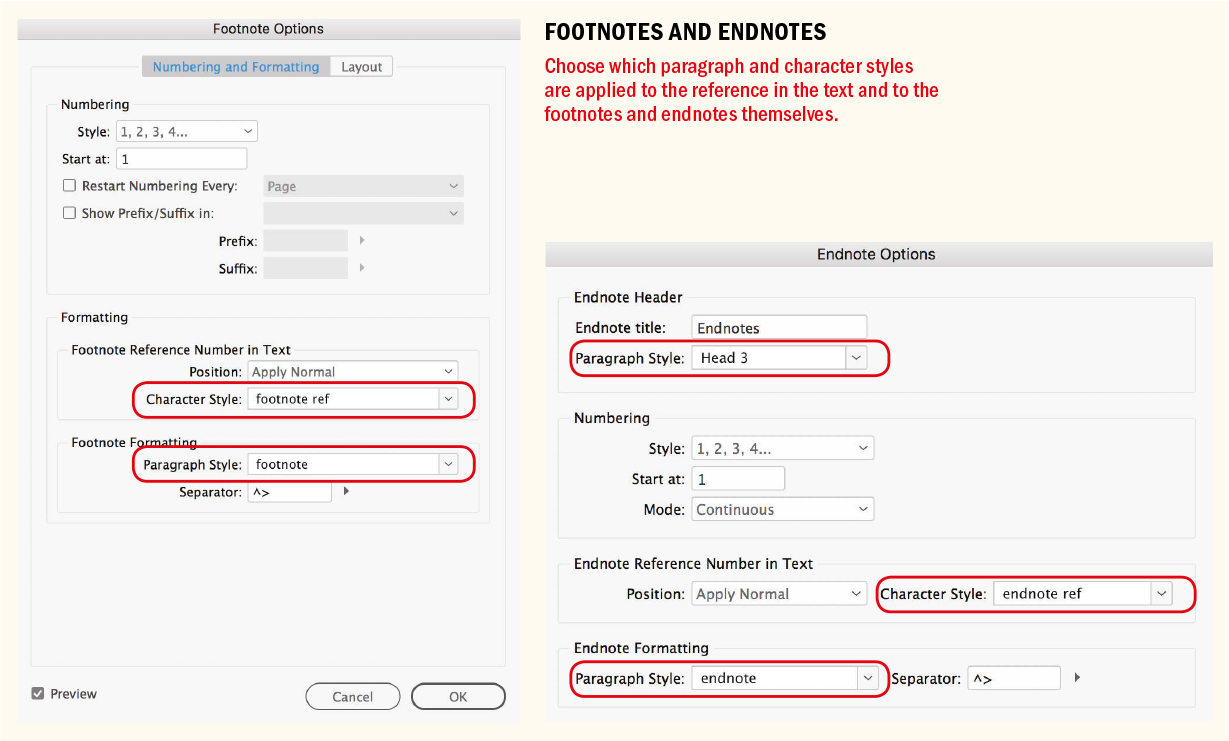
Footnotes and Endnotes
Although footnotes and endnotes are not specifically related to styles, you’d find it difficult to use these long-document features effectively without styles. Choose Type > Document Footnote Options or Type > Document Endnote Options to determine what character style is automatically applied to a footnote or endnote reference and what paragraph style is applied to the footnote or endnote itself.
Creating a Table of Contents
If you’ve used paragraph styles in your document, you can create a dynamic table of contents — that is, one in which the entries and page numbers are auto-generated and which will (with prompting) update as your pagination changes. InDesign finds and gathers any content formatted with the paragraph styles you opt to include in your table of contents (TOC) wherever they are used in the document and applies your specified styles to the collected content.
Here’s how to create a TOC:
Make sure you have a place for the TOC. If necessary, create a new page.
Choose Layout > Table of Contents. Click More Options if necessary to see the full dialog box.
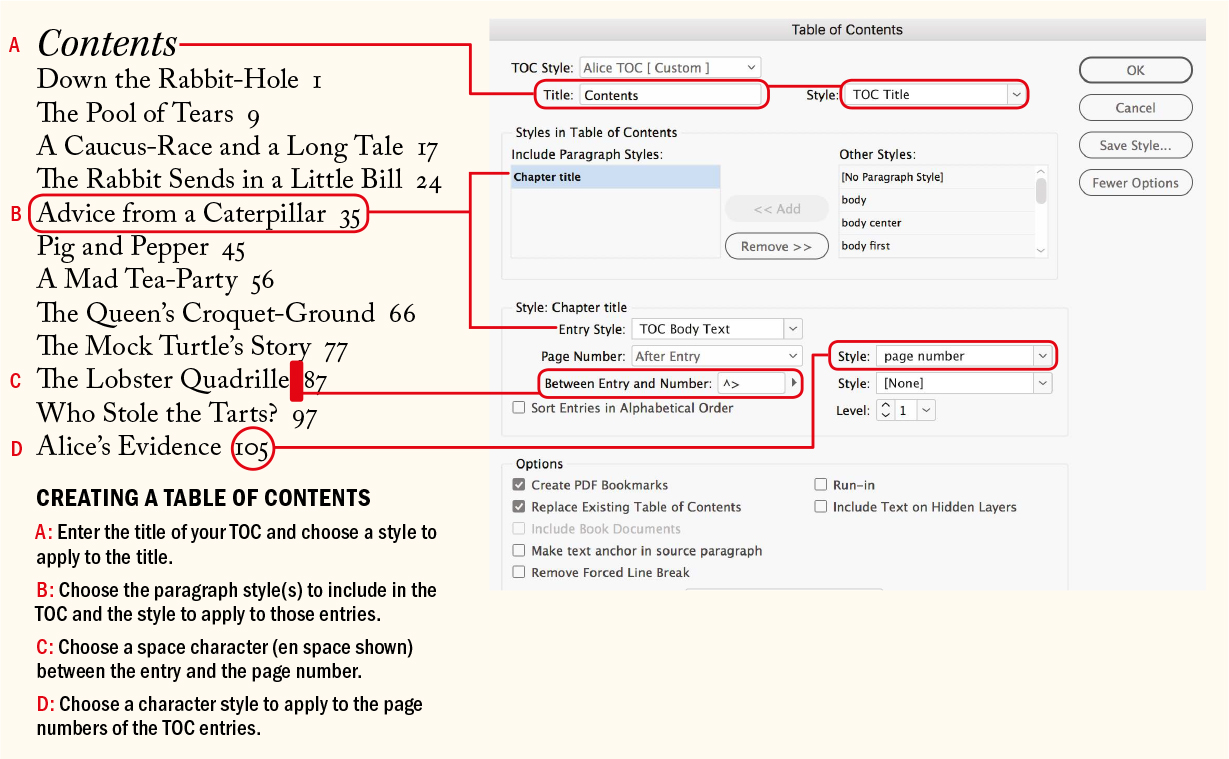
Give your TOC a title (“Contents” by default) and choose the paragraph style that is applied to this title. I prefer to use TOC Title, an auto-generated style that, first time around, requires redefining according to your needs.
Choose which styles in your document (listed on the right) become styles in your TOC. Depending on the document’s complexity, its TOC may have one level or multiple levels, but if you find yourself with more than three, you might question why.
Choose the paragraph style you want applied to your TOC entries. For the first level, I choose TOC Body Text. This is another auto-generated style: it won’t look right initially, but it’s a simple matter to redefine it.
Next, in the Style section, choose how to format the TOC. You can have the page number before or, more typically, after the entry. You can even choose not to have a page number — potentially useful in an EPUB. You choose what character you want between the entry and the page number — for example, an en space, a tab, a right-indent tab — and which character style, if any, to apply to this space and to the page number itself. Leave PDF Bookmarks selected to create a dynamic TOC: if you export your document to an interactive PDF, the TOC entries become PDF bookmarks that viewers can click to access those pages. Even if you don’t plan on making an interactive document, there’s no harm in having this selected.
NOTE: A document can contain multiple TOC styles. This allows you to experiment with alternative TOCs as well as generate additional TOCs — perhaps for a list of figures or illustrations.
Before leaving the dialog, click Save Style to capture your settings as a TOC style. Although this final step isn’t required for a print TOC, if you’re planning on exporting to EPUB it’s essential.
When you click OK, you get a text cursor loaded with your TOC story. You can place this on the page, or portion of the page, that you set aside in step 1.
Note that the updating of the TOC isn’t automatic. If anything about your pagination changes, choose Layout > Update Table of Contents. The good news is that this happens in a flash and you won’t need to repeat all these steps. However, be aware that you will lose any manual formatting changes or edits you apply to the TOC text.
Styles and EPUB Export
If you’re creating EPUBs, there are some additional considerations when working with styles.
EPUBs and TOCs
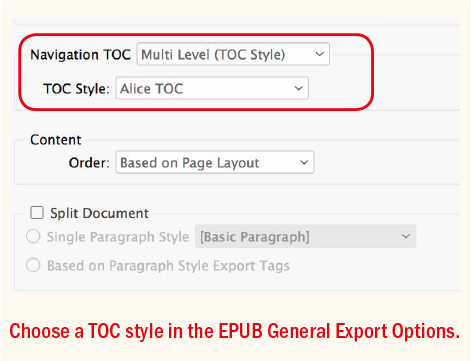
When exporting to EPUB (both fixed-layout and reflowable), your TOC style is used to generate a table of contents that readers can access through the ereader software (sometimes called a navigational TOC) — even though you may not have a TOC placed anywhere in the document. To use a TOC style to generate a navigational table of contents in an EPUB, choose File > Export or press Cmd+E (Ctrl+E) and select EPUB as the format. In the General options, choose TOC Style from the Navigation drop-down, then choose your saved TOC style from the drop-down to its right.
Splitting Documents
The exporting tagging options that are part of paragraph style options allow you to split a reflowable EPUB into distinct chap–ters using specified paragraph styles as break points. These chapters become independent XHTML files in the resulting EPUB. To split a reflowable EPUB based upon your export tagging settings, choose File > Export or press Cmd+E (Ctrl+E) and select EPUB as the format. Choose Based on Paragraph Style Exporting Tagging from the Split Document drop-down menu in the General options.
Export Tagging
A second purpose of export tagging is to map your InDesign styles to XHTML code. These can be standard tags (h1, h2, p, and so on), or custom tags that exist in a predefined CSS. You can also add a CSS class — which is used for slight variations in styling and is broadly equivalent to an InDesign character style. If you don’t enter a class name, InDesign automatically generates one based on the style name. The process for mapping styles to PDF tags is the same, except that PDF tags are uppercase.
Rather than set up export tagging on a style-by-style basis, choose Edit All Export Tags from the Paragraph Styles panel menu and bulk-map your InDesign styles to appropriate EPUB and HTML tags, as well as the corresponding PDF tags. You can also choose what paragraphs should split the EPUB here.
The most efficient workflow for creating EPUBs — and one that requires an understanding of XHTML and CSS — involves mapping your InDesign styles to a predefined CSS file.
When you export to EPUB, InDesign typically creates a lot of redundant markup. Each InDesign style becomes a CSS class, and every possible property of the InDesign style is included in that CSS class. A class in web design is like a character style. Adding a class to all your paragraphs is equivalent to applying a paragraph style and then applying a character style with the same settings for font, font size, color, and so on, on top of that paragraph style. It will work, but it’s unnecessary and unwieldy.
If you have a predefined CSS file, you can map your InDesign styles to the styles in that file. In Export Tagging, you can type the name of your defined tag in the Tag field. If you’ve defined a class for this style, you can enter that too. Add your external style sheet in the Advanced EPUB export options. In the resulting XHTML, the paragraphs will take on the attributes defined in the external CSS file, and the exported EPUB will be devoid of any extraneous markup.
Setting up the external style sheet in the first place is an investment of time, but one that will quickly repay your efforts. With this approach, the same style sheet can control the appearance of multiple EPUBs, and the HTML code within each file is leaner and far less confusing.
▄
Even if they appear intimidating at first, persevere with styles. They’re the kind of thing that computers excel at: keeping track of multiple formatting options, where they are applied, and when they are updated. With all the time you save by using styles, you can add a level of nuance and artistry — the kind of thing that humans do best.