2
RPA, Workflow, Decisions, and Business Applications
This chapter will look at several core technologies that can enable intelligent automation, exploring Robotic Process Automation (RPA), Workflow, Decisions, and Business Applications. We will also discuss the specifics of what we currently support today in IBM Cloud Pak for Business Automation (CP4BA) and what kinds of solutions you can build with these technologies.
In this chapter, we will cover the following topics:
- Robotic Process Automation
- Workflow
- Process-driven workflow (business process management)
- Process-driven workflow
- Case Management
- Case management
- Decisions
- Business applications
Throughout this chapter, we will be using different use cases to showcase the variety of solutions that you can build with CP4BA.
Robotic Process Automation
Robotic Process Automation (RPA) started as a program to mimic human users’ interaction with their desktops to perform tasks. RPA has expanded beyond the initial scope to include the following:
- Task Automation: Even though we use the term RPA to refer to this technology, an RPA bot, in most cases, is about performing a certain task. Typically, to automate work between multiple RPA bots, or between RPA bots and humans, an overall process is usually required.
- Integration: Although many RPA vendors started with desktop automation, some of them, such as IBM RPA, have back-office integration capabilities in their products. IBM RPA can also be configured to work with other enterprise integration platforms such as IBM App Connect [1].
- Artificial Intelligence (AI): An RPA bot can make use of different AI techniques to help it perform tasks such as visual recognition and image processing so that it can recognize UI elements on-screen. It can also use natural language processing (NLP) so that it can interact with humans through natural language and machine learning (ML) so that it can provide recommendations.
Key components and concepts of RPA
The following diagram shows the development and runtime flows we have in IBM RPA:

Figure 2.1 – RPA development and runtime flow
Let’s look at this flow in more detail:
- Automation developers make use of IBM RPA Studio to develop RPA scripts.
Once the scripts have been developed, the automation developers will publish the scripts to the RPA Control Center. The automation developers will also select whether the bots can be scheduled for unattended execution or must be launched manually for attended execution.
- For attended bots, users can use the IBM RPA Launcher tool to select to launch the bots on the desktop.
- Alternatively, the users can schedule the bots to be run at different times through the RPA Control Center. During execution, the bots can work with both internal and external applications to complete their tasks.
IBM RPA Studio
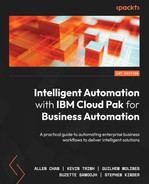
IBM RPA Studio is what automation developers use to create RPA scripts that define sequences of commands. During runtime, an RPA bot executes a specific RPA script. The following screenshot shows IBM RPA Studio. RPA Studio is a desktop tool that’s used often since RPA’s primary use cases are around desktop automation:
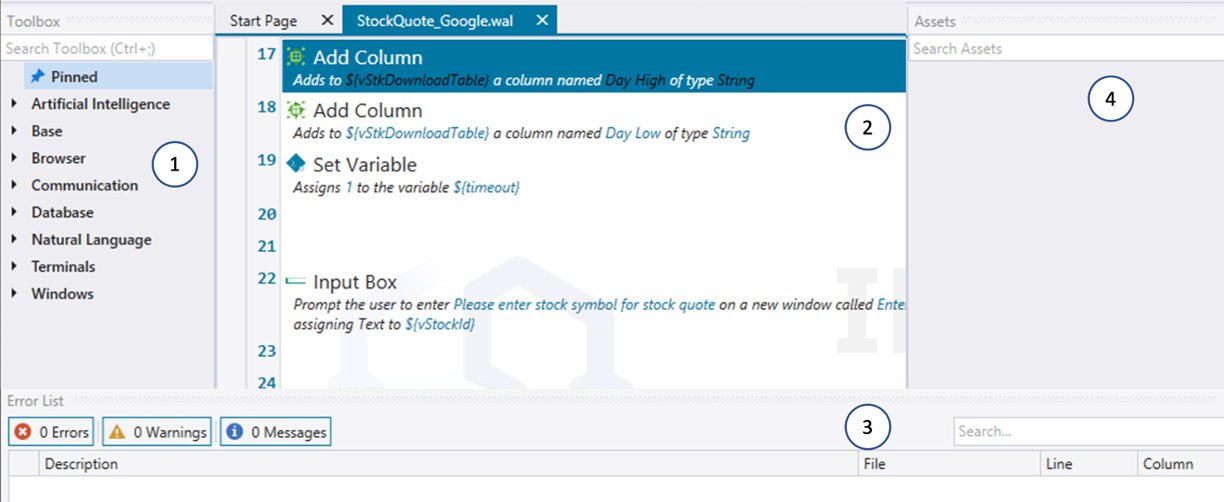
Figure 2.2 – IBM RPA Studio
There are four main panes in RPA Studio (see Figure 2.2):
- Commands Palette: This pane shows a list of available commands to be used in the robot script.
- Visual Script Editor: This is where the automation developers can visually construct the robot scripts, using the commands from the Commands Palette.
- Messages Panel: This is where errors and warning messages are shown during development and testing.
- Variables and Assets: If there are variables and reusable routines, they will be shown here.
Scripts and commands
There are over hundreds of commands, including many prebuilt integrations with popular business tools and systems such as Microsoft Outlook, Microsoft Word, PDF processing, SAP, and more.
Here are the categories of commands and what they can be used for [2]:
|
Command Category |
Purpose |
|
Base |
These commands cover the most often used actions, such as the flow control, conditions, and loops, manipulating text, emails, images, date and time, and working with FTP, files, and folders. |
|
Browser |
These commands perform work on a web browser or web pages – for example, navigating websites, extracting information from HTML pages, solving web CAPTCHAs, downloading files, and so on. |
|
Communication |
These commands allow the bot to communicate with the users through either textual (emails, files) or voice (IVR). This also allows the bots to ask for and respond to requests. |
|
Database |
These commands are about searching for and updating information in various database systems (for example, Oracle, SQL Server, MySQL, and ODBC). |
|
Artificial Intelligence |
These commands allow developers to embed AI logic into the bot, such as fuzzy logic, classifiers, and knowledge bases. |
|
Natural Language |
These commands allow NLP to be used together with the set of communication commands to create human-to-machine interaction through NLP. |
|
Terminals |
These commands are about connecting to a remote Command-Line Interface (CLI) or terminal emulators so that the bot can run commands, send keystrokes, and read responses from the terminal screen. |
|
Windows |
Windows commands are about working with native Microsoft Windows applications and services, such as sending mouse and keyboard signals, accessing clipboards, and working with Excel or Remote Desktop. |
Table 2.1 – RPA commands categories
Recorder
IBM RPA provides a recorder for automation developers to capture their activities on the screen to speed up the creation of a robot. To use the recorder, select Start Recorder on the Home tab and then follow the on-screen instructions to complete the recording:
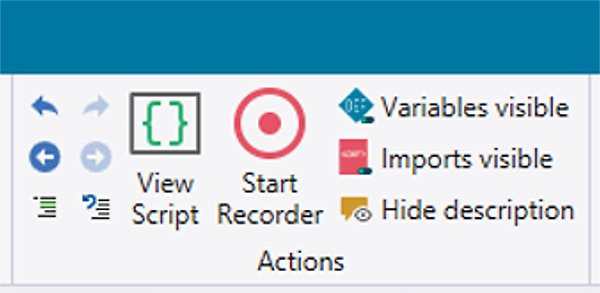
Figure 2.3 – The Start Recorder function in IBM RPA
At the end of the recording session, the Script Editor will be populated with a series of commands capturing the user’s activities. The recorder is a useful tool to jump-start the creation of an RPA bot, but some customization would still be required afterward, such as replacing captured responses with a variable or inserting intentional delays between commands to account for the different operating environments.
Attended and unattended bots
Once the RPA script is completed, the automation developer can publish the script (WAL file) to the RPA server. There are two modes that the script can run in:
- Attended: In this mode, the script can be launched by users via the RPA Launcher. This allows the users to run the bot whenever they want on their desktop and allows the bot to collect information or interact with the user during its execution. This is useful in cases where the automation cannot be fully automated or when information must be collected from the user during execution.
- Unattended: In this mode, users can schedule the bot to be run on a predefined schedule, such as every day at 10 A.M. and on a given set of computers. Users can also call the bot directly through an API. This is useful for fully automated activities that do not require any human intervention during execution.
Control Center
IBM RPA Control Center is where you can log in to manage and schedule the execution of robots (in the form of scripts). Within Control Center, you can manage a set of scripts (or bots), create dashboards, and set up computers (where the bots will run) and credentials (for example, username and password).
In the following screenshot, we are in the Manage Scripts view, where you can find all the available bots that have been published and a schedule that has been set up:
Figure 2.4 – IBM RPA Control Center
In the following screenshot, we have set up a schedule to run the bot every weekday at 11:00 A.M.:
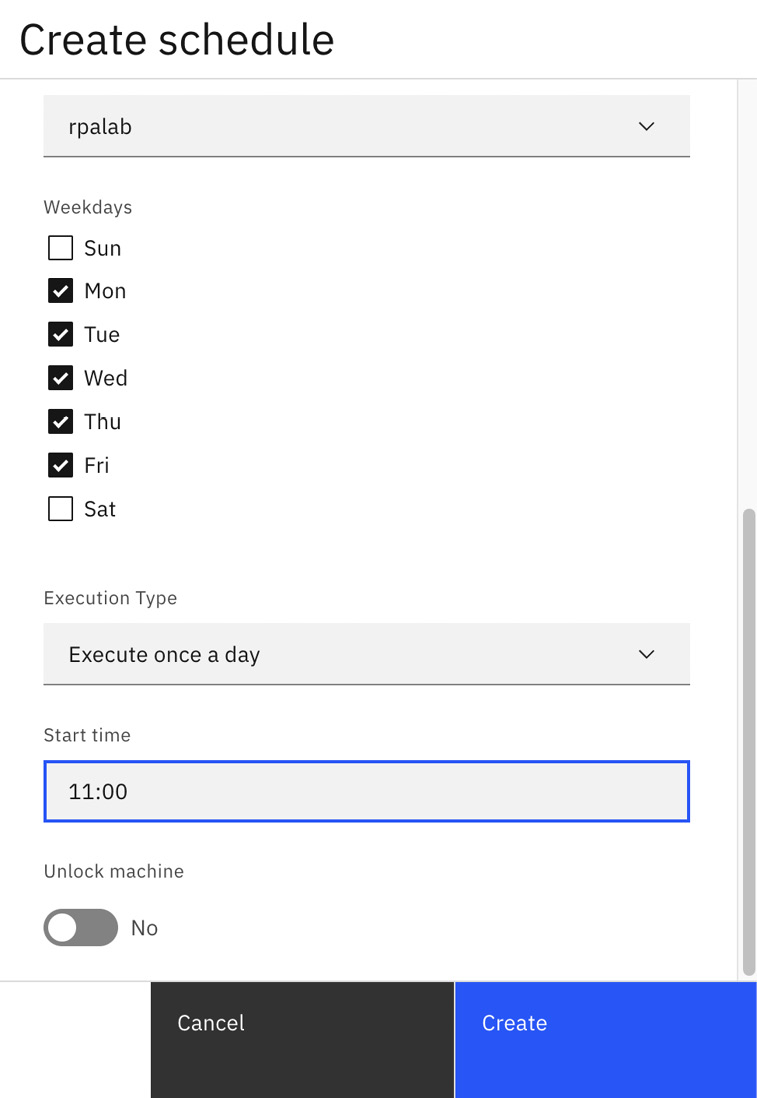
Figure 2.5 – IBM RPA – Create schedule
Dashboard
Being able to have visibility into how a bot is performing is very important to help us understand how we can optimize our intelligent automation solution. Within IBM RPA Control Center, you can build custom dashboards using a set of available widgets. We will look at this in more detail in Chapter 12, Workforce Insights:
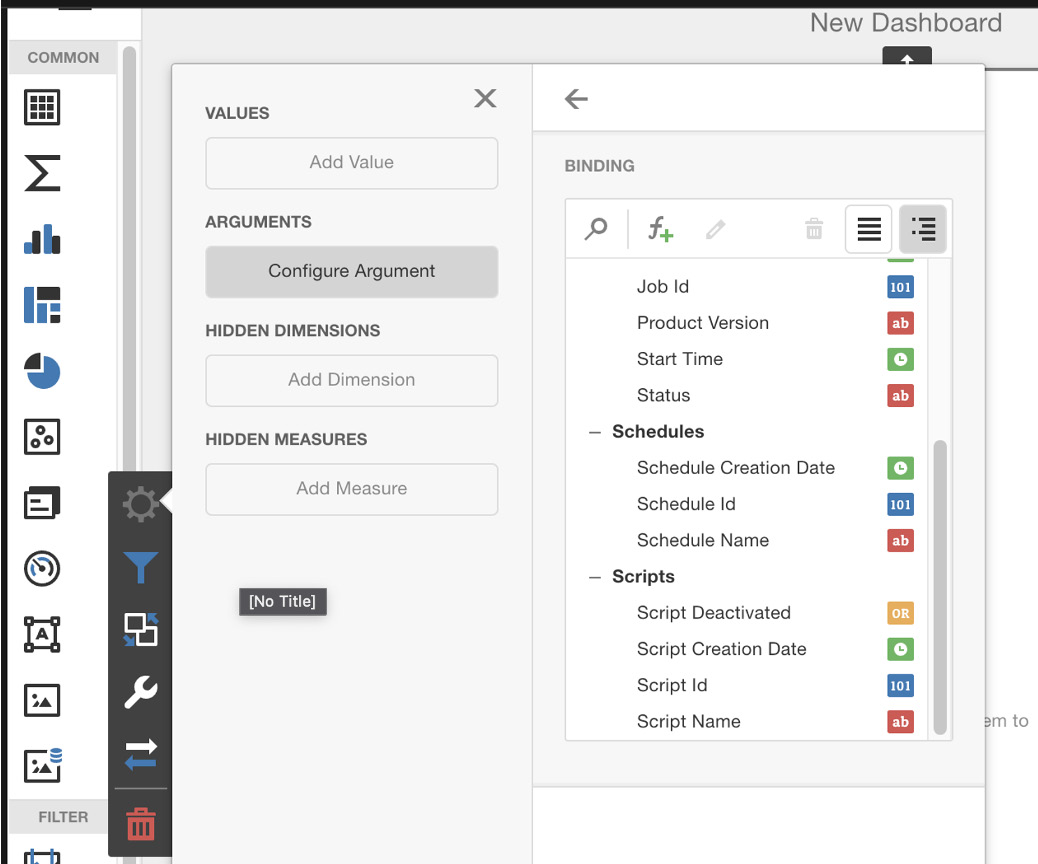
Figure 2.6 – IBM RPA dashboard designer
In Chapter 5, Task Automation with RPA, and Chapter 6, Chatbot with RPA, we will discuss two use cases of how IBM RPA can be used to automate your tasks.
Workflow
As discussed briefly in Chapter 1, What Is Cloud Pak for Business Automation?, a workflow is about the orchestration of activities that can be performed by humans, robots (for example, RPA), and systems.
Some workflow systems only sequence APIs, but those systems are typically more focused on connecting two or three systems, with the assumption that the sequence will be completed within a short duration (usually a few seconds or less). To truly support a business workflow to coordinate work between humans, robots, and systems, IBM Business Automation Workflow, or its lightweight variant, IBM Workflow Process Service (WfPS), supports a much richer and more flexible function set.
These are some of the key workflow capabilities that we can make use of as we craft our intelligent automation solutions:
|
Capabilities |
Meaning |
|
Process-driven or knowledge-driven |
These are the two extremes of a workflow – a predesigned workflow with a programmed sequence or a set of loosely coupled activities where the next activity will rely on the decision made by the current activity owner. In the first case, we typically call it business process management, while in the second case, we call it case management. We will look at this in more detail in the following section. |
|
Stateful and stateless |
Most workflow solutions that involve long-running activities (for example, human tasks) are stateful. This allows the workflow to wait in the background when it starts the long-running activity and then resumes once the activity is completed later. In IBM BAW, it can also be used to run a certain portion of the workflow as stateless, where it assumes all activities will be completed within the same business transaction. |
|
Headless or with an embedded UI |
Many workflow solutions involve interaction with humans through a user interface (usually a form). IBM BAW provides a built-in form builder to provide an integrated authoring experience. However, it is also possible to use IBM BAW in headless mode, where a separate team will be building a custom UI experience while still leveraging IBM BAW for workflow orchestration. |
|
Self-triggered or event-triggered |
There are multiple ways to launch a workflow, such as launching the workflow explicitly via an API or a Launch UI, or through an event trigger such as a timer or messages. |
|
Trackable and auditable |
All activities of a workflow system are recorded and can be queried later. This includes information such as who and when a process is started or completed, who and when a task is claimed or completed, and when a system task (such as calling an external service) is started, completed, or failed. This information allows us to provide the necessary business auditability, as well as to derive insights using various AI techniques. |
|
Version migration |
It is not unusual for a business process to last for days, weeks, or months. However, it is very common for business processes to change over time. IBM BAW allows you to upgrade existing running workflow instances to a newer version of a business process. We call this technique version migration and it is an advanced capability that is not usually provided by other workflow vendors. |
Table 2.2 – Key workflow characteristics
Starting with Business Automation Workflow release 18.0.0.0 in 2018, we have merged two separate workflow products (IBM Business Process Management and IBM Case Manager) into a single offering. Now, within a single environment, we can support both process-driven and knowledge-driven workflows.
In the next section, we will learn how IBM BAW can be used to support the two major kinds of workflows.
Process-driven workflow (business process management)
As can be expected, a process-driven workflow comprises a series of activities connected via a process diagram. In BAW, we support the use of the Business Process Model and Notation (BPMN 2.0) to model the process sequence. BPMN 2.0 is a graphical notation for business users to visualize a business process and can also be used as an interchange format between different BPMN 2.0 modeling tools.
Here are some of the basic workflow patterns that can be composed in IBM BAW to create an end-to-end process flow. Each pattern is a combination of work being done by humans, robots, and systems, and the automation developers can choose to combine these patterns to form arbitrarily complex workflow logic:
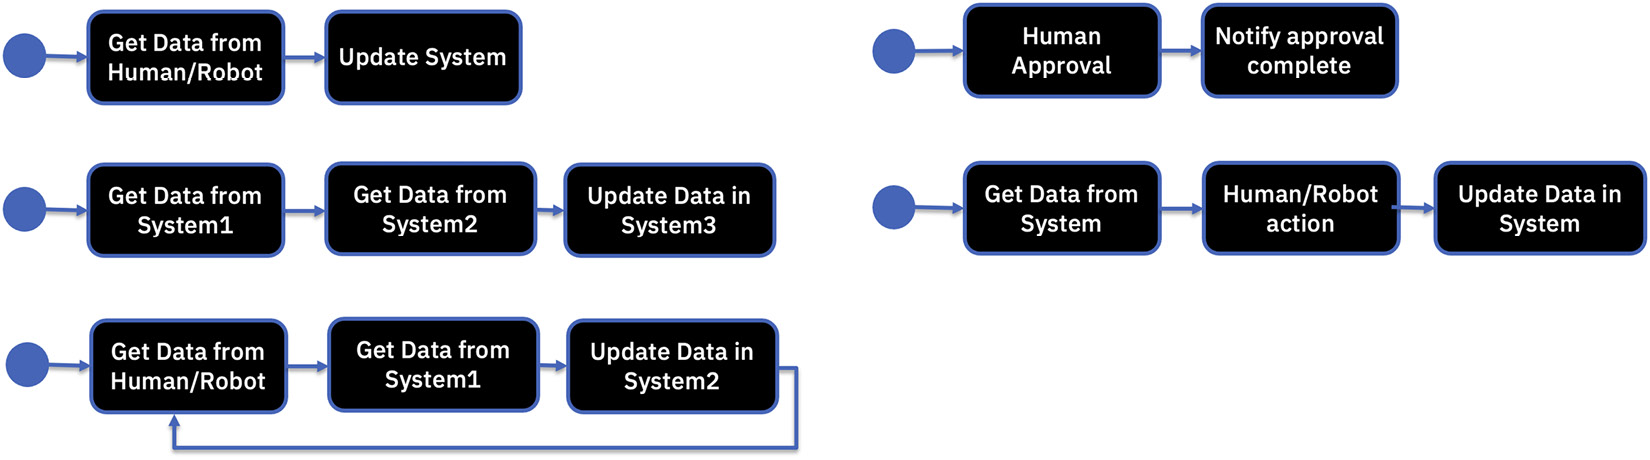
Figure 2.7 – Workflow patterns – sequence and loops
A key difference between a workflow designed for a business process and an integration-centric workflow is each activity can be long-running (it can take minutes, days, or weeks) and interruptible.
In addition to the simple patterns, you can also use decision logic to decide where to go next in a workflow or create parallel activities where multiple activities can be executed at the same time. However, you must consider the physical constraints before attempting to spawn hundreds or thousands of parallel activities as there are limits to how much a system can handle concurrently:
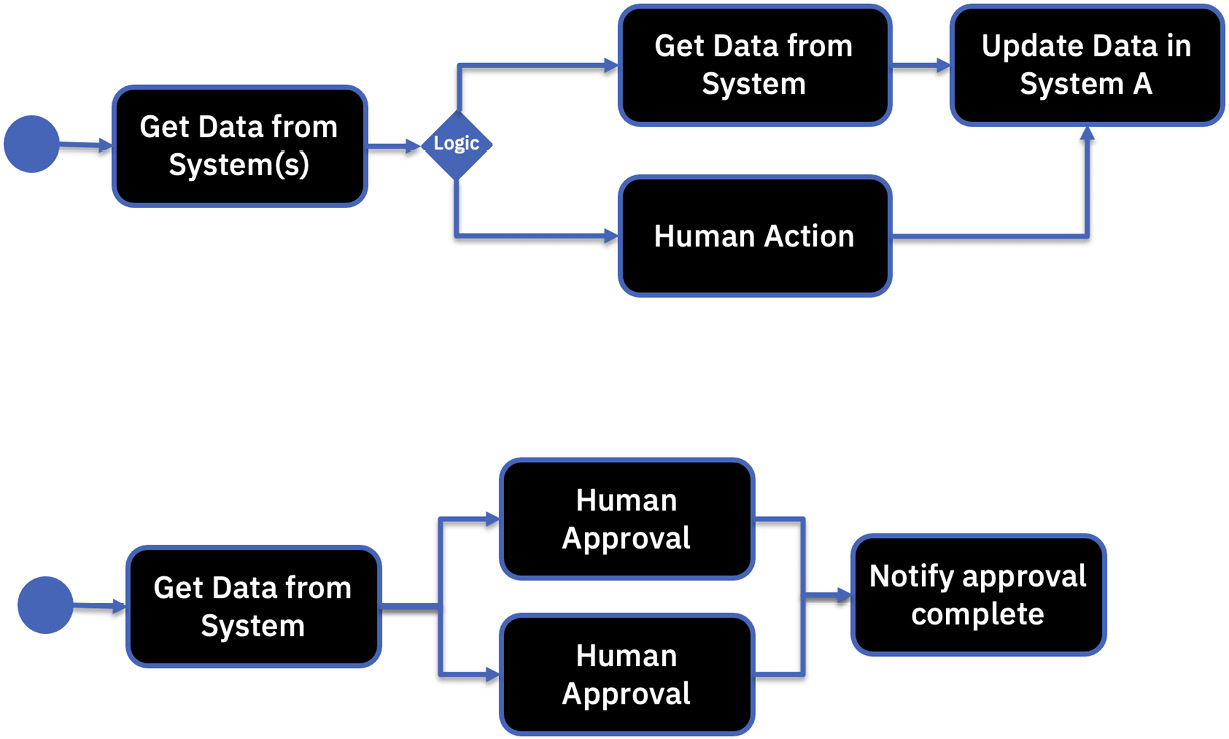
Figure 2.8 – Workflow patterns – branching and parallel activities
There is a common mistake in process modeling, where the automation developers focus only on the happy path (that is, when everything works). However, more than likely, something will go wrong, so we must describe what should happen when something is not working as expected. In the workflow, we can describe how to handle both system and business exceptions, as well as escalations when things are not happening fast enough, such as when an approval is overdue:
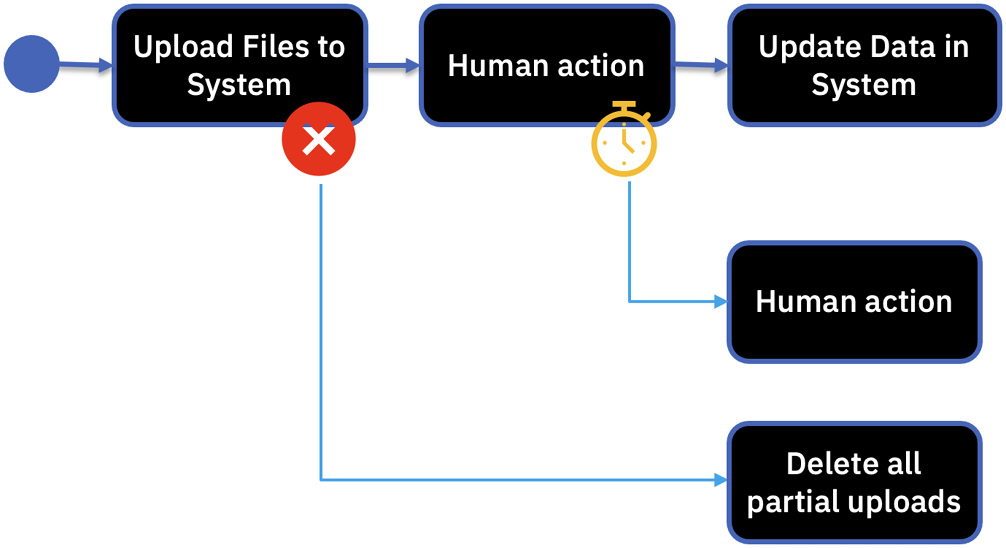
Figure 2.9 – Workflow patterns – events and escalation
Key components and concepts
The following diagram shows the development and runtime flows we have in IBM BAW:
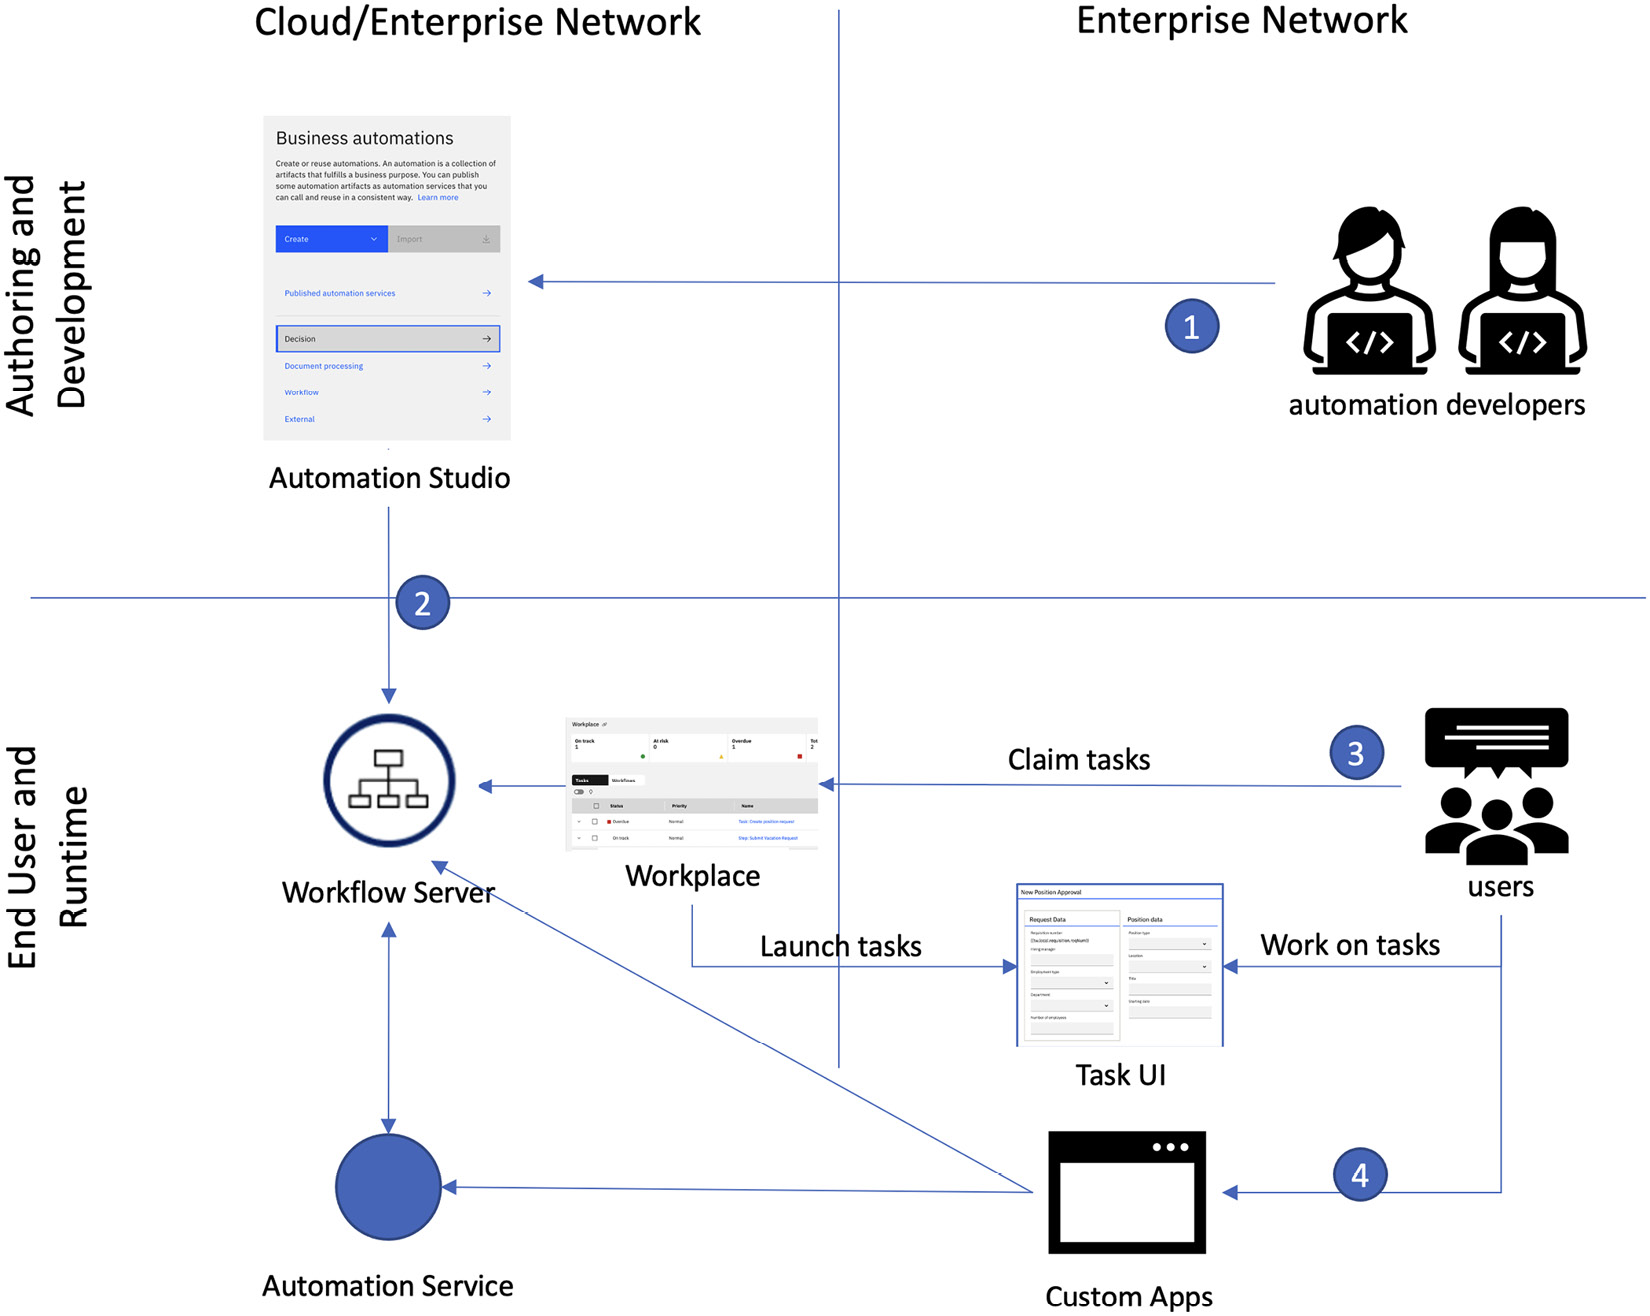
Figure 2.10 – Workflow development and runtime flow
- The automation developers will make use of IBM Business Automation Studio to develop the workflow automations.
- Once the automations have been developed, the automation developers will publish the automations to the workflow server, maybe through a DevOps CI/CD pipeline. The workflow server will also publish automation services for the workflow services selected by the automation developers.
- Business users will use the IBM workplace to launch a new workflow or to check whether tasks are waiting for them and work on those.
- Alternatively, an automation developer can build custom applications using the Business App Designer in Studio or other tools of their choice, leveraging the automation services or API available in the workflow server.
Workflow automation project
To create a workflow project, go to Business Automation Studio and select Create Workflow under the Business automations panel. In the following example, an existing sample Workflow automation project exists called Hiring Sample, along with the Vacation Approval and Insurance Policy Approval projects:
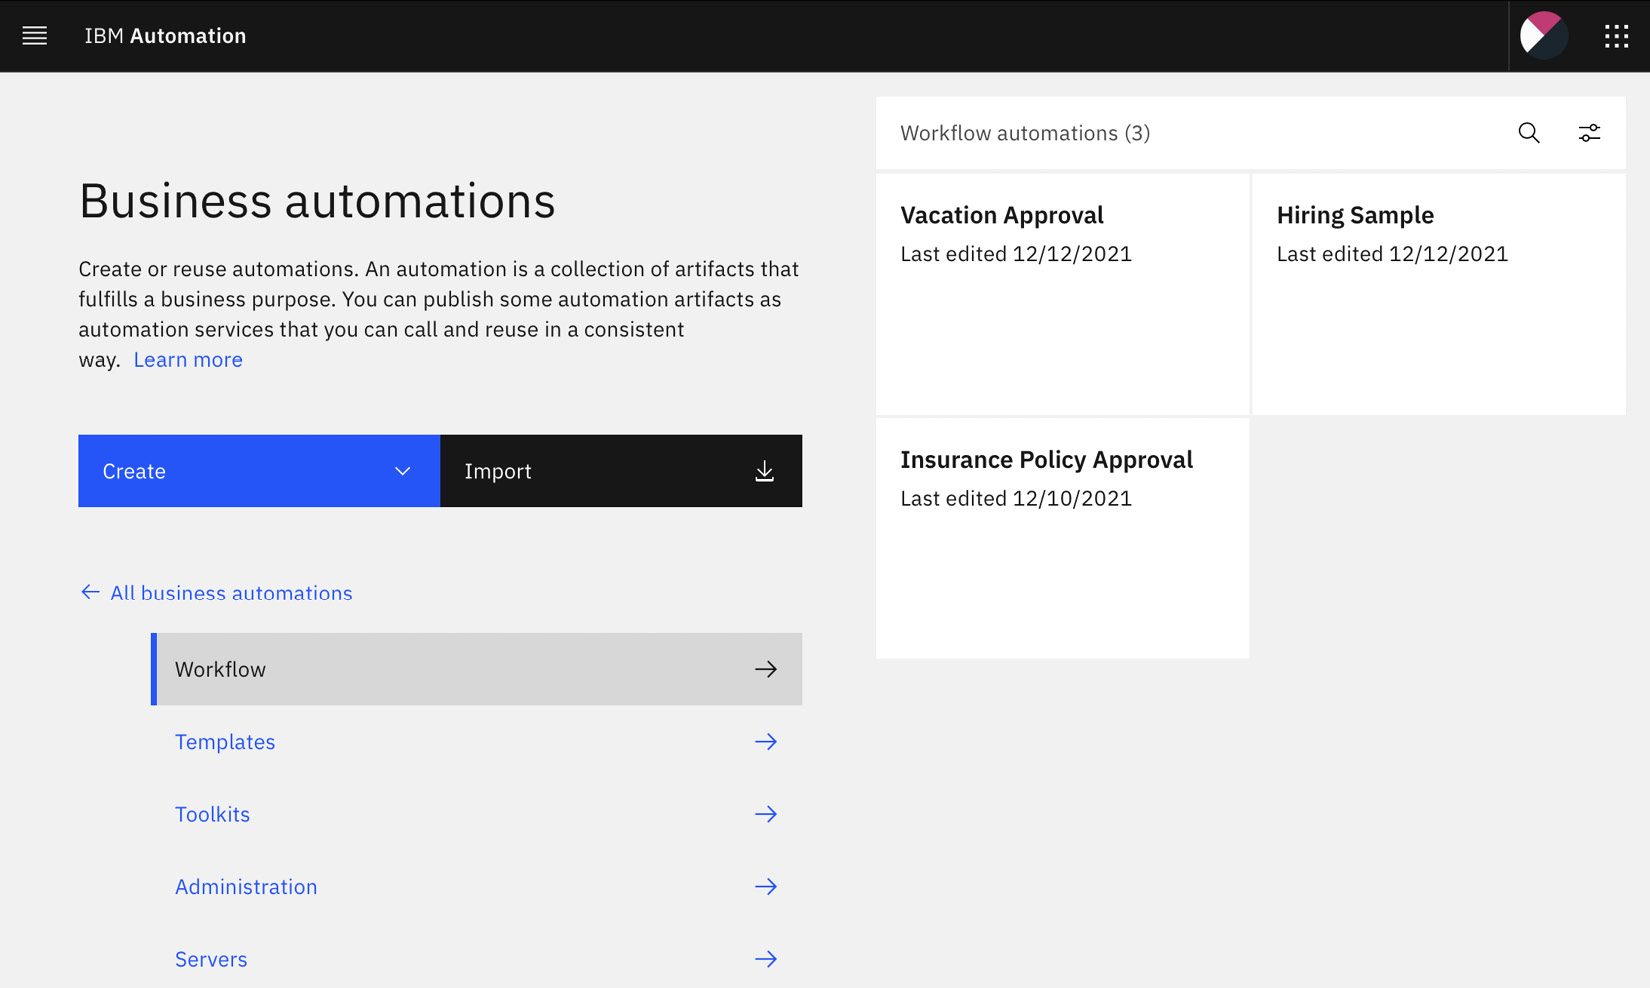
Figure 2.11 – Creating a workflow automation project in Business Automation Studio
Workflow Designer
When you open the workflow automation project, you will be in Workflow Designer. This designer makes use of a low-code design approach based on visually modeling a BPMN-based process diagram, as well as a visual user interface designer. Within the designer, there are several major segments:

Figure 2.12 – Workflow Designer
Let’s take a look at these in more detail:
- Asset tree: Here, you will find the different asset types that can be part of a workflow automation project – Processes, User interface, Exposed Automation Services, Services, Events, Teams, Data, Performance, Files, Toolkits, and Smart folders.
- Design canvas: Depending on the asset type, a different editor will appear. In this case, we have a BPMN visual designer where everything can be specified.
- Properties panel: This is where the details of the execution behavior of a workflow activity can be specified. Unlike some of the other process designer experiences, within Workflow Designer, there is no need to break out into separate JavaScript or Java editors to specify the execution logic of workflow activity.
- Playback and Versioning: One important differentiation of the workflow automation in CP4BA is the ability to run the process at any time via the Playback button. There is no compilation required, and it will even generate any missing user interfaces. During playback, an Inspector panel will appear that will allow the automation developer to walk through the process one step at a time and sample the data as it flows through the process sequence:
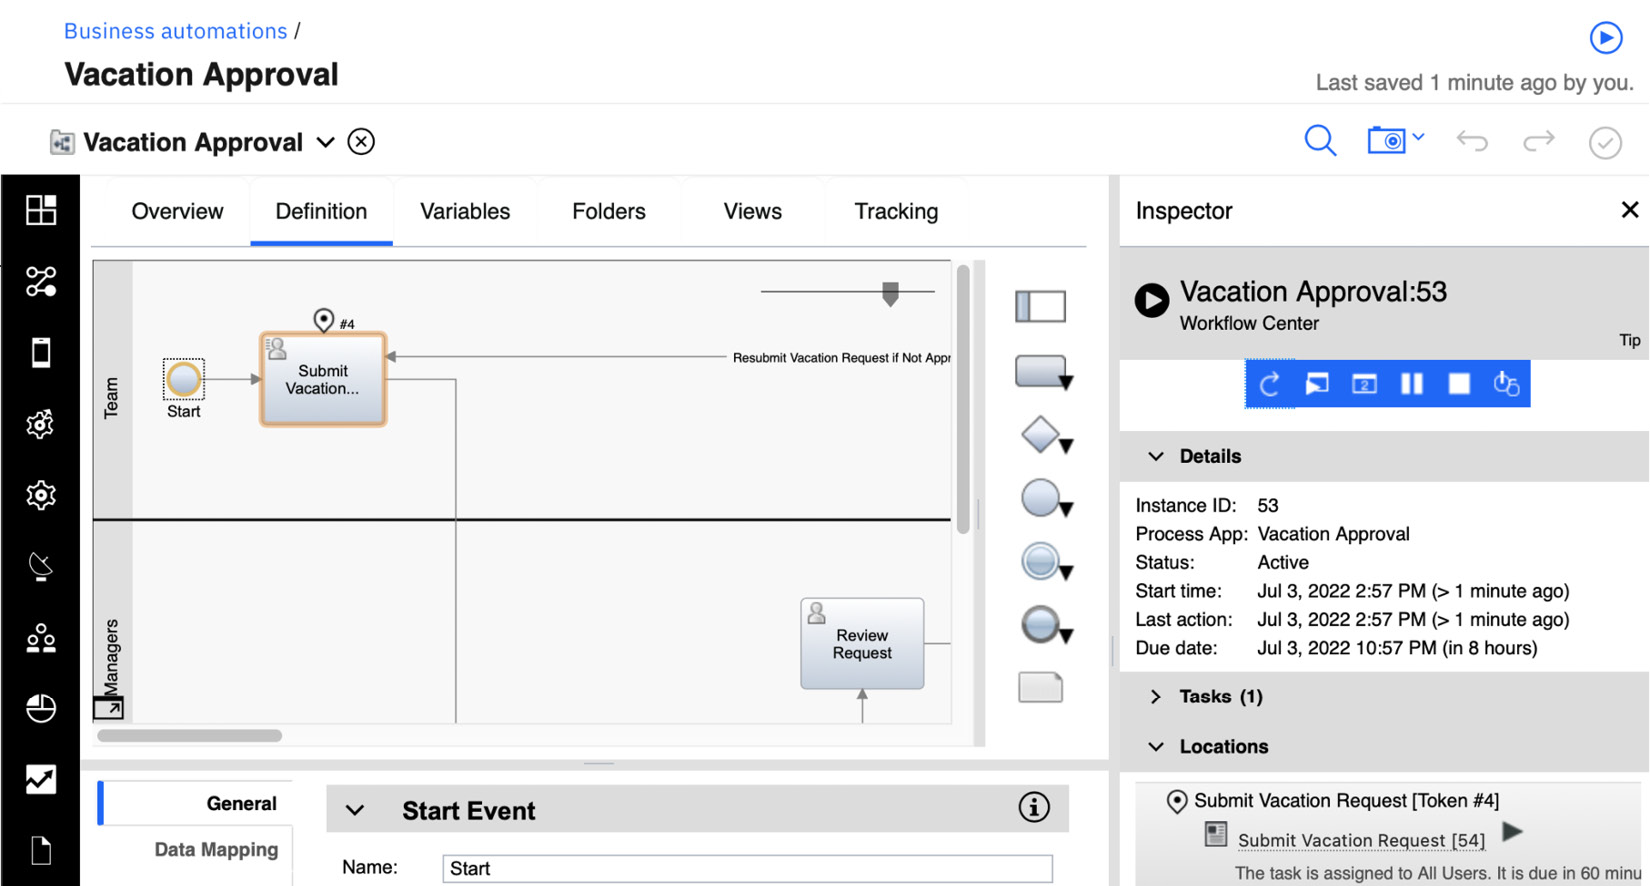
Figure 2.13 – Playback – running the process directly in Workflow Designer
Process Flows and Service Flows
Process Flows and Service Flows are where the automation developers can specify the sequence of activities. There can be multiple Process Flows and Service Flows within the same workflow application. Within a Process Flow, you can specify the orchestration of activities over time:
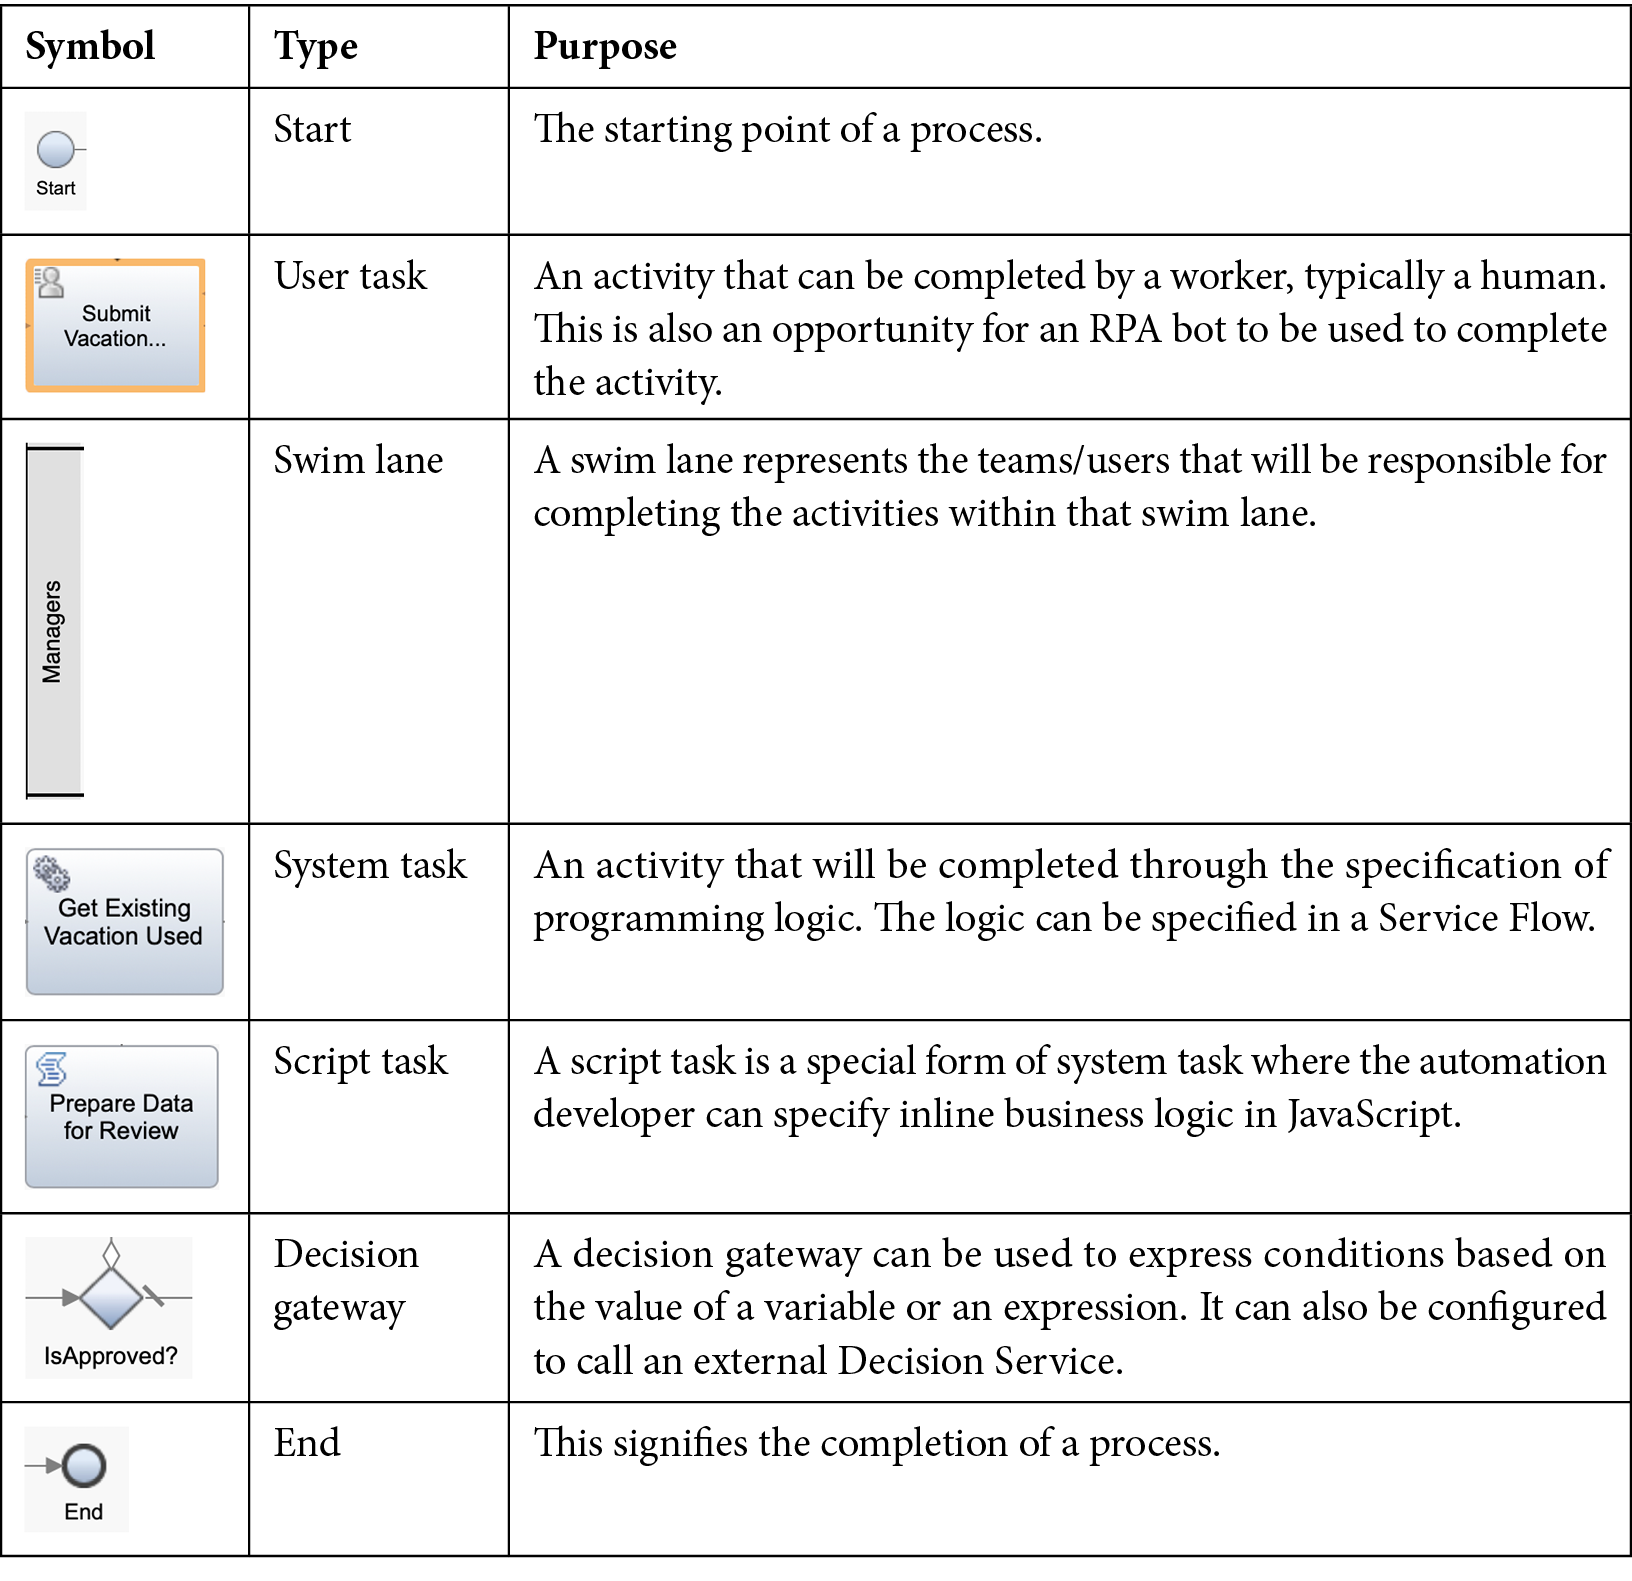
Table 2.3 – Workflow activity types
While a Process Flow is long-running (a process can take minutes, days, or months to complete), a Service Flow can be used to specify a set of activities that can be completed within a short duration – for example, calling an external service and preparing the result for the next step in a process. A Service Flow is like a process, except it has no swim lane and all activities are assumed to be completed without human intervention:
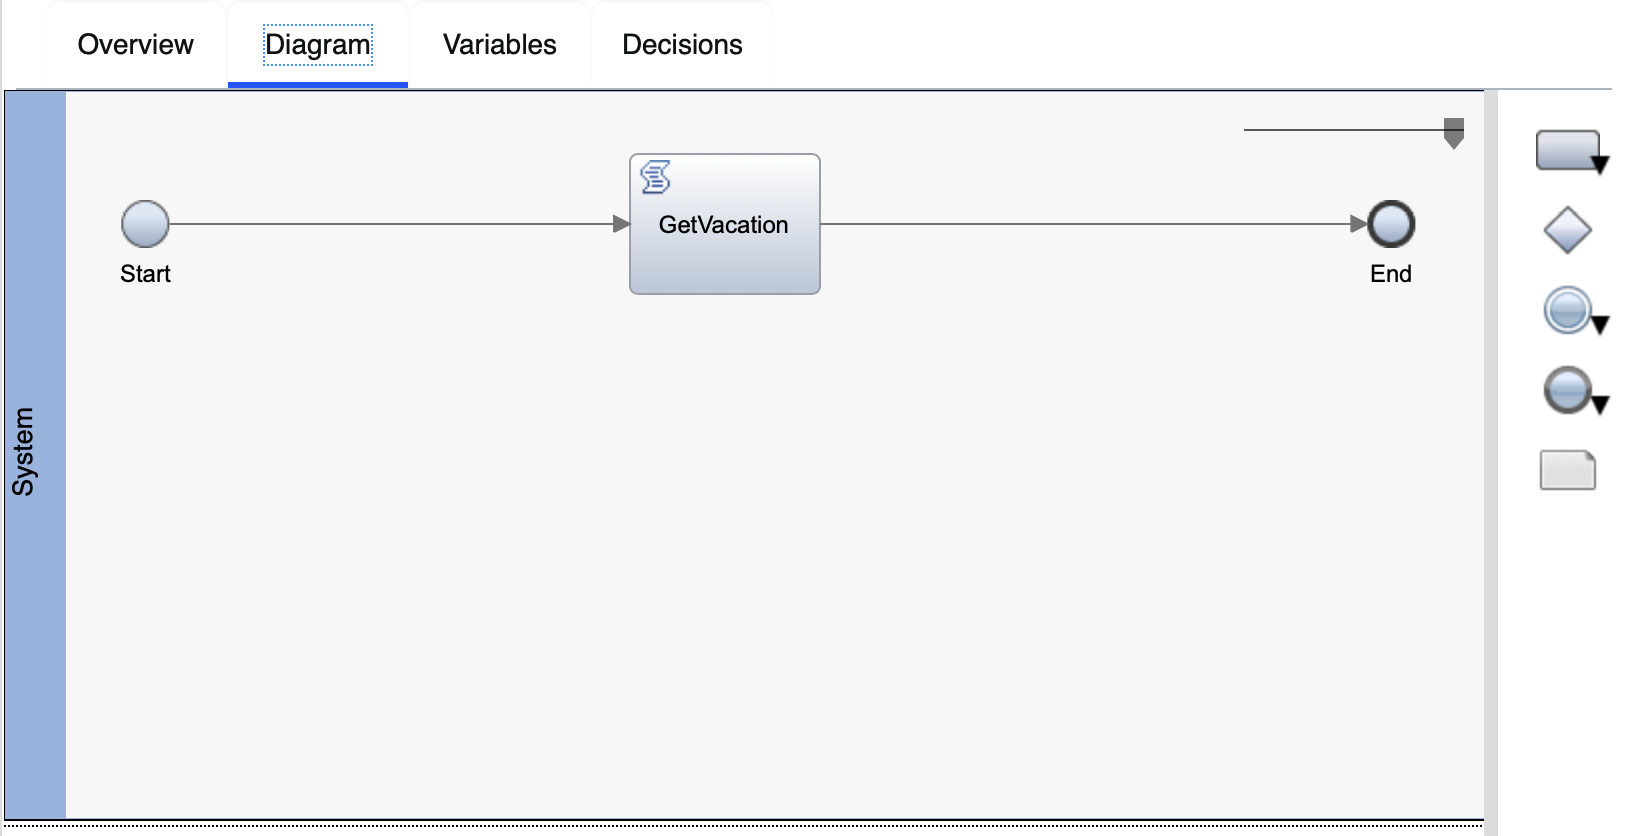
Figure 2.14 - A simple Service Flow
User interfaces – User Task
Anytime during a workflow that you need to engage a person to complete the work, you will need a user task. This kind of work can be quick, such as filling in the contact information of a customer, but it can also represent an offline activity that will take a while to complete, such as delivering a package across the country. Each User Task must be assigned a team, and optionally a deadline. A team can be defined statically with a selection of members within an organization or can be defined dynamically through a service flow. Each team will also have a manager that can be used by the system in case of an escalation due to an overdue task.
Once a workflow reaches a user task, it will wait until the task is picked up (or claimed) by a user that belongs to the team that has been assigned to the task. It is important to note that while the workflow is waiting, it is being put in the background; other workflows in the system can continue to run while this is happening.
The following diagram is an example of a user task. In this user task, Review Vacation Request, the managers will be presented with a user interface where they can decide whether a given request should be approved or not:
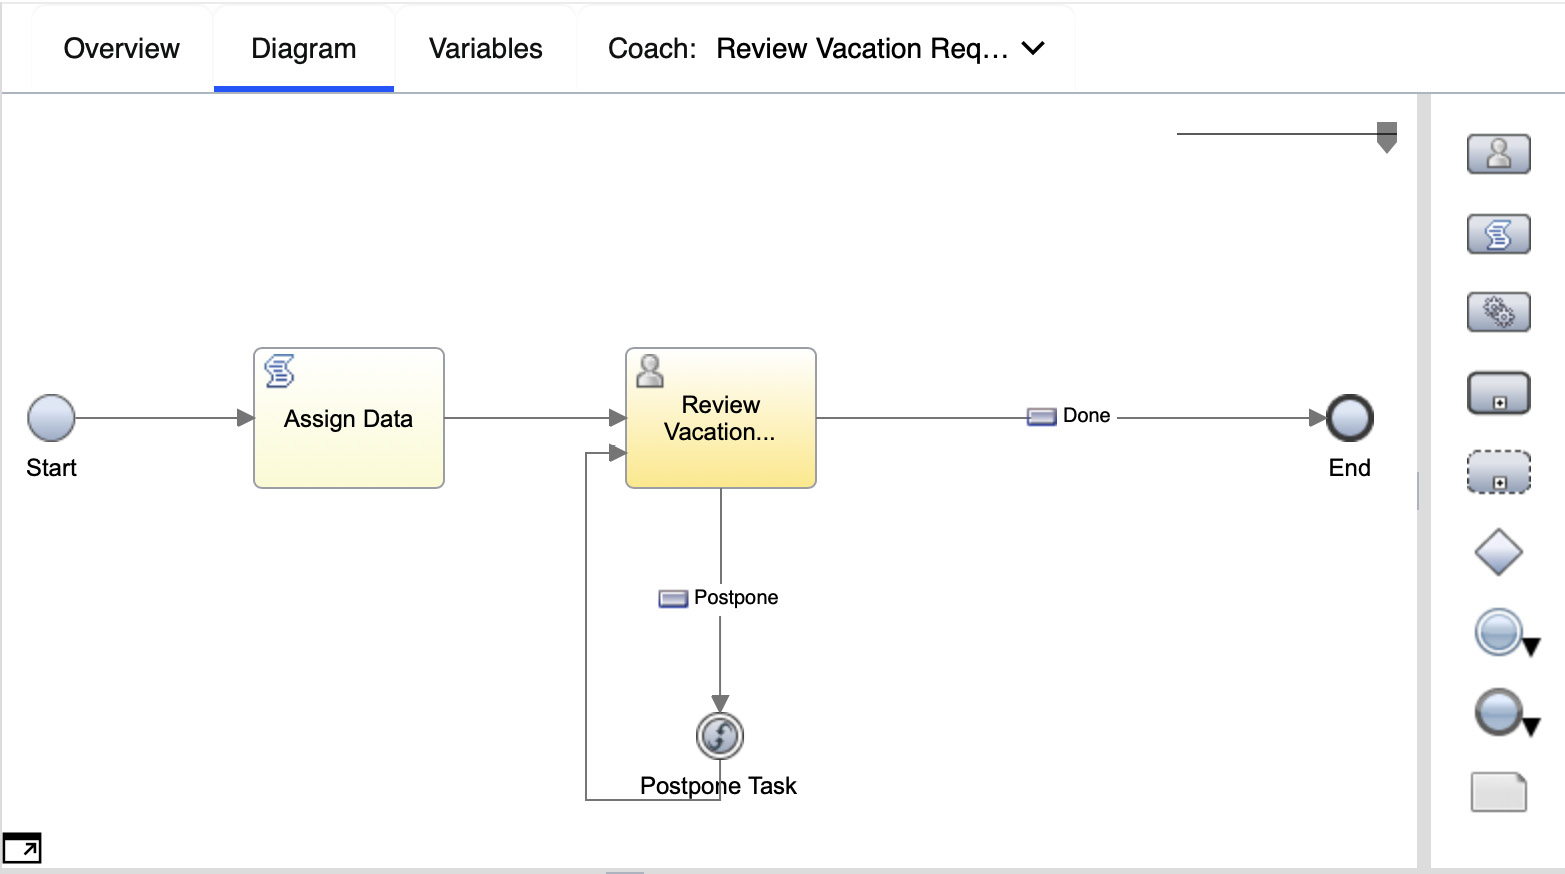
Figure 2.15 – User interface page flow – client-side human service
Workflow Process Server and Workflow Process Service
Once the automation developers are satisfied with the business logic of the process, they can create a version (called a Snapshot) of the workflow application and then deploy it onto the Workflow Process Server.
In 2020, a single lightweight Workflow runtime container called Workflow Process Service (WfPS) was added, where developers can run this workflow as part of their existing applications.
All BPMN-based process applications built with Workflow Designer are full-featured Workflow Process Server or a lightweight standalone Workflow Process Service.
Workplace
During the execution of a process, once a team has been assigned a task, the system will send a notification to all team members with a URL to log into the IBM Workplace. Once logged in, all users will be presented with the set of tasks that were assigned to them.
In the screenshot, two outstanding tasks have been assigned to the person, one for Create position request and another for Submit Vacation Request:
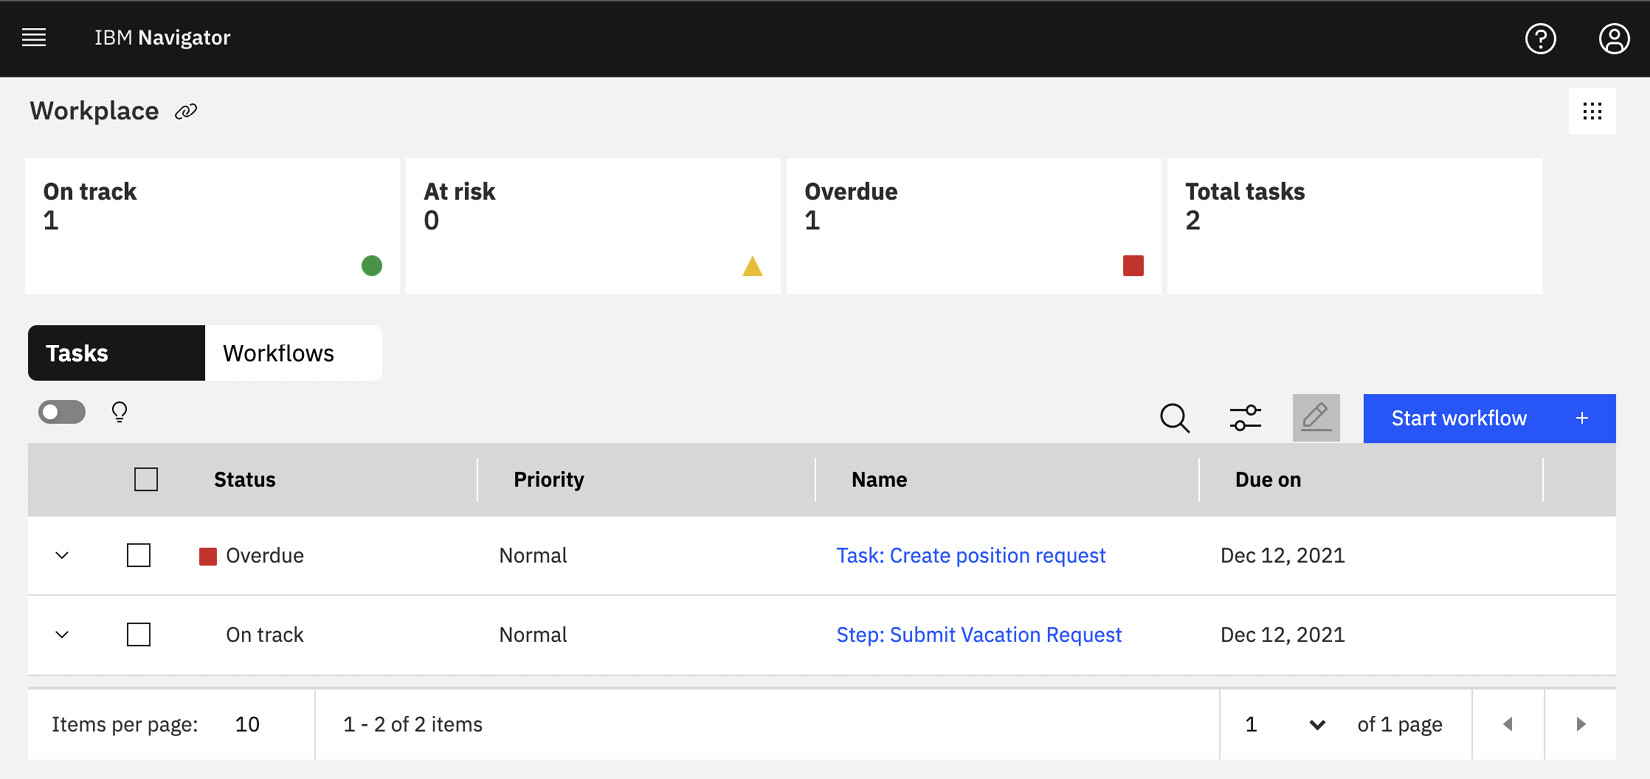
Figure 2.16 – IBM Workplace
Other optional components
There are also optional components that offer more advanced capabilities:
- Workflow Federation Server: This allows customers to deploy multiple Workflow systems but still provide a single Workplace and task list for all the workflow users. Having multiple workflow systems provides more flexibility in managing the scalability and availability of many different workplace applications.
- Workflow AI Server: This allows customers to leverage information gathered during the execution of the business processes to derive insights with the help of AI. We will provide a more in-depth discussion on this in Chapter 12, Workforce Insights.
Case management
In the domain of workflow automation, not every single business process can be sequenced or specified ahead of time. We can make the argument that the majority of the work cannot be fully sequenced and may rely on the knowledge of the participants to guide the next step(s) of the process.
As an example, let’s say you have gone to the doctor. During the visit, the doctor will perform a diagnosis based on your symptoms. Based on the initial diagnosis, the doctor will provide some advice on what the proper next steps are. The doctor might prescribe medicine or refer you to a specialist. However, given the wide variety of outcomes, trying to model this as a business process would likely create a very complex model, and would never be complete. In the workflow domain, the doctor is a knowledge worker, and what to do next depends on suggestions of the worker based on what he/she can determine. One common thing is that each patient in a doctor’s office will likely have a file containing the patient’s medical history, and every visit would be considered a new case. Based on the decision of the doctor, the case will be either closed with recommendations, scheduled for a later follow-up, or passed to a specialist for further examination.
The purpose of case management is to allow us to describe this workflow in a way that matches what would have happened in real life, but still allow enough flexibility so that all the knowledge workers can participate to guide the next steps.
Doctors are not the only knowledge workers. We are all knowledge workers in the domain that we are specialized in. We could be a courier trying to decide the best route to deliver a package, a repairman deciding how to best repair an appliance, or an insurance adjustor deciding whether a claim can be approved or not.
Key components and concepts of case management
Case features are additional capabilities that can be added to your workflow automation project. They introduce case solutions and case types to the overall solution.
Workflow Automation Project – case features
Case support is part of your workflow automation project. When creating a workflow project, you can turn on case features:
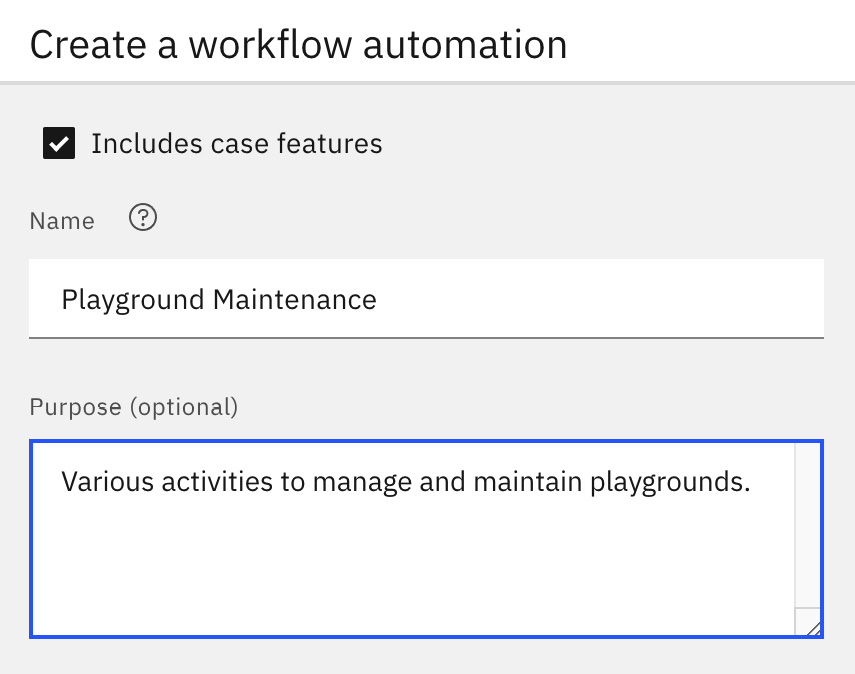
Figure 2.17 – Create a workflow automation
Once you choose to include the case features, you will be taken directly to the Case Solution view. Within a case solution, you can still make use of all the process features that we described earlier. It is just that in this situation, we are assuming that your intelligent automation solution is a case-like solution.
Case solution and case types
A case solution includes all the things necessary to describe the different possible cases and how those cases should be handled. The following screenshot shows what a case solution might look like to help various playground staff manage playground maintenance:
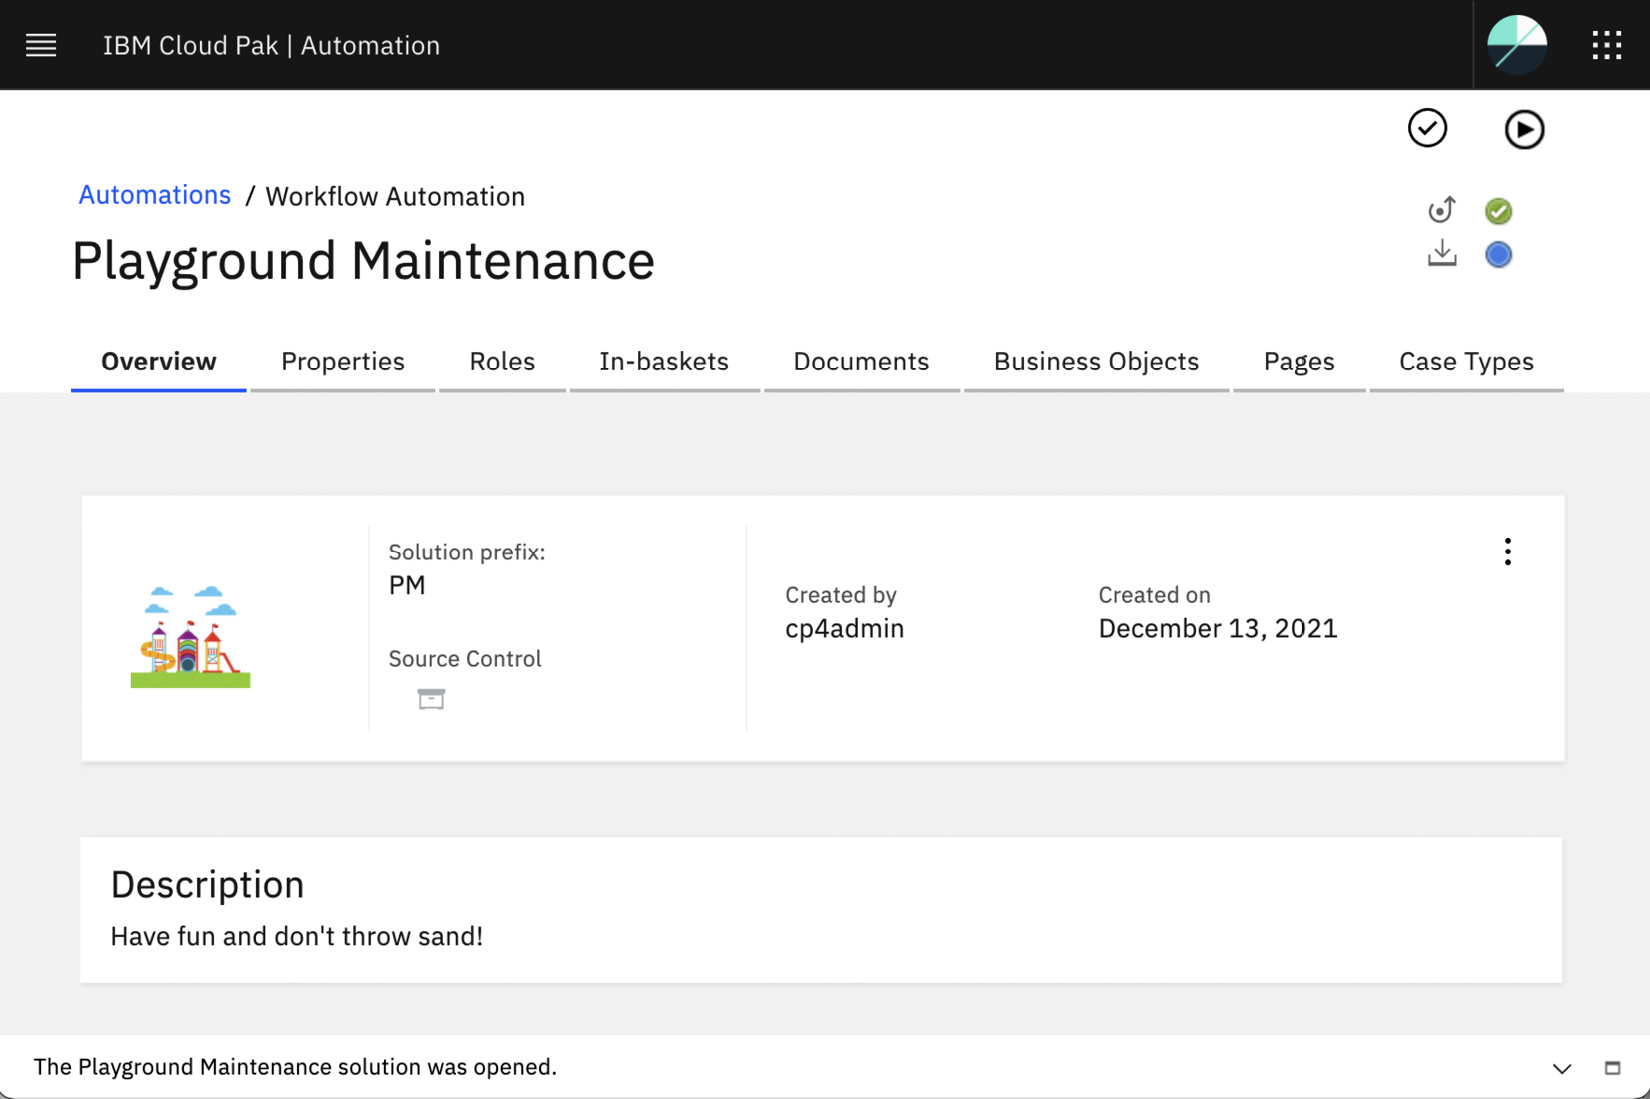
Figure 2.18 – Case solution for playground maintenance
A case solution is divided into eight different sections:
|
Sections |
Purpose |
|
Overview |
The overview and description of the case solution. |
|
Properties |
Every case solution has a set of properties, be it the approver, the start date of a case, or the decision. Each property will have a data type such as an integer, a date, or a business object. |
|
Roles |
Who can work on the case, and what roles would each person have? This could include Manager, Maintenance Team, and so on. |
|
In-baskets |
This is the task list of the worker. Every day, the workers can inspect their in-basket(s) to see if there is new work waiting for them to do. |
|
Documents |
Many case solutions are document-centric. In the case of the doctor’s office, we have the patient view records and various medical reports. In the case of playground maintenance, we have pictures of the damage, repair invoices, and so on. This leverages the powerful document classification and metadata capabilities of the underlying FileNet Content Services. |
|
Business objects |
Business objects represent the data definition that can be used as a type of property. |
|
Pages |
Workers work with a case solution through a set of user interfaces that we call pages. The advantages of our case solution approach are that there is already a set of pre-built case pages that the automation developer can customize, as opposed to them having to build them out themselves. |
|
Case types |
In a case solution, there are different case types. In the playground maintenance example, we have a case type called Issue where someone can report an issue that will require maintenance. |
Table 2.4 – Workflow case features
The following screenshot shows the list of properties associated with the Playground Maintenance project. A property can be of the Boolean, DateTime, Float, Integer, String, or Business Object type:
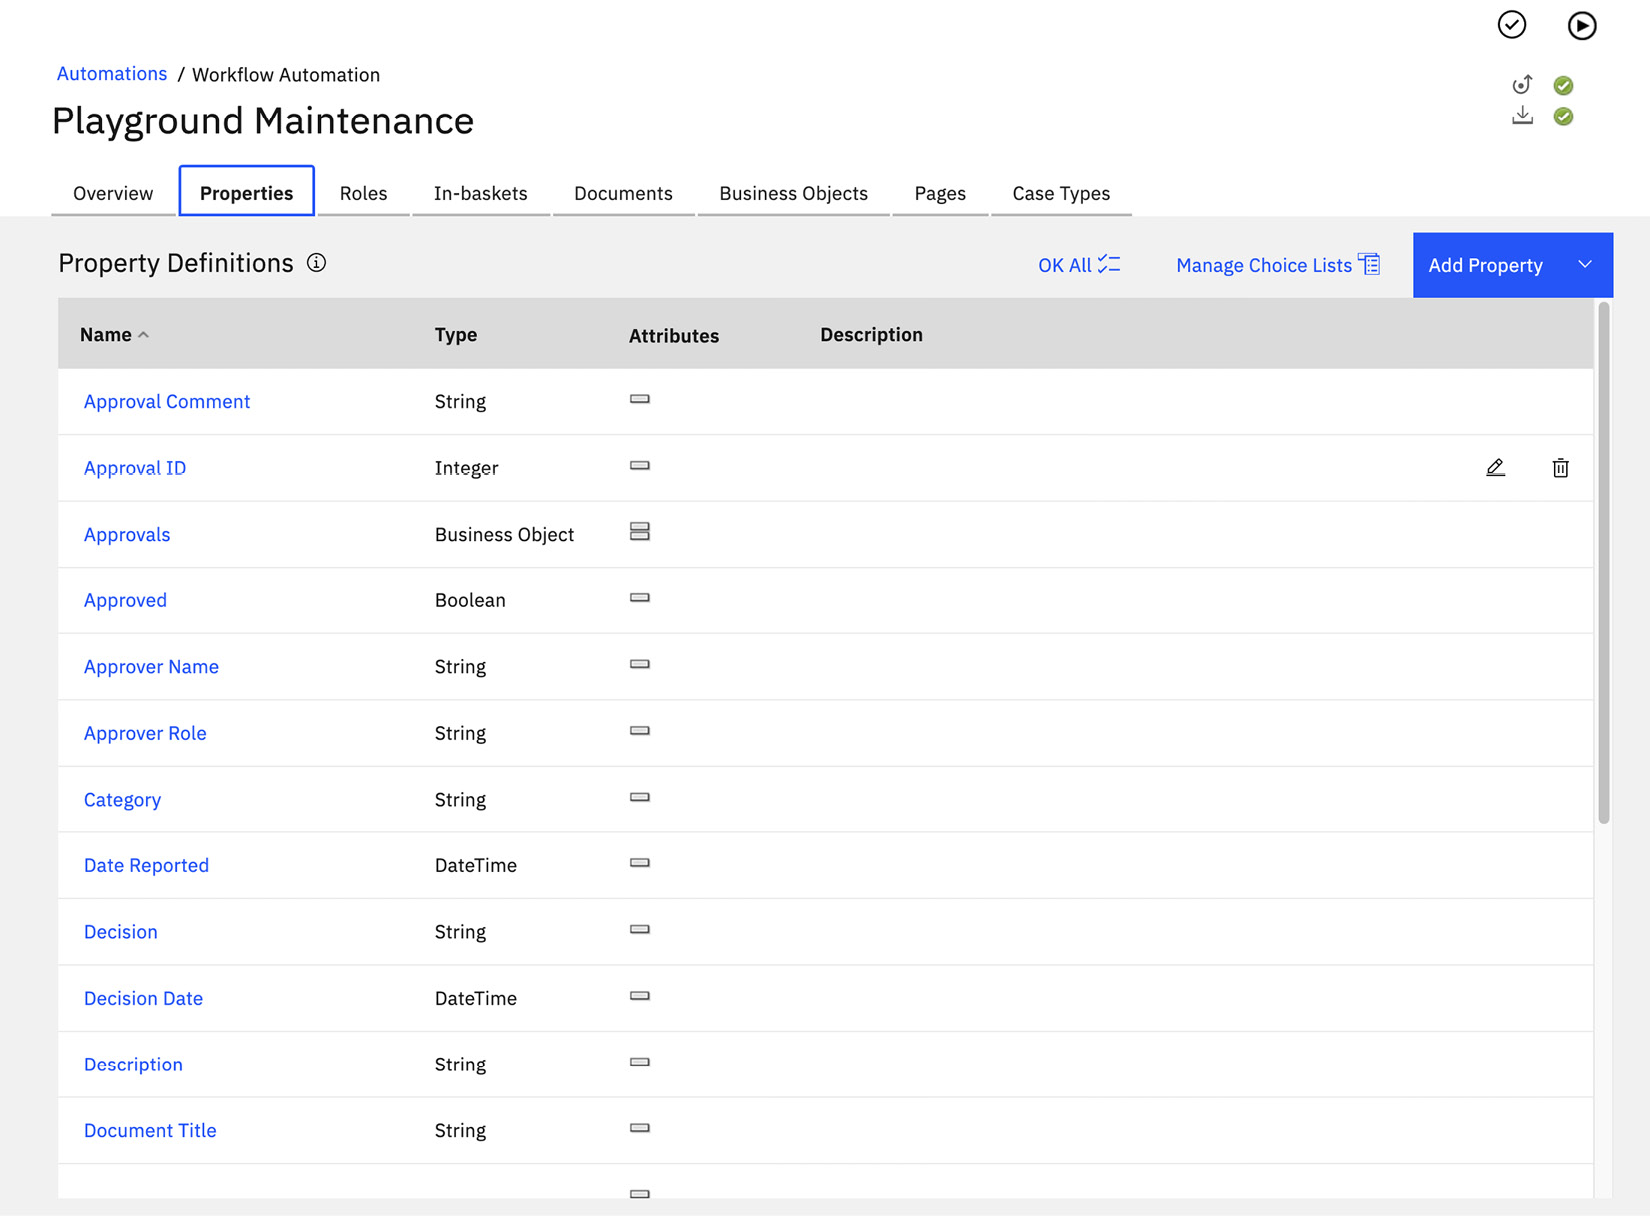
Figure 2.19 – The Properties view of the case solution
Case Pages is where we will define the user interface that a worker will use when working on a case. There is already a set of predefined case pages, such as how to handle case details, how to handle adding or splitting a case, or how to perform work on a particular task. In the Playground Maintenance project example, Case Details will contain information such as the date of the submission, which equipment is broken, and how important the issue is:

Figure 2.20 – Case Pages
Case Types is where the automation developer can define the set of cases that this case solution will handle. In this simple example, there is only one case type – Issue. Within a case type, we can define multiple forms of activities. Unlike a process diagram, there are no lines that indicate the flow of activities. Instead, we have a concept of precondition, which describes when a specific activity will become active. In the following screenshot, there are four activities. Two of them will be started as soon as the case starts (New Issue Review and Legal Review), while the other two (Approval Request and Document Review) are discretionary:
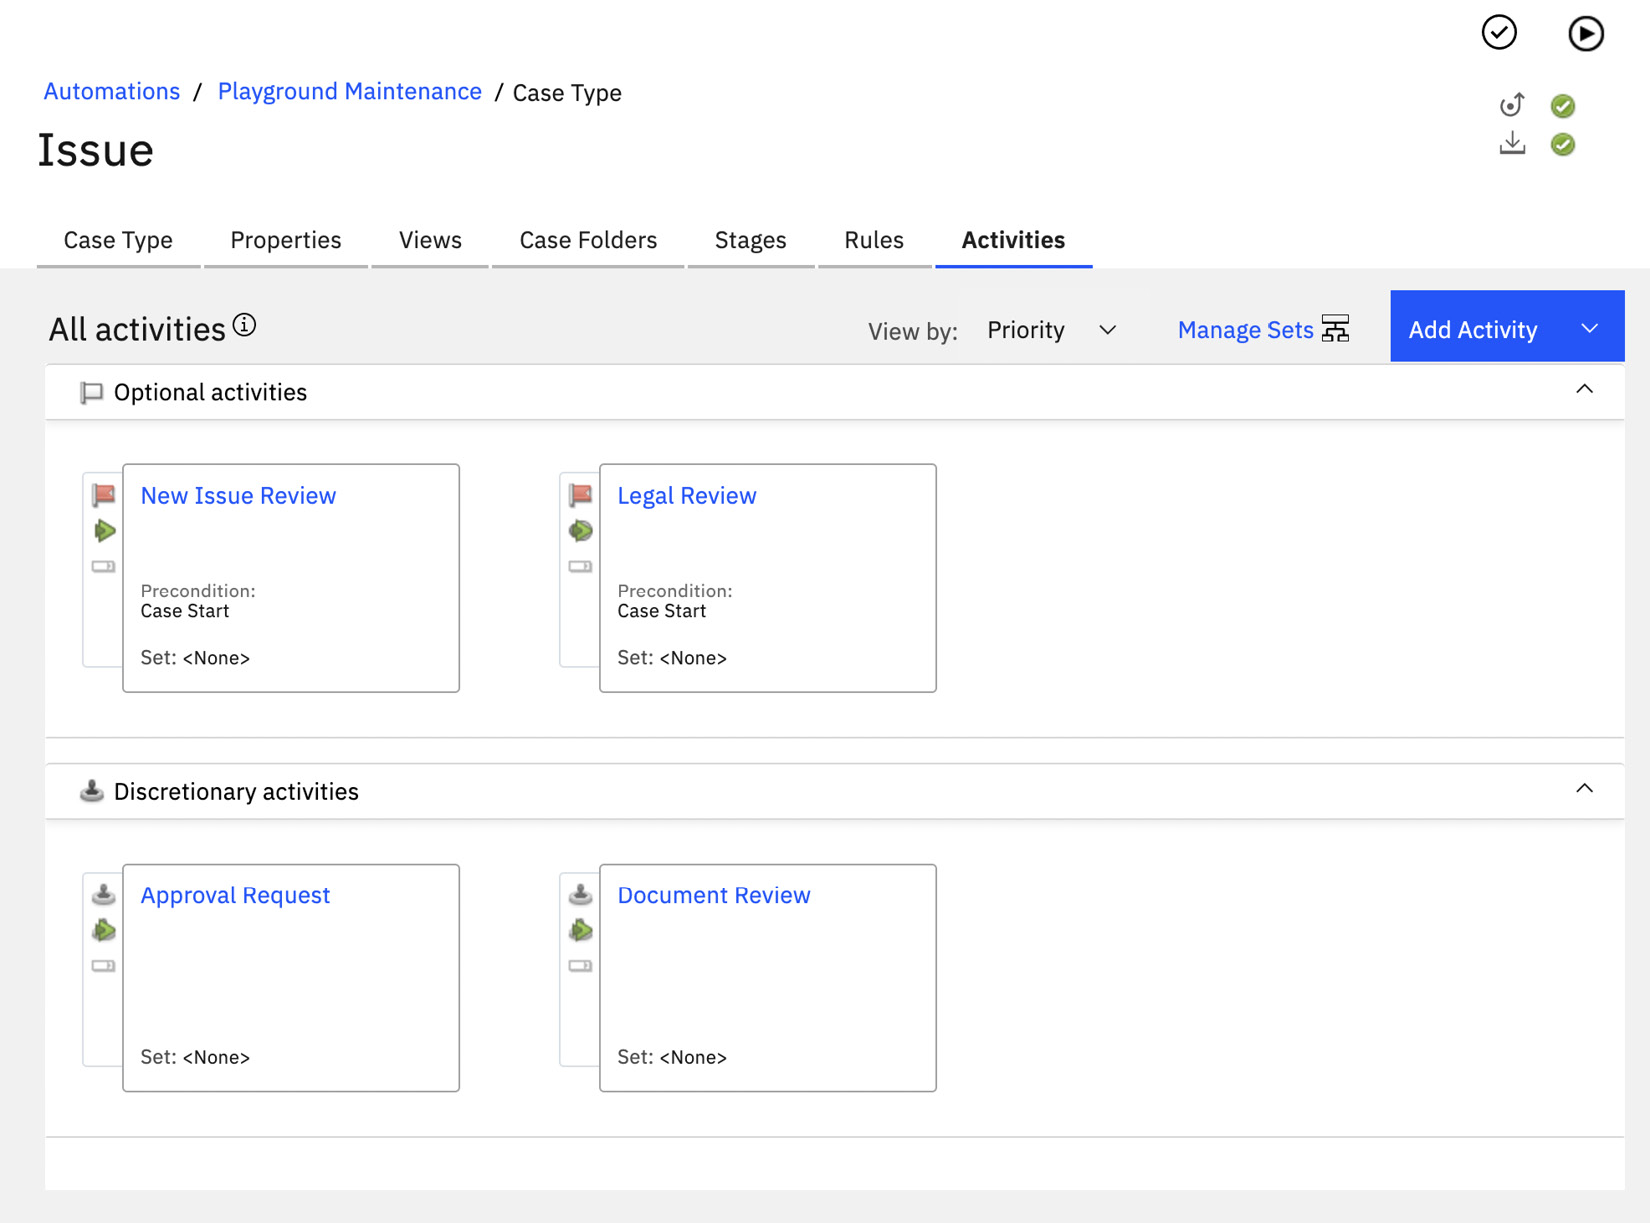
Figure 2.21 – Case diagram
A case activity can be a simple human task or it can be set up to launch a business process created by the workflow process designer:

Figure 2.22 – Case activity implemented by a process
Once a case solution is ready, we can try it right away using the Playback feature by launching the solution directly from the designer. Once launched, you can add a new case by providing the necessary information as part of the Add Issue page:
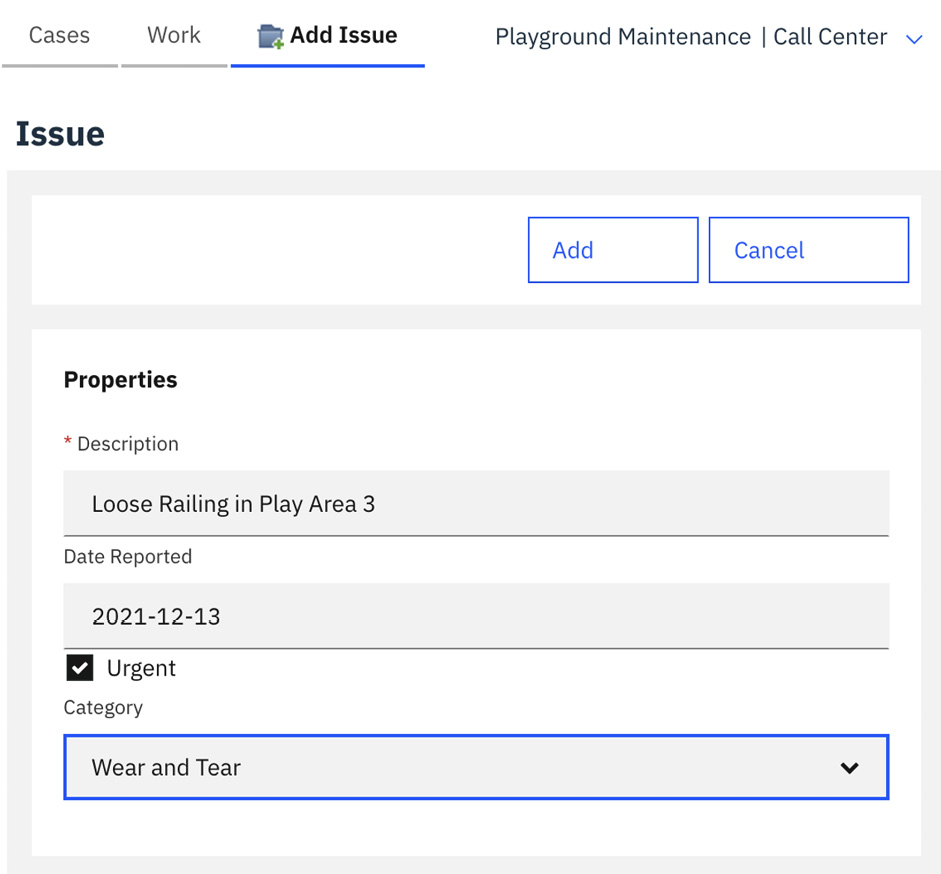
Figure 2.23 – Opening a new case
Once a new case has been opened, case workers can add more details to the case. In our example, case workers can add photos to show how the railing is loose and quotes they can get from vendors on how much it would cost to fix the issue:
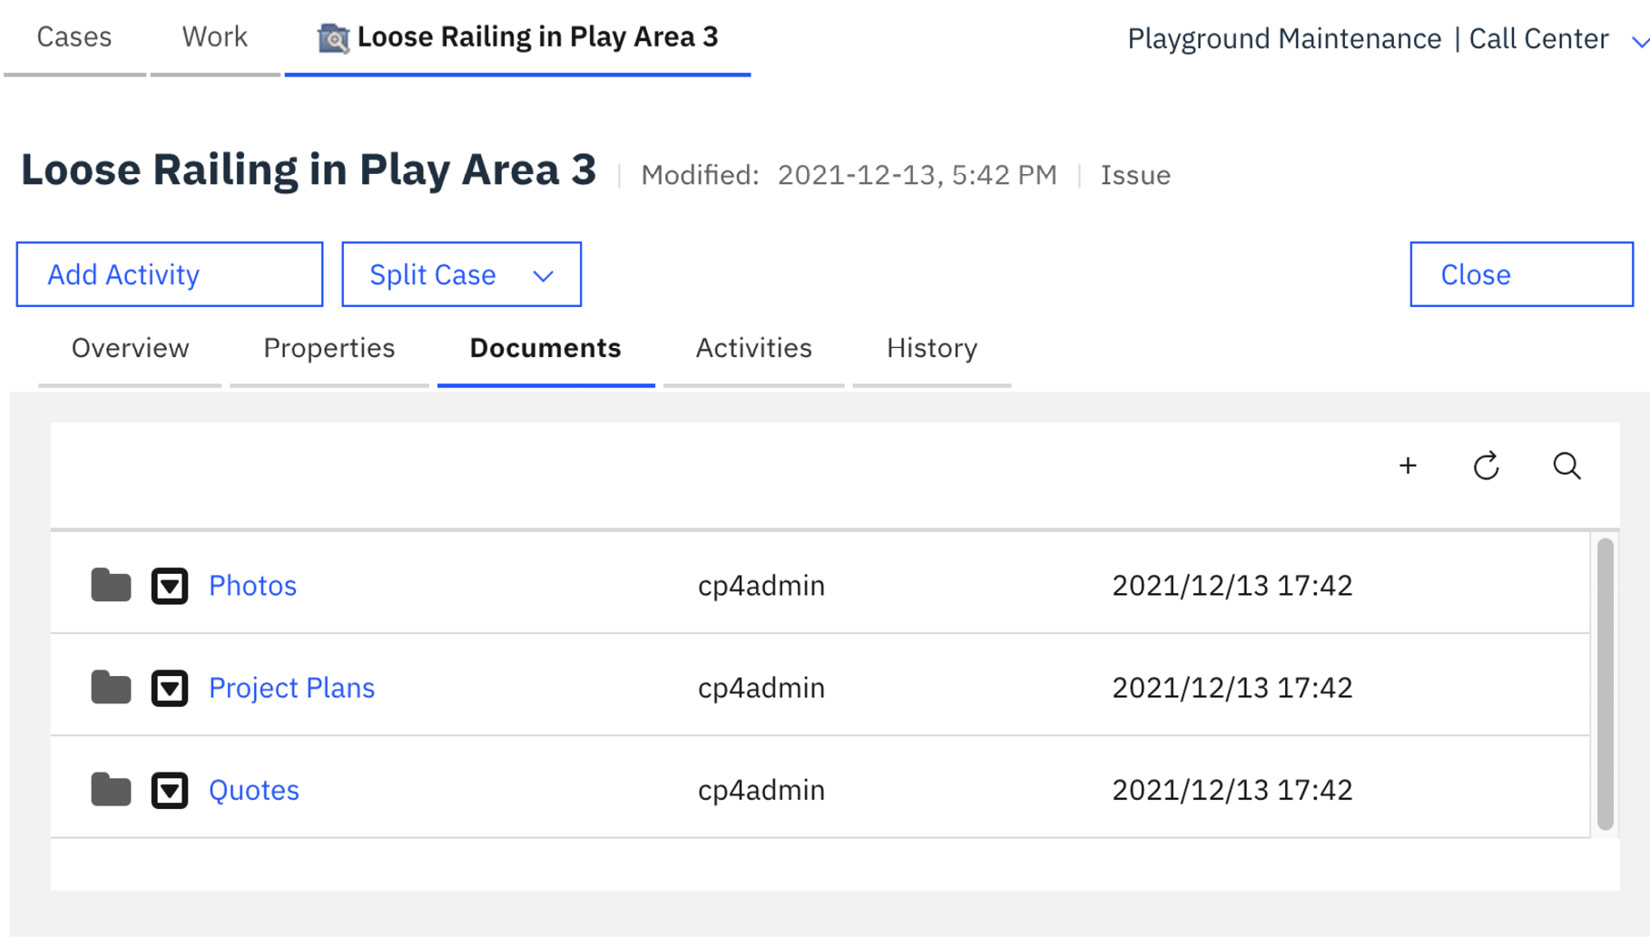
Figure 2.24 – Working a case by the case worker
Once a case is completed, the case workers can close the case, and the system will retain all data and information. In the future, a case can be reopened by the case workers.
Hopefully, by now, you have a general idea of why workflow automation is an important aspect of any intelligent automation solution. In a way, workflow automation is the glue that ties all the different pieces of an automation solution together. In Chapter 7, Workflow for Process Automation, we will provide more details on how to build an end-to-end workflow automation solution.
Decisions
In general, decisions are the results of the rules and policies made as part of your day-to-day business operations. In decision automation, the goal is to provide a system where those rules and policies can be modeled, managed, executed, and monitored. Within IBM CP4BA, we have two related decision management platforms targeting different experiences – IBM Operational Decision Manager (ODM) and IBM Automation Decision Services (ADS). While both systems can be used for decision management, IBM ODM is more focused on enterprise-wide rules management and is more geared toward developers. On the other hand, IBM ADS is designed from the beginning to support a low-code/no-code experience to build enterprise decisions and is part of Business Automation Studio. In this book, we will focus more on IBM ADS.
In ADS, we provide a low-code design experience where automation developers can express the decisions based on the Decision Model & Notation (DMN), as defined by the OMG Standards Development Organization. DMN is a modeling notation that is designed to support the precise specification of decision logic.
Key components and concepts of decisions
The following diagram shows the development and runtime flows we have in IBM ADS:
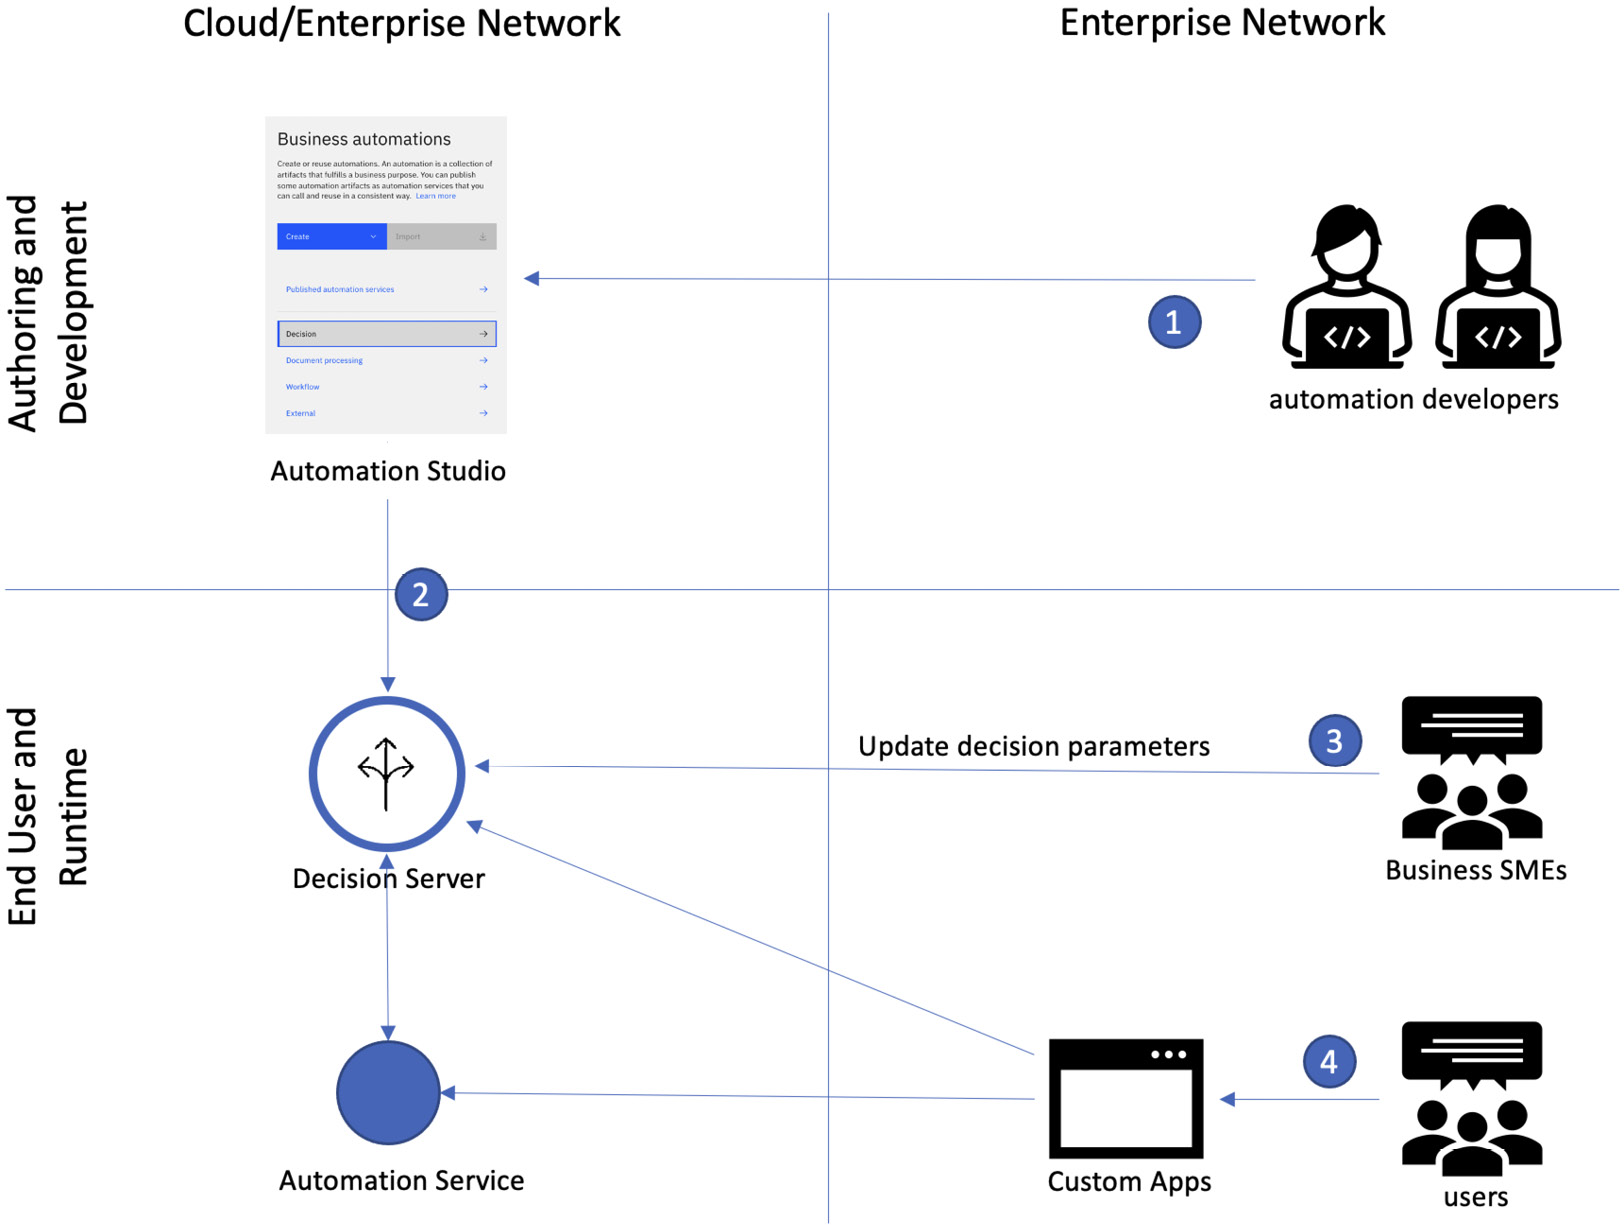
Figure 2.25 – Decision development and runtime flow
Let’s look at this in more detail:
- The automation developers will make use of IBM Business Automation Studio to develop the decision automations.
- Once the automations have been developed, the automation developers will publish the automations to the decision server, maybe through a DevOps CI/CD pipeline. The decision server will also publish automation services for decision services selected by the automation developers.
- Business subject matter experts (SMEs) can also make certain modifications to the decision parameters directly at runtime as the business conditions change.
- An automation developer can also build custom applications using the Business App Designer in Studio or other tools of their choice to call the decisions that are running in the decision server.
Decision Designer
The Decision Designer is where you can use DMN to describe the decision logic. The designer has three main sections, as shown in the following screenshot:
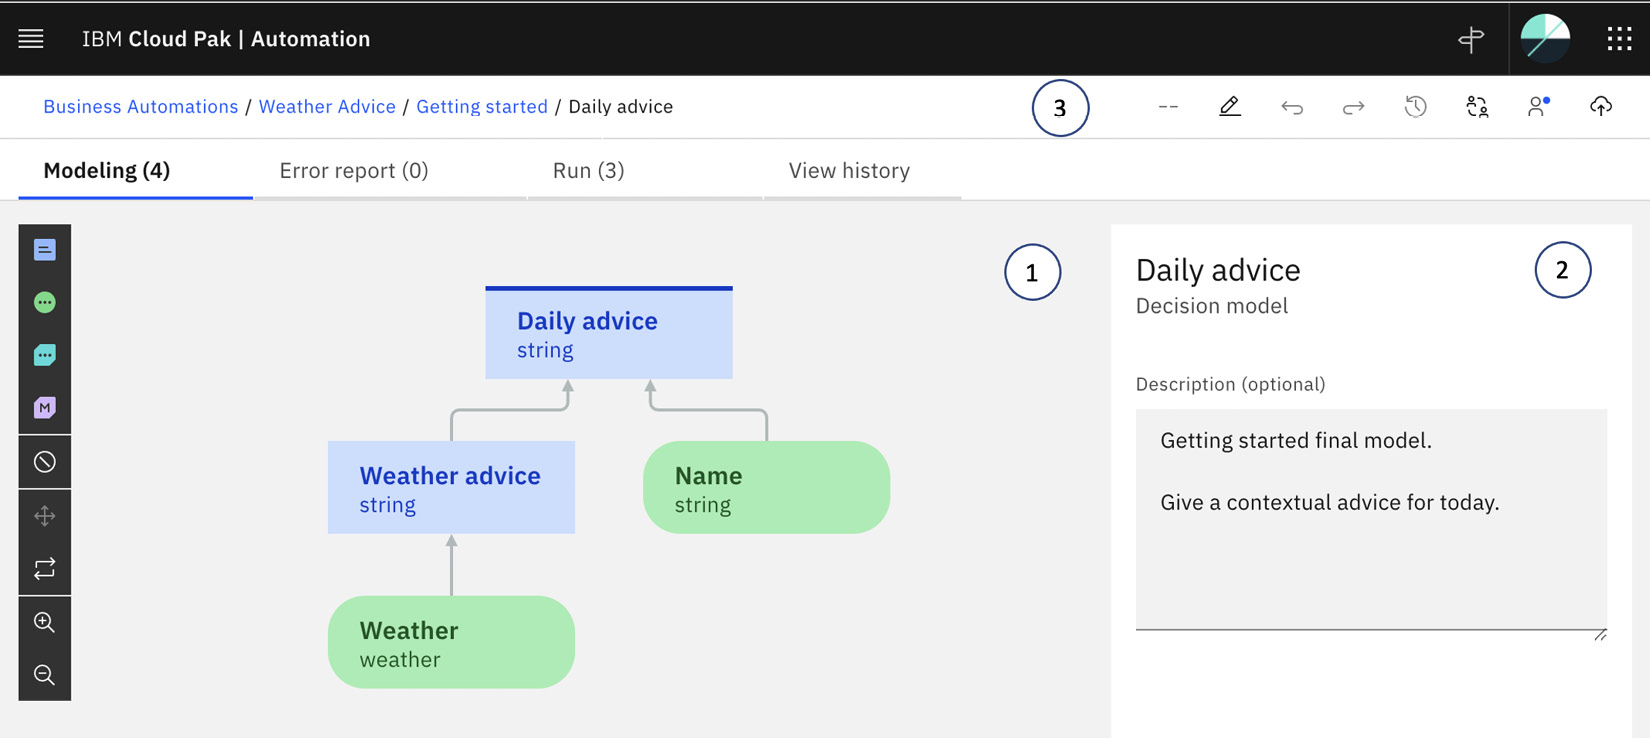
Figure 2.26 – Decision Designer
Let’s look at these in more detail:
- Decision Model: The decision model is where you can describe the decision. It is based on the DMN specification and comprises four types of nodes connected in a bottom-up data flow diagram:
- Decision node: A decision node represents a decision and contains business logic expressed as a set of business rules and decision tables.
- Prediction node: A prediction node represents the result of a predictive model. A predictive model makes use of machine learning (ML) to derive a prediction from historical data.
- Function node: A function node represents the result of another decision model. This allows automation developers to easily create different decision models to facilitate reusability and better modularity.
- Input data node: An input data node represents a piece of information that can used as input to the decision model.
- Properties Panel: This panel is used to describe the details of a specific decision node.
- Status Panel: This panel is used to describe the various states of the decision model – for example, to describe whether the decision is currently shared with other developers in the team or the number of changes that have been made.
Decision logic
There are three ways to express the business logic of a decision:
- Business rules
- Decision table
- Prediction rules with machine learning
Business rules
Business rules are logic statements such as if-then-else, except, in this case, we allow automation developers to express the business in a natural language-like syntax called Business Action Language (BAL). BAL is very powerful as it allows runnable logic to be written in a way that would allow business users to read and understand the logic.
This is important as business rules are often first expressed in documents such as contracts or regulations, and in situations where we want to allow business experts to express the rules themselves or to verify the rules later, it is important that the rules are in a form that can be easily understood.
The following screenshot shows an example of simple business rules expressed using BAL:
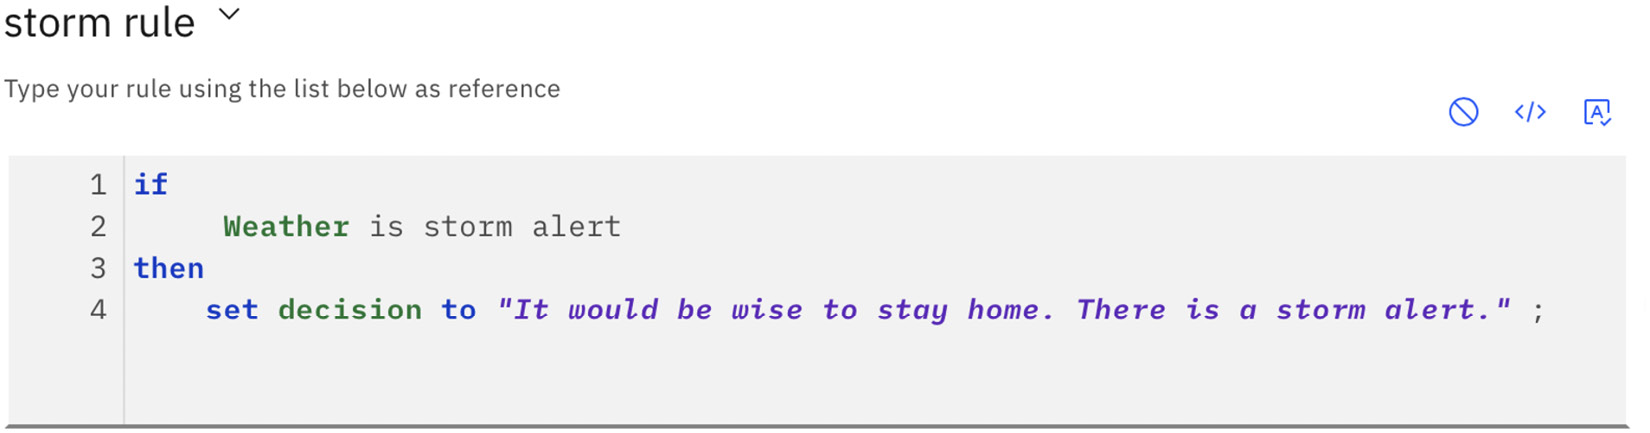
Figure 2.27 – Business rules
Decision tables
There are going to be situations where you will need to decide on multiple data points. We can always write a complex business rule with multiple levels of nested conditions, but it can become unreadable very fast. Instead, a decision table can be used.
A decision table is like an Excel spreadsheet, except the last column represents the decision to be made based on the data expressed in all previous columns. In the following screenshot, we have a decision table that gives weather-related advice, depending on the min and max rain forecast percentage and the temperature:
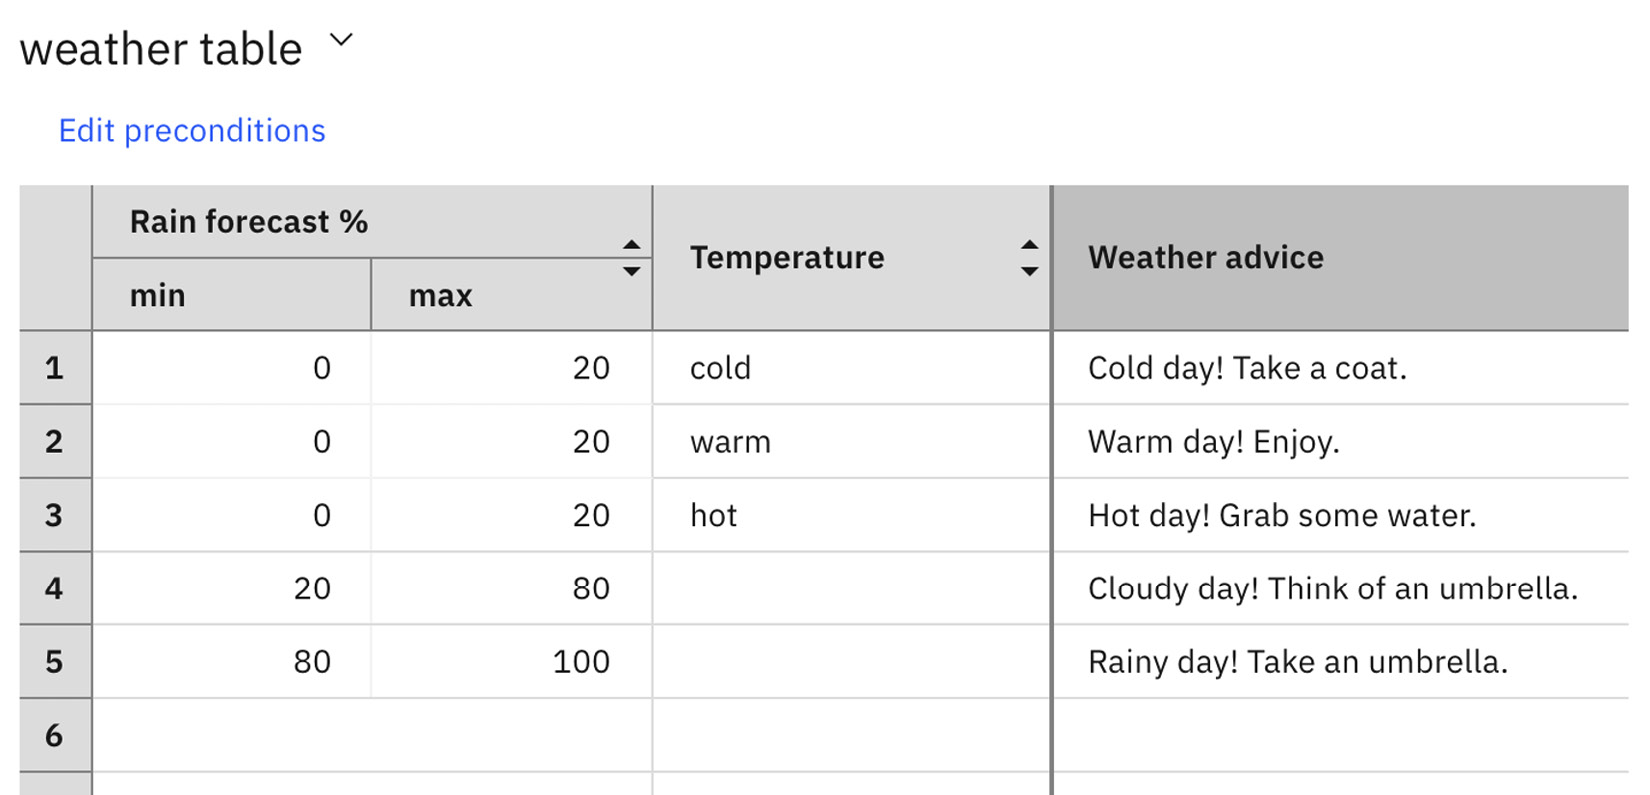
Figure 2.28 – Decision table
Predictive rules with machine learning
Traditionally, business decisions are usually expressed in deterministic logic using business rules or decision tables. However, with intelligent automation, we want to make sure AI techniques allow decisions to be made by combining deterministic logic with predictive logic based on historical behavior patterns.
In a prediction rule, we invoke an ML model to provide a prediction. This prediction can then be combined with other decision logic to create the final decision. In the following screenshot, we are making use of an ML model to predict the risk of a loan based on prior business patterns:

Figure 2.29 – Prediction rule
Decision server
Once the automation developers are satisfied with a decision, they can test it directly within the designer by going to the Run tab. This allows the automation developers to test drive the decision before publishing it as an automation service to be used by other applications, or by workflow automation:
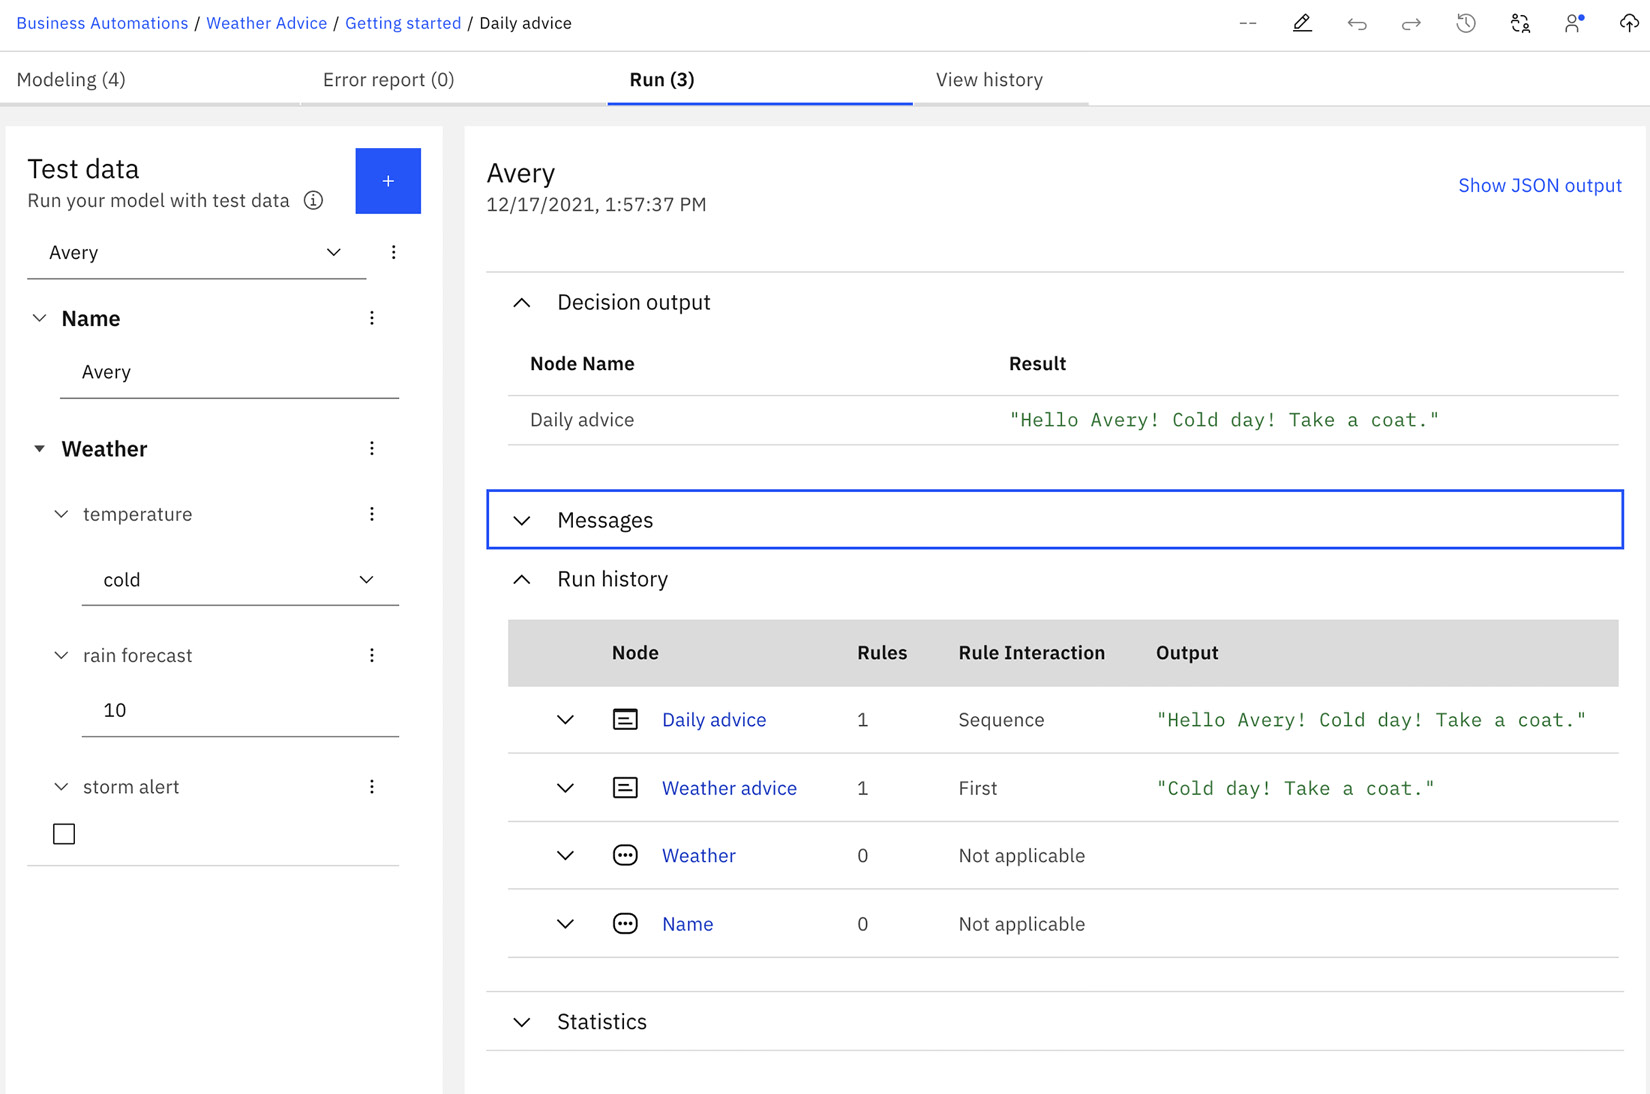
Figure 2.30 – Testing a decision
In Chapter 8, Automate Decisions to Speed Up Your Processes, we will provide a more in-depth discussion on how to build a decision service.
Business applications
To broaden the impact of your intelligent automation solutions, you need to find a way for your solutions to reach the hundreds or thousands of business users both inside and outside your organization. With IBM CP4BA, in addition to allowing you to build workflows, RPAs, decisions, and other automation technology, a low-code approach is provided so that you can visually build an end user business application by making use of all the automation that was built by your automation developers.
Application Designer provides a low-code approach for automation developers to build business applications with a highly customizable UI builder with a rich palette of controls. You can also drag and drop pre-built automation components for workflows, decisions, and content onto the canvas and connect them with UI components with no coding.
Key components and concepts of business applications
The following diagram shows the development and runtime flows we have in IBM Business Application:

Figure 2.31 – Application development and runtime flow
Let’s look at this in more detail:
- The automation developers will make use of IBM Business Automation Studio to develop the business applications.
- Once the applications have been developed, the automation developers will publish the automations to IBM Navigator, which, in turn, will publish the applications to App Engine.
- Business users can then log into IBM Navigator. Once they have done this, they can launch and work on the applications.
Application Designer
Application Designer is a low-code WYSIWYG visual designer that lets you build business applications. It adopts a drag-and-drop visual metaphor for automation developers to drag a visual component from the View palette onto the design canvas:
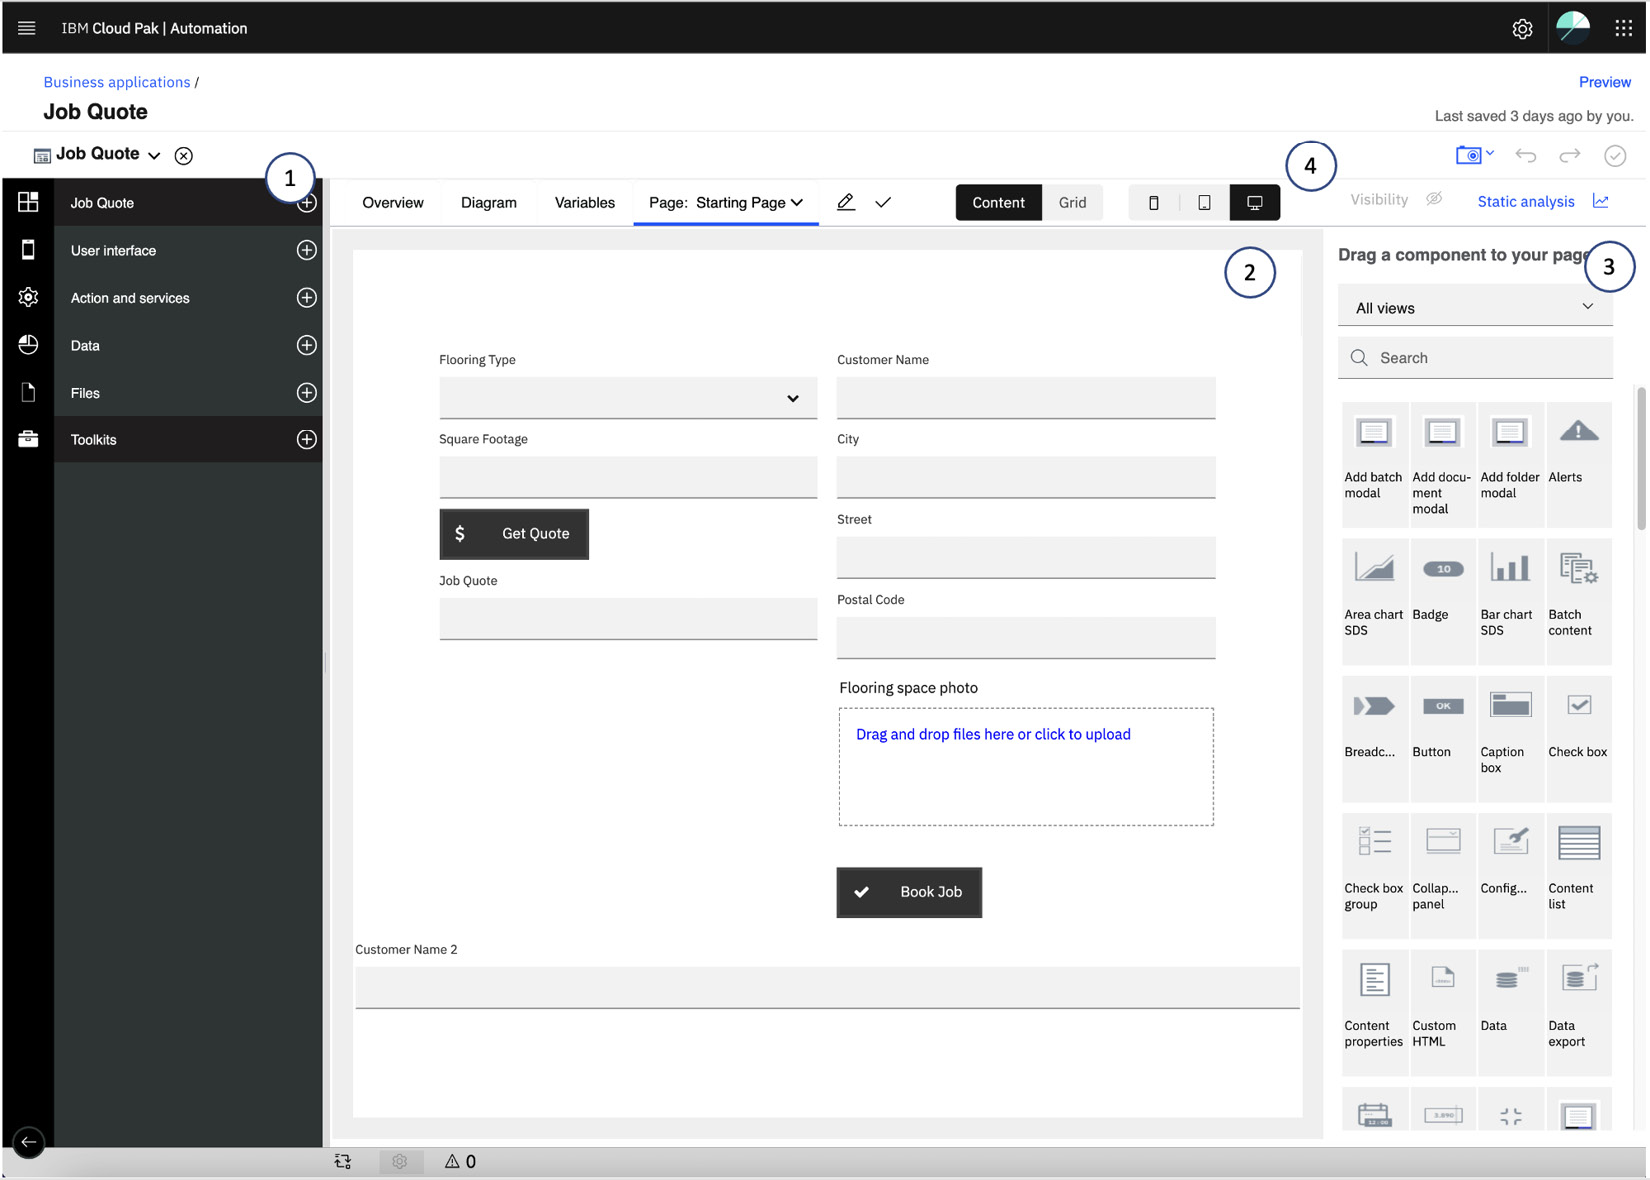
Figure 2.32 – Application Designer
There are four major sections in the designer:
- Artifact Tree: There are several artifact types in a business application:
- User interface: The user experience of the application
- Action and services: The business logic of the business application uses a combination of actions and automation services
- Data: The data definition – for example, customer, flooring type, and so on
- Files: Visual resources such as images, or custom logic with external JavaScript modules
- Page Canvas: This is where you can visually compose the user interface of a business application. There can be multiple pages in a business application, and you can create sophisticated page flow logic in the diagram view.
- Component Palette: This contains the set of all available out-of-the-box views, discovered automatic services, or custom views provided by the dependent toolkits.
- Responsive Design and Preview: One of the unique features of Application Designer is its Responsive Design feature. This means that all visual layouts or visual elements will adjust automatically, depending on the viewing platforms, whether it is on the web, a tablet, or a device. The automation developers can also customize this to provide a different experience, depending on the viewing choice of the users.
Component Palette
This is where you can select from the set of available components to build the application. There are close to 100 different visual components available, and automation developers can also contribute more to this by using templates and toolkits:
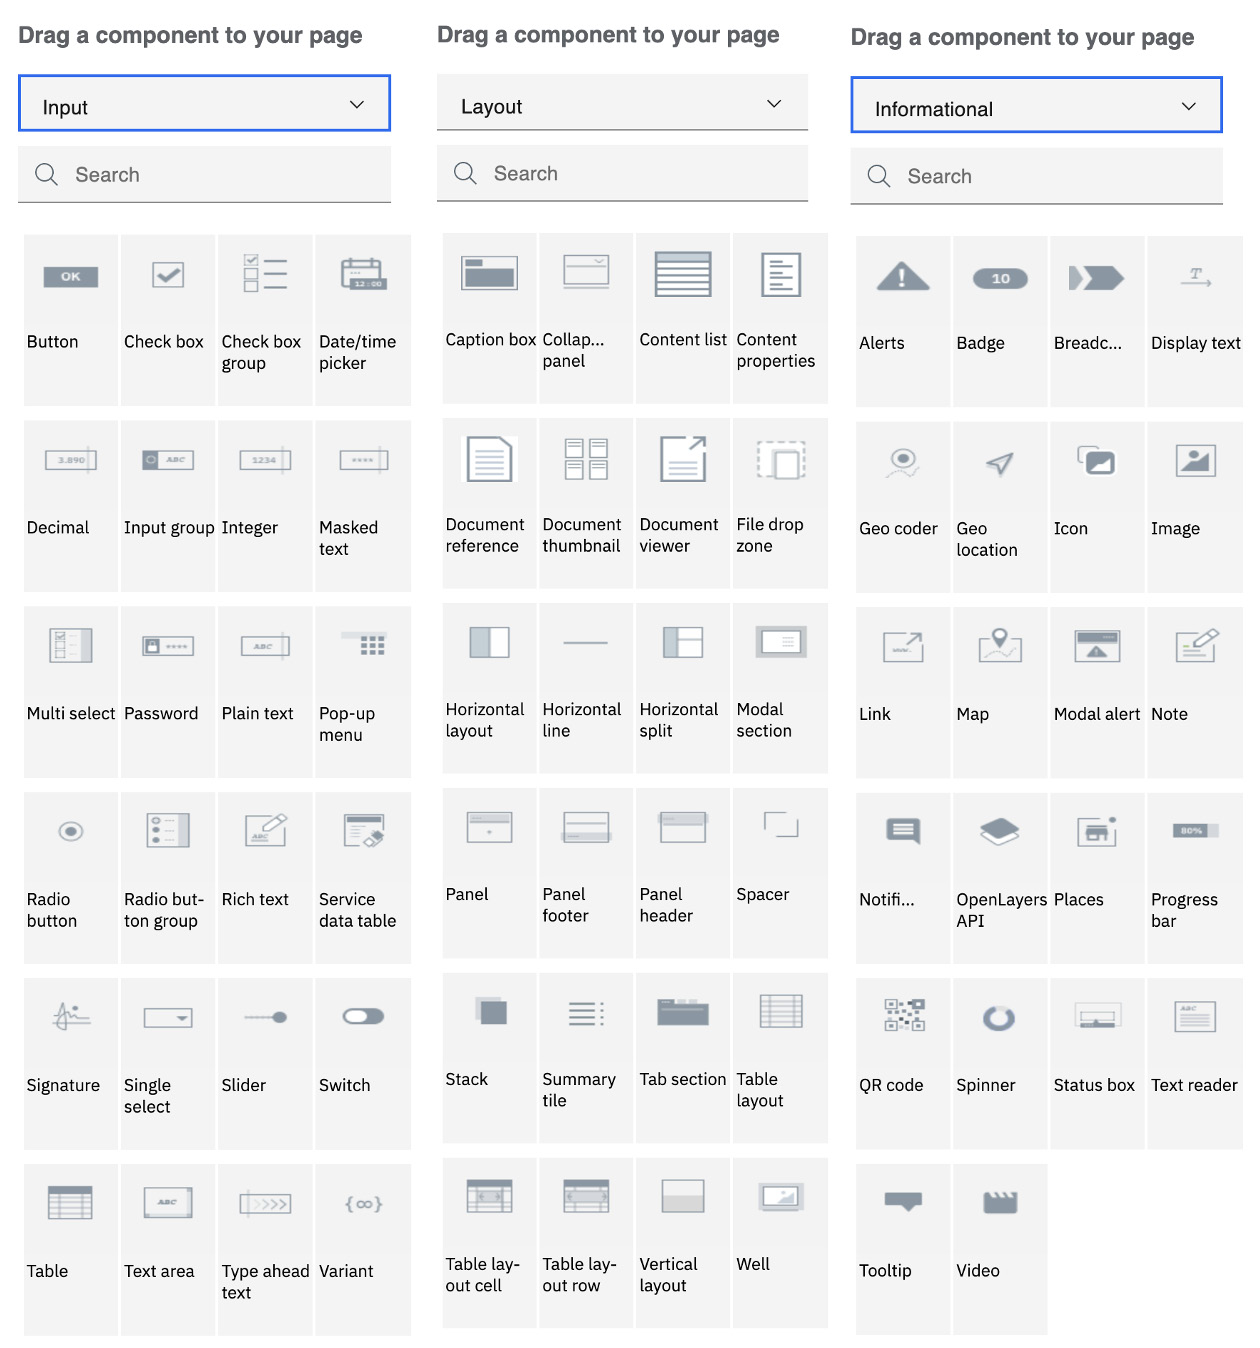
Figure 2.33 – Application Designer Component Palette
You can see the rest of the visual components here:
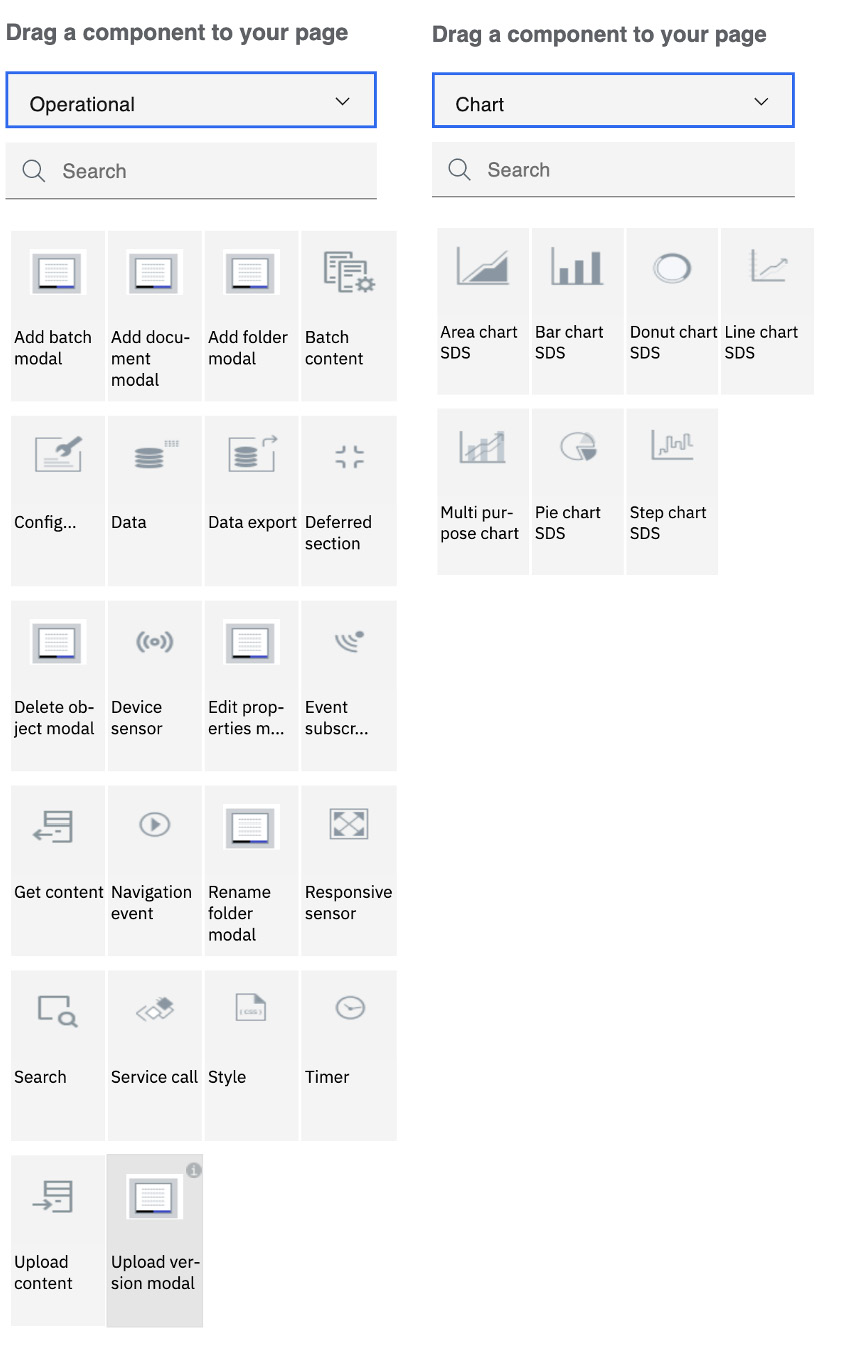
Figure 2.34 – Application Designer Component Palette (continued)
Actions and automation services
Actions are server-side business logic that will be used by the application at runtime. An action is expressed as a visual logic flow using a low-code technique such as a service flow.
An automation developer can also discover available automation services and use them in the business application. Using automation services reduces the effort required to manage dependencies between services:
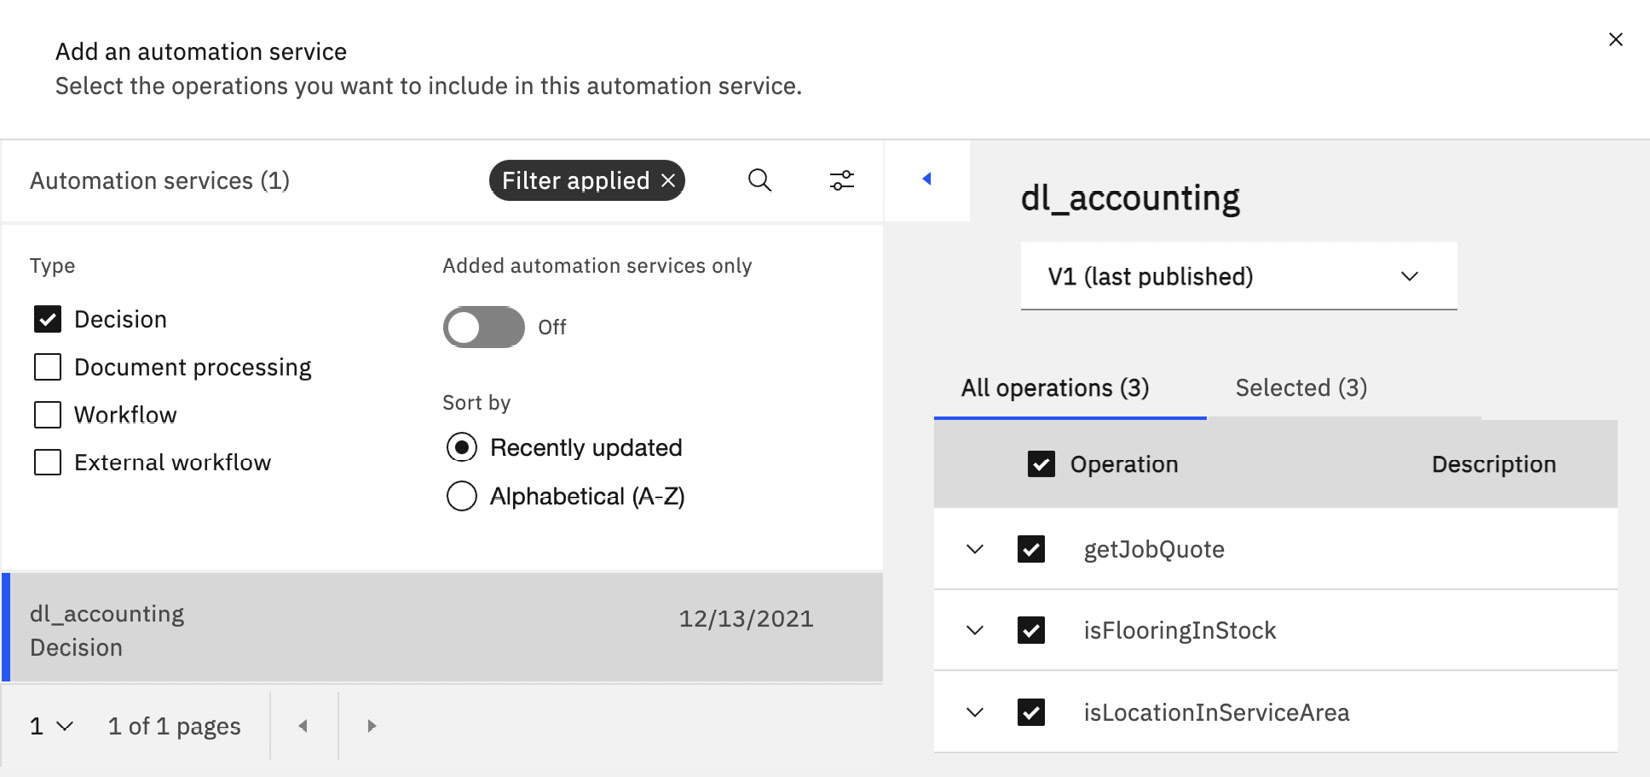
Figure 2.35 – Discovering an automation service
Preview and Application Engine
Once the automation developers are satisfied with the visual design of the application, they can run the application (such as by using the Playback capability in the workflow) by using the Preview function.
The application will then be packaged and deployed to IBM Navigator and Application Engine for execution:

Figure 2.36 – Previewing a business application
In Chapter 11, Engaging Business Users with Business Applications, we will learn more about how to build a business application as a part of an overall intelligent automation solution.
Summary
In this chapter, we learned about the four major capabilities that businesses can use to define and operationalize their automations in an intelligent automation solution. First, we talked about how RPA can be used to automate work performed by workers on their desktops, as well as to create chatbots to handle simple queries.
Then, we discussed how workflow automation can orchestrate activities across humans, robots, and systems. To add intelligence to your solution, you can express business rules and combine them with predictive logic using ML. Finally, you learned how to build business applications to provide business-friendly applications for your business users to work with all your automations.
In the next chapter, you will learn how to discover and identify what should and can be automated with Process Discovery and Process Mining.
Further reading
- IBM App Connect: https://www.ibm.com/cloud/app-connect.
- Set of available commands in IBM RPA: https://www.ibm.com/docs/en/rpa/21.0?topic=commands
- Business Process Model and Notation (BPMN 2.0): https://www.omg.org/spec/BPMN/
- Decision Model & Notation (DMN): https://www.omg.org/dmn/