
7
Accurate Extraction, and Health Insights with Amazon HealthLake
In the previous chapter, we examined the challenges in the review and verification stage of the Intelligent Document Processing (IDP) pipeline. We looked at how we can leverage business rules with serverless architecture to automate validation, such as checking the completeness of a document. We also discussed how to leverage and automate human review with AWS AI services and discussed completeness checks with post-processing logic. We learned how to use the Amazon Comprehend PII and Amazon Comprehend Medical PHI detection APIs to handle sensitive data. We will now change gear and dive into document processing with clinical health data extraction and insights with Amazon HealthLake. We will navigate through the following sections in this chapter:
- Introducing Fast Healthcare Interoperability Resources (FHIR)
- Using Amazon HealthLake as a health data store
- Handling documents with an FHIR data store
Technical requirements
For this chapter, you will need access to an AWS account. Before getting started, we recommend that you create an AWS account by referring to the AWS account setup and Jupyter notebook creation steps mentioned in the Technical requirements section in Chapter 2, Document Capture and Categorization
You can find Chapter-7 code sample in GitHub: https://github.com/PacktPublishing/Intelligent-Document-Processing-with-AWS-AI-ML-/tree/main/chapter-7. Also recommend to check availability of AI service in your AWS regions before using it.
Introducing Fast Healthcare Interoperability Resources (FHIR)
Despite the widespread usage and adoption of Electronic Health Records (EHRs), one-third of providers, payers, and care teams struggle to exchange healthcare data. A patient may go through multiple doctor visits, routine check-ups, and lab tests over time, and we should treat all this data as essential. But this data is siloed and doesn’t provide a central patient view, which thus makes the goal to catalog the entire patient’s medical journey.
Healthcare data interoperability is a step toward combining health data across various disparate systems and sites to help healthcare professionals to spend more time with their patients rather than performing healthcare data collection.
Although healthcare organizations define interoperability standards, it is not enough. While data standards have been available in the past, they have not been sufficient to achieve full interoperability. For interoperability to be successful, healthcare organizations need a more granular focus that encompasses syntactic interoperability, where a common standard and language are used to interpret the data.
The Health Level Seven® (HL7®) Fast Healthcare Interoperability Resources (FHIR®) standard defines how healthcare information can be exchanged between different systems. Data can be stored in different formats and on disparate systems. One of the main requirements of FHIR is to follow secure and confidential data exchange methods. The standards development organization HL7® uses a collaborative approach to develop and upgrade FHIR. FHIR offers extended operations with RESTful APIs to perform actions. You can use some of the common API operations, such as CREATE, READ, UPDATE, and DELETE (CRUD), to interact and perform actions on health data resources in the repository. We will be using FHIR CRUD operations on our healthcare resources, so we recommend getting familiar with FHIR operations.
Using Amazon HealthLake as a health data store
Amazon HealthLake is an end-to-end HIPAA-eligible machine learning service that provides health, healthcare, and life sciences customers with a complete view of their patients, with analytic and query functionality. What do we mean by HIPAA eligible? An HIPAA-eligible AI service is one that can be configured to meet HIPAA compliance requirements. For example, the service offers different encryption mechanisms to support security at rest, but it is the responsibility of a person to configure the required type of encryption mechanism as per their compliance requirements. Figure 7.1 is a high-level diagram of Amazon HealthLake being fed both structured and unstructured health data. Health data is enriched and normalized for further analytics, search, or machine learning use cases.

Figure 7.1 – Amazon HealthLake
You can input any health data, such as medical reports, doctor’s notes, and lab reports, in FHIR format to Amazon HealthLake. Amazon HealthLake stores, transforms, and normalizes this input, and derives meaningful health insights by leveraging machine learning to learn from raw health data. The secure HIPAA-eligible infrastructure of Amazon HealthLake further enriches the data with medical insights and ontology linking for queries and search operations. Often, customers extend the transformed and indexed data with Amazon SageMaker for model development or Amazon QuickSight and additional analytics services for visualization.
Now let’s take a look at Amazon HealthLake’s features in the AWS console:
- Go to Amazon HealthLake in the AWS console and click on View Data Stores:

Figure 7.2 – Amazon HealthLake on AWS Console
- We need to create a data store. Click on Create Data Store:

Figure 7.3 – Amazon HealthLake – Create Data Store
- Provide a name for your data store and leave the Format as FHIR R4. If you want, you can load sample data to explore the functionality of Amazon HealthLake. It will load your data store with Synthea synthetic data.

Figure 7.4 – Create Data Store settings
- Amazon HealthLake offers encryption at rest with Amazon KMS, but for our experiment, we will use AWS owned keys:

Figure 7.5 – Data store encryption settings

Figure 7.6 – Amazon HealthLake data store
We have been through the steps to create a data store in Amazon HealthLake. Now let’s see how to perform FHIR operations against this data.
FHIR operations with Amazon HealthLake
Let’s run some operations on our Amazon HealthLake data store. Amazon HealthLake’s console has a query interface for quick testing. Let’s run some queries.
PUT operation
We are planning to PUT a patient FHIR resource on Amazon HealthLake data store. We will leverage the sample patient FHIR data from Synthea for testing with the following instructions:
- Click on Run query, as shown in the preceding figure.
- In Query settings, select Create for Query type, and select Patient for Resource type. If you click on Info next to Request body, the sample input data opens up in the right-hand panel. Click on Apply Patient example, and this will fill the Request examples section with sample data.

Figure 7.7 – Amazon HealthLake - Create Patient Resource
- Then click on Run query:

Figure 7.8 – Amazon HealthLake query – Run query
- You can look at the response, as shown in the following figure. Amazon HealthLake will create and store FHIR patient resources in a scalable data store. Make a note of the "id" from the Patient FHIR resource.

Figure 7.9 – Amazon HealthLake query – response
We just looked at an example of running an FHIR PUT operation on Amazon HealthLake. Now let’s see how to run an FHIR READ operation to read FHIR data from our data store.
READ operation
We are planning to do a READ operation on our patient’s FHIR resource on our Amazon HealthLake data store. We will leverage the Synthea sample patient FHIR data with the following instructions:
- Click on Run query, as shown in Figure 7.10.
- In Query settings, select Read as Query type, Patient as Resource type, and for the Resource ID, provide the ID copied in the PUT operation section in step 4.
- Click on Run query:

Figure 7.10 – Amazon HealthLake query – Read request
The patient resource is shown in the following figure:

Figure 7.11 – Amazon HealthLake read response
We have been through the steps to upload a sample patient FHIR resource to our Amazon HealthLake data store, and then we used the READ API to read the uploaded patient resource from the FHIR data store. Amazon HealthLake supports Create, Read, Update, Delete (CRUD) operations.
Transform
Amazon HealthLake has natural language models to transform raw medical text with medical NLP, such as extracting an entity’s medical condition, medication, dosage, traits, and PHI. We will get more details on that in the following examples.
We will now look at Amazon HealthLake operations that leverage APIs programmatically.
For full code-walkthrough follow the steps in the Notebook: https://github.com/PacktPublishing/Intelligent-Document-Processing-with-AWS-AI-ML-/blob/main/chapter-7/healthlake-07.ipynb
HealthLake PUT request
We have created a data store, and now we will use the FHIR API to PUT FHIR resources such as patient data in the data store:
- Import the libraries required to run an FHIR PUT request on Amazon HealthLake:
import boto3
import requests
import json
- Then we create a boto3 client for Amazon HealthLake:
client = boto3.client('healthlake')
- Get FHIR HealthLake datastore endpoint and patient resource, and store them in data_store_endpoint and resource_path variables. We will use put_file.json (https://github.com/PacktPublishing/Intelligent-Document-Processing-with-AWS-AI-ML-/blob/main/chapter-7/put_file.json) to create patient FHIR resource.
# Parse the input arguments
data_store_endpoint = "<YOUR_DATASTORE_ENDPOINT>"
resource_path = "Patient/3cedeb4b-a9b8-41d2-aef2-de4c0413ec95" //replace this with your unique patient ID
request_body_file = "put_file.json"
region = "us-east-1"
# Frame the resource endpoint
resource_endpoint = data_store_endpoint+resource_path
- We now need authentication for our FHIR API. We are using the requests_auth_aws_sigv4 library for a SigV4 signature:
!pip install requests-auth-aws-sigv4
from requests_auth_aws_sigv4 import AWSSigV4
region = "us-east-1"
session = boto3.session.Session(region_name=region)
# Frame authorization
auth = AWSSigV4("healthlake", session=session)
- As mentioned in step 3, our patient resource JSON is defined in put_file.json. We need to read the JSON body and store the data in json_data.
- Then we call the FHIR endpoint with SigV4 authentication. We are calling a PUT request and passing json_data with authentication to the put method:
# Read the request body from input file
with open(request_body_file) as json_body:
json_data = json.load(json_body)
# Calling data store FHIR endpoint using SigV4 auth
r = requests.put(resource_endpoint, json=json_data, auth=auth)
print(r.json())
You can see the patient resource result in the following figure:

Figure 7.12 – Patient resource
We have learned how to perform PUT FHIR operations programmatically on Amazon HealthLake.
HealthLake GET request
We have created a data store and uploaded a patient FHIR resource. Now we will use the GET FHIR API (get(resource_endpoint, auth))to get the patient FHIR resource created in the previous section:
- Get FHIR HealthLake datastore endpoint and patient resource, and store them in data_store_endpoint and resource_path variables. We are trying to get the same patient resource that we created in step 3 in the previous section:
data_store_endpoint = "<YOUR_DATASTORE_ENDPOINT>"
resource_path = "Patient/3cedeb4b-a9b8-41d2-aef2-de4c0413ec95" //replace this with your unique patient ID
region = "us-east-1"
# Frame the resource endpoint
resource_endpoint = data_store_endpoint+resource_path
- We need SigV4 authentication to call the FHIR API:
# Frame authorization
auth = AWSSigV4("healthlake", session=session)
- Now we call the GET FHIR API and pass in the resource endpoint created in step 1 and the authentication token created in step 2:
# Calling data store FHIR endpoint using SigV4 auth
r = requests.get(resource_endpoint, auth=auth)
print(r.json())
- You can see the output of the GET request as follows:

Figure 7.13 – Patient Resource – output
We have learned how to perform GET FHIR operations programmatically on Amazon HealthLake.
HealthLake delete request
We have created a data store and uploaded a patient FHIR resource. Now we will use the FHIR delete API to delete the patient FHIR resource:
- Get FHIR HealthLake datastore endpoint and patient resource, and store them in data_store_endpoint and resource_path variables. We are trying to get the same patient resource that we created earlier:
data_store_endpoint = "<YOUR_DATASTORE_ENDPOINT>"
resource_path = "Patient/3cedeb4b-a9b8-41d2-aef2-de4c0413ec95" //replace this with your unique patient ID
region = "us-east-1"
#Frame the resource endpoint
resource_endpoint = data_store_endpoint+resource_path
- We need SigV4 authentication to call the FHIR API:
# Frame authorization
auth = AWSSigV4("healthlake", session=session)
- Now we call the delete FHIR API and pass in the resource endpoint created in step 1 and the authentication token created in step 2:
# Calling data store FHIR endpoint using SigV4 auth
r = requests.delete(resource_endpoint, auth=auth)
# HTTP Response code should be 204 once the resource is successfully deleted
print(r)
- We get a Response 204 to show that the FHIR resource was successfully deleted, as shown in the following screenshot:
Figure 7.14 – Patient Resource – delete response
Now we understand the features of Amazon HealthLake and how to use FHIR APIs to perform operations on an FHIR data store.
Handling documents with an FHIR data store
Now let’s see what happens when our input for HealthLake is not in FHIR format, but is a document instead. Amazon HealthLake currently only supports data in FHIR format. What if we need to process document-based health data along with FHIR data? Can we still create a centralized scalable FHIR data store for health data?
And the answer is yes. We can use Amazon Textract to get raw text from the document and convert it to an FHIR resource (a DocumentReference resource). This DocumentReference FHIR resource can then be input into Amazon HealthLake with additional FHIR resources.
This is a three-step process:
- Extracting data from the document with Amazon Textract
- Creating a DocumentReference FHIR resource from the extracted Textract response
- Ingesting the DocumentReference FHIR resource to Amazon HealthLake
You can see the architecture in the following figure:
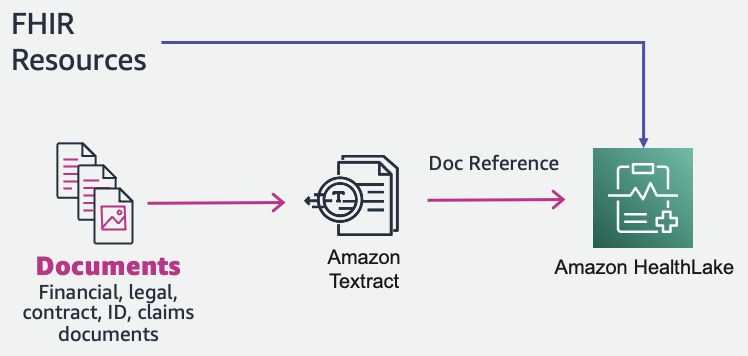
Figure 7.15 – Document processing with Amazon HealthLake
Now let’s see the implementation of this architecture:
- We are using a raw doctor’s note for our program. This is a scanned image document. Let’s display the doctor’s note document:
# Document
documentName = "doctornotes1.png"
display(Image(filename=documentName))
- The image of the doctor’s note is as follows:

Figure 7.16 – Sample doctor’s note
- Now we will call Amazon Textract to extract data from the doctor’s note. We create a Textract client. Then we call the Textract API to extract all the elements from the document. We define the Textract call in a method called calltextract():
# process using image bytes
def calltextract(documentName):
client = boto3.client(service_name='textract',
region_name= 'us-east-1',
endpoint_url='https://textract.us-east-1.amazonaws.com')
with open(documentName, 'rb') as file:
img_test = file.read()
bytes_test = bytearray(img_test)
print('Image loaded', documentName)
# process using image bytes
response = client.analyze_document(Document={'Bytes': bytes_test}, FeatureTypes=['FORMS'])
return response
- Now call the method defined in step 3 and print the response:
response= calltextract(documentName)
print(response)
- You can see the response in the next figure:

Figure 7.17 – Textract response
- Print all the lines extracted from the doctor’s note and store them in the text variable. Also, let’s print all the lines from the document:
# Print detected text
text = ""
for item in response["Blocks"]:
if item["BlockType"] == "LINE":
text = text + " " + item["Text"]
print(text)
- This will print the lines extracted by Amazon Textract from the raw doctor’s note:

Figure 7.18 – Raw doctor’s note
- Next, we create a DocumentReference FHIR resource. The API requires a base64 encoded string. So, we are using the base64 library to encode the string:
#convert to base64
import base64
sample_string_bytes = text.encode("ascii")
base64_bytes = base64.b64encode(sample_string_bytes)
print(base64_bytes)
base64_string = base64_bytes.decode("ascii")
print(f"Encoded string: {base64_string}")
- Let’s look at the encoded string:

Figure 7.19 – base64 encoded string
- The next step is to create the DocumentReference FHIR resource with the encoded string created in step 9:
import json
json_docref = '{"resourceType":"DocumentReference","id":"id12345","meta":{"profile":["http://hl7.org/fhir /us/core/StructureDefinition/us-core-documentreference"]},"identifier":[{"system":"urn:ietf:rfc:3986","value":"urn:uuid:f11b9b48-ff6b-a62b-8425-037ea9c2d826"}],"status":"current","type":{"coding":[{"system":"http://loinc.org","code":"34117-2","display":"History and physical note"},{"system":"http://loinc.org","code":"51847-2","display":"Evaluation+Plan note"}]},"category":[{"coding":[{"system":"http://hl7.org/fhir/us/core/CodeSystem/us-core-documentreference-category","code":"clinical-note","display":"Clinical Note"}]}],"subject":{"reference":"Patient/patientid12345"},"date":"2022-04-13T05:07:38.982+00:00","author":[{"reference":"Practitioner?identifier=http://hl7.org/fhir/sid/us-npi|9999990259","display":"Dr. Tandra334 Carter549"}],"custodian":{"reference":"Organization?identifier=https://ocktank.com/synthetic/synthea|f7ae497d-8dc6-3721-9402-43b621a4e7d2","display":"PCP14023"},"content":[{"attachment":{"contentType":"text/plain; charset=utf-8","data":"IFRoZSBwYXRpZW50IGlzIGFuIDg2LXllYXItb2xkIGZlbWFsZSBhZG1p dHRlZCBmb3IgZXZhbHVhdGlvbiBvZiBhYmRvbWluYWwgcGFpbiBhbmQgY mxvb2R5IHN0b29scy4gVGhlIHBhdGllbnQgaGFzIGNvbGl0aXMgYW5kIG Fsc28gZGl2ZXJ0aWN1bGl0aXMsIHVuZGVyZ29pbmcgdHJlYXRtZW50LiB EdXJpbmcgdGhlIGhvc3BpdGFsaXphdGlvbiwgdGhlIHBhdGllbnQgY29t cGxhaW5zIG9mIHNob3J0bmVzcyBvZiBicmVhdGgsIHdoaWNoIGlzIHdvc nNlbmluZy4gVGhlIHBhdGllbnQgdW5kZXJ3ZW50IGFuIGVjaG9jYXJkaW 9ncmFtLCB3aGljaCBzaG93cyBzZXZlcmUgbWl0cmFsIHJlZ3VyZ2l0YXR pb24gYW5kIGFsc28gbGFyZ2UgcGxldXJhbCBlZmZ1c2lvbi4gVGhpcyBj b25zdWx0YXRpb24gaXMgZm9yIGZ1cnRoZXIgZXZhbHVhdGlvbiBpbiB0a GlzIHJlZ2FyZC4gQXMgcGVyIHRoZSBwYXRpZW50LCBzaGUgaXMgYW4gOD YteWVhci1vbGQgZmVtYWxlLCBoYXMgbGltaXRlZCBhY3Rpdml0eSBsZXZ lbC4gU2hlIGhhcyBiZWVuIGhhdmluZyBzaG9ydG5lc3Mgb2YgYnJlYXRo IGZvciBtYW55IHllYXJzLiBTaGUgYWxzbyB3YXMgdG9sZCB0aGF0IHNoZ SBoYXMgYSBoZWFydCBtdXJtdXIsIHdoaWNoIHdhcyBub3QgZm9sbG93ZW QgdGhyb3VnaCBvbiBhIHJlZ3VsYXIgYmFzaXMu"},"format":{"system":"http://ihe.net/fhir/ValueSet/IHE.FormatCode.codesystem","code":"urn:ihe:iti:xds:2017:mimeTypeSufficient","display":"mimeType Sufficient"}}],"context":{"encounter":[{"reference":"Encounter/98309c16-75dd-8780-4bab-2d2788f7f885"}],"period":{"start":"2022-04-13T05:07:38+00:00","end":"2022-04-13T05:22:38+00:00"}}}'
print(json.dumps(json_docref))
- You can see the printed JSON DocumentReference FHIR resource in the following screenshot. Also, we are manually storing the JSON DocumentReference FHIR in the doc_ref.json file:
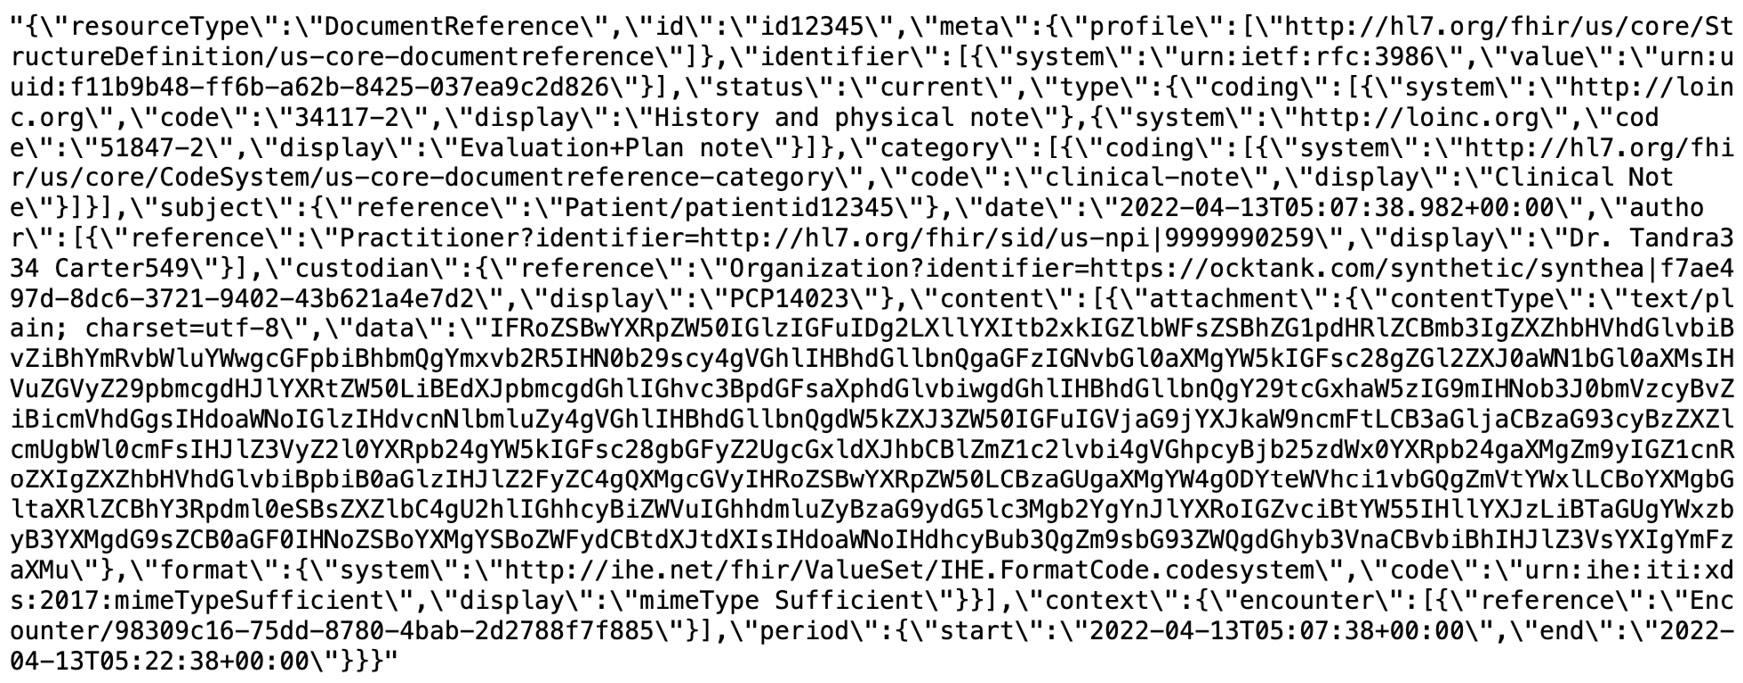
Figure 7.20 – DocumentReference JSON data
- Next, we will ingest the DocumentReference FHIR resource into Amazon HealthLake. To do that, we create a resource endpoint, which includes our FHIR data store with the DocumentReference resource ID:
# Parse the input arguments
request_body_file = "doc_ref.json"
region = "us-east-1"
# Frame the resource endpoint
resource_endpoint = data_store_endpoint+resource_path
resource_endpoint = "<YOUR_DATASTORE_ENDPOINT>/r4/DocumentReference/" + "id12345"
- The FHIR API expects to have SigV4. We are using the AWSSigV4 library and creating Sigv4 authentication:
!pip install requests-auth-aws-sigv4
from requests_auth_aws_sigv4 import AWSSigV4
# Frame authorization
auth = AWSSigV4("healthlake", session=session)
- We now read the doc_ref.json file and store the data in the json_data object. Now we are calling the PUT FHIR API to store the DocumentReference FHIR resource in the Amazon HealthLake data store. We are passing json_data along with authentication token to the put method, as in requests.put (resource_endpoint, json=json_data, auth=auth):
# Read the request body from input file
with open(request_body_file) as json_body:
json_data = json.load(json_body)
# Calling data store FHIR endpoint using SigV4 auth
r = requests.put(resource_endpoint, json=json_data, auth=auth)
print(r.json())
- Let’s print the response of the PUT request, as follows:

Figure 7.21 – Document reference JSON data – JSON file
We learned how to convert an unstructured document to an FHIR resource and then upload it to Amazon HealthLake to create a centralized view of patient health data.
Now, let’s summarize the chapter.
Summary
In this chapter, we discussed the fundamentals of FHIR and how to use it in the healthcare industry to solve challenges such as healthcare data interoperability. We also discussed Amazon HealthLake and its core features for storing, transforming, and analyzing health data. Amazon HealthLake’s NLP models interpret medical insights such as medical condition, medication, dosage, medical ontology linking, and more from health data, which can be further leveraged to create additional models with Amazon SageMaker or visualizations.
We then walked through the console and code to see how to create an Amazon HealthLake FHIR data store and how to input FHIR resources into our data store. We also discussed a sample architecture and implementation to ingest document-based health data into Amazon HealthLake to create a centralized, secure, scalable, HIPAA-eligible health data lake.
In the next chapter, we will extend the discussion to healthcare data interoperability. We will see how we can use AWS AI services with scalable AWS infrastructure to define a healthcare data interoperability platform.
References
- To find out more about HL7, visit: https://www.hl7.org/fhir/.
- To find out more about FHIR operations, visit: https://www.hl7.org/fhir/operations.html.