
2
Document Capture and Categorization
One of the first stages of an Intelligent Document Processing (IDP) pipeline is to collect your documents and store them in a highly available, reliable, and secure data store. Data is our gold mine, and to extract insights from our documents, we need to understand our data and pre-process it as needed. Most of the time, organizations receive a package of documents that are not labeled. To understand the documents, you need to manually scan these documents and label them into the right category, which is known as the document classification stage of the IDP pipeline. Thus, we are looking for an automated process for data collection and document classification.
In this chapter, we will be covering the following topics:
- Understanding data capture with Amazon S3
- Understanding document classification with Amazon Comprehend’s custom classifier
- Understanding document categorization with computer vision
Technical requirements
To do the hands-on labs in the book, you will need access to an AWS account at https://aws.amazon.com/console/. Please refer to the Signing up for an AWS account subsection within the Setting up your AWS environment section for detailed instructions on how you can sign up for an AWS account and sign in to the AWS Management Console. The Python code and sample datasets for the solution discussed in this chapter are available at https://github.com/PacktPublishing/Intelligent-Document-Processing-with-AWS-AI-ML-/tree/main/chapter-2.
Signing up for an AWS account
In this chapter and all the subsequent chapters in which we will run code examples, you will need access to an AWS account. Before getting started, we recommend that you create an AWS account.
Important note
Please use the AWS Free Tier, which enables you to try services free of charge based on certain time limits or service usage limits. For more details, please see https://aws.amazon.com/free.
Setting up your AWS environment
Please go through the following steps to create an AWS account:
- Open https://portal.aws.amazon.com/billing/signup.
- Click on the Create a new AWS account button at the bottom left of the page.
- Enter your email address and a password, confirm the password, and provide an AWS account name (this can be a reference to how you will use this account, such as sandbox).
- Select the usage type (Business or Personal), provide your contact information, read and agree to the terms of the AWS Customer Agreement, and click Continue.
- Provide credit card information and a billing address, and click Continue.
- Go through the rest of the steps to complete your AWS account signup process. Please make a note of your user ID and password; this is the root access to your AWS account.
- Once the AWS account is created, go to the AWS Management Console (console.aws.amazon.com) and sign in using the root credentials you created in the previous steps.
- Type IAM in the services search bar at the top of the console and select IAM to navigate to the IAM console. Select Users from the left pane in the IAM console and click on Add User.
- Provide a username, and then select Programmatic access and AWS Management Console access for Access Type. Keep the password as Autogenerated and keep Require password reset selected.
- Click Next: Permissions. On the Set Permissions page, click on Attach existing policies directly and select the checkbox to the left of Administrator Access. Click Next twice to go to the Review page. Click Create user.
- Now, go back to the AWS Management Console (console.aws.amazon.com) and click Sign In. Provide the IAM username you created in the previous step and the temporary password, and then create a new password to log in to the console.
- Log in to your AWS account when prompted in the various chapters and sections. You now have access to the AWS Management Console (https://aws.amazon.com/console/).
In the next section, we will show you how to create an S3 bucket and upload your documents.
Creating an Amazon SageMaker Jupyter notebook instance
In this section, we will see how to create a notebook instance in Amazon SageMaker. This is an important step, as most of our solution examples are run using notebooks. After the notebook is created, please follow the instructions to use the notebook in the specific chapters based on the solution being built.
Follow these steps to create an Amazon SageMaker Jupyter notebook instance:
- Log in to the AWS Management Console if you haven’t already. Type SageMaker in the services search bar at the top of the page, select SageMaker from the list, and click on it to go to the Amazon SageMaker management console.
- In the SageMaker console, on the left pane, click on Notebook to expand the option, and then click Notebook instances.
- On the Notebook instances page, click the Create notebook instance button at the top right.
- Type a name for the notebook instance and select a suitable notebook instance type. For most of the solution builds in this book, an AWS Free Tier (https://aws.amazon.com/free) instance such as ml.t2.medium should suffice.
- In the Permissions and encryption section, click the IAM role list and choose Create a new role, then choose Any S3 bucket, and then select Create Role.
- Accept defaults for the rest of the fields and click Create notebook instance.
Your notebook instance will take a few minutes to be provisioned; once it’s ready, the status will change to In Service. In the next few sections, we will walk through the steps required to modify the IAM role we attached to the notebook.
Changing IAM permissions and trust relationships for the Amazon SageMaker notebook execution role
In AWS, security is “job zero,” and each service needs explicit role level access to call another service – for example, if we want to call a Textract service inside a SageMaker notebook instance, we need to give required permission to SageMaker Notebook, using Identity and Access Management (IAM) to call the Textract service. In this section, we will walk through the steps needed to add additional permission policies to our Amazon SageMaker Jupyter notebook role:
- Open the Amazon SageMaker console by typing sagemaker in the services search bar at the top of the page in the AWS Management Console, and then select Amazon SageMaker from the list.
- In the Amazon SageMaker console, on the left pane, expand the Notebook and click Notebook instances.
- Click the name of the notebook instance you need to change permissions for.
- On the Notebook instance settings page, scroll down to Permissions and encryption and click IAM role ARN.
- This will open the IAM Management Console, and your role summary will be displayed along with the permissions and other details for your role. Click Attach policies.
- On the Add permissions to <your execution role name> page, type textract in the search bar, select the checkbox next to the policy (AmazonTextractFullAccess) you are interested in, and click Attach policy at the bottom right. You should now see the policy attached to your role. Follow the same process for the Comprehend, Comprehend medical, rekognition, healthLake, and amazon augmented AI services. To simplify, and for the hands-on code, you can select full access policies for the respective services. But for the production workload, and to follow security guidelines, it is recommended that you select minimal access privilege
Important note
To run all the hands-on labs in this book, Full list of required IAM Roles can be found in https://github.com/PacktPublishing/Intelligent-Document-Processing-with-AWS-AI-ML-/blob/main/IAM_Roles.
- In some cases, we may need a custom policy for our requirement rather than a managed policy provided by AWS. Specifically, we would add an inline policy (https://docs.aws.amazon.com/IAM/latest/UserGuide/id_roles_use_passrole.html) to allow PassRole of our SageMaker notebook execution role to services that can assume this role (added at the Trust relationships stage), for actions that need to be performed from the notebook. Click Create inline policy on the right of your SageMaker notebook execution role summary page.
- Now, click the JSON tab and paste the following JSON statement into the input area:
{ "Version": "2012-10-17", "Statement": [ {
"Action": [
"iam:PassRole"
],
"Effect": "Allow",
"Resource": "<IAM ARN of your current SageMaker
notebook execution role>"
}
]
}
- Click Review policy.
- On the Review policy page, type a name for your policy and click Create policy at the bottom right of the page.
- Now that you know how to attach permissions and an inline policy to your role, let’s go to the last step of this section, updating trust relationships (https://docs.aws.amazon.com/directoryservice/latest/admin-guide/edit_trust.html) for your role. On the Summary page for your SageMaker notebook execution role, click the Trust relationships tab, and click Edit trust relationship.
- Copy the following JSON snippet and paste it into the Policy Document input field. This statement gives Amazon SageMaker, Amazon Simple Storage Service (Amazon S3), and Amazon Comprehend the ability to assume the SageMaker notebook execution role permissions. Depending on the chapter and the use case we are building, the services that will need to assume the role will vary, and you will be instructed accordingly. For now, please consider the following JSON snippet as an example to understand how to edit trust relationships:
{ "Version": "2012-10-17", "Statement": [
{ "Effect": "Allow",
"Principal":
{ "Service":
[ "sagemaker.amazonaws.com",
"s3.amazonaws.com",
"comprehend.amazonaws.com" ]
},
"Action": "sts:AssumeRole"
}
]
}
- Click the Update Trust Policy button at the bottom right of the page.
- You should see the trusted entities updated for your role.
Important note
You cannot attach more than 10 managed policies to an IAM role. If your IAM role already has a managed policy from a previous chapter, please detach this policy before adding a new policy as per the requirements of your current chapter. When we create an Amazon SageMaker Jupyter notebook instance (as we did in the previous section), the default role creation step includes permissions for either an S3 bucket that you specify or any S3 bucket in your AWS account.
Now, you are all set.
Go to the GitHub link https://github.com/PacktPublishing/Intelligent-Document-Processing-with-AWS-AI-ML- and then the chapter-2.pynb notebook.
Now that we are done with the technical requirements, let’s look at the components involved in the data capture stage.
Understanding data capture with Amazon S3
Document capture or ingestion is a process to aggregate all our data in a secure, centralized, scalable data store. While building a data capture stage for your IDP pipeline, you have to take data sources, data format, and a data store into consideration.
Data store
The first step is to store our documents for transformation. To store documents, we can use any type of document store, such as a local filesystem or Amazon S3. For this IDP pipeline, we will be leveraging AWS AI services, and we recommend, for an easier, more secure, and more scalable document store, to leverage Amazon S3, an object storage service that offers industry-leading scalability, data availability, security, and performance. Amazon S3 has 11 9s of durability, and millions of customers all around the world leverage Amazon S3 for their data store.
Many regulatory industries, such as GE Healthcare, use Amazon S3 for data storage during their digital transformation journeys. GE Health Cloud leveraged Amazon S3 to build a single portal for healthcare data access. Similarly, customers across industries such as the financial sector, public sectors, and so on have leveraged Amazon S3 for their secure data store. You can leverage Amazon S3 to build a data lake. You can run big data analytics and AI/ML applications to unlock insights from your documents. But, at times, you will see companies having their data source centralized on-premises, not wanting to store documents redundantly anywhere else for security reasons. We will discuss how to process documents from such data sources by leveraging AWS IDP in a later section. Moreover, you will see document processing requirements when data sources are in Salesforce, Workday, Box, SAP, and so on, and we can use a custom connector to process documents from these data sources, but connector implementation details are out of the scope of this book.
For this book, we will leverage Amazon S3 as a data store for IDP with AWS AI services. This offers ease of access and implementation for document processing with AWS AI services.
Data sources
Data can come from various different sources. Data capture can be synchronous where we need to process and get a result instantaneously. For example, we might want to submit receipts for reimbursement. We would need an instantaneous acknowledgment that our receipts are in the right resolution and have been uploaded successfully. We would not expect to receive an instant approval or denial result, which may at times need human reviews, but we expect an immediate acknowledgment.
I was speaking to one of our customers, who was working on building a smart portal for the online submission of university applications. As a process, you would expect the applicant needs to submit ID proof along with other details relevant to the application and the university enrollment application forms itself at the least. Moreover, different universities have their own university-specific application requirements. This process used to be manual and take a long time, with multiple iterations needed just to collect all required documents with the right resolutions. With the building of the smart portal, applicants could now immediately get an acknowledgment if all required documents with the right quality had been uploaded successfully or not. This can eliminate 2 weeks of additional time just to collect all required documents needed for the application. You can imagine this requirement with your use cases, where there is a need to process fully or partially documents to give instantaneous results. In Figure 2.1, you can see how various types of documents from different channels can be centralized in an Amazon S3 data store.

Figure 2.1 – The IDP pipeline – data capture
Let’s see how to upload and process those documents for synchronous extraction using code. We will use the syncdensetext.png file for the following hands-on code.
We will be using the AWS Boto3 library to call into our AI service APIs. You may need to upgrade your boto3 libraries to get the latest updated access to APIs.
Refer to your notebook (https://github.com/PacktPublishing/Intelligent-Document-Processing-with-AWS-AI-ML-/blob/main/chapter-2/Chapter-2-datacapture.ipynb for full hands-on lab) section to import the boto3 library:
 import boto3
from IPython.display import Image, display
!pip install textract-trp
from trp import Document
from PIL import Image as PImage, ImageDraw
import time
from IPython.display import IFrame
Follow these instructions to create an Amazon S3 bucket:
- First, you get a handle for an S3 client by calling into the boto3.client("S3") API.
- Create an S3 bucket and upload your sample documents.
- Give a unique name to your bucket:
# Create a Unique S3 bucket
s3BucketName = <YOUR_BUCKET_NAME>
print(s3BucketName)
Important note
Bucket names are globally unique, so be creative and give a unique name to your Amazon S3 bucket in <YOUR_BUCKET_NAME>. You might want to add a random hash number to your bucket name, as bucket names are globally unique.
- Create an S3 bucket and upload the syncdensetext.png sample document file to your created S3 bucket. We will use this document as an example to process using the AWS AI service:
# Upload document to your S3 Bucket
print(s3BucketName)
!aws s3api create-bucket --bucket {s3BucketName}
!aws s3 cp syncdensetext.png s3://{s3BucketName}/syncdensetext.png
- Now, display our syncdensetext.png document:
chapter2_syncdensedoc = "syncdensetext.png"
display(Image(url=s3.generate_presigned_url('get_object', Params={'Bucket': s3BucketName, 'Key': chapter2_syncdensedoc})))
The output for the preceding code looks like the following:
Figure 2.2 – Sample document content
- Once we have uploaded our sample document to our Amazon S3 bucket, we want to extract data elements from it. For that reason, we will get a "Textract" boto3 client:
# Amazon Textract client
textract = boto3.client('textract')
- Then, we call Amazon Textract’s detect_document_text API with our S3 bucket name and the document name.
- We collect the Textract JSON response in the response object.
- We loop through our JSON response to collect all the LINE and print it:
# Document Extraction with Amazon Textract
response = textract.detect_document_text(
Document={
'S3Object': {
'Bucket': s3BucketName,
'Name': chapter2_syncdensedoc
}
})
# Print All the lines
for line in response["Blocks"]:
if line["BlockType"] == "LINE":
print (line["Text"])
Important note
We will look into the API details of Amazon Textract in Chapter 3, Accurate Document Extraction with Amazon Textract.
Check the following output for all the extracted lines from the document.

Figure 2.3 – The LINES output of the synchronous API
Other data sources can be just simple fax or mail attachments or a bulk upload of documents. These documents need to be processed periodically or ad hoc to get insights from documents. Any asynchronous or batch processing operations can fit these use cases.
For example, for real estate insurance, the reviewer needs to check and validate real estate properties for accurate assessments. For that reason, they collect and upload insurance title documents from various sources and web and bulk upload to their data store. They manually extract the data elements from the documents such as address, lot number, and so on, and do the data entry in their system so that a user can easily find those data elements easily, which helps in making the right assessment. As you can see, in this use case, there is no need to process documents instantaneously, but you can asynchronously upload and extract elements from your documents.
Let’s see how to upload and process those documents for asynchronous extraction in code.
Follow the steps mentioned previously to create your Amazon S3 bucket and upload the sync_densetext.png document to your S3 bucket.
This is the method to start a Textract asynchronous operation to extract elements from your Amazon S3 bucket:
- We use the boto3 client for Textract, and we call into the start_document_text_detection API of Amazon Textract to process our document’s extraction asynchronously.
- We pass in our bucket name and document name as parameters to the start_document_text_detection API.
- We return the response for JobId from the method for asynchronous document processing:
def startasyncJob(s3BucketName, filename):
response = None
response = textract.start_document_text_detection(
DocumentLocation={
'S3Object': {
'Bucket': s3BucketName,
'Name': filename
}
})
return response["JobId"]
The following is the method to check for the completion of Amazon Textract’s asyncronous API extraction. The Textract asyncronous API takes time to process all our documents. Constant polling to check the status of the Textract processing may cause unnecessary CPU overhead, so we will use a sleep and pool mechanism to get the status of our asynchronous operation. There are additional options to pool status of an asynchronous API job. We will discuss this in detail in Chapter 3, Accurate Document Extraction with Amazon Textract:
- This is the function to get a result from our Textract asynchronous API, once the job is completed:
def isAsyncJobComplete(jobId):
response = textract.get_document_text_detection(JobId=jobId)
status = response["JobStatus"]
print("Job status: {}".format(status))
while(status == "IN_PROGRESS"):
time.sleep(10)
response = textract.get_document_text_detection(JobId=jobId)
status = response["JobStatus"]
print("Job status: {}".format(status))
return status
- We get the result in the response object and loop through it to pull all page blocks.
This function returns all page blocks as pagearrays:
def getAsyncJobResult(jobId):
pages = []
response = textract.get_document_text_detection(JobId=jobId)
pages.append(response)
ntoken = None
if('NextToken' in response):
ntoken = response['NextToken']
while(ntoken):
response = textract.get_document_text_detection(JobId=jobId, NextToken=ntoken)
pages.append(response)
print("Resultset page recieved: {}".format(len(pages)))
nextToken = None
if('NextToken' in response):
ntoken = response['NextToken']
return pages
Let’s see how we can call into previously mentioned process documents asynchronously:
- We first call into the startasynJob() function to start the asynchronous extraction of our document. We pass in our bucket name and the document name.
- We check for the completion status of the Textract asynchronous job.
- Once the status is complete, we get the response object from the API and loop through the JSON response to print all the line:
jobId = startasyncJob(s3BucketName, chapter2_syncdensedoc)
print("Started job with id: {}".format(jobId))
if(isAsyncJobComplete(jobId)):
response = getAsyncJobResult(jobId)
# Print detected text
for resultPage in response:
for item in resultPage["Blocks"]:
if item["BlockType"] == "LINE":
print ('�33[94m' + item["Text"] + '�33[0m')
You can check the output here:

Figure 2.4 – LINES output of the asynchronous API
Let’s move on to sensitive document processing next.
Sensitive document processing
At times, some companies have their own internal security and regulations and do not want to store documents in the cloud. Other times, a customer already has a data store on-premises and does not want to store documents in two different data stores. That adds work to maintain two different data stores, one in the cloud and the other on-premises. Can they process documents without sending them to the cloud?
So, let’s check the solution in code:
- We are using a local file, sensitive-doc.png, for our testing. We are not uploading the document to Amazon S3, but we want to process it locally by calling into the Amazon S3 API:
# Document Name
chapter2_sensitivedoc = "sensitive-doc.png"
print(chapter2_sensitivedoc)
- Let’s first check what our sensitive-doc.png looks like:
display(Image(filename=chapter2_sensitivedoc))
Let’s check the following output:

Figure 2.5 – Sensitive Document content display
- Next, we collect all the contents from the documents as raw bytes.
- We pass these raw bytes as a parameter to Amazon Textract’s synchronous API-detect_document_text API.
- After processing, we get the response from the synchronous API in the response object.
- We loop through the JSON response and collect all LINE items.
- Finally, we print all the LINE items from the sensitive-doc.png document:
# Read sensitive document content
with open(chapter2_sensitivedoc, 'rb') as document:
imgbytes = bytearray(document.read())
# Call Amazon Textract by sending bytes
res = textract.detect_document_text(Document={'Bytes': imgbytes})
# Print detected text
for line in res["Blocks"]:
if line["BlockType"] == "LINE":
print (line["Text"])
Let’s check the following output:

Figure 2.6 – The lines output from the sensitive document
Document diversity
Documents come in different formats, layouts, types, and sizes. Some documents can just be a single page type, but others can be of multiple pages and can be of type PDF, JPEG, PNG, TIFF, Word, and so on. Examples of single-page documents include driver’s licenses and insurance cards, and examples of multipage documents include legal contract documents and policy documents.
These documents can have diverse layouts, such as a structured layout (such as a table) or unstructured (such as dense paragraphs of text). Alternatively, they can be semi-structured, such as form type of layouts in documents. Sometimes, we get documents that can have multiple different formats, such as dense text interweaved with forms and tables in single or multiple pages. We will look into the accurate extraction of these different formats in Chapter 3, Accurate Document Extraction with Amazon Textract.
Preprocessing for document processing
Our ML models may require a certain quality and prerequisite before the accurate extraction of data elements from documents. Some of the prerequisites might include a minimum font size requirement or a maximum document size for accurate document processing. For example, Amazon Textract can process documents with a maximum size of 10 MB and a recommended resolution of 150 dpi. You can find all the quotas and limits at the following service limit page link: https://docs.aws.amazon.com/textract/latest/dg/limits.html.
For those instances, you will have to take additional steps to preprocess those documents. We will not be covering preprocessing for IDP in detail, but we highly recommend you to check out the blog post here: https://aws.amazon.com/blogs/machine-learning/improve-newspaper-digitalization-efficacy-with-a-generic-document-segmentation-tool-using-amazon-textract/.
Understanding document classification with the Amazon Comprehend custom classifier
Sometimes, we receive many documents as a single package, and we need to process each document individually to derive insights from it as per business requirements. To achieve this, one of the major tasks is to categorize and index different types of documents. This later helps in the accurate extraction of information that meets business-specific requirements. This process of categorizing documents is known as document classification.
Let’s look into a claims processing use case in the insurance industry. Claims processing is very much a transactional use case, with millions of claims getting processed every single year in the United States. A manual submission of a claims package is a combination of multiple documents, such as an insurance form, receipts, invoices, ID documents, and some unstructured documents such as doctor’s notes and discharge summaries. A package is a combination of scanned pages, where each document can be a single or multiple pages long. You want to categorize these documents accurately for the accurate extraction of information. For example, for an invoice document, you may want to extract the amount and invoice ID, but for an insurance form, you may want to extract a diagnosis code and a person’s insurance ID number. So, the extraction requirements depend on the type of document you are processing. For that, we need to classify documents before processing. With a manual workforce, you can preview the documents to categorize them into their specified folders. But as with any other manual processing, it can be expensive, error-prone, and time-consuming, so we need an automated way to classify these documents. The following diagram shows a process to classify documents.

Figure 2.7 – The IDP pipeline – data classification
This process is crucial when we try to automate our document extraction process, where we receive multiple documents and don’t have a clear way to identify each document type. If you are dealing with a single document type or have an identifiable way to locate a document, then you can skip this step in the IDP pipeline. Alternatively, classify those documents correctly before proceeding in the IDP pipeline.
We will use the Amazon Comprehend custom classifier feature for automating our document classification process. Amazon Comprehend provides a capability to bring in your labeled documents to leverage Comprehend’s AutoML feature to accurately classify documents. The auto-algorithm selection and model tuning significantly helps you spend less time building your classification model. Moreover, the ML infrastructure is already taken care of by Amazon Comprehend. As it is a managed service, it automatically takes care of your ML infrastructure to build, train, and deploy your model. You do not need to spend time and effort building your ML platform to train your model. After Amazon Comprehend builds a classification model from your dataset, it gives you the evaluation metrics for your model performance.
Custom classification is a two-step process:
- You train your own custom classification model to identify classes as per your requirement.
- You send unlabeled documents for accurate classification.
In this architecture, we will walk you through the following steps:
- The user uploads documents to be classified.
- Amazon Textract extracts data from each document. We will discuss the Amazon Textract extraction feature in detail in Chapter 3, Accurate Document Extraction with Amazon Textract.
- Extracted data is sent to the Amazon Comprehend real-time classifier to accurately categorize documents.
Let’s now dive into the details of training a Comprehend custom classifier.
Training a Comprehend custom classification model
First, we will walk you through the following architecture on how you can train a custom classification model and run an analysis job for inferencing or classifying documents.

Figure 2.8 – The IDP pipeline – data classification architecture
This architecture walks you through the following steps:
- Training documents such as insurance forms, invoices, and ID documents are already uploaded into an Amazon S3 bucket during the data capture stage, explained previously.
- Amazon Textract extracts the text from these documents. We will discuss the Amazon Textract extraction feature in detail in Chapter 4, Accurate Extraction with Amazon Comprehend.
- We perform additional post-processing to create labeled training data for the classification training model.
- Using this labeled training data, an Amazon Comprehend job is created to classify documents.
- After training is completed, we create an analysis job to classify documents as required by our categorization logic.
Important note
Amazon Comprehend also offers a real-time endpoint mode for inference of documents. Comprehend charges per resource endpoint, which can be expensive, so it is recommended to delete your endpoint when not in use. Also, if your workload can be processed asynchronously, I recommend using a Comprehend analysis job instead of creating a real-time endpoint.
Now, let’s look at a hands-on example. For the dataset, we will be leveraging invoice- and receipt-type documents. Also, for full notebook walkthrough check: https://github.com/PacktPublishing/Intelligent-Document-Processing-with-AWS-AI-ML-/blob/main/chapter-2/Chapter-2-comprehend-classification.ipynb.
- Let’s start with the dataset. All training datasets can be found in the classification-training folder on GitHub: https://github.com/PacktPublishing/Intelligent-Document-Processing-with-AWS-AI-ML-/tree/main/chapter-2/classification-training-dataset
- Upload the sample documents to an Amazon S3 bucket as follows:
# Upload images to S3 bucket:
!aws s3 cp classification-training-dataset s3://{data_bucket}/idp/textract --recursive --only-show-errors
The documents are scanned images, and the text needs to be extracted to be a trained classification model. So, let’s extract text from the documents.
- We have written a helper function, textract_extract, to extract text from documents. We are calling into the Amazon Textract DetectDocumentText API for accurate extraction. Please note that we will look into Amazon Textract in more detail in Chapter 3, Accurate Document Extraction with Amazon Textract:
def textract_extract(table, bucket=data_bucket):
try:
        response = textract.detect_document_text(
                Document={
                    'S3Object': {
                        'Bucket': bucket,
                        'Name': table
                    }
                })
- We process the extracted text and stored it in the right folders for model labeling.
- We store invoice sample documents in the invoices folder and the receipt sample documents in the receipts folder. Then, we call the helper function, data_path, which loops through the directory and creates a dictionary to hold the extracted document path.
The sample output is shown as follows:

Figure 2.9 – Labeled sample documents
- After the documents are labeled, we upload the training dataset to an Amazon S3 bucket, as shown here:
# Upload Comprehend training data to S3
key='idp/comprehend/comprehend_train_data.csv'
data_compre.to_csv("comprehend_train_data.csv", index=False, header=False)
s3.upload_file(Filename='comprehend_train_data.csv',
Bucket=data_bucket,
Key=key)
- Then, we call into the Amazon Comprehend create_document_classifier API to train the classification model:
create_response = comprehend.create_document_classifier(
InputDataConfig={
'DataFormat': 'COMPREHEND_CSV',
'S3Uri': f's3://{data_bucket}/{key}'
},
DataAccessRoleArn=role,
DocumentClassifierName=document_classifier_name,
VersionName=document_classifier_version,
LanguageCode='en',
Mode='MULTI_CLASS'
)
document_classifier_arn = create_response['DocumentClassifierArn']
print(f"Comprehend Custom Classifier created with ARN: {document_classifier_arn}")
- Comprehend can take time to train your model. You can use Amazon Comprehend’s describe_document_classifier() command or check on the AWS Management Console for the completion status.
After the Comprehend classifier model is trained, you can check the performance of the Comprehend classification model as follows:
- Go to Custom classification on the AWS Management Console of Amazon Comprehend.

Figure 2.10 – Amazon Comprehend – Custom classification
- Select the Comprehend Custom classification model that we trained in the previous steps.

Figure 2.11 – Comprehend custom classification model performance
It is recommended to check the Comprehend training performance metrics at the following link: https://docs.aws.amazon.com/comprehend/latest/dg/cer-doc-class.html.
Let’s next move on to cover inference with the Comprehend classifier.
Inference with the Comprehend classifier
We will submit a sample document to our trained custom classifier and leverage a Comprehend analysis job for inference.
Amazon Comprehend requires a text document with UTF-8 encoding. We have already processed the sample document and stored it in https://github.com/PacktPublishing/Intelligent-Document-Processing-with-AWS-AI-ML-/blob/main/chapter-2/rawText-invoice-for-inference.txt.
If you want to use your document, which can be of any scanned image type, we recommend calling Amazon Textract to extract text from it, as follows:
response = textract.detect_document_text(
Document={
'S3Object': {
'Bucket': bucket,
'Name': table
}
})After data is extracted from the document by Amazon Textract, go to Amazon Comprehend in the AWS Management Console and follow these steps:
- Click on Create Analysis job.
- In Job settings, select the classification model that you trained in the previous steps.

Figure 2.12 – Creating an Amazon Comprehend classification job
- Provide the input data path of the aforementioned sample document.
- Select your S3 bucket for output data; this is where the result will be stored.

Figure 2.13 – Filling in classification job information
- Select Create new IAM role.
- Then, click Create job.
Let’s look at the result next.
Result
After the analysis job is completed, go to the Amazon S3 bucket that you have specified as the output location. Check the result in the output.tgz file.
Classification of documents based on sensitive data
One of the common use cases across regulatory industries is classifying documents based on the presence of sensitive data in them.

Figure 2.14 – Data classification for sensitive versus non-sensitive documents
We will dive into a hands-on solution in Chapter 4, Accurate Extraction with Amazon Comprehend, in the How to leverage document enrichment for document classification section.
Understanding document categorization with computer vision
In document preprocessing, you will come across use cases where documents are classified based on a branded logo on the document or having tables. These are visual clues that we want to use to classify documents before processing. We can use Amazon Rekognition, computer vision software with deep learning-powered image recognition, to detect visual clues such as objects, scenes, and text from any scanned images for document classification.
You can leverage an Amazon Rekognition Custom Label to detect a logo from any document and classify the document based on the logo. For example, a healthcare provider supports multiple insurance providers. Patients when visiting a doctor’s office submit insurance cards. These insurance cards can be processed automatically to detect the logos from them, and the documents can be classified according to their corresponding categories.
Now, let’s look at a hands-on example, where we have input documents with an AWS logo as well as a non-AWS logo:
- We will train a Rekognition model to identify the AWS logo from a document.
- After the model is trained, we will leverage the trained model to classify documents into two categories, AWS documents and non-AWS documents.
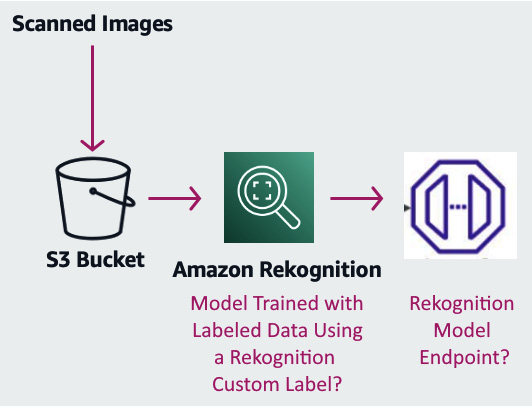
Figure 2.15 – Data classification of structural elements
- Go to Amazon Rekognition in the AWS Management Console. We will be covering the following steps, as shown in the following figure, to train a Rekognition model.

Figure 2.16 – Amazon Rekognition in the AWS Management Console
The data preparation instructions are as follows:
- Go to Amazon Rekognition Custom Label.
- Create a project with your preferred name and click Create project.

Figure 2.17 – An Amazon Rekognition project
- Next, click on Create dataset. You can upload these <git link> documents as an initial dataset.
Important note
We recommend using a more versatile and equal distribution of samples for accurate training of the model.
- Next, add labels to your images.
- Click Start Labeling Job and follow the instructions to label your images.
For labeling, we are using the Amazon Rekognition console to tag the logo appropriately, as shown here:

Figure 2.18 – Amazon Rekognition labeling
Next, follow these Rekognition model training instructions:
- Once the labeling task is completed, click on Train model.

Figure 2.19 – Amazon Rekognition model training
It will take some time to train your Rekognition model.
- Rekognition, with the default setting, will split the dataset into train and testing datasets.
- Click on the Use model tab shown in Figure 2.20 and start your model. Wait for the model to come to the RUNNING state.

Figure 2.20 – Amazon Rekognition Custom Label model performance
- Now, let's get inference from our trained model. You can find full walk-through of the Notebook here: https://github.com/PacktPublishing/Intelligent-Document-Processing-with-AWS-AI-ML-/blob/main/chapter-2/Chapter-2-Rekognition-Classification.ipynb. Go through the following code block to import the required libraries:
import boto3
import io
import logging
import argparse
from PIL import Image, ImageDraw, ImageFont
from botocore.exceptions import ClientError
- Here is the method to call the Rekognition Custom Label model:
def callrek_cl(document):
model="arn:aws:rekognition:us-east-1:<MY_ACCOUNT>:project/book-rek-class-1/version/book-rek-class-1.2022-02-25T13.12.07/1645812727191"
image=Image.open(document)
image_type=Image.MIME[image.format]
# get images bytes for call to classify
image_bytes = io.BytesIO()
image.save(image_bytes, format=image.format)
image_bytes = image_bytes.getvalue()
response = rek_client.detect_custom_labels(Image={'Bytes': image_bytes}, ProjectVersionArn=model)
return response
- Call the method defined previously:
response = callrek_cl("chapter-2-rekcl.png")
print(response)
response1 = callrek_cl("cha15train.png")
print(response1)
Check the output response shown here.

Figure 2.21 – Amazon Rekognition classification output
Summary
In this chapter, we discussed how to build a data capture stage for the IDP pipeline. Data is your gold mine, and you need a secure, scalable, and reliable data store. We introduced Amazon S3 and how you can leverage an object store to aggregate and store data in a scalable and highly available manner. We also described the data capture stage, with documents of varying layouts, formats, and types.
We then reviewed the need for document classification and categorization, with examples including mortgage processing and insurance claims processing. We discussed Amazon Comprehend and its custom classification feature. This chapter also gave you a hands-on experience in how to classify documents as invoice and receipt types. Moreover, we also looked at Amazon Rekognition, and how we can use its Custom Label feature to classify documents on its structural formats. You also had hands-on experience in classifying documents with the presence of the AWS logo or a non-AWS logo.
In the next chapter, we will go through the details of document extraction. We will look into the details of the extraction stage in the IDP pipeline. We will also dive deep into one of the AI services, Amazon Textract, to accurately extract information from any type of document.