
16. Ajax-Enabled Rich Internet Applications with XML and JSON
... the challenges are for the designers of these applications: to forget what we think we know about the limitations of the Web, and begin to imagine a wider, richer range of possibilities. It’s going to be fun.
—Jesse James Garrett
To know how to suggest is the great art of teaching.
—Henri-Frederic Amiel
It is characteristic of the epistemological tradition to present us with partial scenarios and then to demand whole or categorical answers as it were.
—Avrum Stroll
O! call back yesterday, bid time return.
—William Shakespeare
Objectives
In this chapter you will:
• Learn what Ajax is and why it’s important for building Rich Internet Applications.
• Use asynchronous requests to give web applications the feel of desktop applications.
• Use the XMLHttpRequest object to manage asynchronous requests to servers and to receive asynchronous responses.
• Use XML with the DOM.
• Create a full-scale Ajax-enabled application.
16.1.1 Traditional Web Applications vs. Ajax Applications
16.1.2 Traditional Web Applications
16.2 Rich Internet Applications (RIAs) with Ajax
16.4 “Raw” Ajax Example Using the XMLHttpRequest Object
16.4.4 XMLHttpRequest Object Event, Properties and Methods
16.6 Creating a Full-Scale Ajax-Enabled Application
16.6.3 Interacting with a Web Service on the Server
16.6.5 Creating HTML5 Elements and Setting Event Handlers on the Fly
16.6.6 Implementing Type-Ahead
16.6.7 Implementing a Form with Asynchronous Validation
Summary | Self-Review Exercises | Answers to Self-Review Exercises | Exercises
16.1. Introduction
Despite the tremendous technological growth of the Internet over the past decade, the usability of web applications has lagged behind that of desktop applications. Rich Internet Applications (RIAs) are web applications that approximate the look, feel and usability of desktop applications. Two key attributes of RIAs are performance and a rich GUI.
RIA performance comes from Ajax (Asynchronous JavaScript and XML), which uses client-side scripting to make web applications more responsive. Ajax applications separate client-side user interaction and server communication and run them in parallel, reducing the delays of server-side processing normally experienced by the user.
There are many ways to implement Ajax functionality. “Raw” Ajax uses JavaScript to send asynchronous requests to the server, then updates the page using the DOM. “Raw” Ajax is best suited for creating small Ajax components that asynchronously update a section of the page. However, when writing “raw” Ajax you need to deal directly with cross-browser portability issues, making it impractical for developing large-scale applications. These portability issues are hidden by Ajax toolkits, such as jQuery, ASP.NET Ajax and JSF’s Ajax capabilities, which provide powerful ready-to-use controls and functions that enrich web applications and simplify JavaScript coding by making it cross-browser compatible.
Traditional web applications use HTML5 forms to build GUIs that are simple by comparison with those of Windows, Macintosh and desktop systems in general. You can achieve rich GUIs in RIAs with JavaScript toolkits providing powerful ready-to-use controls and functions that enrich web applications.
Previous chapters discussed HTML5, CSS3, JavaScript, the DOM and XML. This chapter uses these technologies to build Ajax-enabled web applications. The client side of Ajax applications is written in HTML5 and CSS3 and uses JavaScript to add functionality to the user interface. XML is used to structure the data passed between server and client. We’ll also use JSON (JavaScript Object Notation) for this purpose. The Ajax component that manages interaction with the server is usually implemented with JavaScript’s XMLHttpRequest object—commonly abbreviated as XHR. The server processing can be implemented using any server-side technology, such as PHP, ASP.NET and JavaServer Faces, each of which we cover in later chapters.
We begin with several examples that build basic Ajax applications using JavaScript and the XMLHttpRequest object. In subsequent chapters, we use tools such as ASP.NET Ajax and JavaServer Faces to build Ajax-enabled RIAs. We also include an online introduction to jQuery.
16.1.1. Traditional Web Applications vs. Ajax Applications
In this section, we consider the key differences between traditional web applications and Ajax-based web applications.
16.1.2. Traditional Web Applications
Figure 16.1 presents the typical interactions between the client and the server in a traditional web application, such as one that employs a user registration form. The user first fills in the form’s fields, then submits the form (Fig. 16.1, Step 1). The browser generates a request to the server, which receives the request and processes it (Step 2). The server generates and sends a response containing the exact page that the browser will render (Step 3), which causes the browser to load the new page (Step 4) and temporarily makes the browser window blank. Note that the client waits for the server to respond and reloads the entire page with the data from the response (Step 4). While such a synchronous request is being processed on the server, the user cannot interact with the client web page. Frequent long periods of waiting, due perhaps to Internet congestion, have led some users to refer to the World Wide Web as the “World Wide Wait;” this situation has improved greatly in recent years. If the user interacts with and submits another form, the process begins again (Steps 5–8).
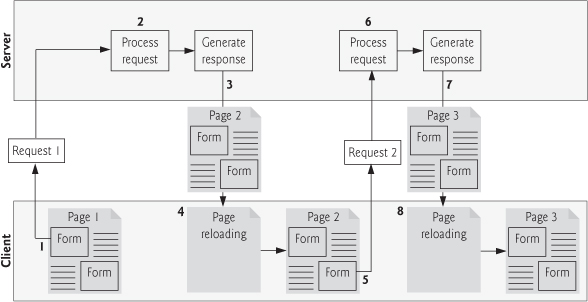
Fig. 16.1. Classic web application reloading the page for every user interaction.
This model was originally designed for a web of hypertext documents—what some people call the “brochure web.” As the web evolved into a full-scale applications platform, the model shown in Fig. 16.1 yielded erratic application performance. Every full-page refresh required users to re-establish their understanding of the full-page contents. Users sought a model that would yield the responsive feel of desktop applications.
16.1.3. Ajax Web Applications
Ajax applications add a layer between the client and the server to manage communication between the two (Fig. 16.2). When the user interacts with the page, the client creates an XMLHttpRequest object to manage a request (Step 1). The XMLHttpRequest object sends the request to the server (Step 2) and awaits the response. The requests are asynchronous, so the user can continue interacting with the application on the client side while the server processes the earlier request concurrently. Other user interactions could result in additional requests to the server (Steps 3 and 4). Once the server responds to the original request (Step 5), the XMLHttpRequest object that issued the request calls a client-side function to process the data returned by the server. This function—known as a callback function—uses partial page updates (Step 6) to display the data in the existing web page without reloading the entire page. At the same time, the server may be responding to the second request (Step 7) and the client side may be starting to do another partial page update (Step 8). The callback function updates only a designated part of the page. Such partial page updates help make web applications more responsive, making them feel more like desktop applications. The web application does not load a new page while the user interacts with it.
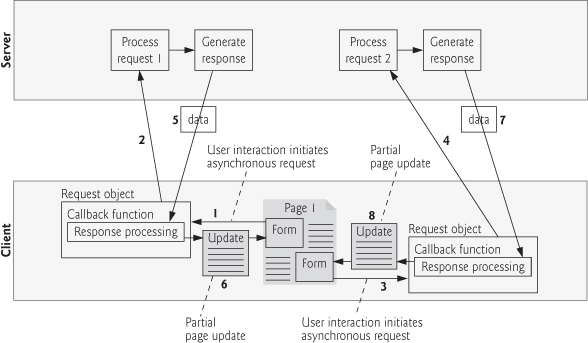
Fig. 16.2. Ajax-enabled web application interacting with the server asynchronously.
16.2. Rich Internet Applications (RIAs) with Ajax
Ajax improves the user experience by making interactive web applications more responsive. Consider a registration form with a number of fields (e.g., first name, last name e-mail address, telephone number, etc.) and a Register (or Submit) button that sends the entered data to the server. Usually each field has rules that the user’s entries have to follow (e.g., valid e-mail address, valid telephone number, etc.).
When the user clicks Register, an HTML5 form sends the server all of the data to be validated (Fig. 16.3). While the server is validating the data, the user cannot interact with the page. The server finds invalid data, generates a new page identifying the errors in the form and sends it back to the client—which renders the page in the browser. Once the user fixes the errors and clicks the Register button, the cycle repeats until no errors are found, then the data is stored on the server. The entire page reloads every time the user submits invalid data.
Ajax-enabled forms are more interactive. Rather than the entire form being sent to be validated, entries can be validated individually, dynamically, as the user enters data into the fields. For example, consider a website registration form that requires a valid e-mail address. When the user enters an e-mail address into the appropriate field, then moves to the next form field to continue entering data, an asynchronous request is sent to the server to validate the e-mail address. If it’s not valid, the server sends an error message that’s displayed on the page informing the user of the problem (Fig. 16.4). By sending each entry asynchronously, the user can address each invalid entry quickly, versus making edits and resubmitting the entire form repeatedly until all entries are valid. Simple validation like this for e-mails and phone numbers can also be accomplished with HTML5’s new input elements that you learned in Chapter 3, rather than using Ajax. Asynchronous requests could also be used to fill some fields based on previous fields (e.g., automatically filling in the “city” and “state” fields based on the ZIP code entered by the user).
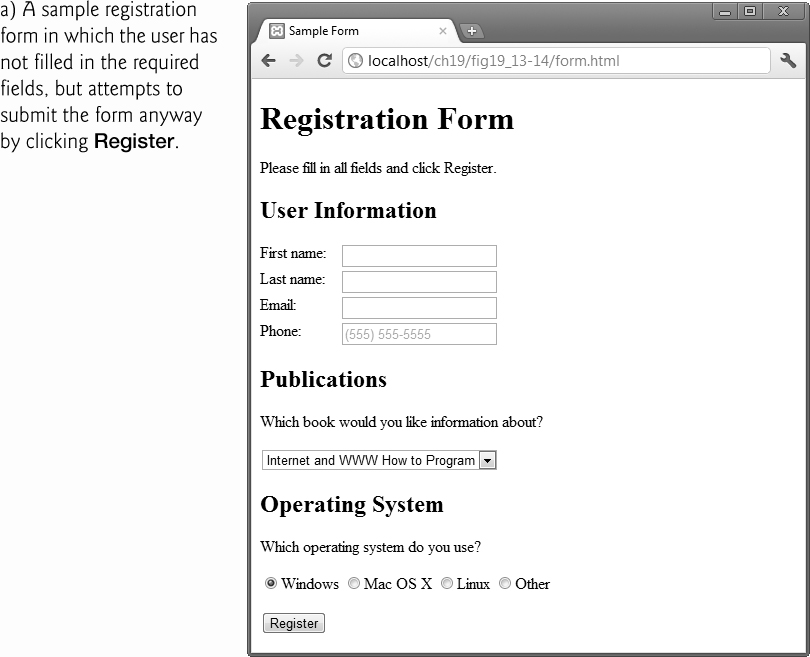
Fig. 16.3. Classic HTML5 form: The user submits the form to the server, which validates the data (if any). Server responds indicating any fields with invalid or missing data.

Fig. 16.4. Ajax-enabled form shows errors asynchronously when user moves to another field.
16.3. History of Ajax
The term Ajax was coined by Jesse James Garrett of Adaptive Path in February 2005, when he was presenting the previously unnamed technology to a client. The technologies of Ajax (HTML, JavaScript, CSS, the DOM and XML) had all existed for many years prior to 2005.
Asynchronous page updates can be traced back to earlier browsers. In the 1990s, Netscape’s LiveScript language made it possible to include scripts in web pages (e.g., web forms) that could run on the client. LiveScript evolved into JavaScript. In 1998, Microsoft introduced the XMLHttpRequest object to create and manage asynchronous requests and responses. Popular applications like Flickr and Google’s Gmail use the XMLHttpRequest object to update pages dynamically. For example, Flickr uses the technology for its text editing, tagging and organizational features; Gmail continuously checks the server for new e-mail; and Google Maps allows you to drag a map in any direction, downloading the new areas on the map without reloading the entire page.
The name Ajax immediately caught on and brought attention to its component technologies. Ajax has enabled “webtop” applications to challenge the dominance of established desktop applications. This has become increasingly significant as more and more computing moves to “the cloud.”
16.4. “Raw” Ajax Example Using the XMLHttpRequest Object
In this section, we use the XMLHttpRequest object to create and manage asynchronous requests. This object, which resides on the client, is the layer between the client and the server that manages asynchronous requests in Ajax applications. It’s supported on most browsers, though they may implement it differently—a common issue with browsers. To initiate an asynchronous request (shown in Fig. 16.5), you create an instance of the XMLHttpRequest object, then use its open method to set up the request and its send method to initiate the request. We summarize the XMLHttpRequest properties and methods in Figs. 16.6–16.7.
Figure 16.5 presents an Ajax application in which the user interacts with the page by moving the mouse over book-cover images; a detailed code walkthrough follows the figure. We use the mouseover and mouseout events to trigger events when the user moves the mouse over and out of an image, respectively. The mouseover event calls function getContent with the URL of the document containing the book’s description. The function makes this request asynchronously using an XMLHttpRequest object. When the XMLHttpRequest object receives the response, the book description is displayed below the book images. When the user moves the mouse out of the image, the mouseout event calls function clearContent to clear the display box. These tasks are accomplished without reloading the page on the client. You can test-drive this example at http://test.deitel.com/iw3htp5/ch16/fig16_05/SwitchContent.html.
 Performance Tip 16.1
When an Ajax application requests a file from a server, such as an HTML5 document or an image, the browser typically caches that file. Subsequent requests for the same file can load it from the browser’s cache rather than making the round trip to the server again.
 Software Engineering Observation 16.1
For security purposes, the XMLHttpRequest object doesn’t allow a web application to request resources from domains other than the one that served the application. For this reason, the web application and its resources must reside on the same web server (this could be a web server on your local computer). This is commonly known as the same origin policy (SOP). SOP aims to close a vulnerability called cross-site scripting, also known as XSS, which allows an attacker to compromise a website’s security by injecting a malicious script onto the page from another domain. To get content from another domain securely, you can implement a server-side proxy—an application on the web application’s web server—that can make requests to other servers on the web application’s behalf.
16.4.1. Asynchronous Requests
The function getContent (lines 46–63) sends the asynchronous request. Line 51 creates the XMLHttpRequest object, which manages the asynchronous request. We store the object in the global variable asyncRequest (declared at line 13) so that it can be accessed anywhere in the script. You can test this web page at test.deitel.com/iw3htp5/ch16/fig16_05/SwitchContent.html.
Line 56 calls the XMLHttpRequest open method to prepare an asynchronous GET request. In this example, the url parameter specifies the address of an HTML document containing the description of a particular book. When the third argument is true, the request is asynchronous. The URL is passed to function getContent in response to the onmouseover event for each image. Line 57 sends the asynchronous request to the server by calling the XMLHttpRequest send method. The argument null indicates that this request is not submitting data in the body of the request.
1 <!DOCTYPE html>
2
3 <!-- Fig. 16.5: SwitchContent.html -->
4 <!-- Asynchronously display content without reloading the page. -->
5 <html>
6 <head>
7 <meta charset = "utf-8">
8 <style type = "text/css">
9 .box { border: 1px solid black; padding: 10px }
10 </style>
11 <title>Switch Content Asynchronously</title>
12 <script>
13 var asyncRequest; // variable to hold XMLHttpRequest object
14
15 // set up event handlers
16 function registerListeners()
17 {
18 var img;
19 img = document.getElementById( "cpphtp" );
20 img.addEventListener( "mouseover",
21 function() { getContent( "cpphtp8.html" ); }, false );
22 img.addEventListener( "mouseout", clearContent, false );
23 img = document.getElementById( "iw3htp" );
24 img.addEventListener( "mouseover",
25 function() { getContent( "iw3htp.html" ); }, false );
26 img.addEventListener( "mouseout", clearContent, false );
27 img = document.getElementById( "jhtp" );
28 img.addEventListener( "mouseover",
29 function() { getContent( "jhtp.html" ); }, false );
30 img.addEventListener( "mouseout", clearContent, false );
31 img = document.getElementById( "vbhtp" );
32 img.addEventListener( "mouseover",
33 function() { getContent( "vbhtp.html" ); }, false );
34 img.addEventListener( "mouseout", clearContent, false );
35 img = document.getElementById( "vcshtp" );
36 img.addEventListener( "mouseover",
37 function() { getContent( "vcshtp.html" ); }, false );
38 img.addEventListener( "mouseout", clearContent, false );
39 img = document.getElementById( "javafp" );
40 img.addEventListener( "mouseover",
41 function() { getContent( "javafp.html" ); }, false );
42 img.addEventListener( "mouseout", clearContent, false );
43 } // end function registerListeners
44
45 // set up and send the asynchronous request.
46 function getContent( url )
47 {
48 // attempt to create XMLHttpRequest object and make the request
49 try
50 {
51 asyncRequest = new XMLHttpRequest(); // create request object
52
53 // register event handler
54 asyncRequest.addEventListener(
55 "readystatechange", stateChange, false);
56 asyncRequest.open( "GET", url, true ); // prepare the request
57 asyncRequest.send( null ); // send the request
58 } // end try
59 catch ( exception )
60 {
61 alert( "Request failed." );
62 } // end catch
63 } // end function getContent
64
65 // displays the response data on the page
66 function stateChange()
67 {
68 if ( asyncRequest.readyState == 4 && asyncRequest.status == 200 )
69 {
70 document.getElementById( "contentArea" ).innerHTML =
71 asyncRequest.responseText; // places text in contentArea
72 } // end if
73 } // end function stateChange
74
75 // clear the content of the box
76 function clearContent()
77 {
78 document.getElementById( "contentArea" ).innerHTML = "";
79 } // end function clearContent
80
81 window.addEventListener( "load", registerListeners, false );
82 </script>
83 </head>
84 <body>
85 <h1>Mouse over a book for more information.</h1>
86 <img id = "cpphtp" alt = "C++ How to Program book cover"
87 src = "http://test.deitel.com/images/thumbs/cpphtp8.jpg">
88 <img id = "iw3htp" alt = "Internet & WWW How to Program book cover"
89 src = "http://test.deitel.com/images/thumbs/iw3htp5.jpg">
90 <img id = "jhtp" alt = "Java How to Program book cover"
91 src = "http://test.deitel.com/images/thumbs/jhtp9.jpg">
92 <img id = "vbhtp" alt = "Visual Basic 2010 How to Program book cover"
93 src = "http://test.deitel.com/images/thumbs/vb2010htp.jpg">
94 <img id = "vcshtp" alt = "Visual C# 2010 How to Program book cover"
95 src = "http://test.deitel.com/images/thumbs/vcsharp2010htp.jpg">
96 <img id = "javafp" alt = "Java for Programmers book cover"
97 src = "http://test.deitel.com/images/thumbs/javafp.jpg">
98 <div class = "box" id = "contentArea"></div>
99 </body>
100 </html>


Fig. 16.5. Asynchronously display content without reloading the page.
16.4.2. Exception Handling
Lines 59–62 introduce exception handling. An exception is an indication of a problem that occurs during a program’s execution. The name “exception” implies that the problem occurs infrequently. Exception handling enables you to create applications that can handle (i.e., resolve) exceptions—often allowing a program to continue executing as if no problem had been encountered.
Lines 49–58 contain a try block, which encloses the code that might cause an exception and the code that should not execute if an exception occurs (i.e., if an exception occurs in a statement of the try block, the remaining code in the try block is skipped). A try block consists of the keyword try followed by a block of code enclosed in curly braces ({}). If there’s a problem sending the request—e.g., if a user tries to access the page using an older browser that does not support XMLHttpRequest—the try block terminates immediately and a catch block (also called a catch clause or exception handler) catches (i.e., receives) and handles the exception. The catch block (lines 59–62) begins with the keyword catch and is followed by a parameter in parentheses—called the exception parameter—and a block of code enclosed in curly braces. The exception parameter’s name (exception in this example) enables the catch block to interact with a caught exception object (for example, to obtain the name of the exception or an exception-specific error message via the exception object’s name and message properties, respectively). In this case, we simply display our own error message "Request Failed" and terminate the getContent function. The request can fail because a user accesses the web page with an older browser or the content that’s being requested is located on a different domain.
16.4.3. Callback Functions
The stateChange function (lines 66–73) is the callback function that’s called when the client receives the response data. Lines 54–55 register function stateChange as the event handler for the XMLHttpRequest object’s readystatechange event. Whenever the request makes progress, the XMLHttpRequest object calls the readystatechange event handler. This progress is monitored by the readyState property, which has a value from 0 to 4. The value 0 indicates that the request is not initialized and the value 4 indicates that the request is complete—all the values for this property are summarized in Fig. 16.6. If the request completes successfully (line 68), lines 70–71 use the XMLHttpRequest object’s responseText property to obtain the response data and place it in the div element named contentArea (defined at line 98). We use the DOM’s getElementById method to get this div element, and use the element’s innerHTML property to place the content in the div.
16.4.4. XMLHttpRequest Object Event, Properties and Methods
Figures 16.6 and 16.7 summarize some of the XMLHttpRequest object’s properties and methods, respectively. The properties are crucial to interacting with asynchronous requests. The methods initialize, configure and send asynchronous requests.

Fig. 16.6. XMLHttpRequest object event and properties.
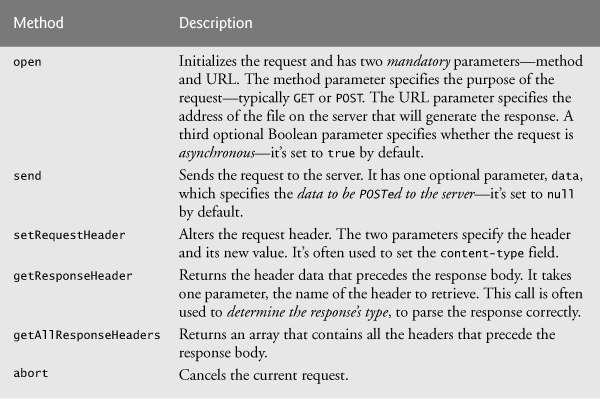
Fig. 16.7. XMLHttpRequest object methods.
16.5. Using XML and the DOM
When passing structured data between the server and the client, Ajax applications often use XML because it’s easy to generate and parse. When the XMLHttpRequest object receives XML data, it parses and stores the data as an XML DOM object in the responseXML property. The example in Fig. 16.8 asynchronously requests from a server XML documents containing URLs of book-cover images, then displays the images in the page. The code that configures the asynchronous request is the same as in Fig. 16.5. You can test-drive this application at
http://test.deitel.com/iw3htp5/ch16/fig16_08/PullImagesOntoPage.html
1 <!DOCTYPE html>
2
3 <!-- Fig. 16.8: PullImagesOntoPage.html -->
4 <!-- Image catalog that uses 1Ajax to request XML data asynchronously. -->
5 <html>
6 <head>
7 <meta charset="utf-8">
8 <title> Pulling Images onto the Page </title>
9 <style type = "text/css">
10 li { display: inline-block; padding: 4px; width: 120px; }
11 img { border: 1px solid black }
12 </style>
13 <script>
14 var asyncRequest; // variable to hold XMLHttpRequest object
15
16 // set up and send the asynchronous request to get the XML file
17 function getImages( url )
18 {
19 // attempt to create XMLHttpRequest object and make the request
20 try
21 {
22 asyncRequest = new XMLHttpRequest(); // create request object
23
24 // register event handler
25 asyncRequest.addEventListener(
26 "readystatechange", processResponse, false);
27 asyncRequest.open( "GET", url, true ); // prepare the request
28 asyncRequest.send( null ); // send the request
29 } // end try
30 catch ( exception )
31 {
32 alert( 'Request Failed' );
33 } // end catch
34 } // end function getImages
35
36 // parses the XML response; dynamically creates an undordered list and
37 // populates it with the response data; displays the list on the page
38 function processResponse()
39 {
40 // if request completed successfully and responseXML is non-null
41 if ( asyncRequest.readyState == 4 && asyncRequest.status == 200 &&
42 asyncRequest.responseXML )
43 {
44 clearImages(); // prepare to display a new set of images
45
46 // get the covers from the responseXML
47 var covers = asyncRequest.responseXML.getElementsByTagName(
48 "cover" )
49
50 // get base URL for the images
51 var baseUrl = asyncRequest.responseXML.getElementsByTagName(
52 "baseurl" ).item( 0 ).firstChild.nodeValue;
53
54 // get the placeholder div element named covers
55 var output = document.getElementById( "covers" );
56
57 // create an unordered list to display the images
58 var imagesUL = document.createElement( "ul" );
59
60 // place images in unordered list
61 for ( var i = 0; i < covers.length; ++i )
62 {
63 var cover = covers.item( i ); // get a cover from covers array
64
65 // get the image filename
66 var image = cover.getElementsByTagName( "image" ).
67 item( 0 ).firstChild.nodeValue;
68
69 // create li and img element to display the image
70 var imageLI = document.createElement( "li" );
71 var imageTag = document.createElement( "img" );
72
73 // set img element's src attribute
74 imageTag.setAttribute( "src", baseUrl + escape( image ) );
75 imageLI.appendChild( imageTag ); // place img in li
76 imagesUL.appendChild( imageLI ); // place li in ul
77 } // end for statement
78
79 output.appendChild( imagesUL ); // append ul to covers div
80 } // end if
81 } // end function processResponse
82
83 // clears the covers div
84 function clearImages()
85 {
86 document.getElementById( "covers" ).innerHTML = "";
87 } // end function clearImages
88
89 // register event listeners
90 function registerListeners()
91 {
92 document.getElementById( "all" ).addEventListener(
93 "click", function() { getImages( "all.xml" ); }, false );
94 document.getElementById( "simply" ).addEventListener(
95 "click", function() { getImages( "simply.xml" ); }, false );
96 document.getElementById( "howto" ).addEventListener(
97 "click", function() { getImages( "howto.xml" ); }, false );
98 document.getElementById( "dotnet" ).addEventListener(
99 "click", function() { getImages( "dotnet.xml" ); }, false );
100 document.getElementById( "javaccpp" ).addEventListener(
101 "click", function() { getImages( "javaccpp.xml" ); }, false );
102 document.getElementById( "none" ).addEventListener(
103 "click", clearImages, false );
104 } // end function registerListeners
105
106 window.addEventListener( "load", registerListeners, false );
107 </script>
108 </head>
109 <body>
110 <input type = "radio" name ="Books" value = "all"
111 id = "all"> All Books
112 <input type = "radio" name = "Books" value = "simply"
113 id = "simply"> Simply Books
114 <input type = "radio" name = "Books" value = "howto"
115 id = "howto"> How to Program Books
116 <input type = "radio" name = "Books" value = "dotnet"
117 id = "dotnet"> .NET Books
118 <input type = "radio" name = "Books" value = "javaccpp"
119 id = "javaccpp"> Java/C/C++ Books
120 <input type = "radio" checked name = "Books" value = "none"
121 id = "none"> None
122 <div id = "covers"></div>
123 </body>
124 </html>


Fig. 16.8. Image catalog that uses Ajax to request XML data asynchronously.
When the XMLHttpRequest object receives the response, it invokes the callback function processResponse (lines 38–81). We use XMLHttpRequest object’s responseXML property to access the XML returned by the server. Lines 41–42 check that the request was successful and that the responseXML property is not empty. The XML file that we requested includes a baseURL node that contains the address of the image directory and a collection of cover nodes that contain image filenames. responseXML is a document object, so we can extract data from it using the XML DOM functions. Lines 47–52 use the DOM’s method getElementsByTagName to extract all the image filenames from cover nodes and the URL of the directory from the baseURL node. Since the baseURL has no child nodes, we use item(0).firstChild.nodeValue to obtain the directory’s address and store it in variable baseURL. The image filenames are stored in the covers array.
As in Fig. 16.5 we have a placeholder div element (line 122) to specify where the image table will be displayed on the page. Line 55 stores the div in variable output, so we can fill it with content later in the program.
Lines 58–77 generate an HTML5 unordered list dynamically, using the createElement, setAttribute and appendChild HTML5 DOM methods. Method createElement creates an HTML5 element of the specified type. Method appendChild inserts one HTML5 element into another. Line 58 creates the ul element. Each iteration of the for statement obtains the filename of the image to be inserted (lines 63–67), creates an li element to hold the image (line 70) and creates an <img> element (line 71). Line 74 sets the image’s src attribute to the image’s URL, which we build by concatenating the filename to the base URL of the HTML5 document. Lines 75–76 insert the <img> element into the li element and the li element into the ul element. Once all the images have been inserted into the unordered list, the list is inserted into the placeholder element covers that’s referenced by variable output (line 79). This element is located on the bottom of the web page.
Function clearImages (lines 84–87) is called to clear images when the user clicks the None radio button. The text is cleared by setting the innerHTML property of the placeholder element to an empty string.
16.6. Creating a Full-Scale Ajax-Enabled Application
Our next example demonstrates additional Ajax capabilities. The web application interacts with a web service to obtain data and to modify data in a server-side database. The web application and server communicate with a data format called JSON (JavaScript Object Notation). In addition, the application demonstrates server-side validation that occurs in parallel with the user interacting with the web application. You can test-drive the application at http://test.deitel.com/iw3htp5/ch16/fig16_09-10/AddressBook.html.
16.6.1. Using JSON
JSON (JavaScript Object Notation)—a simple way to represent JavaScript objects as strings—is a simpler alternative to XML for passing data between the client and the server. Each object in JSON is represented as a list of property names and values contained in curly braces, in the following format:
{ "propertyName1" : value1, "propertyName2": value2 }
Arrays are represented in JSON with square brackets in the following format:
[ value1, value2, value3 ]
Each value can be a string, a number, a JSON representation of an object, true, false or null. You can convert JSON strings into JavaScript objects with JavaScript’s JSON.parse function. JSON strings are easier to create and parse than XML and require fewer bytes. For these reasons, JSON is commonly used to communicate in client/server interaction.
16.6.2. Rich Functionality
The previous examples in this chapter requested data from files on the server. The example in Figs. 16.9–16.10 is an address–book application that communicates with a server-side web service. The application uses server-side processing to give the page the functionality and usability of a desktop application. We use JSON to encode server-side responses and to create objects on the fly. Figure 16.9 presents the HTML5 document. Figure 16.10 presents the JavaScript.
Initially the address book loads a list of entries, each containing a first and last name (Fig. 16.9(a)). Each time the user clicks a name, the address book uses Ajax functionality to load the person’s address from the server and expand the entry without reloading the page (Fig. 16.9(b))—and it does this in parallel with allowing the user to click other names.
The application allows the user to search the address book by typing a last name. As the user enters each keystroke, the application asynchronously calls the server to obtain the list of names in which the last name starts with the characters the user has entered so far (Fig. 16.9(c), (d) and (e))—a popular feature called type-ahead.
The application also enables the user to add another entry to the address book by clicking the Add an Entry button (Fig. 16.9(f)). The application displays a form that enables live field validation.
As the user fills out the form, the ZIP code is eventually entered, and when the user tabs to the next field, the blur event handler for the ZIP-code field makes an Ajax call to the server. The server then validates the ZIP code, uses the valid zip code to obtain the corresponding city and state from a ZIP-code web service and returns this information to the client (Fig. 16.9(g). [If the ZIP code were invalid, the web service would return an error to the server, which would then send an error message back to the client.]
When the user enters the telephone number and moves the cursor out of the Telephone: field, the blur event handler for that field uses an Ajax call to the server to validate the telephone number—if it were invalid, the server would return an error message to the client.
When the Submit button is clicked, the button’s event handler determines that some required data is missing and displays the message “First Name and Last Name must have a value.” at the bottom of the screen (Fig. 16.9(h)). The user enters the missing data and clicks Submit again (Fig. 16.9(i)). The client-side code revalidates the data, determines that it’s correct and sends it to the server. The server performs its own validation, then returns the updated address book, which is displayed on the client, with the new name added in (Fig. 16.9(j)).
1 <!DOCTYPE html>
2
3 <!-- Fig. 16.9 addressbook.html -->
4 <!-- Ajax enabled address book application. -->
5 <html>
6 <head>
7 <meta charset="utf-8">
8 <title>Address Book</title>
9 <link rel = "stylesheet" type = "text/css" href = "style.css">
10 <script src = "AddressBook.js"></script>
11 </head>
12 <body>
13 <div>
14 <input id = "addressBookButton" type = "button"
15 value = "Address Book">
16 <input id = "addEntryButton" type = "button"
17 value = "Add an Entry">
18 </div>
19 <div id = "addressBook"">
20 <p>Search By Last Name: <input id = "searchInput"></p>
21 <div id = "Names"></div>
22 </div>
23 <div id = "addEntry" style = "display : none">
24 <p><label>First Name:</label> <input id = "first"></p>
25 <p><label>Last Name:</label> <input id = "last"></p>
26 <p class = "head">Address:</p>
27 <p><label>Street:</label> <input id = "street"></p>
28 <p><label>City:</label> <span id = "city" class = "validator">
29 </span></p>
30 <p><label>State:</label> <span id = "state" class = "validator">
31 </span></p>
32 <p><label>Zip:</label> <input id = "zip">
33 <span id = "validateZip" class = "validator"></span></p>
34 <p><label>Telephone:</label> <input id = "phone">
35 <span id = "validatePhone" class = "validator"></span></p>
36 <p><input id = "submitButton" type = "button" value = "Submit"></p>
37 <div id = "success" class = "validator"></div>
38 </div>
39 </body>
40 </html>

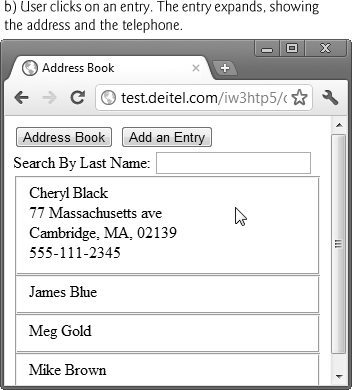


Fig. 16.9. Ajax-enabled address–book application.
1 // Fig. 16.10 addressbook.js
2 // Ajax-enabled address-book JavaScript code
3 // URL of the web service
4 var webServiceUrl = "/AddressBookWebService/Service.svc";
5
6 var phoneValid = false; // indicates if the telephone is valid
7 var zipValid = false; //indicates if the ZIP code is valid
8
9 // get a list of names from the server and display them
10 function showAddressBook()
11 {
12 // hide the "addEntry" form and show the address book
13 document.getElementById( "addEntry" ).style.display = "none";
14 document.getElementById( "addressBook" ).style.display = "block";
15
16 callWebService( "/getAllNames", parseData );
17 } // end function showAddressBook
18
19 // send the asynchronous request to the web service
20 function callWebService( methodAndArguments, callBack )
21 {
22 // build request URL string
23 var requestUrl = webServiceUrl + methodAndArguments;
24
25 // attempt to send the asynchronous request
26 try
27 {
28 var asyncRequest = new XMLHttpRequest(); // create request
29
30 // set up callback function and store it
31 asyncRequest.addEventListener("readystatechange",
32 function() { callBack( asyncRequest ); }, false);
33
34 // send the asynchronous request
35 asyncRequest.open( "GET", requestUrl, true );
36 asyncRequest.setRequestHeader("Accept",
37 "application/json; charset=utf-8" );
38 asyncRequest.send(); // send request
39 } // end try
40 catch ( exception )
41 {
42 alert ( "Request Failed" );
43 } // end catch
44 } // end function callWebService
45
46 // parse JSON data and display it on the page
47 function parseData( asyncRequest )
48 {
49 // if request has completed successfully, process the response
50 if ( asyncRequest.readyState == 4 && asyncRequest.status == 200 )
51 {
52 // convert the JSON string to an Object
53 var data = JSON.parse(asyncRequest.responseText);
54 displayNames( data ); // display data on the page
55 } // end if
56 } // end function parseData
57
58 // use the DOM to display the retrieved address-book entries
59 function displayNames( data )
60 {
61 // get the placeholder element from the page
62 var listBox = document.getElementById( "Names" );
63 listBox.innerHTML = ""; // clear the names on the page
64
65 // iterate over retrieved entries and display them on the page
66 for ( var i = 0; i < data.length; ++i )
67 {
68 // dynamically create a div element for each entry
69 // and a fieldset element to place it in
70 var entry = document.createElement( "div" );
71 var field = document.createElement( "fieldset" );
72 entry.onclick = function() { getAddress( this, this.innerHTML ); };
73 entry.id = i; // set the id
74 entry.innerHTML = data[ i ].First + " " + data[ i ].Last;
75 field.appendChild( entry ); // insert entry into the field
76 listBox.appendChild( field ); // display the field
77 } // end for
78 } // end function displayAll
79
80 // search the address book for input
81 // and display the results on the page
82 function search( input )
83 {
84 // get the placeholder element and delete its content
85 var listBox = document.getElementById( "Names" );
86 listBox.innerHTML = ""; // clear the display box
87
88 // if no search string is specified, all the names are displayed
89 if ( input == "" ) // if no search value specified
90 {
91 showAddressBook(); // Load the entire address book
92 } // end if
93 else
94 {
95 callWebService( "/search/" + input, parseData );
96 } // end else
97 } // end function search
98
99 // Get address data for a specific entry
100 function getAddress( entry, name )
101 {
102 // find the address in the JSON data using the element's id
103 // and display it on the page
104 var firstLast = name.split(" "); // convert string to array
105 var requestUrl = webServiceUrl + "/getAddress/"
106 + firstLast[ 0 ] + "/" + firstLast[ 1 ];
107
108 // attempt to send an asynchronous request
109 try
110 {
111 // create request object
112 var asyncRequest = new XMLHttpRequest();
113
114 // create a callback function with 2 parameters
115 asyncRequest.addEventListener("readystatechange",
116 function() { displayAddress( entry, asyncRequest ); }, false);
117
118 asyncRequest.open( "GET", requestUrl, true );
119 asyncRequest.setRequestHeader("Accept",
120 "application/json; charset=utf-8"); // set response datatype
121 asyncRequest.send(); // send request
122 } // end try
123 catch ( exception )
124 {
125 alert ( "Request Failed." );
126 } // end catch
127 } // end function getAddress
128
129 // clear the entry's data
130 function displayAddress( entry, asyncRequest )
131 {
132 // if request has completed successfully, process the response
133 if ( asyncRequest.readyState == 4 && asyncRequest.status == 200 )
134 {
135 // convert the JSON string to an object
136 var data = JSON.parse(asyncRequest.responseText);
137 var name = entry.innerHTML // save the name string
138 entry.innerHTML = name + "<br>" + data.Street +
139 "<br>" + data.City + ", " + data.State
140 + ", " + data.Zip + "<br>" + data.Telephone;
141
142 // change event listener
143 entry.onclick = function() { clearField( entry, name ); };
144 } // end if
145 } // end function displayAddress
146
147 // clear the entry's data
148 function clearField( entry, name )
149 {
150 entry.innerHTML = name; // set the entry to display only the name
151 entry.onclick = function() { getAddress( entry, name ); };
152 } // end function clearField
153
154 // display the form that allows the user to enter more data
155 function addEntry()
156 {
157 document.getElementById( "addressBook" ).style.display = "none";
158 document.getElementById( "addEntry" ).style.display = "block";
159 } // end function addEntry
160
161 // send the ZIP code to be validated and to generate city and state
162 function validateZip( zip )
163 {
164 callWebService ( "/validateZip/" + zip, showCityState );
165 } // end function validateZip
166
167 // get city and state that were generated using the zip code
168 // and display them on the page
169 function showCityState( asyncRequest )
170 {
171 // display message while request is being processed
172 document.getElementById( "validateZip" ).
173 innerHTML = "Checking zip...";
174
175 // if request has completed successfully, process the response
176 if ( asyncRequest.readyState == 4 )
177 {
178 if ( asyncRequest.status == 200 )
179 {
180 // convert the JSON string to an object
181 var data = JSON.parse(asyncRequest.responseText);
182
183 // update ZIP-code validity tracker and show city and state
184 if ( data.Validity == "Valid" )
185 {
186 zipValid = true; // update validity tracker
187
188 // display city and state
189 document.getElementById( "validateZip" ).innerHTML = "";
190 document.getElementById( "city" ).innerHTML = data.City;
191 document.getElementById( "state" ).
192 innerHTML = data.State;
193 } // end if
194 else
195 {
196 zipValid = false; // update validity tracker
197 document.getElementById( "validateZip" ).
198 innerHTML = data.ErrorText; // display the error
199
200 // clear city and state values if they exist
201 document.getElementById( "city" ).innerHTML = "";
202 document.getElementById( "state" ).innerHTML = "";
203 } // end else
204 } // end if
205 else if ( asyncRequest.status == 500 )
206 {
207 document.getElementById( "validateZip" ).
208 innerHTML = "Zip validation service not avaliable";
209 } // end else if
210 } // end if
211 } // end function showCityState
212
213 // send the telephone number to the server to validate format
214 function validatePhone( phone )
215 {
216 callWebService( "/validateTel/" + phone, showPhoneError );
217 } // end function validatePhone
218
219 // show whether the telephone number has correct format
220 function showPhoneError( asyncRequest )
221 {
222 // if request has completed successfully, process the response
223 if ( asyncRequest.readyState == 4 && asyncRequest.status == 200 )
224 {
225 // convert the JSON string to an object
226 var data = JSON.parse(asyncRequest.responseText);
227
228 if ( data.ErrorText != "Valid Telephone Format" )
229 {
230 phoneValid = false; // update validity tracker
231 document.getElementById( "validatePhone" ).innerHTML =
232 data.ErrorText; // display the error
233 } // end if
234 else
235 {
236 phoneValid = true; // update validity tracker
237 } // end else
238 } // end if
239 } // end function showPhoneError
240
241 // enter the user's data into the database
242 function saveForm()
243 {
244 // retrieve the data from the form
245 var first = document.getElementById( "first" ).value;
246 var last = document.getElementById( "last" ).value;
247 var street = document.getElementById( "street" ).value;
248 var city = document.getElementById( "city" ).innerHTML;
249 var state = document.getElementById( "state" ).innerHTML;
250 var zip = document.getElementById( "zip" ).value;
251 var phone = document.getElementById( "phone" ).value;
252
253 // check if data is valid
254 if ( !zipValid || !phoneValid )
255 {
256 // display error message
257 document.getElementById( "success" ).innerHTML =
258 "Invalid data entered. Check form for more information";
259 } // end if
260 else if ( ( first == "" ) || ( last == "" ) )
261 {
262 // display error message
263 document.getElementById("success").innerHTML =
264 "First Name and Last Name must have a value.";
265 } // end if
266 else
267 {
268 // hide the form and show the address book
269 document.getElementById( "addEntry" ).style.display = "none";
270 document.getElementById( "addressBook" ).style.display = "block";
271
272 // call the web service to insert data into the database
273 callWebService( "/addEntry/" + first + "/" + last + "/" + street +
274 "/" + city + "/" + state + "/" + zip + "/" + phone, parseData );
275 } // end else
276 } // end function saveForm
277
278 // register event listeners
279 function start()
280 {
281 document.getElementById( "addressBookButton" ).addEventListener(
282 "click", showAddressBook, false );
283 document.getElementById( "addEntryButton" ).addEventListener(
284 "click", addEntry, false );
285 document.getElementById( "searchInput" ).addEventListener(
286 "keyup", function() { search( this.value ); }, false );
287 document.getElementById( "zip" ).addEventListener(
288 "blur", function() { validateZip( this.value ); }, false );
289 document.getElementById( "phone" ).addEventListener(
290 "blur", function() { validatePhone( this.value ); }, false );
291 document.getElementById( "submitButton" ).addEventListener(
292 "click", saveForm, false );
293
294 showAddressBook();
295 } // end function start
296
297 window.addEventListener( "load", start, false );
Fig. 16.10. JavaScript code for the address–book application.
16.6.3. Interacting with a Web Service on the Server
When the page loads, the load event (Fig. 16.10, line 297) calls the start function (lines 279–295) to register various event listeners and to call showAddressBook, which loads the address book onto the page. Function showAddressBook (lines 10–17) shows the addressBook element and hides the addEntry element (lines 13–14). Then it calls function callWebService to make an asynchronous request to the server (line 16). Our program uses an ASP.NET REST web service that we created for this example to do the server-side processing. The web service contains a collection of methods, including getAllNames, that can be called from a web application. To invoke a method you specify the web service URL followed by a forward slash (/), the name of the method to call, a forward slash and the arguments separated by forward slashes. Function callWebService requires a string containing the method to call on the server and the arguments to the method in the format described above. In this case, the function we’re invoking on the server requires no arguments, so line 16 passes the string "/getAllNames" as the first argument to callWebService.
Function callWebService (lines 20–44) contains the code to call our web service, given a string containing the web-service method to call and the arguments to that method (if any), and the name of a callback function. The web-service method to call and its arguments are appended to the request URL (line 23). In this first call, we do not pass any parameters because the web method that returns all the entries requires none. However, future web method calls will include arguments in the methodAndArguments parameter. Lines 28–38 prepare and send the request, using functionality similar to that in the previous two examples. There are many types of user interactions in this application, each requiring a separate asynchronous request. For this reason, we pass the appropriate asyncRequest object as an argument to the function specified by the callBack parameter. However, event handlers cannot receive arguments, so lines 31–32 register an anonymous function for asyncRequest’s readystatechange event. When this anonymous function gets called, it calls function callBack and passes the asyncRequest object as an argument. Lines 36–37 set an Accept request header to receive JSON-formatted data.
16.6.4. Parsing JSON Data
Each of our web service’s methods in this example returns a JSON representation of an object or array of objects. For example, when the web application requests the list of names in the address book, the list is returned as a JSON array, as shown in Fig. 16.11. Each object in Fig. 16.11 has the attributes first and last.
1 [ { "first": "Cheryl", "last": "Black" },
2 { "first": "James", "last": "Blue" },
3 { "first": "Mike", "last": "Brown" },
4 { "first": "Meg", "last": "Gold" } ]
Fig. 16.11. Address–book data formatted in JSON.
When the XMLHttpRequest object receives the response, it calls function parseData (Fig. 16.10, lines 47–56). Line 53 calls the JSON.parse function, which converts the JSON string into a JavaScript object. Then line 54 calls function displayNames (lines 59–78), which displays the first and last name of each address–book entry passed to it. Lines 62–63 use the HTML5 DOM to store the placeholder div element Names in the variable listbox and clear its content. Once parsed, the JSON string of address–book entries becomes an array, which this function traverses (lines 66–77).
16.6.5. Creating HTML5 Elements and Setting Event Handlers on the Fly
Line 71 uses an HTML5 fieldset element to create a box in which the entry will be placed. Line 72 registers an anonymous function that calls getAddress as the onclick event handler for the div created in line 70. This enables the user to expand each address–book entry by clicking it. The arguments to getAddress are generated dynamically and not evaluated until the getAddress function is called. This enables each function to receive arguments that are specific to the entry the user clicked. Line 74 displays the names on the page by accessing the first (first name) and last (last name) fields of each element of the data array. To determine which address the user clicked, we introduce the this keyword. The meaning of this depends on its context. In an event-handling function, this refers to the DOM object on which the event occurred. Our function uses this to refer to the clicked entry. The this keyword allows us to use one event handler to apply a change to one of many DOM elements, depending on which one received the event.
Function getAddress (lines 100–127) is called when the user clicks an entry. This request must keep track of the entry where the address is to be displayed on the page. Lines 115–116 set as the callback function an anonymous function that calls displayAddress with the entry element as an argument. Once the request completes successfully, lines 136–140 parse the response and display the addresses. Line 143 updates the div’s onclick event handler to hide the address data when that div is clicked again by the user. When the user clicks an expanded entry, function clearField (lines 148–152) is called. Lines 150–151 reset the entry’s content and its onclick event handler to the values they had before the entry was expanded.
You’ll notice that we registered click-event handlers for the items in the fieldset by using the onclick property of each item, rather than the addEventListener method. We did this for simplicity in this example because we want to modify the event handler for each item’s click event based on whether the item is currently displaying just the contact’s name or its complete address. Each call to addEventListener adds another event listener to the object on which it’s called—for this example, that could result in many event listeners being called for one entry that the user clicks repeatedly. Using the onclick property allows you to set only one listener at a time for a paticular event, which makes it easy for us to switch event listeners as the user clicks each item in the contact list.
16.6.6. Implementing Type-Ahead
The input element declared in line 20 of Fig. 16.9 enables the user to search the address book by last name. As soon as the user starts typing in the input box, the keyup event handler (registered at lines 285–286 in Fig. 16.10) calls the search function (lines 82–97), passing the input element’s value as an argument. The search function performs an asynchronous request to locate entries with last names that start with its argument value. When the response is received, the application displays the matching list of names. Each time the user changes the text in the input box, function search is called again to make another asynchronous request.
The search function first clears the address–book entries from the page (lines 85–86). If the input argument is the empty string, line 91 displays the entire address book by calling function showAddressBook. Otherwise line 95 sends a request to the server to search the data. Line 95 creates a string to represent the method and argument that callWebService will append to the request URL. When the server responds, callback function parseData is invoked, which calls function displayNames to display the results on the page.
16.6.7. Implementing a Form with Asynchronous Validation
When the Add an Entry button in the HTML5 document is clicked, the addEntry function (lines 155–159) is called, which hides the addressBook div and shows the addEntry div that allows the user to add a person to the address book. The addEntry div in the HTML5 document contains a set of entry fields, some of which have event handlers (registered in the JavaScript start function) that enable validation that occurs asynchronously as the user continues to interact with the page. When a user enters a ZIP code, then moves the cursor to another field, the validateZip function (lines 162–165) is called. This function calls an external web service to validate the ZIP code. If it’s valid, that external web service returns the corresponding city and state. Line 164 calls the callWebService function with the appropriate method and argument, and specifies showCityState (lines 169–211) as the callback function.
ZIP-code validation can take significant time due to network delays. The function showCityState is called every time the request object’s readyState property changes. Until the request completes, lines 172–173 display "Checking zip..." on the page. After the request completes, line 181 converts the JSON response text to an object. The response object has four properties—Validity, ErrorText, City and State. If the request is valid, line 186 updates the zipValid script variable that keeps track of ZIP-code validity, and lines 189–192 show the city and state that the server generated using the ZIP code. Otherwise lines 196–198 update the zipValid variable and show the error code. Lines 201–202 clear the city and state elements. If our web service fails to connect to the ZIP-code validator web service, lines 207–208 display an appropriate error message.
Similarly, when the user enters the telephone number, the function validatePhone (lines 214–217) sends the phone number to the server. Once the server responds, the showPhoneError function (lines 220–239) updates the validatePhone script variable and shows the error message, if the web service returned one.
When the Submit button is clicked, the saveForm function is called (lines 242–276). Lines 245–251 retrieve the data from the form. Lines 254–259 check if the ZIP code and telephone number are valid, and display the appropriate error message in the Success element on the bottom of the page. Before the data can be entered into a database on the server, both the first-name and last-name fields must have a value. Lines 260–265 check that these fields are not empty and, if they’re empty, display the appropriate error message. Once all the data entered is valid, lines 266–275 hide the entry form and show the address book. Lines 273–274 call function callWebService to invoke the addEntry function of our web service with the data for the new contact. Once the server saves the data, it queries the database for an updated list of entries and returns them; then function parseData displays the entries on the page.
Summary
Section 16.1 Introduction
• Despite the tremendous technological growth of the Internet over the past decade, the usability of web applications has lagged behind that of desktop applications.
• Rich Internet Applications (RIAs, p. 572) are web applications that approximate the look, feel and usability of desktop applications. RIAs have two key attributes—performance and rich GUI.
• RIA performance comes from Ajax (Asynchronous JavaScript and XML, p. 572), which uses client-side scripting to make web applications more responsive.
• Ajax applications separate client-side user interaction and server communication and run them in parallel, making the delays of server-side processing more transparent to the user.
• “Raw” Ajax (p. 572) uses JavaScript to send asynchronous requests to the server, then updates the page using the DOM.
• When writing “raw” Ajax you need to deal directly with cross-browser portability issues, making it impractical for developing large-scale applications.
• Portability issues are hidden by Ajax toolkits (p. 572), which provide powerful ready-to-use controls and functions that enrich web applications and simplify JavaScript coding by making it cross-browser compatible.
• We achieve rich GUI in RIAs with Ajax toolkits and with RIA environments such as Adobe’s Flex, Microsoft’s Silverlight and JavaServer Faces. Such toolkits and environments provide powerful ready-to-use controls and functions that enrich web applications.
• The client-side of Ajax applications is written in HTML5 and CSS3 and uses JavaScript to add functionality to the user interface.
• XML and JSON are used to structure the data passed between the server and the client.
• The Ajax component that manages interaction with the server is usually implemented with JavaScript’s XMLHttpRequest object (p. 572)—commonly abbreviated as XHR.
• In traditional web applications, the user fills in the form’s fields, then submits the form. The browser generates a request to the server, which receives the request and processes it. The server generates and sends a response containing the exact page that the browser will render, which causes the browser to load the new page and temporarily makes the browser window blank. The client waits for the server to respond and reloads the entire page with the data from the response.
• While a synchronous request (p. 573) is being processed on the server, the user cannot interact with the client web browser.
• The synchronous model was originally designed for a web of hypertext documents—what some people call the “brochure web.” This model yielded “choppy” application performance.
• In an Ajax application, when the user interacts with a page, the client creates an XMLHttpRequest object to manage a request. The XMLHttpRequest object sends the request to and awaits the response from the server. The requests are asynchronous (p. 574), allowing the user to continue interacting with the application while the server processes the request concurrently. When the server responds, the XMLHttpRequest object that issued the request invokes a callback function (p. 574), which typically uses partial page updates (p. 574) to display the returned data in the existing web page without reloading the entire page.
• The callback function updates only a designated part of the page. Such partial page updates help make web applications more responsive, making them feel more like desktop applications.
Section 16.2 Rich Internet Applications (RIAs) with Ajax
• A classic HTML5 registration form sends all of the data to be validated to the server when the user clicks the Register button. While the server is validating the data, the user cannot interact with the page. The server finds invalid data, generates a new page identifying the errors in the form and sends it back to the client—which renders the page in the browser. Once the user fixes the errors and clicks the Register button, the cycle repeats until no errors are found; then the data is stored on the server. The entire page reloads every time the user submits invalid data.
• Ajax-enabled forms are more interactive. Entries are validated dynamically as the user enters data into the fields. If a problem is found, the server sends an error message that’s asynchronously displayed to inform the user of the problem. Sending each entry asynchronously allows the user to address invalid entries quickly, rather than making edits and resubmitting the entire form repeatedly until all entries are valid. Asynchronous requests could also be used to fill some fields based on previous fields’ values.
Section 16.3 History of Ajax
• The term Ajax was coined by Jesse James Garrett of Adaptive Path in February 2005, when he was presenting the previously unnamed technology to a client.
• All of the technologies involved in Ajax (HTML5, JavaScript, CSS, dynamic HTML, the DOM and XML) had existed for many years before the term “Ajax” was coined.
• In 1998, Microsoft introduced the XMLHttpRequest object to create and manage asynchronous requests and responses.
• Popular applications like Flickr, Google’s Gmail and Google Maps use the XMLHttpRequest object to update pages dynamically.
• The name Ajax immediately caught on and brought attention to its component technologies. Ajax has quickly become one of the hottest technologies in web development, as it enables webtop applications to challenge the dominance of established desktop applications.
Section 16.4 “Raw” Ajax Example Using the XMLHttpRequest Object
• The XMLHttpRequest object (which resides on the client) is the layer between the client and the server that manages asynchronous requests in Ajax applications. This object is supported on most browsers, though they may implement it differently.
• To initiate an asynchronous request, you create an instance of the XMLHttpRequest object, then use its open method to set up the request and its send method to initiate the request.
• When an Ajax application requests a file from a server, the browser typically caches that file. Subsequent requests for the same file can load it from the browser’s cache.
• For security purposes, the XMLHttpRequest object does not allow a web application to request resources from servers other than the one that served the web application.
• Making a request to a different server is known as cross-site scripting (also known as XSS, p. 578). You can implement a server-side proxy—an application on the web application’s web server—that can make requests to other servers on the web application’s behalf.
• When the third argument to XMLHttpRequest method open is true, the request is asynchronous.
• An exception (p. 581) is an indication of a problem that occurs during a program’s execution.
• Exception handling (p. 581) enables you to create applications that can resolve (or handle) exceptions—in some cases allowing a program to continue executing as if no problem had been encountered.
• A try block (p. 581) encloses code that might cause an exception and code that should not execute if an exception occurs. A try block consists of the keyword try followed by a block of code enclosed in curly braces ({}).
• When an exception occurs, a try block terminates immediately and a catch block (also called a catch clause or exception handler, p. 581) catches (i.e., receives) and handles the exception.
• The catch block begins with the keyword catch (p. 581) and is followed by an exception parameter in parentheses and a block of code enclosed in curly braces.
• The exception parameter’s name enables the catch block to interact with a caught exception object, which contains name and message properties.
• A callback function is registered as the event handler for the XMLHttpRequest object’s readystatechange event (p. 582). Whenever the request makes progress, the XMLHttpRequest calls the readystatechange event handler.
• Progress is monitored by the readyState property, which has a value from 0 to 4. The value 0 indicates that the request is not initialized and the value 4 indicates that the request is complete.
Section 16.5 Using XML and the DOM
• When passing structured data between the server and the client, Ajax applications often use XML because it consumes little bandwidth and is easy to parse.
• When the XMLHttpRequest object receives XML data, the XMLHttpRequest object parses and stores the data as a DOM object in the responseXML property.
• The XMLHttpRequest object’s responseXML property contains the XML returned by the server.
• DOM method createElement creates an HTML5 element of the specified type.
• DOM method setAttribute adds or changes an attribute of an HTML5 element.
• DOM method appendChild inserts one HTML5 element into another.
• The innerHTML property of a DOM element can be used to obtain or change the HTML5 that’s displayed in a particular element.
Section 16.6 Creating a Full-Scale Ajax-Enabled Application
• JSON (JavaScript Object Notation, p. 587)—a simple way to represent JavaScript objects as strings—is an alternative way (to XML) for passing data between the client and the server.
• Each JSON object is represented as a list of property names and values contained in curly braces.
• An array is represented in JSON with square brackets containing a comma-separated list of values.
• Each value in a JSON array can be a string, a number, a JSON representation of an object, true, false or null.
• JavaScript’s JSON.parse function can convert JSON strings into JavaScript objects.
• JSON strings are easier to create and parse than XML and require fewer bytes. For these reasons, JSON is commonly used to communicate in client/server interaction.
• To implement type-ahead (p. 588), you can use an element’s keyup-event handler to make asynchronous requests.
Self-Review Exercises
16.1 Fill in the blanks in each of the following statements:
a. Ajax applications use ________ requests to create Rich Internet Applications.
b. In Ajax applications, the ________ object manages asynchronous interaction with the server.
c. The event handler called when the server responds is known as a(n) ________ function.
d. The ________ attribute can be accessed through the DOM to update an HTML5 element’s content without reloading the page.
e. JavaScript’s XMLHttpRequest object is commonly abbreviated as ________.
f. ________ is a simple way to represent JavaScript objects as strings.
g. Making a request to a different server is known as ________.
h. JavaScript’s ________ function can convert JSON strings into JavaScript objects.
i. A(n) ________ encloses code that might cause an exception and code that should not execute if an exception occurs.
j. The XMLHttpRequest object’s ________ contains the XML returned by the server.
16.2 State whether each of the following is true or false. If false, explain why.
a. Ajax applications must use XML for server responses.
b. The technologies that are used to develop Ajax applications have existed since the 1990s.
c. To handle an Ajax response, register for the XMLHttpRequest object’s readystatechanged event.
d. An Ajax application can be implemented so that it never needs to reload the page on which it runs.
e. The responseXML property of the XMLHttpRequest object stores the server’s response as a raw XML string.
f. An exception indicates successful completion of a program’s execution.
g. When the third argument to XMLHttpRequest method open is false, the request is asynchronous.
h. For security purposes, the XMLHttpRequest object does not allow a web application to request resources from servers other than the one that served the web application.
i. The innerHTML property of a DOM element can be used to obtain or change the HTML5 that’s displayed in a particular element.
Answers to Self-Review Exercises
16.1
a. asynchronous.
b. XMLHttpRequest.
c. callback.
d. innerHTML.
e. XHR.
f. JSON.
g. cross-site scripting (or XSS).
h. JSON.parse.
i. try block.
j. responseXML property.
16.2
a. False. Ajax applications can use any type of textual data as a response. For example, we used JSON in this chapter.
b. True.
c. True.
d. True.
e. False. If the response data has XML format, the XMLHttpRequest object parses it and stores it in a document object.
f. False. An exception is an indication of a problem that occurs during a program’s execution.
g. False. The third argument to XMLHttpRequest method open must be true to make an asynchronous request.
h. True.
i. True.
Exercises
16.3 Describe the differences between client/server interactions in traditional web applications and client/server interactions in Ajax web applications.
16.4 Consider the AddressBook application in Fig. 16.9. Describe how you could reimplement the type-ahead capability so that it could perform the search using data previously downloaded rather than making an asynchronous request to the server after every keystroke.
16.5 Describe each of the following terms in the context of Ajax:
a. type-ahead
b. edit-in-place
d. asynchronous request
e. XMLHttpRequest
f. “raw” Ajax
g. callback function
h. same origin policy
i. Ajax libraries
j. RIA
[Note to Instructors and Students: Owing to security restrictions on using XMLHttpRequest, Ajax applications must be placed on a web server (even one on your local computer) to enable them to work correctly, and when they need to access other resources, those must reside on the same web server. Students: You’ll need to work closely with your instructors in order to understand your lab setup, so that you can run your solutions to the exercises (the examples are already posted on our web server), and in order to run many of the other server-side applications that you’ll learn later in the book.]
16.6 The XML files used in the book-cover catalog example (Fig. 16.8) also store the titles of the books in a title attribute of each cover node. Modify the example so that every time the mouse hovers over an image, the book’s title is displayed below the image.
16.7 Create an Ajax-enabled version of the feedback form from Fig. 2.15. As the user moves between form fields, ensure that each field is nonempty. For the e-mail field, ensure that the e-mail address has a valid format. In addition, create an XML file that contains a list of e-mail addresses that are not allowed to post feedback. Each time the user enters an e-mail address, check whether it’s on that list; if so, display an appropriate message.
16.8 Create an Ajax-based product catalog that obtains its data from JSON files located on the server. The data should be separated into four JSON files. The first should be a summary file, containing a list of products. Each product should have a title, an image filename for a thumbnail image and a price. The second file should contain a list of descriptions for each product. The third file should contain a list of filenames for the full-size product images. The last file should contain a list of the thumbnail-image file names. Each item in a catalogue should have a unique ID that should be included with the entries for that product in every file. Next, create an Ajax-enabled web page that displays the product information in a table. The catalog should initially display a list of product names with their associated thumbnail images and prices. When the mouse hovers over a thumbnail image, the larger product image should be displayed. When the user moves the mouse away from that image, the original thumbnail should be redisplayed. You should provide a button that the user can click to display the product description.