
13. JavaScript Event Handling: A Deeper Look
The wisest prophets make sure of the event first.
—Horace Walpole
Do you think I can listen all day to such stuff?
—Lewis Carroll
The user should feel in control of the computer; not the other way around. This is achieved in applications that embody three qualities: responsiveness, permissiveness, and consistency.
—Inside Macintosh, Volume 1 Apple Computer, Inc., 1985
We are responsible for actions performed in response to circumstances for which we are not responsible.
—Allan Massie
Objectives
In this chapter you’ll:
• Learn the concepts of events, event handlers and event bubbling.
• Create and register event handlers that respond to mouse and keyboard events.
• Use the event object to get information about an event.
• Recognize and respond to many common events.
13.3 Event mousemove and the event Object
13.4 Rollovers with mouseover and mouseout
13.5 Form Processing with focus and blur
13.6 More Form Processing with submit and reset
Summary | Self-Review Exercises | Answers to Self-Review Exercises | Exercises
13.1. Introduction
We’ve seen that HTML5 pages can be controlled via scripting, and we’ve already used several events—load, submit and click—to trigger calls to JavaScript functions. This chapter takes a deeper look into JavaScript events, which allow scripts to respond to user interactions and modify the page accordingly. Events allow scripts to respond to a user who is moving the mouse, entering form data, pressing keys and much more. Events and event handling help make web applications more dynamic and interactive. We give examples of event handling several common events and list other useful events.
13.2. Reviewing the load Event
In several earlier examples, we used the window object’s load event to begin executing scripts. This event fires when the window finishes loading successfully (i.e., all its children are loaded and all external files referenced by the page are loaded). Actually, every DOM element has a load event, but it’s most commonly used on the window object. The example of Figs. 13.1–13.2 reviews the load event. The load event’s handler creates an interval timer that updates a span with the number of seconds that have elapsed since the document was loaded. The document’s (Fig. 13.1) paragraph contains the span (line 14).
1 <!DOCTYPE html>
2
3 <!-- Fig. 13.1: onload.html -->
4 <!-- Demonstrating the load event. -->
5 <html>
6 <head>
7 <meta charset = "utf-8">
8 <title>load Event</title>
9 <link rel = "stylesheet" type = "text/css" href = "style.css">
10 <script src = "load.js"></script>
11 </head>
12 <body>
13 <p>Seconds you have spent viewing this page so far:
14 <span id = "soFar">0</span></p>
15 </body>
16 </html>
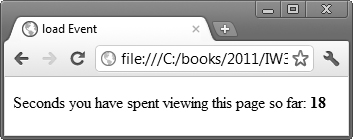
Fig. 13.1. Demonstrating the window’s load event.
Registering an Event Handler
An event handler is a function that responds to an event. Assigning an event handler to an event for a DOM node is called registering an event handler. The script (Fig. 13.2) registers the window’s load event handler at line 18. Method addEventListener is available for every DOM node. The method takes three arguments:
• The first is the name of the event for which we’re registering a handler.
• The second is the function that will be called to handle the event.
• The last argument is typically false—the true value is beyond this book’s scope.
Line 19 indicates that when the load event occurs, function startTimer (lines 6–9) should execute. This function uses method window.setInterval to specify that function updateTime (lines 12–16) should be called every 1000 milliseconds. The updateTime function increments variable seconds and updates the counter in the span named "soFar".
1 // Fig. 13.2: load.js
2 // Script to demonstrate the load event.
3 var seconds = 0;
4
5 // called when the page loads to begin the timer
6 function startTimer()
7 {
8 window.setInterval( "updateTime()", 1000 );
9 } // end function startTimer
10
11 // called every 1000 ms to update the timer
12 function updateTime()
13 {
14 ++seconds;
15 document.getElementById( "soFar" ).innerHTML = seconds;
16 } // end function updateTime
17
18 window.addEventListener( "load", startTimer, false );
Fig. 13.2. Script that registers window’s load event handler and handles the event.
Note that the load event enables us to access the elements in the HTML5 page after they’re fully loaded. If a script loaded in the document’s head section contains statements that appear outside any script functions, those statements execute when the script loads—that is, before the body has loaded. If such a statement attempted to use getElementById to get a DOM node for an HTML5 element in the body, getElementById would return null. Another solution to this problem is to place the script as the last item in the document’s body element—in that case, before the script executes, the body’s nested elements will have already been created.
Registering Multiple Event Handlers
Method addEventListener can be called multiple times on a DOM node to register more than one event-handling method for an event. For example, if you wanted to perform a visual effect when the mouse is over a button and perform a task when that button is pressed, you could register mouseover and click event handlers.
Removing Event Listeners
It’s also possible to remove an event listener by calling removeEventListener with the same arguments that you passed to addEventListener to register the event handler.
A Note About Older Event-Registration Models
We use the W3C standard event-registration model, which is supported by all of the browsers we use in this book. In legacy HTML and JavaScript code, you’ll frequently encounter two other event-registration models—the inline model and the traditional model.
The inline model places calls to JavaScript functions directly in HTML code. For example, the following code indicates that JavaScript function start should be called when the body element loads:
<body onload = "start()">
The onload attribute corresponds to the body element’s load event. By current web development standards, it’s generally considered poor practice to intermix HTML and JavaScript code in this manner.
The traditional model uses a property of an object to specify an event handler. For example, the following JavaScript code indicates that function start should be called when document loads:
document.onload = "start()";
The onload property corresponds to the document object’s load event. Though this property is specified in JavaScript and not in the HTML5 document, there are various problems with using it. In particular, if another statement assigns a different value to document.onload, the original value is replaced, which may not be the intended result.
For more information about these older event-registration models, visit these sites:
www.onlinetools.org/articles/unobtrusivejavascript/chapter4.html
www.quirksmode.org/js/introevents.html
13.3. Event mousemove and the event Object
This section introduces the mousemove event, which occurs whenever the user moves the mouse over the web page. We also discuss the event object, which contains information about the event that occurred. The example in Figs. 13.3–13.5 creates a simple drawing program that allows the user to draw inside a table element in red or blue by holding down the Shift key or Ctrl key and moving the mouse over the box. (In the next chapter, we’ll introduce HTML5’s new canvas element for creating graphics.) We do not show the example’s style.css file, because the styles it contains have all been demonstrated previously.
HTML5 Document
The document’s body (Fig. 13.3, lines 12–18) has a table with a caption that provides instructions on how to use the program and an empty tbody. The document’s load event will call a function named createCanvas (Fig. 13.4) to fill the table with rows and columns.
1 <!DOCTYPE html>
2
3 <!-- Fig. 13.3: draw.html -->
4 <!-- A simple drawing program. -->
5 <html>
6 <head>
7 <meta charset="utf-8">
8 <title>Simple Drawing Program</title>
9 <link rel = "stylesheet" type = "text/css" href = "style.css">
10 <script src = "draw.js"></script>
11 </head>
12 <body>
13 <table id = "canvas">
14 <caption>Hold <em>Ctrl</em> (or <em>Control</em>) to draw blue.
15 Hold <em>Shift</em> to draw red.</caption>
16 <tbody id = "tablebody"></tbody>
17 </table>
18 </body>
19 </html>


Fig. 13.3. Simple drawing program.
Function createCanvas in draw.js
The createCanvas function (Fig. 13.4, lines 4–25) fills in the table with a grid of cells. The style.css file used in this example contains a CSS rule that sets the width and height of every td element to 4px. Another CSS rule in the file sets the table to 400px wide and uses the border-collapse CSS property to eliminate space between the table cells.
1 // Fig. 13.4: draw.js
2 // A simple drawing program.
3 // initialization function to insert cells into the table
4 function createCanvas()
5 {
6 var side = 100;
7 var tbody = document.getElementById( "tablebody" );
8
9 for ( var i = 0; i < side; ++i )
10 {
11 var row = document.createElement( "tr" );
12
13 for ( var j = 0; j < side; ++j )
14 {
15 var cell = document.createElement( "td" );
16 row.appendChild( cell );
17 } // end for
18
19 tbody.appendChild( row );
20 } // end for
21
22 // register mousemove listener for the table
23 document.getElementById( "canvas" ).addEventListener(
24 "mousemove", processMouseMove, false );
25 } // end function createCanvas
26
27 // processes the onmousemove event
28 function processMouseMove( e )
29 {
30 if ( e.target.tagName.toLowerCase() == "td" )
31 {
32 // turn the cell blue if the Ctrl key is pressed
33 if ( e.ctrlKey )
34 {
35 e.target.setAttribute( "class", "blue" );
36 } // end if
37
38 // turn the cell red if the Shift key is pressed
39 if ( e.shiftKey )
40 {
41 e.target.setAttribute( "class", "red" );
42 } // end if
43 } // end if
44 } // end function processMouseMove
45
46 window.addEventListener( "load", createCanvas, false );
Fig. 13.4. JavaScript code for the simple drawing program.
Line 6 defines variable side and sets it to 100—we use this as the number of rows and the number of columns in each row for a total of 10,000 table cells. Line 7 stores the tbody element so that we can append rows to it as they’re generated. The outer loop creates each table row and the inner loop creates each cell. The inner loop uses DOM method createElement to create a td elemen and appends the cell as a child of the row.
Lines 23–24 set function processMouseMove as the table’s mousemove event handler, which effectively specifies that function as the mousmove event handler for the table and all of its nested elements. An element’s mousemove event fires whenever the user moves the mouse over that element.
Function processMouseMove in draw.js
At this point, the table is set up and function processMouseMove (lines 28–44) is called whenever the mouse moves over the table. When the browser calls an event-handling function, it passes an event object to the function. That object contains information about the event that caused the event-handling function to be called. Figure 13.5 shows several properties of the event object.
If an event-handling function is defined with a parameter (as in line 28), the function can use the event object. The function parameter is commonly named e. Function processMouseMove colors the cell the mouse moves over, depending on the key that’s pressed when the event occurs. When the mouse moves over the table, the td element that the mouse moved over receives the event first. If that element does not have an event handler for the mouseover event, the event is sent to the td element’s parent element, and so on—this is known as event bubbling (which we discuss in more detail in Section 13.7). This process continues until a mouseover event handler is found—in this case, the one for the table element. The event object, however, always contains the specific element that original received the event. This is stored in the object’s target property. Line 30 uses this property to get the element’s tag name. If the tag name is "td", then lines 33–42 do the actual drawing. The event object’s ctrlKey property (line 33) contains a boolean which reflects whether the Ctrl key was pressed during the event. If ctrlKey is true, line 35 changes the color of the target table cell by setting its class attribute to the CSS class blue (defined in style.css). Similarly, if the shiftKey property of the event object is true, the Shift key is pressed and line 41 changes the color of the cell to red by setting its class attribute to the CSS class blue. This simple function allows the user to draw inside the table on the page in red and blue. You’ll add more functionality to this example in the exercises at the end of this chapter.

Fig. 13.5. Some event-object properties.
13.4. Rollovers with mouseover and mouseout
Two more events fired by mouse movements are mouseover and mouseout. When the mouse cursor moves into an element, a mouseover event occurs for that element. When the cursor leaves the element, a mouseout event occurs. The example in Figs. 13.6–13.7 uses these events to achieve a rollover effect that updates text when the mouse cursor moves over it. We also introduce a technique for creating rollover images—though you’ve already seen that image rollover effects can be accomplished with CSS3 as well. We do not show the example’s style.css file, because the styles it contains have all been demonstrated previously.
HTML5 Document
The HTML5 document (Fig. 13.6) contains an h1 with a nested img, a paragraph and a div with a nested unordered list. The unordered list contains the hexadecimal color codes for 16 basic HTML colors. Each list item’s id is set to the color name for the hexadecimal color value that’s displayed. The style.css file provides CSS rules that set the div’s width and border and that display the unordered list’s elements in inline-block format. The div’s width allows only four list items per line.
1 <!DOCTYPE html>
2
3 <!-- Fig 13.6: mouseoverout.html -->
4 <!-- Events mouseover and mouseout. -->
5 <html>
6 <head>
7 <meta charset = "utf-8">
8 <title>Events mouseover and mouseout</title>
9 <link rel = "stylesheet" type = "text/css" href = "style.css">
10 <script src = "mouseoverout.js"></script>
11 </head>
12 <body>
13 <h1><img src = "heading1.png" id = "heading"
14 alt = "Heading Image"></h1>
15 <p>Can you tell a color from its hexadecimal RGB code
16 value? Look at the hex code, guess its color. To see
17 what color it corresponds to, move the mouse over the
18 hex code. Moving the mouse out of the hex code's table
19 cell will display the color name.</p>
20 <div>
21 <ul>
22 <li id = "Black">#000000</li>
23 <li id = "Blue">#0000FF</li>
24 <li id = "Magenta">#FF00FF</li>
25 <li id = "Gray">#808080</li>
26 <li id = "Green">#008000</li>
27 <li id = "Lime">#00FF00</li>
28 <li id = "Maroon">#800000</li>
29 <li id = "Navy">#000080</li>
30 <li id = "Olive">#808000</li>
31 <li id = "Purple">#800080</li>
32 <li id = "Red">#FF0000</li>
33 <li id = "Silver">#C0C0C0</li>
34 <li id = "Cyan">#00FFFF</li>
35 <li id = "Teal">#008080</li>
36 <li id = "Yellow">#FFFF00</li>
37 <li id = "White">#FFFFFF</li>
38 </ul>
39 </div>
40 </body>
41 </html>
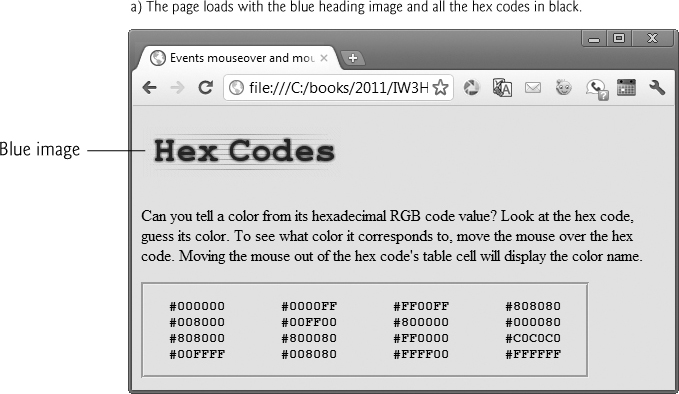


Fig. 13.6. HTML5 document to demonstrate mouseover and mouseout.
Script-Level Variables in mouseoverout.js
Figure 13.7 presents the JavaScript code for this example. To create a rollover effect for the image in the heading, lines 3–6 create two new JavaScript Image objects—image1 and image2. Image image2 displays when the mouse hovers over the image. Image image1 displays when the mouse is outside the image. The script sets the src properties of each Image in lines 4 and 6, respectively. Creating Image objects preloads the images, so the browser does not need to download the rollover image the first time the script displays the image. If the image is large or the connection is slow, downloading would cause a noticeable delay in the image update.
 Performance Tip 13.1
Preloading images used in rollover effects prevents a delay the first time an image is displayed.
1 // Fig 13.7: mouseoverout.js
2 // Events mouseover and mouseout.
3 image1 = new Image();
4 image1.src = "heading1.png";
5 image2 = new Image();
6 image2.src = "heading2.png";
7
8 function mouseOver( e )
9 {
10 // swap the image when the mouse moves over it
11 if ( e.target.getAttribute( "id" ) == "heading" )
12 {
13 e.target.setAttribute( "src", image2.getAttribute( "src" ) );
14 } // end if
15
16 // if the element is an li, assign its id to its color
17 // to change the hex code's text to the corresponding color
18 if ( e.target.tagName.toLowerCase() == "li" )
19 {
20 e.target.setAttribute( "style",
21 "color: " + e.target.getAttribute( "id" ) );
22 } // end if
23 } // end function mouseOver
24
25 function mouseOut( e )
26 {
27 // put the original image back when the mouse moves away
28 if ( e.target.getAttribute( "id" ) == "heading" )
29 {
30 e.target.setAttribute( "src", image1.getAttribute( "src" ) );
31 } // end if
32
33 // if the element is an li, assign its id to innerHTML
34 // to display the color name
35 if ( e.target.tagName.toLowerCase() == "li" )
36 {
37 e.target.innerHTML = e.target.getAttribute( "id" );
38 } // end if
39 } // end function mouseOut
40
41 document.addEventListener( "mouseover", mouseOver, false );
42 document.addEventListener( "mouseout", mouseOut, false );
Fig. 13.7. Processing the mouseover and mouseout events.
Function mouseOver and mouseOut
Lines 41–42 register functions mouseOver and mouseOut to handle the mouseover and mouseout events, respectively.
Lines 11–14 in the mouseOver function handle the mouseover event for the heading image. We use the event object’s target property (line 11) to get the id of the DOM object that received the event. If the event target’s id attribute is the string "heading", line 13 sets the img element’s src attribute to the src attribute of the appropriate Image object (image2). The same task occurs with image1 in the mouseOut function (lines 28–31).
The script handles the mouseover event for the list items in lines 18–22. This code tests whether the event’s target is an li element. If so, the code sets the element’s style attribute, using the color name stored in the id as the value of the style’s color property. Lines 35–38 handle the mouseout event by changing the innerHTML in the list item (i.e., the target) to the color name specified in the target’s id.
13.5. Form Processing with focus and blur
The focus and blur events can be useful when dealing with form elements that allow user input. The focus event fires when an element gains the focus (i.e., when the user clicks a form field or uses the Tab key to move between form elements), and blur fires when an element loses the focus, which occurs when another control gains the focus. The example in Figs. 13.8–13.9 demonstrates these events.
HTML5 Document
The HTML5 document in Fig. 13.8 contains a form followed by a paragraph in which we’ll display help text for the input element that currently has the focus.
1 <!DOCTYPE html>
2
3 <!-- Fig. 13.8: focusblur.html -->
4 <!-- Demonstrating the focus and blur events. -->
5 <html>
6 <head>
7 <meta charset = "utf-8">
8 <title>A Form Using focus and blur</title>
9 <link rel = "stylesheet" type = "text/css" href = "style.css">
10 <script src = "focusblur.js"></script>
11 </head>
12 <body>
13 <form id = "myForm" action = "">
14 <p><label class = "fixed" for = "name">Name:</label>
15 <input type = "text" id = "name"
16 placeholder = "Enter name"></p>
17 <p><label class = "fixed" for = "email">E-mail:</label>
18 <input type = "email" id = "email"
19 placeholder = "Enter e-mail address"></p>
20 <p><label>Click here if you like this site
21 <input type = "checkbox" id = "like"></label></p>
22 <p><label for = "comments">Any comments?</p>
23 <textarea id = "comments"
24 placeholder = "Enter comments here"></textarea>
25 <p><input id = "submit" type = "submit">
26 <input id = "reset" type = "reset"></p>
27 </form>
28 <p id = "helpText"></p>
29 </body>
30 </html>


Fig. 13.8. Demonstrating the focus and blur events.
JavaScript for the focus and blur Events
The script in Fig. 13.9 registers the event handlers for the window’s load event (line 35) and for the form elements’ focus and blur events.
1 // Fig. 13.9: focusblur.js
2 // Demonstrating the focus and blur events.
3 var helpArray = [ "Enter your name in this input box.",
4 "Enter your e-mail address in the format user@domain.",
5 "Check this box if you liked our site.",
6 "Enter any comments here that you'd like us to read.",
7 "This button submits the form to the server-side script.",
8 "This button clears the form.", "" ];
9 var helpText;
10
11 // initialize helpTextDiv and register event handlers
12 function init()
13 {
14 helpText = document.getElementById( "helpText" );
15
16 // register listeners
17 registerListeners( document.getElementById( "name" ), 0 );
18 registerListeners( document.getElementById( "email" ), 1 );
19 registerListeners( document.getElementById( "like" ), 2 );
20 registerListeners( document.getElementById( "comments" ), 3 );
21 registerListeners( document.getElementById( "submit" ), 4 );
22 registerListeners( document.getElementById( "reset" ), 5 );
23 } // end function init
24
25 // utility function to help register events
26 function registerListeners( object, messageNumber )
27 {
28 object.addEventListener( "focus",
29 function() { helpText.innerHTML = helpArray[ messageNumber ]; },
30 false );
31 object.addEventListener( "blur",
32 function() { helpText.innerHTML = helpArray[ 6 ]; }, false );
33 } // end function registerListener
34
35 window.addEventListener( "load", init, false );
Fig. 13.9. Demonstrating the focus and blur events.
Script-Level Variables
The helpArray (lines 3–8) contains the messages that are displayed when each input element receives the focus. Variable helpText (line 9) will refer to the paragraph in which the help text will be displayed.
Function init
When the window’s load event occurs, function init (lines 12–23) executes. Line 14 gets the helpText paragraph element from the document. Then, lines 17–22 call the function registerListeners (lines 26–33) once for each element in the form. The first argument in each call is the element for which we’ll register the focus and blur events, and the second argument a helpArray index that indicates which message to display for the element.
Function registerListeners—Using Anonymous functions
Function registerListeners registers the focus and blur events for the object it receives as its first argument. In each case, we define an anonymous function to handle the event. An anonymous function is defined with no name—it’s created in nearly the same way as any other function, but with no identifier after the keyword function. This notation is useful when creating a function for the sole purpose of assigning it to an event handler. We never call the function ourselves, so we don’t need to give it a name, and it’s more concise to create the function and register it as an event handler at the same time. For example, line 29
function() { helpText.innerHTML = helpArray[ messageNumber ]; }
defines an anonymous function that sets the helpText paragraph’s innerHTML property to the string in helpArray at index messageNumber. For the blur event handler, line 32 defines an anonymous function that sets the helpText paragraph’s innerHTML property to the empty string in helpArray[6].
13.6. More Form Processing with submit and reset
Two more events for processing forms are submit (which you’ve seen in earlier chapters) and reset. These events fire when a form is submitted or reset, respectively (Fig. 13.10). This example enhances the one in Fig. 13.8. The HTML5 document is identical, so we don’t show it here. The new JavaScript code for this example is in lines 24–36, which register event handlers for the form’s submit and reset events.
Line 24 gets the form element ("myForm"), then lines 25–30 register an anonymous function for its submit event. The anonymous function executes in response to the user’s submitting the form by clicking the Submit button or pressing the Enter key. Line 28 introduces the window object’s confirm method. As with alert and prompt, we do not need to prefix the call with window and a dot (.). The confirm dialog asks the users a question, presenting them with an OK button and a Cancel button. If the user clicks OK, confirm returns true; otherwise, confirm returns false.
1 // Fig. 13.8: focusblur.js
2 // Demonstrating the focus and blur events.
3 var helpArray = [ "Enter your name in this input box.",
4 "Enter your e-mail address in the format user@domain.",
5 "Check this box if you liked our site.",
6 "Enter any comments here that you'd like us to read.",
7 "This button submits the form to the server-side script.",
8 "This button clears the form.", "" ];
9 var helpText;
10
11 // initialize helpTextDiv and register event handlers
12 function init()
13 {
14 helpText = document.getElementById( "helpText" );
15
16 // register listeners
17 registerListeners( document.getElementById( "name" ), 0 );
18 registerListeners( document.getElementById( "email" ), 1 );
19 registerListeners( document.getElementById( "like" ), 2 );
20 registerListeners( document.getElementById( "comments" ), 3 );
21 registerListeners( document.getElementById( "submit" ), 4 );
22 registerListeners( document.getElementById( "reset" ), 5 );
23
24 var myForm = document.getElementById( "myForm" );
25 myForm.addEventListener( "submit",
26 function()
27 {
28 return confirm( "Are you sure you want to submit?" );
29 }, // end anonymous function
30 false );
31 myForm.addEventListener( "reset",
32 function()
33 {
34 return confirm( "Are you sure you want to reset?" );
35 }, // end anonymous function
36 false );
37 } // end function init
38
39 // utility function to help register events
40 function registerListeners( object, messageNumber )
41 {
42 object.addEventListener( "focus",
43 function() { helpText.innerHTML = helpArray[ messageNumber ]; },
44 false );
45 object.addEventListener( "blur",
46 function() { helpText.innerHTML = helpArray[ 6 ]; }, false );
47 } // end function registerListener
48
49 window.addEventListener( "load", init, false );
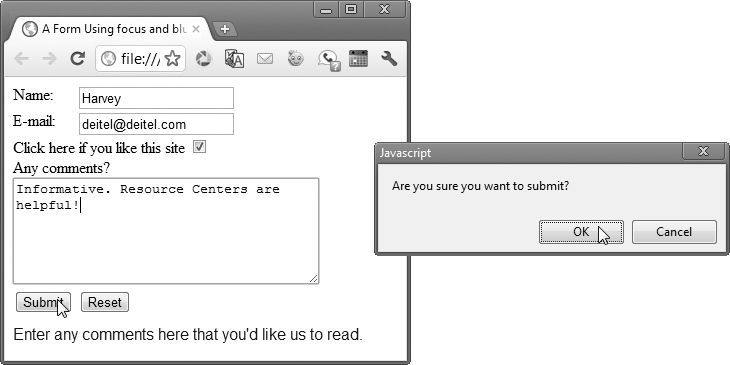
Fig. 13.10. Demonstrating the focus and blur events.
Our event handlers for the form’s submit and reset events simply return the value of the confirm dialog, which asks the users if they’re sure they want to submit or reset (lines 28 and 34, respectively). By returning either true or false, the event handlers dictate whether the default action for the event—in this case submitting or resetting the form—is taken. Other default actions, such as following a hyperlink, can be prevented by returning false from a click event handler on the link. If an event handler returns true or does not return a value, the default action is taken once the event handler finishes executing.
13.7. Event Bubbling
Event bubbling is the process by which events fired on child elements “bubble” up to their parent elements. When an event is fired on an element, it’s first delivered to the element’s event handler (if any), then to the parent element’s event handler (if any). This might result in event handling that was not intended. If you intend to handle an event in a child element alone, you should cancel the bubbling of the event in the child element’s event-handling code by using the cancelBubble property of the event object, as shown in Figs. 13.11–13.12.
1 <!DOCTYPE html>
2
3 <!-- Fig. 13.11: bubbling.html -->
4 <!-- Canceling event bubbling. -->
5 <html>
6 <head>
7 <meta charset="utf-8">
8 <title>Event Bubbling</title>
9 <script src = "bubbling.js">
10 </head>
11 <body>
12 <p id = "bubble">Bubbling enabled.</p>
13 <p id = "noBubble">Bubbling disabled.</p>
14 </body>
15 </html>

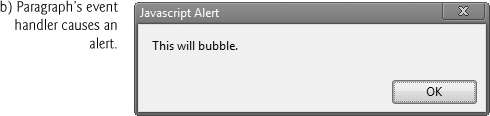


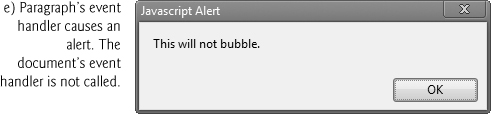
Fig. 13.11. Canceling event bubbling.
Clicking the first p element triggers a call to bubble (Fig. 13.12, lines 8–12). Then, because line 22 registers the document’s click event, documentClick is also called. This occurs because the click event bubbles up to the document. This is probably not the desired result. Clicking the second p element calls noBubble (lines 14–18), which disables the event bubbling for this event by setting the cancelBubble property of the event object to true. The default value of cancelBubble is false, so the statement in line 11 is unnecessary.
 Common Programming Error 13.1
Forgetting to cancel event bubbling when necessary may cause unexpected results in your scripts.
1 // Fig. 13.12: bubbling.js
2 // Canceling event bubbling.
3 function documentClick()
4 {
5 alert( "You clicked in the document." );
6 } // end function documentClick
7
8 function bubble( e )
9 {
10 alert( "This will bubble." );
11 e.cancelBubble = false;
12 } // end function bubble
13
14 function noBubble( e )
15 {
16 alert( "This will not bubble." );
17 e.cancelBubble = true;
18 } // end function noBubble
19
20 function registerEvents()
21 {
22 document.addEventListener( "click", documentClick, false );
23 document.getElementById( "bubble" ).addEventListener(
24 "click", bubble, false );
25 document.getElementById( "noBubble" ).addEventListener(
26 "click", noBubble, false );
27 } // end function registerEvents
28
29 window.addEventListener( "load", registerEvents, false );
Fig. 13.12. Canceling event bubbling.
13.8. More Events
The events we covered in this chapter are among the most commonly used. Figure 13.13 lists some common events and their descriptions. The actual DOM event names begin with "on", but we show the names you use with addEventListener here.
13.9. Web Resource
www.quirksmode.org/js/introevents.html
An introduction and reference site for JavaScript events. Includes comprehensive information on history of events, the different event models, and making events work across multiple browsers.
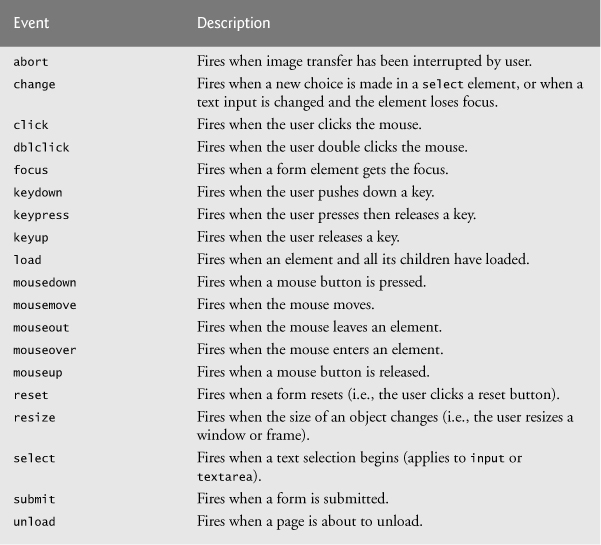
Fig. 13.13. Common events.
Summary
Section 13.1 Introduction
• JavaScript events (p. 423) allow scripts to respond to user interactions and modify the page accordingly.
• Events and event handling help make web applications more responsive, dynamic and interactive.
Section 13.2 Reviewing the load Event
• Functions that handle events are called event handlers (p. 424). Assigning an event handler to an event on a DOM node is called registering an event handler (p. 424).
• The load event fires whenever an element finishes loading successfully.
• If a script in the head attempts to get a DOM node for an HTML5 element in the body, getElementById returns null because the body has not yet loaded.
• Method addEventListener can be called multiple times on a DOM node to register more than one event-handling method for an event.
• You can remove an event listener by calling removeEventListener (p. 425) with the same arguments that you passed to addEventListener to register the event handler.
• The inline model of event registration places calls to JavaScript functions directly in HTML code.
• The traditional model of event registration uses a property of an object to specify an event handler.
Section 13.3 Event mousemove and the event Object
• The mousemove event (p. 425) fires whenever the user moves the mouse.
• The event object (p. 428) stores information about the event that called the event-handling function.
• The event object’s ctrlKey property (p. 429) contains a boolean which reflects whether the Ctrl key was pressed during the event.
• The event object’s shiftKey property (p. 429) reflects whether the Shift key was pressed during the event.
• In an event-handling function, this refers to the DOM object on which the event occurred.
• The event object stores in its target property the node on which the action occurred.
Section 13.4 Rollovers with mouseover and mouseout
• When the mouse cursor enters an element, a mouseover event (p. 429) occurs for that element. When the mouse cursor leaves the element, a mouseout event (p. 429) occurs for that element.
• Creating an Image object and setting its src property preloads the image.
Section 13.5 Form Processing with focus and blur
• The focus event (p. 433) fires when an element gains focus (i.e., when the user clicks a form field or uses the Tab key to move between form elements).
• blur (p. 433) fires when an element loses focus, which occurs when another control gains the focus.
Section 13.6 More Form Processing with submit and reset
• The submit and reset events (p. 436) fire when a form is submitted or reset, respectively.
• An anonymous function (p. 436) is a function that’s defined with no name—it’s created in nearly the same way as any other function, but with no identifier after the keyword function.
• Anonymous functions are useful when creating a function for the sole purpose of assigning it to an event handler.
• The confirm method (p. 437) asks the users a question, presenting them with an OK button and a Cancel button. If the user clicks OK, confirm returns true; otherwise, confirm returns false.
• By returning either true or false, event handlers dictate whether the default action for the event is taken.
• If an event handler returns true or does not return a value, the default action is taken once the event handler finishes executing.
Section 13.7 Event Bubbling
• Event bubbling (p. 438) is the process whereby events fired in child elements “bubble” up to their parent elements. When an event is fired on an element, it’s first delivered to the element’s event handler (if any), then to the parent element’s event handler (if any).
• If you intend to handle an event in a child element alone, you should cancel the bubbling of the event in the child element’s event-handling code by using the cancelBubble property (p. 438) of the event object.
Self-Review Exercises
13.1 Fill in the blanks in each of the following statements:
a. The state of three keys can be retrieved by using the event object. These keys are ________, ________ and ________.
b. If a child element does not handle an event, ________ lets the event rise through the object hierarchy.
c. The ________ of an event-handling function specifies whether to perform the default action for the event.
d. In an event handler, the event object’s ________ property specifies the element on which the event occurred.
e. Three events that fire when the user clicks the mouse are ________, ________ and ________.
13.2 State whether each of the following is true or false. If the statement is false, explain why.
a. The load event fires whenever an element starts loading.
b. The click event fires when the user clicks the mouse on an element.
c. The focus event fires when an element loses focus.
d. When using the rollover effect with images, it’s a good practice to create Image objects that preload the desired images.
e. Returning true in an event handler on an a (anchor) element prevents the browser from following the link when the event handler finishes.
Answers to Self-Review Exercises
13.1
a. Ctrl, Alt and Shift.
b. event bubbling.
c. return value.
d. target.
e. click, mousedown, mouseup.
13.2
a. False. The load event fires when an element finishes loading.
b. True.
c. False. It fires when an element gains focus.
d. True.
e. False. Returning false prevents the default action.
Exercises
13.3 Add an erase feature to the drawing program in Fig. 13.3. Try setting the background color of the table cell over which the mouse moved to white when the Alt key is pressed.
13.4 Add a button to your program from Exercise 13.3 to erase the entire drawing window.
13.5 You have a server-side script that cannot handle any ampersands (&) in the form data. Write a function that converts all ampersands in a form field to " and " when the field loses focus (blur).
13.6 Write a function that responds to a click anywhere on the page by displaying an alert dialog. Display the event name if the user held Shift during the mouse click. Display the element name that triggered the event if the user held Ctrl during the mouse click.
13.7 Use CSS absolute positioning, mousedown, mousemove, mouseup and the clientX/clientY properties of the event object to create a program that allows you to drag and drop an image. When the user clicks the image, it should follow the cursor until the mouse button is released.
13.8 Modify Exercise 13.7 to allow multiple images to be dragged and dropped in the same page.