
In order to show how media programming can be done, we introduce in this chapter the Java Media Framework (JMF), a simple yet powerful tool for handling media in Java applications. This is by no means the only media tool available to programmers, not even Java programmers. Furthermore, high-performing applications may require lower-level APIs than the one provided by JMF. For instance, another option to develop voice application could be to use the lower-level Java Sound API.
We do not intend to make a thorough coverage of the JMF API; actually, that would take a complete separate book by itself. Our sole interest is just to focus on some of the key functionalities offered by the API, and let the reader gain an understanding of its scope of applicability and potential. Again, we will be focusing just on the functional aspects, so the code in this chapter is not valid for commercial purposes.
Additionally, we will build a simple program that is able to:
capture media and transmit it over the network
receive media over the network and render it to the user
We will use this simple program for the media part of our soft-phone application in later chapters.
The Java Media Framework (JMF) is an application programming interface (API) for handling time-based media in Java applications. It allows programmers to develop Java code to capture, present, store, and process time-based media. Moreover, it can be extended to support additional media types and perform custom processing.
Additionally, JMF defines an optional RTP API to enable the transmission and reception of RTP streams. The JMF reference implementation from Sun and IBM that we will be using throughout the book fully supports the JMF RTP API.
Figure 11.1 shows the fundamental data-processing model offered by the JMF API.

The model considers three stages in a data-processing flow: input, processing, and output.
The input stage is meant to acquire the media data. The media data can be obtained from different sources.
From capture device (e.g., from microphone or camera)
From file (e.g., music.wav)
From the network (e.g., from received RTP stream)
The processing stage takes the data obtained at the input stage and applies some processing to it, such as:
Multiplexing/demultiplexing
Encoding/decoding
Packetizing/depacketizing
The output stage is responsible for sending the media data to the destination. Possible destinations are:
A presentation device (e.g., soundcard and loudspeakers)
A file
The network (e.g., transmit the media data as an RTP stream)
JMF allows programmers to configure media-processing scenarios that combine different input, output, and processing options. It offers a high-level API to manage the data capture, presentation, and processing of time-based media. Additionally, it also offers a low-level API, called the JMF plug-in API, that supports the seamless integration of custom processing components and extensions. This is shown in Figure 11.2.

We will be focusing on the JMF high-level API. This API does not give the programmer real-time access to the low-level media-processing functions, but rather, allows him or her to configure and manipulate a set of high-level objects that encapsulate the main media functions such as players, processors, data sinks, and so on, and thus to build the desired media-handling scenario in a Java application.
Time-based media takes the form of a media stream. The aim of the input stage is to obtain a media stream. The processing stage also results in a new media stream, which can then be fed into the output stage for presentation and so forth.
In order to obtain a media stream at the input stage, we can programmatically specify its location and the protocol used to access it. In order to represent the location and the protocol, sometimes a URL or a media locator[1] format is used. For example:
A media stream obtained from a local file could be identified by a “file://” URL.
A media stream obtained from a file in a web server might be identified by an “http://” URL.
A media stream obtained from the network could be represented by an “rtp://” media locator.
A media stream captured from the soundcard could be represented by a “dsound://” media locator.
Media streams can also contain multiple channels of data called tracks. For example, a media stream might contain both an audio track and a video track. A media stream that contains multiple tracks is said to be multiplexed. The process of extracting the individual tracks is called demultiplexing.
A track is identified by a media type (e.g., audio or video) and a format that defines how the data for the track is structured, including information about the sample rate, bits per sample, and number of channels.
Tables 11.3 and 11.4 show some of the formats that can be used with JMF.
The JMF API defines several entities that model media processing. The main entities are:
Managers
Data source
Player
Processor
Data sink
Session manager
In order for an application to obtain instances of objects that represent the main JMF entities (such as datasources, players, processors and datasinks), the application uses intermediary objects called managers. JMF uses four managers:
ManagerCaptureDeviceManagerPackageManagerPlugInManager
Throughout this book, we will use the first two types of managers:
The
Managerclass handles the construction ofPlayer,Processor,DataSource, andDataSinkobjects. Table 11.1 shows some of the main methods of theManagerclass.Table 11.1.
Manager Methods
Description
DataSourcecreateDatasource(MediaLocator ml)Creates a
DataSourcefor the specified media.PlayercreatePlayer(DataSource ds)Creates a
Playerfor theDataSource.ProcessorcreateProcessor(DataSource ds)Creates a
Processorfor theDataSource.DataSinkcreateDataSink(DataSource ds, MediaLocator ml)Create a
DataSinkfor the specified inputDataSourceand destinationMediaLocator.The
CaptureDeviceManagerclass maintains a registry of available capture devices. An application can use itsgetDeviceList()method, passing aFormatobject as argument in order to obtain a list ofCaptureDeviceInfoobjects. The list represents a set of devices capable of capturing media in the desired format. Table 11.2 shows some of the main methods of theCaptureDeviceManagerclass.Table 11.2.
CaptureDeviceManager Methods
Description
vectorgetDeviceList(Format format)Gets a list of
CaptureDeviceInfoobjects that correspond to devices that can capture data in the specified format.booleanaddDevice(CaptureDeviceInfo di)Adds a
CaptureDeviceInfoobject for a new capture device to the list of devices maintained by theCaptureDeviceManager.booleanremoveDevice(CaptureDeviceInfo di)Removes a
CaptureDeviceInfoobject from the list of devices maintained by theCaptureDeviceManager.
A data source is an entity that encapsulates a media stream. During the media-handling process, different data sources may represent the underlying media streams at different stages of the process, as shown in Figure 11.3, where the data source is represented as a circle.

A data source is modeled by the DataSource abstract class. At the input phase of the media-processing model, a DataSource object can be obtained from a URL or media locator. In the following example, a DataSource is obtained from a file:
MediaLocator ml=new MediaLocator("file://c:\music.wav");
DataSource ds= Manager.createDataSource(ml);
A DataSource can also be obtained as the output of a processing stage.
The JMF API defines the Format class that represents a media format. It is extended by the AudioFormat and VideoFormat classes.
For instance, in order to create an AudioFormat object, we would specify the following parameters:
type of encoding (e.g., LINEAR, GSM, G723, etc.)
sample rate
number of bits per sample
number of channels
The following line of code creates an AudioFormat object that represents a GSM media format with sampling rate of 8,000 samples per second, 8 bits per sample, and just one channel:
AudioFormat af=new AudioFormat(AudioFormat.GSM,8000,8,1);
Table 11.3 shows some of the supported audio formats in JMF; the first column indicates the JMF name for the format. When the string “_RTP” is appended to a format name, it refers to the packetized version of the format. As such, “GSM” refers to the actual format used in European 2G mobile systems, whereas “GSM_ RTP” refers to the packetized GSM format suitable to be conveyed using RTP.
Table 11.3.
JMF Audio Format | Description |
|---|---|
ULAW | ITU-T G.711 standard that uses logarithmic PCM-encoded samples for voice, sampled at 8,000 samples/second. Used in North America and Japan. |
ALAW | ITU-T G.711 standard that uses logarithmic PCM-encoded samples for voice, sampled at 8,000 samples/second. Used in Europe and rest of the world. |
ULAW_RTP | Packetized version of ULAW. |
G723 | ITU-T G.723 standard wideband speech codec. Superseded by G.726. |
G723_RTP | Packetized version of G.723. |
GSM | ETSI GSM standard linear predictive coding (LPC) full rate (FR) codec. |
GSM_RTP | Packetized version of GSM codec. |
LINEAR | PCM encoded voice samples. |
MPEG | Corresponds to the MovingPicture Expert Group (MPEG) standard MPEG-1 for voice. |
MPEG_RTP | Packetized version of MPEG. |
MPEGLAYER3 | Corresponds to the Moving Picture Expert Group (MPEG) standard MPEG-1 layer 3 (the popular MP3). |
The same consideration applies for video formats. Table 11.4 shows some JMF-supported video formats; the first column indicates the JMF name for the format.
Table 11.4.
JMF Video Format | Description |
|---|---|
H261 | ITU-T H.261 video coding standard that operates at video rates between 40kbps and 2Mbps. |
H261_RTP | Packetized version of H.261. |
H263 | ITU-T H.263 video coding standard that operates at low bitrates. It is more advanced than H.261 and provides a suitable replacement. |
H263_RTP | Packetized version of H.263. |
MPEG | Corresponds to the Moving Picture Expert Group (MPEG) standard MPEG-1 for video. |
MPEG_RTP | Packetized version of MPEG. |
YUV | Refers to a video format that embraces the Y(luminance), U (chrominance), B(chrominance) color model. |
A player is an entity responsible for processing and rendering a media stream. It is modeled by the Player interface. The media stream is conveyed to the Player as a DataSource. For instance, the following line of code creates a Player for the DataSource ds:
Player p=Manager.createPlayer(ds);
In Figure 11.4 a Player is shown in the last stage of the media-handling process.

In order to start a player, we can invoke the start() method:
p.start();
A player can be either at the Started or Stopped state. When we instruct the player to start, it will go through different preparation states as it obtains the necessary resources. The methods that can be invoked on a Player depend on its state. The JMF implementation can inform the application about the transitions between the different states using a Java Event model. More specifically, our application can implement the ControllerListener interface and can receive notifications of changes of state. This allows programmers to build highly responsive systems.
Figure 11.5 shows the different states a Player can go through. Table 11.5 contains a brief description of each state.

Table 11.5.
State | Description |
|---|---|
Unrealized | The Player has been instantiated, but does not yet know anything about its media. |
Realizing | The Player is in the process of determining its resource requirements. |
Realized | The Player knows what resources it needs and information about the type of media it is to present. |
Prefetching | The Player is preparing to present its media. |
Prefetched | The Player is ready to be started. |
Started | The Player’s clock starts running. |
The Player interface extends the Controller interface, from which it obtains methods, such as realize() or prefetch(), that explicitly attempt to move the Player to the Realized state or the Prefetched state, respectively (via the Realizing state and the Prefetching states).
A processor is a specialized type of player that provides control over media stream processing. It is modeled through the Processor interface that extends the Player interface. A Processor typically receives an input DataSource and produces an output DataSource. This is shown in Figure 11.6. The Processor can multiplex, demultiplex, encode, decode, and apply effect filters over a media stream. A Processor can also render a media stream to a presentation device.

The following code would create a Processor object for the DataSource ds:
Processor p=Manager.createProcessor(ds);
A Processor has two additional preparation states (as compare with a Player), Configuring and Configured, which occur before the Processor enters the Realizing state. In order to cause the Processor to enter the Configuring state, the configure() method can be invoked on it. In order to start a Processor, the start() method can be invoked.
Figure 11.7 shows the different states a Player can go through.

A data sink gets a media stream as input, and renders the data to some destination (typically different from a presentation device). In that way, data sinks can be used to write data to a file or to send data over a network. This is shown in Figure 11.8 where we can see a DataSink in the last stage of the media-handling process.

A data sink is represented by the DataSink interface.
The following line of code would create a DataSink for the specified input DataSource and destination MediaLocator:
DataSink dsink=Manager.createDataSink(ds,ml);
In order to start transferring data to the destination, two steps are needed:
In scenarios that involve sending or receiving RTP sessions over or from the network, a SessionManager may be used instead of a DataSink (see Figure 11.9). A SessionManager offers an enhanced degree of control over RTP sessions compared to a DataSink (which offers almost no degree of control).
The SessionManager represents an entity that is used to manage and coordinate an RTP session. It keeps track of the participants in the media session and keeps track of the media being transmitted. It also handles the RTCP control channel. Thus, it offers methods to:
start and close an RTP session
create RTP streams to be sent
add and remove peers
obtain session statistics
etc.
A key concept when working with a SessionManager is the RTPStream class, which represents an RTP stream. There are two types of RTP streams:
ReceiveStream: represents an incoming RTP stream.SendStream: represents an outgoing RTP stream.
We will see in the next sections how these classes are used in order to transmit and receive RTP streams.
A SessionManager can send session-related events to objects that implement specific listener interfaces. Four types of listener are defined for the SessionManager:
SessionListener:Receives notifications of changes in the state of the session.SendStreamListener:Receives notifications of changes in the state of the stream that is being transmitted.ReceiveStreamListener:Receives notifications of changes in the state of the stream that is being received.RemoteListener:Receives notifications of control messages from a remote participant.
In our practices, we will be using just the ReceiveStreamListener. It offers an update() method, which is invoked as soon as the first RTP packets in the session are received. The SessionManager passes a ReceiveStreamEvent object as an argument to the update() method. The ReceiveStreamEvent represents an event occurring at the receiving side (in this case, the particular type of event we are interested in is NewReceivedStream, which extends ReceiveStreamEvent). It is possible to obtain a reference to the ReceiveStream from the ReceivedStreamEvent. Then we can convert the ReceiveStream into a DataSource and further process it in our application. In the next section, we will see all this in action.
In order to use a SessionManager, first we have to create an instance of it. That is achieved by directly using the new() method for the implementation class. In our case, we will be using the RTPSessionMgr class provided by the IBM and Sun implementation, therefore we would include the following code to our application:
RTPSessionMgr sm=new() RTPSessionMgr;
Next we would need to initialize the SessionManager by calling its initSession() method and passing some configuration parameters such as the local session addresses and so forth. The local session address represents the source address (IP and port) that will be used in outgoing RTP and RTCP packets:
sm.initSession(localAddress,.......);
Then we would call the startSession() method, which starts the session, causing RTCP reports to be generated and callbacks to be made through the SessionListener interface.
There are several flavors of the startSession method. Some of them are more oriented to multicast scenarios, whereas others are targeted at bidirectional unicast scenarios. We will look at one of the latter because it fits better for our purpose of building a peer-to-peer communication application.
In the unicast version of the startSession method, we need to pass as parameters, among others, the destination session address where the application will send outgoing packets, and the receiver session address where the application expects to receive the incoming packets. The destination session address represents the destination address (IP and port) for RTP packets and RTCP packets:
sm.startSession(receiver address,......,destination address,....);
Calling startSession() over the SessionManager does not start transmission of the media stream. If we wanted to start transmission of a concrete media stream represented by a DataSource object, ds, we would need to first create a SendStream object from the DataSource. The second argument in the creation method represents the index of the stream in the DataSource that we want to use to create the RTP stream. In our case, we just set it to 1, which means the first stream in the DataSource:
SendStream ss=sm.createSendStream(ds,1);
And then we could start actual transmission of the stream:
ss.start();
In order to receive a media stream, as soon as this is detected by the SessionManager, it would fire a ReceivedStreamEvent event to our listener, which would then obtain a reference to the ReceivedStream:
ReceiveStream rs= event.getReceiveStream();
And next we would obtain a DataSource from the ReceiveStream;
DataSource ds=rs.getDataSource();
The startSession() and initSession() methods that we saw in the previous section require that we pass a session address as an argument. JMF defines the SessionAddress class that encapsulates a session address. It comprises four pieces of information:
IP address for RTP
Port for RTP
IP address for RTCP
Port for RTCP
The IP addresses are passed to the constructor method as java.net.InetAddress objects, whereas the port argument is an integer value (int).
Example:
InetAddress addr=InetAddress.getByName("1.2.3.4");
SessionAddress sa=new SessionAddress(addr, 50000, addr, 50001);Now that we have described the main pieces, let us now see how the API is used in order to implement the following operations:
capture live media
capture media file
present media
send media to file
process media
receive media from network
send media over network
Let us say we want to obtain a media stream from a capture device such as a microphone or a camera. In JMF terms, what we want is the DataSource corresponding to the live media. We can use the Manager to create the DataSource. JMF provides two ways to obtain the DataSource from a capture device:
If we know the media locator of the capture device, we can directly obtain the
DataSourcefrom it. In the following example, “dsound://8000” represents an audio card that samples voice at 8,000 Hz:MediaLocator ml=new MediaLocator("dsound://8000"); DataSource ds= Manager.createDataSource(ml);Obtain the
CaptureDeviceInfocorresponding to a capture device that supports a specified format. As we saw in previous sections, we can invoke the methodgetDeviceListon theCaptureDeviceManager, passing the specification of the desired format. Once we have theCaptureDeviceInfo, we can obtain a media locator from it:AudioFormat df=new AudioFormat(AudioFormat.LINEAR,8000,8,1); Vector devices=CaptureDeviceManager.getDeviceList(df); CaptureDeviceInfo di=(CaptureDeviceInfo) devices.elementAt(0); DataSource ds=Manager.createDataSource(di.getLocator());
In a commercial application, we would need to cope with the situations where there are no devices that support the specified AudioFormat. In our examples, we will always be using a linear format with voice sampled at 8,000 Hz and with 8 bits per sample. Such a format is supported by virtually all the soundcards in the market, therefore we will not worry about those situations in our examples.
Capturing a media stream from a file is equal to obtaining a DataSource that represents that stream. The best way to do that is through a URL that represents the local file. For instance, in order to obtain the media stream from the file music. wav, we could do the following:
MediaLocator ml=new MediaLocator("file://c:\music.wav");
DataSource ds=Manager.createDataSource(ml);
If the media stream were stored in a remote file in a web server, we could obtain it by using an HTTP URL.

Let us assume that we already have a DataSource that represents a media stream that we want to render to a presentation device. The most common way to do so is by using a Player. The following example represents the simplest way to play the media stream contained in DataSource ds:
Player player = Manager.createPlayer(ds);
player.start();
The start() method attempts to transition the Player to the Started state as soon as possible. Therefore, it automatically tries to move the Player to the Realized state, then to the Prefetched state, and finally to the Started state. Applications that want to determine with more accuracy when the Player is started may want to retain the control of moving the Player from one state to the other. One way to do that is by implementing the ControllerListener interface and explicitly invoking the realize() and prefetch() methods when appropriate. For our simple examples, we will always directly use the start() method.

In order to send a media stream to a file, we need two pieces of information:
a
DataSourceobject representing the media streama URL representing the location of the file
The simplest way to send media to a file is to create a DataSink object that points to the file URL, and pass the input DataSource in the creation method. Once created, we just open and start the data sink. In our example, ds represents the DataSource object:
MediaLocator ml=new MediaLocator("file://c:\oo.wav");
DataSink sink=Manager.createDataSink(ds,ml);
sink.open();
sink.start();
It is important to note that, in this case, the DataSource ds represents the input media stream to the DataSink, whereas the MediaLocator ml is used to determine the file acting as sink for the media.

In order to be able to process the media stream, we need an input DataSource and a Processor object.
The first step is to create the Processor from the input DataSource iDS:
Processor p=Manager.createProcessor(iDS);
Instead of directly starting the Processor (as we did with the Player in previous examples), we need to explicitly control the transition of the Processor through the different states. The reason for that is that we need to set up the processing rules in the Processor, and for that, the Processor needs to have reached the Configured state. Therefore, the next step would be to instruct the Processor to transit to the Configured state:
p.configure();
The configure method is asynchronous, therefore we need to wait until the Configured state is reached in order to set up the processing rules. This may be achieved in different ways. For the purpose of our simple example, which focuses on functionality and not on performance, a possible option would be to create a loop that checks the state:
while (p.getState()!=Processor.Configured) {
  Thread.sleep(20);
}
Using the loop approach is not recommended for commercial code. A commercial product might want to implement the ControllerListener interface and set the rules when a transition event to Configured is fired. Another possible option is to use the StateHelper class included in the JMF package.
Next we set the processing rules by defining which is the desired format of the first and only track in the input media stream. To do so, first we create an AudioFormat object that represents the desired GSM format with a sampling rate of 8,000 samples per second and 4 bits to represent each sample. The last argument represent the number of audio channels; in our case, just one:
AudioFormat af=new AudioFormat(AudioFormat.GSM,8000,4,1);
Then we get a TrackControl object that allows us to invoke the setFormat() method:
TrackControl track[]= p.getTrackControls();
track[0].setFormat(af);
Once the output format is defined in the Processor, we move it to the Realized state and wait for the Processor to become Realized:
p.realize();
while (p.getState() != Processor.Realized) {
  Thread.sleep(20);
}
Then we obtain the output DataSource and invoke start() on the Processor:
DataSource oDS = p.getDataOutput();
p.start();
If we wanted to send the output media stream over the network, we should have asked the Processor to not only encode the input stream, but also to perform packetization. The way to indicate to the Processor that the stream needs to be packetized for sending it in an RTP session is just to append “_RTP” to the desired media format that is passed as a parameter to the setFormat() method:
AudioFormat af=new AudioFormat(AudioFormat.GSM_RTP,8000,4,1);
The JMF RTP API offers two ways to receive and send RTP media from the network. The first way uses just RTP media locators, whereas the second one implies using a SessionManager. Using media locators is the simplest form, and is good enough if we want to send just one media stream. If we want to send several media streams, or if more control over the session is desired, then using the SessionManager becomes a must.
In any event, in the receiving case, the goal is to obtain a DataSource object that represents the RTP media stream received over the network. We will call the received DataSource rDS. In the sending case, the goal is to transmit a stream represented by a DataSource. We will call the transmitted DataSource tDS.
We will see here the two approaches.
For the receiving case, let us imagine that the IP address and port where our receiver application is expecting the media is 1.2.3.4:40000. In the simplest approach, we just create a DataSource from an RTP media locator:
MediaLocator ml=new MediaLocator("rtp://1.2.3.4:40000/audio/1");
DataSource rDS=Manager.createDataSource(ml);
The last “1” in the RTP media locator represents the time to live (TTL) in RTP packets.
For the sending case, in its simplest form, in order to send a media stream over the network using RTP, we just need to create a DataSink object and pass two arguments to it:
The
DataSourceobject that represents the media stream that we want to send over the network.A RTP media locator that identifies the destination of the stream. Let us assume that the address of the destination is 5.4.3.2:50000:
MediaLocator ml=new MediaLocator("rtp://5.4.3.2:50000/audio/1");
DataSink sink=Manager.createDataSink(tDS,ml);
Once the data sink has been created, we just need to open and start it:
sink.open();
sink.start();
The sending scenario is depicted in Figure 11.15.

Another approach to receive and send media from/over the network consists of using a SessionManager.
In order to receive incoming streams, our application would implement the ReceiveStreamListener interface. As soon as the incoming session is detected (i.e., the first RTP packets are received), the SessionManager will post a NewReceiveStreamEvent. From that event, we will get the ReceiveStream, and from the ReceiveStream, it is possible to obtain a DataSource (rDS).
On the other hand, let us assume that we want to transmit via RTP the stream represented by a DataSource (tDS). First we need to obtain a reference to a SendStream object from the DataSource object. Then we would simply call the start() method on the SendStream object in order to start transmitting. Figure 11.16 shows the JMF entities involved in this scenario.

Let us see step-by-step how this works.
First we need to create an object that implements the SessionManager interface. In the reference implementation from Sun and IBM that we are using, the class that implements the SessionManager interface is called RTPSessionMgr. Thus, we would use the following line of code to create the SessionManager:
RTPSessionMgr sm = new RTPSessionMgr();
In order to receive the ReceiveStreamEvents, our class needs to implement the ReceiveStreamListener interface. We also need to register our interest in receiving events from the SessionManager. That is achieved by invoking the method addReceiveStreamListener() on the SessionManager:
sm.addReceiveStreamListener(this);
Then we need to initialize and start the session in the SessionManager. We need to pass some configuration parameters as arguments to the initSession() and startSession() methods on the SessionManager.
In the initSession() method, we need to pass the following parameters:
A
SessionAddressobject that encapsulates the IP address and port that we would use as origin address and port in outgoing packets.[2] We will assume at this point that we are using a computer with just one IP address, and that we are not concerned with the source port in outgoing packets. Thus, we will let theSessionManagerchoose the values itself by passing an emptySessionAddressto theinitSession()method.A
SourceDescriptionobject that describes the source user description as used in SDES RTCP packets. As we explained in Chapter 10, the SDES is not relevant in peer-to-peer communications, so we will set it to null.An integer value that represents the fraction of the session bandwidth that the
SessionManagermust use when sending out RTCP reports. We will set it to 0.05, which is a reasonable value in most cases.An integer value that represents the fraction of the previous value that the
SessionManagermust use to send out RTCP sender reports from the local participant. We will set it to 0.25, which is a reasonable value in most cases.
In the startSession() method, we need to pass the following parameters:
A receiver
SessionAddressobject that encapsulates the IP address and port where our application expects to receive both RTP and RTCP packets. This parameter is crucial. In a communication scenario, we would obtain this information from the received SDP. In our example, the IP address for both RTP and RTCP is “1.2.3.4.” The port for RTP is 40000, and the RTCP port is 40001.[3]A sender
SessionAddressobject that encapsulates the IP address and port that our application will use as source address when sending packets.A destination
SessionAddressobject that encapsulates the IP address and port that our application will use in order to send outgoing packets. In our example, the remote destination IP address for both RTP and RTCP is “5.4.3.2.” The remote destination port for RTP is 50000, and the RTCP port is 50001.An
EncryptionInfoobject that encapsulates the encryption parameters for the session. We are not using encryption here, so we will set it to null.
With all the previous considerations, the necessary code would be:
InetAddress localIP = InetAddress.getByName("1.2.3.4");
InetAddress remIP = InetAddress.getByName("5.4.3.2");
SessionAddress senderAddr = new SessionAddress();
SessionAddress localAddr = new SessionAddress(localIP,
  40000,localIP,40001);
SessionAddress remAddr=new SessionAddress(remIP,50000,remIP,
  50001);
sm.initSession(senderAddr, null, 0.05, 0.25);
sm.startSession(localAddr,localAddr,remoteAddr, null);
Now that a bidirectional unicast media session has been created, we need to actually receive and send data.
In order to receive data, we need to provide the method that will be invoked when a ReceivedStreamEvent is fired. The method is called update(). We first check if the received event corresponds to the detection of a new received stream. If that is the case, we obtain the ReceiveStream. From it, we obtain the DataSource object, which was our target:
public class MyReceiveStreamListener implements
 ReceiveStreamListener {
  public void update(ReceiveStreamEvent event) {
    if (event instanceof NewReceiveStreamEvent){
     rs=event.getReceiveStream();
     DataSource rDS=rs.getDataSource();
    }
  }
}
In order to send data, once the session manager is started, we just need to create a SendStream from our DataSource and invoke the start method on the SendStream objects:
ss = tManager.createSendStream(tDS, 1);
ss.start();
In the next sections, we will create a practical component that puts all these ideas together.
We have in the previous section seen how to implement different steps in the JMF media-processing model. Now we will build an end-to-end scenario that combines some of the individual steps seen previously. In particular, we are interested in developing a VoiceTool component that can later be used by the soft-phone application that we will build in Chapter 12.
The VoiceTool Java class contains the necessary methods to start and stop transmission and reception of voice. It uses a single session manager, myVoice-SessionManager, for both reception and transmission, which is defined as a member of the class. VoiceTool implements the ReceiveStreamListener interface. Next we see the class definition and data fields:
public class VoiceTool implements ReceiveStreamListener {
private RTPSessionMgr myVoiceSessionManager=null;
private Processor myProcessor=null;
private SendStream ss=null;
private ReceiveStream rs=null;
private Player player=null;
private AudioFormat af=null;
private DataSource oDS=null;
VoiceTool offers three methods:
int startMedia (String peerIP,int peerPort,int recvPort,int fmt): This method creates the RTP unicast session between the local host atrecvPort, and the remote host,peerIP, atpeerPort. Then it starts voice transmission and reception. The last argument,fmt, indicates the audio format used for transmission. For simplicity, we will consider only two possible video formats (GSM_RTP and G723_RTP). This method will return an integer value of 1 if it was executed successfully, or a negative value if an error was encountered.void stopMedia(): This method is used to stop voice transmission and reception.void update(ReceiveStreamEvent event): This is a method from theReceiveStreamListenerinterface thatVoiceToolimplements.
Let us now explain the code in the methods step-by-step.
First we obtain the DataSource for the captured media:
AudioFormat df=new AudioFormat(AudioFormat.LINEAR,8000,8,1);
Vector devices=CaptureDeviceManager.getDeviceList(df);
CaptureDeviceInfo di=(CaptureDeviceInfo) devices.elementAt(0);
DataSource iDS=Manager.createDataSource(di.getLocator());
Then we create a Processor and set up the processing rules:
myProcessor = Manager.createProcessor(daso);
myProcessor.configure();
while (myProcessor.getState()!=Processor.Configured) {
   Thread.sleep(20);
}
myProcessor.setContentDescriptor(new ContentDescriptor
  (ContentDescriptor.RAW_RTP));
TrackControl track[]=myProcessor.getTrackControls();
switch (fmt) {
   case 3: af=new AudioFormat(AudioFormat.GSM_RTP,8000,4,1);
   case 4: af=new AudioFormat(AudioFormat.G723_RTP,8000,4,1);
}
track[0].setFormat(af);
myProcessor.realize();
while (myProcessor.getState() != Processor.Realized) {
   Thread.sleep(20)
}
Next we obtain the output DataSource:
oDS = myProcessor.getDataOutput();
Then we create a SessionManager object and invoke initSession() and startSession() on it. Additionally, we also register our interest in receiving ReceiveStreamEvents:
myVoiceSessionManager = new RTPSessionMgr();
// Next line we register our interest in receiving
// ReceiveStreamEvents
myVoiceSessionManager.addReceiveStreamListener(this);
SessionAddress senderAddr = new SessionAddress();
myVoiceSessionManager.initSession(senderAddr, null,
  0.05,0.25);
InetAddress destAddr = InetAddress.getByName(peerIP);
SessionAddress localAddr = new SessionAddress (InetAddress.
  getLocalHost(),recvPort,InetAddress.getLocalHost(),recvPort+1);
SessionAddress remoteAddr = new SessionAddress(destAddr,
  peerPort, destAddr, peerPort + 1);
myVoiceSessionManager.startSession(localAddr , localAddr ,
  remoteAddr,null);
Next we obtain a SendStream from the Datasource obtained as output of the processor:
ss = myVoiceSessionManager.createSendStream(oDS, 1);
We then start capture and transmission:
ss.start();
myProcessor.start();
The VoiceTool class implements the update() method in the ReceiveStreamListener interface. The code for the method is shown next. As soon as a new received stream is detected, we obtain the DataSource from it, and create a Player passing the obtained DataSource as argument:
public void update(ReceiveStreamEvent event) {
  if (event instanceof NewReceiveStreamEvent){
    rs=event.getReceiveStream();
    DataSource rDS=rs.getDataSource();
    try{
      player = Manager.createPlayer(rDS);
      player.start();
    }catch (Exception ex){
      ex.printStackTrace();
    }
  }
}
Figure 11.17 shows the main JMF entities involved in the previous scenarios for sending and receiving.

First we need to stop and close the Player:
player.stop();
player.deallocate();
player.close();
ss.stop();
Then we stop capture and processing:
myProcessor.stop();
myProcessor.deallocate();
myProcessor.close();
And finally, we close the RTP session and free the used source ports:
myVoiceSessionManager.closeSession();
myVoiceSessionManager.dispose();
Based on the previous example, we can easily develop a tool valid for video transmission and reception. Such a tool will also be used in our audio/video soft-phone project in the following chapters.
The VideoTool Java class contains the necessary methods to start and stop transmission and reception of video. It uses a single session manager, myVideo-SessionManager, for both reception and transmission, which is defined as a member of the class. VideoTool implements the ReceiveStreamListener interface. Next we see the class definition and data fields:
public class VideoTool implements ReceiveStreamListener {
private RTPSessionMgr myVideoSessionManager=null;
private Processor myProcessor=null;
private SendStream ss=null;
private ReceiveStream rs=null;
private Player player=null;
private VideoFormat vf=null;
private DataSource oDS=null;
private VideoFrame vframe;
VideoTool offers three methods:
int startMedia (String peerIP, int peerPort, int recvPort, int fmt): This method creates the RTP unicast session between the local host atrecvPortand the remote host,peerIP, atpeerPort. Then it starts video transmission and reception. The last argument,fmt, indicates the video format used for transmission. For simplicity, we will consider only two possible video formats (JPEG_RTP and H263_RTP). This method will return an integer value of 1 if it was executed successfully, or a negative value if an error was encountered.void stopMedia(): This method is used to stop video transmission and reception.void update(ReceiveStreamEvent event): This is a method from theReceiveStreamListenerinterface thatVideoToolimplements.
In the VoiceTool example, the capture device was a standard microphone. In this case, for the video, we will use a webcam connected to our computer via USB. Such webcams are commonplace in the market today, and can typically be obtained for around $30. Not all the webcams in the market work fine with JMF. In order to work with JMF, readers using MS Windows should have a webcam that supports WDM (Windows Driver Model) or VFW (Video for Windows) interfaces. Most webcams in the market today comply with this requirement.
Let us now explain the code step-by-step.
First we obtain the DataSource for the captured media. In this case, we will get the DataSource directly from a media locator, as was explained in previous sections. Thus, we need to learn the media locator for our webcam. A simple way to determine this is through the utilization of the JMStudio, which is an application that is included in the JMF package that can be downloaded from the Sun site. This application includes several features to test the capture, presentation, transmission, and reception of media in our computer. It also includes a JMF Registry Editor that allows us to browse through all the different media components in the system, including capture devices.
In order to determine the media locator for our camera connected via USB, we need to follow these steps:
Start the JMStudio (Figure 11.18).
Go to File, Preferences menu (Figure 11.19).
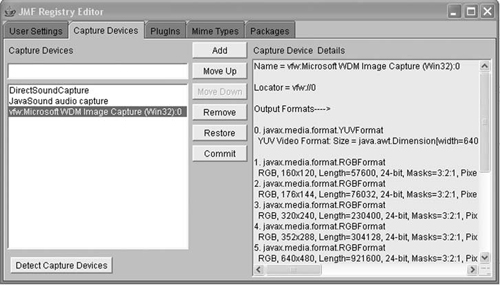
We will see the main window of the JMF Registry Editor. We click on the Capture Devices tab. Once there, we click on the Detect Capture Devices button. It may take some seconds to detect the new camera. When it is ready, the description of the webcam capture device, including its media locator, will appear on the right pane on the window. In this case, we see that the media locator is “vfw://0.” This is shown in Figure 11.20.


So now we can proceed to obtain the DataSource:
MediaLocator ml=new MediaLocator("vfw://0")
DataSource iDS=Manager.createDataSource(ml);
Then we create a Processor and set up the processing rules:
myProcessor = Manager.createProcessor(daso);
myProcessor.configure();
while (myProcessor.getState()!=Processor.Configured) {
   Thread.sleep(20);
}
myProcessor.setContentDescriptor(new ContentDescriptor
  (ContentDescriptor.RAW_RTP));
TrackControl track[] = myProcessor.getTrackControls();
switch (fmt) {
   case 26: vf=new VideoFormat(VideoFormat.JPEG_RTP);
   case 34: vf=new VideoFormat(VideoFormat.H263_RTP);
}
At this point, we want to check if the chosen format (vf) is supported by the Processor. The way to do that is to go through the list of all supported formats and see if we find a match for vf. We will use the getSupportedFormats() method in the TrackControl interface. The list that is obtained in this manner will contain only the supported video formats that can be sent over RTP, given that we already set the ContentDescriptor in the Processor to “RAW_RTP.”
If the format is not supported, the method stops execution and returns — 1.
boolean match=false;
format mySupportedFormats[]=track[0].getSupportedFormats();
for (int j=0;j< mySupportedFormats.length;j++) {
   if (vf.matches(mySupportedFormats[j])) match=true;
}
if (match==false) return -1;
If the format is supported, the method continues with the next steps. We set the output format and obtain the output DataSource:
track[0].setFormat(af);
myProcessor.realize();
while (myProcessor.getState() != Processor.Realized) {
   Thread.sleep(20)
}
oDS = myProcessor.getDataOutput();
Then we create a SessionManager object and invoke initSession() and startSession() on it. Additionally, we also register our interest in receiving ReceiveStreamEvents:
myVideoSessionManager = new RTPSessionMgr();
// Next line we register our interest in receiving
// ReceiveStreamEvents
myVideoSessionManager.addReceiveStreamListener(this);
SessionAddress senderAddr = new SessionAddress();
myVideoSessionManager.initSession(senderAddr, null, 0.05,
  0.25);
InetAddress destAddr = InetAddress.getByName(peerIP);
SessionAddress localAddr = new SessionAddress(InetAddress.
  getLocalHost(), recvPort,InetAddress.getLocalHost(),
  recvPort + 1);
SessionAddress remoteAddr = new SessionAddress(destAddr,
  peerPort,destAddr, peerPort + 1);
myVideoSessionManager.startSession(localAddr , localAddr ,
  remoteAddr,null);
Next we obtain a SendStream from the Datasource obtained as output of the processor:
ss = myVideoSessionManager.createSendStream(oDS, 1);
We then start capture and transmission:
ss.start();
myProcessor.start();
The update() method here is similar to the one in the voice case. The difference resides in the code needed to present the received video. For presenting the video, we need to obtain a visual component of the Player through the getVisualComponent() method. Then we create a video frame and add the visual component on it. The VideoFrame is a simple external class that extends JFrame and includes a panel called JPanel1.
The complete code for the update() method is:
public void update(ReceiveStreamEvent event) {
if (event instanceof NewReceiveStreamEvent){
   rs=event.getReceiveStream();
   DataSource rDS=rs.getDataSource();
try{
   player = Manager.createRealizedPlayer(rDS);
   Component comp=player.getVisualComponent();
   Dimension d=comp.getSize();
   vframe=new VideoFrame();
   vframe.jPanel1.add(comp);
   vframe.setSize(d);
   vframe.pack();
   vframe.setVisible(true);
   player.start();
}catch (Exception ex){
   ex.printStackTrace();
}
}
}
The code for the VideoFrame class is:
public class VideoFrame extends JFrame {
   JPanel jPanel1=new JPanel();
   FlowLayout f1=new FlowLayout();
   FlowLayout f2=new FlowLayout();
   Public VideoFrame() {
       try{
         this.setTitle("Remote video");
         jbInit();
       }
       }catch (Exception ex){
          ex.printStackTrace();
       }
     }
     void jbInit() throws Exception {
       this.getContentPane().setLayout(f1);
       jPanel1.setLayout(flowLayout2);
       this.getContentPane().add(jPanel1,null);
    }
}
It is almost identical to the voice case, but for the fact that when video reception stops, we need to close the frame in the GUI that we used to present the media:
public void stopMedia() {
   try{
      player.stop();
      player.deallocate();
      player.close();
      ss.stop();
      myProcessor.stop();
      myProcessor.deallocate();
      myProcessor.close();
      // close the video frame
      vframe.dispose();
      myVideoSessionManager.closeSession("terminated");
      myVideoSessionManager.dispose();
      }catch(Exception ex) {
        ex.printStackTrace();
      }
}
In the next chapter, we will build a soft-phone application. There are cases where a soft-phone application needs to play tones to the user. This typically happens in two situations:
When an incoming call is received, the soft-phone generates an alerting signal to let the called user know a call is being received.
When a user places a call, he or she may receive an indication that the remote party is being alerted. Such indication is commonly expressed as a ringing tone that is played to the caller.
In this section, we will build a simple component that allows playing an alerting signal or a ringing tone based on two prestored files to which the soft-phone application is supposed to have access:
alertsignal.wav
ringtone.wav
The example is quite straightforward; we will build a class called TonesTool that offers three methods:
void prepareTone (String filename)void playTone ()void stopTone()
In order to build a responsive system, we have separated the preparation phase from the actual playing phase. In the preparation phase, we just create a DataSource object for the file to be played. This is a quite time-consuming process, and thus we should not do it in realtime when just the tone or signal needs to be played. One possible moment to invoke the prepareTone() method is when the soft-phone is started.
The code is straightforward.
try{
   MediaLocator ml=new MediaLocator(filename);
   dsource=Manager.createDataSource(ml);
   player=Manager.createPlayer(dsource);
   player.addControllerListener(this);
   }catch(Exception ex){
      ex.printStackTrace();
   }
end=true;
   notify();
   player.stop();
   }catch(Exception ex){
      ex.printStackTrace();
   }
There is one aspect that deserves more attention: how to play a recurrent signal. The wave files contain only a single instance of the tone or signal. Thus, we need to play it again and again. In order to create this effect, we will use the controllerListener interface, which allows a Player to post events to an object that implements such an interface. The method in the interface that we will use is called controllerUpdate().
When controllerUpdate() is invoked, we just check if the posted event is an EndOfMediaEvent, which would mean that the file is finished and we need to play it again. Before invoking start() on the player again, we check the value of the class variable end. It is a Boolean variable that we use to control if playing needs to continue.
The three components that we developed—VoiceTool, VideoTool, and TonesTool—will be used by the soft-phone application that we will build in the next chapter. Still, it should be easy for readers to build a simple Java program to test these components.
For instance, in order to test the VoiceTool class, we could build a very simple GUI with two buttons. When a user presses the StartMedia button, the GUI reads the input parameters, creates an instance of VoiceTool, and invokes the startMedia() method:
VoiceTool myVoiceTool=new VoiceTool();
MyVoiceTool.startMedia(destIP,destPort,recvPort,format)
Likewise, when the user presses the StopMedia button, the stopMedia method in VoiceTool is called:
MyVoiceTool.startMedia(destIP,destPort,recvPort,format)
Next we show, in Figure 11.21, what the GUI might look like.

In order to make this example work, we should run one instance of it in each computer. The value of the destination port in computer A should be equal to the value of the receive port in computer B, and vice versa.
In this chapter, we learned how to develop simple programs that manipulate media streams. So far, we have learned how to program SIP, SDP, and media—that is, the three key ingredients that make up a multimedia application. Thus, in the next chapter, we will put these three ingredients together and cook a SIP-based voice and video soft-phone!
[1] A media locator provides a way to identify the location of a media stream when a URL cannot be used. It has a similar format as a URL, though it supports non-IETF standardized schemes. For instance, there is no such a thing as an IETF-standard RTP URL, but we can model media obtained from the network via RTP with a RTP media locator. The media locator is represented by the MediaLocator class. The MediaLocator class is closely related to the URL class. URLs can be obtained from MediaLocators, and MediaLocators can be constructed from URLs.
[2] Even if we were not sending RTP packets, there will always be RTCP packets being sent, so this parameter is necessary.