
In this chapter, we start putting into practice some of the SIP concepts learned so far. We will show some very simple programming examples that illustrate how SIP works. As was stated in previous chapters, the purpose of this book is not to teach the reader how to program commercial SIP applications. This book’s goal is to enable the reader to understand SIP-based multimedia communication. We believe that letting readers “play” with practical programming examples using a protocol-level API may help them to consolidate the learning about SIP. In order to understand the next examples, only a basic understanding of the Java language is required. Actually, we believe that the complexity of managing low-level SIP APIs such as JAIN SIP or SIP servlets does not stem from the complexity of the Java aspects, but rather, from the complexity of the underlying protocol. During the past few chapters, the reader has, we hope, obtained a sound understanding of what SIP is and how it works—so this chapter should be easy to follow, even for people with little programming experience. We invite even those readers without programming experience to have a look at the code snippets and identify the SIP concepts interleaved between the Java artifacts.
The chapter begins by reviewing the concepts around the Java Event model. Then we describe the general architecture of the JAIN SIP API and highlight its main interfaces and classes. We will then construct very simple programming examples to illustrate basic SIP concepts. First, we will show you how to set up the JAIN SIP environment; then we will learn how to build SIP messages. After that, we will learn how to use the SIP transport sublayer in order to send and receive messages statelessly. The next step will be to use the transaction sublayer, and last we will practice with the SIP dialog concept.
After this chapter has been completed, the reader should have the necessary tools to start thinking of building more-complex applications.
JAIN SIP is a Java API specification for the Session Initiation Protocol. It is developed for the J2SE environment, and provides application developers with a standardized interface for SIP services that are functionally compatible with the RFC 3261 specification. More specifically, JAIN SIP API mainly provides the application developer with an interface to:
Build and parse SIP messages.
Use the transaction sublayer (i.e., send/receive messages statefully).
Use the transport sublayer (i.e., send/receive messages statelessly).
In addition to that, the interface also provides access to SIP dialog functionality. The dialog functionality eases the task of writing applications that need to handle SIP dialogs. For example, SIP User Agents or SIP Back-to-Back User Agents are classical applications that require extensive management of SIP dialogs.
The JAIN SIP API can be seen as an interface to an implementation of SIP. In the industry jargon, a protocol implementation is commonly referred to as a SIP stack.[1] A SIP stack may consist just of Java code, or it may be written in other languages—in which case there is still the need for some Java wrapper classes that implement the JAIN SIP interfaces on one hand, and connect to the non-Java code on the other.[2] The application programmer does not need to bother with how the underlying protocol implementation is done. He or she will just “see” the Java interface in any case. Moreover if he or she is dissatisfied with the vendor that provides the protocol implementation, the application programmer could even replace it without the need to rewrite his or her application.
JAIN SIP is a protocol API—that is to say, it is a low-level API. An interesting aspect about a protocol API is that there are no limitations as to the type of SIP applications that may be developed using the interface. For instance, we could develop a SIP UA, a proxy, a B2BUA, and so forth. On the other hand, when using a protocol-level API, the programmer has to basically implement all the SIP core sublayer logic by himself or herself. Therefore, the JAIN SIP API is very good for helping us to better understand how the SIP protocol works, but we would recommend that readers use a higher-level interface if they want to build a quick-to-market and complex application.
Figure 8.1 shows the layering model for the SIP protocol that we learned in Chapter 7, and highlights how it maps to the functionality provided by JAIN SIP. The JAIN SIP API offers access to the functionality in the transport, transaction, and dialog sublayer, plus only partial access to the SIP core sublayer. Most of the functionality in the SIP core sublayer has to be implemented by programmers themselves in applications sitting on top of JAIN SIP.

To date, there have been three versions of the JAIN SIP API. The first one (1.0) was based on SIP spec RFC 2543. As we already know, that SIP specification was replaced by RFC 3261. So, a newer version (1.1) of the JAIN SIP API, which had compliancy for RFC 3261, was developed. The latest JAIN SIP version is 1.2. It incorporates some enhancements to the 1.1 specification, and it is the one that we will use in this book. Table 8.1 shows some of the main differences between the three JAIN SIP specifications.
Table 8.1.
JAIN SIP 1.0 | JAIN SIP 1.1 | JAIN SIP 1.2 |
|---|---|---|
Supports RFC 2543 | Supports RFC 3261 and some SIP extensions | Supports RFC 3261 plus additional extensions |
No transaction interface | Transaction interface defined | Transaction interface enhanced |
No explicit dialog support | Dialog object is added | Dialog support is enhanced |
No possibility to configure the protocol implementation | Added SipStack properties to configure the protocol implementation | SipStack properties are extended |
Version 1.2 of the JAIN SIP specification complies with the base SIP specification defined in RFC 3261 and with the following SIP extensions:
INFO method [RFC 2976]
Reliability of provisional responses [RFC 3262]
Event Notification Framework [RFC 3265],
UPDATE method [RFC 3311]
Reason header [RFC 3326]
MESSAGE method [RFC 3428]
REFER method [RFC 3515]
Distributing Authoritative Name Servers via Shared Unicast Addresses [RFC 3258]
PUBLISH method [RFC 3903]
We have not yet looked at SIP extensions. These and other SIP extensions will be explained in the third part of this book. In this chapter, we will use only the basic SIP functionality that JAIN SIP provides.
The JAIN SIP architecture is based on a number of patterns:
Peer-provider pattern
Factory pattern
Event-listener pattern
The main interfaces and classes in the JAIN SIP API are shown in the following UML class diagram in Figure 8.2.

A peer is a platform-specific implementation of a Java API. In the case of JAIN SIP, the peer corresponds to a particular vendor’s SIP protocol stack—that is, the actual software that implements SIP. We have represented it with some pieces of machinery to illustrate this fact.
A provider provides functions using the platform-specific capabilities of the peer with which it is associated. In the case of JAIN SIP, the provider allows applications to send and receive SIP messages. It is represented by a Java interface called SipProvider.
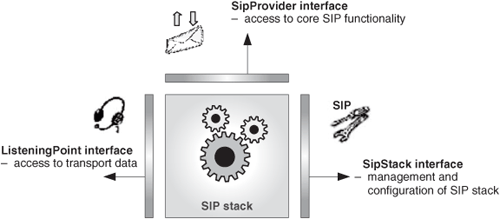
In addition to SipProvider, there are other two interfaces that also provide access to some aspects of the underlying SIP implementation:
the
SipStackinterfacethe
ListeningPointinterface
The SipStack interface allows programmers to manage and configure the underlying SIP stack. For instance, it includes methods to start or stop the SIP stack. The SIP stack configuration is specified through a set of SipStack Java properties that define aspects such as stack name, outbound proxy, automatic dialog support, and so on. The SipStack interface also contains operations to create instances of SipProvider and ListeningPoint.
The other interface to the SIP stack functionality is the ListeningPoint. A ListeningPoint is a Java representation of the socket that a SipProvider messaging entity uses to send and receive messages. The underlying SIP stack may use several sockets for communicating with the network. The ListeningPoint interface allows the application to set and get the transport parameters (IP, port, transport) corresponding to a particular ListeningPoint instance (i.e., socket).
Therefore, the main three interfaces toward a SIP stack are the SipProvider, the SipStack, and the ListeningPoint, each of them exposing different aspects of the underlying implementation. This is shown in Figure 8.3.
The application developer that wants to build a SIP application needs to gain access to the peer—that is, to the underlying SIP software machinery. In other words, the application needs to create SIP objects that encapsulate the SIP functionality. The application does this via a factory. A factory is an intermediary that encapsulates the method for accessing the SIP peer, and allows the application to obtain instances of the peer implementation classes. This is a common Object-Orientated design pattern that, in this case, maximizes the decoupling between the application and the peer implementation. For instance, our application is shielded from changes in the names of the implementation classes because it will always obtain the instances from the factory in the same way. One advantage of this decoupling is that the application will work transparently with different peer implementations. This is shown in Figure 8.4.

The factory class in JAIN SIP is called SipFactory. The factory is a singleton class—that is, there is only a single instance of it in the entire system. The application will get the instance of the factory and then invoke its methods, which create instances of the implementation classes.
Not all the JAIN SIP peer objects are obtained through the SipFactory. There are other objects that are obtained through the following factories also provided by JAIN SIP:
the
MessageFactorythe
AddressFactorythe
HeaderFactory
These factories allow the developer to create Java objects that represent SIP messages, SIP addresses, and SIP headers, respectively.
The programmer can get an instance of these factories by invoking factory-creation methods on the SipFactory.
This pattern represents occurrences of interest as events. Each occurrence is represented by a Java object. The mechanism for processing events is defined by an event-listener interface that includes a “processEvent” operation for each type of event. When the SIP stack receives SIP messages (requests and responses) from the network, the SipProvider passes them as events on to the event listener, which is called SipListener in the JAIN SIP case. This situation is depicted in Figure 8.5.

The application developer is responsible for implementing the methods in the SipListener interface. These methods contain the code that processes the events fired by the SipProvider. The application on top of the JAIN SIP API will include an object that implements the SipListener interface. A SipListener has to register with the SipProvider for the reception of SIP events. Once registered, as soon as SIP messages arrive at the SIP stack, the SIP provider will invoke the corresponding “processEvent” method in SipListener.
The SIP events represent incoming messages from the network to the SIP stack. There are two types of events (Figure 8.6):
RequestEvent: Represents a SIP request received from the network.ResponseEvent: Represents a SIP response received from the network.

Let us now look a bit more in detail at the way these classes and interfaces are used. As we said, first of all, the application needs to get a reference to an instance of the SipFactory. We will use the static getInstance() method for that. Then we need to get an instance of SipStack, by invoking the createSipStack() method on the SipFactory. This method takes a Properties object as an argument that contains the configuration for the SIP implementation (e.g, stack name, retransmission behavior, etc.). Table 8.2 shows the methods in SipFactory.
Table 8.2.
SipFactory Methods | Description | |
|---|---|---|
|
| Creates an instance of the |
|
| Creates an instance of the |
|
| Creates an instance of the |
|
| Creates an instance of a |
|
| Returns an instance of a |
|
| Returns the current pathname of the |
|
| Resets the |
|
| Sets the pathname that identifies the location of a particular vendor’s implementation of this specification. |
The next step is to create a ListeningPoint by invoking createListeningpoint() on the SipStack instance. The ListeningPoint represents the IP address, port, and transport that a SipProvider messaging entity will use to send and receive SIP messages, so in the creation method, the application will need to pass the “port” and “transport” parameters. Once the ListeningPoint is created, the application will create a SipProvider messaging entity by calling createSipProvider() on the SipStack instance. It uses the ListeningPoint previously created as an argument for the creation method. Table 8.3 shows the main methods in the SipStack interface, and Figure 8.7 is a sequence diagram that shows the creation of the relevant objects.
Table 8.3.
SipStack Methods | Description | |
|---|---|---|
|
| Creates a |
|
| Creates a new peer |
|
| Initiates the stack processing. |
|
| Initiates the stack shutdown. |

As we have said before, the SipProvider interface is absolutely key in JAIN SIP because it provides the application with a window to the operation of SIP. This interface hides the implementation of all the messaging functionality in SIP, including the transport and transaction sublayer. So this is the interface that we will use to send messages statelessly and to create transactions over which the application can send messages statefully. In addition to that, the SipProvider is also responsible for delivering the events to the SipListener as soon as they occur (a SIP message is received from the network or a timer fires). Furthermore, the SIP provider also implements the SIP dialog functionality, and allows the application to obtain access to SIP dialogs. This fact particularly contributes to easing the development of SIP UAs or applications on top of them, because this type of application relies heavily on the dialog concept. Table 8.4 summarizes the main methods in the SipProvider interface.
Table 8.4.
SipProvider Methods | Description | |
|---|---|---|
|
| Registers the |
|
| Creates a new |
|
| Creates a new |
|
| Sends a SIP request statelessly. |
|
| Sends a SIP response statelessly. |
So far, we have created the SipProvider so we would have the capability to send messages for transmission into the network. Now we need to enable my application to receive events as well. For that, we need to create a class that implements the SipListener interface and then registers the listener with the provider. For that, it will use a method called addSiplistener() invoked over the SipProvider (Figure 8.8). The methods in the SipListener interface are shown in Table 8.5. The meaning of these methods is quite straightforward. When a SIP request is received from the network, the SipProvider invokes the processRequest() method on the SipListener and passes the received request as an argument. The same applies for the processResponse() method relative to SIP responses. The remaining methods inform the SipListener about events occurring in the SipStack, such as time-outs and so on. All events that are used as arguments for these methods (RequestEvent, ResponseEvent, and so on.) derive from the Java EventObject class, whereas the SipListener interface derives from the EventListener interface.

Table 8.5.
SipListener Methods | |
|---|---|
|
|
|
|
|
|
|
|
|
|
|
|
It is important to highlight that, in JAIN SIP terminology, SIP messages that are sent by the application are simply called messages, whereas SIP messages received by the application are referred to as events.[3] This is shown in Figure 8.9, which also shows the different levels (transport, transaction, dialog) that an application can use to send messages to or receive events from the SipProvider.

In addition to SipFactory, the JAIN SIP API also defines three other factories: MessageFactory, HeaderFactory and AddressFactory (Figure 8.10). The application can invoke methods on these factories in order to create Java objects that implement useful functionality for the manipulation of SIP messages, headers, and addresses.

The MessageFactory allows the application to create Request and Response objects that represent SIP request and response messages. In Table 8.6, we can see the two main methods in MessageFactory: createRequest() and createResponse(). Input arguments to the methods are not shown here; they are used to specify the different elements of a SIP message (start line, headers, and so on).
The Request and Response interfaces provide access to SIP requests and responses. These interfaces extend the Message interface, as is shown in Figure 8.11.

The Message interface provides mainly:
Generic accessor functions to headers
Convenience header accessor methods for the body content type, language, disposition, and length
Accessor methods to the body content itself
The methods in the Message interface that we will more frequently use during this book are shown in Table 8.7.
Table 8.7.
Message Methods | Description | |
|---|---|---|
|
| Adds a new header to the message. |
|
| Sets the new header to replace existing headers of that type in the message. |
|
| Removes the header of the supplied name from the message. |
|
| Removes the first header from a list of headers. |
The Request interface adds some methods to manipulate the request line, whereas the Response interface adds some others to manipulate the response line. These are shown in Tables 8.8 and 8.9.
The HeaderFactory allows the application to create instances of peer classes that implement interfaces for the manipulation of SIP headers. All of these interfaces are derived from the Header interface (Figure 8.12). Table 8.10 contains a list of the methods in HeaderFactory that we will most often use during this book.

Table 8.10.
HeaderFactory Methods | |
|---|---|
|
|
|
|
|
|
|
|
|
|
|
|
|
|
In addition to the header interfaces, there is another relevant interface called Parameters, which allows manipulation of the SIP parameters in the SIP headers. The interfaces for those headers that may have parameters extend the Parameters interface (in addition to the header interface).
The AddressFactory interface allows the application to create Java objects that implement addresses of various kinds. More specifically, it allows us to create objects that implement the following interfaces:
Address
URI
SipURI
TelURL
Table 8.11 shows some of the creation methods in AddressFactory that we will use throughout the book.
An Address object is used to represent a SIP user’s address. It comprises two elements: a display name and a URI. The display name of an address is optional, but, if included, can be displayed to an end user. The URI is the user’s address.
A URI object represents a generic Uniform Resource Identifier. It is the base interface for any type of URI. The URI interface has two subinterfaces: SipURI and TelURL.
A SipURI object represents a SIP URI, and the TelURL object represents a TEL URL. Figure 8.13 is a diagram that shows the relationships between the different interfaces. Both the SipURI and TelURL interfaces also extend the Parameters interface.

For the practices in this chapter—except for Example 1, which is not a full application—we will use a simple architecture. The SIP application will consist of just two classes. The first one, called ExampleGUI, will contain the user interface. The second one, called ExampleListener, will be the core class where events will be processed.
ExampleListener will implement the SipListener interface in order to receive events from the underlying SIP implementation (3). These events will be passed to ExampleListener in processRequest() or processResponse() calls invoked by the SipProvider onto ExampleListener.
ExampleListener will also receive calls (2) from the ExampleGUI class representing events generated in the user interface (1). For example, when a user presses a button to initiate a call, ExampleGUI will invoke the custom userInput() method onto ExampleListener. The userInput() method may have an input parameter that indicates the type of GUI event that has been generated (e.g., user pressed “Yes” button or “No” button) so that ExampleListener can apply the appropriate service logic.
ExampleListener class will also generate SIP messages (4) toward the SipProvider, and it may also produce outputs to the user interface by invoking the display method (5) on ExampleGUI in order to display the received or sent SIP message (for tracing purposes).
Figure 8.14 illustrates this architecture.

In this architecture, we will not use Java events for the communication between ExampleGUI and ExampleListener but rather, direct method calls because it results in a simpler code. The ExampleListener class implements a simple state machine that receives events from the SipProvider and calls from the ExampleGUI, processes them and generates the appropriate output to the network or/and to the GUI.
We will focus on the ExampleListener class, which is the one that contains the actual SIP-related code. The reader may actually implement the ExampleGUI class as he or she prefers, using whatever graphical tool at hand to design the interface. GUI design is not the focus of this book.
Figure 8.15 shows the template that all our examples in this chapter will use in order to implement the ExampleListener class.

The program starts by importing the JAIN SIP packages plus other Java packages (e.g., java.net, java.util) that we may use in our class:
import javax.sip.*;
import javax.sip.message.*;
import javax.sip.header.*;
import javax.sip.address.*;
import java.net.*;
import java.util.*;
After the import section, there comes the name of the class. We can observe that ExampleListener implements the SipListener interface. Next comes the declaration section and the constructor. The constructor will be identical in all the examples in this chapter.
Next are the SipListener methods that process the events coming from the SipProvider. And, at the end of the class code, we will have the userInput() method that ExampleGUI will invoke on ExampleListener in order to communicate actions happening in the user interface. For example, if, when the user presses a button, there is a need to send a SIP message to the network, the code needed to send a SIP message would be included in the userInput() method.
All the examples shown in this chapter simply allow the reader practice with the API. Neither the clients nor the servers built here are full User Agent Clients (UAC) or User Agent Servers (UAS).
The full code, including GUI and listener, for all the examples can be downloaded from the book’s web page (see Appendix A).
When the application is started, the GUI is loaded. At that point, the user has to fill in some configuration parameters (listening port, and so on), and then press the “On” button. This GUI event causes ExampleGUI to create an instance of ExampleListener. The constructor method for ExampleListener contains the code needed for the JAIN SIP environment initialization. Once the system has been initialized, ExampleListener is ready to receive events from the SipProvider or from the user interface.
We will now see the code, contained in the constructor method, that is needed in order to set up the JAIN SIP environment and create instances of the fundamental classes.
We will consider two arguments in the constructor method. The first one is the port that we will be using. This will be introduced through the GUI, and communicated to the ExampleListener through the constructor method. The port will always refer to a UDP port because we will in all examples use UDP as the network transport. The second argument contains a reference to ExampleGUI so that ExampleListener can instruct the GUI to generate appropriate output when necessary by invoking the display() method on such a reference. So, the signature of the constructor methods would look like:
public ExampleListener (int port, ExampleGUI GUI) {
In the code of the constructor. we will create the main JAIN SIP objects. The first thing is to get an instance of SipFactory:
mySipFactory=SipFactory.getInstance();
The next step is to create the SipStack. Before invoking the creation method for SipStack, we need to set the pathname that identifies the location of a particular vendor’s implementation of the JAIN SIP implementation. The pathname must be the reverse domain name assigned to the vendor that provides the implementation. In our case, we will be using the open-source JAIN SIP implementation from NIST. Its pathname must commence with “gov.nist”:
mySipFactory.setPathName("gov.nist");
We will also need to get an instance of the remaining factories:
myMessageFactory=mySipFactory.createMessageFactory();
myHeaderFactory=mySipFactory.createHeaderFactory();
myAddressFactory=mySipFactory.createAddressFactory();
For the creation of the SipStack, we need first to create and configure the Properties object that we will pass as an argument to the creation method. The Properties class is imported from the java.util package. For the examples, we will use all the default values of the SipStack properties but one: the SipStack name.
Properties myProperties=new Properties();
myProperties.setProperty("javax.sip.STACK_NAME," "myStack");
mySipStack=MySipFactory.createSipStack(myProperties);
Then we create the ListeningPoint. In order to create the Listening Point, we need to pass as an argument the IP address, port, and transport. We already said that we will use UDP as the transport for our examples. On the other hand, it is the user who configures the port in the GUI, and then it is communicated to ExampleListener as an argument in the constructor method. So the only thing we don’t know is the IP address. There is a very simple way to programmatically determine the IP address of our computer. It consists of using the InetAddress class from the java.net package.
myIP=InetAddress.getLocalHost().getHostAddress();
So now we can create the ListeningPoint:
myListeningPoint=mySipStack.createListeningPoint(myIP,port,
"udp");
The next step is to create the SipProvider, passing the recently created ListeningPoint as an argument. We are telling the SIP implementation to create a SIP messaging entity (the SipProvider) that listens at the specified ListeningPoint:
mySipProvider=mySipStack.createSipProvider(myListeningPoint);
Last, we register the SipListener with the SipProvider:
mySipProvider.addSipListener(this);
A sequence diagram for the JAIN SIP initialization process is depicted in Figure 8.16. For simplicity, method arguments are not shown.

The main JAIN SIP entities are now created. Let us now look at the particular examples.
We will show four different examples in this chapter. But for the first one, which is aimed at just showing how to build a SIP message, the rest of the examples imply an exchange of SIP messages between two communicating applications. Readers have two options in order to test those examples.
If the reader has at his or her disposal two computers connected to a local area network or to the Internet, he/she can start one instance of our example applications in each machine. One application will initiate requests, and the other will respond to them. This approach has an interesting benefit: we can also run a network sniffer in either of the two machines, and we will be able to see all the SIP traffic generated and received by our application. The drawback comes from the fact that, for our examples, the application that initiates the requests needs to know the IP address of the other machine. Although this might be a practical way of running the examples if the reader has a couple of computers connected to a switch at home, it may be cumbersome to run it in an Internet environment, given that we would need to find an alternative way of communicating the IP addresses between the two machines before SIP communication can start. In Chapter 13, we will build some network infrastructure (a registrar) that will be used to locate the users so we will no longer need to know the IP address of the other party, but just his or her logical identity.
All in all, we recommend that readers follow the second option in order to run the examples.
In this option, just one PC is needed (Figure 8.17). We will run two instances of our application on the same PC. As before, one application will act as client, and the other as server. The trick here is that we will use the local loop address of the TCP/IP stack (127.0.0.1) to avoid the need to have a physical network. Although the TCP/IP stack sees an IP packet destined to the local loop address, it knows the packet does not need to go out through the network interface, but rather, must be delivered to an application on the same machine. The only precaution we need to have in order for this scenario to work is that the two instances of our applications need to listen in two different ports.

A minor drawback of this option is that not all the sniffers in the market allow us to trace traffic on the local loop. In order to overcome such an issue, we will build a very simple sniffer functionality in our application so that whenever a SIP message is generated or received by it, the SipListener can pass it as a String to ExampleGUI using the display() method. ExampleGUI will display the message in a window of our application.
In this first example, we do not yet intend to send or receive SIP messages. We will just learn how to use the interfaces provided by the MessageFactory, HeaderFactory, and AddressFactory in order to build a SIP message. This first example is not a full Java application yet; it just intends to show the Java code needed for building a SIP message.
Let us imagine we want to build the following REGISTER message:
REGISTER sip:registrar.ocean.com SIP/2.0Via: SIP/2.0/UDP peterpc.ocean.com:5060;branch=z9hG4bKnashds7Max-Forwards: 70To: Bob <sip:[email protected]>From: Bob <sip:[email protected]>;tag=456248Call-ID: 843817637684230@998sdasdh09CSeq: 1826 REGISTERContact: <sip:[email protected]>Content-Length: 0
The first thing we will do is create the addresses that we will need for this example. There are three SIP URIs in different fields of this message:
▪ The registrar’s SIP URI: | sip:registrar.ocean.com |
▪ Peter’s Address of Record: | |
▪ Peter’s Contact Address: |
Address destAddress=myAddressFactory.createAddress("sip:
  registrar.ocean.com");
Address addressOfRecord=myAddressFactory.createAddress("sip:
  [email protected]");
Address contactAddress= myAddressFactory.createAddress("sip:
  [email protected]");
The destination address will have to be converted to a URI object before we can pass it to the createRequest() method, so:
javax.sip.address.URI myRequestURI=destAddress.getURI();
Next, we create the headers:
ArrayList viaHeaders=new ArrayList();
ViaHeader myViaHeader=myHeaderFactory.createViaHeader("peterpc.
  ocean.com"
,5060,udp, "z9hG4bKnashds7");
viaHeaders.add(myViaHeader);
MaxForwardsHeader myMaxForwardsHeader =
   myHeaderFactory.CreateMaxForwardsHeader(70);
ToHeader myToHeader= myHeaderFactory.createToHeader
 (addressOfRecord,null);
FromHeader myFromHeader=myHeaderFactory.createFromHeader(address
  OfRecord,
"456248");
CallIDHeader myCallIDHeader=
 myHeaderFactory.createCallIDHeader("843817637684230@
 998sdasdh09");
CseqHeader myCSeqHeader=
  myHeaderFactory.createCSeqHeader(1826,"REGISTER");
Then we create the message introducing the main headers as arguments to the createRequest() method in MessageFactory:
Request myRequest=myMessageFactory.createRequest(myRequestURI,
"REGISTER," myCallIDHeader myCSeqHeader, myFromHeader
,myToHeader, viaHeaders, myMaxForwardsHeader);
And last, we add to the message those headers that were not introduced as arguments to the createRequest() method:
ContactHeader myContactHeader=
HeaderFactory.createContactHeader(contactAddress);
myRequest.addHeader(myContactHeader);
The Request object (myRequest) now contains all the info in the SIP message that we wanted to build. The next line of code prints the message on the screen:
System.out.println(myRequest);
In this example, we will build a simple application that is able to send and receive SIP messages statelessly. We have chosen to send a SIP REGISTER message. There will be two instances of the application. One instance will act as a client, sending the REGISTER, and the other one will act as a server, receiving the REGISTER.
The program will present a simple GUI that includes the following elements:
A text field where the user can input the local port (where the application is bound). In the server instance, this port represents the listening port where incoming messages from the network are received. In the client instance, this port represents the value of the UDP Source Port field in outgoing packets.
A text field where the user introduces his or her own Address -of -Record. It is introduced only in the client instance.
A text field where the user introduces the SIP URI of the server instance. It is introduced only in the client instance.
An “On” button for initializing the SIP environment.
A “Send” button for sending the messages.
A text screen, where the user can visualize the sent and received messages.
Figure 8.18 shows a possible layout for the GUI.

The application follows the general architecture for the practices that we described in previous sections. It consist of two classes: Example2GUI and Example2Listener. In addition to the SipListener methods, Example2Listener will implement a method called userInput() that will be invoked by Example2GUI when the user presses the “Send” button. The signature for the userInput() method is:
void userInput(String destination, String aor)
where “destination” is a String representing the SIP URI of the recipient of the request, and “aor” is a String representing the Address of Record of the user initiating the request. These two parameters are inputted in the GUI by the user, and conveyed as arguments in the userInput() method.
Likewise, Example2GUI will implement a method called “display.” This method will contain a String as argument that represents the SIP message sent or received so that it can be displayed in the GUI.
Figure 8.19 shows the method calls between the two classes.

The way the application works is quite simple. As soon as the program is started and the frame is loaded, the user should configure the local (own) port. After doing so, the user will press the “On” button, causing Example2GUI to create an instance of Example2Listener. The constructor method of Example2Listener will set up the JAIN SIP environment on the port introduced by the user. If the initialization has been successful, we will see a message in the GUI that shows the own IP address and port to which our application is successfully bound (Figure 8.20). The port was introduced in the GUI, whereas the IP address is directly obtained by the program:
String myIP=InetAddress.getLocalHost().getHostAddress();

Once both application instances (client and server) are initialized, the user will fill in his or her own Address of Record and the server address in the GUI for the client instance.
The server address will be of the form:
sip: <destination IP address>: <destination port>
If we are running the client and server instances of the application in the same machine, the destination IP address will be the local loop address: 127.0.0.1. Moreover, in that case, we need to make sure that the client own port and destination port are different!
It is also crucial that the destination port entered in the client GUI coincides with the local port configured in the server instance. Figure 8.21 shows the GUIs for the client and server instances.

The user will then press the “Send” button. At that point, Example2GUI will call the method userInput() in Example2Listener, including the parameters introduced by the user. The code in the userInput() method will first build the REGISTER message.
In order to create the request, we follow a similar procedure as in Example 1. Instead of inputting the CallID value into the header-creation method, we will ask the SIP implementation to generate a CallID value for us:
CallIdHeader myCallIdHeader=mySipProvider.getNewCallId();
Next, we have to send the created message statelessly. For that, we just need to invoke the sendRequest() method on the SipProvider. This will cause the SipProvider to pass the message to the transport sublayer, bypassing the transaction sublayer, and therefore sending the message statelessly:
mySipProvider.sendRequest(myRequest);
After this, we will then invoke the display() method on the Example2GUI object, whose reference we obtained as an argument in the constructor method. By invoking display(), the sent message can be presented to the user:
myGUI.display(">>> "+ myRequest.toString());
Figure 8.22 shows a sequence diagram that represents the actions needed for creating and sending the message.

When the server instance receives the message, its SipProvider will invoke the processRequest() method on Example2Listener. The code in the processRequest() method will first obtain the Request object from the RequestEvent:
Request myRequest=requestReceivedEvent.getRequest();
Then we just convert the Request object into a string and send it to the GUI to be displayed by invoking the display() method on Example2GUI so that we can see the actual received message:
Request myRequest=requestReceivedEvent.getRequest();
myGUI.display("<<< "+myRequest.toString());
Figure 8.23 shows a sequence diagram that represents the actions taken at reception of a message.

In Figure 8.24, we can see a snapshot of the running client and server. The tracing facility embedded in the application (i.e., the display method) allows us to see all the details of the transmitted and received messages.

We will now repeat the example in the previous section, but, in this case, sending the REGISTER message statefully instead of statelessly. That is to say, we will use the transaction sublayer. The program is then equivalent to the previous one, except for the following points:
The methods
userInput()andprocessRequest()have been modified so as to send and receive the messages statefully.When the server receives the request, it generates a 200 OK response. This will also allow us to understand how responses are constructed and managed.
Next is the code in class Example3Listener.
Let us try to understand the new code for handling messages statefully.
In order to create the request, we follow the same procedure as in Example 2. The only difference in this case is that, rather than inputting the branch id value into the via header-creation method, we will ask the SIP implementation to generate a branch id value for us. In order to do so, we will set the branch id argument as null:
ViasHeader myViaHeader=HeaderFactory.createViaHeader(myIP,myP
  ort, "udp,"null);
In order to send a request statefully, we first need to create a client transaction using SipProvider’s method getNewClientTransaction(). Then we can send the request using the sendRequest() method on the ClientTransaction interface.
After sending the message, the display method will be executed so as to visualize the sent message on the GUI:
ClientTransaction myClientTransaction=
 mySipProvider.getNewClientTransaction(myRequest);
myClientTransaction.sendRequest();
gui.display(">>> "+ myRequest.toString());
Figure 8.25 depicts a sequence diagram comprising the creation and sending of the request.

When a request is received, the SipProvider will invoke the processRequest() method. The application will also convert the request into a string, and display it in the GUI:
Request myRequest=requestReceivedEvent.getRequest();
myGUI.display("<<< "+myRequest.toString());
In order to send a response statefully, the application has to obtain a new server transaction associated to the request just received. This is done by invoking the getNewServerTransaction() method on the SipProvider.
Then we need to create the response through the createResponse() method on the MessageFactory. Next, we just send it by invoking the sendResponse() method on the ServerTransaction:
ServerTransaction myServerTransaction=
  mySipProvider.getNewServerTransaction(myRequest);
Response myResponse=myMessageFactory.createResponse(200,
  myRequest);
myServerTransaction.sendResponse(myResponse);
myGUI.display(">>> "+myResponse.toString());
Figure 8.26 depicts a sequence diagram comprising the reception of the request and sending of the response.

When a response is received, the SipProvider will invoke the processResponse() method. We will obtain the Response object by invoking get-Response() on the ResponseEvent. Then we will just convert the Response object into a string and send it to the GUI to be displayed:
Response myResponse=responseReceivedEvent.getResponse();
myGUI.display("<<< "+myesponse.toString());
Figure 8.27 depicts a sequence diagram for the reception of the response at the client.

In this example, we will play with the Dialog interface. The dialog functionality that we learned in Chapter 7 is encapsulated in the JAIN SIP Dialog interface. The Dialog interface eases the task of writing applications that manage dialogs. In this example, we will also build a client and a server. The client will initiate the dialog by sending an INVITE.[4] As soon as the server receives the INVITE, it generates a 180 Ringing response. When the user accepts the invitation, the server will generate a 200 OK response.
The program structure will be similar to the one in the previous example. There will be some differences, though:
There will be two buttons in the GUI. One is used in the client to initiate the dialog; it is called “Initiate.” The other one is called “Accept,” and it is used in the server in order to accept the invitation.
Pressing either of the two buttons will cause
Example4GUIto invoke theuserInput()method onExample4Listener. In order to distinguish between the two buttons, we have added a new argument inuserInput()called “type,” which takes value 0 when the “Initiate” button is pressed, and value 1 when the user presses the “Accept” button.There is a new
showStatus()method thatExample4Listenerwill invoke onExample4GUI. This method allows us to present additional information on the GUI in a separate label. We will use it in order to convey dialog status information to be displayed.In order to display dialog status information, we will need to obtain the Dialog object in different situations.
Figure 8.28 shows a possible layout for the GUI.

The creation of the INVITE request is similar to the creation of the REGISTER in previous examples. The main difference is obviously the name of the method, and the fact that the To header contains the address of the recipient.
This is done exactly in the same way as in Example 3. The dialog-creating request, in this case the INVITE, is not yet part of any dialog, so we will just create a new client transaction and send the message through it:
ClientTransaction myClientTransaction=
 mySipProvider.getNewClientTransaction(myRequest);
myClientTransaction.sendRequest();
This scenario is resolved in the same way as in Example 3. When a request is received, the SipProvider will invoke the processRequest() method:
Request myRequest=requestReceivedEvent.getRequest();
Just after receiving the INVITE request, the application will send back a 180 Ringing provisional response. Before sending the response, we will include a tag in the To header, as well as add a contact header to the message. Once the message has been sent, we obtain the Dialog object and show the dialog’s status on the GUI:
ServerTransaction myServerTransaction=
  mySipProvider.getNewServerTransaction(myRequest);
Response myResponse=myMessageFactory.createResponse(180, myRequest);
ToHeader responseToHeader=(ToHeader) myResponse.getHeader("To");
ResponseToHeader.setTag("454326");
Address contactAddress =
  myAddressFactory.createAddress("sip:"+myIP+":"+myPort);
myContactHeader=myHeaderFactory.createContactHeader(contactAddress);
myResponse.addHeader(myContactHeader);
myServerTransaction.sendResponse(myResponse);
myDialog= myServerTransaction.getDialog();
myGUI.showStatus("Dialog status:"+myDialog.getState().toString());When the called user presses the “Accept” button, the application needs to create a 200 OK response and send it back to the calling user. So, within the code for the userInput() method, for the case where type = 1 (ACCEPT), we will first need to invoke the createResponse() method on MessageFactory. For that, we pass as an argument the originally received request. In addition to that, we also obtain the Dialog object, which represents SIP dialog that has just been created:
Request originalRequest=myServerTransaction.getRequest();
Response myResponse =myMessageFactory.createResponse(200,
  originalRequest);
ToHeader responseToHeader=(ToHeader) myResponse.getHeader("To");
ResponseToHeader.setTag("454326");
myServerTransaction.sendResponse(myResponse);
myDialog= myServerTransaction.getDialog();
myGUI.showStatus("Dialog status: "+myDialog.getState().toString());When a response is received, the SipProvider will invoke the process Response() method, and we will get the Response object from the ResponseEvent. We also get the client transaction and the dialog corresponding to the request, and show the dialog state:
Response myResponse=responseReceivedEvent.getResponse();
myClientTransaction=responseReceivedEvent.getClientTransaction();
myDialog= myClientTransaction.getDialog();
myGUI.showStatus("Dialog status: "+myDialog.getState().toString());When a response is received, the SipProvider will invoke the processResponse() method, and we will get the Response object from the ResponseEvent. We also get the client transaction and the dialog corresponding to the request. It is crucial that we obtain the Dialog because we need it in order to generate the ACK in the next step:
Response myResponse=responseReceivedEvent.getResponse();
myClientTransaction=responseReceivedEvent.getClientTransaction();
myDialog= myClientTransaction.getDialog();
myGUI.showStatus("Dialog status: "+myDialog.getState().toString());In order to send the ACK, we first need to build it. JAIN SIP offers a method called createAck() to build an ACK message from the Dialog that we obtained in the last step. We need to include as an argument to the method the sequence number of the original INVITE request that created the dialog. Once created, the Dialog interface again offers a method to send the ACK:
Request ackRequest=myDialog.createAck(1);
ackRequest.addHeader(myContactHeader);
myDialog.sendAck(ackRequest);
When a request is received, the SipProvider will invoke the processRequest() method, and we will get the Request object from the RequestEvent:
Request myRequest=requestReceivedEvent.getRequest();
In Figure 8.29, we can see a snapshot of the running client and server.

Initiating a dialog without offering the user the capability of terminating it is not of much use to the user. In the next example (Example 5), we will extend Example 4 to incorporate also the possibility for terminating dialogs.
We will now extend the previous example with the capability for the user to be able to terminate the dialog by sending a BYE message, which is a mid-dialog request.[5] This example will show how we can use the
Dialoginterface to construct and send any new requests within the dialog. So this is applicable to the BYE request, but also to any other mid-dialog requests (e.g., re-INVITE, and so on).
The new aspects as compared with Example 4 are:
From the GUI perspective, we will have an additional “Terminate” button for the user to press whenever he or she wants to terminate the dialog. Therefore, we will have an additional value for the “type” parameter in the
userInput()method, and additional code in it to construct the BYE request. The new value of the “type” parameter will be 2.We will need extra code in the
processRequest()andprocessResponse()methods in order to cope with the reception of BYE requests or responses.
Figure 8.30 shows a possible layout for the GUI.

Sending a mid-dialog request is a very easy process by using the Dialog interface. A Dialog object stores all the state needed by a SIP dialog that will be used for constructing new requests.
First, we invoke the createRequest() method on the Dialog. The new mid-dialog request needs to be sent statefully, so we will also create a new client transaction that will be used to send the request. Finally, we send the request by invoking the sendRequest() method on the Dialog object; we pass the client transaction as an argument:
Request myRequest= myDialog.createRequest("BYE");
myClientTransaction= mySipProvider.getNewClientTransaction
  (myRequest);
myDialog.sendRequest(myClientTransaction);
myGUI.showStatus("Dialog status: "+myDialog.getState().toString());
Figure 8.31 shows a sequence diagram that includes the creation and sending of a mid-dialog request.

When a request is received, the SipProvider will invoke the processRequest() method. The application then must obtain the server transaction. In order to obtain server transactions for requests outside of a dialog, we have so far used the getNewServerTransaction() method. However, for requests within a dialog, such as a BYE request, the server transaction is included in the received RequestEvent, so we can easily obtain it by:
Request myRequest=requestReceivedEvent.getRequest();
myServerTransaction=requestReceivedEvent.getServerTransaction();
After receiving the BYE request, the application will create a 200 OK response, and send it using the obtained server transaction for the BYE request. The response will be created based on the request message that created this transaction and that was previously stored:
Response myResponse=myMessageFactory.createResponse(200, myRequest);
myServerTransaction.sendResponse(myResponse);
myDialog=myServerTransaction.getDialog();
myGUI.showStatus("Dialog status: "+myDialog.getState().toString());
Figure 8.32 shows a sequence diagram that includes the reception of a mid-dialog request and the sending of a 200 OK response to it.

When a response is received, the SipProvider will invoke the processResponse() method, and we will get the Response object from the ResponseEvent:
Response myResponse=responseReceivedEvent.getResponse();
In Figure 8.33, we can see a snapshot of the running client and server.

In this chapter, we have introduced the main concepts around the JAIN SIP interface, and we have built some very simple applications that allow us to experiment with the SIP signaling. But IP communications is not just signaling—there is media as well, and there is also the need to describe the media. In the next chapters, we will learn how to programmatically access the media layer so as to be able to code, decode, send, and receive media packets. We will also learn how to build applications that use the Real-time Transport Protocol, as well as learn to program the Session Description Protocol. Armed with these three ingredients (signaling, media, and session description), we will be able, in Chapter 12, to tackle the design and implementation of a simple SIP soft phone.
[1] On one hand, the industry uses the term SIP stack in order to refer to SIP implementation. On the other hand, the JAIN SIP specification defines an interface called SipStack, which actually represents a management interface to SIP implementation (or SIP stack). So the same term is used to refer to two different aspects. The context and the fact that the Java interface name is written without embedded blank spaces should permit the reader to distinguish when we are referring to one case or the other.
[2] In order to access non-Java functionality from a Java class, the so-called JNI (Java Native Interface) is used.
[3] This is because the upward path (network to application) is represented as an event stream received via the listener, and the downward path is triggered by “downcalls” (method calls) on the provider object. The pattern is different in each direction.
[4] Let us remember that the only method that is able to create a dialog in RFC 3261 is the INVITE method.
[5] Strictly speaking, the BYE method is used to terminate a session (not a dialog); however, the dialog created when establishing that session is also terminated. Given that in these academic exercises, we are not yet playing with the media plane (so there is no effective media session established), the practical effect of the BYE request is to terminate the dialog.