
Ionic Cloud can provide all of the user management and authentication capabilities out of the box. The following providers are supported by Ionic Cloud:
- E-mail/password
- Custom authentication
- GitHub
Depending on the app, you may not need to use all of these authentication methods. For example, it would make more sense to use a LinkedIn authentication for an app focusing on a working professional to narrow down the audiences who fit the user profile of the app. If you have your own authentication server where you maintain your own user database, you can still use the custom authentication of Ionic Cloud to create a custom token.
This chapter will try to simplify the authentication concept as much as possible. You will learn how to do the following things:
- Register a new user
- Log in and logging out a user
- Change user profile data using custom fields
Observe the following screenshot of the app:

You can run this app via a browser. There is no need to test user authentication using a physical device.
Observe the following instructions:
- Create a new
MySimpleAuthapp using theblanktemplate, as shown, and go to theMySimpleAuthfolder:$ ionic start MySimpleAuth blank --v2 $ cd MySimpleAuth
- Install Ionic Cloud Angular using the following command:
$ npm install @ionic/cloud-angular --save - Initialize your Ionic Cloud setting so that an app ID can be created in your account, as follows:
$ ionic io initNote
You will be prompted to log in to your Ionic Cloud account for this command line. The initialization process will save the
app_idandapi_keyvalues to your project'sionic.io.bundle.min.js. This means you cannot change the project in your Ionic Cloud account after this (or you will have to manually remove the IDs and reinitialize). Your app ID is also recorded in theionic.config.jsonfile. - Log in to your Ionic Cloud at https://apps.ionic.io.
- Identify the new app that you initialized and copy the app ID (that is,
7588ce26), as shown in the following screenshot: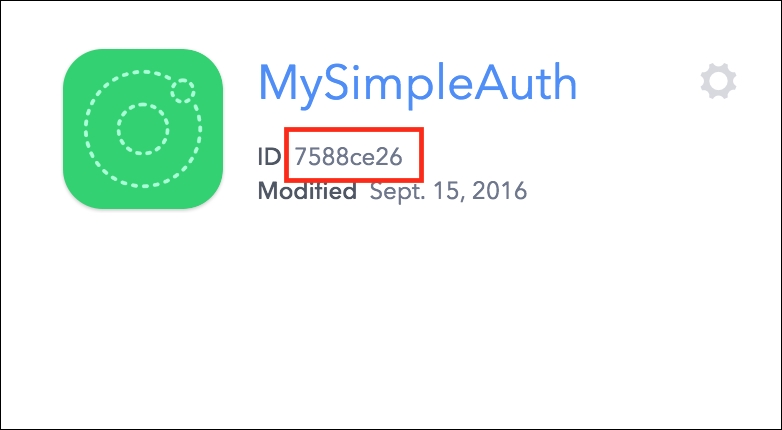
- Open and edit
./src/app/app.module.tswith the following code:import { NgModule } from '@angular/core'; import { IonicApp, IonicModule } from 'ionic-angular'; import { CloudSettings, CloudModule } from '@ionic/cloud-angular'; import { MyApp } from './app.component'; import { HomePage } from '../pages/home/home'; const cloudSettings: CloudSettings = { 'core': { 'app_id': '288db316' } }; @NgModule({ declarations: [ MyApp, HomePage ], imports: [ IonicModule.forRoot(MyApp), CloudModule.forRoot(cloudSettings) ], bootstrap: [IonicApp], entryComponents: [ MyApp, HomePage ], providers: [] }) export class AppModule {} - Edit and replace ./src/pages/home/home.html with the following code:
<ion-header> <ion-navbar> <ion-title> User Authentication </ion-title> </ion-navbar> </ion-header> <ion-content padding> <div *ngIf="!auth.isAuthenticated()"> <h4> Register or Login </h4> <ion-list> <ion-item> <ion-label fixed>Email</ion-label> <ion-input type="text" [(ngModel)]="email"></ion-input> </ion-item> <ion-item> <ion-label fixed>Password</ion-label> <ion-input type="password" [(ngModel)]="password"></ion-input> </ion-item> </ion-list> <ion-grid> <ion-row> <ion-col width-50> <button ion-button block (click)="register()">Register</button> </ion-col> <ion-col width-50> <button ion-button block (click)="login()">Login</button> </ion-col> </ion-row> </ion-grid> </div> <div *ngIf="auth.isAuthenticated()"> <h4> User Profile </h4> <ion-list *ngIf="auth.isAuthenticated()"> <ion-item> <ion-label fixed>Name</ion-label> <ion-input class="right" type="text" [(ngModel)]="name"></ion-input> </ion-item> <ion-item> <ion-label>Birthday</ion-label> <ion-datetime displayFormat="MM/DD/YYYY" [(ngModel)]="birthday"></ion-datetime> </ion-item> </ion-list> <ion-grid> <ion-row> <ion-col width-50> <button ion-button color="secondary" block (click)="save()">Save</button> </ion-col> <ion-col width-50> <button ion-button color="dark" block (click)="logout()">Logout</button> </ion-col> </ion-row> </ion-grid> </div> </ion-content> - Open and edit
./src/pages/home/home.tswith the following code:import { Component } from '@angular/core'; import { NavController, LoadingController, ToastController } from 'ionic-angular'; import { Auth, User, UserDetails, IDetailedError } from '@ionic/cloud-angular'; @Component({ templateUrl: 'home.html' }) export class HomePage { public email: string = ""; public password: string = ""; public name: string = ""; public birthday: string = ""; constructor(public navCtrl: NavController, public auth: Auth, public user: User, public loadingCtrl: LoadingController, public toastCtrl: ToastController) { this.initProfile(); } private initProfile() { if (this.auth.isAuthenticated()) { this.name = this.user.get('name', ''); this.birthday = this.user.get('birthday', ''); } } register() { let details: UserDetails = {'email': this.email, 'password': this.password}; let loader = this.loadingCtrl.create({ content: "Registering user..." }); loader.present(); this.auth.signup(details).then(() => { console.log('User is now registered'); console.log(this.user); loader.dismiss(); return this.auth.login('basic', {'email': this.email, 'password': this.password}); }, (err: IDetailedError<string[]>) => { loader.dismiss(); for (let e of err.details) { if (e === 'conflict_email') { alert('Email already exists.'); } else { alert('Error creating user.'); } } }); } login() { let details: UserDetails = {'email': this.email, 'password': this.password}; let loader = this.loadingCtrl.create({ content: "Logging in user..." }); loader.present(); this.auth.login('basic', details).then((data) => { console.log('Finished login'); this.initProfile(); loader.dismiss(); console.log(data); console.log(this.user); }, (err) => { loader.dismiss(); alert('Login Error'); } ); } save() { let toast = this.toastCtrl.create({ message: 'User profile was saved successfully', position: 'bottom', duration: 3000 }); toast.present(); this.user.set('name', this.name); this.user.set('birthday', this.birthday); this.user.save(); } logout() { this.auth.logout(); this.email = ''; this.password = ''; this.name = ''; this.birthday = ''; } } - Finally, add a minor
inputfield alignment in./src/pages/home/home.scss, as follows:.home-page { ion-input.right > input { text-align: right; } } - Go to your Terminal and run the app:
$ ionic serve
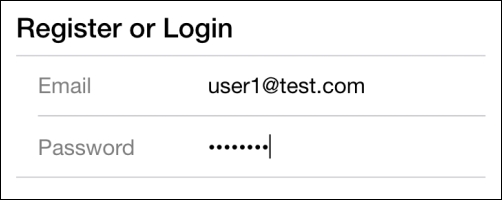
In a nutshell, Ionic Cloud acts as a backend server for your app. It allows you to create a new user record in its database. Through the user class, you can interact with the Ionic Cloud authentication system. The first step is to register the user. This takes an Email and Password as shown in the following screenshot:
When you click on Register, the following code will be executed:
this.auth.signup(details).then(() => {
  console.log('User is now registered');
  console.log(this.user);
  loader.dismiss();
  return this.auth.login('basic', {'email': this.email, 'password': this.password});
}
The details object has the e-mail and password from the form. Once it has successfully completed, it will automatically log in the user via this.auth.login.
Note that this piece of code here is just to show the loading screen to prevent the user from clicking on the Register button multiple times:
let loader = this.loadingCtrl.create({
  content: "Registering user..."
});
loader.present();
This example app only has Name and Birthday as custom user data, as illustrated in the following screenshot:

To save the User Profile, you call the save() method as shown in the following code:
save() {
  let toast = this.toastCtrl.create({
    message: 'User profile was saved successfully',
    position: 'bottom',
    duration: 3000
  });
  toast.present();

  this.user.set('name', this.name);
  this.user.set('birthday', this.birthday);
  this.user.save();
}
If you look into the console log, the user token and custom data are also available, as shown in the following screenshot:

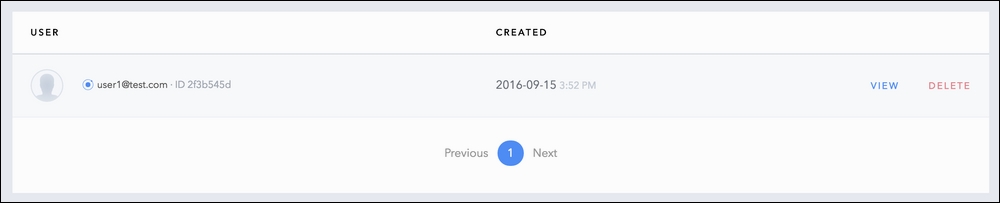
You can also view the UserData in the Ionic Cloud portal. Log in to your account and navigate to your app's Auth menu.
Click on the VIEW button of the user you created, as shown in the following screenshot:
Select the CUSTOM DATA tab and you can see the same information stored for the user, as illustrated in the following screenshot:

For more information about user authentication, you may want to refer the official Ionic documentation at http://docs.ionic.io/services/users/.