
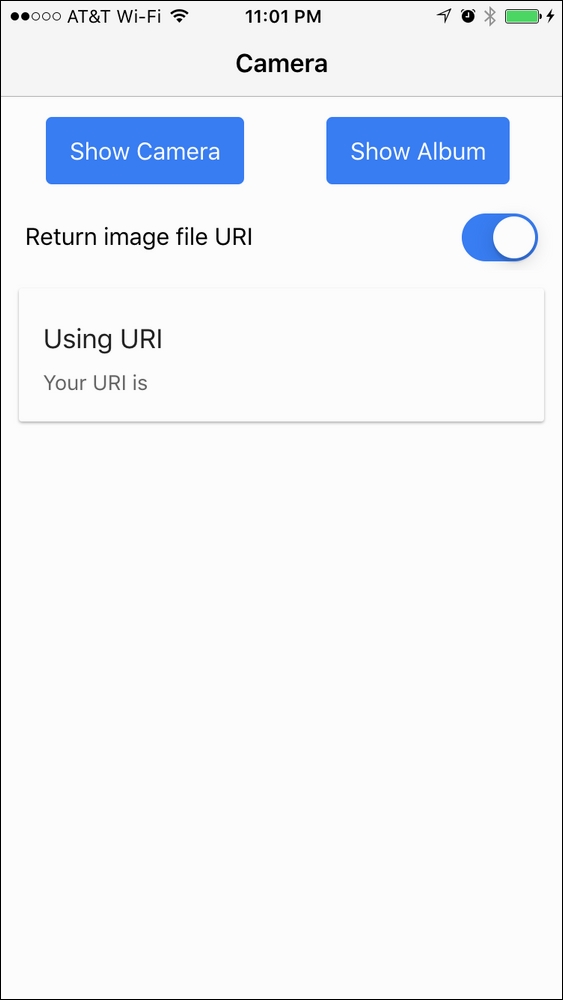
For this section, you will make an app to take a picture using the device camera or load an existing picture from the device album. The picture could be either in the Base64 format or saved in a local filesystem relating to your app. The following is a screenshot of the app:
Here is the high-level process:
- Access the Cordova camera plugin to trigger camera capture and get the image back in the Base64 or URI format
- Parse the Base64 data or URI on an
<img>DOM object - Display the URI if it's in the URI format
- Capture an event of a toggle component
- Display long data (for example, URI) using horizontal scroll
You should have a physical device ready in order to test the camera capability. It's possible to just run the code via an emulator, but the filesystem support might look different across the various platforms.
The following are the instructions to add camera support:
- Start a blank project (for example,
MyCamera) and go to that folder:$ ionic start MyCamera blank --v2 $ cd MyCamera
- Add the Cordova camera plugin using the following code:
$ ionic plugin add cordova-plugin-cameraYou should be able to see a new folder
org.apache.cordova.camerabeing added in the/pluginsfolder. - Replace
./src/pages/home/home.htmlwith the following code:<ion-header> <ion-navbar> <ion-title> Camera </ion-title> </ion-navbar> </ion-header> <ion-content padding> <ion-row class="center"> <ion-col width-50> <button ion-button (click)="getPicture(1)">Show Camera</button> </ion-col> <ion-col width-50> <button ion-button (click)="getPicture(0)">Show Album</button> </ion-col> </ion-row> <ion-item class="no-border"> <ion-label>Return image file URI</ion-label> <ion-toggle energized [(ngModel)]="useURI"> </ion-toggle> </ion-item> <ion-card> <img [src]="imageData" *ngIf="imageData" /> <ion-card-content> <ion-card-title> <div *ngIf="useURI"> Using URI </div> <div *ngIf="!useURI"> Using Base64 </div> </ion-card-title> <p *ngIf="useURI"> Your URI is {{ imageData }} </p> <p *ngIf="!useURI"> Your Base64 image has {{ (imageData + '').length }} bytes </p> </ion-card-content> </ion-card> </ion-content>Since you have only one page, this template will show two buttons and an area to display the image.
- Replace
./src/pages/home/home.tswith the following code:import { Component, Input } from '@angular/core'; import { NavController } from 'ionic-angular'; import { Camera } from 'ionic-native'; @Component({ selector: 'page-home', templateUrl: 'home.html' }) export class HomePage { public imageData: string; @Input('useURI') useURI: Boolean = true; constructor(public navCtrl: NavController) { } getPicture(sourceType){ Camera.getPicture({ quality: 50, allowEdit: true, encodingType: Camera.EncodingType.JPEG, saveToPhotoAlbum: false, destinationType: this.useURI ? Camera.DestinationType.FILE_URI : Camera.DestinationType.DATA_URL, targetWidth: 800, targetHeight: 800, sourceType: sourceType }).then((imageData) => { if (this.useURI) { this.imageData = imageData; } else { this.imageData = "data:image/jpeg;base64," + imageData; } }, (err) => { console.log(err); }); } }There is only one method:
getPicture(). This method will return the photo data so that the template can render. - Replace
/app/pages/home/home.scsswith the following code:.center { text-align: center; } .no-border .item-inner { border-bottom: 0; }There are only a few minor changes in the styling so that you can keep them simple.
- Connect your device to your computer.
- Go to the Terminal and execute the following command line for iOS:
$ ionic run iosIf you want to run the app in your Android device, use the following code:
$ ionic run android - When you run the app and take a picture, you should see the app as shown in the following screenshot:

Camera.getPicture() is just an abstraction of navigator.camera.getPicture() from the Cordova camera plugin. If you are already familiar with Cordova or ngCordova from Ionic 1, this should be very familiar. Let's start from the template. You have the following two buttons, which trigger the same, getPicture(), method:
<button ion-button (click)="getPicture(1)">Show Camera</button><button ion-button (click)="getPicture(0)">Show Album</button>
These are just different ways to access photos: either from the camera itself or from the existing photos in the phone's album. For the photo to render, you need to pass the photo data into the src attribute, as follows:
<img [src]="imageData" *ngIf="imageData" />
Note that you only want to show this <img> tag when imageData exists with some data. The imageData variable could be Base64 or an internal URL of the photo. To specify this option, there is a toggle button, as shown:
<ion-toggle energized [(ngModel)]="useURI"></ion-toggle>
You will use the useURI variable inside the class, as illustrated, to determine which format to return the photo data in.
@Input('useURI') useURI: Boolean = true;Both useURI and sourceType will be used in the getPicture() function, as follows:
Camera.getPicture({
    quality: 50,
    allowEdit: true,
    encodingType: Camera.EncodingType.JPEG,
    saveToPhotoAlbum: false,
    destinationType: this.useURI ? Camera.DestinationType.FILE_URI: Camera.DestinationType.DATA_URL,
    targetWidth: 800,
    targetHeight: 800,
    sourceType: sourceType
}).then((imageData) => {
    if (this.useURI) {
      this.imageData = imageData;
    } else {
      this.imageData = "data:image/jpeg;base64," + imageData;
    }
}, (err) => {
    console.log(err);
});
It's important to adjust the quality, targetWidth and targetHeight to low so that the photo is not too big, which could crash the device, especially when it doesn't have enough memory. When you return the Base64 data, it must be prefixed with the string data:image/jpeg;base64.
One item that isn't discussed here is the ability to post image data to the server. The common scenario is to upload the file from the filesystem. It's not a good idea to send data as Base64 because of the data size, which is double the original binary size.
It is possible to create Instagram-like filter effects using just JavaScript. You can leverage an existing library, such as Filterous (https://github.com/girliemac/Filterous), to modify the image canvas directly.
There is an Instagram plugin (https://github.com/vstirbu/InstagramPlugin) for Cordova on GitHub. You could write some extra code to pass the image to Instagram. The user must have Instagram installed on the phone first, though. This idea is nice when you plan to do some cool image processing (for example, adding funny text) before letting Instagram perform the photo filter operation.
You could even add the Cordova's social network plugin and post the resulting images to Twitter or Facebook.