
|
Python as a language goes out of its way to encourage a good clear programming style. It certainly doesn’t enforce it, though; you’re just as free to write obscure and unmaintainable code with Python as you are with any other programming language. When talking to programmers who haven’t used Python, I’m sometimes surprised by their perception that it’s harder to write well-structured programs with Python because it’s a dynamically typed language. In fact, by making it easy to express your intentions and reducing the amount of code you need to write, Python makes large projects more maintainable.
In this chapter, as well as learning more about IronPython, you’ll also explore some Python programming best practices. This exploration includes getting deeper inside Python by using some of Python’s magic methods. You’ll also create a small application to tackle some common programming tasks, using several .NET namespaces that you haven’t yet seen.
We start with a look at data modeling in Python.
Computer science has many difficult problems, but one problem central to many applications is data modeling. Data modeling means structuring and organizing data, both for a computer to be able to work with the data and to make it possible to coherently present the data to humans. This means finding the right way of representing the data. The structures you choose must be a good fit, and you must provide the right API for accessing and modifying the data.
The built-in datatypes, such as the list and the dictionary, provide straightforward ways of accessing data. They even have syntax built into the language for doing so. Data modeling in Python is often done by creating structures that reuse the same way of accessing the underlying information. In .NET languages, you might provide data access by implementing interfaces; Python achieves the same thing using protocols.
The traditional .NET languages are all statically typed. To call methods on an object, the compiler needs to know what type it is and that the type has the required method. Certain properties of objects, such as being able to iterate over them and index them, are supported in .NET through interfaces. If a class implements an interface, then the compiler knows that it supports certain types of operations. The .NET interfaces that allow indexing by position or by key are IList and IDictionary.
Instead of interfaces, Python uses protocols. The Python equivalent of IList is the sequence protocol; the equivalent of IDictionary is the mapping protocol. An object can support either of these protocols by implementing the __getitem__ and/or the __setitem__ and __delitem__ methods (table 4.1). Python uses the same methods for both protocols.
Table 4.1. The Python sequence and mapping protocol magic methods
Python syntax | Translates to | Operation |
|---|---|---|
|
| Fetching an item by key or index |
|
| Setting an item by key or index |
|
| Deleting an item |
This table shows how using indexing to set/fetch or delete an item translates to Python method calls. Instead of being called directly, Python calls the indexing methods for you when it encounters an indexing operation. These method names start and end with double underscores—which marks them as magic methods. There are many more protocols for other operations such as comparison, numerical operations, and iteration. These operations also have corresponding magic methods (and many have equivalent .NET interfaces).
Let’s look at how protocols work in practice with the sequence and mapping protocols.
These protocols are duck typing in action. An indexing operation will succeed if the indexed object supports the appropriate magic method, irrespective of what type it is.
Duck typing can be extremely useful. If you have an API that takes a mapping type object and sets or fetches entries from the object, you can pass in any object that implements the mapping protocol. Protocols are a dynamically typed versions of interfaces. They allow you to create data structures as classes, implementing custom behavior when data is set or fetched. You can also provide additional methods to access or modify the data beyond simple access.
Listing 4.1 is an example class that prints to the console whenever you fetch, set, or delete entries. It uses a dictionary as the underlying data store. In practical terms, you may want to do something more useful than printing, but this is only an example!
Example 4.1. A custom mapping type
lass ExampleMappingType(object):
   def __init__(self):
      self._dataStore = {}

   def __getitem__(self, key):
      value = self._dataStore[key]
      print 'Fetching: %s, Value is: %s' % (key, value)
      return value

   def __setitem__(self, key, value):
      print 'Setting: %s to %s' % (key, value)
      self._dataStore[key] = value

   def __delitem__(self, key):
      print 'Deleting:', key
      del self._dataStore[key]

>>> mapping = ExampleMappingType()
>>> mapping['key1'] = 'value1'
Setting: key1 to value1
>>> x = mapping['key1']
Fetching: key1, Value is: value1
>>> print x
value1
>>> del mapping['key1']
Deleting: key1
Any Python code that expects a Python dictionary, but only performs indexing operations on it, can use ExampleMappingType. If the code does more than indexing operations—for example, calling dictionary methods such as keys or items—you could implement these as well. If you had wanted to implement a sequence type instead of a mapping type, then the magic methods implemented here would have worked with numbers instead of keys for the index.
We’ve completed our look at data modeling and protocols. So far it has been quite abstract. Let’s see if we can put this knowledge, along with everything else you’ve learned about Python, into use with some more substantial design patterns. The first one is the Model-View-Controller pattern, and it will form the basis of our running example.
A good structure for applications with a user interface and an underlying data model is the Model-View-Controller pattern, often referred to as MVC. The basic structure is shown in figure 4.1.
Figure 4.1. The basic structure of Model-View-Controller. The Controller mediates between the View and the Data Model, which remain separated.
The layer of your application that interacts with the user is the view. In a desktop application, this is the GUI code.
The model is an object-oriented representation of your data. Its structure depends on what kind of data your application is dealing with. Although the view may query the model, the model knows nothing about the view. Changes to the model are made through the controller. The advantage of this structure is that your data model is then entirely independent of the view layer, keeping a good separation of code. Additionally, if you turn your program into a web application or rewrite with a different type of user interface, then the data model can remain unchanged.
The controller mediates between the view and the model. It uses the public API of the model to change data in response to user input. It also supplies the view with the data to be presented to the user.
The view may subscribe to events on the model to be kept aware of internal state changes; it may also directly query the model, but changes go through the controller.
Model-View-Controller will be the core pattern in our running example.
In the next few chapters, you’ll build an IronPython application. Our running example, called MultiDoc, is a Windows Forms desktop application for editing multipage documents and saving them as a single file. Using Windows Forms not only makes for good visual examples, but it should also be possible to refactor the application to use an alternative user interface if you build the application carefully.
As we develop MultiDoc, you’ll learn some further aspects of Python and use a wider range of .NET components. More importantly, we focus on good design practice and effective use of common Python idioms. Our editor should perform the following tasks:
Allow the user to edit and create text documents
Divide each document into multiple pages, which are edited in a separate tab of a multitabbed control
Allow the user to add or delete pages
Allow the document to be saved as a single file and then reloaded
More features may be a natural fit for MultiDoc, but this is the initial specification; let’s see where it goes.
You can initially provide a simple GUI and then gradually (incrementally) add more features. The advantage of this approach is that, once you’ve created the first simple version, you can maintain a working application at every stage. New features can be added and tested; if necessary, you can refactor the structure as the program grows. To continue with the construction analogy: you’ll first build a small shed; then you’ll refactor it into a bungalow, adding a new floor and some modern conveniences; and finally you’ll have a three-bedroom house. I’m not sure we’ll have time to get to the mansion stage, but you ought to end up with an attractive little piece of real estate (and fortunately, refactoring code is less work than remodeling houses).
The user interface is the view layer in the Model-View-Controller pattern, and this is where we start creating MultiDoc.
The specification says that the user edits documents using an interface with multiple tabs, one tab per page. The Windows Forms control for presenting a multitabbed interface is the TabControl, a container control. Individual pages within the TabControl are represented with TabPage controls. Let’s create a form with a TabControl in it to establish the base of the view layer of the application; you’ll build on this as you add new features.
The TabControl will form the main component in the MultiDoc user interface. Windows Forms handles drawing the tabs and switching between the pages; but, if you need to, you can implement custom behavior when the user selects a new tab. In this first prototype of MultiDoc, you’ll add a method to create a new TabPage, which can contain the TextBox—the basic Windows Forms text editing control. To keep things simple, you’ll start with a single TabPage (listing 4.2).
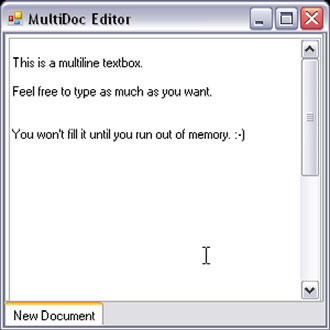
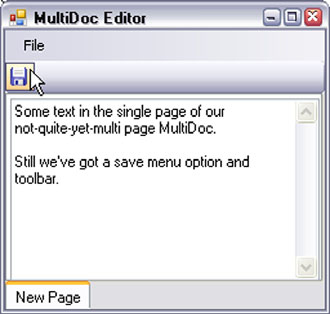
The code in this listing creates the embryonic MultiDoc editor. Although it uses controls that you haven’t specifically seen yet, they’re configured in exactly the same way as the ones that you’ve already worked with. If you run this code, you should get a form with a tab control, containing a single tab page filled with a text box, as shown in figure 4.2.
Note
You can set two properties on a control to specify the way the control is laid out in the parent control: Dock and Anchor. Both are configured by setting an enumeration (DockStyle and AnchorStyles), and control the way that the child control is resized when the parent is resized.
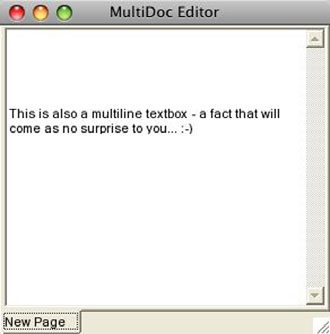
Figure 4.3 shows the same code running under Mono on Mac OS X (Mono 1.9,[3] IronPython 1.1, and Mac OS X 10.5.2 if you need to know these things). All the code in the running example should run fine on Mono with little to no changes.
There’s almost no logic in listing 4.2; most of the code is concerned with configuring the controls you use. (And you could do a lot more configuration.) One new thing in this listing is the setting of the MinimumSize property to specify a minimum size for the main form. By default, you can resize a form down to almost nothing—which looks a bit odd; this setting solves this problem. MinimumSize takes a Size structure, which is constructed from two integers.
Before starting the event loop, you also call Application.EnableVisualStyles. This enables styles so that the application will use any theme that the user may have set under Windows.
The TabControl is positioned within the form, using the Dock property and the DockStyle enumeration. DockStyle.Fill is used to tell the form to fill all the available space with the TabControl. You do the same thing with the TextBox. As you add more features to the GUI, you’ll be using different values for DockStyle. For example, you’ll probably position a menu or toolbar using DockStyle.Top.
The new tab page is created by the addTabPage method, called from the constructor. addTabPage has to do a lot of configuration of the text box to make it usable as a minimal editor. You want to be able to use the tab key to enter tabs rather than moving the focus; you’d like vertical scrollbars if there’s more text in the text box than fits in the available space; and so on. This is all fairly straightforward.
The code written so far is the skeleton of a user interface. It doesn’t deal at all with how you’ll represent the user data or how the user interface will interact with the data; for this you need to create a data model.
To keep MultiDoc easy to maintain, you should define standard ways of accessing and changing the document. This will be useful for saving documents, loading new documents, switching between individual pages in the document, and so on.
The documents in our example are intended to contain multiple pages; a logical data model would be a document containing pages, with both the document and the pages represented in classes. Pages are stored sequentially, so it makes sense to make the document a sequence-type container for pages.
Pages need to store the text in them; plus, they have a title displayed on the tab. As this is the only attribute they have (for the moment), you can represent them with a simple class (see listing 4.3).

This listing shows the code to implement a simple data model with Document and Page classes. For the moment, all the code will be kept in a single source file, but the listing only shows the additional code for the Document and Page classes. By default, the Document class creates one empty page when it’s instantiated. Thanks to the compactness of Python, there’s very little boilerplate, and every line does something of note. We’ve left it up to you to deduce the meaning of most of the code.
To hook this into the presentation layer (the view) that you’ve already created, you need a controller.
The main element in the MultiDoc user interface is the TabControl. It has TabPages, which map to the pages that the document holds.
The controller is responsible for setting the data on the model, and for keeping the view and the model synchronized. In this way, the code is neatly separated between the view, which manages the GUI layout, and the controller, which responds to the user input.
As the application grows, it may need several controller classes for the major GUI elements; the first will be a TabController. Because this will be responsible for adding new pages, the addTabPage method can be moved into the controller. To do this, you’ll need a reference to both the TabControl instance on the MainForm, and the current document. When MainForm is instantiated, it should create a document and then instantiate the TabController, passing in both the TabControl and the new document.
The TabController can then iterate over all the pages in the document and create a TabPage for each one. When you come to loading documents with multiple pages already in them, creating the appropriate TabPages in the view will then happen automatically (listing 4.4).
This listing shows the new MainForm creating a document and initializing the tab controller. The document creates one page by default, and the tab controller then automatically creates a tab page.
Note
The tab controller creates a tab page for each page in the document by iterating over them. You haven’t specifically implemented the protocol methods for iteration (__iter__ and next), but you get a default implementation for free along with the sequence protocol method __getitem__.
The tab controller has the updateDocument method for keeping the document updated with changes from the user interface. This method needs to be called before saving the document, or every time the active tab is changed.
Keeping the document updated means you need to keep track of the currently selected page—which is done with the self.index instance variable. At the end of the TabController constructor, you set the index to the currently selected tab and register the maintainIndex method to be called whenever the selected tab changes. Whenever the selected tab changes, the SelectedIndexChanged event fires.
When maintainIndex is called, the selected index has already changed. It calls updateDocument, which fetches the text from the tab that was previously selected (by using the index variable). It puts this text into the equivalent page on the document; each tab has a corresponding page in the document, so the index of the tab also acts as the index of the page on the document. After updating the model, maintainIndex then stores the index of the newly selected tab; the next time the user switches tabs, this one will be synced to the model. The point of all this is so that, when you need to save the document, you know that you only need to sync the currently selected page, and then you can save the document.
There’s a problem, though. When the form hasn’t yet been shown, the SelectedIndex will be -1. When the form is shown, the selected index will then be set, but the SelectedIndexChanged event is not fired. Adding some extra code in the constructor allows you to get around this; if SelectedIndex returns -1, then you explicitly select the first tab.
You’ve now created the core structure for the application; but, if you run this new version of MultiDoc, it looks identical to the previous version. So far you’ve refactored the code to provide a better structure. You’ve also learned a bit more about Python and dived into using design patterns. In the coming sections we continue developing MultiDoc, but use more .NET classes that you haven’t seen yet.
The next step in our exploration is extending MultiDoc using the command pattern.
A command pattern is where a request is encapsulated as an object.[4] In practice, this means that you represent each new command as a class, and provide a common interface for command classes to perform actions. The command pattern makes it extremely easy to add new commands.
We want to add the capability to MultiDoc to save documents that are being edited (currently only a single page). Traditionally, applications offer the following two types of save commands:
A Save command, which uses the current filename without prompting for one if the document has been saved before
A Save As command, which always prompts for a filename
Let’s start with the Save command. If we’re careful, it should be easy to reuse most of the code from the Save command in the Save As command.
To save files, the SaveFileDialog class will be an integral part. This class is the standard file dialog box used by almost every Windows application.
The SaveFileDialog presents the user with an explorer window so that a filename can be selected to save a file with. The dialog box is shown modally—it blocks the application until the user has selected a file.
To use this dialog box, you need to configure the filter, which determines which file types are shown in the explorer, and the title. You may also want to configure which directory the browser opens in and if any initial filename is to appear there. As with other controls you’ve used, this is all done by setting simple properties.
The dialog box is displayed by calling the ShowDialog method. This method blocks until the user has selected a filename or hit the cancel button, but you need some way of telling which of these two actions the user has performed. ShowDialog returns either DialogResult.OK or DialogResult.Cancel, depending on whether the user selects a file or cancels. DialogResult is an enumeration, which .NET is so fond of. If this were a native Python GUI toolkit, then calling ShowDialog would probably return only True or False!
Listing 4.5 shows an interactive interpreter session which creates and configures a Save File dialog box and displays the result. It takes an existing file path and uses the Path class from System.IO[5] to extract the file and directory name from the path.
Figure 4.4 shows the result of running the code from this listing; a Save File dialog box is displayed with all the properties that you’ve set. If you select a file with the dialog box, then DialogResult.OK will be returned, and the FileName attribute set appropriately. If you hit the cancel button instead, then DialogResult.Cancel is returned.
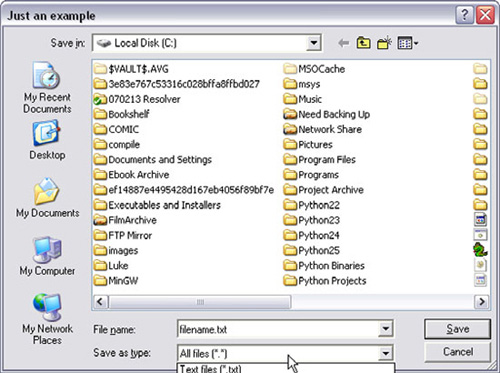
Figure 4.4. A SaveFileDialog configured from the interactive interpreter and displayed with ShowDialog
You’re one step closer toward being able to create the Save command. Now that you’ve ascertained that the user wants to save the file, you need to write out the file with the chosen filename.
Initially, you’re going to write out the contents of the text box, from the Text property, as a text file. Strings on .NET are stored using Unicode, and IronPython strings are no exception. Unicode is an abstract representation of text; when you write the text to the filesystem, an encoding must be used. The encoding is a concrete way of representing text by assigning digits to each character. .NET can choose a default encoding for you, but you need to be aware that this is happening.
.NET provides several different ways of writing text files, built on top of the FileStream class. FileStreams read or write, with either text or binary data, to files on the filesystem. .NET also provides the StreamWriter class, an abstraction layer on top of the FileStream for the easy writing of text files. The corresponding class for reading text files is the StreamReader.
To initialize a StreamWriter, you can either pass in a filename (as a string), or a ready-created FileStream instance. You can also specify an encoding; but, if you omit this, then the default encoding will be used. When developing with Python, the default encoding is ASCII; when using .NET framework classes, the default encoding will usually be UTF-8. Using UTF-8 is likely to result in many less Unicode headaches.
The following segment of code creates a StreamWriter and writes a string to a file:
>>> from System.IO import StreamWriter
>>> writer = StreamWriter('filename.txt')
>>> writer.Write('some text')
>>> writer.Close()
Tip
The class System.IO.File also has some convenient static methods for reading and writing files. File.ReadAllText and File.WriteAllText (and the corresponding methods for reading and writing bytes) mean that reading or writing files can be a one-liner. They don’t give as fine a degree of control, but are often all that you need.
If you want to open the file in any mode other than write (for example, to append to a file), you’ll need to create the FileStream and specify a FileAccess mode. Python also provides standard ways of working with files. It uses a single built-in function, open, for both reading and writing files. You specify the mode with one of the following strings:
In Python, the string class is used for representing both text and binary data, so file handles (returned by open) have read and write methods that always take or return strings.
>>> handle = open('filename.txt', 'w')
>>> handle.write('some text')
>>> handle.close()
>>> handle = open('filename.txt', 'r')
>>> text = handle.read()
>>> handle.close()
>>> print text
some text
If your code is making heavy use of .NET classes, then it may make sense to use the .NET way. If you want your code to run on both CPython and IronPython, then you should use the Python patterns for working with files.
The code segments shown so far for writing files will work fine, as long as nothing goes wrong. Unfortunately, many things can go wrong when writing to external devices; the device may be read-only, or the drive may be full. If this happens, you have to be able to handle it and report it to the user.
We’ve already covered handling exceptions in Python; now you get a chance to use it. If saving a file fails, for whatever reason, you want to catch the exception and inform the user of the problem.
This is a good example of where the creators of IronPython have done an excellent job of making the boundary between the .NET and the Python world seamless. The exception raised by .NET for this kind of error is an IOException. IronPython converts this into a Python exception. The corresponding Python exception type is called IOError. In these examples, we’re going to use features from both the .NET platform and the Python language. As you saw in the previous section, this can be done using standard Python patterns or with the .NET classes, a technique that should feel familiar to .NET programmers. This is the essence of IronPython at work: the flexibility of Python combined with the power and breadth of .NET. Using IronPython from the interactive interpreter, as you’ve been doing, illustrates how useful IronPython can be for experimenting with .NET classes, even if you’re coding in straight C#. Table 4.2 shows a mapping of some common Python exceptions to their .NET equivalents. Not all Python exceptions have .NET equivalents; for these cases, custom exceptions are defined inside IronPython[7] (such as RuntimeError, NameError, SyntaxError, and ImportError).
Table 4.2. Python exceptions mapping to .NET exceptions
.NET exception | |
|---|---|
|
|
|
|
|
|
|
|
|
|
|
|
|
|
|
|
|
|
|
|
|
|
|
|
|
|
|
|
|
|
|
|
|
|
|
|
When you catch the exception, the instance of IOError raised will carry a message telling you what went wrong. You can turn the exception instance into a string by using the built in str function. The following code segment tries to save a file with a bogus filename—unless you have this file on drive z, that is! It catches the ensuing error and reports it by printing the error message:
>>> from System.IO import StreamWriter
>>> filename = 'z:\NonExistentFile.txt'
>>> try:
...    writer = StreamWriter(filename)
... except IOError, e:
...    print 'Something went wrong.'
...    print 'The error was:
%s' % str(e)
...
Something went wrong.
The error was:
Could not find a part of the path 'z:NonExistentFile.txt'
But MultiDoc is a GUI application, and you don’t want to rely on the console for reporting problems. The standard way for informing the user of this sort of problem is using the system message box.
As with the other GUI elements we’ve been working with, you can get access to the system message box through the Windows Forms namespace. Instead of instantiating a message box, you call the static method Show on the MessageBox class.
The Show method has a plethora of different overloads to control the way you display the message box. You can configure the message, the title, choose an icon, and specify the number and type of buttons on the message box. The following code segment displays a message box with a title and message, with an icon and an OK button. You use a couple of enumerations to specify the buttons and the icon.
>>> from System.Windows.Forms import MessageBox, MessageBoxButtons,
      MessageBoxIcon
>>> message = 'Hello from a MessageBox'
>>> title = 'A MessageBox'
>>> MessageBox.Show(message, title,
... MessageBoxButtons.OK, MessageBoxIcon.Asterisk)
<System.Windows.Forms.DialogResult object at 0x... [OK]>
>>>
If you enter the code from this segment into an interactive interpreter session, then you should see the message box shown in figure 4.5.
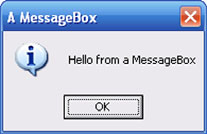
The i in a bubble is the icon specified with MessageBoxIcon.Asterisk. You can pick from a veritable smorgasbord of icons with this enumeration. You can also use Yes, No, and Cancel buttons instead of the OK button (or various other button combinations) by changing the value from the MessageBoxButtons enumeration. The call to Show returns a DialogResult, depending on the button used to exit the message box. You can find all the possible values for these enumerations in the MSDN documentation.
You’re now ready to implement the Save command. You know how to ask the user to choose a filename, how to write out the file, and how to handle and report any problems that occur. Let’s put all this together.
We intend to implement two save-like commands, the Save command and the Save As command. Save As will be similar to the Save command, so let’s ensure that as much of the code as possible from the Save command can be reused. Figure 4.6 shows the sequence of actions for the Save command.
The Save As command will be very similar to the sequence shown in this figure, except that it will still present the file dialog box to the user even if the document already has a filename associated with it.
The command will need access to the text from the document, which will need to be updated. The easiest way for the command to update the document is to give it a reference to the tab controller (listing 4.6).
Example 4.6. SaveCommand, which handles necessary user actions and writes file to disk
from System.IO import Directory, Path, StreamWriter
filter = 'Text files (*.txt)|*.txt|All files (*.*)|*.*'
class SaveCommand(object):
title = "Save Document"
def __init__(self, document, tabController):
self.document = document
self.tabController = tabController
self.saveDialog = SaveFileDialog()  self.saveDialog.Filter = filter
self.saveDialog.Title = self.title
def execute(self):
self.saveDialog.Filter = filter
self.saveDialog.Title = self.title
def execute(self):  fileName = self.document.fileName
text = self.getText()
directory = Path.GetDirectoryName(fileName)
directoryExists = Directory.Exists(directory)
fileName = self.document.fileName
text = self.getText()
directory = Path.GetDirectoryName(fileName)
directoryExists = Directory.Exists(directory)  if fileName is None or not directoryExists:
self.promptAndSave(text)
else:
self.saveFile(fileName, text)
def getText(self):
self.tabController.updateDocument()
return self.document[0].text
def promptAndSave(self, text):
saveDialog = self.saveDialog
if saveDialog.ShowDialog() == DialogResult.OK:
fileName = saveDialog.FileName
if self.saveFile(fileName, text):
self.document.fileName = filename
def saveFile(self, fileName, text):
try:
writer = StreamWriter(fileName)
if fileName is None or not directoryExists:
self.promptAndSave(text)
else:
self.saveFile(fileName, text)
def getText(self):
self.tabController.updateDocument()
return self.document[0].text
def promptAndSave(self, text):
saveDialog = self.saveDialog
if saveDialog.ShowDialog() == DialogResult.OK:
fileName = saveDialog.FileName
if self.saveFile(fileName, text):
self.document.fileName = filename
def saveFile(self, fileName, text):
try:
writer = StreamWriter(fileName)  writer.Write(text)
writer.Close()
return True
except IOError, e:
name = Path.GetFileName(fileName)
MessageBox.Show(
writer.Write(text)
writer.Close()
return True
except IOError, e:
name = Path.GetFileName(fileName)
MessageBox.Show(  'Could not write file "%s"
The error was:
%s' %
(name, e),
"Error Saving File",
MessageBoxButtons.OK,
MessageBoxIcon.Error
)
return False
'Could not write file "%s"
The error was:
%s' %
(name, e),
"Error Saving File",
MessageBoxButtons.OK,
MessageBoxIcon.Error
)
return FalseThis listing shows the full code for the SaveCommand. The constructor creates and configures a SaveFileDialog ![]() . It saves this, along with a reference to the document and the tab controller, as instance attributes for use whenever the command is launched.
. It saves this, along with a reference to the document and the tab controller, as instance attributes for use whenever the command is launched.
The execute method is simple ![]() . It fetches the text from the document, using the
. It fetches the text from the document, using the getText method, which also synchronizes the document by calling updateDocument on the tab controller.
It then checks to see if the document already has a filename set on it. If it does, then the code can jump straight to saveFile; otherwise, you need to prompt the user for a filename—which is done from promptAndSave. As well as checking whether a filename is set, it also checks that the directory specified still exists ![]() ; the file could have been on a USB key that has since been removed, meaning that the save will fail.
; the file could have been on a USB key that has since been removed, meaning that the save will fail.
A lot of .NET methods allow calls with null values. You can pass None (the Python equivalent of null) to Path.GetDirectoryName(fileName), and it returns None to you. When you then call Directory.Exists(directory), where directory might now be None, Exists returns False. The code is a bit easier to read than making the conditional more complex.
saveFile attempts to save the file ![]() , displaying the message box if anything goes wrong
, displaying the message box if anything goes wrong ![]() . It returns
. It returns True or False depending on whether or not it’s successful. You can call it from promptAndSave (assuming the user doesn’t cancel out of the file dialog box). If the Save File operation is successful, then you can set the filename on the document.
Because you’ve already written the SaveCommand, it ought to be easy to now build a SaveAsCommand.
The SaveAsCommand is going to share a lot of functionality with the SaveCommand. The main difference is that when the command is launched, it should always prompt the user to choose a filename. But, if the document does have a filename associated with it, the dialog box should start in the right directory and be prepopulated with this name. This is all done in listing 4.7.
Thanks to splitting out a lot of the functionality of the Save command into separate methods, the Save As command is very little code! The change in functionality is all handled by overriding the title and the execute method. execute now sets initial state on the Save dialog box (if a filename already exists) and then always calls promptAndSave.
Let’s pause and consider what you’ve achieved. The command pattern acts as a blueprint for creating new commands, so less thinking is required when you have to create, or wire up a new one! When you come to create a new command, you know what shape it should be and what interface you need to provide. You can also easily share functionality between similar commands.
Now that you’ve created the two commands Save and Save As, you need to hook them into the user interface so that the user has access to them.
One way of providing access to the commands would be with a shortcut key. This is a useful feature (I’m a keyboard guy whenever possible), but users these days expect fancy GUI features. The standard way of providing access to commands like Save is through menus and toolbars. Fortunately, the .NET menu classes provide a way of setting shortcut keys on menu items, so you can have the best of both worlds.
So far, you’ve created a Model-View-Controller structure for our fledgling application. The view contains the GUI layout code. The model stores the underlying data, and the controllers (so far you only need one, for the tab control) mediates between the view and the model, implementing the logic required to keep them synchronized. Although the controllers hold a reference to the model, the model knows nothing about the view or the controllers and is completely independent.
User actions are represented by command classes, wrapping all the functionality into an object. Our commands have access to the tab controller and the model. They need to respond to the user interface and access the data model. In our case, you need to be able to ask the controller to update the document from the user interface.
For a small application like MultiDoc, this may feel like over-engineering. We’ve abstracted the application out into several classes, most of which are very small. But you’ve already seen, in the case of the Save As command, how this approach can be helpful; as you add new features, we can promise you’ll appreciate this structure even more.
There’s still one vital step missing: the commands aren’t yet used. In this section, you’ll extend the view by adding new ways for the user to interact with MultiDoc by launching the commands. Two obvious ways of doing this are through menus and a toolbar; we start with a menu.
Creating menus with Windows Forms is easy. You need to use different classes for the top-level menu strip and the individual menu item. .NET menus are controls like any of the other GUI elements used so far. You could put them anywhere in the MultiDoc form. The traditional place for menus, and the place where the user will expect them, is at the top of the form. You achieve this with the Dock property and DockStyle.Top.
The class we use for the top-level menu strip is MenuStrip. For the menu items, we use ToolStripMenuItem. As well as creating the menu hierarchy, this class allows you to specify shortcut keys to launch the individual items. The hierarchy we want to create, initially at least, is simple and looks like figure 4.7.
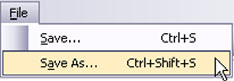
Let’s work from the bottom up, and start with the Save... and Save As... items. As with other controls, you set the displayed text of the item using the Text property.
>>> saveItem = ToolStripMenuItem()
>>> saveItem.Text = '&Save...'
Menu items have two types of keyboard shortcuts. The first type allows menus to be operated from the keyboard. Pressing Alt in a form displays the menu, which you can then navigate with the cursor keys. Items with an underlined letter can be launched with that key. You configure this shortcut by putting an ampersand (&) in front of a letter in the Text property.
The second key shortcut allows a menu item to be launched without the menu being open. The standard key combination for a save operation is Ctrl-S; you set this using the Windows Forms Keys enumeration. You combine the S key with the Ctrl key using a bitwise or the following:
>>> saveItem.ShortcutKeys = Keys.S | Keys.Control
The last thing you need to do for this menu item is to configure the action when it’s launched, either by selection through the menu or by the keyboard shortcut. Here, we come back to our old friend the Click event, to which you need to add an event handler.
Obviously, we’d like our SaveCommand to be triggered, specifically the execute method. Unfortunately, there’s a problem. Windows Forms event handlers receive two arguments when they’re called, sender and event, but our execute method doesn’t take any arguments. You can either rewrite execute to take two arguments, which it doesn’t need, or you can wrap the call with another function which absorbs them.
Python has an easy way of creating functions in a single line: lambda functions.
Note
Lambda functions are sometimes known as anonymous functions because, unlike the usual syntax for declaring functions, you don’t need to give them a name. They can take arguments, but the body can only contain an expression and not statements. The expression is evaluated, and the result returned. Lambdas can be used anywhere that an expression is expected.
Lambda functions can be declared inline. The syntax is shown in figure 4.8.
You could hook up your commands by wrapping the call in a function like this:
>>> def handler(sender, event):
...    command.execute()
>>> item.Click += handler
Instead, use a lambda, which is identical (except shorter) to using a function:
>>> item.Click += lambda sender, event : command.execute()
Using a lambda here is appropriate because the function is only a convenience wrapper. You don’t need to use it later, so it doesn’t need a name.
You’ve now created and configured a menu item, but it still needs to be placed in its parent menu. For the Save item, the parent is the File menu. File is also a ToolStripMenuItem, with a Text property; its children (the submenu items) live in the DropDownItems collection.
>>> fileMenu = ToolStripMenuItem()
>>> fileMenu.Text = '&File'
>>> fileMenu.DropDownItems.Add(saveItem)
We’re sure it won’t surprise you to learn that the menu items will appear in the order that they’re added. This isn’t quite the end of the story; you still need to create a top-level menu and add the submenu to it. The top-level menu uses the MenuStrip class, and the submenus are added to its Items collection.
>>> menuStrip = MenuStrip()
>>> menuStrip.Items.Add(fileMenu)
Commonly used options are often exposed via a toolbar as well as menus. In .NET, you use the ToolStrip class.
Windows Forms contains a class called ToolBar. This is an abomination from .NET 1, and shouldn’t be used under any circumstances! The right class for creating toolbars is the ToolStrip.
A toolbar has a series of icons that launch commands. Figure 4.9 shows the Resolver One toolbar.
A minor prerequisite for creating a toolbar is having some icons to use. My personal favorites are the free toolbar icons from glyFX.[8] After a great deal of scouring the internet, these are the best icons that I’ve found that you’re free to use in applications. The usual condition for distributing these icons with your application is that you should use them as a compiled resource. You can do this by compiling the icons into your executable or by serializing the .NET image objects. We explore both of these techniques later in the book; but, for this example, glyFX has given us permission to use the icons without compiling them.[9]
Toolbars are another easy-to-use component. The toolbar itself is an instance of the ToolStrip class. The individual buttons are instances of ToolStripButton.
To associate an image with a button, you set the Image property with an instance of the Bitmap class, and set the DisplayStyle property to ToolStripItemDisplayStyle.Image. Bitmap comes from the System.Drawing assembly, and can be constructed from the path to the image file as a string.
The icon for Save is a 16x16 pixel icon called save_16.ico, which is stored in a folder called icons. The path to the icon, relative to our application file, is icons/save_16.ico. At runtime, you have no idea what the current directory is; you can’t assume that it will be the application directory.
If you were running with a custom executable, you could extract the directory from the full path to the executable.
>>> from System.Windows.Forms import Application
>>> from System.IO import Path
>>> executablePath = Application.ExecutablePath
>>> directory = Path.GetDirectoryName(executablePath)
If your script is being run by ipy.exe, then this approach will return the directory containing ipy.exe. When run in this way, a magic name called __file__ is available with the full path of the file currently being executed. In that case, you can replace executablePath with __file__.
The following code segment should work in either case:
executablePath = __file__
if executablePath is None:
   executablePath = Application.ExecutablePath
directory = Path.GetDirectoryName(executablePath)
Now that you can reliably work out the path to the icon, you can create the toolbar button.
>>> from System.Drawing import Bitmap, Color
>>> from System.Windows.Forms import ToolStripButton, ToolStripItemDisplayStyle
>>> iconPath = Path.Combine(directory, r'iconsicon.bmp')
>>> image = Bitmap(iconPath)
>>> button = ToolStripButton()
>>> button.DisplayStyle = ToolStripItemDisplayStyle.Image
>>> button.Image = image
Toolbar icons are usually intended to be displayed with one color nonvisible; this is a cheap way of gaining a transparency layer. The convention is that Color.Magenta is used as the transparent color. This is an odd convention, but must be because magenta is such a ghastly[10] color that it would be rare to want to see it...
>>> button.TransparentColor = Color.Magenta
As well as setting the image on the toolbar button, you can set the text that will be displayed when the mouse hovers over the button, known as the tooltip text:
>>> button.ToolTipText = 'Save'
You set the command on the button in exactly the same way as you did for the menu.
>>> button.Click += lambda sender, event: command.execute()
The toolbar buttons are added to the Items collection of the ToolStrip. Again we want the toolbar to appear at the top of the form, just below the menu strip. To do this, you still use DockStyle.Top, but you have to add the toolbar to the form after the menu. The toolbar will then be docked to the bottom of the menu.
>>> toolbar = ToolStrip()
>>> toolbar.Items.Add(button)
>>> toolbar.Dock = DockStyle.Top
By default, the toolbar comes with a gripper, which can be used to move it around. But, also by default, you can’t move the toolbar around, so it makes sense to hide it. You do this with another wonderful Windows Forms enumeration: the ToolStripGripStyle.
>>> toolbar.GripStyle = ToolStripGripStyle.Hidden
Now you know enough to use both toolbars and menus in MultiDoc.
You’ve now written your commands, and learned all you need to know to wire them into the MultiDoc user interface. You need to make some changes in the presentation layer and our MainForm class, as well as some additions to the imports to support the new code.
Listing 4.8 shows the expanded import code for the new and improved MultiDoc (hey, we’re getting there!). It includes the code that determines the path to the project directory, so that you can load the icon.
Providing a menu and toolbar means using lots of extra names from the Windows Forms namespace, a lot of which are enumerations for configuration. You could replace the long list of names with from System.Windows.Forms import *. This wouldn’t show you explicitly which names you’re using (and would pollute the namespace with a lot more names that you’re not using); personally, I think it’s bad practice. Jim Hugunin disagrees with me, so you’ll have to decide whom you trust more![11]
You’ve accumulated all the knowledge you need to integrate the commands into MainForm, a process that will change it almost out of recognition. Previously, it was a simple class, only twenty-four lines of code initializing a couple of components, barely deserving of its own class. Here, the view comes into its own, and the new additions to MainForm swell it substantially. We’ve split the changes into several segments to make them easier to digest. Once you’ve pieced all these changes together, not forgetting the commands and model classes, running MultiDoc should result in something that looks remarkably like figure 4.10. Clicking the toolbar icon, or using the menu options, should bring up the Save File dialog box.
Listing 4.9 shows the new MainForm constructor. You need to add the calls to new methods to initialize the commands, menus, and toolbar. Both the toolbar and top-level menu are positioned using DockStyle.Top. To get the desired layout (menu at the top of the form, followed by the toolbar), the toolbar must be initialized before the menu.
The initializeCommands method is trivially simple, so we’ve included it here. We’ll go through the next two methods individually.
The code for creating new menu items and new toolbar buttons is simple, but a bit verbose. It would be tedious to have to type all the code for each new menu item and toolbar icon. Both initializeToolbar and initializeMenus follow the same pattern; a top-level method creates the main control, which calls into a submethod for creating each of the items. The two methods for creating the toolbar are shown in listing 4.10.
Here the submethod is called addToolbarItem. The top-level control is the ToolStrip, which is configured and added to the form’s collection of controls. The toolbar icon needs some text to display as the tooltip, a function to call for the click handler, and a path to the icon file. These three things are the arguments that addToolbarItem takes.
Creating the menu is similar; the method createMenuItem is responsible for creating the individual menu items. There’s a slight complication—the class used to represent the individual items is also used to represent the container menus like File. Sometimes ToolStripMenuItem needs to be configured with a click handler, and sometimes without. To get around this, the handler and keys (for the shortcut key) arguments to createMenuItem are optional. Listing 4.11 shows the full code for creating the menus.
As you can see, even with adding just this basic functionality, MainForm has grown quite a bit. It’s now recognizable as an application, and it actually does something! To get this far, you’ve used .NET classes from several different namespaces, and you have the structure in place to make adding more features easy.
In this chapter, you’ve created the beginnings of the MultiDoc application. Along the way, you’ve learned new things about Python, such as the use of lambda functions, and used .NET classes such as Path and StreamWriter. Through the use of design patterns, you’ve provided infrastructure for adding menus and toolbar items, keeping the data model and the view in sync, and for saving the text from a single page.
MultiDoc still doesn’t fulfill the specification, though. You still need to add the following features:
The ability to add and remove tab pages
Saving of multipage documents
Loading of documents
You could add many more features, just to provide what people think of as essential requirements in such a basic program. Writing an application is a big task. Even so, thanks to the succinctness of Python, MultiDoc currently stands at less than 250 lines of code including blank lines.
To add extra tabs without losing functionality, you’ll need to be able to save multipage documents. Our basic text format won’t quite cut it, so we start the next chapter with a writer that can handle multiple pages. On top of this, you’ll add a document loader, which will require the use of another design pattern, and a command to open documents.
[3] Later versions of Mono, 2.0 onwards, have several important bugs fixed for the Mac, so it is worth using the latest version if possible.
[4] Duncan Booth, Patterns in Python, http://www.suttoncourtenay.org.uk/duncan/accu/pythonpatterns.html.
[5] IO is a namespace in the System assembly. You don’t need to explicitly add a reference to the System assembly because the IronPython engine uses it.
[6] It uses System.Text.Encoding.Default, which depends on the user’s regional and language settings. On a UK English Windows machine, it’s likely to be ISO 8859-1.
[7] A reference and discussion of custom exceptions in IronPython 1 can be found at http://www.codeplex.com/IronPython/Wiki/View.aspx?title=Exception%20Model.
[9] They’re included in the downloads available from the IronPython in Action website at http://www.ironpythoninaction.com.
[10] Which is perhaps unfair for a color that has such a noble history. It was one of the few colors my first computer could display. The name magenta also has a history both more noble and ghastly than you might realize. It was named after the Battle of Magenta in Italy in 1859.
[11] In fact, Jim is virtually alone amongst experienced Pythonistas in advocating from module import *, but he does have an interesting point. He argues that, instead of polluting the current namespace, it should add the namespace of the imported module to those searched when names are looked up, behavior which matches the semantics of other languages such as VB.