
This chapter covers |
|---|
|
In the last chapter, you added to the MultiDoc codebase the ability to load and save multiple pages with XML. Alas, we didn’t have the chance to give the user access to your work. In this chapter, we bring life to the skeleton of the MultiDoc framework by clothing it with the flesh of additional features and functionality. Some of these features will require the refactoring of classes you’ve already written. In the process, you’ll learn more about Python and get to use Visual Studio with IronPython plus some .NET classes that you haven’t seen yet.
Although you’ve extended MultiDoc to read and write XML files, you still don’t have a way of updating all the parts of the code that need access to documents. It’s the responsibility of the tab controller to keep the view and the model synchronized; it needs a way of updating the view when the model is changed. The save commands also need a reference to the current document. You can provide this by making some classes document observers.
The model classes should remain loosely coupled to the view and controllers (a substantial part of the Model-View-Controller pattern), so you can’t give the document the responsibility for telling the tab controller to update the view.
Now that OpenCommand can create new documents, we want the following to happen:
OpenCommandto load and set the document on the main formThe save commands to update with the new document
The tab controller to update with the new document
The tab controller to update the view appropriately
We implement all these steps in this section.
For the main form to know which objects to update, it needs a list of objects interested in the document—these are the document observers. Implementing a list of objects that need to keep track of the document will get you half way toward a pattern known as the observer pattern.[1] The observer pattern is a common pattern to use along with Model-View-Controller.
The full observer pattern involves providing a mechanism (usually an event mechanism) for model classes to inform controllers that a change has occurred. You don’t yet need this part of the pattern, but the first step of the pattern is to have a central mechanism for keeping all observers updated with the current model classes. In our case, the relevant model class is the document.
In the tail end of the last chapter, you implemented code in the OpenCommand that sets the document attribute on the main form. When this happens, you need the aforementioned behavior to be triggered. Attributes that trigger behavior when they’re set are known as properties. Python also has properties, so this seems like an appropriate place to introduce them.
Properties, which are common in other languages including C#, are a mechanism for giving you control over what happens when an attribute is accessed, set, or deleted. We’ve already used them a great deal when configuring and using .NET classes.
They’re an alternative to providing get/set/delete methods. They don’t do anything that you couldn’t achieve with getter and setter methods, but they allow the external API of an object to be more elegant and natural to use. They also allow you to seamlessly migrate a Python API from using normal attributes to providing custom behavior. This is the process we’re going through now with the document.
Python properties are created using the built-in type property. It behaves like a function, but is used inside a class namespace to bind methods that you want to be called when an attribute is accessed.
The full signature of property is as follows:
name = property(fget=None, fset=None, fdel=None, doc=None)
fget—. A method to be called when the attribute is fetchedfset—. A method to be called when the attribute is setfdel—. A method to be called when the attribute is deleteddoc—. A docstring for the property
All four arguments are optional (and can be passed in as keyword arguments if you want), so you only need to provide the methods that you need. (It’s relatively unusual to provide a docstring for properties, unless you’re using an automated documentation generating tool.)
Listing 6.1 is an example of a class with a property x, with custom behavior when the property is fetched, set, or deleted. The underlying value for x is stored in an attribute called _x.
The following interactive interpreter session demonstrates it in use:
>>> example = PropertyExample(3)
>>> example.x
getting x
3
>>> example.x = 6
setting x
>>> del example.x
Attempting to delete x
>>> example.x
getting x
6
Even after attempting to delete it, the x attribute is still available. You could have similar behavior just by omitting the fdel argument (the third argument) to property; attempting to delete x would then raise the exception AttributeError: undeletable attribute. Similarly, omitting the fset argument (the second argument) would create a read-only property that can’t be set.
So how do you use properties to implement document observers on the MainForm?
Now that you understand properties, you can make the document a property on MainForm. We’ve already outlined what we want to achieve. Setting the document on MainForm should update all the observers and cause the tab controller to update the view.
You can do this in the following three steps:
The objects that need to keep track of the current document are the two save commands and the tab controller. Listing 6.2 creates a list of the observers and makes document a property.
Example 6.2. Creating a document property on MainForm
def initializeObservers(self):
   self.observers = [
      self.saveCommand,
      self.saveAsCommand,
      self.tabController
   ]

def _setDocument(self, document):
   self._document = document
   for observer in self.observers:
      observer.document = document

document = property(lambda self: self._document, _setDocument)
The first argument to property is the getter method. This is a lambda that returns _document, the underlying instance variable used to store the real document. _setDocument is the setter method. When a new document is set, it iterates over all the observers and sets the document on them. Note that even when you add the OpenCommand to MainForm, it won’t need to be added to the list of observers.[3]
You also need to change the __init__ method of MainForm to use the new observer system. You remove the line doc = self.document = Document() and change the last part of __init__ to
self.tabController = TabController(tab)

self.initializeCommands()
self.initializeToolbar()
self.initializeMenus()
self.initializeObservers()
self.document = Document()
This creates the tab controller without passing the document, and then it initializes the list of observers and sets a default, empty document. Setting the document triggers the property to set the document on all the observers. (The document should also no longer be passed into the save commands in initializeCommands.)[4]
The next thing to do is to refactor the tab controller to also use a document property.
Currently the TabController is initialized with a document and creates a tab for every page. It no longer needs to be given the document when it’s initialized, but it needs to create the tabs whenever a document is set. If a document is already open, then the existing tabs need to be removed first.
Luckily, this is easy to achieve by moving the code that creates the tab pages from the TabController constructor and into the setter method for the document property. You also need another small piece of magic; all the changes necessary are shown in listing 6.3.
When a new document is set on the tab controller, any current tab pages are cleared with a call to tabControl.TabPages.Clear(). Clearing the tabs can cause the SelectedIndexChanged event to be raised several times. To avoid this, if you already have a document set, you first remove the event handler. After creating new tab pages for the document, you wire up the event again.
The last step in finally getting the open command to work is adding a menu item and toolbar button to the view that launches it.
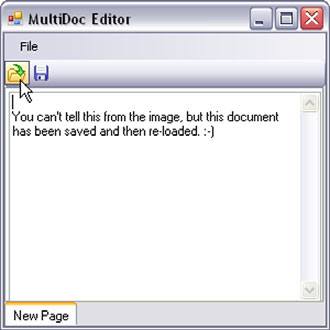
The pattern for creating new menu items and new toolbar buttons is well established in MainForm. Adding a new Open item, to both menu and toolbar, can be achieved with a little copy-and-paste magic and another icon from those wonderful folk at glyFx. When we eventually get the OpenCommand wired in, it will look like figure 6.1.
The first change is to add the OpenCommand to the initializeCommands method. The OpenCommand is initialized with a reference to the MainForm instance. Because this method is being called by the MainForm, you pass in self to the OpenCommand constructor.
def initializeCommands(self):
   tabC = self.tabController
   self.saveCommand = SaveCommand(tabC)
   self.saveAsCommand = SaveAsCommand(tabC)
   self.openCommand = OpenCommand(self)
As you can see from this segment, the save commands only receive the tab controller and not the document.
Once you’ve put this code in place, MultiDoc will be capable of loading the new documents saved in XML format. This still doesn’t meet our original specification because you have no way of creating new pages.
The next section will address this; along the way you’ll learn about dialogs and using Visual Studio Express with IronPython.
In our exploration of creating an application with IronPython, we’ve managed to work our way through about three-quarters of our original specification in only 520 lines of pure-Python code. We’ve divided MultiDoc into eight modules, and it’s proving easy to refactor and extend. Importantly, the code is also readable.
The last piece of functionality to make MultiDoc useful is the ability to add new tab pages. Because our tab pages have names, you also need to be able to specify the name when you create tab pages, and preferably rename them later. While we’re at it, it would be nice to be able to delete pages as well. This is the easiest code to write and prepares the way nicely for learning about creating dialogs.
When the user asks to perform an irreversible action, such as removing a tab page, it’s normal to ask for confirmation of the action. You’re undoubtedly familiar with the standard Windows OK/Cancel dialog box, which gives the user the choice of whether to continue with the action or to abort.
This is actually our old friend the system message box.
In case you’ve forgotten, the most useful overload of
Showis as follows:
MessageBox.Show(String, String,
   MessageBoxButtons, MessageBoxIcon)
The two strings are the text and caption (body and title) of the message box.
When you used the message box to alert the user of errors loading or saving a file, you only had an OK button. You specified this by passing in MessageBoxButtons.OK.
You can create a message box with different buttons by providing a different member of the MessageBoxButtons enumeration in the call to Show. The possible options are listed in table 6.1.
Table 6.1. Members of the MessageBoxButtons enumeration for specifying the buttons on the system message
| Effect |
|---|---|
| The message box contains Abort, Retry, and Ignore buttons. |
| The message box contains an OK button. |
| The message box contains OK and Cancel buttons. |
| The message box contains Retry and Cancel buttons. |
| The message box contains Yes and No buttons. |
| The message box contains Yes, No, and Cancel buttons. |
You can tell which button the user selected by the return value of Show, which will be a member of the DialogResult enumeration. Every possible button has a corresponding member on DialogResult. Table 6.2 lists all the members.
Table 6.2. Members of the DialogResult enumeration for interpreting the return value of a dialog or message box
| Meaning |
|---|---|
| The dialog box return value is Abort (usually sent from a button labeled Abort). |
| The dialog box return value is Cancel (usually sent from a button labeled Cancel). |
| The dialog box return value is Ignore (usually sent from a button labeled Ignore). |
| The dialog box return value is No (usually sent from a button labeled No). |
| Nothing is returned from the dialog box. This means that the modal dialog box continues running. |
| The dialog box return value is OK (usually sent from a button labeled OK). |
| The dialog box return value is Retry (usually sent from a button labeled Retry). |
| The dialog box return value is Yes (usually sent from a button labeled Yes). |
For our use case, MessageBoxButtons.OkCancel seems like the right choice. Only MessageBoxIcon is left to choose; the options are displayed in table 6.3.
Table 6.3. Members of the MessageBoxIcon enumeration for specifying the icon in a message box
| Icon description |
|---|---|
| The message box contains a symbol consisting of a lowercase letter i in a circle. |
| The message box contains a symbol consisting of a white X in a circle with a red background. |
| The message box contains a symbol consisting of an exclamation point in a triangle with a yellow background. |
| The message box contains a symbol consisting of a white X in a circle with a red background. |
| The message box contains a symbol consisting of a lowercase letter i in a circle. |
| The message box contain no symbols. |
| The message box contains a symbol consisting of a question mark in a circle. |
| The message box contains a symbol consisting of a white X in a circle with a red background. |
| The message box contains a symbol consisting of an exclamation point in a triangle with a yellow background. |
Because we’re asking a question, MessageBox.Question seems appropriate. Now that that’s settled, you’re ready to write RemoveCommand. Because you’ll have several commands for working with tab pages and they’ll all be short, let’s put them in a module called tabcommands.py.
The full call to MessageBox.Show looks like the following:
result = MessageBox.Show("Are you sure?", "Delete Page"
   MessageBoxButtons.OKCancel, MessageBoxIcon.Question)
result will then either be DialogResult.OK or DialogResult.Cancel. Now that you know how to use the message box, you need to build the infrastructure that can act on the user’s choice.
To fully implement a RemovePage command, there are three distinct steps:
Ask the user for confirmation.
Remove the currently visible tab.
Delete the corresponding page from the model.
Because the first step triggers the following two, you should implement those first. But before that, we need to avoid a potential bug.
There’s always the possibility that the user will try and activate the command after there are no pages left. You need to ensure that this situation doesn’t cause MultiDoc to crash. It’s the controller’s job to synchronize the model and the view, so the right place to implement this is in the tab controller.
It would be good to check whether there’s at least one tab page before displaying the message box. You can tell whether a tab control has any pages in a couple of ways; the number of pages will be 0, and the SelectedIndex property will return -1. To check whether there are any pages, you can add a property hasPages to the tab controller. This wraps a simple function (a lambda) that checks SelectedIndex. It needs to return False if the result is -1; otherwise, True.
hasPages = property(lambda self: self.tabControl.SelectedIndex != -1)
To delete the current page, you need to delete the currently selected index from the document’s list of pages. You also need to remove the current visible tab page from the TabPages collection.
Listing 6.4 shows the implementation of deletePage. Even though you intend to check hasPages before asking the user to confirm page deletion, you should still check inside this method. This method is now part of the public API of the TabController and should be safe against being called when there are no pages.
Example 6.4. Method on TabController to delete pages on the view and the model
def deletePage(self):
   if not self.hasPages:
      return
   index = self.tabControl.SelectedIndex
   del self.document[index]
   tabPage = self.tabControl.SelectedTab
   self.tabControl.TabPages.Remove(tabPage)
You need to make the same change to the updateDocument and maintainIndex methods, a process which raises another issue. Deleting a page causes the SelectedIndex to change, so maintainIndex will be called. This isn’t generally a problem; the extra call to updateDocument won’t usually do any harm. It is a problem when the deleted page is the last tab page. The index of the deleted page (stored as self.index) will no longer be a valid index for the tab pages at all, and updateDocument will blow up. maintainIndex still needs to update the index tracking variable, but you should make the call to updateDocument conditional on the stored index being valid. Listing 6.5 shows the new maintainIndex.
Example 6.5. Keeping the model updated from user input in the view
def maintainIndex(self, sender, event):
   if not self.hasPages:
      return
   if self.index < len(self.tabControl.TabPages):
      self.updateDocument()
   self.index = self.tabControl.SelectedIndex
Now on to the RemoveCommand itself. It needs to be initialized with a reference to the tab controller. In the execute method, it should check whether there are any tab pages. If there are, then it should ask the user to confirm, calling deletePage if the user hits OK.
This is a rather short piece of code, as shown in listing 6.6.
Example 6.6. Asking for confirmation before calling deletePage on TabController
from System.Windows.Forms import (
   DialogResult, MessageBox,
   MessageBoxButtons, MessageBoxIcon
)
class RemoveCommand(object):

   def __init__(self, tabController):
      self.tabController = tabController

   def execute(self):
      if not self.tabController.hasPages:
         return
      result = MessageBox.Show("Are you sure?",
                        "Delete Page",
                        MessageBoxButtons.OKCancel,
                        MessageBoxIcon.Question)
      if result == DialogResult.OK:
         self.tabController.deletePage()
The result of activating this command, with at least one page present, is the message box in figure 6.2. At this point, you’ve successfully completed creating the Delete Page functionality.

Frequently, presenting the user with an OK/Cancel choice isn’t enough. In the next section, we look at creating custom dialogs.
For the user to provide a new name to rename a page, you need to present some kind of dialog. The right control to enter the new name in is the TextBox. By default, the old name should appear in the text box so that the user can edit it rather than having to type the name in full.
Again, you’ll need some support for this in the tab controller, both to fetch the current page title and to set the new one. Because you need to fetch and set the current page title, you can make it a property on the tab controller, as in listing 6.7.
Example 6.7. Providing a currentPageTitle for fetching and setting title
def _getCurrentPageTitle(self):
   if not self.hasPages:
      return None
   index = self.tabControl.SelectedIndex
   return self.document.pages[index].title

def _setCurrentPageTitle(self, title):
   if not self.hasPages:
      return
   index = self.tabControl.SelectedIndex
   page = self.document.pages[index]
   page.title = title
   self.tabControl.SelectedTab.Text = title

currentPageTitle = property(_getCurrentPageTitle, _setCurrentPageTitle)
Dialogs are displayed modally, blocking the GUI until the user completes the action by selecting OK or Cancel (or whatever buttons you provide).
Creating dialogs is simple; they’re simply forms that you display with a call to ShowDialog instead of Show. They can contain any controls you like. There are several other subtleties to making a form into something that looks and feels like a dialog. We’ll go through these as we create RenameTabDialog.
This dialog will be very simple. All it needs is a text box to edit/enter the name, and an OK and a Cancel button. Because we’ll shortly be creating a command for adding tab pages, which will include choosing a name, it makes sense if the dialog is flexible enough for both jobs.
Listing 6.8 is the initialization for the new command.[5]

As with MainForm, the dialog is a subclass of Form. It takes two arguments in the constructor: a string name (the current name of the tab) and a Boolean rename (whether you’re renaming a page or creating a new one). The title of the dialog is set differently depending on which of these two actions is taken—which, in fact, is the only difference between the two uses.
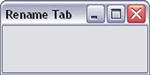
This dialog isn’t resizable, so you can use FormBorderStyle.FixedDialog as the border style. This makes the form non-resizable, and also gives the form an appearance in keeping with a dialog. You set the form to a fixed size, using the Size structure from System.Drawing. A form with only these options set would look like figure 6.3.
By default, all active forms have an icon in the taskbar. This isn’t normal for dialogs, and setting the border style doesn’t; this is why the dialog sets the ShowInTaskbar property to False. The code after this sets the padding on the form. (Padding is a structure in System.Windows.Forms.) The padding affects the layout of controls that don’t have an absolute location specified; this is normally for controls laid out using Dock. The layout is done in two methods not yet written: initializeTextBox, which needs to know the initial name, and initializeButtons.
Positioning the text box in the dialog is easy. We want it to be at the top of the dialog (above the buttons), and nearly as wide as the dialog. To position the dialog in the form, you set Dock = DockStyle.Top. This will create a text box of default width, which isn’t wide enough, so you need to explicitly set the width. You also set the name passed into the constructor as the text in the textbox; you can see this in listing 6.9.
Example 6.9. Creating and laying out text box for RenameTabDialog
def initializeTextBox(self, name):
   self.textBox = TextBox()
   self.textBox.Text = name
   self.textBox.Width = 160
   self.Dock = DockStyle.Top

   self.Controls.Add(self.textBox)
The next method is to lay out the buttons for the dialog. Unfortunately, getting these positioned correctly is a bit more intricate. The code for this is shown in listing 6.10.
The buttons are contained in a panel, which is laid out in the form using DockStyle.Bottom. Its width is set to be the same width as the form. Its height is set to 23 pixels, which is the default height of a button. Because we’re using DockStyle.Left and DockStyle.Right to position the buttons in the panel, you need to set an explicit height on the panel, or the buttons will look very odd. You also need to set a width on the buttons, 75 pixels being the default width of a button. Any other combination of settings[6] causes one of these parameters to be overridden.
initializeButtons also does some magic which is relevant to creating dialogs. Two default actions are common to most dialogs: accepting and canceling them. These can be triggered by pressing the Esc key (to cancel), or Enter key (to accept). You can tell the form which buttons to treat as accept and cancel buttons with the following two steps:
Setting the
AcceptButtonandCancelButtonproperties on the formHooking up the appropriate
DialogResultto the buttons
The accept and cancel actions will be triggered by clicking the buttons or by pressing the Enter or Escape keys while the dialog box has focus. The acceptButton has an explicit handler, but the default action for the cancel button is fine (returning DialogResult.Cancel).
Because we want to just display the dialog and return a result, you can wrap it in a function. With a form displayed as a dialog, accepting or canceling the dialog (even with the close button) doesn’t close it; it’s merely hidden. You could reuse the dialog; but, in this case, it’s more convenient to close it so that you don’t need to keep track of it and its resources can be freed up. This is exactly what listing 6.11 does.
When ShowDialog is called, it displays the dialog. The elegant result can be seen in figure 6.4—note the padding around the buttons! If the user selects OK (or hits the Enter key), then the function returns the text from the text box; otherwise, it returns None.
Inspecting the controls after the dialog has returned is one way of retrieving the values the user has selected on the dialog. An alternative approach would be to define (and wire up to the buttons) onAccept and onClose methods, which can set attributes or data structures on the dialog representing the user choices.
With the dialog in place, you need a command to use it. This command can go in tabcommands.py, and is also very simple—as you can see in listing 6.12. It uses the currentPageTitle property you added to the tab controller and the ShowDialog function.
Example 6.12. RenameCommand: using the dialog
from renamedialog import ShowDialog

class RenameCommand(object):
   def __init__(self, tabController):
      self.tabController = tabController

   def execute(self):
      if not self.tabController.hasPages:
         return
      currentTitle = self.tabController.currentPageTitle

      newTitle = ShowDialog(currentTitle, True)
      if newTitle is not None:
         self.tabController.currentPageTitle = newTitle
Getting even this simple dialog to look right is much harder than it should be. GUI layout can be very fiddly, and finding the right combination of controls and layout options takes a lot of experimentation.
One thing that helps is making the renamedialog module executable—calling the ShowDialog function when it’s run directly with IronPython. If you remember from the Python tutorial, you can do this with a conditional block that checks the magic variable __name__. Listing 6.13 shows the conditional block at the start of the import code and then the class and function definitions.
Example 6.13. Importing code and function calls for module as script
if __name__ == '__main__':
import clr
clr.AddReference("System.Windows.Forms")
clr.AddReference("System.Drawing")
from System.Drawing import Size
from System.Windows.Forms import (
Button, DialogResult,
DockStyle, Panel, Form,
FormBorderStyle, Padding, TextBox
)
[RenameTabDialog and ShowDialog...]
if __name__ == '__main__':
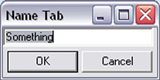
print ShowDialog("Something", False)
print ShowDialog("Something Else", True)If the script is run as the main script, then ShowDialog is called twice, printing the return value. It’s called once as a Name dialog and once as a Rename dialog. If the dialog is imported rather than being run, then this code has no effect.
Being able to make minor modifications to a single element of an application and then immediately rerun the script[7] with no compile phase is one of the advantages of working with IronPython. This kind of manual testing is no replacement for an automated test suite, but unfortunately test suites aren’t (yet) clever enough to make aesthetic judgments about the appearance of GUIs.
By now .NET developers are probably jumping up and down and crying that there’s a much easier way of resolving GUI layout issues. They’d be right; that easier way is Visual Studio. Visual Studio contains a built-in forms designer that lets you do GUI layout with drag-and-drop actions.
So if we have this amazing tool available, why have we put so much effort into manual layout? Visual Studio is ideal for creating fixed-size dialog; for forms that need to cope with resizing, we tend to prefer hand-coded solutions. Obviously, if you don’t understand how to lay out forms in code, this won’t seem like an option for you. But even with Visual Studio, you have to set properties to the appropriate values, so you need to know what they are and what they mean. More importantly, if something goes wrong or doesn’t look right, the only way you’ll be able to fix it (or even understand the problem) is by knowing what the designer is doing when you lay out controls.[8]
You now have a working implementation of a manually created Rename Page dialog. This nearly completes the functionality we aimed to add to MultiDoc at the start of the chapter. Having wrestled with manual layout (or at least seen the result of our wrestlings), you now get to use Visual Studio. This works well with IronPython; we’re sure this will come as a relief if you’re a .NET developer, and perhaps something of a pleasant surprise if you’re a Python developer.
For this example, we use the free version of Visual Studio, Visual Studio Express. Visual Studio Express doesn’t have IronPython integration, so we have to find another way to work with it to create our dialog.
Depending on which version you download,[9] it can generate Visual Basic, C#, C++, or Visual J#. Because they all compile to .NET assemblies and we won’t be directly writing code in this example, it doesn’t really matter which one you choose. Having generated code in another language can be an advantage; it means there’s less temptation to fiddle with it!
You can create the dialog layout in Visual Studio, subclass it in IronPython, and program all the behavior in the subclass. You need to create an assembly containing a suitable base class for our dialog.
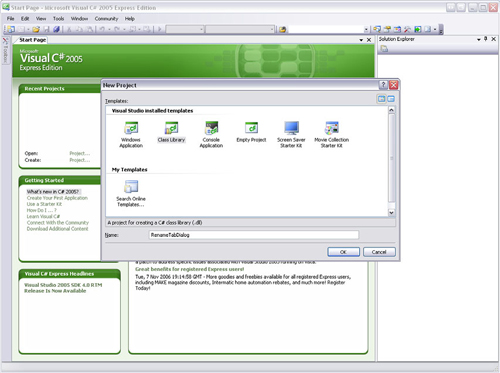
Our base class dialog will be a class library, so open Visual Studio Express and create a new class library. You’ll be presented with the interface in figure 6.5.
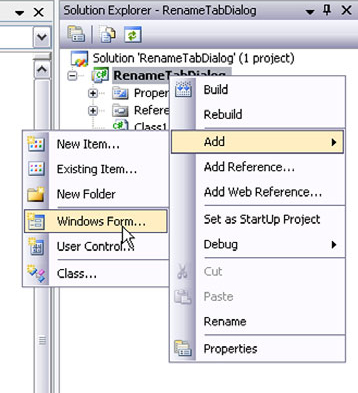
After creating the class library, preferably with a sensible name, you need to add a form to it. If you right-click the project in the Solution Explorer, you should see the menus shown in figure 6.6, and be able to add a form.
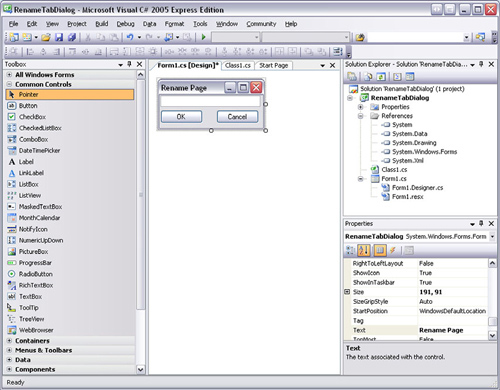
This will add the form to the project, and Visual Studio will whirr away for a few seconds while it adds references to relevant assemblies such as System.Windows.Forms. You can then resize the form and drag controls from the toolbox onto it. You’ll also need to open the Properties pane by right-clicking the form and selecting Properties. You want to end up with an interface looking like figure 6.7.
By clicking each element (the form, the buttons, and the text box), you can configure the different properties for each control. For our dialog, you need to complete the following steps:
Set the
DialogResultproperties on the buttons.Make sure you name the
TextBoxtextBox and set the modifier to Public rather than Private. You’ll be able to access the property from theShowDialogfunction.Set the form border to
FixedDialog.Set the form name to
RenameTabDialogBase.Set the form
ShowInTaskbarproperty toFalse.Set the
AcceptButtonandCancelButtonproperties on the form tookButtonandcancelButton.
Creating the dialog with Visual Studio takes considerably less time than trying to tweak the GUI by hand, but the results are almost identical.
Note
In IronPython 1, you can access protected .NET members as if they were public.[10] The IronPython 2 rules about accessing .NET members are closer to C#.[11] You’ll subclass the dialog we’re creating, so protected status would allow you access from inside the subclass—but you also need external access so the text box must be public.
Pressing F6 in Visual Studio (or selecting the Build > Build Solution menu item) compiles our project into an assembly. The compiled assembly will then be available in the binRelease folder of the project as RenameTabDialog.dll (assuming you named your project RenameTabDialog).
For you to use this assembly from IronPython, it needs to be somewhere on sys.path. The simplest solution is to put it in the same directory as the IronPython file using it. We can then add a reference to RenameTabDialog and import RenameTabDialogBase from the RenameTabDialog namespace. You’ll need to tweak these names to match the ones you’ve used in the Visual Studio project.
Having done the layout and configuring in the Visual Studio project, we can reduce the amount of code in the dialog. Instead of subclassing Form, you can now create a subclass of RenameTabDialogBase. You still need to set the title and the initial text in the text box. The full code for the dialog is shown in listing 6.14.
Example 6.14. Using the dialog created in Visual Studio with IronPython
if __name__ == '__main__':
   import clr
   clr.AddReference('RenameTabDialog')
   clr.AddReference('System.Windows.Forms')

from RenameTabDialog import RenameTabDialogBase
from System.Windows.Forms import DialogResult

class RenameTabDialog(RenameTabDialogBase):
   def __init__(self, name, rename):
      RenameTabDialogBase.__init__(self)

      title = "Name Tab"
      if rename:
         title = "Rename Tab"
      self.Text = title

      self.textBox.Text = name
As the external API is the same as the hand-coded dialog, the ShowDialog function can remain unchanged.
Although this example of using Visual Studio used a dialog created with the forms designer, you’ve actually created a class library and imported it into IronPython. This is how easy it is to extend IronPython from other .NET languages, a subject we look into in more detail later in the book.
We’ve just about made it through our three new commands. You’ve created commands that can remove pages and rename pages, and written the infrastructure code to support them. In this section, you created a dialog for naming and renaming tab pages, using the forms designer from Visual Studio. In the next section, which introduces a command to add new pages, you get to reuse this dialog.
When we wrote the dialog to rename pages, we had in mind that you’d also use it to ask the user for a name when creating new pages. If ShowDialog is called with False as the second argument, then the dialog is shown with an appropriate title for naming a new page.
You already have a method on the tab controller for creating a new tab page: addTabPage. This only deals with the view, though; it adds a tab page to the tab control, but it doesn’t create a new page on the document. addTabPage is called when you load new documents, which already have pages. You need a new method that will handle both the model and the view for you, calling down to addTabPage for the view. This is the newPage method, shown in listing 6.15. The second argument to addTabPage is an empty string because the freshly created page has no text in it yet.
Example 6.15. Creating a new page in model and adding corresponding tab page
def newPage(self, title):
   page = Page(title)
   self.document.pages.append(page)
   self.addTabPage(title, "")
   newPageIndex = len(self.tabControl.TabPages) - 1
   self.tabControl.SelectedIndex = newPageIndex
Merely creating a new tab page doesn’t select it, so newPage finds the index of the new tab page (which is the last one), by asking for the length of the TabPages collection. You have to subtract one from the index because the tab control is zero-indexed, and then you select the new tab page by setting the SelectedIndex on the tab control.
With the support for adding tab pages in the tab controller, you need a corresponding command that uses it. This is where the code reuse comes in. The command needs to ask the user for a name, and call newPage if the user doesn’t cancel out of the dialog. You need to make another call to ShowDialog, but pass False as the second argument. NewPageCommand is shown in listing 6.16.
The three tab commands are now complete; but, as usual, they aren’t available to the user until they’re wired into the view. This small but vital step is the subject of the next section.
You’ve done this before, and these commands are just as easy to wire up as the previous ones. The nice bonus is that adding these commands to the user interface will make MultiDoc actually usable. To spice up this section, we add a couple of new features: an application icon and a new document command.
The first is purely cosmetic, but no Windows Forms application would be complete without an application icon to replace the default one! When a form is displayed, an icon is displayed in the upper-left corner of the form, and the same icon is displayed in the taskbar. The default icon is the bizarre three-colored boxes, not unattractive, but also instantly recognizable as the generic Windows Forms icon. Changing this is trivially easy using the Icon property on the form and the Icon class from the System.Drawing namespace.
MultiDoc is a document editor for multiple pages, so an icon showing pages of text is appropriate—and is exactly what the glyFx copy icon looks like. The following code segment should be added to the MainForm constructor:
iconPath = 'icons\copy_clipboard_16.ico'
self.Icon = Icon(Path.Combine(executableDirectory, iconPath))
The second feature is another that you would consider standard in a document editor: a new document command. With the infrastructure we’ve provided, this is also easy—but maybe not quite as easy as changing the application icon. Because creating a new document will destroy anything in the current document, you should ask the user for confirmation. (Even better would be to maintain a modified flag so that you only ask the user for confirmation if the current document has local modifications. We leave this implementation as an exercise for you!)
The NewDocumentCommand is almost identical to the RemoveCommand—except that, instead of deleting a page, it sets a new document on the tab controller. Listing 6.17 is the NewDocumentCommand.
Example 6.17. NewDocumentCommand
from System.Windows.Forms import (
   DialogResult, MessageBox,
   MessageBoxButtons, MessageBoxIcon
)

from model import Document

class NewDocumentCommand(object):
   def __init__(self, tabController):
      self.tabController = tabController

   def execute(self):
      result = MessageBox.Show("Are you sure?",
                        "New Document",
                        MessageBoxButtons.OKCancel,
                        MessageBoxIcon.Question)
      if result == DialogResult.OK:
         self.tabController.document = Document()
Setting a document on the tab controller triggers the property behavior created earlier, clears the current document, and creates a new one.
The other changes follow the same pattern for wiring the previous commands. The new commands need to be added to initializeCommands and then wired up by adding menu and toolbar items. This is just a copy and paste job from the earlier code, slightly modified to use the new commands. The new menu items should appear under a new top-level menu item, Edit.
There’s a nice icon for a new document in the glyFx set, but nothing suitable for adding a new page. Justin Fleming of Fuchsia Shock Design[12] came to the rescue and created a plus icon. We haven’t shown the menu and toolbar code changes here; they should be easy for you to work out, and the source code is available for download.
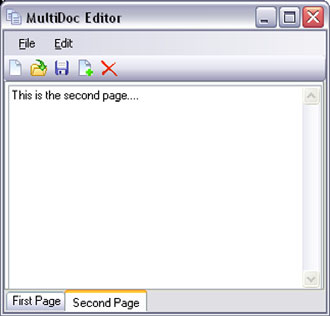
With these changes in place, MultiDoc looks like figure 6.8.
MultiDoc now has all the features from the original specification. To distribute MultiDoc, you currently need to distribute the icons in their original format. This is (normally!) against the glyFx terms of use, so we should find a way of solving this problem.
One way you can avoid distributing the icons in their original form is to convert them to a convenient binary format. Object persistence, sometimes called serialization, is a common programming need. Serializing takes an object and converts it into binary (or possibly text) data for storing in a file or database. This representation can be turned back into an object again later.
You can store the icons as serialized objects; and, instead of constructing Bitmap or Icon instances inside MultiDoc, you can deserialize them. In the .NET world, the most compact serialization is done with the BinaryFormatter class, which lives in the System.Runtime.Serialization.Formatters.Binary namespace.
The BinaryFormatter is easy to use; you instantiate it and call formatter.Serialize with a filestream and the object to persist.
>>> import clr
>>> clr.AddReference('System.Drawing')
>>> from System.Drawing import Bitmap
>>> from System.Runtime.Serialization.Formatters.Binary import BinaryFormatter
>>> from System.IO import FileMode, FileStream
>>> bitmap = Bitmap('icons\save_16.ico')
>>> stream = FileStream('save.dat', FileMode.Create)
>>> formatter = BinaryFormatter()
>>> formatter.Serialize(stream, bitmap)
>>> stream.Close()
Re-inflating persisted objects is just as easy.
>>> stream = FileStream("save.dat", FileMode.Open)
>>> bitmap = formatter.Deserialize(stream)
>>> stream.Close()
>>> type(bitmap)
<type 'Bitmap'>
You can write a simple script that iterates over all the files in the icon directory and converts them into persisted bitmaps (with the exception of the application icon, which needs to be an Icon instead). Python excels at this sort of scripting task; and, with the full range of .NET framework classes available to you, IronPython excels even more. The lack of boilerplate means that you can rapidly write scripts for file manipulation and similar administration jobs.
Directory.GetFiles (the equivalent of os.listdir from the Python standard library) returns a list of all the files in a directory, so the script shown in listing 6.18 should do the job.
Running this script will save a binary version of all our icons. (Because it skips non-image files, you can run it more than once without it crashing.) You also need to provide a MainForm method to deserialize the data files rather than load the images, as shown in listing 6.19.
Example 6.19. Image deserializing method for MainForm
def loadImage(self, filename):
   path  = Path.Combine(self.iconPath, filename)
   stream = File.OpenRead(path)
   image = BinaryFormatter().Deserialize(stream)
   stream.Close()
   return image
But creating a new BinaryFormatter for every image could be inefficient. You shouldn’t try to optimize first unless performance proves to be an issue—premature optimization is the root of many kinds of evil.[13] Because setting the images is done when MultiDoc loads, you could look at performance tuning if startup time is too long. (And you’d profile how long this delays startup before making the change.) In practice, it doesn’t seem to be an issue.
We’ve added five new commands to MultiDoc; now it can be used for the purposes for which it was created: reading, saving, and creating multipage documents. There are other features that might be nice, but none of them should be too difficult to add. The point of the structure we chose for MultiDoc is that it should be relatively easy to work out where in the code any changes should go. For example, if you want to save the currently selected tab in the document, you need to add something to the model to represent it. You also need to update the selection on the model when it changes in the view (the job of the tab controller) and so on. Correspondingly, when you’re tracking down bugs or problems, you should have a good idea of where to start looking.
We hope that, through MultiDoc, you’ve seen how easy it is to refactor well-structured Python code to include new features. Particularly useful is the ability to experiment with .NET classes using the interactive interpreter. You can also make minor speculative changes to your code and run it immediately with no need for a compile phase.
Python is no silver bullet—you saw the value of the form designer from Visual Studio—but integrating .NET class libraries with IronPython applications is absurdly easy. Extending your IronPython application with third-party libraries or GUI components is just as simple, or you may want to move performance-sensitive algorithms into C#. IronPython makes it simple to create prototypes, and prove that a particular approach works, before moving code into another .NET language. (In fact, this is how IronPython itself was developed.)
We’ve now completed MultiDoc as specified. In the process of writing it, I (Michael) discovered several bugs that cost me time to go back and fix. This process would have been a lot less painful if I had a good test suite. One of the advantages of dynamic languages in general, and Python in particular, is that they’re easy to test. The ability to modify live objects at runtime comes in particularly useful. In the next chapter, we look at testing practices using the Python standard library module unittest.
[3] It only uses the document to check if it has a filename, and it can get this via the reference to MainForm that it keeps.
[4] This Herculean task we leave to you—alternatively, you can download the source code.
[5] As with all our examples, see the full version in the downloadable examples for all the imports that go with this code.
[6] At least all the other myriad combinations we’ve tried.
[7] Here we’re running a class library as an executable, for testing purposes.
[8] For a better explanation of this, read Joel Spolsky’s The Law of Leaky Abstractions at http://www.joelonsoftware.com/articles/LeakyAbstractions.html.
[9] See http://msdn.microsoft.com/vstudio/express/. Note that you can install multiple versions side by side.
[10] IronPython uses reflection to discover members. Marking them as protected or private only makes them less convenient to access; it doesn’t truly hide them from the determined programmer.
[11] If you subclass a .NET class, protected members are public, so you can still access them from outside the class. You can’t access protected members on a non-Python subclass.
[13] At least in terms of programming...