
This chapter covers |
|---|
|
.NET is a large platform and has a great deal to offer programmers. The framework is extremely broad; the classes it provides cover almost every aspect of programming that you can imagine. The IronPython .NET integration makes it easy to use these classes directly from IronPython code; you’ll rarely do type conversion between Python types and .NET ones. Not only are the .NET objects straightforward to use and configure from within IronPython, but they’re also integrated into the Python infrastructure so that you can use Python idioms to work with them.
To understand how to use the .NET types available in the framework, you’ll need to be able to read the .NET documentation. In this chapter, you’ll create some basic applications using Windows Forms and translate the Microsoft documentation into IronPython along the way. Windows Forms is a mature library for building user interfaces for desktop applications. We could have picked almost any of the different libraries provided by .NET, but Windows Forms is a great library to work with, and it also makes for some very visual examples!
The .NET framework consists of 112 assemblies and 935 namespaces.[1] .NET 3.0, which introduces several important new libraries including the Windows Presentation Foundation, builds on .NET 2.0 rather than replacing it. Namespaces are the libraries that provide classes and other .NET types such as enumerations and structures. With these, you create applications,[2] work with XML and databases, communicate with the computer system, or access external applications such as Word and Excel.
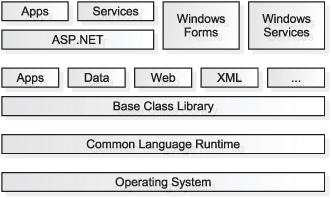
The most fundamental libraries of the framework are known as the Base Class Libraries (BCL).[3] The BCL includes namespaces like System, System.Collections, and System.IO. Higher level libraries, such as Windows Forms, are built on top of the base class libraries. Figure 3.1 shows this structure—from the operating system on which the CLR runs, through the base class library, and up to the intermediate and higher level libraries.
We’re going to start exploring the .NET framework with a handful of classes from the Windows Forms namespace.
We’ve done enough talking about using .NET classes; it’s time to put what you’ve learned into action. Let’s start by creating a simple Windows Forms application, using classes from the System.Windows.Forms assembly.
Windows Forms is a rich and mature GUI framework. It contains an extraordinary number of different components for building applications, including sophisticated data-bound controls.[4] You can see a small selection of the components available in figure 3.2.
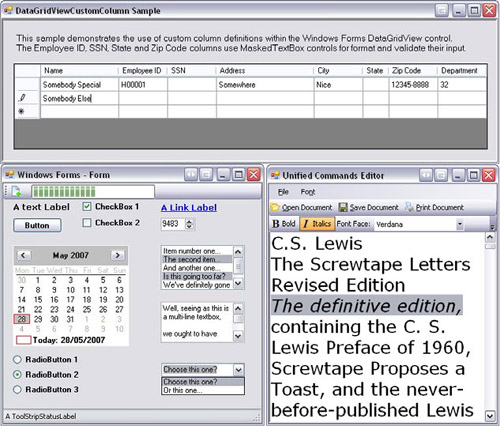
Windows Forms controls include standard components such as labels, text boxes, radio buttons, and check boxes. It also has many more complex controls such as rich text boxes (as shown in the figure with the C.S. Lewis text), calendars, and data tables.
Recently, a new user-interface library has been added to the .NET framework: WPF. This has a more sophisticated appearance[5] and some interesting integration with XAML and vector graphics, but has fewer controls and is less mature than Windows Forms. Windows Forms is still the standard for building business applications.
To build a Windows Forms application, the first two components we need are the Application and Form classes. To configure and use these classes, you should first look up their attributes in the documentation.
The documentation for the framework libraries is in the Microsoft Developer Network (MSDN) library. It contains references for C#, the .NET framework, and other Microsoft programming resources.
The documentation for the Application class is located at the following URL:
http://msdn2.microsoft.com/en-us/library/system.windows.forms.application.aspx
Here you’ll find general information about the class and some code examples. More useful is the Application Members page, which lists all the attributes of the Application class. Every framework class has a page like this, listing all its members with a brief description.
The top of the Application Members page tells you that the Application class provides static methods. Static methods are called on the class rather than on an instance. Here you’ll find the method Run, which is the one we need. If you click this link, it will take you to the documentation for the static method Run.
This page shows that Application.Run can be called in three different ways. .NET allows classes to have multiple versions of methods, including constructors. Multiple methods and constructors are called overloads; the type of objects you pass in determines which overload is called. The three different call signatures of Run are as follow:
Application.Run()Application.Run(ApplicationContext)Application.Run(Form)
Because we don’t want to mess around with application contexts right now, and we do want to display a form, we use the third overload. This overload requires an instance of the Form class.
The Form documentation is located at the following URL:
http://msdn2.microsoft.com/en-us/library/system.windows.forms.form.aspx
If you browse over to the Form Members page, you’ll find the link the same way you found the link to Application Members. You’ll be configuring the Form instance through the public properties, which are all listed on this page; you’ve already used a couple of them in the interactive interpreter example. At the top of the page, you can see a link to the Form Constructor.
public Form()
This bit of code tells you that the constructor is public (which is great news because you want to use it) and takes no arguments.
Now you know how to start the application loop and create a form, which is the most trivial Windows Forms application possible. Let’s put this into practice.
To make it a bit more interesting, first set a title on the form. Turn back to the Form Members page of the MSDN document and look at the properties. There you’ll see a property named Text. This is yet another link; clicking it takes you to a page with information about the Text property.
The code examples there tell you what you need to know about this property.
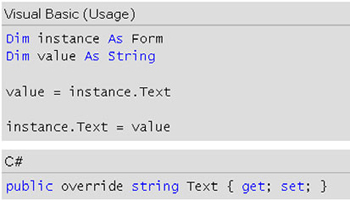
From the C #and the Visual Basic examples (shown in figure 3.3), you can tell that this property takes a string and that it can be both set and retrieved. Some properties are read-only, but not this one (and there are a few that are write-only—which is pretty weird and also pretty rare).
Note
When we refer to the current versions of IronPython, we mean the versions at the time of writing: IronPython 1.1.2 and 2.0. All the IronPython code in this book should work with both versions of IronPython; the differences between IronPython 1 and 2 will be shown in the examples. If there are limitations, we’ve tried to refer to specific versions.
Execute the following lines of IronPython code at the interactive interpreter:
>>> import clr
>>> clr.AddReference('System.Windows.Forms')
>>> from System.Windows.Forms import Application, Form
>>> form = Form()
>>> form.Text = 'Hello World'
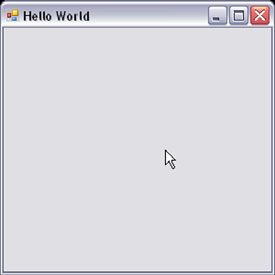
>>> Application.Run(form)If you’ve entered it correctly, you should see a plain form with the title set to Hello World, looking similar to figure 3.4.
An important thing to note from this example is that, when you set the Text on the form, you used a string literal from IronPython. Strings created in IronPython are Python strings; they have all the usual Python string methods, but they’re also .NET strings.
IronPython strings, numbers, and Booleans aren’t just similar to their .NET equivalents; they are .NET types.
Note
You’ve already met the Python built-in types. Strings, numbers, and Booleans are examples of the .NET built-ins.[7]
This example may seem like a trivial one, but that’s only because it is! You haven’t done anything that you didn’t do in the interactive interpreter example at the end of chapter one. The important thing to take away is how to navigate the MSDN documentation. In this book, we can cover only a tiny proportion of the available classes, but the technique for finding out the information you need is identical.
After running the example, you’ll see the form appear. Starting the application loop shows the form you pass in. A form on its own is a bit dull, though; let’s add some more controls to the form. Along the way, you’ll meet some more of the .NET types.
The .NET framework is a different programming environment than Python, and it uses types that aren’t native to the Python world. These include structures, enumerations, and different container types. Because of the deep level of integration between IronPython and .NET, you can use these types directly in IronPython. In this section, you’ll use several of these types in the context of working with Windows Forms controls.
Adding new GUI elements to a form is done in the same way regardless of the element you want to add. A wide range of these elements are available, each of which is represented by a different class in the System.Windows.Forms namespace.
It’s possible to create forms and then add and configure components, using the Visual Studio designer.[8] You can see in figure 3.5 that Visual Studio will generate IronPython code for you, and let you configure the control properties. Whether you’re using the designer or building your user interfaces by hand, you still need to understand the components to configure them.
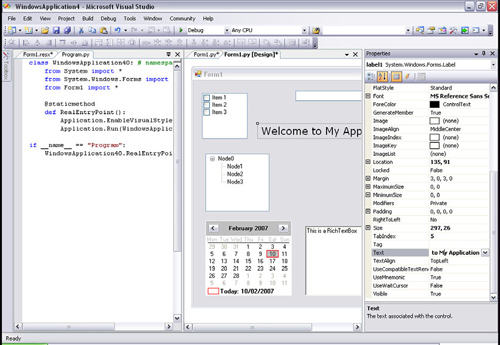
Figure 3.5. Visual Studio in designer mode, with an IronPython project. IronPython code is on the left, and control properties are on the right.
Let’s start with a nice simple component: the Label class. It’s used for adding text labels to forms; it doesn’t do a great deal, but you can configure it in a lot of ways. You can set the position and size of the label; you can also configure the color of text on the label and the background color. This configuration is done using properties common to other classes within the System.Windows.Forms namespace. The Windows Forms’ term for GUI components, such as forms, buttons, and labels, is controls. A label is a control, and so are buttons and text boxes.
These classes all inherit from the Control class. Different categories of controls inherit from various other intermediate classes such as ScrollableControl or ContainerControl, but all the GUI elements inherit directly or indirectly from Control.
If you look at the Label Members page[9] on MSDN, you’ll see that many of the members have (Inherited from Control) by them. Why is this interesting? A lot of the properties and events you’ll use in the coming sections are like this. Once you’ve learned how to use them on a specific control, you’ve learned to use them on other controls as well. Some controls may override the inherited member, but the usage will still be similar or related to the standard behavior.
Properties that come into this category include the following:
TextBackColorForeColorFontSizeLocationHeightWidth
But just as a bare form is pretty pointless, so is a lonely label. Individual controls only have a point when part of a GUI. You need to know how to add controls to a parent control, and that means working with a collection.
One of the properties inherited from Control not mentioned in the last section is Controls. Control.Controls is a special type of collection, specifically a ControlCollection. Collections are .NET container classes, similar to Python lists and dictionaries.
The ControlCollection keeps track of the child controls on a parent and keeps them in order. When the parent is displayed, all the child controls are also displayed. You can add, remove, or reorder the controls in the collection by calling methods on it. You may remember the simplest of these from the interactive interpreter example at the end of chapter one. To add a control to a Form, or any other parent control, use the Add method of the Controls property.
>>> form = Form()
>>> label = Label()
>>> form.Controls.Add(label)
You can see a list of all the methods available on the Controls property at the ControlCollection members page.[10] The most useful methods include the following:
Clear—. Removes all controls from the collectionRemove—. Removes the specified control from the control collectionRemoveAt—. Removes a control from the control collection at the specified index
You can see from the RemoveAt method that the control collection keeps controls by index. It uses the standard .NET indexing mechanism by implementing the IList interface. In Python terms, this means that you can index it like a list (using positive indexes only).
>>> label is form.Controls[0]
True
You can also iterate over the controls in the collection—not because ControlCollection implements IList, but because it implements the IEnumerable .NET interface. IronPython ensures that enumberable objects from other .NET languages are iterable in IronPython.
ControlCollection has two more useful attributes, the property Count and the method Contains. You don’t need to use these directly in order to take advantage of them.
.NET objects that contain other objects often have a Length or a Count property, which tells you how many members they contain. In Python, you get the length of a container using the built-in function len.
>>> len(form.Controls)
1
The Contains method checks whether a collection contains a specified member. In Python, you check for membership in a container using the in operator, and this is available on .NET collections.
>>> label in form.Controls
True
>>> newLabel = Label()
>>> newLabel in form.Controls
False
Before leaving this subject, we’d like to look at one more ControlCollection method, one you probably won’t use very often from IronPython. AddRange allows you to extend the collection by adding an array of controls. Normally, you’ll add controls to the collection individually, but we want to use this method to demonstrate that Python objects aren’t always the direct equivalent of similar .NET objects.
.NET arrays are similar to Python lists—except that, because the languages they’re used from are statically typed, arrays carry information about the type of objects they contain. An array can only contain objects of a single type. Calling a .NET method, which expects an array, and giving it a list will fail.
>>> form.Controls.AddRange([label])
Traceback (most recent call last):
TypeError: expected Array, got list
Although Python lists are similar to .NET arrays, they aren’t directly equivalent; you’ll need to convert your list into an array if you want to use the AddRange method.
We’ve been looking at the ControlCollection available on Windows Forms controls as the Controls property. The integration of .NET with IronPython doesn’t extend only to instantiating and configuring classes. Whenever you come across.NET collections, there are various ways in which you can treat them in the same way as Python containers, but there are some differences.
We started this section by looking at how you add controls to a form. Adding to the Controls collection is one way, but another way has exactly the same effect. You can assign the parent control to the Parent property of the child control. Under the hood, the child control will be added to the parent’s collection.
>>> form = Form()
>>> label = Label()
>>> label.Parent = form
>>> len(form.Controls)
1
We’ve thoroughly covered how to add a new label to a form, so let’s look at some more ways to configure a label. In the process, you’ll meet a new .NET type: the structure.
Our form, with a single label, is still going to look pretty dull. In this section, you’ll add some color, literally.
All controls have two properties particularly related to color, ForeColor and BackColor. BackColor sets the background color of the control. The ForeColor affects elements of the control, such as the text of a label.
You specify the color using the Color structure from the System.Drawing namespace. System.Drawing lives in its own assembly; to use it, you need to add a reference to its assembly.
>>> clr.AddReference('System.Drawing')
>>> from System.Drawing import Color
Note
The struct type is suitable for representing lightweight objects. Although it’s always possible to represent these using classes, structs use less memory.
Structures carry small but related amounts of information when using a class isn’t justified. Structures typically have named fields, but they can also have constructors and members, and even implement interfaces. In Python, you’d probably use a class or create a data structure using the built-in types; when you use structures from IronPython, it’s likely to be making use of ones from .NET.
The Color structure has a multitude of fields, representing the .NET selection of predefined colors with weird and wonderful names.[11] To use a specific color, specify it by name.
>>> label.BackColor = Color.AliceBlue
>>> label.ForeColor = Color.Crimson
Individual colors are defined by four eight-bit values—the Red, Green, Blue, and Alpha channels—for each specified color. You can access these values on the named members of the Color structure.
>>> Color.Red.R, Color.Red.G, Color.Red.B
(255, 0, 0)
>>> Color.Red.A
255
If you can’t find the color you need from the fantastic selection of named colors that the .NET framework offers, you can create new ones with the FromArgb method, which has several overloads. The most common way of using it is to pass in three integers representing the red, green, and blue components.
>>> newColor = Color.FromArgb(27, 94, 127)
In the exploration of control properties, you’ve now encountered several .NET types. One you haven’t yet seen is the enumeration. In the next section, you’ll use the FormBorderStyle property, which takes an enumeration.
So far, you’ve been configuring the humble label. The label has another property inherited from Control: the BorderStyle. It isn’t normal to configure a border on a label. It makes more sense to configure this on a Form, using the FormBorderStyle property instead.
Unsurprisingly, BorderStyle and FormBorderStyle configure the style of border that Windows Forms draws controls with. You might want to change the border style on a panel (containing a group of controls) to make it stand out within a user interface, or you might want to make a form look more like a dialog box.
You have three different border styles to choose from; you specify the one you want using a .NET type called an enumeration.
The FormBorderStyle enumeration belongs in the System.Windows.Forms namespace. It has the following three members:
Fixed3D—. A three-dimensional borderFixedSingle—. A single-line borderNone[13]—. No border
To change the border style of a form, you set the FormBorderStyle property to a member of the BorderStyle enumeration.
>>> form = Form()
>>> form.FormBorderStyle = FormBorderStyle.Fixed3D
This pattern is used quite a bit in Windows Forms. You’ll often configure controls by setting a property, using an enumeration with the same (or similar) name as the property. Now it’s time to put together everything you’ve learned so far and see the results.
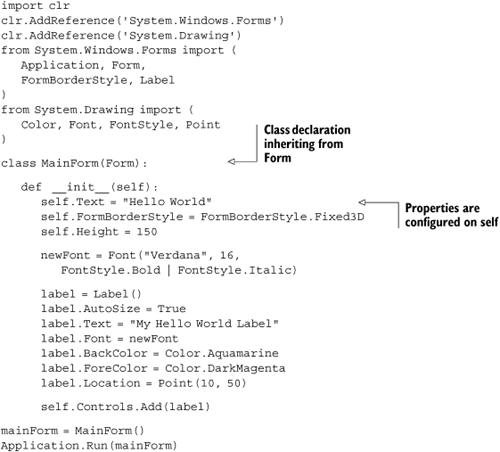
We’ve now covered quite a lot of theory. Let’s put it into practice and display a form with a configured label. You’ll use a few .NET types that you haven’t yet seen, but it should be obvious what they’re doing. Listing 3.1 creates a form that shows a label. The font, color, and position of the label are configured using the types we’ve been discussing.
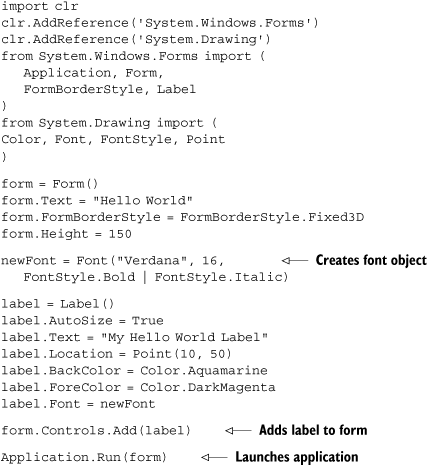
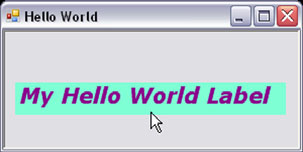
In figure 3.6, you can see the result, showing a form with a configured label. The only really new part of the code in this listing is setting the font on the label.
Fonts are created using the Font class from the System.Drawing namespace. You can create fonts in several ways; Font has fourteen different ways of calling its constructor! This example uses a string to specify the font family, an integer for the size, and the FontStyle enumeration for the style. To make the font bold and italic, the style is specified with a bitwise OR of the two different FontStyle members.
FontStyle.Bold | FontStyle.Italic
This form is still pretty dull, though; it doesn’t do a great deal. Once Application.Run has been called the event loop is in charge of the application. To make things happen, the application has to be able to respond to events.
In the form you’ve created, you haven’t set up any event handlers. When programming with a GUI toolkit, the usual model is event-based programming; this is the case for Windows Forms.
Instead of following a linear path through a program, you put in place event handlers to respond to certain events. The message loop (sometimes called the application loop or the message pump) manages these events and calls your event handlers when an event they’re listening for occurs.
These events can be a great deal of things—key presses, mouse clicks, or a control receiving focus, for example. You usually have the chance to respond to events at several different levels. You could put an event handler to respond to any mouse clicks (and possibly cancel the event); or, if the click happens over a button, you could listen to the click event on the button instead.
Events are also used throughout the .NET framework for working with networks, timers, threads, and more. Handling events from IronPython is very easy; let’s explore them using the MouseMove event.
In the pages of control members that we’ve looked at so far, you might have noticed the parts of the pages headed Public Events, Protected Events, and Private Events. These are all the different events that these controls can raise. To have your code respond to these events, you create event handlers and add them to the event.
If you (again) browse over to the Form Members page and look in the Public Events section, you’ll see an event called MouseMove. This event allows a control to respond to mouse moves while the mouse is over the control. You could use this event to draw a rectangle on the form as the user moves the mouse—say, to highlight an area of an image.
The page you reach by following the MouseMove link from the Form Members page tells you about the event. Most straightforwardly, it tells you that this event Occurs when the mouse pointer is moved over the control.
More importantly, it also shows you how to use the event, but you have to dig into the C# example. In the long code example, which illustrates using various mouse events, is the following line:
this.panel1.MouseMove += new
System.Windows.Forms.MouseEventHandler(this.panel1_MouseMove);
MouseMove is an event on a panel. The event handler is added to the event using += (add-in-place). Event handlers in C# must be delegates; for mouse events, the delegate needs to be a MouseEventHandler, which is defined in System.Windows.Forms. In C#, delegates are classes that wrap methods so that they can be called like functions. Here the delegate wraps the panel1_MouseMove method, which is to be called when the MouseMove event occurs. Luckily, it’s easier to use events from IronPython than it is from C#.
You need to know how to write your event handler, and the only important detail is what arguments the handler will receive. In the C# example, the panel1_MouseMove method is declared as
private void panel1_MouseMove(object sender,
     System.Windows.Forms.MouseEventArgs e)
{ ... }
The event handler receives two arguments: sender, which is declared as being an object (very informative); and event, which is an instance of MouseEventArgs. This pattern is the same for all Windows Forms event handlers; they receive the sender and an event. The sender is the control that raises the event.
Not all events have particularly useful information on them; sometimes it’s enough to know that the event occurred, and you can ignore the event passed into the handler. For the MouseMove event, the event can tell you the location of the mouse.
Now you need to know how to create the required event handler in IronPython.
Python has a native function type, so the IronPython engine does some behind-the-scenes magic for you, allowing you to use functions as event handler delegates.
Creating and adding simple event handler looks like the following:
form = Form()
def onMouseMove(sender, event):
   print event.X, event.Y

form.MouseMove += onMouseMove
We turn this into something more interesting by building on our example with a label. When the mouse moves over the label, the color of the label text and background will change. You’ll make the color random by using the Random class from the System namespace and the FromArgb method of the Color structure (listing 3.2).
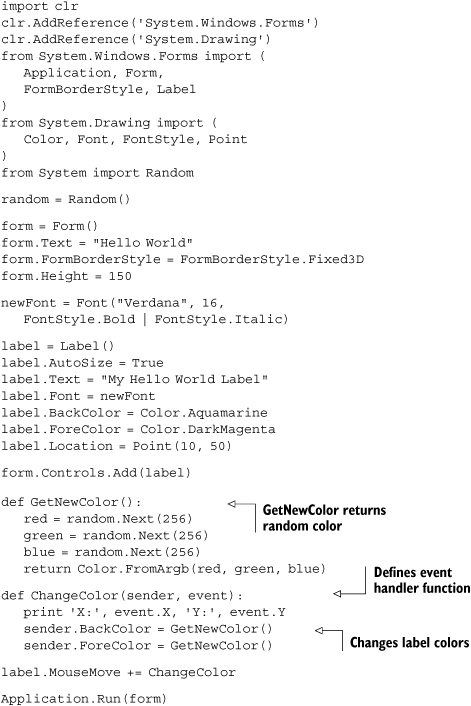
Figure 3.7 gives you an idea of what to expect when you run this code. You should see a form and label looking similar to the previous example that introduced the Label class. When you move the mouse over the label, the MouseMove event is raised, and the handler is called. The label text and background colors should change to random colors, and the mouse location is printed.
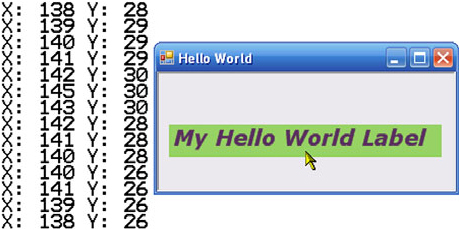
You might have noticed that the values for X and Y, the mouse coordinates, are low. The coordinates are the position of the mouse within the label, called the client area of the label. The top left of the label is position 0,0. Controls have methods to convert locations within their client area to screen coordinates[14] (and vice versa); but, when specifying locations within a control, you always use client coordinates. When you position controls within a container, you don’t need to know where they are on the screen or their parent controls.
You also use a new class, Random, from the System namespace. The IronPython engine already has a reference to the System assembly, so you don’t need to explicitly add one. The Random class is an easy-to-use, pseudo-random number generator. You create an instance of Random at the module level; the GetNewColor function uses it to fetch three integers from 0–255 and return a new color.
We’ve gone through the techniques to look up classes in the MSDN documentation (almost in excruciating detail for the early examples). If you want to know more about the Random class, we’ll leave it as an exercise for you to find the documentation, both for the class and the Next method.
The examples so far have passed form instances directly to Application.Run. A much better way of organizing your code is to create a subclass of Form and do your setup in the constructor. This also makes a great example of subclassing a .NET class in IronPython.
Creating IronPython classes that inherit from .NET types works fine. In listing 3.3, you inherit from Form to better organize the code.
This code has exactly the same result as the first Hello World example with the label. The only difference is that the form is configured inside the __init__ method (the constructor). __init__ is called when a new instance of MainForm is created; inside the body of this method, the variable self refers to the new instance. Because MainForm is a subclass of Form, it has all the same properties and is configured in the same way you saw earlier.
By now, you can see how easy it is to work with the .NET framework from IronPython. If you’re a Python programmer, you should note that the different .NET types merely behave as objects with attributes and methods, and you have a (large) new set of libraries to work with. If you’re a .NET programmer, then all your knowledge of .NET is relevant to IronPython. Now that we’ve covered the basic principles, it’s time to start on the meat!
.NET objects come in various types, which are part of a type system called the Common Type System.[15] Most of the types in this system fall into one of the following categories:
Built-in types
Pointers
Classes
Structures
Interfaces
Enumerations
Delegates
We’ve encountered or discussed all of these types, except for pointers (and we need to discuss interfaces a bit more deeply). Pointers[16] are mainly used for interacting with unmanaged resources, and don’t turn up in most applications. You’ve also seen how easy it is to use .NET objects from within IronPython; it can be simpler and require less lines of code than using them with a language like C#!
In the next couple of chapters, you’ll build an IronPython application that takes advantage of a wider selection of the huge number of framework classes available to you. As the application gets larger, a good structure will be essential for keeping the code readable and easy to maintain and extend. We’ll be exploring good Python practice, and growing your understanding of IronPython and .NET, by using some common design patterns.
[1] As of .NET 3.5 SP1. Source: http://blogs.msdn.com/brada/archive/2008/08/18/what-changed-in-net-framework-3-5-sp1.aspx.
[2] Command-line applications, Windows applications, and web applications or services.
[4] Control is the .NET word for a GUI element. In other GUI libraries, they’re often referred to as widgets.
[5] It’s also easier to skin controls to customize their appearances.
[6] Pythonic is a subjective word used to describe whether or not a piece of code holds with recommended Python idioms.
[7] See http://msdn2.microsoft.com/en-us/library/ya5y69ds.aspx for a reference to all the C# built-in types.
[8] Generating IronPython from Visual Studio 2005 requires the full version of Visual Studio and the SDK; it can’t be done with Visual Studio Express. Instead, you can use IronPython Studio, which is based on Visual Studio 2008 and works as a standalone application or integrated into Visual Studio.
[10] http://msdn2.microsoft.com/en-us/library/system.windows.forms.control.controlcollection_members.aspx
[11] As usual, you can see them all on the Color Members page.
[12] Not everything that looks like an enumeration is one. The use of predefined colors, such as Color.Red, makes Color look like an enumeration—it’s a struct.
[13] Normally an object member named None would be invalid syntax in Python. This is a limitation of the CPython parser and would be inconvenient when working with .NET, which has several enumerations with members named None.
[14] PointToScreen and PointToClient methods.
[16] You can find a good reference on pointers at http://www.codeproject.com/KB/dotnet/pointers.aspx.