
This chapter covers |
|---|
|
Because Python is interpreted, it’s often referred to as a scripting language. The Python community regards this term as slightly derogatory because it seems to imply that Python is suited to only simple scripting tasks rather than larger applications. Having said that, Python does make a great scripting language. Scripts can be kept as text source files, common tasks can be achieved with very little code, and you don’t need to use classes or even functions if they aren’t appropriate for the job at hand. The greatest advantage of Python for system administration tasks is that, as a full programming language, it’s easy to migrate what starts as a simple script into a full application.
In this chapter, we look at system administration with IronPython, taking advantage of the features that Python and the .NET framework provide. The aspects of .NET that we use are Windows Management Instrumentation (WMI) and PowerShell, both of which are frameworks aimed particularly at the systems administrator.
Every computer user does some system administration, even if it’s only maintaining a stable and working system. System administration encompasses everything from keeping a computer operating to maintaining large networks with many computers and servers. Although these are radically different situations, they share some needs and techniques in common. We start our look at administration with an example of simple scripting.
For simple tasks, one of Python’s great advantages is that it doesn’t push any particular programming paradigm. If you want to write a script to automate a regular task, you aren’t forced to write an object-oriented application; you aren’t even forced to write functions if the task at hand doesn’t call for them. Listing 10.1 is a script for a typical admin task of clearing out the temp folder of files that haven’t been modified for more than seven days.
Python has a rich tradition of being used for shell scripting, particularly on the Linux platform. Commands are executed on the command line, and output their results on standard out, often as a series of lines. Commands that work on multiple files can often accept input from standard input, so commands can be chained together; the output from one script forms the input to the next.
Microsoft has extended the shell scripting concept with PowerShell; you can pipe objects, as well as text, between commands. We look at integrating IronPython with PowerShell later in this chapter, but first we use IronPython to create more flexible shell scripts.
Because Python is widely used by system administrators, it has grown many libraries to make their lives easier, both in the standard library and third-party libraries. The script in listing 10.1 uses the Python standard library modules os, stat, and datetime to work with paths, files, and dates. There are many more standard library modules, and table 10.1 lists some particularly useful for scripting.
Table 10.1. Standard library modules useful for shell scripting
Name | Purpose |
|---|---|
| Working with processes and operating system–specific information |
| Handling files and paths |
| Containing more system-specific information and the standard input, output, and error streams |
| Interpreting calls to |
| High-level file operations including copying, moving, and deleting trees of directories |
| Pathname pattern expansion |
| Path and filename pattern matching |
| File and directory comparison |
Two common needs in command-line scripts are to interpret command-line arguments and to read from configuration files. Although the Python standard library does include modules for these tasks,[1] alternative libraries do the job better, as we demonstrate in our next example.
One command invaluable on UNIX-like systems, but missing from the Windows command-line environment, is the find command. Windows does have a command called find, but it’s for searching for text in files and the search feature of the Explorer user interface isn’t a replacement for command-line search. The UNIX find does a massive range of different things, but the functionality I (Michael) miss most is searching a path for files whose name matches (or doesn’t match) particular patterns. Let’s see how much Python code it takes to implement this functionality.
The specification for search.py is as follows:
Accepting a path, or list of paths, to search for files (defaulting to the current directory)
Accepting a pattern to match filenames with, using the standard * and ? wildcards and defaulting to everything
Accepting a pattern to exclude files
A mechanism for excluding specific directories from the search
Printing matching files to standard output on individual lines
As a first step, let’s look at how our script can meet that specification by accepting command-line arguments.
Command-line arguments are exposed to you in their raw form as sys.argv, but you can make life easier by using a module called argparse[2] written by Steven Bethard. Listing 10.2 is a simple function that creates an argument parser and uses it to parse the arguments passed at the command line.
This snippet only uses the most basic features of argparse, which has a great deal more functionality that we haven’t needed to use. To be able to specify multiple path arguments, you use the append action rather than the store action for this argument, and provide an empty list as the default value.
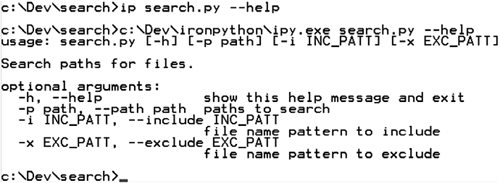
You get two of the nicest features of argparse with no deliberate effort. If a user calls the script with an invalid set of arguments, argparse will print a helpful error message and exit. Additionally, it automatically generates a useful help message if the script is called with the arguments -h or --help. You can see this message in figure 10.1.
As well as handling command-line arguments, you need a way of specifying directories to exclude from the search. We regularly work with Subversion repositories and need to locate files within them. Subversion repositories on the filesystem keep copies of the working base of files under version control in hidden directories called .svn. Any file that matches will inevitably also match a copy, so we like to be able to exclude all.svn directories from searches. One way of doing this is through a configuration file.
I prefer the ConfigObj[3] module for reading (and writing) ini-style configuration files. This module also has many advanced options, but makes simple access to config files trivially easy. Listing 10.3 is a function to read a list of excluded directories from a config file called search.ini, which is stored in the user’s home directory.
Example 10.3. Reading config files with ConfigObj
from configobj import ConfigObj

def GetExcludesFromConfig():
   home = os.path.join(os.getenv('HOMEDRIVE'),
                 os.getenv('HOMEPATH'))

   rcfile = os.path.join(home, 'search.ini')
   config = ConfigObj(rcfile)
   exclude_dirs = config.get('exclude', [])
   if not isinstance(exclude_dirs, list):
      exclude_dirs = [exclude_dirs]

   return exclude_dirs
This code first constructs the path to the user’s home directory by combining the environment variables HOMEDRIVE and HOMEPATH. On a UNIX-type system, you could simply use the HOME environment variable. Another alternative would be to call os.expanduser(~), which does the same thing under the hood.
You can access the config file by creating a ConfigObj instance with the path to the file. You don’t have to worry about whether this file exists or not. By default ConfigObj doesn’t raise an exception if the file doesn’t exist because you may be creating a new one.
Normally ini files store key/value pairs, in sections defined by names in square brackets. ConfigObj doesn’t require values to be in a section—which is useful for simple configuration files. It will also read a comma-separated list of values into a list of strings for you. The search.ini file only needs to be a text file with a single entry, exclude_dirs.
exclude_dirs = '.svn', '.cvs'
Having read in the config file, you can access the members using dictionary-like access: exclude_dirs = config['exclude_dirs']. Unfortunately, if the config file isn’t found or the exclude_dirs member isn’t present, then a KeyError exception is raised. Instead, you can use the get method to fetch the value, supplying a default value of an empty list if exclude_dirs isn’t available.
If there was only a single value and the user forgot the trailing comma to make it a list, then exclude_dirs would be read in as a string instead of a list. Before returning the list of excluded directories, you check that it is a list; and, if it isn’t, you turn it into one.
You now have the config file and command-line handling written, but the script needs to be able to recursively walk directories returning filenames for you to filter.
The Python standard library does contain a function for traversing directory trees (os.walk), but it doesn’t include a mechanism for easily excluding directories and its interface isn’t ideal for our use case. Fortunately, this is an ideal situation for a simple Python generator. Reinventing the wheel may be bad as a general practice; but, if it can be done in ten lines of Python, then it’s worth making an exception! Listing 10.4 recursively walks a directory tree, skipping directories in the exclude list, yielding filenames as it finds them.
The final piece of the puzzle is to use the helper functions we’ve written to filter the filenames and print the relevant ones to standard out.
To filter the filenames, using any include or exclude patterns that the user may have supplied, you can use the fnmatch[4] module. To do this, you need to use the arguments as parsed by argparse. Listing 10.5 shows the search function, which iterates over all the paths the user has specified, walks them with the walk function we just wrote, and filters filenames using fnmatch.fnmatch. It also has a section of code that glues everything together and runs when search.py is executed as a script.
One advantage of protecting the execution code with if __name__ == '__main__' is that search.py can be imported from as a module as well as executed as a script. The code is reusable; but, more importantly, you could (should!) write unit tests for the individual functions.
You can see in this listing how ParseArgs returns the arguments it has parsed. It returns them as a single object, and the individual arguments are accessed using the attribute names specified as the dest argument. The search function iterates over all the paths returned by walk (which handles excluding directories for you), and then filters the paths based on whether they do or do not match the include and exclude patterns.
So far we’ve accomplished writing a useful, and easily extensible, shell script in seventy lines of Python code.[5] Extending this script—for example, to take an extra command-line argument to return only files newer than a certain file in order to pipe the output to a backup script—would be simple.
As well as the flexibility of Python for creating admin tools, you also have the power of .NET at your fingertips. The Windows operating system includes a powerful system, aimed specifically at system administration, called Windows Management Instrumentation.
One of the primary Windows interfaces for system management is Management Instrumentation, known affectionately by the acronym WMI. WMI is a management infrastructure, through which system components provide information about their state and notification of events. You can use WMI to change configuration, interrogate the local system or remote computers, and respond to events. Practical uses for WMI include tasks like inventorying all installed software, uninstalling programs, creating scheduled tasks, and obtaining information about running services. Additionally, applications can provide instrumentation so that they can be queried by WMI.
Despite having Windows in the name, WMI is an implementation of the platform-independent Web-Based Enterprise Management (WBEM) and Common Information Model (CIM) standards. But, although parts of the necessary components have been implemented in Mono, large parts of it are considered too Windows-specific and will probably never be implemented. Sadly, this means that most of the examples in this section don’t work with Mono.
Although WMI provides you with access to some very low-level system information, it has a good high-level managed interface, in the form of the System.Management namespace. This makes it easier to work with WMI through .NET and IronPython than some of the alternatives.
System.Management provides a managed interface to the WMI infrastructure. The core classes are ManagementObjectSearcher, ManagementQuery, and ManagementEventwatcher. WMI queries are created using Windows Query Language (WQL), which is a derivative of SQL. Much of working with WMI involves knowing how to construct your WQL queries.[6]
Listing 10.6 shows a basic example of WMI that queries and prints the processor usage percentage every five seconds.
ManagementObjectSearcher is a more commonly used way of executing queries, and it will return a collection of management objects. For example, listing 10.7 queries the system for information about all the attached logical disks.
Example 10.7. Querying the system with ManagementObjectSearcher
import clr
clr.AddReference("System.Management")
from System.Management import ManagementObjectSearcher

query = "Select * from Win32_LogicalDisk"
searcher = ManagementObjectSearcher(query)

for drive in searcher.Get():
   for p in drive.Properties:
      print p.Name, p.Value
   print
If you know the property that you’re interested in, you can index instead of going through drive.Properties. For example, to get the drive name you can use drive["Name"].
Things get interesting when you start to monitor events. For this, you use the ManagementEventWatcher class. Listing 10.8 creates a watcher that calls an event handler when new processes start.
This code is really very simple. All the magic happens in constructing the WQL query and adding an event handler to the event watcher instance. Under the hood, WqlEventQuery constructs the following WQL query:
select * from __InstanceCreationEvent
within 1 where TargetInstance isa "Win32_Process"
You specify a timeout when you construct the query (using System.Timespan); the timeout corresponds to the within clause of the WQL query. Some events have a builtin mechanism for notifying WMI (WMI event providers); these are called extrinsic events. WMI discovers other events, intrinsic events, by polling, and the timeout tells WMI how often to poll for you.
This code snippet listens for events by hooking up a handler to the EventArrived event. Instead of using this event, you can make a call to watcher.WaitForNextEvent, which blocks until the event is raised. In this situation, you can also set a timeout directly on the watcher. Instead of blocking forever, the timeout causes the watcher to throw an exception if an event isn’t raised in time. The following snippet shows this in practice:
>>> watcher = ManagementEventWatcher()
>>> watcher.Query = query
>>> watcher.Options.Timeout = TimeSpan(0, 0, 5)
>>> e = watcher.WaitForNextEvent()
Traceback (most recent call last):
SystemError: Timed out
As we mentioned, the secret knowledge needed for harnessing WMI is how to construct your WQL queries. For example, to be notified of new USB storage devices becoming available (plug-and-play events), you could use this query:
wql = ("Targetinstance isa 'Win32_PNPEntity' and "
      "TargetInstance.DeviceId like '%USBStor%'")
query = WqlEventQuery("__InstanceCreationEvent", timeout, wql)
Let’s look a bit more at WQL and the elements available to you to construct queries.
The basic pattern for WQL notification queries is as follows:
SELECT * FROM __EventClass WITHIN PollingInterval WHERE TargetInstance ISA
     WMIClassName AND TargetInstance.WMIClassPropertyName = Value
The key to constructing useful queries is knowing which events, classes, and properties provide you with the information you need.
Intrinsic events are represented by classes derived from one of the following:
The instance events, which are the most common, are as follow:
__InstanceCreationEvent
__InstanceModificationEvent
__InstanceDeletionEvent
Extrinsic events derive from the __ExtrinsicEvent class.
When an event is raised, the corresponding WMI class is instantiated; this is the TargetInstance we’ve already used in some of our examples. You can navigate the documentation for all the standard WMI classes at http://msdn.microsoft.com/library/default.asp?url=/library/en-us/wmisdk/wmi/wmi_classes.asp.
Once you have an event, and have pulled the target instance out, you can explore the interesting properties through the Properties collection. Various tools are available to investigate WMI namespaces and all the classes they provide.[7]
Sometimes it’s useful to work directly with these classes—which you do by creating an instance of ManagementClass corresponding to the WMI class you’re interested in. Listing 10.9 illustrates this by creating events with a timer.
This code[8] would be useful for making your WMI demos a bit more predictable; but beyond that, it doesn’t have much practical application. Fortunately, you can do more useful things with ManagementClass, such as listing all the processes that run on startup.
>>> StartupClass = ManagementClass('Win32_StartupCommand')
>>> processes = StartupClass.GetInstances()
>>> for p in processes:
...   print p['Location'], p['Caption'], p['Command']
As well as interesting properties, many WMI instances also have useful methods (although not Win32_StartupCommand, as it happens). The Win32_Process class has some, though; and because WMI method invocation is slightly odd, here’s an example:
>>> from System import Array
>>> StartupClass = ManagementClass('Win32_Processes')
>>> processes = StartupClass.GetInstances()
>>> proc = list(processes)[-1]
>>> proc.Properties['Name'].Value
'csrss.exe'
>>> arg_array = Array.CreateInstance(object, 2)
>>> proc.InvokeMethod('GetOwner', arg_array)
0
>>> arg_array
System.String[]('SYSTEM', 'NT AUTHORITY')
You can see from the GetOwner method documentation[9] that it takes two strings as arguments. (The documentation also specifies the meaning of the return value—in this case, 0 for success.) These are out parameters to be populated with the user who owns the process and the domain under which it’s running. But, because the arguments have to be supplied as an array, you can create a fresh array with two members and pass it into InvokeMethod along with the method name.
Another method on Win32_Process is SetPriority.[10] This takes a single integer (the priority) as an argument (64 for idle priority), which you put in an object array.
>>> arg_array = Array[object]((64,))
>>> proc.InvokeMethod('SetPriority', arg_array)
0
You’ll see shortly that PowerShell can make it easier to discover the methods on WMI objects.
A lot of the real power of WMI for system administrators is in the ability to connect to computers on the network. Because this isn’t something we’ve covered yet, let’s see how it’s done.
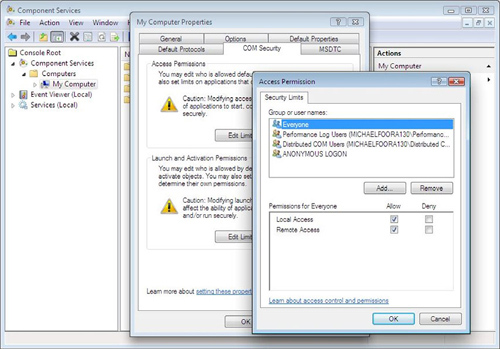
Here’s where it starts to get fun. Connecting remotely isn’t something you want to allow any old soul to do, and so the security permissions have to be set correctly on the target computer. There are a couple of places where you might have to adjust permissions. To allow remote access, the first place to try is Console Root > Component Services > My Computer > (right-click) Properties > COM Security from the DCOMCNFG application.[11] You can launch DCOMCNFG from the command line, and it should look like figure 10.2.
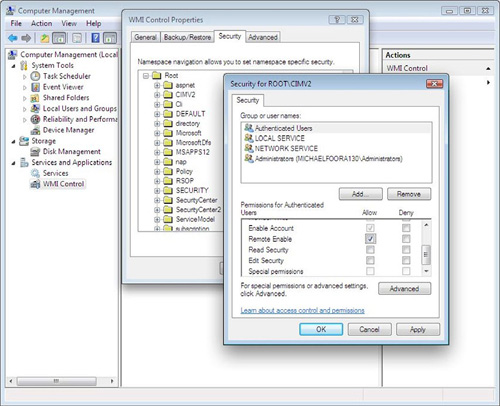
If you still get access permission errors in any of the following examples, you can also set the access permissions for individual WMI namespaces via the Computer Management console from the Control Panel. The full route to this dialog is Control Panel > Administrative Tools > Computer Management > Services & Applications > WMI Control > (right-click) Properties, and it should look like figure 10.3!
We haven’t talked about WMI namespaces at all yet. All the examples we’ve looked at so far have worked without specifying an explicit scope. This means that they’ve connected to the default namespace on the local machine. To connect to machines on a network, you’ll need to connect to an explicit scope.
The default scope is \localhost
ootcimv2, which means the rootcimv2 namespace on the local machine. CIMV2 (where CIM stands for Common Information Model) is the default namespace and contains all the most commonly used classes, including all the ones we’ve used so far. There are other namespaces such as rootDEFAULT, which contains classes for working with the registry. Other providers can register namespaces to provide instrumentation via WMI. The BizTalk namespace is rootMicrosoftBizTalkServer, SQLServer is rootMicrosoftSqlServer, and so on.[12]
To specify the default namespace on a remote machine (in the same domain on the network), you specify a scope like \FullComputerName
ootcimv2. You do this with the .NET ManagementScope class.
We’ve already talked about how you enable permissions for remote connections, but you have two choices about how to connect. You can either connect using the credentials of the user running the script, called impersonation, or you can explicitly specify a username and password for the connection.
Listing 10.10 shows how to create a ManagementScope for a connection to a remote computer with a specific username and password.
Example 10.10. Specifying username and password for a WMI connection
from System.Management import (
   ConnectionOptions, ManagementScope
 )
options = ConnectionOptions()
options.EnablePrivileges = True
options.Username = "administrator"
options.Password = "******"
network_scope = r"\FullComputerName
ootcimv2"
scope =  ManagementScope(network_scope, options)
Listing 10.11 shows how to make the same connection using impersonation.
Example 10.11. A WMI connection with impersonation
from System.Management import (
   AuthenticationLevel, ImpersonationLevel,
   ManagementScope, ConnectionOptions
)
options = ConnectionOptions()
options.EnablePrivileges = True
options.Impersonation = ImpersonationLevel.Impersonate
options.Authentication = AuthenticationLevel.Default
network_scope = r"\FullComputerName
ootcimv2"
scope =  ManagementScope(network_scope, options)
Whether you should use authentication or impersonation depends on the details of the network you’re working with. If the computers you’re connecting to are configured to allow remote connections from any user with the correct privileges, then impersonation is easier. If the computer limits connections to a specific user, or set of users, then you’ll need to use authentication.
Having created the scope, you use it to create a ManagementEventWatcher and start listening for events. Listing 10.12 is more of a real-world example than some of the examples we’ve used so far. It monitors a remote computer for low memory situations (specifically when the available physical memory drops below 10 MB).
If you’re monitoring a network of servers, you’re going to be interested in (and concerned about) events like this. Because you’re monitoring for a change in the system, this event is an __InstanceModificationEvent, and the WQL is as follows:
TargetInstance ISA "Win32_OperatingSystem"
AND TargetInstance.FreePhysicalMemory < 10000
Another useful thing to watch for[13] might be disk space dropping below a certain threshold on any fixed disk (that is, not including USB sticks/CDs and so on). Here’s WQL with the threshold set at 1 MB:
TargetInstance ISA 'Win32_LogicalDisk' AND TargetInstance.DriveType = 3
AND TargetInstance.FreeSpace < 1000000
(You could achieve a similar goal by watching for the extrinsic event Win32_VolumeChangeEvent.)
To be notified if CPU usage goes above 80 percent on any processor, the WQL is as follows:
TargetInstance ISA 'Win32_Processor' AND TargetInstance.LoadPercentage > 80
The next query monitors for unauthorized access (failed login attempts). This query relies on access auditing being in place so that the entries go into the event logs. To remotely access the security logs, you’ll need to specify the security privilege. Setting options.EnablePrivileges = True should be enough; but, if you’re using authentication, then you may need to set options.Authentication = AuthenticationLevel.Security. This event is an __InstanceCreationEvent, and the WQL is as follows:
TargetInstance ISA 'Win32_NTLogEvent' AND
TargetInstance.CategoryString = 'Logon/Logoff' AND TargetInstance.Type =
'audit failure'
Systems administration requires a great many tools for different situations. Despite its baroque interface, WMI is an extremely powerful tool. Because of the level of integration with .NET through the managed APIs, WMI works very well with IronPython. In exploring those APIs, we’ve uncovered quite a few different ways it can be useful, whether you’re investigating a single machine or monitoring a whole network of computers. The advantage of Python here is that, as well as rapidly creating simple diagnostic scripts (or even working interactively), you can also build larger monitoring applications where WMI is only a small part of the whole solution.
Another useful tool for Windows system administration is PowerShell. It’s more commonly used as a standalone environment, but we’re going to look at how IronPython can be part of the answer from inside PowerShell and how PowerShell can become another component for use in IronPython.
The (relatively) new kid on the block for system administrators is PowerShell. PowerShell extends the concept of shell scripting to allow you to pipe objects between commands instead of just data. It’s essentially a programming language (cleverly disguised as a scripting environment) specialized for Windows system administration. We know what you’re thinking; you have Python—why would you need another language?
Note
There’s an open source implementation of PowerShell for Mono called Pash (PowerShell + bash). See http://pash.sourceforge.net/ for more details. It aims to be a faithful implementation of PowerShell, with the project page proclaiming the user experience should be seamless for people who are used to Windows’ version of PowerShell. The scripts, cmdlets and providers should runs AS-IS (except where they use Windows-specific functionality).
In this section, you’ll see that IronPython and PowerShell can interact in two different ways. We use PowerShell commands and APIs directly from IronPython, and we also use IronPython in PowerShell as a way of overcoming some of PowerShell’s limitations.
The normal way to use PowerShell is as a replacement command line. Running PowerShell opens a console window that looks much like the normal Windows command prompt, cmd.exe, but is in fact much more like the Python interactive interpreter. You execute PowerShell commands that return objects, which you can store or pipe to other commands. You can see the PowerShell command prompt in figure 10.4.
PowerShell processes the output of its commands as .NET objects. The commands themselves (cmdlets) are usually thin wrappers around .NET classes. The PowerShell infrastructure provides argument parsing and binding, a runtime, and utilities for formatting and displaying results. This infrastructure is provided through a set of .NET assemblies installed when you install PowerShell. The top-level namespace for this infrastructure and its accompanying APIs is System.Management.Automation.[14] This is an apposite name. Automation is at the heart of systems administration. Humans are unreliable and the more we can automate, and keep humans out of the process, the better. Naturally, these namespace are available to use from IronPython.
Note
To follow these examples, you’ll need PowerShell 1.0 installed.[15] This section isn’t a comprehensive introduction to PowerShell. If you want to learn more about PowerShell, then Windows PowerShell in Action by Bruce Payette (Manning, 2007) is a great resource.
The simplest way to access PowerShell functionality from IronPython is by creating a runspace, which is a kind of execution scope for PowerShell commands. The PowerShell commands live in a different namespace, Microsoft.Powershell.Commands. You can use a runspace to execute commands by name, and don’t need to directly reference this namespace.
Listing 10.13 invokes a PowerShell command in a runspace and uses the object that the command returns.
The call to Invoke returns a collection of PSObject objects, which you can interact with. One use case is to take advantage of the WMI/PowerShell integration, which can make it easier to work with certain aspects of WMI. Listing 10.14 uses the Get-WmiObject command to examine the video controller and the CPU and to find a running process.
You’ll notice that the last command uses the filter keyword. This is a WMI query that uses PowerShell rather than WQL syntax. Like the WMI objects we’ve already worked with, PowerShell objects have a Properties collection that you can iterate over. They also have Methods and Members collections. Unfortunately, I got null reference exceptions when accessing the Methods collection; but you can find methods by iterating over all members and checking for instances of the PSMethod type.
The RunspaceInvoke instances are great for executing individual commands, but you can achieve more by creating a pipeline. This gets you, in effect, a PowerShell environment embedded into IronPython. Listing 10.15 creates a pipeline, adds commands to it, and then invokes the whole pipeline.
Example 10.15. The PowerShell pipeline
import clr
clr.AddReference('System.Management.Automation')
from System.Management.Automation.Runspaces import (
RunspaceFactory
)
runspace = RunspaceFactory.CreateRunspace()
runspace.Open()
runspace.SessionStateProxy.SetVariable("processName", 'ipy')
pipeline = runspace.CreatePipeline()
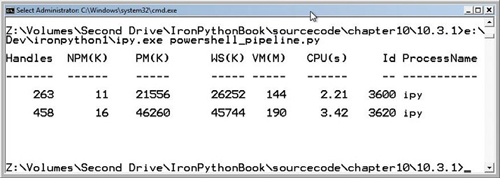
pipeline.Commands.AddScript('Get-Process -Name $processName')
pipeline.Commands.Add('Out-String')
results = pipeline.Invoke()
for result in results:
print resultThis code uses a different technique to create the runspace—from a factory that returns a Runspace[18] instance, which you must Open before using it. The runspace also has an OpenAsync method, which opens it in another thread.
The code also sets the processName variable in the execution environment via the SessionStateProxy. These APIs are analogous to the IronPython hosting API, and could be useful if you want to expose a PowerShell scripting environment to your users!
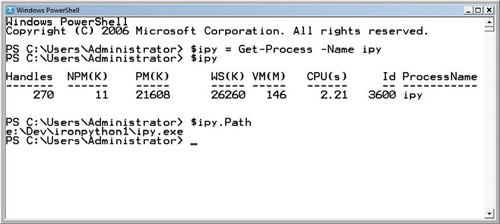
The last command added to the pipeline command collection is the Out-String command. This formats the results using the PowerShell pretty printer so that, when you print the results, you get nicely formatted output like the one in figure 10.5.
We’ve looked at one side of the coin: embedding PowerShell in IronPython. Let’s move into the flip side.
Because PowerShell is a .NET scripting environment, it can use .NET assemblies and objects. The IronPython interpreter is an ordinary (for some value of ordinary) .NET object and can easily be used from other .NET applications, which includes PowerShell.
So why on earth would you want to do this? Well, it turns out that you can use IronPython to overcome certain limitations with PowerShell. These limitations include operations that would block the console or actions that should only be done from an STA thread and don’t work directly from PowerShell, which runs in a Multi-Threaded Apartment (MTA).[19] You can also use IronPython from within PowerShell to work with Python libraries.
You embed IronPython via its hosting API—which is something we’ll explore in more detail when we look at providing a scripting API to a .NET application with IronPython. IronPython 1 and 2 have different hosting APIs, so how you access IronPython from inside PowerShell depends on which version of IronPython you have.
Listing 10.16 shows the PowerShell code necessary for executing code with IronPython 1. It assumes you have the IronPython assemblies in the current working directory.

The call to load assemblies requires an absolute path, which you construct with a call to Resolve-Path (which resolves paths relative to current working directory). Having constructed an IronPython engine, Python code is executed with the Execute method.
Listing 10.17 shows the equivalent for code for IronPython 2. The code is more complicated because IronPython 2 is built on the DLR and the hosting API is more generic.
This snippet uses a different technique to load the assemblies. It assumes you’ve set an environment variable IP2ASSEMBLIES with the path to a directory containing the IronPython 2 assemblies.
To execute code you have to create a script source from the code string and the SourceCodeKind.Statements enumeration member. The syntax to do this in PowerShell is somewhat ugly. The obvious thing to do is to abstract this little dance out into a function like listing 10.18.
Example 10.18. Executing Python code from a function in PowerShell
$base_dir_env = Get-Item env:IP2ASSEMBLIES
$base_dir = $base_dir_env.Value
$first_path = Join-Path $base_dir 'Microsoft.Scripting.dll'
$second_path = Join-Path $base_dir 'IronPython.dll'

[reflection.assembly]::LoadFrom($first_path)
[reflection.assembly]::LoadFrom($second_path)

$global:engine = [ironpython.hosting.python]::CreateEngine()
$global:st = [microsoft.scripting.sourcecodekind]::Statements

Function global:Execute-Python ($code) {
   $source = $engine.CreateScriptSourceFromString($code, $st)
   $scope = $engine.CreateScope()
   $source.Execute($scope)
}
This listing creates a function, which executes code that you pass in as a string. PowerShell’s scoping rules are very different from Python’s.[21] The global keyword makes Execute-Python available to the interactive environment when this code is executed from a script. Because PowerShell is dynamically scoped, all the variables the function uses also have to be global because they’ll be looked up in the scope that calls the function.
Execute-Python is called, as follows:
Execute-Python 'print "Hello world from PowerShell"'
You can build on this general technique, whether working with IronPython 1 or 2, to do various things useful from within the PowerShell environment.
PowerShell runs in an MTA thread, which causes problems for code that has to be called from an STA. This prevents you using Windows Forms objects, such as calling Clipboard.SetText to put text on the clipboard. You can get around this by spinning up an STA thread from IronPython and setting the clipboard from there[22] (listing 10.19).
Warning
Unhandled exceptions inside threads will cause PowerShell to bomb out and die! You will get the exception traceback when it happens. Running PowerShell from cmd.exe rather than launching it from the start menu will give you a chance to read the traceback.
Example 10.19. Setting the clipboard from PowerShell with IronPython 1
$global:ClipCode = @'
import clr
clr.AddReference("System.Windows.Forms")
from System.Windows.Forms import Clipboard
from System.Threading import (
   ApartmentState, Thread,
   ThreadStart
)
def thread_proc():
    Clipboard.SetText(text)

t = Thread(ThreadStart(thread_proc))
t.ApartmentState = ApartmentState.STA
t.Start()
'@

Function global:Set-Clipboard ($Text){
 $engine.Globals["text"] = $Text
 $engine.Execute($ClipCode)
}
This code works with IronPython 1 and assumes you’ve already created the IronPython engine as the $engine variable (and made it global). The reason this code is specific to IronPython 1 is that it sets the text variable in the Python engine Globals so that the IronPython code can use it to set the text on the clipboard. To make this code work with IronPython 2, you need to create an explicit execution scope and set the variable in there. You then need to pass the scope in when you call Execute on $ClipCode, and this is where the fun starts.
When you call Execute with one argument (a ScriptScope), it becomes a generic method. Calling generic methods from PowerShell is non-trivial. Luckily, Lee Holmes has solved this problem, so you’ll use his Invoke-GenericMethod[23] script to invoke Execute.
Again assuming that you’ve already created an IronPython engine, listing 10.20 creates a Set-Clipboard function that sets text on the clipboard using IronPython 2.
Another difference between this code and the code for IronPython 1 is that, for IronPython 2, you need to explicitly add references to the system assemblies, both System.dll and mscorlib.dll. In IronPython 1, the PythonEngine does this, but not in IronPython 2.
The code that finds the right generic overload of Execute isn’t pretty, but it’s abstracted away in the Invoke-GenericMethod script. The call parameters are as follows:
./Invoke-GenericMethod instance MethodName params arguments
params should be an array of strings with the type names of the arguments. The arguments parameter is the set of arguments that Execute is to be called with, passed in as an array of objects. If you pass in an individual string and an individual object for params and arguments, then PowerShell will cast them into arrays.
The next use case for IronPython from PowerShell is for handling events. In .NET, asynchronous events are raised on another thread, preventing you from using PowerShell script blocks as event handlers. The usual solution is to wait for the event to be raised on the main execution thread, which blocks the console. You can get around this by subscribing to the event from IronPython.
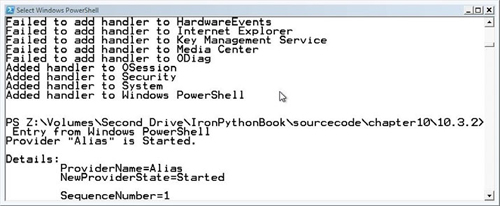
Listing 10.21 uses the EventLog class,[24] and its EntryWritten event, to print the details of any messages written to the Windows event logs.
Example 10.21. Handling asynchronous events from PowerShell with IronPython
$source = $engine.CreateScriptSourceFromString(@'
import clr
clr.AddReference('System')
from System.Diagnostics import EventLog

def handler(sender, event):
   print 'Entry from', sender.Log
   entry = event.Entry
   print entry.Message

logs = EventLog.GetEventLogs()
for log in logs:
   try:
      log.EnableRaisingEvents = True
      log.EntryWritten += handler
      print 'Added handler to', log.Log
   except:
     print 'Failed to add handler to', log.Log
'@, $st)

$scope = $engine.CreateScope()
$source.Execute($scope)
After running this code, control returns immediately to the console. To see your event handlers in action, start a new program, or perform any action that causes writes to event logs, and you’ll see the log messages appear at the console. You can see the start of one of these messages in figure 10.6.
So far we’ve been using IronPython to access .NET features from PowerShell. Because PowerShell has native access to most of .NET, bar a few limitations, a more compelling reason to use IronPython is to access Python itself. In particular, you can use IronPython to take advantage of Python libraries.
Using the same pattern as the previous examples, you can create a PowerShell function that calls into Python code and returns the result. In theory, you could do this with a single expression, creating the ScriptSource with SourceCodeKind.Expression rather than SourceCodeKind.Statements.[25] Calling generic methods that return values becomes an even bigger world of pain, but there’s a simple way around this: you can assign the return value to a variable and fetch that back out of the scope.
The basic pattern is as follows:
$src = 'result = some_function(value)'
$script = $engine.CreateScriptSourceFromString($src, $st)
$scope.SetVariable('value', $value)

./Invoke-GenericMethod ...

[Ref] $result = $null
$scope.TryGetVariable('result', $result)
$result.Value
Fetching the result out of the scope is done with TryGetVariable, which takes an out parameter. You do this from PowerShell by creating a [Ref] type. You fetch the resulting value by accessing the Value property after the call to TryGetVariable.
Listing 10.22 pulls all this together. It provides two functions, B64Encode and B64Decode, that can encode and decode strings with the base64 encoding, using the base64[26] library from the Python standard library.
PowerShell functions return all unhandled output. Inside B64Encode and B64Decode, unneeded values are suppressed by piping them to out-null. The real result is returned by $result.Value, and it does in fact work!
PS C:> $a = B64Encode 'This really works!'
PS C:> $a
VGhpcyByZWFsbHkgd29ya3M=
PS C:> B64Decode $a
This really works!
Extending this example to call Python functions that take or return multiple values would be simple—just set and fetch more variables in the scope.
One interesting, if slightly insane, way of using this would be when embedding PowerShell into IronPython. You could pass in a scope populated with Python callback functions, and call into them from PowerShell as a way of communicating between the environments.
PowerShell is an interesting new programming environment. We’re not about to give up IronPython for PowerShell, but it’s great to see that these two systems can work well together. After summarizing this chapter, we’ll move on to using IronPython with a completely different system.
Python is a powerful general-purpose programming language, and its combination of clarity and succinctness means that systems administration is an area where it shines. The integration of the .NET framework to the Windows operating system makes IronPython particularly suited to Windows system administration.
Python eats simple scripting tasks for breakfast, but it has the great advantage of scaling well when simple scripts need to grow and become applications. Whatever task you’re tackling, you should check for standard library or third-party modules that could help. After the standard library, we recommend the Python Package Index (PyPI)[27] be your first port of call. Equally importantly, if you create general-purpose libraries to support your Python applications, you should consider creating Python packages with distutils[28] or setuptools[29] for distribution via PyPI.
For systems administration, both WMI and PowerShell can also be powerful tools. Despite the oddness of WMI, it provides a high-level API for working with low-level details of a system, such as the BIOS, the computer hardware, and the operating system. For networked operations, it often provides a ready-made solution where the alternative would be a custom-written application.
The topic of PowerShell is a slight anomaly for this book. PowerShell is an alternative programming language; but, for programming tasks of any size, IronPython is more suitable. This is hardly surprising, though; PowerShell is highly specialized to provide a scripting environment for admins rather than to be an application programming language. Despite their different virtues, the two environments can work well together—IronPython using PowerShell for the things it’s good at and vice versa.
The next chapter is on a very different topic: web application programming with IronPython and ASP.NET.
[1] optparse and ConfigParser, respectively.
[2] It isn’t yet in the standard library, but will be by Python 3.0. You can find argparse at http://argparse.python-hosting.com.
[3] Disclaimer: I am one of the authors of ConfigObj. You can find it at http://pypi.python.org/pypi/ConfigObj/.
[5] For useful hints on working with Python scripts from the command line, read the following article: http://www.voidspace.org.uk/python/articles/command_line.shtml.
[6] The Microsoft reference is at http://msdn2.microsoft.com/en-us/library/aa394606.aspx.
[7] For example, Marc, The PowerShell Guy, has one tool aimed at PowerShell but useful for anyone interested in WMI. See http://thepowershellguy.com/blogs/posh/archive/2007/03/22/powershell-wmi-explorer-part-1.aspx.
[8] The timer.Put() line of this example requires administrator access under Vista.
[11] See this page for the details: http://msdn2.microsoft.com/en-us/library/aa393266(VS.85).aspx.
[12] There’s a recipe in the IronPython Cookbook that will list all the available WMI namespaces and the classes they contain. See http://www.ironpython.info/index.php/WMI_with_IronPython.
[13] Many thanks to Tim Golden, a Python and WMI guru, for his help with these examples. Tim has created an excellent module for using WMI from CPython. See http://timgolden.me.uk/python/wmi.html.
[15] PowerShell can be obtained from http://www.microsoft.com/powershell.
[16] There are several good examples of using COM from IronPython on the IronPython Cookbook, including a good introduction, at http://www.ironpython.info/index.php/Interop_introduction.
[17] You can download the samples from the IronPython 2.0 release page on CodePlex.
[18] See http://msdn2.microsoft.com/en-us/library/system.management.automation.runspaces.runspace.aspx.
[19] PowerShell 2 will support an -sta command-line switch. Even then this solution could be useful because it will allow you to access STA functionality without having to start PowerShell with particular command-line arguments.
[20] Downloaded from http://www.ironpythoninaction.com/, of course.
[21] And not at all better in our opinion. Dynamic scoping is designed with interactive use in mind, and is the same as the scoping rules used by Bash.
[22] Many thanks to Marc, The PowerShell Guy, who provided the original code for this example.
[25] Assumin that you’re working with the IronPython 2 API.
[27] The Python package repository. See http://pypi.python.org/pypi.
[28] The standard library module for compiling, creating, and installing Python packages. See http://docs.python.org/lib/module-distutils.html.
[29] setuptools is a third-party framework for the easy installation of Python packages. See http://peak.telecommunity.com/DevCenter/setuptools.