
14 Extending Istio on the request path
- Understanding Envoy filters
- Using Istio’s
EnvoyFilterresource to configure Envoy directly - Using Lua to customize the request path
- Using WebAssembly to customize the request path
As you’ve seen throughout this book, Istio can bring a lot of value to organizations with its application-networking functionality. Organizations adopting Istio will likely have other constraints or assumptions that Istio may not fulfill out of the box. You will likely need to extend Istio’s capabilities to more nicely fit within these constraints.
As we saw in chapter 3, and reinforced throughout the book, the Envoy proxy is a foundational component of the Istio service mesh. Envoy is the service proxy that lives with the application instance and on the request path between services in a mesh. Although Envoy has a significant set of functionality that can simplify application networking for your services, you will most likely run into scenarios where you need to enhance Envoy for “last-mile” or customized integration. The following are examples of extension:
-
Integrating with rate limiting or external authorization services
-
Implementing custom protocols like HMAC signing/verification
Envoy may provide almost everything you need, but eventually, you’ll need to customize it for your specific use cases. This chapter covers extending Istio on the request path, which inevitably means extending Envoy.
14.1 Envoy’s extension capabilities
One of the Envoy proxy’s strengths is that it was built to be extended. A lot of thought and care went into designing Envoy’s APIs, and a big reason for its popularity is the extensions others have written for it. A significant way that Envoy can be extended is with its filter extensions. To understand where we can extend Envoy and what will give us the most benefit for applications, we should understand some of Envoy’s architecture.
14.1.1 Understanding Envoy’s filter chaining
In chapter 3, we introduced Envoy’s concepts of listeners, routes, and clusters, as illustrated in figure 14.1. We made the point that these are high-level concepts but promised to go into more specifics in this chapter. Here, we focus on Listeners and how the listener model can be extended with filters and filter chains.

Figure 14.1 A request comes in from a downstream system through the listeners, then goes through the routing rules, and ends up going to a cluster that sends to an upstream service.
A listener in Envoy is a way to open a port on a networking interface and start listening to incoming traffic. Envoy is ultimately a layer 3 and layer 4 (L3/L4) proxy that takes bytes off a network connection and processes them in some way. This brings us to the first important part of the architecture: the filter. A listener reads bytes off the networking stream and processes them through various filters or stages of functionality, as shown in figure 14.2.
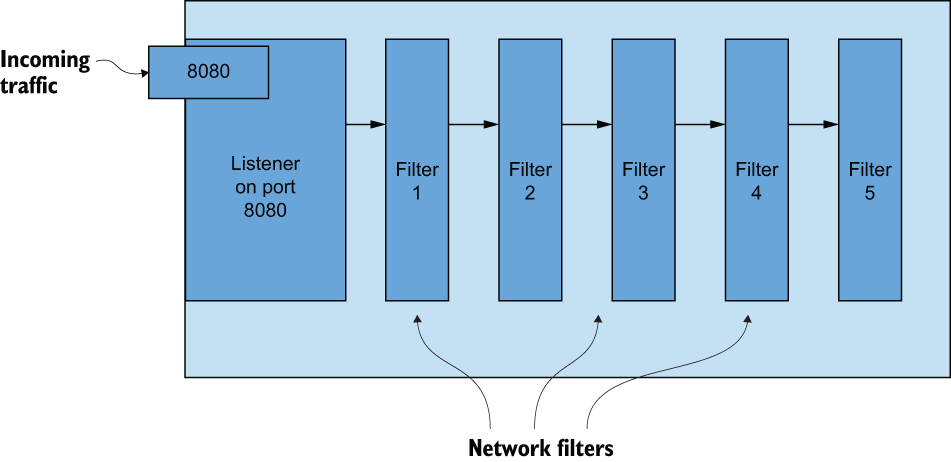
Figure 14.2 Bytes come in from the network through listeners, while listeners process bytes through network filters.
Envoy’s most basic filters are network filters, which operate on a stream of bytes for either encoding or decoding. You can configure more than one filter to operate on the stream in a sequence called a filter chain, and these chains can be used to implement the functionality of the proxy.
For example, out of the box, Envoy has network filters for the following protocols, along with many others:
One of the most commonly used network filters is HttpConnectionManager. This filter is responsible for abstracting away the details of converting a stream of bytes into HTTP headers, body, and trailers for HTTP-based protocols (that is, HTTP 1.1, HTTP 2, gRPC, and recently HTTP 3, and so on) and is shown in figure 14.3.
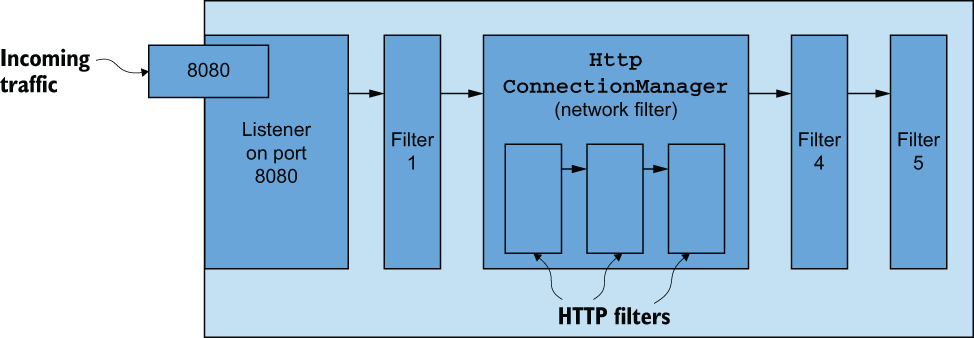
Figure 14.3 HttpConnectionManager is a popular and useful network filter for converting a stream of bytes into HTTP (HTTP/1, HTTP/2, and so on) requests and routing them based on L7 properties like headers or body details.
HttpConnectionManager (sometimes referred to as the HCM) handles HTTP requests as well as things like access logging, request retry, header manipulation, and request routing based on headers, path prefixes, and other request attributes. The HCM also has a filter-based architecture that allows you to build or configure HTTP filters into a sequence or chain of filters that operate on an HTTP request. Some examples of out-of-the-box HTTP filters include the following:
A full list of HTTP filters can be found at http://mng.bz/BxKJ.
HTTP filters can be configured in a sequence to operate on an HTTP request. The HTTP filters must end in a terminal filter that sends the request to an upstream cluster. The HTTP filter responsible for this is the router filter, shown in figure 14.4. The router filter matches requests to upstream clusters with configurable timeout and retry parameters. See chapter 6 and the Envoy docs (http://mng.bz/domQ) for more on this functionality.

Figure 14.4 HttpConnection-Manager has a filter chain that processes HTTP requests, ending with a routing filter.
Users can also write their own filters and layer them on top of the proxy without having to change any of Envoy’s core code. For example, Istio’s proxy (https://github.com/istio/proxy) adds filters on top of Envoy and builds a custom Envoy for its data plane. Other open source projects like Gloo Edge (http://github.com/solo-io/gloo) follow this same approach. However, this introduces a custom Envoy proxy build that can be a lot to maintain and require developers to use C++.
14.1.2 Filters intended for extension
Although you can write your own filters in C++ and build them into the proxy, that’s beyond the scope of this book. There are ways to extend Envoy’s HTTP capabilities, including writing filters, without compiling changes into the Envoy binary itself, by using the following HTTP filters:
With these filters, you can configure calls out to an external service, run a Lua script, or run custom code to enhance the capabilities of the HCM when processing HTTP requests or responses. For calling an external service for processing, we’ll focus on the rate-limiting filter. We can also call out for external authorizations, as we covered in chapter 9.
NOTE Envoy has an external processing filter for calling out to an external service for generic processing. This filter exists in the code base but does not do anything at the time of writing. We focus on other ways to call out to an external service, such as with the global rate-limiting filter.
14.1.3 Customizing Istio’s data plane
Armed with a high-level understanding of Envoy’s filter architecture, in the next few sections we extend the capabilities of the Envoy data plane using one of the following methods:
-
Configuring an Envoy HTTP filter with the
EnvoyFilterresource from the Istio API -
Implementing a Lua script and loading it into the Lua HTTP filter
We need to understand how to configure Envoy’s filters directly, and for this, we’ll use Istio’s EnvoyFilter resource. We used this resource in previous chapters, but we dig into it deeper here.
14.2 Configuring an Envoy filter with the EnvoyFilter resource
The first step in extending Istio’s data plane is to figure out whether an existing filter in Envoy is sufficient to accomplish the type of extension we’re looking for. If one exists, we can use the EnvoyFilter resource to directly configure Istio’s data plane.
Istio’s APIs generally abstract away the underlying Envoy configuration, focusing on specific networking or security scenarios. Resources like VirtualService, DestinationRule, and AuthorizationPolicy all end up getting translated to an Envoy configuration and potentially configure specific HTTP filters in a filter chain. Istio does not try to expose every possible filter or configuration for the underlying Envoy proxy, and there may be cases where we need to configure Envoy directly. Istio’s EnvoyFilter resource is intended for advanced use cases where a user needs to either tweak or configure a portion of Envoy not exposed by Istio’s higher-level APIs. This resource can configure just about anything (with some limitations) in Envoy, including listeners, routes, clusters, and filters.
The EnvoyFilter resource is intended for advanced usage of Istio and is a “break glass” solution. The underlying Envoy API may change at any time between releases of Istio, so be sure to validate any EnvoyFilter you deploy. Do not assume any backward compatibility here. Bad configuration with this API can potentially take down the entire Istio data plane.
Let’s look at an example and understand how it works. If you’ve followed along from previous chapters, let’s reset our workspace, so we can start from scratch:
$  kubectl config set-context $(kubectl config current-context)
 --namespace=istioinaction
$  kubectl delete virtualservice,deployment,service,
destinationrule,gateway,authorizationpolicy,envoyfilter --all
Let’s deploy services we’ll use for the chapter:
$  kubectl apply -f services/catalog/kubernetes/catalog.yaml
$  kubectl apply -f services/webapp/kubernetes/webapp.yaml
$  kubectl apply -f services/webapp/istio/webapp-catalog-gw-vs.yaml
$  kubectl apply -f ch9/sleep.yaml
$  kubectl delete sidecar --all -n istio-system
Suppose we want to extend our data plane with tooling to debug certain requests that flow through the webapp service. We can extend Envoy with some custom filters, but if we look thoroughly enough, we see that a Tap filter exists for this type of functionality. It is not exposed by Istio’s APIs, so we can use the EnvoyFilter resource to configure this filter for our webapp service.
The first thing to know about an EnvoyFilter resource is that it applies to all workloads in the namespace for which it is declared, unless you specify otherwise. If you create an EnvoyFilter resource in the istio-system namespace, it will be applied to all workloads in the mesh. If you want to be more specific about the workloads in a namespace to which the custom EnvoyFilter configuration applies, you can use a workloadSelector, as we’ll see in our example.
The second thing to know about an EnvoyFilter resource is that it applies after all other Istio resources have been translated and configured. For example, if you have VirtualService or DestinationRule resources, those configurations are applied to the data plane first.
Finally, you should take great care when configuring a workload with the EnvoyFilter resource. You should be familiar with Envoy naming conventions and configuration specifics. This really is an advanced usage of Istio’s API and can bring down your mesh if misconfigured.
In our example, we want to configure Envoy’s tap filter (http://mng.bz/ramX) to sample messages that go over the data plane for the webapp workload, as shown in figure 14.5. Every time a request or response flows over the tap filter, it streams it out to some listening agent. In this example, we stream it out to the console/CLI.
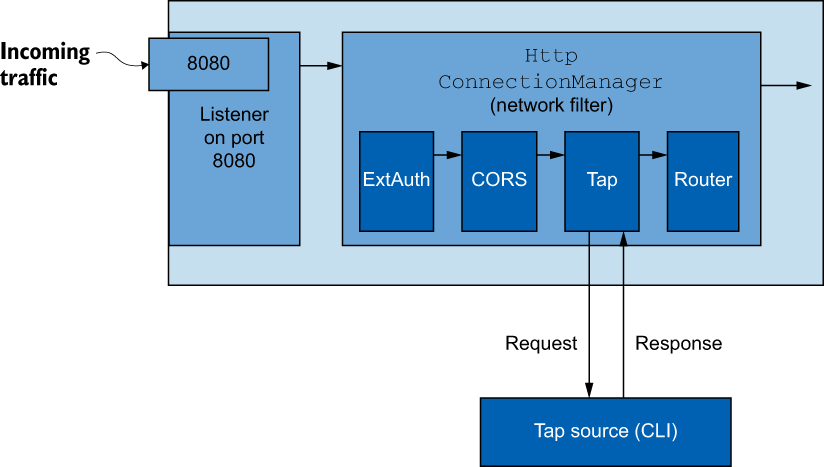
Figure 14.5 The Envoy HTTP tap filter allows you to stream requests and responses unmodified and without impacting the client or upstreams, as a way to debug/introspect the data plane.
We configure an EnvoyFilter resource like this:
apiVersion: networking.istio.io/v1alpha3
kind: EnvoyFilter
metadata:
  name: tap-filter
  namespace: istioinaction
spec:
  workloadSelector:
    labels:
      app: webapp                               ❶
  configPatches:
  - applyTo: HTTP_FILTER                        ❷
    match:
      context: SIDECAR_INBOUND
      listener:
        portNumber: 8080
        filterChain:
          filter:
            name: "envoy.filters.network.http_connection_manager"
            subFilter:
              name: "envoy.filters.http.router"
    patch:                                      ❸
      operation: INSERT_BEFORE
      value:
       name: envoy.filters.http.tap
       typed_config:
          "@type": "type.googleapis.com/
envoy.extensions.filters.http.tap.v3.Tap"
          commonConfig:
            adminConfig:
configId: tap_configLet’s go through this section by section to make sure we understand the details. The first thing to notice is that we deploy this EnvoyFilter to the istioinaction namespace. As mentioned earlier, this would otherwise apply to the sidecars for all the workloads in that namespace, but we use a workloadSelector to be very specific about the workloads to which this configuration should apply.
Next, we need to specify where in the Envoy configuration to patch the configuration. In this example, we specify that it will be an HTTP_FILTER for an inbound listener (SIDECAR_INBOUND). As mentioned previously, there are network filters for listeners, and one of those is the HCM. The HCM also has a chain of HTTP-specific filters that process HTTP requests. We also specify a particular listener in this example: the HCM on the listener bound to port 8080. Finally, we pick the envoy.filters.http.router HTTP filter in this HCM HTTP filter chain. We pick this specific filter because we will order our new filter right before it, as we’ll see in the next section of the configuration.
In the patch section of this EnvoyFilter resource, we specify how we want to patch the configuration. In this case, we merge the configuration before the specific filter we selected in the previous configuration section. The filter we add, envoy.filters .http.tap goes before the http.filters.http.router in the HCM filter chain. We have to be explicit about the structure of the tap filter configuration, so we give it an explicit type. For the details of the tap configuration format, see the Envoy documentation: http://mng.bz/VlG5.
Let’s apply this EnvoyFilter to the webapp workload in the istioinaction namespace:
We can verify the Envoy configuration in the webapp sidecar proxy with the following command. Try to find the HTTP filters for the HCM and locate the new tap filter configuration:
$  istioctl pc listener deploy/webapp.istioinaction
--port 15006 --address 0.0.0.0 -o yaml
Note that we are reviewing the listener on port 15006 because that’s the default ingress port in the sidecar proxy. All other ports reroute to this listener.
You should see something like this when you run the previous command:
- name: envoy.filters.http.tap
    typedConfig:
    '@type': type.googleapis.com/envoy.extensions.filters
.http.tap.v3.Tap
    commonConfig:
        adminConfig:
        configId: tap_config
- name: envoy.filters.http.router
    typedConfig:
    '@type': type.googleapis.com/envoy.extensions.filters
.http.router.v3.Router
Let’s verify that the tap functionality is working. You need two terminal windows for this. In one window, start the tap on the webapp workload by passing in a tap configuration with curl:
{
  "config_id": "tap_config",
  "tap_config": {
     "match_config": {
        "http_request_headers_match": {
          "headers": [
              {
                "name": "x-app-tap",
                "exact_match": "true"
              }
          ]
        }
     },
     "output_config": {
        "sinks": [
           {
              "streaming_admin": {}
           }
        ]
     }
  }
}
This configuration instructs the tap filter to match on any incoming HTTP requests with the x-app-tap header equal to true. When the tap filter finds a request like this, it streams the request out to a tap handler, which is curl in this case (which is automatically sent to stdout). Before we can reach the admin tap endpoint, we should port-forward the endpoint to localhost in one window:
In another window, start the tap:
In another window, call the service like this:
$  curl -H "Host: webapp.istioinaction.io" -H "x-app-tap: true"
http://localhost/api/catalog
You should see the tap output in the window where you started the tap. It gives all the information about the request, like headers, body, trailers, and so on. Continue to investigate the Envoy tap filter and how it can be used in Istio to debug requests across the network.
14.3 Rate-limiting requests with external call-out
In the previous section, we extended the Istio data plane with functionality that exists in an out-of-the-box HTTP filter. There are also out-of-the-box filters that enhance the data plane with functionality that exists as a call-out. With these filters, we call out to an external service and have it perform some functionality that can determine how or whether to continue with a request. In this section, we explore how to configure Istio’s data plane to call out to a rate-limiting service to enforce service-side rate-limiting for a particular workload (see figure 14.6).
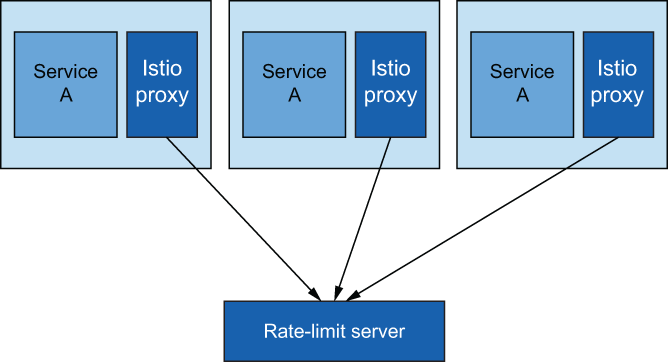
Figure 14.6 Multiple replicas of the same service call the same rate-limit service to get global rate limiting for a particular service.
Just as Istio uses Envoy for the data plane, the specific call-out for rate limiting comes from an Envoy HTTP filter. There are several ways to do rate limiting in Envoy (as a network filter, local rate limiting, and global rate limiting), but we specifically explore the global rate-limiting functionality. With global rate limiting, you have all Envoy proxies for a particular workload calling the same rate-limiting service, which calls a backend global key-value store as shown in figure 14.7. With this architecture, we can ensure that a rate limit is enforced regardless of how many replicas of a service exist.

Figure 14.7 With Envoy global rate limiting, we can call out to a rate-limiting server to determine whether we need to rate limit a particular request. Attributes of the request are sent to the rate-limiting server to make a decision.
To configure rate limiting, we need to deploy the rate-limit server, which comes from the Envoy community (see https://github.com/envoyproxy/ratelimit)—or, more accurately, a rate-limit server that implements the Envoy rate-limiting API (http://mng.bz/xvXB). This server is configured to talk with a backend Redis cache and stores rate-limit counters in Redis (optionally, you can use Memcache). Before we deploy the rate-limit server, we need to configure it with the expected rate-limiting behavior.
14.3.1 Understanding Envoy rate limiting
Before configuring the Envoy rate-limit server (RLS), we need to understand how rate limiting works. We are specifically looking at understanding Envoy’s HTTP global rate limiting, which exists as an HTTP filter and needs to be configured into the HTTP filter chain on the HCM. When the rate-limit filter processes an HTTP request, it takes certain attributes from the request and sends them out to the RLS for evaluation. Envoy rate-limiting terminology uses the word descriptors to refer to attributes or groups of attributes. These descriptors, or attributes, of the request can be things like remote address, request headers, destination, or any other generic attributes about the request.
The RLS evaluates the request attributes that have been sent as part of a request against a set of predefined attributes, as shown in figure 14.8, and increments counters for those attributes. The request attributes may be grouped or defined in a tree to determine what attributes should be counted. If an attribute or set of attributes matches the RLS definitions, then the counts for those limits are incremented. If a count exceeds a threshold, that request is rate-limited.

Figure 14.8 Attributes of the request, like remote address, request headers, client ID, and so on, also known as descriptors in Envoy terminology, are sent to the rate-limiting server to make a rate-limit decision against a preconfigured set of descriptors.
Configuring the Envoy rate-limit server
Let’s configure the RLS with the attribute counters and limits. For our example use case, we want to limit certain groups of users depending on what loyalty tier they have with our example organization. We can determine the loyalty tier in a request by examining the x-loyalty header.
For a particular group of users in the gold tier (x-loyalty:gold), we allow 10 requests per minute. For silver (x-loyalty:silver), we allow five requests per minute; and for bronze (x-loyalty:bronze), we allow three requests per minute. For a loyalty tier that cannot be identified, rate limiting will kick in after one request per minute.
The RLS configuration that captures these attributes of a request (descriptors) can be expressed as follows:
apiVersion: v1
kind: ConfigMap
metadata:
  name: catalog-ratelimit-config
  namespace: istioinaction
data:
  config.yaml: |
    domain: catalog-ratelimit
    descriptors:
      - key: header_match
        value: no_loyalty
        rate_limit:
          unit: MINUTE
          requests_per_unit: 1
      - key: header_match
        value: gold_request
        rate_limit:
          unit: MINUTE
          requests_per_unit: 10
      - key: header_match
        value: silver_request
        rate_limit:
          unit: MINUTE
          requests_per_unit: 5
      - key: header_match
        value: bronze_request
        rate_limit:
          unit: MINUTE
          requests_per_unit: 3
Note that we don’t deal with the actual request headers directly, just the attributes sent as part of a request. In the next section, we explore how to define these attributes. As mentioned earlier, the RLS configuration defines what rules to follow for rate limiting. When a request is processed through the Istio data plane, attributes are sent to the RLS; and if they match, rate limiting happens accordingly.
Configuring the request path for rate limiting
Once we’ve configured the RLS, we need to configure Envoy with which attributes to send for a particular request. Envoy terminology refers to this configuration as the rate-limit actions taken for a particular request path. For example, if we call the catalog service on path /items, we want to capture whether a request has an x-loyalty header and the group to which it belongs.
To configure the appropriate attributes (actions) sent to the RLS, we need to specify the rate_limit configuration for a particular Envoy route configuration. Istio doesn’t have an API for this yet (at the time of this writing), so we have to use EnvoyFilter resources. Here’s how we can specify rate-limit actions for any route on the catalog service:
apiVersion: networking.istio.io/v1alpha3
kind: EnvoyFilter
metadata:
  name: catalog-ratelimit-actions
  namespace: istioinaction
spec:
  workloadSelector:
    labels:
      app: catalog
  configPatches:
    - applyTo: VIRTUAL_HOST
      match:
        context: SIDECAR_INBOUND
        routeConfiguration:
          vhost:
            route:
              action: ANY
      patch:
        operation: MERGE

        value:
          rate_limits:    ❶
            - actions:
              - header_value_match:
                  descriptor_value: no_loyalty
                  expect_match: false
                  headers:
                  - name: "x-loyalty"
            - actions:
              - header_value_match:
                  descriptor_value: bronze_request
                  headers:
                  - name: "x-loyalty"
                    exact_match: bronze
            - actions:
              - header_value_match:
                  descriptor_value: silver_request
                  headers:
                  - name: "x-loyalty"
                    exact_match: silver
            - actions:
              - header_value_match:
                  descriptor_value: gold_request
                  headers:
                  - name: "x-loyalty"
exact_match: goldNow let’s deploy these rules along with the RLS and see how we configure the data plane.
To deploy these rules as a Kubernetes configmap and then deploy the RLS with a Redis backend, run the following commands:
$  kubectl apply -f ch14/rate-limit/rlsconfig.yaml
$  kubectl apply -f ch14/rate-limit/rls.yaml
If we list the Pods in the istioinaction namespace, we should see our new rate limit server:
NAME                         READY   STATUS    RESTARTS   AGE
webapp-f7bdbcbb5-qk8fx       2/2     Running   0          24h
catalog-68666d4988-qg6v5     2/2     Running   0          24h
ratelimit-7df4b47668-4x2q9   1/1     Running   1          24s
redis-7d757c948f-c84dk       1/1     Running   0          2m26s
So far, all we’ve done is configure and deploy the RLS, but we need to configure Envoy with the attributes to send to the RLS to be counted and rate-limited. To do that, let’s apply the EnvoyFilter resource that does that, as we’ve seen:
$  kubectl apply -f ch14/rate-limit/catalog-ratelimit.yaml
$  kubectl apply -f ch14/rate-limit/catalog-ratelimit-actions.yaml
To test our rate-liming functionality, let’s deploy the sleep app into the istioinaction namespace to simulate a client calling the catalog service. If you didn’t install the sleep app earlier in the chapter, run the following command:
Once this Pod comes up successfully, let’s make a call to the catalog service as in the following example:
$  kubectl exec -it deploy/sleep -c sleep --
curl http://catalog/items
You can run this command only approximately once a minute. This aligns with the rate limits specified for requests with no x-loyalty header. If you change the request to add an x-loyalty header, more requests per minute will be allowed. Experiment with the rate-limit enforcement by passing in different values for the x-loyalty header as in the following example:
kubectl exec -it deploy/sleep -c sleep --
curl -H "x-loyalty: silver" http://catalog/items
If you find that rate limiting is not enforced, you can check that all of the correct EnvoyFilter resources are applied and that the RLS is up and running without any errors in the logs. To double-check that the underlying Envoy configuration has the correct rate-limit actions, you can use istioctl to get the underlying routes for the catalog service:
$  istioctl proxy-config routes deploy/catalog.istioinaction -o json
| grep actions
You should see multiple output lines with the word actions. If you don’t, something wasn’t configured right, and you should double-check that things were applied correctly.
14.4 Extending Istio’s data plane with Lua
Extending Istio’s data plane by configuring existing Envoy filters is convenient, but what if the functionality we want to add doesn’t already exist as an out-of-the box Envoy filter? What if we want to implement some custom logic on the request path? In this section, we look at how to extend data-plane behavior with our own custom logic.
We saw in the previous sections that Envoy has a lot of out-of-the-box filters that we can add to a filter chain to enhance the behavior of the Envoy data plane. One of those is the Lua filter, which allows us to customize the behavior of the request or response path by writing Lua scripts and injecting them into the proxy (see figure 14.9). These scripts can be used to manipulate the headers and inspect the body of a request or response. We will continue to use the EnvoyFilter resource to configure the data plane to inject Lua scripts to change the processing of the request path.
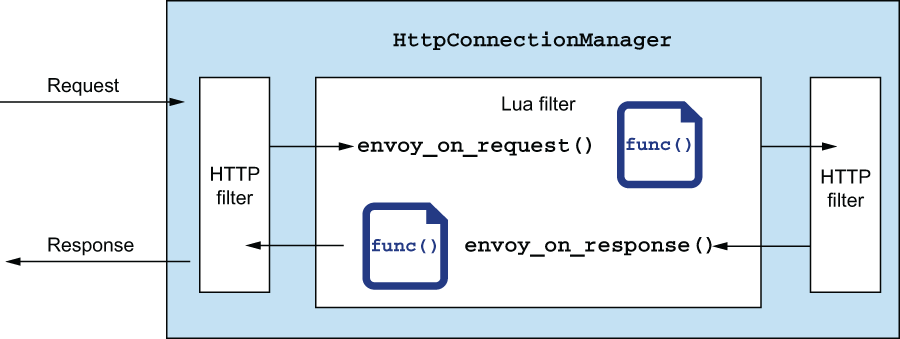
Figure 14.9 Extending request-path functionality with Lua scripting language
NOTE Inspecting the request body can impact how the stream is treated in the proxy. For example, you may run operations on the body that cause it to be fully buffered into memory. This can have performance impacts. See the Envoy proxy documentation on the Lua filter: http://mng.bz/AxOW.
Let’s take a common example for customizing the behavior of the request path. Suppose we want to treat every request that comes in as part of an A/B testing group. We can only determine the correct group at run time based on characteristics of the request. To do so, we need to call out to an A/B testing engine to determine the group to which a particular request belongs. The response from this call-out should be added as a header to the request, and any upstream service can use this header to make decisions about routing for A/B testing purposes.
Before we get started, let’s remove the configuration from the previous section:
Let’s deploy some supporting services for this example. We deploy a sample httpbin service that will echo back the request headers we send into the service. We also deploy our sample A/B testing bucket service. This service evaluates a request’s headers and returns a string representing a particular group that request should be in:
$  kubectl apply -f ch14/httpbin.yaml
$  kubectl apply -f ch14/bucket-tester-service.yaml
Let’s look at a Lua script we can write to manipulate the request or response headers and how we can implement this use case. In Envoy, we can implement the envoy_on_request () or envoy_on_response() Lua function to inspect and manipulate the request and response, respectively. If we need to make a call to another service from within Lua, we have to use an Envoy-provided function (we should not use a general-purpose Lua library to make RPC calls, because we want Envoy to manage the call correctly with its non-blocking threading architecture). We can use the httpCall() function to communicate with an external service. The following script implements our use case:
function envoy_on_request(request_handle)
  local headers, test_bucket = request_handle:httpCall(
  "bucket_tester",
  {
    [":method"] = "GET",
    [":path"] = "/",
    [":scheme"] = "http",
    [":authority"] = "bucket-tester.istioinaction.svc.cluster.local",
    ["accept"] = "*/*"
  }, "", 5000)

  request_handle:headers():add("x-test-cohort", test_bucket)
end
We implement the envoy_on_request() function, and we use the httpCall() built-in function to communicate with an external service. We take the response and add it to a header called x-test-cohort. See the Envoy documentation for more about the built-in functions, including httpCall (): http://mng.bz/mx2r.
We can add this script to an EnvoyFilter resource as we did in the previous section:
apiVersion: networking.istio.io/v1alpha3
kind: EnvoyFilter
metadata:
  name: webapp-lua-extension
  namespace: istioinaction
spec:
  workloadSelector:
    labels:
      app: httpbin
  configPatches:
  - applyTo: HTTP_FILTER
    match:
      context: SIDECAR_INBOUND
      listener:
        portNumber: 80
        filterChain:
          filter:
            name: "envoy.filters.network.http_connection_manager"
            subFilter:
              name: "envoy.filters.http.router"
    patch:
      operation: INSERT_BEFORE
      value:
       name: envoy.lua
       typed_config:
          "@type": "type.googleapis.com/
envoy.extensions.filters.http.lua.v3.Lua"
          inlineCode: |
            function envoy_on_request(request_handle)
              -- some code here
            end
            function envoy_on_response(response_handle)
              -- some code here
            end
We apply this filter to the httpbin workloads as defined by the workloadSelector in the previous listing:
If we make a call to our httpbin service, we should see a new header x-test-cohort that gets added when we make the call-out to the A/B testing service:
$  kubectl exec -it deploy/sleep
-- curl httpbin.istioinaction:8000/headers

{
  "headers": {
    "Accept": "*/*",
    "Content-Length": "0",
    "Host": "httpbin.istioinaction:8000",
    "User-Agent": "curl/7.69.1",
    "X-B3-Sampled": "1",
    "X-B3-Spanid": "1d066f4b17ee147b",
    "X-B3-Traceid": "1ec27110e4141e131d066f4b17ee147b",
    "X-Test-Cohort": "dark-launch-7"
  }
}
You can examine the details more closely in the ch14/lua-filter.yaml file in the book’s source code. In this example, we saw how to use a filter that was purposefully built to extend the functionality of the data plane. We used the Lua scripting language to implement this functionality and some built-in functions to make callouts to other services. In the next section, we see how to use other languages to implement our custom functionality with WebAssembly.
14.5 Extending Istio’s data plane with WebAssembly
The last approach to extend Istio on the request path that we cover in this chapter is writing new Envoy filters with WebAssembly. In the previous sections, we reused existing Envoy filters and configured them to extend the out-of-the-box Istio capabilities, including injecting our own custom scripts to manipulate the request path. In this section, we explore how we can build our own Envoy filters and dynamically deploy them to the Istio data plane.
14.5.1 Introducing WebAssembly
WebAssembly (Wasm) is a binary instruction format that is intended to be portable across environments and that can be compiled from many different programming languages and run in a VM. Wasm was originally developed to speed up the execution of CPU-intensive operations for web apps in a browser and extend the support for browser-based apps to languages other than JavaScript (see figure 14.10). It became a W3C Recommendation in 2019 and is supported in all major browsers.

Figure 14.10 WebAssembly is custom code packaged as a module that can run safely in a sandboxed VM within a target host like a web browser.
Wasm is intended to have a compact size and load footprint and execute at near-native speeds. It is also safe to embed in host applications (that is, a browser) because it is memory safe and runs in a sandboxed execution environment (VM). A Wasm module only has access to memory and functionality that the host system allows.
14.5.2 Why WebAssembly for Envoy?
There are two main drawbacks to writing your own native Envoy filter:
-
You must statically build the changes into a new Envoy binary, which effectively becomes a “custom” build of Envoy.
Envoy embeds a WebAssembly execution engine that can be used to customize and extend various areas of Envoy, including HTTP filters. You can write Envoy filters in any language supported by Wasm and dynamically load them into the proxy at run time, as shown in figure 14.11. This means you can keep using the out-of-the-box Envoy proxy in Istio and dynamically load your custom filters at run time.

Figure 14.11 A Wasm module can be packaged and run within the Wasm HTTP filter.
14.5.3 Building a new Envoy filter with WebAssembly
To build an Envoy filter with WebAssembly, you need to know what language you want to use, what Envoy version you’re on, and what Envoy Abstract Binary Interface (ABI) is supported by that particular version of Envoy. Then you need to pick the correct language SDK and set up the build and dependency toolchain correctly. For this section, we use an open source developer tool called wasme from the folks at Solo.io to create and build Wasm filters for Envoy. With wasme, you can quickly bootstrap a Wasm for the Envoy project and automate any of the boilerplate scaffolding. Let’s see how to get started building Envoy filters with Wasm.
At the time of this writing, there are Envoy Wasm SDKs for the following four programming languages:
In this section, we build a new Envoy filter with Wasm using the AssemblyScript language (www.assemblyscript.org). AssemblyScript is a variant of TypeScript, so JavaScript developers should be familiar with it. It gives a nice alternative to C++ when building filters for Envoy.
NOTE WebAssembly support in Envoy is considered experimental and subject to change. We recommend thoroughly testing any Wasm modules you create and deploy to Envoy before getting into a production environment.
14.5.4 Building a new Envoy filter with the meshctl tool
The meshctl tool is a Docker-like tool for creating, building, publishing, and deploying Wasm modules; it significantly simplifies the user experience when building Wasm filters for Envoy. First, download meshctl and put it on your system path:
curl -sL https://run.solo.io/meshctl/install | sh
export PATH=$HOME/.gloo-mesh/bin:$PATH
Next, pick a folder to bootstrap a new Wasm project, and then run the following command:
This creates a new folder called hello-wasm, all the dependency files, and even an index.ts file with the initial implementation of a filter. This initial implementation shows how to add a header to an HTTP response. If you look into ./hello-wasm/assembly/index.ts, you should see two TypeScript classes created. The first class, AddHeaderRoot, sets up any custom configuration for the Wasm module. The second class, AddHeader, contains the meat of the implementation where you can implement the callback functions that end up processing the request path. In this example, we implement the onResponseHeaders function of the AddHeader class like this:
class AddHeader extends Context {
  root_context : AddHeaderRoot;
  constructor(root_context:AddHeaderRoot){
    super();
    this.root_context = root_context;
  }
  onResponseHeaders(a: u32): FilterHeadersStatusValues {
    const root_context = this.root_context;
    if (root_context.configuration == "") {
      stream_context.headers.response.add("hello", "world!");
    } else {
      stream_context.headers.response.add("hello",
        root_context.configuration);
    }
    return FilterHeadersStatusValues.Continue;
  }
}
There are also other useful functions for manipulating the request or response:
If we navigate into the hello-wasm folder, we can build the Wasm module with the meshctl wasm tooling like this:
$  meshctl wasm build assemblyscript ./hello-wasm/
 -t webassemblyhub.io/ceposta/istioinaction-demo:0.1
The meshctl wasm tool handles all of the boilerplate tool-chain setup and initiates a build appropriate for the language originally chosen for the module. The output for the build process creates an Open Container Initiative (OCI)-compliant image packaged with the .wasm module as one of the layers in the image.
You can use the meshctl wasm tool to list what modules you have locally:
$ meshctl wasm list
NAME                                            TAG SIZE    SHA
webasseblyhub.io/ceposta/cache-example          1.0 12.6 kB 10addc6d
webassemblyhub.io/ceposta/demo-filter           1.0 12.6 kB a515a5d2
webassemblyhub.io/ceposta/istioinaction-demo    0.1 12.6 kB a515a5d2
You can publish this module to a registry capable of storing OCI images. For example, to use the free webassemblyhub.io repository, you can publish your module like this:
To see the details of a specific OCI image, you can check the ~/.gloo-mesh/wasm/store folder and find the image that was just built. For example:
$ ls -l ~/.gloo-mesh/wasm/store/bc234119a3962de1907a394c186bc486/

total 28
-rw-r--r-- 1 solo solo   224 Jul  2 19:04 descriptor.json
-rw-rw-r-- 1 solo solo 12553 Jul  2 19:04 filter.wasm
-rw-r--r-- 1 solo solo    43 Jul  2 19:04 image_ref
-rw-r--r-- 1 solo solo   221 Jul  2 19:04 runtime-config.json
Here you can see the filter.wasm binary along with some metadata files that describe the OCI image and the versions of Envoy (and associated ABIs) that are compatible with the filter. The intention of the image-based packaging is to store it in an existing OCI registry and build tooling to support it.
14.5.5 Deploying a new WebAssembly Envoy filter
Before we get started, let’s remove the configuration from the previous section (or any previous attemps to deploy a Wasm filter):
Let’s deploy some supporting services for this example. We deploy a sample httpbin service that will echo back the request headers we send into the service:
In the previous section, we created a new Wasm module from scratch, built and packaged it, and published it to a Wasm registry. In this section, we use Istio’s WasmPlugin resource to deploy the Wasm filter to workloads running in the service mesh to enhance the capabilities of the request/response path.
Here is a simple WasmPlugin resource that selects the httpbin workload and specifies the module URL (oci, file or https) to load the Wasm filter into the Istio data plane:
apiVersion: extensions.istio.io/v1alpha1
kind: WasmPlugin
metadata:
  name: httpbin-wasm-filter
  namespace: istioinaction
spec:
  selector:
    matchLabels:
      app: httpbin                                              ❶
  pluginName: add_header
url: oci://webassemblyhub.io/ceposta/istioinaction-demo:1.0 ❷In this example, we pull the module directly from an OCI-compliant registry. We already published our Wasm module to the webasseblyhub.io registry in the previous section, and in this configuration we pull it directly down from the registry into the proxy.
Now, when we make a call to the httpbin service, we can verify that we get the expected results. In this case, we expect to see a response header called “hello” with a value of “world”:
$  kubectl exec -it deploy/sleep -c sleep --
curl -v httpbin:8000/status/200

*   Trying 10.102.125.217:8000...
* Connected to httpbin (10.102.125.217) port 8000 (#0)
> GET /status/200 HTTP/1.1
> Host: httpbin:8000
> User-Agent: curl/7.79.1
> Accept: */*
>
* Mark bundle as not supporting multiuse
< HTTP/1.1 200 OK
< server: envoy
< date: Mon, 06 Dec 2021 16:02:37 GMT
< content-type: text/html; charset=utf-8
< access-control-allow-origin: *
< access-control-allow-credentials: true
< content-length: 0
< x-envoy-upstream-service-time: 3
< hello: world!                      ❶
<
* Connection #0 to host httpbin left intactAlthough this example was simple, more complex processing and logic can be built into the filter. With WebAssembly, you can pick the language of your choice to extend Envoy proxy and dynamically load the module at runtime. With Istio the WasmPlugin is used to declaratively load the Wasm module.
Summary
-
Envoy’s internal architecture is built around listeners and filters.
-
Envoy’s HTTP filter architecture can be configured directly with Istio’s
EnvoyFilterresource for more fine-grained configuration or to configure aspects of Envoy not exposed by Istio’s API. -
We can extend Envoy’s request path for service-to-service communication with functionality like rate limiting or the tap filter.
-
Lua and Wasm are available for more advanced customizations to the data plane without having to rebuild Envoy.