Chapter 10
The Standard Template Library
- The capabilities offered by the Standard Template Library (STL)
- How to use smart pointers
- How to create and use containers
- How to use iterators with containers
- The types of algorithms that are available with the STL, and how you can apply the more common ones
- How to use function objects with the STL
- How to define lambda expressions and use them with the STL
- How to use polymorphic function wrappers with lambda expressions
You can find the wrox.com code downloads for this chapter on the Download Code tab at www.wrox.com/go/beginningvisualc. The code is in the Chapter 10 download and individually named according to the names throughout the chapter.
WHAT IS THE STANDARD TEMPLATE LIBRARY?
As its name implies, the Standard Template Library is a library of standard class and function templates. You can use these templates to create a wide range of powerful general-purpose classes for organizing your data, as well as functions for processing that data in various ways. The STL is defined by the standard for C++ and is therefore always available with a conforming compiler. Because of its broad applicability, the STL can greatly simplify programming in many of your applications.
I’ll first explain, in general terms, the kinds of resources the STL provides and how they interact with one another, before diving into the details of working examples. The STL contains six kinds of components: containers, container adapters, iterators, algorithms, function objects, and function adapters. Because they are part of the standard library, the names of the STL components are all defined within the std namespace.
The STL is a very large library, some of which is highly specialized, and to cover the contents fully would require a book in its own right. In this chapter, I’ll introduce the fundamentals of how you use the STL and describe the more commonly used capabilities. Let’s start with containers.
Containers
Containers are objects that you use to store and organize other objects. A class that implements a linked list is an example of a container. You create a container class from an STL template by supplying the type of the object that you intend to store. For example, vector<T> is a template for a container that is a linear array that automatically increases in size when necessary. T is the type parameter that specifies the type of objects to be stored. Here are a couple of statements that create vector<T> containers:
std::vector<std::string> strings;     // Stores object of type string
std::vector<double> data;             // Stores values of type double
The first statement creates the strings container class that stores objects of type string, while the second statement creates the data container that stores values of type double.
You can store items of a fundamental type, or of any class type, in a container. If your type argument for a container template is a class type, the container can store objects of that type, or potentially of any derived class type. However, storing objects of a derived class type in a container created for base class objects will cause object slicing. Object slicing results in the derived part of an object being sliced off and occurs when you pass a derived class object by value for a parameter of a base class type. The base class copy constructor will be called to copy the derived class object, and because this constructor has no knowledge of derived class data members, they will not be copied. You can avoid slicing of objects of a derived type by storing pointers in the container. You can store pointers to a derived class type in a container that stores base class pointers.
The templates for the STL container classes are defined in the standard headers shown in the following table:
| HEADER FILE | CONTENTS |
|---|---|
vector |
A vector<T> container represents an array that stores elements of type T that automatically increases its size when required. You can only add new elements efficiently to the end of a vector container. |
array |
An array<T,N> container represents an array with a fixed number of elements, N, of type T. One advantage of this container over a normal array is that it is an object that knows its size, so when you pass an array<> container to a function it retains knowledge of the number of elements. An array<> container has an advantage over a vector<> in that it can be allocated entirely on the stack, whereas a vector<> needs heap access. |
deque |
A deque<T> container implements a double-ended queue of elements of type T. This is equivalent to a vector with the capability for adding elements to the beginning efficiently. |
list |
A list<T> container is a doubly-linked list of elements of type T. |
forward_list |
A forward_list<T> container is a singly linked list of elements of type T. Inserting and deleting elements in a forward_list<T> will be faster than in a list<T> as long as you are processing the list elements in a forward direction. |
map |
A map<K,T> is an associative container that stores each object (of type T) with an associated key (of type K). Key/object pairs are stored in the map as objects of type pair<K,T>, which is another STL template type. The key determines where the key/object pair is located and is used to retrieve an object. Each key must be unique.This header also defines the multimap<K,T> container where the keys in the key/object pairs need not be unique. |
unordered_map |
An unordered_map<K,T> container is similar to a map<K,T>, except that the key/object pairs are in no particular order in the container. Pairs are grouped into buckets based on hash values produced from the keys.The unordered_multimap<K,T> container is also in this header. This differs from an unordered_map<K,T> container in that the keys do not have to be unique. |
set |
A set<T> container is a map where each element serves as its own key. All elements in a set must be unique. A consequence of using an object as its own key is that you cannot change an object in a set; to change an object you must delete it and then insert the modified version. The elements in the container are ordered in ascending sequence by default but you can arrange to order them in any sequence you want.This header also defines the multiset<T> container, which is a set container where the elements need not be unique. |
unordered_set |
An unordered_set<T> container is similar to a set<T> except that the elements are not ordered in any particular way, but are organized into buckets depending on the hash values of the elements. Like set<T>, the elements must be unique.The unordered_multiset<T> container that is also in this header is similar to unordered_set<T>, except that the elements can be duplicated. |
bitset |
Defines the bitset<T> class template that represents a fixed number of bits. This is typically used to store flags that represent a set of states or conditions. |
All the template names are defined within the std namespace. T is the template type parameter for the type of elements stored in a container; where keys are used, K is the type of key.
Allocators
Most of the STL containers grow their size automatically to accommodate however many elements you store. Additional memory for these containers is made available by an object called an allocator that allocates space when required. You can optionally supply your own allocator object type through an additional type parameter. For example, the vector<T> template for creating a vector is really a vector<T, Allocator=allocator<T>> template, where the second type parameter, Allocator, is the allocator type. The second type parameter has the default value allocator<T> so this allocator type is used when you don’t specify your own.
Your allocator must be defined as a class template with a type parameter so that an instance of the allocator type can match the type of element stored in the container. For example, suppose you have defined your own class template, My_Allocator<T>, to provide memory to a container on request. You could then create a vector container that will use your allocator with the statement:
auto data = vector<CBox, My_Allocator<CBox>>();This container stores elements of type CBox with additional memory being allocated to the container by an object of type My_Allocator<CBox>.
So why would you want to define your own allocator when you can always use the default? The primary reason is efficiency in particular circumstances. For example, your application may lend itself to allocating a large chunk of memory on the heap that your allocator can issue piecemeal to the container without further dynamic memory operations. You can then release the memory in one go when the container is no longer required. I won’t be delving deeper into how you can define your own allocators. It’s not that it’s difficult — but I have to stop somewhere.
Comparators
Some containers use a comparator object that is used to determine the order of elements within the container. For example, the map<K,T> container template is really:
map<K, T, Compare=less<K>, Allocator=allocator<pair<K,T>> >allocator<pair<K,T>> is an allocator type for key/object pairs and Compare is a function object type that acts as a comparator for keys of type K and determines the order in which the key/object pairs are stored. The last two type parameters have default values so you don’t have to supply them. The default comparator type, less<K>, is a function object template defined in the STL that implements a “less than” comparison between objects of type K. I will discuss function objects later in this chapter.
It is quite likely that you will want to specify your own comparator for a map. You might want ordering based on “greater than” comparisons for the keys you are using. Supplying your own allocator type is much less likely. For this reason the allocator type parameter for the template comes last.
Container Adapters
A container adapter is a template class that wraps an existing container class to provide a different, and typically more restricted, capability. The container adapters are defined in the headers in the following table.
| HEADER FILE | CONTENTS |
|---|---|
queue |
A queue<T> container is defined by an adapter from a deque<T> container by default, but you could define it using a list<T> container. You can only access the first and last elements in a queue, and you can only add elements at the back and remove them from the front. Thus, a queue<T> container works more or less like the queue in your local coffee shop.This header also defines a priority_queue<T> container, which is a queue that orders the elements it contains so that the largest element is always at the front. Only the element at the front can be accessed or removed. A priority queue is defined by an adapter from a vector<T> by default, but you could use a deque<T> as the base container. |
stack |
A stack<T> container is defined by an adapter from a deque<T> container by default, but you could define it using a vector<T> or a list<T> container. A stack is a last-in first-out container, so adding or removing elements always occurs at the top, and you can only access the top element. |
Iterators
Iterators are objects that behave like pointers and are very important for accessing the contents of all containers except for those defined by a container adapter; container adapters do not support iterators. You can obtain an iterator from a container, which you can use to access the objects you have stored in it. You can also create iterators that will allow input and output of objects, or data items of a given type from or to a stream. Although basically all iterators behave like pointers, not all iterators provide the same functionality. However, they do share a base level of capability. Given two iterators, iter1 and iter2, accessing the same set of objects, the comparison operations iter1 == iter2, iter1 != iter2, and the assignment iter1 = iter2 are always possible, regardless of the types of iter1 and iter2.
Iterator Categories
There are four categories of iterators, and each category supports a different range of operations. The operations described for each category in the following table are in addition to the three operations that I mentioned in the previous paragraph:
| ITERATOR CATEGORY | DESCRIPTION |
|---|---|
| Input and output iterators | These iterators read or write a sequence of objects and may only be used once. To read or write a second time, you must obtain a new iterator. You can perform the following operations on these iterators:++iter or iter++*iterFor the dereferencing operation, only read access is allowed in the case of an input iterator, and only write access for an output iterator. |
| Forward iterators | Forward iterators incorporate the capabilities of both input and output iterators, so you can apply the operations shown for the previous category to them, and you can use them for access and store operations. Forward iterators can also be reused to traverse a set of objects in a forward direction as many times as you want. |
| Bidirectional iterators | Bidirectional iterators provide the same capabilities as forward iterators and additionally allow the operations --iter and iter--. This means you can traverse backward as well as forward through a sequence of objects. |
| Random access iterators | Random access iterators have the same capabilities as bidirectional iterators but also allow the following operations:iter+n or iter-niter += n or iter -= niter1 - iter2iter1 < iter2 or iter1 > iter2iter1 <= iter2 or iter1 >= iter2iter[n]Being able to increment or decrement an iterator by an arbitrary value n allows random access to the set of objects. The last operation using the [] operator is equivalent to *(iter + n). |
Thus, iterators in the four successive categories provide a progressively greater range of functionality. Where an algorithm requires an iterator with a given level of functionality, you can use any iterator that provides the required level of capability. For example, if a forward iterator is required, you must use at least a forward iterator; an input or an output iterator will not do. On the other hand, you could use a bidirectional iterator or a random access iterator because they both have the capability provided by a forward iterator.
Note that when you obtain an iterator from a container, the kind of iterator you get will depend on the sort of container you are using. The types of some iterators can be complex, but as you’ll see, in many instances the auto keyword can deduce the type for you.
SCARY Iterators
Visual C++ supports SCARY iterators, which in spite of the name, are nothing to be frightened of. SCARY is a strange acronym that is less than obvious, standing for “Seemingly erroneous (appearing Constrained by conflicting generic parameters), but Actually work with the Right implementation (unconstrained bY the conflicts due to minimized dependencies).” SCARY iterators are simply iterators that have a type that depends only on the type of element stored in a container, and not on other template parameters used to instantiate the container, such as the allocator and comparator types. In previous implementations of the STL, different containers created to store elements of a given type, but with different comparator or allocator types, would have iterators of different types. There is no necessity for an iterator type to be dependent on the type of comparator or allocator used by a container. With the current implementation of the STL, the iterators will have the same type, determined only by the element type. SCARY iterators can make the code faster and more compact.
Functions Returning Iterators
The std::begin() and std::end() functions return an iterator that points to the first element and one past the last element respectively of the container, std::string object or array that you pass as the argument. The std::rbegin() and std::rend() functions return reverse iterators that enable you to traverse backwards through a sequence. The std::cbegin(), std::cend(),std::crbegin()and std::crend()functions are similar to the first four I mentioned except that they return const iterators for the argument. These functions are included in the iterator header, the string header, and the headers for the majority of containers. You’ll see these functions in action later in this chapter. In most situations you can use these functions without the std prefix. The compiler will deduce that the function is from the std namespace from the argument type.
SMART POINTERS
Smart pointers are objects of a template type that behave like pointers but are different — they are smart. They are intended for use with objects you allocate dynamically. If you use a smart pointer when you allocate heap memory, the smart pointer will take care of deleting it. Using smart pointers for objects you create dynamically means never having to use delete. This means that you avoid the possibility of memory leaks. You can store smart pointers in a container, as you’ll see.
Smart pointers come in three flavors. The memory header defines the following template types for smart pointers in the std namespace:
unique_ptr<T>defines a unique object that behaves as a pointer toT; i.e., there can be only one such object. Assigning or copying aunique_ptr<T>object is not possible. The address stored by one such object can be moved to another usingstd::move(). After such an operation the original object will be invalid.- A
shared_ptr<T>object stores an address of an object of typeT, and severalshared_ptr<T>objects can point to the same object. The number ofshared_ptr<T>objects pointing to a given object is recorded. Allshared_ptr<T>objects that point to the same object must be destroyed before the object that they point to can be deleted. When the last of theshared_ptr<T>objects pointing to a given object dies, the object to which it points will be destroyed and the memory released. weak_ptr<T>stores a pointer that is linked to ashared_ptr. Aweak_ptr<T>does not increment or decrement the reference count of the linkedshared_ptrso it does not prevent the object from being destroyed and its memory released when the lastshared_ptrreferencing it is destroyed.
The reference count for a shared_ptr<T> pointing to a given object, obj, is incremented each time a new one is created and is decremented each time one of the shared_ptr<T> objects is destroyed. When the last shared_ptr<T> object pointing to obj is destroyed, obj will also be destroyed.
It is possible to inadvertently create reference cycles with shared_ptr objects. Conceptually a reference cycle is where a shared_ptr object, pA, points to another shared_ptr object pB, and pB points to pA. With this situation, neither can be destroyed. In practice this occurs in a way that is a lot more complicated. weak_ptr objects are designed to avoid the problem of reference cycles. By using weak_ptr objects to point to an object that a single shared_ptr object points to, you avoid reference cycles. When the single shared_ptr object is destroyed, the object pointed to is also destroyed. Any weak_ptr objects associated with the shared_ptr will then not point to anything.
Using unique_ptr Objects
A unique_ptr object stores a pointer uniquely. No other unique_ptr object can contain the same address so the object pointed to is effectively owned by the unique_ptr object. When the unique_ptr object is destroyed, the object to which it points is destroyed too.
You can create and initialize a smart pointer like this:
unique_ptr<CBox> pBox {new CBox {2,2,2}};pBox will behave just like an ordinary pointer and you can use it in the same way to call public member functions for the CBox object. The big difference is that you no longer have to worry about deleting the CBox object from the heap.
Here’s a version of some code that you saw back in Chapter 5, modified to use a unique_ptr:
#include <iostream>
#include <memory>

std::unique_ptr<double> treble(double);     // Function prototype

int main()
{
   double num {5.0};
   std::unique_ptr<double> ptr {};
   ptr = treble(num);
   std::cout << "Three times num = " << 3.0*num << std::endl;
   std::cout << "Result = " << *ptr << std::endl;
}

std::unique_ptr<double> treble(double data)
{
   std::unique_ptr<double> result {new double {}};
   *result = 3.0*data;
   return result;
}
This produces the result you would expect. ptr points to a double value of 15.0 after the statement that calls treble() has executed. You cannot copy a unique_ptr object or pass it by value to a function. The treble() function creates a local unique_ptr<double> object, modifies the value that it points to, and returns it. How does the treble() function return a unique_ptr<double> object when it cannot be copied? When you return a unique_ptr object from a function, std::move()is used to move the pointer from the local unique_ptr object to the object that is received by the calling function. Moving the pointer from one unique_ptr to another transfers ownership of the object pointed to, so the source unique_ptr object will contain nullptr. This has implications when you store unique_ptr objects in a container. I’ll show you how you can store smart pointers in an STL container later in this chapter.
The make_unique<T>() function template creates a new T object on the heap and then creates a unique_ptr<T> object that points to the Tobject. The arguments that you pass to make_unique<T>() are the arguments to the T class constructor. Here’s how you could create a unique_ptr object holding the address of a CBox object:
auto pBox = std::make_unique<CBox>(2.0, 3.0, 4.0);This creates a CBox object on the heap and stores its address in a new unique_ptr<CBox> object, pBox. Apart from the fact that it cannot be duplicated, you can use pBox just like an ordinary pointer.
Another version of make_unique<>() can create a unique_ptr object pointing to a new array in the free store. For example:
auto pBoxes = std::make_unique<CBox[]>(6);This statement creates an array of six CBox objects on the heap and stores the address of the array in a unique_ptr<CBox[]> object. You put the array type as the function template argument and the array dimension as the argument to the function. You access the array elements by indexing the unique_ptr object, pBoxes. For example:
pBoxes[1] = CBox {1.0, 2.0, 3.0};This sets the second element in the array to a CBox object with the dimensions you see. Thus the unique_ptr object acts just like the array name for a normal array.
Using shared_ptr Objects
You can define a shared_ptr object explicitly using the shared_ptr<T> constructor, but it is better to use the make_shared<T>() function that creates an object of type T on the heap and then returns a shared_ptr<T> object that points to it because the memory allocation is more efficient. Here’s an example:
auto pBox = make_shared<CBox>(1.0, 2.0, 3.0); // Points to a CBox objectThis creates a CBox object on the heap with length, width, and height values as 1.0, 2.0, and 3.0 and stores the shared_ptr<CBox> object that points to it in pBox.
In contrast to unique_ptr, you can have multiple shared_ptr objects pointing to the same object. The object pointed to will survive until the last shared_ptr object that points to it is destroyed, then it too will be destroyed. A shared_ptr object will be copied when you return it from a function.
You can initialize a shared_ptr with another shared_ptr:
std::shared_ptr<CBox> pBox2 {pBox};pBox2 points to the same object as pBox.
Using a smart pointer works in the same way as an ordinary pointer:
std::cout << "Box volume = " << pBox->volume() << std::endl;A smart pointer that you define with a base class type, can store a pointer to a derived class type. For example, given the CBox and CCandyBox classes that you saw in Chapter 9, you could define a shared_ptr like this:
shared_ptr<CBox> pBox {new CCandyBox {2,2,2}};pBox points to a CCandyBox object so smart pointers work in the same way as ordinary pointers in this respect too.
If you use a local smart pointer in a function to point to an object on the heap, the memory for the object will be automatically released when the function returns — assuming that you are not returning the smart pointer from the function. You can use smart pointers as class members. If you are defining a class that uses smart pointers to keep track of heap objects, you won’t need to implement a destructor to be sure that the memory for the objects is released when the class object is destroyed. The default constructor will call the destructor for each member that is a smart pointer.
Accessing the Raw Pointer in a Smart Pointer
You will sometimes need access to the address that a smart pointer contains; this is called a raw pointer. You will see later in the book that there are circumstances with the MFC where you need a raw pointer because MFC member functions do not accept smart pointers as arguments. Calling the get() memberof a smart pointer object returns the raw pointer, which you can then pass to a function that requires it.
Calling the reset() member of a smart pointer resets the raw pointer to nullptr. This will cause the object that is pointed to be destroyed when there are no other smart pointers that contain the same address.
Casting Smart Pointers
You cannot use the standard cast operators such as static_cast, dynamic_cast, and const_cast with smart pointers. When you need to cast a smart pointer, you must use static_pointer_cast, dynamic_pointer_cast, and const_pointer_cast instead of the standard operators. When you use dynamic_pointer_cast to cast a shared_ptr<T> object to a shared_ptr<Base> object, the result will be a shared_ptr containing nullptr if Base is not a base class for T. The cast operations for smart pointers are defined as function templates in the memory header.
ALGORITHMS
Algorithms are STL function templates that operate on a set of objects that are made available to them by an iterator. Because the objects are accessed through an iterator, an algorithm needs no knowledge of the source of the objects. The objects could be retrieved by the iterator from a container or even from a stream. Because iterators work like pointers, all STL functions that accept an iterator as an argument will work equally well with a regular pointer.
As you’ll see, you will frequently use containers, iterators, and algorithms in concert, in the manner illustrated in Figure 10-1.
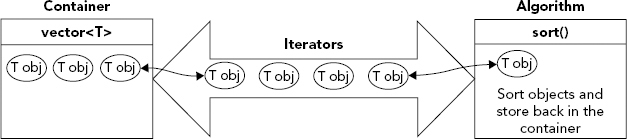
To apply an algorithm to the contents of a container, you supply iterators that point to objects within the container. The algorithm uses these iterators to access these objects in sequence and to write them back to the container when appropriate. For example, when you apply the sort() algorithm to a vector, you pass two iterators to the function. One points to the first element, and the other to one past the last element. The sort() function uses these iterators to access the objects for comparison, and to write them back to the container to establish the ordering. You’ll see this working in an example later in this chapter.
Algorithms are defined in two standard header files, the algorithm header and the numeric header.
FUNCTION OBJECTS IN THE STL
Function objects are objects of a class type that overloads the () operator (the function call operator), which means that the class implements the operator()() function. The implementation of the operator()() member function in a function object can return a value of any type. Function objects are also called functors.
The STL defines a set of function templates object types that define functors in the functional header. For example, the STL defines the less<T> template that I mentioned in the context of the map container. If you instantiate the template as less<MyClass>, you have a type for function objects that implement operator()() to provide the less-than comparison for MyClass objects. For this to work, MyClass must implement the operator<() function.
Many algorithms make use of function objects to specify binary operations to be carried out, or to specify predicates that determine how or whether a particular operation is to be carried out. A predicate is a function that returns a value of type bool, and because a function object can implement the operator()() member function to return a value of type bool, a function object can be a predicate. For example, suppose you have defined a Comp class that implements operator()()to compare two objects and return a bool value. If you create an object obj of type Comp, the expression obj(a,b) returns a bool value that results from comparing a and b, and thus acts as a predicate.
Predicates come in two flavors, binary predicates that involve two operands, and unary predicates that require one operand. Comparisons such as less-than and equal-to, and logical operations such as AND and OR, are implemented as binary predicates that are members of function objects; logical negation, NOT, is implemented as a unary predicate member of a function object.
You can define your own function objects when necessary. You’ll see function objects in action with algorithms and some container class functions later in this chapter. You can also define lambda expressions, which I’ll also introduce later in this chapter. Lambda expressions are often easier to use than function objects.
FUNCTION ADAPTERS
Function adapters are function templates that allow function objects to be combined to produce a more complex function object. A simple example is the not1 function adapter. This takes an existing function object that provides a unary predicate and inverts it. Thus, if the function object function returns true, the function that results from applying not1 to it will be false. Function adapters are yet another topic I won’t be discussing in depth, not because they are terribly difficult to understand — they aren’t — but because there’s a limit to how much I can cram into a single chapter.
THE RANGE OF STL CONTAINERS
You can apply the STL container templates in a wide range of applications. Sequence containers are containers in which you store objects of a given type in a linear fashion, either as a dynamic array or as a list. Elements are retrieved based on their position in the container. Associative containers store objects based on a key that you supply with each object to be stored; the key is used to locate the object within the container. Keys can be values of fundamental types or class objects. In a typical application, you might store phone numbers in an associative container, using names as the keys. You can retrieve a particular number from the container just by supplying the appropriate name. Sets are containers that hold elements that are stored and retrieved based on the elements themselves. They can be unordered, rather like objects rattling around in a bag, or they can be ordered, where a sequence is established within the container that depends on what the objects are. There are also sets that allow you to specify a comparator that will establish a particular order within the set. I won’t be discussing sets in detail. I’ll first introduce you to sequence containers, and then I’ll delve into associative containers and what you can do with them.
SEQUENCE CONTAINERS
The class templates for the five basic sequence containers are vector<T>, array<T,N>, list<T>, forward_list<T>, and deque<T>.
Which template you choose in any particular instance depends on the application. These containers are differentiated by the operations they can perform efficiently, as Figure 10-2 shows.
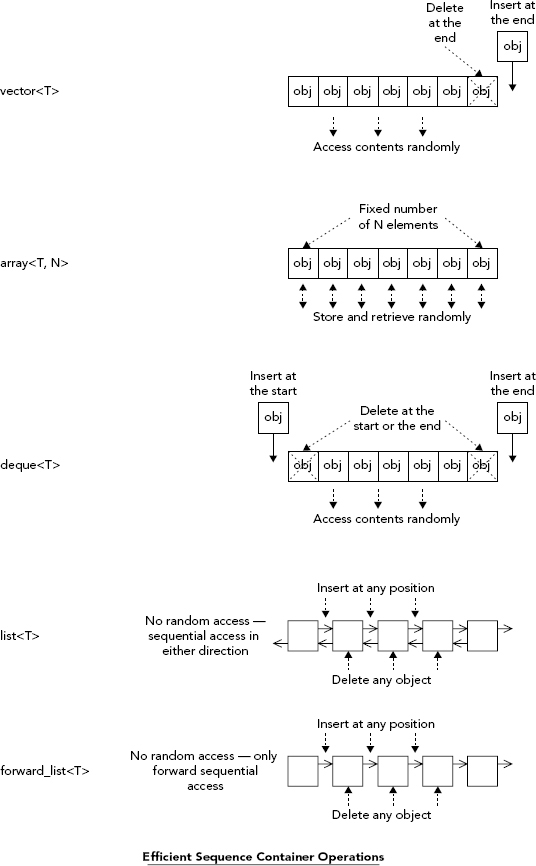
If you need random access to the contents of a container with a variable size, and you are happy to always add or delete objects at the end of a sequence, then vector<T> is the container template to choose. It is possible to add or delete objects randomly within a vector, but the process will be somewhat slower than adding objects to the end because all the objects past the insertion or deletion point have to be moved. If you can manage with a fixed number of elements, the array<T,N> container will be faster than a vector<T> in store and retrieve operations because you don’t have the overhead of providing for increasing the capacity of the container. An array<T,N> container can be allocated on the stack and is more flexible than a normal array.
A deque<T> container is similar to a vector<T> and supports the same operations, but it has the additional capability to add and delete elements at the beginning of the sequence. A list<T> container is a doubly-linked list, so adding and deleting at any position is efficient. The downside of a list is that there is no random access to the contents; the only way to access an object that is internal to the list is to traverse the contents from the beginning, or to run backward from the end.
Let’s look at sequence containers in more detail and try some examples. I’ll be introducing the use of iterators, algorithms, and function objects along the way.
Creating Vector Containers
The simplest way to create a vector container is like this:
vector<int> mydata;This creates a container that will store values of type int. The initial capacity is zero, so you will be allocating more memory right from the outset when you insert the first value.
The push_back() member function adds a new element to the end of a vector, so to store a value in this vector you would write:
mydata.push_back(99);The argument to push_back() is the item to be stored. This statement stores 99 in the vector, so after executing this, the vector contains one element. The push_back() function is overloaded with an rvalue reference parameter version so it will move temporary objects into the vector rather than copy them.
Here’s another way to create a vector to store integers:
vector<int> mydata(100);This creates a vector that contains 100 elements that are all initialized to zero. Note that you must use parentheses here. If you put 100 between braces, the vector will contain one element with the value 100. If you add new elements, the memory allocated for the vector will be increased automatically, so obviously it’s a good idea to choose a reasonably accurate value for the number of integers you are likely to store. This vector can be used just like an array. For example, to store a value in the third element, you can write:
mydata[2] = 999;Of course, you can only use an index value to access elements that are within the range that exist in the vector. You can’t add new elements in this way though. To add a new element, you can use the push_back() function.
You can initialize the elements in a vector to a different value, when you create it by using this statement:
vector<int> mydata(100, -1);You must use parentheses here too. The second argument is the initial value to be used for elements, so all 100 elements will be set to -1.
If you don’t want to create elements when you create a vector container, you can increase the capacity after you create it by calling its reserve() function:
vector<int> mydata;
mydata.reserve(100);
The argument to the reserve() function is the minimum number of elements to be accommodated. If the argument is less than the current capacity of the vector, then calling reserve() will have no effect. In this code fragment, calling reserve() causes the vector container to allocate sufficient memory for a total of 100 elements although the elements are not yet created.
When you want to specify a set of initial values for elements, you use an initializer list:
vector<int> values {100, 200, 300, 400);This creates a vector containing four elements with the values from the list.
You can also create a vector with initial values for elements from an external array. For example:
double data[] {1.5, 2.5, 3.5, 4.5, 5.5, 6.5, 7.5, 8.5, 9.5, 10.5};
vector<double> mydata(data, data+8);
Here, the data array is created with 10 elements of type double, with the initial values shown. The second statement creates a vector storing elements of type double, with eight elements initially having the values corresponding to data[0] through data[7]. The arguments to the vector<double> constructor are pointers (and can also be iterators), where the first pointer points to the first initializing element in the array, and the second points to one past the last initializing element. Thus, the mydata vector will contain eight elements with initial values 1.5, 2.5, 3.5, 4.5, 5.5, 6.5, 7.5, and 8.5.
Because the constructor in the previous fragment can accept either pointer or iterator arguments, you can initialize a vector when you create it with values from another vector that contains elements of the same type. You just supply the constructor with an iterator pointing to the first element you want to use as an initializer, plus a second iterator pointing to one past the last element you want to use. Here’s an example:
vector<double> values(begin(mydata), end(mydata));After executing this statement, the values vector will have elements that are duplicates of the mydata vector. As Figure 10-3 illustrates, the begin() template function returns a random access iterator that points to the first element in the argument, and end()returns a random access iterator pointing to one past the last element. A sequence of elements is typically specified in the STL by two iterators, one pointing to the first element and the other pointing to one past the last element, so you’ll see this time and time again.
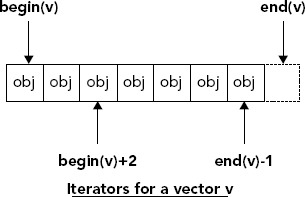
Because begin() and end()return random access iterators, you can modify what they point to when you use them. For a vector<T>, the type of the iterators that begin() and end()return is vector<T>::iterator, where T is the type of object in the vector. Most of the time you can use the auto keyword to specify the iterator type.
Here’s a statement that creates a vector that is initialized with the third through the seventh elements from the mydata vector:
vector<double> values(begin(mydata)+2, end(mydata)-1);Adding 2 to the first iterator makes it point to the third element in mydata. Subtracting 1 from the second iterator makes it point to the last element in mydata; remember that the second argument to the constructor is an iterator that points to a position that is one past the element to be used as the last initializer, so the object that the second iterator points to is not included in the set.
As I said earlier, it is pretty much standard practice in the STL to indicate a sequence of elements in a container by a begin iterator that points to the first element and an end iterator that points to one past the last element. This allows you to iterate over all the elements in a sequence by incrementing the begin iterator until it equals the end iterator. This means that the iterators only need to support the equality operator to allow you to walk through the sequence.
Occasionally, you may want to access the contents of a vector in reverse order. Calling the rbegin() function for a vector returns an iterator that points to the last element, while rend() points to one before the first element (that is, the position preceding the first element), as Figure 10-4 illustrates.

The iterators returned by rbegin() and rend() are called reverse iterators because they present the elements in reverse sequence. For a vector<T> container, reverse iterators are of type vector<T>::reverse_iterator. Figure 10-4 shows how adding a positive integer to the rbegin() iterator moves back through the sequence, and subtracting an integer from rend() moves forward through the sequence.
Here’s how you could create a vector containing the contents of another vector in reverse order:
double data[] {1.5, 2.5, 3.5, 4.5, 5.5, 6.5, 7.5, 8.5, 9.5, 10.5};
vector<double> mydata(data, data+8);
vector<double> values(rbegin(mydata), rend(mydate));
Because you are using reverse iterators as arguments to the constructor in the last statement, the values vector will contain the elements from mydata in reverse order.
When you want to use iterators to access the elements in a vector but do not want to modify the elements you can use the cbegin() and cend()template functions that return const iterators. For example, suppose you want to list the squares of the integer values stored in a vector:
  std::vector<int> mydata {1, 2, 3, 4, 5};
  for(auto iter = std::cbegin(mydata) ; iter != std::cend(mydata) ; ++iter)
    std::cout << (*iter) << " squared is " << (*iter)*(*iter) << std::endl;
Using cbegin() and cend(), there is no possibility of modifying the elements in mydata accidentally within the loop. You also have the standalone template functions and container member functions crbegin() and crend() available that provide const reverse iterators.
The Capacity and Size of a Vector Container
The capacity of a vector is the maximum number of objects it can currently accommodate without allocating more memory. The size is the number of objects actually stored in the container. Obviously the size cannot be greater than the capacity.
You can obtain the size and capacity of the data container by calling the size() and capacity() member functions. For example:
std::cout << "The capacity of the container is: " << data.capacity() << std::endl
          << "The size of the container is: " << data.size() << std::endl;
Calling capacity()for a vector returns the current capacity, and calling its size() function returns the current size, both values being returned as type vector<T>::size_type. This is an implementation-defined integer type that is defined within the vector<T> class template. To create a variable to store the value returned from the size() or capacity() function, you can specify it as type vector<T>::size_type, where you replace T with the type of object stored in the container. The following fragment illustrates this:
vector<double> values;
vector<double>::size_type cap {values.capacity()};
Of course, the auto keyword makes it much easier:
auto cap = values.capacity();If the value returned by the size() function is zero, then clearly the vector contains no elements; thus, you can use it as a test for an empty vector. You can also call the empty() function for a vector to test for this:
if(values.empty())
  std::cout << "No more elements in the vector.";
The empty() function returns a value of type bool that is true when the vector is empty and false otherwise.
You are unlikely to need it very often, but you can discover the maximum possible number of elements in a vector by calling its max_size() function. For example:
std::vector<std::string> strings;
std::cout << "Maximum length of strings vector: "
          << strings.max_size() << std::endl;
Executing this fragment produces the output:
Maximum length of strings vector: 153391689The maximum length is returned as type vector<string>::size_type. Note that the maximum length of a vector will depend on the type of element stored. If you try this with a vector storing values of type int, you will get 1073741823 as the maximum length, and for a vector storing values of type double it is 536870911.
You can increase or decrease the size of a vector by calling its resize() function. If you specify a new size that is less than the current size, sufficient elements will be deleted from the end of the vector to reduce it to its new size. If the new size is greater than the old, new elements will be added to the end of the vector to increase its length to the new size. Here’s code illustrating this:
vector<int> values(5, 66);   // Contains 66 66 66 66 66
values.resize(7, 88);        // Contains 66 66 66 66 66 88 88
values.resize(10);           // Contains 66 66 66 66 66 88 88 0 0 0
values.resize(4);            // Contains 66 66 66 66
The first argument to resize() is the new size. The second argument, when it is present, is the value to be used for new elements that need to be added to make up the new size. If you are increasing the size and you don’t specify a value for new elements, the default value will be used. In the case of a vector storing objects of a class type, the default value will be the object produced by the no-arg constructor for the class.
Accessing the Elements in a Vector
You have already seen that you can access the elements in a vector by using the subscript operator, just as you would for an array. You can also use the at() member function where the argument is the index of the element you want to access. Here’s how you could list the contents of the numbers vector in the previous example using at():
  for(vector<int>::size_type i {}; i<numbers.size() ;i++)
    std::cout << " " << numbers.at(i);
The operation of at()differs from the subscript operator, []. If you use a subscript with the subscript operator that is outside the valid range, the result is undefined. If you do the same with at(), an exception of type out_of_range will be thrown. If there’s the potential for subscript values outside the legal range to arise, it’s better to use the at() function and catch the exception than to allow the possibility for undefined results.
Of course, when you want to access all the elements in a vector, the range-based for loop always provides a simpler mechanism:
  for(auto number : numbers)
    std::cout << " " << number;
To access the first or last element in a vector you can call the front() or back() function, respectively:
std::cout << "The value of the first element is: " << numbers.front() << std::endl;
std::cout << "The value of the last element is: " << numbers.back() << std::endl;
Both functions come in two versions; one returns a reference to the element, and the other returns a const reference. The latter will be called when the vector object is const. If you call front() for a const vector, you cannot use the reference that is returned to modify the element and you cannot store the return value in a non-const variable.
Inserting and Deleting Elements in a Vector
In addition to the push_back() function you have seen, a vector container supports the pop_back() operation that deletes the last element. Both operations execute in constant time, that is, the time to execute will be the same, regardless of the number of elements in the vector. The pop_back() function is very simple to use:
vec.pop_back();This statement removes the last element from the vector vec and reduces the size by 1. If you call pop_back() for an empty vector the behavior is undefined.
You could remove all the elements in a vector by calling the pop_back() function repeatedly, but the clear() function does this much more simply:
vec.clear();This statement removes all the elements from vec, so the size will be zero. Of course, the capacity will be left unchanged.
Insert Operations
You can call the insert() function to insert one or more new elements anywhere in a vector. This operation will execute in linear time, which means that the time increases in proportion to the number of elements in the container. This is because inserting new elements involves moving the existing elements. The simplest version of insert()inserts a single element at a specific position; the first argument is an iterator specifying the insertion position and the second argument is the element to be inserted. For example:
vector<int> vec(5, 99);
vec.insert(begin(vec)+1, 88);
The first statement creates a vector with five integer elements, all initialized to 99. The second statement inserts 88 after the first element; so, after executing this, the vector will contain:
99 88 99 99 99 99For a vector storing objects, an insert() function call will invoke the version with an rvalue reference parameter when the argument is a temporary object so a temporary object will be moved into the vector, not copied. If the second argument to insert() is an lvalue, the version with a normal reference parameter will be called.
You can insert several identical elements, starting from a given position:
vec.insert(begin(vec)+2, 3, 77);The first argument is an iterator specifying the insertion position for the first element, the second argument is the number of elements to be inserted, and the third argument is the element to be inserted. After executing this statement, vec will contain:
99 88 77 77 77 99 99 99 99You have yet another version of insert()that inserts a sequence of elements at a given position. The first argument is an iterator pointing to the insertion position for the first element. The second and third arguments are input iterators specifying the range of elements to be inserted from some source. Here’s an example:
vector<int> newvec(5, 22);
newvec.insert(begin(newvec)+1, begin(vec)+1, begin(vec)+5);
The first statement creates a vector with five integer elements initialized to 22. The second statement inserts four elements from vec, starting with the second. After executing these statements, newvec will contain:
22 88 77 77 77 22 22 22 22Don’t forget that the second iterator in the interval specifies the position that is one past the last element, so the element it points to is not included.
Emplace Operations
The emplace() and emplace_back() member functions insert an object in a vector by creating it in place, rather than moving or copying it. This is useful when the object is constructed using two or more constructor arguments. The emplace() function inserts an object at a specified position. The first parameter is an iterator specifying the insertion position. This is followed by one or more rvalue reference parameters that will be used in a constructor call for type T to create the object in place. The emplace_back() function has one or more rvalue reference parameters that specify the object to be added at the end of the vector. For example, suppose you have defined a vector like this:
std::vector<CBox> boxes;You could add CBox objects to the vector like this:
boxes.push_back(CBox {1, 2, 3});
boxes.push_back(CBox {2, 4, 6});
boxes.push_back(CBox {3, 6, 9});
This will create and append three CBox objects to the vector.
Alternatively you could write this:
boxes.emplace_back(1, 2, 3);
boxes.emplace_back(2, 4, 6);
boxes.emplace_back(3, 6, 9);
Each emplace_back() call selects the CBox constructor to create the object to be added to the end of the vector based on the arguments to the function. Using emplace_back() will result in fewer CBox objects being created than in the case of push_back().
Erase Operations
The erase() member function deletes one or more elements from any position within a vector, but this also is a linear time function and will typically be slow. Here’s how you erase a single element at a given position:
newvec.erase(end(newvec)-2);The argument is an iterator that points to the element to be erased, so this statement removes the second to last element from newvec.
To delete several elements, you supply two iterator arguments specifying the interval. For example:
newvec.erase(begin(newvec)+1, begin(newvec)+4);This will delete the second, third, and fourth elements from newvec. The element that the second iterator argument points to is not included in the operation.
As I said, both the erase() and insert() operations are slow, so you should use them sparingly.
Swap and Assign Operations
The swap() member function enables you to swap the contents of two vectors, provided, of course, the elements in the two vectors are of the same type. Here’s a code fragment showing an example of how this works:
vector<int> first(5, 77);              // Contains 77 77 77 77 77
vector<int> second(8, -1);             // Contains -1 -1 -1 -1 -1 -1 -1 -1
first.swap(second);
After executing the last statement, the contents of the vectors first and second will have interchanged. Note that the capacities of the vectors are swapped as well as the contents and, of course, the size.
The assign() member function replaces the entire contents of a vector with another sequence, or replaces the contents with a given number of instances of an object. Here’s how you could replace the contents of one vector with a sequence from another:
vector<double> values;
for(int i {1}; i <= 50 ;++i)
  values.emplace_back(2.5*i);
vector<double> newdata(5, 3.5);
newdata.assign(begin(values)+1, end(values)-1);
This creates the values vector and stores 50 elements that have the values 2.5, 5.0, 7.5, ... 125.0. The newdata vector is created with five elements, each having the value 3.5. The last statement calls the assign() member of newdata, which deletes all elements from newdata, and then inserts copies of all the elements from values, except for the first and the last. You specify the new sequence to be inserted by two iterators, the first pointing to the first element to be inserted and the second pointing to one past the last element to be inserted. Because you specify the new elements to be inserted by two iterators, the source of the data can be from any sequence, not just a vector. The assign() function will also work with regular pointers, so, for example, you could insert elements from an array of double elements.
Here’s how you use assign()to replace the contents of a vector with a sequence of instances of the same element:
newdata.assign(30, 99.5);The first argument is the count of elements in the replacement sequence, and the second argument is the element to be used. This statement will cause the contents of newdata to be deleted and replaced by 30 elements, each having the value 99.5.
Storing Class Objects in a Vector
You can store objects of any class type in a vector, but the class must meet certain minimum criteria. Here’s a minimum specification for a given class T to be compatible with a vector or, in fact, any sequence container:
class T
{
public:
  T();                                 // Default constructor
  T(const T& t);                       // Copy constructor
  ~T();                                // Destructor
  T& operator=(const T& t);            // Assignment operator
};
The compiler will supply default versions of these class members if you don’t define them, so it’s not difficult for a class to meet these requirements. The important thing to note is that they are required and are likely to be used, so when the default implementation that the compiler supplies will not suffice, you must provide your own implementation.
If you store objects of your own class types in a vector, it’s highly recommended that you implement a move constructor and a move assignment operator for your class because the vector container fully supports move semantics. For example, if the vector needs to resize itself to allow more elements to be added, without move semantics the following sequence of events will occur:
- A new vector with the new size is allocated.
- All objects from the old vector are copied to the new vector.
- All objects in the old vector are destroyed.
- The old vector is deallocated.
With move semantics support in your class, this is what happens:
- A new vector with the new size is allocated.
- All objects from the old vector are moved to the new vector.
- All objects in the old vector are destroyed.
- The old vector is deallocated.
This will be significantly faster because no copying is necessary.
Let’s try an example.
Sorting Vector Elements
The sort<T>() function template that is defined in the algorithm header will sort a sequence of objects of any type as long as the required comparisons are supported. Objects are sorted in ascending sequence by default so the < operation must be supported. You identify the sequence by two random access iterators that point to the first and one-past-the-last objects. Note that random access iterators are essential; iterators with lesser capability will not suffice. The type parameter, T, specifies the type of random access iterator that the function will use. Thus, the sort<T>() template can sort the contents of any container that provides random access iterators, as long as the object type supports comparisons.
In the previous example, you implemented operator <() in the Person class, so you could sort a sequence of Person objects. Here’s how you could sort the contents of the vector<Person> container:
std::sort(stdbegin(people), stdend(people));This sorts the contents of the vector in ascending sequence. You can add an #include directive for algorithm, and put the statement in main() before the output loop, to see the sort in action. Note that you can use sort<T>() to sort arrays. The only requirement is that the < operator should work with the type of the elements. Here’s a code fragment showing how you could use it to sort an array of integers:
const size_t N {100};
int data[N];
std::cout << "Enter up to " << N << " non-zero integers. Enter 0 to end:
";
int value {};
size_t count {};
for(size_t i {} ;i<N ;i++)            // Read up to N integers
{
  std::cin >> value;                  // Read a value
  if(!value)                          // If it is zero,
    break;                            // we are done
  data[count++] = value;
}
std::sort(data, data+count);          // Sort the integers
Note how the pointer marking the end of the sequence of elements to be sorted must still be one past the last element.
When you need to sort a sequence in descending order, you can use the version of the sort<T>() algorithm that accepts a third argument that is a function object that defines a binary predicate. The functional header defines a complete set of function object types for comparison predicates:
less<T> less_equal<T> equal<T> greater_equal<T> greater<T>Each of these templates creates a class type for function objects that you can use with sort() and other algorithms for sorting objects of type T. The sort() function used in the previous fragment uses a less<int> function object by default. To specify a different function object to be used as the sort criterion, you add it as a third argument, like this:
std::sort(data, data+count, std::greater<int>()); // Sort the integersThe third argument to the function is an expression that calls the constructor for the greater<int> type, so you are passing an object of this type to the sort() function. This statement will sort the contents of the data array in descending sequence. If you are trying these fragments out, don’t forget that you need the functional header to be included for the function object. The comparison predicates also come in the form of transparent operator functors. They are referred to as transparent because they perform perfect forwarding of the arguments. When you want to use the transparent form with an algorithm, you just omit the template type argument, like this:
std::sort(data, data+count, std::greater<>());This sorts the container contents with perfect forwarding of the objects to be compared.
Storing Pointers in a Vector
A vector container, like other containers, makes a copy of the objects you add to it. This has tremendous advantages in many circumstances, but it could be very inconvenient in some situations. For example, if your objects are large, there could be considerable overhead in copying each object as you add it to the container. This is an occasion where you might be better off storing smart pointers to the objects in the container. You could create a new version of the Ex10_02.cpp example to store pointers to Person objects in a container.
Array Containers
The array<T,N> template that is defined in the array header defines a container that is similar to an ordinary array in that it is of fixed length, N, and you can use the subscript operator to access the elements. You can also initialize an array container with an initializer list. For example:
std::array<double, 5> values {1.5, 2.5, 3.5, 4.5, 5.5};If you supply fewer initializers than there are elements, the remaining elements will be initialized with the equivalent of zero. This means nullptr if the elements are pointers, and objects created by the default constructor if the elements are objects of a class type. If you supply too many initializers, the code won’t compile.
You can define an array container without initializing it:
std::array<int, 4> data;The size is fixed and the four elements of type int will be created containing junk values. Array container elements of a fundamental type will not be initialized by default, but elements of a class type will be initialized by calling the no-arg constructor. You could construct an array of Person objects where the Person class is as in Ex10_03:
std::array<Person, 10> people;This container has 10 elements of type Person, all with the firstname and secondname members as nullptr.
An array container knows its size, so you can use the range-based for loop when it is passed to a function. For example, here’s a function template that will list any array container of Person objects:
template<size_t N>
void listPeople(const std::array<Person, N>& folks)
{
  for(const auto& p : folks)
    p.showPerson();
}
Defining the function by a template with a parameter, N, allows it to be used to list an array of any number of Person objects. If your application classes use a standard function to display an object, you could add a template type parameter for the type of element stored and get a function that will list any of your arrays of any length or type. Remember, though, that each unique set of template parameter values will produce a separate instance of the template.
Because the elements of an array container are always created when you define it, you can reference an element using the subscript operator and use it as an lvalue. For example:
people[1] = Person("Joe", "Bloggs");This stores a Person object in the second element in the array.
Here’s a summary of some of the most useful members of an array container type:
void fill(const T& arg)sets all the array elements toarg:people.fill(Person("Ned", "Kelly")); // Fill array with Ned Kellyssize()returns the size of the array as an integer.back()returns a reference to the last array element:people.back().showPerson(); // Output the last personbegin()returns an iterator pointing to the first array element.end()returns an iterator pointing to one past the last array element.rbegin()returns a reverse iterator pointing to the last array element.rend()returns a reverse iterator pointing to before the first array element.swap(array& right)swaps the current array withright. The current array andrightmust store the same type of elements and have the same size.array<int, 3> left = {1, 2, 3}; array<int, 3> right = {10, 20, 30}; left.swap(right); // Swap contents of left and right
You can use any of the comparison operators, <, <=, ==, >=, >, and !=, to compare two array containers as long as they store the same number of elements of the same type. Corresponding elements are compared in sequence to determine the result. For example, array1<array2 will result in true if array1 has the first occurring element that is less than the corresponding element in array2. Two arrays are equal if all corresponding elements are equal and unequal if any pair of corresponding elements differ.
Let’s see an example of an array in use.
Double-ended Queue Containers
The double-ended queue container template, deque<T>, is defined in the deque header. A double-ended queue is very similar to a vector in that it can do everything a vector container can, and includes the same function members, but you can also add and delete elements efficiently at the beginning of the sequence as well as at the end. You could replace the vector in Ex10_02.cpp with a double-ended queue, and it would work just as well:
std::deque<Person> people; // Double-ended queue of Person objectsThe push_front() member function adds an element to the front of the container and you can delete the first element by calling pop_front(). There’s also an emplace_front() member so if you were using a deque<Person> container in Ex10_02.cpp, you could add elements at the front instead of the back:
people.emplace_front(firstname, secondname);Using this statement to add elements, the order of elements in the double-ended queue would be the reverse of those in the vector.
Here are examples of constructors for a deque<T> container:
deque<string> strings;            // An empty container
deque<int> items(50);             // 50 elements initialized to default value
deque<double> values(5, 0.5);     // 5 elements of 0.5
deque<int> data(cbegin(items), cend(items));  // Initialized with a sequence
deque<int> numbers {1, 3, 5, 7, 9, 11};
Although a double-ended queue is very similar to a vector and does everything a vector can do, it does have one disadvantage. Because of the additional capability, the memory management for a double-ended queue is more complicated than for a vector, so it will be slightly slower. Unless you need to add elements to the front of the container, a vector is a better choice. Let’s see a double-ended queue in action.
Using List Containers
The list<T> container template from the list header implements a doubly-linked list. The big advantage this has over a vector or a double-ended queue is that you can insert or delete elements anywhere in the sequence in constant time. The main drawback is that a list cannot directly access an element by its position. It’s necessary to traverse the elements in a list from a known position when you want to do this, usually the first or the last. The range of constructors for a list container is similar to that for a vector or double-ended queue. This statement creates an empty list:
std::list<std::string> names;You can also create a list with a given number of default elements:
std::list<std::string> sayings(20); // A list of 20 empty stringsHere’s how you create a list containing a given number of identical elements:
std::list<double> values(50, 2.71828);This creates a list of 50 values of type double equal to 2.71828.
You can also construct a list initialized with values from a sequence specified by two iterators:
std::list<double> samples(++cbegin(values), --cend(values));This creates a list from the contents of the values list, omitting the first and last elements. The iterators returned by the begin() and end() functions for a list are bidirectional iterators, so you do not have the same flexibility as with a vector or a deque container that support random access iterators. You can only change the value of a bidirectional iterator using the increment or decrement operators.
Just like the other sequence containers, you can discover the number of elements in a list by calling its size() member. You can also change the number of elements by calling its resize() function. If the argument to resize() is less than the number of elements, elements will be deleted from the end; if the argument is greater, elements will be added using the default constructor for the type of elements stored.
Adding Elements to a List
You add an element to the beginning or end of a list by calling push_front() or push_back(), just as you would for a double-ended queue. To add elements to the interior of a list, you use the insert() function, which comes in three versions. Using the first version, you can insert a new element at a position specified by an iterator:
std::list<int> data(20, 1);           // List of 20 elements value 1
data.insert(++begin(data), 77);       // Insert 77 as the second element
The first argument to insert() is an iterator specifying the insertion position, and the second argument is the element to be inserted. Incrementing the bidirectional iterator returned by begin() makes it point to the second element. After executing this, the list contents will be:
1 77 1 1 1 1 1 1 1 1 1 1 1 1 1 1 1 1 1 1 1You can see that the list now contains 21 elements, and that the elements from the insertion point on are simply displaced to the right.
You can insert a number of copies of the same element at a given position:
auto iter = begin(data);
  std::advance(iter, 9);    // Increment iterator by 9
data.insert(iter, 3, 88);   // Insert 3 copies of 88 starting at the 10th
iter will be of type list<int>::iterator. The first argument to the insert() function is an iterator specifying the insertion position, the second is the number of elements to be inserted, and the third is the element to be inserted repeatedly. To get to the tenth element you increment the iterator by caling the advance() template function. The advance() function increments the iterator specified by the first argument by the amount specified by the second. Using the advance() function is necessary because you cannot just add 9 to a bidirectional iterator. Thus, this fragment inserts three copies of 88 into the list, starting at the tenth element. Now the contents of the list will be:
1 77 1 1 1 1 1 1 1 88 88 88 1 1 1 1 1 1 1 1 1 1 1 1Now the list contains 24 elements.
Here’s how you can insert a sequence of elements into a list:
std::vector<int> numbers(10, 5);         // Vector of 10 elements with value 5
data.insert(--(--end(data)), cbegin(numbers), cend(numbers));
The first argument to insert() is an iterator pointing to the second-to-last element position. The sequence to be inserted is specified by the second and third arguments to the insert() function, so this will insert all the elements from the vector into the list, starting at the second to last element position. After executing this, the contents of the list will be:
1 77 1 1 1 1 1 1 1 88 88 88 1 1 1 1 1 1 1 1 1 1 5 5 5 5 5 5 5 5 5 5 1 1Inserting the 10 elements from numbers in the second-to-last element position displaces the last two elements in the list to the right. The list now contains 34 elements.
There are three functions that will construct an element in place in the list: emplace(), which constructs an element at a position specified by an iterator; emplace_front(), which constructs an element at the beginning; and emplace_back(), which constructs an element at the end. Here are some examples of their use:
  std::list<std::string> strings;
  strings.emplace_back("first");
  std::string second("second");
  strings.emplace_back(std::move(second));
  strings.emplace_front("third");
  strings.emplace(++begin(strings), "fourth");
The fourth line of code uses the std::move() function to pass an rvalue reference to s to the emplace_back() function. After executing this operation, s will be empty because the contents will have been moved to the list. After executing these statements, strings will contain the elements:
third fourth first secondAccessing Elements in a List
You can obtain a reference to the first or last element in a list by calling its front() or back() member. To access elements that are interior to the list you must use an iterator and increment or decrement it to get to the element you want. As you have seen, begin() and end() return a bidirectional iterator pointing at the first element, or one past the last element, respectively. The rbegin() and rend() functions return bidirectional iterators and enable you to iterate through the elements in reverse sequence. You can use the range-based for loop with a list so you don’t have to use iterators when you want to process all the elements:
  std::list<std::string> strings;
  strings.emplace_back("first");
  std::string second("second");
  strings.emplace_back(std::move(second));
  strings.emplace_front("third");
  strings.emplace(++begin(strings), "fourth");
  for(const auto& s : strings)
    std::cout << s << std::endl;
The loop variable, s, is a reference that will reference each list element in turn.
Sorting List Elements
Because a list<T> container does not provide random access iterators, you cannot use the sort() function that is defined in the algorithm header. This is why the list<T> template defines its own sort() member function. It comes in two versions. To sort a list in ascending sequence you call the sort() member with no arguments. Alternatively, you can specify a function object or a lambda expression that defines a different predicate for comparing members. For example:
strings.sort(std::greater<std::string>()); // Descending sequenceYou can also use the transparent version of the predicate:
strings.sort(std::greater<>()); // Perfect forwardingThis will be faster because the arguments to the comparison operation will be moved, not copied. Let’s try out some of what we have seen in an example.
Other Operations on Lists
The clear() function deletes all the elements from a list. The erase() function allows you to delete either a single element specified by a single iterator, or a sequence of elements specified by a pair of iterators in the usual fashion — the first in the sequence and one past the last:
std::list<int> numbers {10, 22, 4, 56, 89, 77, 13, 9};
numbers.erase(++begin(numbers));      // Remove the second element

// Remove all except the first and the last two
numbers.erase(++begin(numbers), --(--end(numbers)));
Initially, the list contains all the values in the initializer list. The first erase() operation deletes the second element, so the list will contain:
10 4 56 89 77 13 9For the second erase() operation, the first argument is the iterator returned by begin(), incremented by 1, so it points to the second element. The second argument is the iterator returned by end(), decremented twice, so it points to the second-to-last element. Of course, this is one past the end of the sequence, so the element that this iterator points to is not included in the set to be deleted. The list contents after this operation will be:
10 13 9The remove() function removes elements from a list that match a particular value. With the numbers list defined as in the previous fragment, you could remove all elements equal to 22 with the following statement:
numbers.remove(22);The assign() function removes all the elements from a list and copies either a single object into the list a given number of times, or copies a sequence of objects specified by two iterators. Here’s an example:
std::list<int> numbers {10, 22, 4, 56, 89, 77, 13, 9};
numbers.assign(10, 99);         // Replace contents by 10 copies of 99
numbers.assign(data+1, data+4); // Replace contents by 22 4 56
The assign() function comes in the two overloaded versions illustrated here. The arguments to the first are the count of the number of replacement elements, and the replacement element value. The arguments to the second version are either two iterators or two pointers, specifying a sequence in the way you have already seen.
The unique() function will eliminate adjacent duplicate elements from a list, so if you sort the contents first, applying the function ensures that all elements are unique. Here’s an example:
std::list<int> numbers {10, 22, 4, 10, 89, 22, 89, 10} ; // 10 22 4 10 89 22 89 10
numbers.sort();                                          // 4 10 10 10 22 22 89 89
numbers.unique();                                        // 4 10 22 89
The result of each operation is shown in the comments.
The splice() function removes all or part of one list and inserts it in another. Obviously, both lists must store elements of the same type. Here’s the simplest way you could use the splice() function:
std::list<int> numbers {1, 2, 3};                        // 1 2 3
std::list<int> values {5, 6, 7, 8};                      // 5 6 7 8
numbers.splice(++begin(numbers), values);                // 1 5 6 7 8 2 3
The first argument to splice() is an iterator specifying where the elements should be inserted, and the second argument is the list that is the source of the elements. This operation removes all the elements from the values list and inserts them immediately preceding the second element in the numbers list.
Here’s another version of splice() that removes elements from a given position in a source list and inserts them at a given position in a destination list:
std::list<int> numbers {1, 2, 3};                        // 1 2 3
std::list<int> values {5, 6, 7, 8};                      // 5 6 7 8
numbers.splice(begin(numbers), values, --end(values));   // 8 1 2 3
In this version, the first two arguments to splice() are the same as the previous version of the function. The third argument is an iterator specifying the position of the first element to be selected from the source list; all elements, from this position to the end, are removed from the source and inserted in the destination list. After executing this code fragment, values will contain 5 6 7.
The third version of splice() requires four arguments and selects a range of elements from the source list:
std::list<int> numbers {1, 2, 3};                        // 1 2 3
std::list<int> values {5, 6, 7, 8};                      // 5 6 7 8
numbers.splice(++begin(numbers), values, ++begin(values),
                                          --end(values));// 1 6 7 2 3
The first three arguments to this version of splice() are the same as the previous version, and the last argument is one past the last element to be removed from the source. After executing this, values will contain:
5 8The merge() function removes elements from the list that you supply as an argument and inserts them in the list for which the function is called. Both lists must be ordered in the same sense before you call merge(). The order of the second list argument determines the ordering of the final combined list. If the lists are not ordered in the same sense, the debug version of the code will assert; the release version will run but the result will not be correct. Here’s a fragment showing how you might use it:
std::list<int> numbers {1, 2, 3};                        // 1 2 3
std::list<int> values {2, 3, 4, 5, 6, 7, 8};             // 2 3 4 5 6 7 8
numbers.merge(values);                                   // 1 2 2 3 3 4 5 6 7 8
This merges the contents of values into numbers, so values will be empty after this operation. The merge() member function that accepts a single argument orders the result in the sequence corresponding to that of the argument. Because the values in both lists are already ordered here, you don’t need to sort them. To merge the same lists in descending sequence, the code would be as follows:
numbers.sort(std::greater<>());                          // 3 2 1
values.sort(std::greater<>());                           // 8 7 6 5 4 3 2
numbers.merge(values, std::greater<>());                 // 8 7 6 5 4 3 3 2 2 1
A greater<>() function object specifies that the lists should be sorted in descending sequence and then merged into the same sequence. The transparent version of the function object is used here where the type argument is deduced. The second argument to merge() is a function object specifying the ordering, which must be the same as that of the lists for correct operation. You can omit the second argument to merge(), in which case it will be deduced to be the same as values.
The remove_if() function removes elements based on the result of applying a unary predicate; I’m sure you’ll recall that a unary predicate is a function object that applies to a single argument and returns a bool value, true or false. If the result of applying the predicate to an element is true, then the element will be deleted from the list. Typically, you would define your own predicate to do this. This involves defining your own class template for the function object or lambda expression that you want, while the STL defines the unary_function<T,R> base class template for use when you want to define your own class template. This template just defines types that will be inherited by the derived class that specifies your function object type. The base class template is defined as follows:
template<class _Arg, class _Result>
struct unary_function
{ // base class for unary functions
  typedef _Arg argument_type;
  typedef _Result result_type;
};
This defines argument_type and result_type for use in your definition of the operator()() function. You must use this base template if you want to use your predicates with function adapters. You’ll see later in this chapter that lambda expressions provide a much easier way to define a predicate.
The way in which you can use the remove_if() function is best explained with a specific application, so let’s try this in a working example.
Using forward_list Containers
The forward_list header defines the forward_list<T> container template that implements a singly linked list of elements of type T, where each element contains a pointer to the next element. This means that, unlike a list<T> container, you can only traverse the elements forwards. Like the list<T> container, you cannot access an element by its position. The only way to access an element is to traverse the list from the beginning. Because the operations for a forward_list<T> container are similar to those for a list<T>, I’ll just highlight a few of them.
The front() member function returns a reference to the first element in the list as long as the list is not empty and the reference will be const if the container object is const. You can test whether or not the list is empty using the empty() member, which returns false as long as there is at least one element in the list. The remove() function removes the element that matches the object you supply as the argument. There’s also the remove_if() member for which you supply a predicate as an argument, which can be a function object or a lambda expression. All elements for which the predicate is true are removed.
Because it is a singly linked list, a forward_list<T> container only has forward iterators. You can use the global functions to obtain iterators such as begin() and end() with it, except for those that return reverse iterators.
You can add an element to a forward_list using either push_front() or emplace_front(). The emplace_front() function creates an object from the arguments that you supply and inserts it at the front of the list. The push_front() function inserts the object you supply as the argument at the front of the list.
For example:
std::forward_list<std::string> words;
std::string s1 {"first"};
words.push_front(s1);
words.emplace_front("second");
std::string s2 {"third"};
words.emplace_front(std::move(s2));
words.emplace_front("fourth");
After executing this fragment, words will contain:
fourth third second firstA forward_list<T> container also has a before_begin() function that returns an iterator pointing to the position before the first element. This is for use with the insert_after() and emplace_after() member functions. You can insert one or more objects after a given position in the list using the insert_after() function. There are several versions of this. Here are some examples:
std::forward_list<int> datalist;

// Returns an iterator pointing to the inserted element, 11
auto iter = datalist.insert_after(datalist.before_begin(), 11); // 11

// Inserts 3 copies of the 3rd argument after iter and increments iter
iter = datalist.insert_after(iter, 3, 15);                  // 11 15 15 15

// Insert a range following iter, and increments iter to point to 5
int data[] {1, 2, 4, 5};
iter = datalist.insert_after(
                 iter, std::cbegin(data), std::cend(data)); // 11 15 15 15 1 2 4 5
iter will be of type forward_list<int>::iterator.
You can insert an element after a given position in the list using the emplace_after() function. The first argument is an iterator specifying the element after which the new element should be inserted. The second and subsequent arguments are passed to the constructor for the class type of the object to be inserted. For example:
words.emplace_after(std::cbegin(words), "fifth");After executing this statement with words as it was left by the previous fragment adding elements, the list will contain:
fourth fifth third second firstThe function created a string("fifth") object and stored it following the position pointed to by the first argument.
A forward_list<T> container provides better performance than a list<T> container. Having only one link to maintain makes it faster in operation and there is no size member keeping track of the number of elements. If you need to know the number of elements, you can obtain it using the distance() function from the algorithm header:
std::cout << "Size = " << std::distance(std::cbegin(words), std::cend(words));The arguments are iterators specifying the first element and one past the last element to be counted.
Using Other Sequence Containers
The remaining sequence containers are implemented through container adapters that I introduced at the beginning of this chapter. I’ll discuss each of them briefly and illustrate their operation with examples.
Queue Containers
A queue<T> container implements a first-in first-out storage mechanism through an adapter. You can only add to the end of the queue or remove from the front. Here’s one way you can create a queue:
std::queue<std::string> names;This creates a queue storing elements of type string. By default, the queue<T> adapter class uses a deque<T> container as the base, but you can specify a different sequence container as a base, as long as it supports the operations front(), back(), push_back(), and pop_front(). These four functions are used to operate the queue. Thus, a queue can be based on a list or a vector. You specify the alternate container as a second template parameter. Here’s how you would create a queue based on a list:
std::queue<std::string, std::list<std::string>> names;The second type parameter to the adapter template specifies the underlying sequence container to be used. The queue adapter class acts as a wrapper for the underlying container class and essentially restricts the range of operations you can carry out to those described in the following table.
| FUNCTION | DESCRIPTION |
|---|---|
back() |
Returns a reference to the element at the back of the queue. There are two versions, one returning a const reference and the other returning a non-const reference. If the queue is empty, then the value returned is undefined. |
front() |
Returns a reference to the element at the front of the queue. There are two versions, one returning a const reference and the other returning a non-const reference. If the queue is empty, then the value returned is undefined. |
push() |
Adds the element specified by the argument to the back of the queue. |
pop() |
Removes the element at the front of the queue. |
size() |
Returns the number of elements in the queue. |
empty() |
Returns true if the queue is empty and false otherwise. |
Note that there are no functions that make iterators available for a queue. The only way to access the contents of a queue is via the back() or front() functions.
Priority Queue Containers
A priority_queue<T> container is a queue that always has the largest or highest priority element at the top. Think of a queue of people arranged from the tallest to the shortest. Here’s one way to define a priority queue container:
std::priority_queue<int> numbers;The default criterion for determining the relative priority of elements as you add them to the queue is a standard less<T>() function object. You add an element to the priority queue using the push() function:
numbers.push(99); // Add 99 to the queueWhen you add an element, if the queue is not empty the function will use the less<T>() predicate to decide where to insert the new object. This will result in elements being ordered in ascending sequence from the back of the queue to the front. You cannot modify elements while they are in a priority queue, as this could invalidate the ordering that has been established.
The complete set of operations for a priority queue is shown in the following table.
| FUNCTION | DESCRIPTION |
|---|---|
top() |
Returns a const reference to the element at the front of the priority queue, which will be the largest or highest priority element in the container. If the container is empty, then the value returned is undefined. |
push() |
Adds the element specified by the argument to the priority queue at a position determined by the predicate for the container, which by default is less<T>. |
pop() |
Removes the element at the front of the priority queue, which will be the largest or highest priority element in the container. |
size() |
Returns the number of elements in the priority queue. |
empty() |
Returns true if the container is empty and false otherwise. |
There is a significant difference between the functions available for a priority queue and for a queue. With a priority queue, you have no access to the element at the back; only the element at the front is accessible.
By default, the base container for the priority queue adapter class is vector<T>. You can specify a different sequence container for the base, and an alternative function object for determining the priority of the elements. Here’s how you could do that:
std::priority_queue<int, std::deque<int>, std::greater<>> numbers;This statement defines a priority queue based on a deque<int> container, with elements being inserted using a transparent function object of type greater<>. The elements in this priority queue will be in descending sequence, with the smallest element at the top. The three template parameters are the element type, the type of the container to be used as a base, and the type for the predicate to be used for ordering the elements.
You could omit the third template parameter if you want the default predicate to apply, which will be less<int> in this case. If you want a different predicate but want to retain the default base container, you must explicitly specify it, like this:
std::priority_queue<int, std::vector<int>, std::greater<>> numbers;This specifies the default base container as vector<int> and the predicate type greater<> to be used to determine element ordering.
Stack Containers
The stack<T> adapter template is defined in the stack header and implements a pushdown stack based on a deque<T> container by default. A pushdown stack is a last-in first-out storage mechanism where only the object that was added most recently is accessible.
Here’s how you can define a stack:
std::stack<Person> people;This defines a stack to store Person objects.
The base container can be any sequence container that supports the operations back(), push_back(), and pop_back(). You could define a stack based on a list like this:
std::stack<std::string, std::list<std::string>> names;The first template argument is the element type as before, and the second is the container type to be used as a base for the stack.
There are only five operations available with a stack<T> container, and they are shown in the following table.
| FUNCTION | DESCRIPTION |
|---|---|
top() |
Returns a reference to the element at the top of the stack. If the stack is empty, then the value returned is undefined. You can assign the reference returned to a const or non-const reference and if it is assigned to the latter, you can modify the object in the stack. |
push() |
Adds the element specified by the argument to the top of the stack. |
pop() |
Removes the element at the top of the stack. |
size() |
Returns the number of elements in the stack. |
empty() |
Returns true if the stack is empty and false otherwise. |
As with the other containers provided through container adapters, you cannot use iterators to access the contents. Let’s see a stack working.
The tuple Class Template
The tuple<> class template that is defined in the tuple header is a useful adjunct to the array<> container, and to other sequence containers such as the vector<>. As its name suggests, a tuple<> object encapsulates a number of different items of different types. If you were working with fixed records from a file, or possibly from an SQL database, you could use a vector<> or an array<> container to store tuple<> objects that encapsulate the fields in a record. Let’s look at a specific example.
Suppose you are working with personnel records that contain an integer employee number, a first name, a second name, and the age of the individual in years. You could define an alias for a tuple<> instance to encapsulate an employee record like this:
using Record = std::tuple<int, std::string, std::string, int>;An alias is very useful for reducing the verbosity of the type specification. The Record type name is the equivalent of a tuple<> that stores values of type int, string, string, and int, corresponding to a person’s ID, first name, second name, and age. You could now define an array<> container to store Record objects:
std::array<Record, 5> personnel { Record {1001, "Joan", "Jetson", 35},
                                  Record {1002, "Jim" , "Jones" , 26},
                                  Record {1003, "June", "Jello" , 31},
                                  Record {1004, "Jack", "Jester", 39} };
This defines the personnel container, which is an array that can store five Record objects. If you wanted flexibility in the number of tuples you were dealing with, you could use a vector<> or a list<>. Here, you initialize four of the five elements in personnel from the initializer list. Here’s how you might store a fifth element:
personnel[4] = Record {1005, "Jean", "Jorell", 29};This uses the index operator to access the fifth element in the array container. You also have the option of creating a tuple<> object using the make_tuple() function template:
personnel[4] = std::make_tuple(1005, "Jean", "Jorell", 29);The make_tuple() function creates a tuple<> instance that is equivalent to our Record type because the deduced type parameters are the same.
To access the fields in a tuple, you use the get() template function. The template parameter is the index position of the field you want, indexed from zero. The argument to the function is the tuple that you are accessing. Here’s how you could list the records in the personnel container:
std::cout << std::setiosflags(std::ios::left);      // Left align output
for (const auto& r : personnel)
{
  std::cout << std::setw(10) << std::get<0>(r) << std::setw(10) << std::get<1>(r)
            << std::setw(10) << std::get<2>(r) << std::setw(10) << std::get<3>(r)
            << std::endl;
}
You need to include iomanip to compile this fragment. This outputs the fields in each tuple in personnel on a single line, with the fields left-justified in a field width of 10 characters, so it looks tidy. Note that the type parameter to the get() function template must be a compile-time constant. This implies that you cannot use a loop index variable as the type parameter, so you can’t iterate over the fields in a loop at runtime. It is helpful to define some integer constants that you can use to identify the fields in a tuple in a more readable way. For example, you could define the following constants:
const size_t ID {}, firstname {1}, secondname {2}, age {3};Now you can use these variables as type parameters in get() function instantiations making it much clearer which field you are retrieving:
for (const auto& r : personnel))
{
  std::cout << std::setw(10) << std::get<ID>(r)
            << std::setw(10) << std::get<firstname>(r)
            << std::setw(10) << std::get<secondname>(r)
            << std::setw(10) << std::get<age>(r) << std::endl;
}
Let’s put some of the fragments together into something you can compile and run.
ASSOCIATIVE CONTAINERS
I’ll just discuss some of those available to give you an idea of how they work. The most significant feature of an associative container such as map<K,T> is that you can retrieve a particular object without searching. The location of an object of type T is determined from a key of type K that you supply along with the object when you add it to the container. You can retrieve any object rapidly just by supplying its key.
For set<T> and multiset<T> containers, objects act as their own keys. You might be wondering what the use of a container is, if before you can retrieve an object, you have to have the object available. After all, if you already have the object, why would you need to retrieve it? The point of set and multiset containers is not so much to store objects for later retrieval, but to create an aggregation of objects that you can test to see whether or not a given object is already a member.
I’ll concentrate on map containers. The set and multiset containers are used somewhat less frequently, and their operations are very similar so you should have little difficulty using these after you have learned how to apply map containers.
Using Map Containers
When you create a map<K,T> container, K is the type of key you use to store an object of type T. Key/object pairs are stored as objects of type pair<K,T> that is defined in the utility header. The utility header is included into the map header so this type definition is automatically available. Here’s an example of creating a map:
std::map<Person, std::string> phonebook;This defines an empty map container that stores entries that are key/object pairs, with keys of type Person and objects of type string.
You can also create a map that is initialized with a sequence of pair<K,T> objects from another container:
std::map<Person, std::string> phonebook {iter1, iter2};iter1 and iter2 are a pair of iterators defining a series of key/object pairs from another container in the usual way, with iter2 specifying a position one past the last pair to be included in the sequence. These iterators can be input iterators although the iterators you obtain from a map are bidirectional. You obtain iterators to access the contents of a map using the begin() and end() functions, just as you would for a sequence container.
The entries in a map are ordered based on a function object of type less<Key> by default, so they will be stored in ascending key sequence. You can change the type function object used for ordering entries by supplying a third template type parameter. For example:
std::map<Person, std::string, std::greater<>> phonebook;This map stores entries that are Person/string pairs, where Person is the key with an associated string object. The ordering of entries will be determined by a function object of type greater<>, so the entries will be in descending key sequence.
Storing Objects
You can define a pair object like this:
auto entry = std::pair<Person, std::string>
                                {Person {"Mel", "Gibson"}, "213 345 5678"};
This creates the variable entry of type pair<Person,string> and initializes it to an object created from a Person object and a string object. I’m representing a phone number in a very simplistic way, just as a string, but of course it could be a class object identifying the components of the number, such as country code and area code. The Person class is the class from the previous example.
The pair<K,T> class template defines two constructors, a default constructor that creates an object from the default constructors for types K and T, and a constructor that defines an object from a key and its associated object. There are also constructor templates for copy constructors and constructors creating an object from rvalue references.
You can access the elements in a pair through the members first and second; thus, in the example, entry.first references the Person object and entry.second references the string object.
There is a helper template function, make_pair(), defined in the utility header that creates a pair object:
auto entry = std::make_pair(Person {"Nell", "Gwynne"}, "213 345 5678");The make_pair() function automatically deduces the type for the pair, from the argument types. Note that in this case it will be a pair<Person, const char*> object but that will be converted to pair<Person, string> when you insert it into the phonebook map.
All of the comparison operators are overloaded for pair objects, so you can compare them with any of the operators <, <=, ==, !=, >=, and >.
It’s often convenient to define an alias to abbreviate the pair<K,T> type you are using. For example:
using Entry = std::pair<Person, std::string> ;This defines Entry as the alias for the key/object pair type. Having defined Entry, you can use it to create objects. For example:
Entry entry1 {Person {"Jack", "Jones"}, "213 567 1234"};This statement defines a pair of type pair<Person, string>, using Person("Jack", "Jones") as the Person argument and "213 567 1234" as the string argument.
You can insert one or more pairs in a map using the insert() function. For example, here’s how you insert a single object:
phonebook.insert(entry1);This inserts the entry1 pair into the phonebook container, as long as there is no other entry in the map that uses the same key. This version of the insert() function returns a value that is also a pair, where the first object in the pair is an iterator and the second is a bool value. The bool value will be true if the insertion was made, and false otherwise. The iterator will point to the element if it was stored in the map, or the element that is already in the map for the entry1 key if the insert failed. Therefore, you can check if the object was stored, like this:
auto checkpair = phonebook.insert(entry1);
if(checkpair.second)
  std::cout << "Insertion succeeded." << std::endl;
else
  std::cout << "Insertion failed." << std::endl;
The pair that insert() returns is stored in checkpair. The type for checkpair is pair<map<Person,string>::iterator, bool>, so auto is very helpful here. The type corresponds to a pair encapsulating an iterator of type map<Person,string>::iterator that you can access as checkpair.first; and a bool value that you access as checkpair.second. Dereferencing the iterator in the pair will give you access to the pair that is stored in the map; you can use the first and second members of that pair to access the key and object, respectively. This can be a little tricky, so let’s see what it looks like for checkpair in the preceding code:
std::cout << "The key for the entry is:" << std::endl;
checkpair.first->first.showPerson();
The expression checkpair.first references the first member of checkpair, which is an iterator, so this expression accesses a pointer to the entry in the map. The entry in the map is another pair, so checkpair.first->first accesses the first member of that pair, the key, which is the Person object. You use this to call the showPerson() member to output the name. You could access the pair member that represents the phone number in a similar way, with the expression checkpair.first->second.
Another version of insert() inserts a series of pairs in a map. The pairs are defined by two iterators and the series would typically be from another map, although it could be from a different type of container.
A map defines the operator[]() member function, so you can use the subscript operator to insert an object. Here’s how you could insert the entry1 object in the phonebook map:
phonebook[Person {"Jack", "Jones"}] = "213 567 1234";The subscript value is the key for the object that appears to the right of the assignment operator. This is perhaps a somewhat more intuitive way to store objects in a map. The disadvantage compared to insert() is that you lose the ability to discover whether the key was already in the map.
You can insert a pair that is constructed in place using the emplace() function template:
Entry him {Person {"Jack", "Spratt"}, "213 456 7899"};
auto checkpair = phonebook.emplace(std::move(him));
This creates the pair, him, and calls emplace() with an rvalue reference to him as the argument. The pair that is returned contains an iterator and a bool value, with the same significance as the pair returned by the insert() function.
Of course, you can also write:
auto checkpair = phonebook.emplace(Person {"Jack", "Spratt"}, "213 456 7899");Accessing Objects
You can use the subscript operator to retrieve the object from a map that corresponds to a given key. For example:
string number {phonebook[Person{"Jack", "Jones"}]};This initializes number with the object corresponding to the key Person {"Jack", "Jones"}. If the key is not in the map, then a pair entry will be inserted into the map for this key, with the object as the default for the object type. This implies that for the preceding statement, the no-arg string constructor will be called to create the object corresponding to this key if the entry is not there.
Of course, you may not want a default object inserted when you attempt to retrieve an object for a given key. In this case you can use the find() function to check whether there’s an entry for a key, and then retrieve it if it’s there:
std::string number;
Person key {"Jack", "Jones"};
auto iter = phonebook.find(key);

if(iter != phonebook.end())
{
  number = iter->second;
  std::cout << "The number is " << number << std::endl;
}
else
{
  std::cout << "No number for the key ";
  key.showPerson();
}
The find() function returns an iterator of type map<Person,string>::iterator that points to the object corresponding to the key if the key is present, or to one past the last map entry, which corresponds to the iterator returned by the end() function. Thus, if iter is not equal to the iterator returned by end(), the entry exists so you can access the object through the second member of the pair. If you want to prevent the object in the map from being modified, you could define the iterator type explicitly as map<Person,string>::const_iterator.
Calling count()for a map with a key as the argument will return a count of the number of entries found corresponding to the key. For a map, the value returned can only be 0 or 1, because each key must be unique. A multimap container allows multiple entries for a given key, so in this case other values are possible for the return value from count().
Other Map Operations
The erase() function enables you to remove a single entry or a range of entries from a map. You have two versions of erase() that will remove a single entry. One requires an iterator as the argument pointing to the entry to be erased, and the other requires a key corresponding to the entry to be erased. For example:
Person key {"Jack", "Jones"};
auto count = phonebook.erase(key);
if(!count)
  std::cout << "Entry was not found." << std::endl;
When you supply a key to erase(), it returns a count of the number of entries that were erased. The value returned can only be 0 or 1 for a map. A multimap container can have several entries with the same key, in which case erase() may return a value greater than 1.
You can also supply an iterator as an argument to erase():
Person key {"Jack", "Jones"};
auto iter = phonebook.find(key);
if(iter != phonebook.end())
  iter = phonebook.erase(iter);
if(iter == phonebook.end())
  std::cout << "End of the map reached." << std::endl;
In this case, erase()returns an iterator that points to the entry that remains in the map beyond the entry that was erased, or a pointer to one beyond the end of the map if no such element is present.
The following table shows other operations available with a map.
| FUNCTION | DESCRIPTION |
|---|---|
begin() |
Returns a bidirectional iterator pointing to the first entry. |
end() |
Returns a bidirectional iterator pointing to one past the last entry. |
cbegin() |
Returns a const bidirectional iterator pointing to the first entry. |
cend() |
Returns a const bidirectional iterator pointing to one past the last entry. |
rbegin() |
Returns a reverse bidirectional iterator pointing to the last entry. |
rend() |
Returns a reverse bidirectional iterator pointing to one before the first entry. |
crbegin() |
Returns a const reverse bidirectional iterator pointing to the last entry in the map. |
crend() |
Returns a const reverse bidirectional iterator pointing to one before the first entry. |
at() |
Returns a reference to the data value corresponding to the key you supply as the argument. |
lower_bound() |
Accepts a key as an argument and returns an iterator pointing to the first entry with a key that is greater than or equal to (the lower bound of) the specified key. If the key is not present, the iterator pointing to one past the last entry will be returned. |
upper_bound() |
Accepts a key as an argument and returns an iterator pointing to the first entry with a key that is greater than (the upper bound of) the specified key. If the key is not present, the iterator pointing to one past the last entry will be returned. |
equal_range() |
Accepts a key as an argument and returns a pair containing two iterators. The first pair-member points to the lower bound of the specified key, and the second points to the upper bound of the specified key. If the key is not present, both iterators will point to one past the last entry. |
swap() |
Interchanges the entries you pass as the argument, with the entries for which the function is called. |
clear() |
Erases all entries in the map. |
size() |
Returns the number of entries in the map. |
max_size() |
Returns the maximum capacity of the map. |
empty() |
Returns true if the map is empty and false otherwise. |
The lower_bound(), upper_bound(), and equal_range() functions are not very useful with a map container. However, they come into their own with a multimap when you want to find all elements with a given key. Let’s see a map in action.
Using a Multimap Container
A multimap works very much like the map container, in that it supports the same range of functions — except for the subscript operator, which you cannot use with a multimap. The principle difference between a map and a multimap is that you can have multiple entries with the same key in a multimap, and this affects the way some of the functions behave. Obviously, with the possibility of several keys having the same value, overloading operator[]() would not make much sense.
The insert() function flavors for a multimap are a little different from those for a map. The simplest version accepts a pair<K,T> object as an argument and returns an iterator pointing to the entry that was inserted. The equivalent function for a map returns a pair object because this provides an indication of when the key already exists in the map and the insertion is not possible; of course, this cannot arise with a multimap. A multimap also has a version of insert() with two arguments: the second being the pair object to be inserted, and the first being an iterator pointing to the position from which to start searching for an insertion point. This gives you some control over where a pair is inserted when the same key already exists. This version of insert() also returns an iterator pointing to the element that was inserted. A third version of insert() accepts two iterator arguments that specify a range of elements to be inserted from another source and this version doesn’t return anything.
When you pass a key to erase()for a multimap, it erases all entries with the same key, and the value returned indicates how many were deleted. The significance of having a version of erase()that accepts an iterator as an argument should now be apparent — it allows you to delete a single element. You also have a version of erase() that accepts two iterators to delete a range of entries.
The find() member function can only find the first element with a given key. You really need a way to find several elements with the same key and the lower_bound(), upper_bound(), and equal_range() functions provide you with a way to do this. For example, given a phonebook object that is of type multimap<Person, string>, you could list the phone numbers corresponding to a given key like this:
Person person("Jack", "Jones");
auto iter = phonebook.lower_bound(person);
if(iter == phonebook.end())
  std::cout << "There are no entries for " << person.getName() << std::endl;
else
{
  std::cout << "The following numbers are listed for " << person.getName()
            << ":" << std::endl;
  auto upper = phonebook.upper_bound(person);
  for (; iter != upper; ++iter)
    std::cout << iter->second << std::endl;
}
It’s important to check the iterator returned by lower_bound(). If you don’t, you could end up referencing an entry one beyond the last entry.
MORE ON ITERATORS
The iterator header defines templates for stream iterators that transfer data from a source to a destination. These act as pointers to a stream for input or output, and they enable you to transfer data between a stream and any source or destination that works with iterators, such as an algorithm. Inserter iterators can transfer data into a basic sequence container. There are two stream iterator templates: istream_iterator<T> for input streams and ostream_iterator<T> for output streams, where T is the type of object to be extracted from, or written to, the stream. The header also defines three inserter templates, insert_iterator<T>, back_insert_iterator<T>, and front_insert_iterator<T>, where T is the type of sequence container in which data is to be inserted.
Let’s explore some of these iterators in a little more depth.
Using Input Stream Iterators
Here’s an example of how you create an input stream iterator:
std::istream_iterator<int> numbersInput {std::cin};This creates the iterator numbersInput of type istream_iterator<int> that can point to objects of type int in a stream. The argument to the constructor specifies the stream to which the iterator relates, so this is an iterator that can read integers from cin, the standard input stream.
The default istream_iterator<T> constructor creates an end-of-stream iterator, which will be equivalent to the end iterator for a container that you have been obtaining by calling the end() function. Here’s how you could create an end-of-stream iterator, complementing the numbersInput iterator:
std::istream_iterator<int> numbersEnd;Now you have a pair of iterators that defines a sequence of values of type int from cin. You could use these to load values from cin into a vector<int> container:
std::vector<int> numbers;
std::cout << "Enter integers separated by spaces then a letter to end:"
          << std::endl;
std::istream_iterator<int> numbersInput {std::cin}, numbersEnd;
while(numbersInput != numbersEnd)
  numbers.push_back(*numbersInput++);
After defining the vector container to hold values of type int, you create two input stream iterators: numbersInput is an input stream iterator reading values of type int from cin, and numbersEnd is an end-of-stream iterator. The while loop continues as long as numbersInput is not equal to the end-of-stream iterator, numbersEnd. When you execute this fragment, input continues until end-of-stream is recognized for cin. But what produces that condition? The end-of-stream condition will arise if you enter Ctrl+Z to close the input stream, or if you enter an invalid character such as a letter.
Of course, you are not limited to using input stream iterators as loop control variables. You can use them to pass data to an algorithm, such as accumulate(), which is defined in the numeric header:
std::cout << "Enter integers separated by spaces then a letter to end:"
          << std::endl;
std::istream_iterator<int> numbersInput {std::cin}, numbersEnd;
std::cout << "The sum of the input values that you entered is "
          << std::accumulate(numbersInput, numbersEnd, 0) << std::endl;
This fragment outputs the sum of however many integers you enter. You will recall that the arguments to accumulate() are an iterator pointing to the first value in the sequence, an iterator pointing to one past the last value, and the initial value for the sum. Here, you are transferring data directly from cin to the algorithm.
The sstream header defines the basic_istringstream<T> template that defines an object type that can access data from a stream buffer such as a string object. The header also defines the istringstream type as basic_istringstream<char>, which will be a stream of characters of type char. You can construct an istringstream object from a string object, which means you can read data from the string object, just as you read from cin. Because an istringstream object is a stream, you can pass it to an input iterator constructor and use the iterator to access the data in the underlying stream buffer. Here’s an example:
std::string data {"2.4 2.5 3.6 2.1 6.7 6.8 94 95 1.1 1.4 32"};
std::istringstream input {data};
std::istream_iterator<double> begin(input), end;
std::cout << "The sum of the values from the data string is "
          << std::accumulate(begin, end, 0.0) << std::endl;
You create the istringstream object, input, from the string object, data, so you can read from data as a stream. You create two stream iterators that can access double values in the input stream, and you use these to pass the contents of the input stream to the accumulate() algorithm. Note that the type of the third argument to the accumulate() function determines the type of the result, so you must specify this as a value of type double to get the sum produced correctly. Let’s try an example.
Using Inserter Iterators
An inserter iterator can add new elements to the sequence containers vector<T>, deque<T>, and list<T>. There are three templates that create inserter iterators defined in the iterator header:
back_insert_iterator<T>— Inserts elements at the end of a container of typeT. The container must provide thepush_back()member function for this to work.front_insert_iterator<T>— Inserts elements at the beginning of a container of typeT. This depends onpush_front()being available for the container so it won’t work with a vector.insert_iterator<T>— Inserts elements starting at a specified position within a container of typeT. The container must have aninsert()member function that accepts an iterator as the first argument, and an item to be inserted as the second argument. This also works with sorted/ordered associative containers because they satisfy the requirements.
The constructors for the first two inserter iterator types expect a single argument specifying the container. For example:
std::list<int> numbers;
std::front_insert_iterator<std::list<int>> iter {numbers};
Here, you create an iterator that can insert data at the beginning of the list<int> container numbers.
Inserting a value into the container is very simple:
*iter = 99; // Insert 99 at the front of the numbers containerYou could also use front_inserter() with the numbers container, like this:
std::front_inserter (numbers) = 99;This creates a front inserter for the numbers list and uses it to insert 99 at the beginning of the list. The argument to front_inserter() is the container to which the iterator is to be applied.
The constructor for an insert_iterator<T> iterator requires two arguments:
std::vector<int> values;
std::insert_iterator<std::vector<int>> iter_anywhere {values, std::begin(values)};
The second argument is an iterator specifying where data is to be inserted — the start of the sequence in this instance. You can use this iterator in exactly the same way as the previous one. Here’s how you could insert a series of values into the vector using this iterator:
for(int i {}; i < 100; i++)
  *iter_anywhere = i + 1;
This loop inserts the integers 1 to 100 in the values container at the beginning. After executing this, the first 100 elements will be 1, 2, and so on, through to 100.
You could also use inserter() to insert the elements in reverse order:
for(int i {}; i < 100; i++)
  std::inserter(values, std::begin(values)) = i + 1;
The first argument to inserter() is the container, and the second is an iterator identifying the position where data is to be inserted. The values will be in reverse order from 100 down to 1.
The inserter iterators can be used in conjunction with the copy() algorithm in a particularly useful way. Here’s how you could read values from cin and transfer them to a list<T> container:
std::list<double> values;
std::cout << "Enter a series of values separated by spaces"
          << " followed by Ctrl+Z or a letter to end:" << std::endl;
std::istream_iterator<double> input {std::cin}, input_end;
std::copy(input, input_end, std::back_inserter<std::list<double>> {values});
You first create a list container that stores double values. After prompting for input, you create two input stream iterators for double values. The first iterator points to cin, and the second is an end-of-stream iterator created by the default constructor. You specify the input to the copy() algorithm with the two iterators; the destination for the copy operation is a back inserter iterator that you create in the third argument to the copy() function. The back inserter iterator adds the data transferred by the copy operation to the list container, values. This is quite powerful stuff. If you ignore the prompt, in two statements you read an arbitrary number of values from the standard input stream and transfer them to a list container.
Using Output Stream Iterators
Complementing the input stream iterator template, the ostream_iterator<T> template provides output stream iterators for writing objects of type T to an output stream. There are two constructors for output stream iterators. One creates an iterator that transfers data to the destination stream:
std::ostream_iterator<int> out {std::cout};The template type argument, int, specifies the type of data to be handled, while the constructor argument, cout, specifies the stream that will be the destination for data, so the out iterator can write values of type int to the standard output stream. Here’s how you might use this iterator:
   int data[] {1, 2, 3, 4, 5, 6, 7, 8, 9};
   std::copy(std::cbegin(data), std::cend(data), out);
The copy() algorithm that is defined in the algorithm header copies the sequence of objects specified by the first two iterator arguments to the output iterator specified by the third argument. Here, the function copies the elements from the data array to the out iterator, which will write the elements to cout. The result of executing this fragment will be:
123456789As you can see, the values are written to the output stream with no spaces in between. The second constructor can improve on this:
std::ostream_iterator<int> out{std::cout, ", "};The second argument is a string to be used as a delimiter for output values. If you use this iterator as the third argument to the copy() function in the previous fragment, the output will be:
1, 2, 3, 4, 5, 6, 7, 8, 9,The delimiter string that you specify as a second constructor argument is written to the stream following each value.
Let’s see how an output stream iterator works in practice.
MORE ON FUNCTION OBJECTS
I mentioned earlier that the functional header defines an extensive set of templates for creating function objects that you can use with algorithms and containers. I won’t discuss them all in detail, but I’ll summarize the most useful ones. The function objects for comparisons are:
| FUNCTION OBJECT TEMPLATE | DESCRIPTION |
|---|---|
less<T> |
A binary predicate representing the < operation between objects of type T. For example, less<string>() defines a function object for comparing objects of type string. |
less_equal<T> |
A binary predicate representing the <= operation between objects of type T. For example, less_equal<double>() defines a function object for comparing objects of type double. |
equal_to<T> |
A binary predicate representing the == operation between objects of type T. |
not_equal_to<T> |
A binary predicate representing the != operation between objects of type T. |
greater_equal<T> |
A binary predicate representing the >= operation between objects of type T. |
greater<T> |
A binary predicate representing the > operation between objects of type T. |
There is also the not2<>() template function that creates a binary predicate that is the negation of a binary predicate defined by a function object you pass as the argument. For example, not2(less<int>()) creates a binary predicate for comparing objects of type int that returns true if the left operand is not less than the right operand. You could use the not2() function template to define a binary predicate for use with the sort() algorithm to sort a container, v, with elements of type string:
std::sort(std::begin(v), std::end(v), std::not2(std::greater<std::string>()));The argument to the not2 constructor is greater<string>(), so the sort() function will sort using “not greater than” as the comparison between the string objects in the container, v.
The functional header also defines function objects for performing arithmetic operations. You would typically use these to apply operations to sequences of numerical values using the transform() algorithm that is defined in the algorithm header. These function objects are described in the following table.
| FUNCTION OBJECT TEMPLATE | DESCRIPTION |
|---|---|
plus<T> |
Calculates the sum of two elements of type T. |
minus<T> |
Calculates the difference between two elements of type T by subtracting the second operand from the first. |
multiplies<T> |
Calculates the product of two elements of type T. |
divides<T> |
Divides the first operand of type T by the second. |
modulus<T> |
Calculates the remainder after dividing the first operand of type T by the second. |
negate<T> |
Returns the negative of the operand of type T. |
To make use of these, you need to apply the transform() function. I’ll explain how this works in the next section.
MORE ON ALGORITHMS
The algorithm and numeric headers define a large number of algorithms. The algorithms in the numeric header are primarily devoted to processing arrays of numerical values, whereas those in the algorithm header are more general purpose and provide such things as the ability to search, sort, copy, and merge sequences of objects specified by iterators. There are far too many to discuss in detail in this introductory chapter, so I’ll just introduce a few of the most useful algorithms from the algorithm header to give you a basic idea of how they can be used.
You have already seen the sort() and copy() algorithms in action. Let’s take a brief look at a few others.
- The
fill()algorithm — This algorithm is of this form:fill(ForwardIterator begin, ForwardIterator end, const Type& value)- This fills the elements specified by the iterators begin and end with value. For example, given a vector
v, containing more than 10 values of type string, you could write:
std::fill(std::begin(v), std::begin(v)+10, "invalid");- This would set the first 10 elements in
vto"invalid", the value specified by the last argument.
- This fills the elements specified by the iterators begin and end with value. For example, given a vector
- The
replace()algorithm — Thereplace()algorithm is of the form:replace(ForwardIterator begin_it, ForwardIterator end_it, const Type& oldValue, const Type& newValue)- This examines each element in the range specified by
begin_itandend_it, and replaces each occurrence ofoldValuebynewValue. Given a vectorvthat storesstringobjects, you could replace occurrences of"yes"by"no"using the following statement:
std::replace(std::begin(v), std::end(v), "yes", "no");- Like all the algorithms that receive an interval defined by a couple of iterators,
replace()will also work with pointers. For example:
char str[] = "A nod is as good as a wink to a blind horse."; std::replace(str, str + strlen(str), 'o', '*'), std::cout << str << std::endl;- This will replace every occurrence of
'o'in the null-terminated stringstrby'*', so the result of executing this fragment will be:
A n*d is as g**d as a wink t* a blind h*rse. - This examines each element in the range specified by
- The
find()algorithm — Thefind()algorithm is of the form:InputIterator find(InputIterator begin, InputIterator end, const Type& value)- This searches the sequence specified by the first two arguments for the first occurrence of
value. For example, given a vectorvcontaining values of typeint, you could write:
auto iter = std::find(std::cbegin(v), std::cend(v), 21);- By using
iteras the starting point for a new search, you could usefind()repeatedly to find all occurrences of a given value:
auto iter = std::cbegin(v); const int value {21}; size_t count {}; while((iter = std::find(iter, std::cend(v), value)) != std::cend(v)) { ++iter; ++count; } std::cout << "The vector contains " << count << " occurrences of " << value << std::endl;- This searches the vector
vfor all occurrences ofvalue. On the first iteration, the search starts atcbegin(v). On subsequent iterations, the search starts at one past the previous position that was found. The loop will accumulate the total number of occurrences ofvalueinv.
- This searches the sequence specified by the first two arguments for the first occurrence of
- The
transform()algorithm —transform()comes in two versions. The first applies an operation specified by a unary function object to a set of elements specified by a pair of iterators, and is of the form:OutputIterator transform(InputIterator begin, InputIterator end, OutputIterator result, UnaryFunction f)- This applies the unary function
fto all elements in the range specified by the iteratorsbeginandend, and stores the results, beginning at the position specified by theresultiterator. Theresultiterator can be the same asbegin, in which case the results will replace the original elements. The function returns an iterator that is one past the last result stored. Here’s an example:
std::vector<double> data{ 2.5, -3.5, 4.5, -5.5, 6.5, -7.5}; std::transform(std::begin(data), std::end(data), std::begin(data), std::negate<double>());- The
transform()call applies anegate<double>predicate object to all the elements in the vector data. The results are stored back indataand overwrite the original values so after this operation the vector will contain:
-2.5, 3.5, -4.5, 5.5, -6.5, 7.5- Because the operation writes the results back to
data, thetransform()function will return the iteratorstd::end(data). - The second version of
transform()applies a binary function, with the operands coming from two ranges specified by iterators. The function is of the form:
transform(InputIterator1 begin1, InputIterator1 end1, InputIterator2 begin2, OutputIterator result, BinaryFunction f)- The range specified by
begin1andend1defines the set of left operands for the binary functionfthat is specified by the last argument. The range defining the right operands starts at the position specified by thebegin2iterator; an end iterator does not need to be supplied for this range because there must be the same number of elements as in the range specified bybegin1andend1. The results will be stored in the range, starting at theresultiterator position. Theresultiterator can be the same asbegin1if you want the results stored back in that range, but it must not be any other position betweenbegin1andend1. Here’s an example:
double values[] { 2.5, -3.5, 4.5, -5.5, 6.5, -7.5}; std::vector<double> squares(_countof(values)); std::transform (std::begin(values), std::end(values), std::begin(values), std::begin(squares), std::multiplies<double>()); std::ostream_iterator<double> out {std::cout, " "}; std::copy(std::cbegin(squares), std::cend(squares), out);- You create the
squaresvector with the same number of elements asvaluesto store the results of thetransform()operation. Thetransform()function uses themultiplies<double>()function object to multiply each element ofvaluesby itself. The results are stored insquares. The last two statements use an output stream iterator to list the contents ofsquares, which will be:
6.25 12.25 20.25 30.25 42.25 56.25 - This applies the unary function
TYPE TRAITS AND STATIC ASSERTIONS
A static assertion enables you to detect usage errors at compile time. A static assertion is of the form:
static_assert(constant_expression, string_literal);The constant_expression should result in a value that is convertible to type bool. If the result is true, the statement does nothing; if it is false, the string literal will be displayed by the compiler. A static assertion has no effect on the compiled code. Note that static_assert is a keyword.
The type_traits header defines a range of templates that enable you to create compile-time constants that you can use in conjunction with static assertions to cause the compiler to issue customized error messages. I don’t have the space to describe the contents of type_traits in detail so I’ll just give you one example and use type traits in the next section.
The type_traits header includes several templates for testing types that are particularly useful when you are defining your own templates. Suppose you define the following template:
template<class T>
T average(const std::vector<T>& data)
{
  T sum {};
  for(const auto& value : data)
    sum += value;
  return sum/data.size();
}
This template is intended to be used with a vector of values that are of an arithmetic type. It would be useful to be able to prevent the template from being used with non-arithmetic types — Person objects, for example. It would be useful if this can be caught at compile time. A static_assert in conjunction with the is_arithmetic<T> template from type_traits will do the trick:
template<class T>
T average(const std::vector<T>& data)
{
  static_assert(std::is_arithmetic<T>::value,
                             "Type parameter for average() must be arithmetic.");
  T sum {};
  for(auto& value : data)
    sum += value;
  return sum/data.size();
}
The value member of the is_arithmetic<T> template will be true if T is an arithmetic type and false otherwise. If it is false during compilation; that is, when the compiler processes the average<T>() template used with a non-arithmetic type, the error message will be displayed. An arithmetic type is a floating-point type or an integral type.
Other type testing templates include is_integral<T>, is_signed<T>, is_unsigned<T>, is_floating_point<T>, and is_enum<T>. There are many other useful templates in the type_traits header so it is well worth exploring the contents further.
LAMBDA EXPRESSIONS
A lambda expression provides you with an alternative programming mechanism to function objects. Lambda expressions are a C++ language feature and not specific to STL but they can be applied extensively in this context, which is why I chose to discuss them here. A lambda expression defines a function object without a name, and without the need for an explicit class definition. You would typically use a lambda expression as the means of passing a function as an argument to another function. A lambda expression is much easier to use and understand, and requires less code than defining and creating a function object. Of course, it is not a replacement for function objects in general.
Let’s consider an example. Suppose you want to calculate the cubes (x3) of the elements in a vector containing numerical values. You could use the transform() operation for this, except that there is no function object to calculate cubes. You can easily create a lambda expression to do it, though:
double values[] { 2.5, -3.5, 4.5, -5.5, 6.5, -7.5};
std::vector<double> cubes(_countof(values));
std::transform(std::begin(values), std::end(values), std::begin(cubes),
                                            [](double x){ return x*x*x;} );
The last statement uses transform() to calculate the cubes of the elements in the array, values, and store the result in the vector cubes. The lambda expression is the last argument to the transform() function:
[](double x){ return x*x*x;}The opening square brackets are called the lambda introducer, because they mark the beginning of the lambda expression. There’s a bit more to this, so I’ll come back to it a little later in this chapter.
The lambda introducer is followed by the lambda parameter list between parentheses, just like a normal function. In this case, there’s just a single parameter, x. There are restrictions on the lambda parameter list, compared to a regular function: You cannot specify default values for the parameters and the parameter list cannot be of a variable length.
Finally, you have the body of the lambda expression between braces, again just like a normal function. In this case the body is just a single return statement, but in general, it can consist of as many statements as you like, just like a normal function. I’m sure you have noticed that there is no return type specification. The return type defaults to that of the value returned. Otherwise, the default return type is void. Of course, you can specify the return type. To specify the return type you would write the lambda expression like this:
[](double x) -> double { return x*x*x; }The type double following the arrow specifies the return type.
If you wanted to output the values calculated, you could do so in the lambda expression:
[](double x) {
               double result{x*x*x};
               std::cout << result << "  ";
               return result;
             }
This extends the body of the lambda to provide for writing the value that is calculated to the standard output stream. In this case, the return type is still deduced from the type of the value returned.
The Capture Clause
The lambda introducer can contain a capture clause that determines how the body of the lambda can access variables in the enclosing scope. In the previous section, the lambda expression had nothing between the square brackets, indicating that no variables in the enclosing scope can be accessed within the body of the lambda. A lambda that does not access anything from the enclosing scope is called a stateless lambda.
The first possibility is to specify a default capture clause that applies to all variables in the enclosing scope. You have two options for this. If you place = between the square brackets, the body has access to all automatic variables in the enclosing scope by value — that is, the values of the variables are made available within the lambda expression, but the original variables cannot be changed. If you put & between the square brackets, all the variables in the enclosing scope are accessible by reference, and therefore can be changed by the code in the body of the lambda. Look at this code fragment:
double factor {5.0};
double values[] { 2.5, -3.5, 4.5, -5.5, 6.5, -7.5};
std::vector<double> cubes(_countof(values));
std::transform(std::begin(values), std::end(values), std::begin(cubes),
                                         [=](double x){ return factor*x*x*x;} );
In this fragment, the = capture clause allows all the variables in scope to be accessible by value from within the body of the lambda. Note that this is not quite the same as passing arguments by value. The value of the variable factor is available within the lambda, but you cannot update the copy of factor because it is effectively const. The following statement will not compile, for example:
std::transform(std::begin(values), std::end(values),std::begin(cubes),
           [=](double x)  { factor += 10.0;          // Not allowed!
                            return factor*x*x*x;} );
If you want to modify the temporary copy of a variable in scope from within the lambda, adding the mutable keyword will enable this:
std::transform(std::begin(values), std::end(values),std::begin(cubes),
           [=](double x)mutable { factor += 10.0;          // OK
                                   return factor*x*x*x;} );
Now you can modify the copy of any variable within the enclosing scope without changing the original variable. After executing this statement, the value of factor will still be 5.0. The lambda remembers the local value of factor from one call to the next, so for the first element factor will be 5 + 10 = 15, for the second element it will be 15 + 10 = 25, and so on.
If you want to change the original value of factor from within the lambda, just use & as the capture clause:
std::transform(std::begin(values), std::end(values),std::begin(cubes),
             [&](double x){ factor += 10.0;   // Changes original variable
                            return factor*x*x*x;} );
std::cout << "factor = " << factor << std::endl;
You don’t need the mutable keyword here. All variables within the enclosing scope are available by reference, so you can use and alter their values. The result of executing this will be that factor is 65. If you thought it was going to be 15.0, remember that the lambda expression executes once for each element in data, and the cubes of the elements will be multiplied by successive values of factor from 15.0 to 65.0.
Capturing Specific Variables
You can explicitly identify the variables in the enclosing scope that you want to access. You could rewrite the previous transform() statement as:
std::transform(std::begin(values), std::end(values),std::begin(cubes),
      [&factor](double x) { factor += 10.0;    // Changes original variable
                            return factor*x*x*x;} );
Now, factor is the only variable from the enclosing scope that is accessible, and it is available by reference. If you omit the &, factor would be available by value and not updatable. If you want to identify several variables in the capture clause, just separate them with commas. You could include = in the capture clause list, as well as explicit variable names. For example, with the capture clause [=,&factor] the lambda would have access to factor by reference and all other variables in the enclosing scope by value. Conversely, putting [&,factor] as the capture clause would capture factor by value and all other variables by reference. Note that in a function member of a class, you can include the this pointer in the capture clause for a lambda expression, which allows access to the other functions and data members that belong to the class.
A lambda expression can also include a throw() exception specification that indicates that the lambda does not throw exceptions. Here’s an example:
std::transform(std::begin(values), std::end(values),std::begin(cubes),
      [&factor](double x)throw() { factor += 10.0;
                                   return factor*x*x*x;} );
If you want to include the mutable specification, as well as the throw() specification, the mutable keyword must precede throw() and must be separated from it by one or more spaces.
Templates and Lambda Expressions
You can use a lambda expression inside a template. Here’s an example of a function template that uses a lambda expression:
template <class T>
T average(const vector<T>& vec)
{
  static_assert(std::is_arithmetic<T>::value,
                            "Type parameter for average() must be arithmetic.");
  T sum {};
  std::for_each(std::cbegin(vec), std::cend(vec),
    [&sum](const T& value){ sum += value; });
  return sum/vec.size();
}
This template generates functions for calculating the average of a set of numerical values stored in a vector. The algorithm header defines for_each(). The lambda expression uses the template type parameter in the lambda parameter specification, and accumulates the sum of all the elements in a vector. The sum variable is accessed from the lambda by reference, so it is able to accumulate the sum there. The last line of the function returns the average, which is calculated by dividing sum by the number of elements in the vector. Let’s try an example.
Naming a Lambda Expression
You can assign a stateless lambda — one that does not reference anything in an external scope — to a variable that is a function pointer, thus giving the lambda a name. You can then use the function pointer to call the lambda as many times as you like. For example:
auto sum = [](int a,int b){return a+b; };The function pointer, sum, points to the lambda expression, so you can use it as many times as you like:
  std::cout << "5 + 10 equals " << sum(5,10) << std::endl;
  std::cout << "15 + 16 equals " << sum(15,16) << std::endl;
This is quite useful, but there’s a much more powerful capability. An extension to the functional header defines the function<> class template that you can use to define a wrapper for a function object; this includes a lambda expression. The function<> template is referred to as a polymorphic function wrapper because an instance of the template can wrap a variety of function objects with a given parameter list and return type. I won’t discuss all the details of the function<> class template, but I’ll just show how you can use it to wrap a lambda expression. Using the function<> template to wrap a lambda effectively gives a name to the lambda, which not only provides the possibility of recursion within a lambda expression, it also allows you to use the lambda in multiple statements or pass it to several different functions. The same function wrapper could also wrap different lambda expressions at different times.
To create a wrapper object from the function<> template you need to supply information about the return type, and the types of any parameters, to a lambda expression. Here’s how you could create an object of type function that can wrap a function object that has one parameter of type double and returns a value of type int:
std::function<int(double)> f = [](double x)->int{ return static_cast<int>(x*x); };The type specification for the function template is the return type for the function object to be wrapped, followed by its parameter types between parentheses, and separated by commas. Let’s try a working example that uses the basic capability that is built into the C++ language as well as the function<T> template.
SUMMARY
This chapter introduced the capabilities of the STL. My objective in this chapter was to introduce enough of the details of the STL to enable you to explore the rest on your own. Even though this is a substantial chapter, I have barely scratched the surface of the STL’s capabilities so I would encourage you to explore it further.
EXERCISES
- Write a program that will read some text from the standard input stream, possibly involving several lines of input, and store the letters from the text in a
list<T>container. Sort the letters in ascending sequence and output them. - Use a
priority_queue<T>container to achieve the same result as in Exercise 1. - Modify
Ex10_12.cppso that it allows multiple phone numbers to be stored for a given name. The functionality in the program should reflect this: ThegetEntry()function should display all numbers for a given name, and thedeleteEntry()function should delete a particular person/number combination. - Write a program to implement a phone book capability that will allow a name to be entered to retrieve one or more numbers, or a number to be entered to retrieve a name.
- As you know, the Fibonacci series consists of the sequence of integers 0, 1, 1, 2, 3, 5, 8, 13, 21, ... where each integer after the first two is the sum of the two preceding integers (note the series sometimes omits the initial zero). Write a program that uses a lambda expression to initialize a vector of integers with values from the Fibonacci series.
WHAT YOU LEARNED IN THIS CHAPTER
| TOPIC | CONCEPT |
|---|---|
| Standard Template Library | The STL includes templates for containers, iterators, algorithms, and function objects. |
| Containers | A container is a class object for storing and organizing other objects. Sequence containers store objects in a sequence, like an array. Associative containers store elements that are key/object pairs, where the key determines where the pair is stored in the container. |
| Iterators | Iterators are objects that behave like pointers. Iterators are used in pairs to define a set of objects by a semi-open interval, where the first iterator points to the first object in the series, and the second iterator points to a position one past the last object in the series. |
| Stream iterators | Stream iterators are iterators that allow you to access or modify the contents of a stream. |
| Iterator categories | There are four categories of iterators: input and output iterators, forward iterators, bidirectional iterators, and random access iterators. Each successive category of iterator provides more functionality than the previous one; thus, input and output iterators provide the least functionality, and random access iterators provide the most. |
| Smart pointers | Smart pointers are objects of template class types that encapsulate raw pointers. By using smart pointers instead of raw pointers you can often avoid the need to worry about deleting objects that you have allocated on the heap and thus avoid the risk of memory leaks. |
| Algorithms | Algorithms are template functions that operate on a sequence of objects specified by a pair of iterators. |
| Function objects | Function objects are objects of a type that overloads the () operator (by implementing operator()() in the class). The STL defines a wide range of standard function objects for use with containers and algorithms; you can also write your own classes to define function objects. |
| Lambda expressions | A lambda expression defines an anonymous function object without the need to explicitly define a class type. You can use a lambda expression as an argument to STL algorithms that expect a function object as an argument. |
| Stateless lambda expressions | A stateless lambda expression does not refer to any variables in an enclosing scope. You can store a pointer to a stateless lambda expression in a function pointer. |
| Polymorphic function wrappers | A polymorphic function wrapper is an instance of the function<> template that you can use to wrap a function object. You can also use a polymorphic function wrapper to wrap a lambda expression. |