Chapter 15
Improving the View
- How to draw and update multiple views
- How to implement scrolling in a view
- How to create a context menu at the cursor
- How to highlight the element nearest the cursor to provide feedback to the user
- How to program the mouse to move and delete elements
You can find the wrox.com code downloads for this chapter on the Download Code tab at www.wrox.com/go/beginningvisualc. The code is in the Chapter 15 download and individually named according to the names throughout the chapter.
SKETCHER LIMITATIONS
There are still some limitations in Sketcher. For instance:
- You can open another view window for the current sketch by using the Window
 New Window menu option. This capability is built into an MDI application. However, if you draw in one window the elements are not drawn in the other window. Elements never appear in windows other than the one in which they were created unless the area they occupy is redrawn for some other reason.
 - You can draw only in the client area you can see. It would be nice to be able to scroll the view and draw over a bigger area.
- Even though the document object can delete an element from the sketch, you have no user interface mechanism for deleting an element. If you make a mistake, you either live with it or start over with a new document.
- You can't view a sketch window at different scales. Being able to view a sketch at a larger scale would make it easier to add fine detail.
- You can't print a sketch. If you want to show your artistic capabilities to someone, you have to bring your computer along.
- You can't save a sketch in a file so it has no permanence at all.
These are quite serious deficiencies that limit the usability of the program. You’ll overcome the first three before the end of this chapter. You’ll remove the remaining limitations before the end of the book.
IMPROVING THE VIEW
The first item that you can fix is the updating of all the document view windows when an element is drawn. The problem arises because only the view in which you draw an element knows about it. Each view is acting independently of the others, and there is no communication between them. If you can arrange for all the views to be notified when an element is added to the document, they can take the appropriate action.
Updating Multiple Views
The document class contains the UpdateAllViews() function to help with this particular problem. The function provides a means for the document to send a message to all its views. You just need to call it from the AddElement() function in CSketcherDoc that adds a new element:
  void AddElement(std::shared_ptr<CElement>& pElement)
  {
    m_Sketch.push_back(pElement);
    UpdateAllViews(nullptr, 0, pElement.get());       // Tell all the views
  }
The inherited UpdateAllViews() function is called whenever an element is added to the document. This communicates with the views by calling the OnUpdate() member of each view. The UpdateAllViews() function has three parameters, two of which have default values. The arguments that you can supply are:
- A pointer to the current view object. This identifies the view for which the
OnUpdate()function should not be called. This is a useful feature when the current view is up to date and you have a pointer to it. You could arrange for this if you needed to by adding an extra parameter of typeCSketcherView*toAddElement()and passing thethispointer for the view to it when it was called. Another possibility is that you could callUpdateAllViews()from a view object when an element is created. When you specifynullptras the argument as in this instance,OnUpdate()will be called for all views. This will be passed on as the first argument in allOnUpdate()function calls. - A
longinteger value that has a default value of zero. This is intended to provide a hint about the region to be updated. If you supply a value for this, it will be passed as the second argument in the call to theOnUpdate()function for each view object. - A pointer of type
CObject*with a default value ofnullptr. If you supply this argument, it will be passed as the third argument in theOnUpdate()function call for each view. It should point to an object that provides information about the region to be updated. In our case it should be a pointer to the new element; a smart pointer cannot be used. Callingget()for the smart pointer,pElement, returns theCElement*pointer thatpElementcontains.
To process the information passed to the UpdateAllViews() function, you must add an override for the OnUpdate() member of the view class. You can do this through the Properties window for CSketcherView. Just to remind you, you display the properties for a class by right-clicking the class name in Class View and selecting Properties from the menu. If you click the Overrides button in the Properties window, you’ll be able to find OnUpdate in the list of functions. Click the function name, then the <Add> OnUpdate option that shows in the drop-down list in the adjacent column. You’ll be able to edit the code for the OnUpdate() override you have added in the Editor pane. You only need to add the following highlighted code to the function definition:
void CSketcherView::OnUpdate(CView* pSender, LPARAM lHint, CObject* pHint)
{
   // Invalidate the area corresponding to the element pointed to
   // by the third argument, otherwise invalidate the whole client area
   if(pHint)
   {
      InvalidateRect(dynamic_cast<CElement*>(pHint)->GetEnclosingRect());
   }
   else
   {
      InvalidateRect(nullptr);
   }
}
Note that you must uncomment the parameter names; otherwise, it won’t compile with the additional code. The three arguments passed to OnUpdate() correspond to the arguments that you passed in the UpdateAllViews() function call. Thus, pHint contains the address of the new element. However, you can’t assume that this is always the case. The OnUpdate() function is also called when a view is first created, but with nullptr for the third argument. Therefore, the function verifies that pHint isn’t nullptr and only then calls GetEnclosingRect() to obtain the rectangle enclosing the element. It invalidates this area in the client area of the view by passing the rectangle to the InvalidateRect() function. This area is redrawn by the OnDraw() function in this view when the next WM_PAINT message is sent to the view. If pHint is nullptr, the whole client area is invalidated.
You might be tempted to consider redrawing the new element in the OnUpdate() function. This isn’t a good idea. You should do permanent drawing only in response to a Windows WM_PAINT message. This means that the OnDraw() function in the view should be the only thing that’s initiating any drawing operations for document data. This ensures that the view is drawn correctly whenever Windows deems it necessary.
Come to think of it, the views ought to be notified when an element is deleted from the document. You can modify the DeleteElement() member of the document class to take care of it:
  void DeleteElement(std::shared_ptr<CElement>& pElement)
  {
    m_Sketch.remove(pElement);
    UpdateAllViews(nullptr, 0, pElement.get());    // Tell all the views
  }
Calling remove() for the list removes the element that matches the argument by calling its destructor. This will cause the smart pointer that was in the list to be destroyed. The element to which it points will not be destroyed because there is another shared_ptr referencing it, namely the object that was passed to DeleteElement(). You use this to pass the element pointer to UpdateAllViews(). The smart pointer is passed by reference, so the element will ultimately be destroyed when the smart pointer on the calling site is destroyed.
If you build and execute Sketcher with the new modifications, you should find that you can create multiple views of the document and draw in any of them. All the views get updated to reflect the contents of the document.
Scrolling Views
Adding scrolling to a view looks remarkably easy at first sight, but the water is, in fact, deeper and murkier than it at first appears. We will jump in anyway. The first step is to change the base class for CSketcherView from CView to CScrollView. This new base class has the scrolling functionality built in, so you can alter the definition of the CSketcherView class to this:
class CSketcherView : public CScrollView
{
   // Class definition as before...
};
You must also modify two lines of code at the beginning of the SketcherView.cpp file that refer to the base class for CSketcherView. You need to replace CView with CScrollView as the base class:
IMPLEMENT_DYNCREATE(CSketcherView, CScrollView)

BEGIN_MESSAGE_MAP(CSketcherView, CScrollView)
However, this is still not quite enough. The new view class needs to know some things about the area you are drawing on and want to scroll, such as its size and how far the view is to be scrolled when you use the scroller. This information must be supplied before the view is drawn. You can put the code to do this in the OnInitialUpdate() function in the view class because this will be called after the view is attached to the document but before the view is displayed.
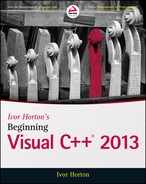
You supply the information required for scrolling by calling the SetScrollSizes() function that is inherited from the CScrollView class. The arguments to this function are explained in Figure 15-1.
Scrolling a distance of one line occurs when you click on the up or down arrow on the scroll bar; a page scroll occurs when you click the scrollbar itself. You have an opportunity to change the mapping mode here. MM_LOENGLISH would be a good choice for the Sketcher application, but we will first get scrolling working with the MM_TEXT mapping mode because there are still some difficulties to be uncovered.
To add the code to call SetScrollSizes(), you need to override the default version of the OnInitialUpdate() function in the view. You access this in the same way as for the OnUpdate() function override — through the Properties window for CSketcherView. After you have added the override, add the code to the function where indicated by the comment:
void CSketcherView::OnInitialUpdate()
{
  CScrollView::OnInitialUpdate();

  CSize DocSize {20000,20000};                    // The document size

  // Set mapping mode and document size
  SetScrollSizes(MM_TEXT, DocSize, CSize {500,500}, CSize {20,20};
}
This maintains the mapping mode as MM_TEXT and defines the total extent that you can draw on as 20,000 pixels in each direction. It also specifies a page scroll increment as 500 pixels in each direction and a line scroll increment as 20 pixels, because the defaults would be too large.
This is enough to get scrolling working after a fashion. Build Sketcher and execute it with these additions. You’ll be able to draw a few elements and then scroll the view. However, although the window scrolls OK, if you try to draw more elements with the view scrolled, things don’t work as they should. The elements appear in a different position from where you draw them and they’re not displayed properly. What’s going on?
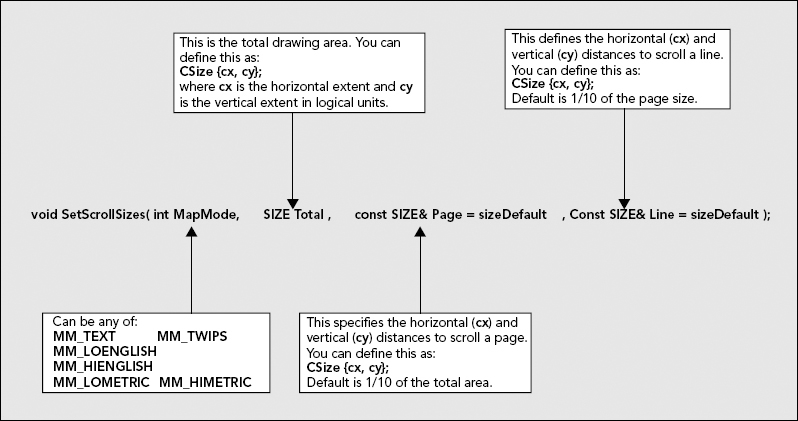
Logical Coordinates and Client Coordinates
The problem is because of the coordinate systems you’re using — and that plural is deliberate. You have been using two coordinate systems in all the examples up to now, although you may not have noticed because they were coincident. When you call a function such as LineTo() for a CDC object it assumes that the arguments you pass to it are logical coordinates. The device context has its own system of logical coordinates. The mapping mode, which is a property of the device context, determines what the unit of measurement is for the coordinates when you draw something.
The coordinate data that you receive along with the mouse messages has nothing to do with the device context or the CDC object — and outside of a device context, logical coordinates don’t apply. The points passed to the OnLButtonDown() and OnMouseMove() handlers have coordinates that are always in device units — that is, pixels — and are measured relative to the upper left corner of the client area. These are referred to as client coordinates. Similarly, when you call InvalidateRect(), the rectangle is assumed to be defined in terms of client coordinates.
In MM_TEXT mode, client coordinates and the logical coordinates in the device context are both in pixels, and so they are the same — as long as you don’t scroll the window. In all the previous examples, there was no scrolling, so everything worked without any problems. With the latest version of Sketcher, it all works well until you scroll the view, whereupon the logical coordinates origin (the 0,0 point) is moved by the scrolling mechanism, so it’s no longer in the same place as the client coordinates origin. The units for logical coordinates and client coordinates are the same, but the origins for the coordinates systems are different. This situation is illustrated in Figure 15-2.
The left side of Figure 15-2 shows the position in the client area where you draw, and the points that are the mouse cursor positions defining the line. These are recorded in client coordinates. The right side shows where the line is actually drawn. Drawing is in logical coordinates, but you have been using client coordinate values as arguments to the drawing functions. When the view is scrolled, the line appears displaced because the logical origin has been relocated.
This means that you are using the wrong values to define elements in Sketcher. When you invalidate areas of the client area to get them redrawn, the enclosing rectangles you pass to the function are also wrong — hence, the weird behavior of the program. With other mapping modes, it gets worse. Not only are the units of measurement in the two coordinate systems different, but the y-axes may be in opposite directions!
Dealing with Client Coordinates
Let’s consider what needs to be done to fix the problem. There are two things you have to address:
- You must convert the client coordinates that you got with mouse messages to logical coordinates before you use them to create elements.
- You must convert a bounding rectangle that you created in logical coordinates back to client coordinates if you want to use it in a call to
InvalidateRect().
These amount to making sure that you always use logical coordinates with device context functions, and always use client coordinates for other communications about the window. The functions that will do the conversions between client coordinates and logical coordinates are members of a device context object, so you need to obtain a device context whenever you want to convert from logical coordinates to client coordinates or vice versa. The coordinate conversion functions are defined in the CDC class and inherited by CClientDC so you can use an object of this type to do the work.
The revised version of the OnLButtonDown() handler incorporating this is as follows:
// Handler for left mouse button down message
void CSketcherView::OnLButtonDown(UINT nFlags, CPoint point)
{

   CClientDC aDC {this};            // Create a device context
   OnPrepareDC(&aDC);               // Get origin adjusted
   aDC.DPtoLP(&point);              // Convert point to logical coordinates
   m_FirstPoint = point;            // Record the cursor position
   SetCapture();                    // Capture subsequent mouse messages
}
You obtain a device context for the current view by creating a CClientDC object and passing the pointer this to the constructor. As you’re using CScrollView, the inherited OnPrepareDC() member function must be called to set the origin for the logical coordinate system in the device context to correspond with the scrolled position. After you have set the origin by this call, you call the DPtoLP() function that converts from Device Points to Logical Points. This converts the point value that was passed to OnLButtonDown() and is in client coordinates to logical coordinates. You then store the point in logical coordinates in m_FirstPoint, ready for creating an element in the OnMouseMove() handler.
The new code for the OnMouseMove() handler is as follows:
void CSketcherView::OnMouseMove(UINT nFlags, CPoint point)
{
  CClientDC aDC {this};              // Device context for the current view
  OnPrepareDC(&aDC);                 // Get origin adjusted
  aDC.DPtoLP(&point);                // Convert point to logical coordinates

  // Verify the left button is down and mouse messages captured
  if((nFlags&MK_LBUTTON)&&(this==GetCapture()))
  {
     m_SecondPoint = point;          // Save the current cursor position

    // Rest of the function as before...
  }
}
The code for converting point is essentially the same as in the previous handler, and that’s all you need here for the moment. The last function that you must change is easy to overlook: the OnUpdate() function in the view class. This needs to be modified to the following:
void CSketcherView::OnUpdate(CView* pSender, LPARAM lHint, CObject* pHint)
{
   // Invalidate the area corresponding to the element pointed to
   // if there is one, otherwise invalidate the whole client area
   if(pHint)
   {
     CClientDC aDC {this};           // Create a device context
     OnPrepareDC(&aDC);              // Get origin adjusted

     // Get the enclosing rectangle and convert to client coordinates
     CRect aRect {dynamic_cast<CElement*>(pHint)->GetEnclosingRect()};
     aDC.LPtoDP(aRect);
     InvalidateRect(aRect);          // Get the area redrawn
  }
  else
  {
    InvalidateRect(nullptr);         // Invalidate the client area
  }
}
The function now creates a CClientDC object and uses an overloaded version of the LPtoDP() member to convert the enclosing rectangle for the element to client coordinates.
You must do the same thing in OnLButtonUp() when you invalidate the enclosing rectangle for the element:
void CSketcherView::OnLButtonUp(UINT nFlags, CPoint point)
{
  if(this == GetCapture())
    ReleaseCapture();                // Stop capturing mouse messages

  // Make sure there is an element
  if(m_pTempElement)
  {
     CRect aRect {m_pTempElement->GetEnclosingRect()}; // Get enclosing rectangle

    GetDocument()->AddElement(m_pTempElement);   // Add element pointer to sketch

     CClientDC aDC {this};                       // Create a device context
     OnPrepareDC(&aDC);                          // Get origin adjusted
     aDC.LPtoDP(aRect);                          // Convert to client coordinates
     InvalidateRect(aRect);                      // Get the area redrawn
    m_pTempElement.reset();                      // Reset pointer to nullptr
   }
}
If you now compile and execute Sketcher with these modifications and are lucky enough not to have introduced any typos, it will work correctly, regardless of the scroller position. If you have a mouse wheel, you can scroll a view using that.
Using MM_LOENGLISH Mapping Mode
The advantage of using the MM_LOENGLISH mapping mode is that it provides drawings in logical units of 0.01 inches, which ensures that the drawing size is the same on displays at different resolutions. This makes the application much more satisfactory from the user’s point of view.
You can set the mapping mode in the call to SetScrollSizes() made from the OnInitialUpdate() function in the view class. You also need to specify the total drawing area: if you define it as 3,000 by 3,000, this provides a drawing area of 30 inches by 30 inches, which should be adequate. The default scroll distances for a line and a page are satisfactory, so you don’t need to specify those. You can use the Class View to get to the OnInitialUpdate() function and then change it to the following:
void CSketcherView::OnInitialUpdate(void)
{
   CScrollView::OnInitialUpdate();

   CSize DocSize {3000,3000};               // Document 30x30ins in MM_LOENGLISH
   SetScrollSizes(MM_LOENGLISH, DocSize);   // Set mapping mode and document size
}
That’s all you need to enable the view to work in MM_LOENGLISH. Note that you are not limited to setting the mapping mode once and for all. You can change the mapping mode in a device context at any time and draw different parts of a view using different mapping modes. A function, SetMapMode(), is used to do this, but I won’t be going into this any further here. Whenever you create a CClientDC object for the view and call OnPrepareDC(), the device context that it owns has the mapping mode you’ve set in the OnInitialUpdate() function. That should do it for the program as it stands. If you build Sketcher, you should have scrolling working, with support for multiple views.
DELETING AND MOVING ELEMENTS
Being able to delete shapes is a fundamental requirement in a drawing program. The document object already has the facility for deleting a sketch element but you still have to decide on the user interface mechanism for this. How are you going to select the element you want to delete? Of course, after you decide on a mechanism for selecting an element, this will apply equally well to selecting an element to move it. This suggests that you can treat moving and deleting elements as related problems. But first, let’s consider how you might initiate move and delete operations in the user interface.
A neat way of providing these functions would be to have a context menu popup at the cursor position when you click the right mouse button. You could then include Move and Delete as items on the menu. A pop-up menu that works like this is a very handy facility in lots of situations.
How should the context menu work? The standard way is that the user moves the mouse over a particular element that is displayed and right-clicks it. This selects the element and pops up a menu containing a list of menu items offering actions that can be performed on that element. The element provides the context for the menu. Naturally, different elements can have different context menus. You have seen this in action in the IDE for Visual C++. When you right-click a class name in Class View, you get a menu that applies to the class, and that’s different from the one you get if you right-click a filename in Solution Explorer. You have two contexts to consider in Sketcher. You could right-click with the mouse cursor over a sketch element, or you could right-click when there is no element under the cursor.
How can you implement this functionality in Sketcher? First you need to create two menus, one for when you have an element under the cursor and one for when you don’t. You can check if there’s an element under the cursor when the user clicks the right mouse button. If there is an element under the cursor, you can highlight it by changing its color so that the user knows exactly the element to which the context menu relates.
First, I’ll explain how you can create and display a menu at the mouse cursor position in response to a right-click, then I’ll discuss how you can implement the details of the move and delete operations.
IMPLEMENTING A CONTEXT MENU
You need two menus for the context menu: one for when there is an element under the mouse cursor and another for when there isn’t. Change to Resource View and expand the list of resources. Right-click the Menu folder to bring up a context menu — another demonstration of what you are now trying to create in the Sketcher application. Select Insert Menu to create a new menu resource. This has a default ID IDR_MENU1 assigned, but you can change this. Select the name of the new menu in the Resource View and display the Properties window for the resource by pressing Alt+Enter (this is a shortcut to the View ![]() Other Windows
Other Windows ![]() Properties Window menu item). You can then edit the resource ID in the Properties window by clicking the value for the ID. You could change it to something more suitable, such as
Properties Window menu item). You can then edit the resource ID in the Properties window by clicking the value for the ID. You could change it to something more suitable, such as IDR_CONTEXT_MENU, in the right column. Note that the name for a menu resource must start with IDR. Pressing the Enter key saves the new name.
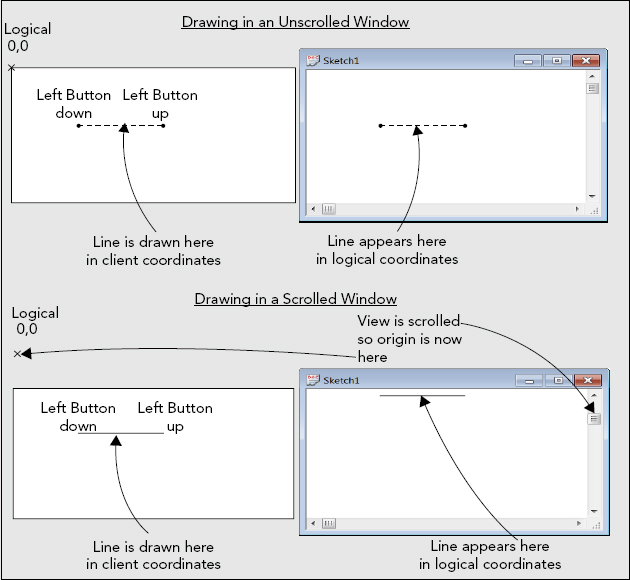
The next step is to create a drop-down menu containing Move and Delete as menu items that will apply when an element is under the cursor. The other drop-down menu will contain menu items from the Element and Color menus to allow the current selections to be changed. You can enter a name for the new item on the menu bar in the Editor pane. This can have any old caption because it won’t actually be seen by the user; the caption “element” will be OK. Now you can add the Move and Delete items to this menu. The default IDs of ID_ELEMENT_MOVE and ID_ELEMENT_DELETE will do fine, but you can change them if you want in the Properties window for each item.
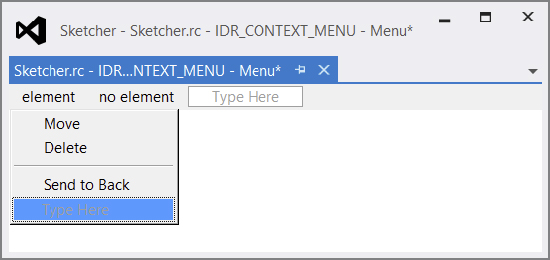
Create a second drop-down menu with the menu name “no element”. Figure 15-3 shows how the element menu looks with the no element menu added.
The no element menu is going to contain menu items for the available element types and colors, identical to those on the Element and Color menus. The IDs you use for these items will be the same as the ones for the IDR_SketchTYPE menu items. The handler for a menu item is associated with the menu ID. Messages for menu items with the same ID will call the same handler, so the same handler will be called for a Line menu item regardless of whether the message originates from an item in the main Element menu or from the no element context menu.
There is a shortcut that saves you from having to re-create all these menu items. If you display the IDR_SketchTYPE menu and extend the Element menu, you can select all the menu items by clicking the first item and then clicking the last item while holding down the Shift key. You can then right-click the selection and select Copy from the pop-up or simply press Ctrl+C. If you then return to the IDR_CONTEXT_MENU and right-click the first item on the no element menu, you can insert the complete contents of the Element menu by selecting Paste from the pop-up or by pressing Ctrl+V. The copied menu items will have the same IDs as the originals. To insert a separator before you add the color menu items, right-click the empty menu item and select Insert Separator from the menu. Add the items from the Color menu to the no element menu after the separator and you’re done. Close the properties box and save the resource file. At the moment, all you have is the definition of the context menus in a resource file. It isn’t connected to the code in the Sketcher program. You now need to associate these menus and their IDs with the view class. You also must create command handlers for the menu items in the pop-up corresponding to the IDs ID_ELEMENT_MOVE and ID_ELEMENT_DELETE.
To choose the appropriate menu to display when the right mouse button is clicked, you’ll need to know whether or not there is an element under the cursor. You can add a protected shared_ptr<CElement> member to the view class to track this:
std::shared_ptr<CElement> m_pSelected; // Records element under the cursorYou’ll store the address of the element under the cursor in this member, when there is one; otherwise, it will contain nullptr.
Associating a Menu with a Class
To associate the context menu with the view class, go to the Class View pane and display the Properties window for CSketcherView by right-clicking the class name and selecting Properties from the pop-up. If you click the Messages button in the Properties window, you’ll be able to add a handler for the WM_CONTEXTMENU message by selecting <Add>OnContextMenu from the adjacent cell in the right column. This handler is called when the user right-clicks in the view. The first argument passed to the handler is a pointer to the window in which the user right-clicked, and the second argument is the cursor position in screen coordinates.
Add the following code to the handler:
void CSketcherView::OnContextMenu(CWnd* pWnd, CPoint point)
{
  CMenu menu;
  menu.LoadMenu(IDR_CONTEXT_MENU);              // Load the context menu
  CMenu* pContext {menu.GetSubMenu(m_pSelected ? 0 : 1)};
  ASSERT(pContext != nullptr);                  // Ensure it's there

  pContext->TrackPopupMenu(TPM_LEFTALIGN | TPM_RIGHTBUTTON,
                                                point.x, point.y, this);
}
Don’t forget to uncomment the parameter names. This handler displays the first menu in the context menu when m_pSelected points to an element, and the second menu when it does not. Calling the LoadMenu() function for the menu object loads the menu resource corresponding to the ID supplied as the argument and attaches it to the CMenu object. The GetSubMenu() function returns a pointer to the context menu corresponding to the integer argument that specifies the position of the context menu in the CMenu object, with 0 being the first, 1 being the second, and so on. After ensuring the pointer returned by GetSubMenu() is not nullptr, you display the context menu by calling TrackPopupMenu(). The ASSERT macro only operates in the debug version of the program. It produces no code in the release version.
The first argument to the TrackPopupMenu() function consists of two flags ORed together. One flag specifies how the pop-up menu should be positioned and can be any of the following values:
TPM_CENTERALIGNcenters the pop-up horizontally relative to the x-coordinate supplied as the second argument to the function.TPM_LEFTALIGNpositions the pop-up so that the left side of the menu is aligned with the x-coordinate supplied as the second argument to the function.TPM_RIGHTALIGNpositions the pop-up so that the right side of the menu is aligned with the x-coordinate supplied as the second argument to the function.
This is just a selection of the options. There are more options available which you can find in the documentation.
The other flag specifies the mouse button and can be either of the following values:
TPM_LEFTBUTTONspecifies that the pop-up only tracks the left mouse button.TPM_RIGHTBUTTONspecifies that the pop-up tracks either the left or the right mouse button.
The next two arguments to TrackPopupMenu()specify the x- and y-coordinates of the context menu in screen coordinates. The y-coordinate determines the position of the top of the menu. The fourth argument specifies the window that owns the menu and that should receive all WM_COMMAND messages from the menu.
Now you can add the handler for the item in the context menu for moving elements. Return to the Resource View and double-click on IDR_CONTEXT_MENU. Right-click the Move menu item and then select Add Event Handler from the menu. It’s a COMMAND handler and you create it in the CSketcherView class. Click the Add and Edit button to create the handler function. You can follow the same procedure to create the handler for the Delete menu item.
Checking Context Menu Items
You don’t have to do anything for COMMAND events for the no element menu items, as you already have handlers for them in the document class. These will automatically take care of the messages from the pop-up items. However, the menu items are in a separate resource, and the menu items will not get checked to reflect the currently selected element type and color. You can fix this in the OnContextMenu() handler, before the context menu is displayed.
The CMenu class has a CheckMenuItem() member that checks a menu item. This function checks or unchecks any item in the menu. The first argument selects which item in the menu is to be checked or unchecked; the second argument is a combination of two flags, one of which determines how the first argument specifies which item is to be checked, and the other specifies whether the menu item is to be checked or unchecked. Because each flag is a single bit in a UINT value, you combine the two using the bitwise OR. The second argument can contain the flag MF_BYCOMMAND if the first parameter is a menu ID or it can contain the flag MF_BYPOSITION which implies the first argument is an index. You can use the former because you know the element IDs. If the second argument contains the MF_CHECKED flag, the item will be checked; the MF_UNCHECKED flag indicates the opposite. Here’s how you can implement checking for the no element menu items:
void CSketcherView::OnContextMenu(CWnd* pWnd, CPoint point)
{
  CMenu menu;
  menu.LoadMenu(IDR_CONTEXT_MENU);              // Load the context menu
  CMenu* pContext {};
  if(m_pSelected)
  {
    pContext = menu.GetSubMenu(0);
  }
  else
  {
    pContext = menu.GetSubMenu(1);

    // Check color menu items
    ElementColor color {GetDocument()->GetElementColor()};
    menu.CheckMenuItem(ID_COLOR_BLACK,
        (ElementColor::BLACK == color ? MF_CHECKED : MF_UNCHECKED)| MF_BYCOMMAND);
    menu.CheckMenuItem(ID_COLOR_RED,
          (ElementColor::RED == color ? MF_CHECKED : MF_UNCHECKED)| MF_BYCOMMAND);
    menu.CheckMenuItem(ID_COLOR_GREEN,
        (ElementColor::GREEN == color ? MF_CHECKED : MF_UNCHECKED)| MF_BYCOMMAND);
    menu.CheckMenuItem(ID_COLOR_BLUE,
         (ElementColor::BLUE == color ? MF_CHECKED : MF_UNCHECKED)| MF_BYCOMMAND);

    // Check element menu items
    ElementType type {GetDocument()->GetElementType()};
    menu.CheckMenuItem(ID_ELEMENT_LINE,
          (ElementType::LINE == type ? MF_CHECKED : MF_UNCHECKED) | MF_BYCOMMAND);
    menu.CheckMenuItem(ID_ELEMENT_RECTANGLE,
      (ElementType::RECTANGLE == type? MF_CHECKED : MF_UNCHECKED) | MF_BYCOMMAND);
    menu.CheckMenuItem(ID_ELEMENT_CIRCLE,
         (ElementType::CIRCLE == type? MF_CHECKED : MF_UNCHECKED) | MF_BYCOMMAND);
    menu.CheckMenuItem(ID_ELEMENT_CURVE,
         (ElementType::CURVE == type? MF_CHECKED : MF_UNCHECKED) | MF_BYCOMMAND);
  }
  ASSERT(pContext != nullptr);                  // Ensure it's there

  pContext->TrackPopupMenu(TPM_LEFTALIGN | TPM_RIGHTBUTTON,
                                                point.x, point.y, this);
}
That’s the context menu finished. You need to identify when an element is under the cursor next.
IDENTIFYING AN ELEMENT UNDER THE CURSOR
It will be a very simple mechanism for identifying the element under the mouse cursor. A sketch element will be under the cursor whenever the cursor is within the enclosing rectangle for the element. For this to be effective, Sketcher must track whether or not there is an element under the cursor at all times.
You can add code to the OnMouseMove() handler in the CSketcherView class to determine which element is under the cursor. This handler is called every time the mouse cursor moves, so all you have to do is add code to determine whether there’s an element under the current cursor position and set m_pSelected accordingly. The test for whether a particular element is under the cursor is simple: if the cursor position is inside the enclosing rectangle for an element, that element is under the cursor. Here’s how you can modify the OnMouseMove() handler to determine whether there’s an element under the cursor:
void CSketcherView::OnMouseMove(UINT nFlags, CPoint point)
{
  // Define a Device Context object for the view
  CClientDC aDC {this};              // DC is for this view
  OnPrepareDC(&aDC);                 // Get origin adjusted
  aDC.DPtoLP(&point);                // Convert point to logical coordinates

  // Verify the left button is down and mouse messages captured
  if((nFlags & MK_LBUTTON) && (this == GetCapture()))
  {
    // Code as before...
  }
  else
  { // We are not creating an element, so select an element
    m_pSelected = GetDocument()->FindElement(point);
  }
}
The new code is one statement that is executed only when you are not creating a new element. The else clause calls the FindElement() function for the document object that you’ll add shortly and stores the smart pointer that is returned in m_pSelected. The FindElement() function has to search the document for the first element that has an enclosing rectangle that encloses point. You can add FindElement() to the CSketcherDoc class definition as a public member and implement it like this:
// Finds the element under the point
std::shared_ptr<CElement> FindElement(const CPoint& point)const
{
  for(const auto& pElement : m_Sketch)
  {
    if(pElement->GetEnclosingRect().PtInRect(point))
      return pElement;
  }
  return nullptr;
}
You use a range-based for loop to search the list from the beginning. Because elements are added to the back of the list, the most recently created element will be tested last. The GetEnclosingRect() member of a sketch element object returns its enclosing rectangle. The PtInRect() member of the CRect class returns TRUE if the point you pass as the argument lies within the rectangle, and FALSE otherwise. You use this function to test whether or not point lies within any enclosing rectangle for a sketch element. The function returns the address of the first element for which this is true, or nullptr if no element in the sketch is found. You can now test the context menus.
Exercising the Context Menus
You have added all the code you need to make the context menus operate, so you can build and execute Sketcher to try them out. When you right-click the mouse a context menu will be displayed. If there are no elements under the cursor, the second context pop-up appears, enabling you to change the element type and color. These options work because they generate exactly the same messages as the main menu options for which you have already written handlers.
If there is an element under the cursor, the first context menu will appear with Move and Delete on it. It won’t do anything at the moment, as you’ve yet to implement the handlers for the messages. Try right-button clicks outside the view window. Messages for these are not passed to the view window in your application, so the pop-up is not displayed.
Highlighting Elements
Ideally, the user will want to know which element is under the cursor before right-clicking to get the context menu. When you intend to delete an element, you want to be sure which element you are operating on. If there are concentric circles displayed, only one will be selected but you won’t know which. Equally, when you want to use the other context menu — to change the drawing color for example — you must be sure no element is under the cursor when you right-click the mouse, otherwise you’ll get the Move/Delete menu displayed. To show which element is under the cursor, you need to highlight it in some way before a right-button click occurs.
You can change the Draw() member function for each element type to accommodate this. You can pass an extra argument to the Draw() function to indicate when the element should be highlighted. If you pass the address of the currently selected element that you save in the m_pSelected member of the view to the Draw() function for an element, you can pass it on to the CreatePen() function, which can compare it to the this pointer to decide the color of the pen.
Highlighting will work in the same way for all element types, so let’s take the CLine member as an example. You can add similar code to each of the classes for the other element types. Before you start changing CLine, you must first amend the definition of the base class CElement:
static const COLORREF SELECT_COLOR{RGB(255,0,180)};    // Highlight color

class CElement : public CObject
{
protected:
  CPoint m_StartPoint;                           // Element position
  int m_PenWidth;                                // Pen width
  COLORREF m_Color;                              // Color of an element
  CRect m_EnclosingRect;                         // Rectangle enclosing an element


public:
  virtual ~CElement();
  // Virtual draw operation
  virtual void Draw(CDC* pDC, std::shared_ptr<CElement> pElement=nullptr) {}

  // Get the element enclosing rectangle
  const CRect& GetEnclosingRect() const
  {
    return m_EnclosingRect;
  }

protected:
  // Constructors protected so they cannot be called outside the class
  CElement();
  CElement(const CPoint& start, COLORREF color, int penWidth = 1);

  // Create a pen
  void CreatePen(CPen& aPen, std::shared_ptr<CElement> pElement)
  {
    if(!aPen.CreatePen(PS_SOLID, m_PenWidth,
     this == pElement.get() ? SELECT_COLOR : m_Color))
    {
      // Pen creation failed
      AfxMessageBox(_T("Pen creation failed"), MB_OK);
      AfxAbort();
    }
  }
};
You need an #include directive for the memory header in Element.h. SELECT_COLOR is the highlight color for all elements and this is a static constant that is defined and initialized at a global scope. A second parameter has been added to the virtual Draw() function. This is a pointer to an element and it will be used when an element is to be highlighted because it is under the mouse cursor. With the second parameter initialized to nullptr, the function can still be called with just one argument; the second argument will be nullptr by default.
The CreatePen() function also has an additional argument that is a pointer to an element. When pElement contains the address of the current element, the pen is created using the highlight color.
You need to modify the declaration of the Draw() function in each of the definitions for the classes derived from CElement in exactly the same way. For example, you should change the CLine class definition to:
class CLine :
  public CElement
{
public:
  virtual ~CLine(void);
  // Function to display a line
  virtual void Draw(CDC* pDC, std::shared_ptr<CElement> pElement=nullptr)
                                                                     override;

      // Rest of the class as before...
};
The implementations for the Draw() functions for the derived classes also need to be extended in the same way. For the CLine class it is:
void CLine::Draw(CDC* pDC, std::shared_ptr<CElement> pElement)
{
  // Create a pen for this object and initialize it
  CPen aPen;
  CreatePen(aPen, pElement);

  // Rest of the function body as before...
}
This is a very simple change. The second argument to the CreatePen() function call is the pElement smart pointer that is passed as the second argument to the Draw() function.
You have nearly implemented element highlighting. The derived classes of the CElement class are now able to draw themselves as highlighted when required — you just need a mechanism to cause an element to be selected. So where should you create this? You can determine which element, if any, is under the cursor in the OnMouseMove() handler in the CSketcherView class, so that’s obviously the place to expedite the highlighting.
The amendments to the OnMouseMove() handler are as follows:
void CSketcherView::OnMouseMove(UINT nFlags, CPoint point)
{
  // Define a Device Context object for the view
  CClientDC aDC {this};                    // DC is for this view
  OnPrepareDC(&aDC);                       // Get origin adjusted
  aDC.DPtoLP(&point);                      // Convert point to logical coordinates

  // Verify the left button is down and mouse messages captured
  if((nFlags & MK_LBUTTON) && (this == GetCapture()))
  {
    // Code as before...
  }
  else
  { // We are not creating an element, so do highlighting
    auto pOldSelected = mp_Selected;                   // Copy previous
    m_pSelected = GetDocument()->FindElement(point);
    if(m_pSelected != pOldSelected)
    {
      if(m_pSelected)
        GetDocument()->UpdateAllViews(nullptr, 0, m_pSelected.get());
      if(pOldSelected)
        GetDocument()->UpdateAllViews(nullptr, 0, pOldSelected.get());
    }
  }
}
You must keep track of any previously highlighted element before you store the address of a new one. If there’s a new element to be highlighted, you must un-highlight the old one. To do this, you save a copy of m_pSelected in pOldSelected before you check for a selected element. You then store the smart pointer returned by the FindElement() function for the document object in m_pSelected.
If pOldSelected and m_pSelected are equal, then either they both contain the address of the same element or they are both nullptr. If they both contain a valid address, the element will already have been highlighted last time around. If they are both nullptr, nothing is highlighted and nothing needs to be done. Thus, in either case, you do nothing.
Thus, you want to do something only when m_pSelected is not equal to pOldSelected. If m_pSelected is not nullptr, you need to get it redrawn, so you call UpdateAllViews() with the first argument as nullptr to get all views updated, and the third argument as m_pSelected.get()identify the region to be updated. If pOldSelected is also not nullptr, you must un-highlight the old element by updating its area in the same way. The updating of each view will be done by its OnUpdate() member, which will invalidate the rectangle enclosing the element. Only the currently active view will have element highlighting active.
Drawing Highlighted Elements
You still need to arrange that the highlighted element is actually drawn highlighted. Somewhere, the m_pSelected pointer must be passed to the draw function for each element. The only place to do this is in the OnDraw() function for the view object:
void CSketcherView::OnDraw(CDC* pDC)
{
  CSketcherDoc* pDoc = GetDocument();
  ASSERT_VALID(pDoc);
  if (!pDoc)
    return;

  // Draw the sketch
  for (const auto& pElement : *pDoc)
  {
    if (pDC->RectVisible(pElement->GetEnclosingRect())) // Element visible?
      pElement->Draw(pDC, m_pSelected);                 // Yes, draw it.
  }
}
You need to change only one line. The second argument to the Draw() function call for an element is the address of the element to be highlighted.
Exercising the Highlights
This is all that’s required for the highlighting to work all the time. It wasn’t trivial but, on the other hand, it wasn’t terribly difficult. You can build and execute Sketcher to try it out. Any time there is an element under the cursor, the element is drawn in magenta. This makes it obvious which element the context menu is going to act on before you right-click the mouse, and means that you know in advance which context menu will be displayed.
Implementing Move and Delete
The next step is to provide code in the bodies of the handlers in the view class for the Move and Delete menu items that you added earlier. You can add the code for Delete first because that’s the simpler of the two.
Deleting an Element
The code that you need in the OnElementDelete() handler in the CSketcherView class to delete the currently selected element is simple:
void CSketcherView::OnElementDelete()
{
  if(m_pSelected)
  {
    GetDocument()->DeleteElement(m_pSelected);         // Delete the element
    m_pSelected.reset();
  }
}
The code to delete an element is executed only if m_pSelected is not nullptr, indicating that there is an element to be deleted. You get a pointer to the document and call the function DeleteElement() for the document object. You have already added this function to CSketcherDoc. When the element has been removed from the document, you call reset() for the smart pointer to change its pointer to nullptr.
That’s all you need in order to delete elements. You should now have a Sketcher program in which you can draw in multiple scrolled views, and delete any of the elements in your sketch from any of the views.
Moving an Element
Moving the selected element is a bit more involved. The element should move along with the mouse cursor, so you need to add code to the OnMouseMove() method to provide for this behavior. Because this message handler is also used to draw elements, you need a mechanism for indicating when you’re in “move” mode. The easiest way to do this is to have a flag in the view class, which you can call m_MoveMode. You can define it as type bool, with the value false indicating that move mode is not in effect.
You’ll also have to keep track of the cursor during the move, so you can add another data member in the view class for this. You can call it m_CursorPos, and it will be of type CPoint. Another thing you should provide for is the possibility of aborting a move. For this you must remember the position of the cursor when the move operation started, so you can move the element back when necessary. This is another member of type CPoint, and it is called m_FirstPos. Add the three new members to the protected section of the view class:
class CSketcherView: public CScrollView
{
  // Rest of the class as before...

protected:
  CPoint m_FirstPoint;         // First point recorded for an element
  CPoint m_SecondPoint;        // Second point recorded for an element
  CPoint m_CursorPos;          // Cursor position
  CPoint m_FirstPos;           // Original position in a move
  std::shared_ptr<CElement> m_pTempElement;
  std::shared_ptr<CElement> m_pSelected;    // Records element under the cursor
  bool m_MoveMode {false};     // Move element flag

// Rest of the class as before...
};
The element move process starts when the Move menu item from the context menu is selected. You can add the code to the message handler for the Move menu item to set up the conditions necessary for the operation:
void CSketcherView::OnElementMove()
{
   CClientDC aDC {this};
   OnPrepareDC(&aDC);              // Set up the device context
   GetCursorPos(&m_CursorPos);     // Get cursor position in screen coords
   ScreenToClient(&m_CursorPos);   // Convert to client coords
   aDC.DPtoLP(&m_CursorPos);       // Convert to logical
   m_FirstPos = m_CursorPos;       // Remember first position
   m_MoveMode = true;              // Start move mode
}
You are doing four things in this handler:
- You get the coordinates of the current mouse cursor position because the move operation starts from this reference point.
- You convert the cursor position to logical coordinates because your elements are defined in logical coordinates.
- You record the initial cursor position in case the user wants to abort the move later.
- You set m_MoveMode to true. This is a flag for the OnMouseMove() handler to recognize move mode.
The GetCursorPos() function is a Windows API function that stores the current cursor position in m_CursorPos. Note that you pass a pointer to this function. The cursor position is in screen coordinates (i.e., coordinates measured in pixels relative to the upper-left corner of the screen). All operations with the mouse cursor are in screen coordinates. You want the cursor position in logical coordinates, so you must do the conversion in two steps. The ScreenToClient() function is inherited from CWnd in the view class. It converts a CPoint or CRect argument from screen to client coordinates. You apply the DPtoLP() function member of the aDC object to m_CursorPos, which is now in client coordinates, to convert it to logical coordinates. Now that you have set the move mode flag, you can update the mouse move message handler to deal with moving an element.
Modifying the WM_MOUSEMOVE Handler to Move an Element
Moving an element only occurs when move mode is on and the cursor is being moved. Therefore, all you need in OnMouseMove() is a block of code to handle moving an element that gets executed only when m_MoveMode is true. The new code to do this is as follows:
void CSketcherView::OnMouseMove(UINT nFlags, CPoint point)
{
  CClientDC aDC {this};              // DC is for this view
  OnPrepareDC(&aDC);                 // Get origin adjusted

  aDC.DPtoLP(&point);                // Convert point to logical coordinates

  // If we are in move mode, move the selected element
  if(m_MoveMode)
  {
    MoveElement(aDC, point);         // Move the element
  }
  else if((nFlags & MK_LBUTTON) && (this == GetCapture()))
  {
   // Rest of the mouse move handler as before...
  }
}
This addition doesn’t need much explaining, really, does it? When m_MoveMode is true you’re in move mode so you call the MoveElement() function that does what is necessary for the move. If m_MoveMode is false, everything continues as before. All you have to do now is implement MoveElement().
Add the declaration for MoveElement() as a protected member of CSketcherView by adding the following at the appropriate point in the class definition:
void MoveElement(CClientDC& aDC, const CPoint& point); // Move an elementAs always, you can also right-click the class name in Class View to do this. The function needs access to the device context object for the view, aDC, and the current cursor position, point, so both of these are reference parameters. The basic implementation of the function in the SketcherView.cpp file is:
void CSketcherView::MoveElement(CClientDC& aDC, const CPoint& point)
{
  CSize distance {point - m_CursorPos};   // Get move distance
  m_CursorPos = point;                    // Set current point as 1st for
                                          // next time

  // If there is an element selected, move it
  if(m_pSelected)
  {
    aDC.SetROP2(R2_NOTXORPEN);
    m_pSelected->Draw(&aDC, m_pSelected); // Draw element to erase it
    m_pSelected->Move(distance);          // Now move the element
    m_pSelected->Draw(&aDC, m_pSelected); // Draw the moved element
  }
}
The distance to move the element that is currently selected is stored locally as a CSize object, distance. The CSize class is designed to represent a relative coordinate position and has two public data members, cx and cy, which correspond to x and y increments. These are calculated as the difference between the current cursor position, stored in point, and the previous cursor position, saved in m_CursorPos. This uses the subtraction operator, which is overloaded in the CPoint class. The version you are using here returns a CSize object, but there is also a version that returns a CPoint object. You can usually operate on CSize and CPoint objects combined. You save the current cursor position in m_CursorPos for use the next time this function is called, which occurs if there is a further mouse move message during the current move operation.
You implement moving an element in the view using the R2_NOTXORPEN drawing mode, because it’s easy and fast. This is exactly the same as what you have been using during the creation of an element. You call Draw() for the selected element in its current color (SELECT_COLOR because it is selected) to reset it to the background color, and then call the Move() member of the element object to relocate it by the distance specified by distance. You’ll add this function to the element classes in a moment. When the element has moved itself, you call its Draw() function once more to display it highlighted at the new position. The color of the element will revert to normal when the move operation ends, because the OnLButtonUp() handler will redraw all the views normally.
Updating Other Views
There’s something we must not overlook. The view in which you are moving an element may not be the only view. If there are other views, then the element should move in those too. You can call UpdateAllViews() for the document object in MoveElement() and pass this as the first argument so that it doesn’t update the current view. You need to do this before and after you move an element. Here’s how that looks:
void CSketcherView::MoveElement(CClientDC& aDC, const CPoint& point)
{
  CSize distance {point - m_CursorPos};   // Get move distance
  m_CursorPos = point;                    // Set current point as 1st for
                                          // next time

  // If there is an element selected, move it
  if(m_pSelected)
  {
    CSketcherDoc* pDoc {GetDocument()};                // Get the document pointer

    pDoc->UpdateAllViews(this, 0L, m_pSelected.get()); // Update all except this

    aDC.SetROP2(R2_NOTXORPEN);
    m_pSelected->Draw(&aDC, m_pSelected);              // Draw element to erase it
    m_pSelected->Move(distance);                       // Now move the element
    m_pSelected->Draw(&aDC, m_pSelected);              // Draw the moved element

    pDoc->UpdateAllViews(this, 0 , m_pSelected.get()); // Update all except this
  }
}
By passing m_pSelected as the third argument to UpdateAllViews(), only the region occupied by the element pointed to will be redrawn. The first call to UpdateAllViews() invalidates the area occupied by the element before the move in each of the other views. The second call invalidates the area after the move.
Getting the Elements to Move Themselves
Add the Move() function as a virtual member of the base class, CElement. Modify the class definition to the following:
class CElement : public CObject
{
protected:
  CPoint m_StartPoint;                           // Element position
  int m_PenWidth;                                // Pen width
  COLORREF m_Color;                              // Color of an element
  CRect m_EnclosingRect;                         // Rectangle enclosing an element

public:
  virtual ~CElement();
  virtual void Draw(CDC* pDC, std::shared_ptr<CElement> pElement=nullptr) {}
  virtual void Move(const CSize& aSize){}        // Move an element

  // Rest of the class as before...

};
As I discussed earlier in relation to the Draw() member, although an implementation of Move() has no meaning here, you can’t make it a pure virtual function because of the requirements of serialization.
You can now add a declaration for the Move() function as a public member of each of the classes derived from CElement. It is the same in each:
virtual void Move(const CSize& aSize) override; // Function to move an elementNext, you can add the implementation of Move() for the CLine class to Line.cpp:
void CLine::Move(const CSize& aSize)
{
  m_StartPoint += aSize;               // Move the start point
  m_EndPoint += aSize;                 // and the end point
  m_EnclosingRect += aSize;            // Move the enclosing rectangle
}
The overloaded += operators in the CPoint and CRect classes make this easy. They all work with CSize objects, so you just add the relative distance specified by aSize to the start and end points for the line and to the enclosing rectangle.
Moving a CRectangle object is just as easy:
void CRectangle::Move(const CSize& aSize)
{
  m_StartPoint += aSize;               // Move the start point
  m_BottomRight += aSize;              // Move the bottom right point
  m_EnclosingRect += aSize;            // Move the enclosing rectangle
}
Because the rectangle is defined by the opposite corner points, the code to move it is essentially the same as that for moving a line.
The Move() member of the CCircle class is identical:
void CCircle::Move(const CSize& aSize)
{
  m_StartPoint += aSize;               // Move the start point
  m_BottomRight += aSize;              // Move the bottom right point
  m_EnclosingRect += aSize;             // Move the enclosing rectangle
}
Moving a CCurve object is a little more complicated, because it’s defined by an arbitrary number of points. You can implement the function as:
void CCurve::Move(const CSize& aSize)
{
  m_EnclosingRect += aSize;            // Move the rectangle
  m_StartPoint += aSize;               // Move the start point
  // Now move all the other points
  for(auto& p : m_Points)
    p += aSize;
}
There’s still not a lot to it. You first move the enclosing rectangle stored in m_EnclosingRect, using the overloaded += operator for CRect objects. You then move the first point. You move the remaining points by using a range-based for loop to iterate over the points in the m_Points vector.
Dropping the Element
Once you have clicked on the Move menu item, the element under the cursor will move around as you move the mouse. All that remains is to add the capability to drop the element in position once the user has finished moving it, or to abort the whole move. To drop the element in its new position, the user will click the left mouse button, so you can manage this operation in the OnLButtonDown() handler. To abort the operation, the user will click the right mouse button — so you can add the code to the OnRButtonDown() handler to deal with this.
You can take care of dropping the element in OnLButtonDown() first. You’ll have to provide for this as a special action when move mode is on. The changes are highlighted:
void CSketcherView::OnLButtonDown(UINT nFlags, CPoint point)
{
  CClientDC aDC {this};                // Create a device context
  OnPrepareDC(&aDC);                   // Get origin adjusted
  aDC.DPtoLP(&point);                  // convert point to logical coordinates

  if(m_MoveMode)
  {
    // In moving mode, so drop the element
    m_MoveMode = false;                // Kill move mode
    auto pElement(m_pSelected);        // Store selected address
    m_pSelected.reset();               // De-select the element
    GetDocument()->UpdateAllViews(nullptr, 0,
                                      pElement.get());  // Redraw all the views
  }
  else
  {
    m_FirstPoint = point;              // Record the cursor position
    SetCapture();                      // Capture subsequent mouse messages
  }
}
The code is pretty simple. You first check for move mode. If this is the case, you just set the move mode flag back to false. You save the address of the selected element in a local pointer because you want to use it to identify the area to be redrawn in the views. You then deselect the element and call the document’s UpdateAllViews() function, causing all the views to be redrawn. This is all that’s required because you’ve been moving the element along with the mouse cursor, so it’s already in the right place.
Add a handler for the WM_RBUTTONDOWN message to CSketcherView using the Properties window for the class. The implementation for aborting a move must do two things. It must move the element back to where it was and turn off move mode. You can move the element back in the right-button-down handler, but you must leave switching off move mode to the right-button-up handler to allow the context menu to be suppressed. The code to move the element back is as follows:
void CSketcherView::OnRButtonDown(UINT nFlags, CPoint point)
{
   if(m_MoveMode)
   {
     // In moving mode, so drop element back in original position
     CClientDC aDC {this};
     OnPrepareDC(&aDC);                      // Get origin adjusted
     MoveElement(aDC, m_FirstPos);           // Move element to original position
     m_pSelected.reset();                    // De-select element
     GetDocument()->UpdateAllViews(nullptr); // Redraw all the views
  }
}
You first create a CClientDC object for use in the MoveElement() function. You then call the MoveElement() function to move the currently selected element the distance from the current cursor position to the original cursor position that we saved in m_FirstPos. After the element has been repositioned, you just deselect the element and get all the views redrawn.
The last thing you must do is switch off move mode in the right-button-up handler so add it and implement it like this:
void CSketcherView::OnRButtonUp(UINT nFlags, CPoint point)
{
  if(m_MoveMode)
  {
    m_MoveMode = false;
  }
  else
  {
      CScrollView::OnRButtonUp(nFlags, point);
  }
}
This switches move mode off if it is on. The default handler was calling the OnContextMenu() handler every time. Now the context menu gets displayed only when it is not move mode.
Exercising the Application
Everything is now complete for the context pop-ups to work. If you build Sketcher, you can select the element type and color from the context menu when the cursor is not over an element. When it is over an element, you can move or delete that element using the other context menu.
DEALING WITH MASKED ELEMENTS
There’s still a limitation that you ought to overcome. If the element you want to move or delete is enclosed by the bounding rectangle of another element that is drawn earlier in sequence, you won’t be able to highlight it because Sketcher always finds the older element first. The older element completely masks the element it encloses. This is a result of the sequence of elements in the list. You add new elements to the back so the elements are ordered in the list from oldest to newest. You could fix this by adding a Send to Back item to the context menu that would move an element to the end of the list.
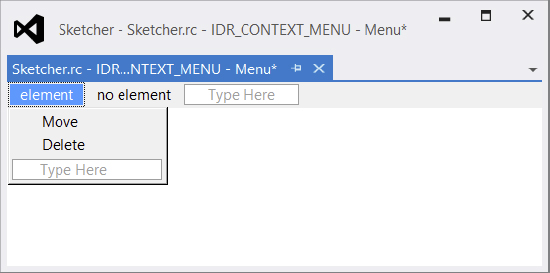
Add a separator and a menu item to the element menu in the IDR_CONTEXT_MENU resource, as shown in Figure 15-4.
The default ID will be ID_ELEMENT_SENDTOBACK, which is fine. You can try a different technique to add the message handler for the new item. You can add the handler for the item to the view class through the Properties window for the CSketcherView class. It’s best to handle it in the view because that’s where you record the selected element. Select the Events toolbar button in the Properties window for the class and double-click the message ID ID_ELEMENT_SENDTOBACK. You’ll then be able to select COMMAND and <Add>OnElementSendtoback in the right column. You can implement the handler as follows:
void CSketcherView::OnElementSendtoback()
{
  GetDocument()->SendToBack(m_pSelected);  // Move element to end of list
}
You’ll get the document to do the work by passing the currently selected element pointer to a public function, SendToBack(), that you will implement in the CSketcherDoc class. Add it to the class definition with a void return type and a parameter of type shared_ptr<CElement>&. You can implement this function within the class definition as:
void SendToBack(std::shared_ptr<CElement>& pElement)
{
  if(pElement)
  {
    m_Sketch.remove(pElement);             // Remove the element from the list
    m_Sketch.push_back(pElement);          // Put it back at the end of the list
  }
}
After checking that the parameter is not nullptr, you remove the element from the list by calling remove(). You add the smart pointer back at the end of the list, using the push_back() function.
With the element moved to the end of the list, it cannot mask any of the others because you search for an element to highlight from the beginning. You will always find one of the other elements first if the applicable enclosing rectangle contains the current cursor position. The Send to Back menu option can always resolve any element masking problem in the view, although you may have to apply it to more than one masking element.
SUMMARY
You have improved the view capability in Sketcher in several ways. You’ve added scrolling to the views using the MFC class CScrollView, and you’ve introduced a pop-up at the cursor for moving and deleting elements. You have also implemented an element-highlighting feature to provide the user with feedback during the moving or deleting of elements.
EXERCISES
- Implement element highlighting so that the line type changes for the element under the cursor as well as the element color.
- Change the Sketcher program so that it uses a vector container to store a sketch instead of a list.
WHAT YOU LEARNED IN THIS CHAPTER
| TOPIC | CONCEPT |
|---|---|
| Windows coordinate systems | When you draw in a device context using the MFC, coordinates are in logical units that depend on the mapping mode set. Points in a window that are supplied along with Windows mouse messages are in client coordinates. The two coordinate systems are usually not the same. |
| Screen coordinates | Coordinates that define the position of the cursor are in screen coordinates that are measured in pixels relative to the upper-left corner of the screen. |
| Converting between coordinate systems | Functions to convert between client coordinates and logical coordinates are available in the CDC class. |
| Updating multiple views | To get multiple views updated when you change the document contents, you can call the UpdateAllViews() member of the document object. This causes the OnUpdate() member of each view object to be called. |
| Updating efficiently | You can pass information to the UpdateAllViews() function to indicate which area in the view needs to be redrawn. This makes redrawing the views faster. |
| Creating a context menu | You create a context menu as a menu resource. The resource can then be loaded into a CMenu object in the handler function for the context menu event. |
| Displaying a context menu | You can display a context menu at the cursor position in an MFC application in response to a right mouse button click by implementing the OnContextMenu()handler for a view. The menu is created as a normal pop-up at the cursor position. |