Chapter 3
Decisions and Loops
- How to compare data values
- How to alter the sequence of program execution based on the result
- How to apply logical operators and expressions
- How to deal with multiple choice situations
- How to write and use loops in your programs
You can find the wrox.com code downloads for this chapter on the Download Code tab at www.wrox.com/go/beginningvisualc. The code is in the Chapter 3 download and individually named according to the names throughout the chapter.
COMPARING VALUES
Unless you want to make decisions on a whim, you need a mechanism for comparing things. This involves some new operators called relational operators. Because all information in your computer is ultimately represented by numerical values (in the last chapter you saw how character information is represented by numeric codes), comparing numerical values is the essence of all decision making. You have six operators for comparing two values:
< |
less than | <= |
less than or equal to |
> |
greater than | >= |
greater than or equal to |
== |
equal to | != |
not equal to |
Each operator compares the values of two operands and returns one of the two possible values of type bool: true if the comparison is true, or false if it is not. You can see how this works by having a look at a few simple examples. The operands can be variables, literals, or expressions. Suppose you have created integer variables i and j with the values 10 and –5, respectively. The expressions,
i > j i != j j > -8 i <= j + 15all return the value true.
Assume that you have defined the following variables:
char first {'A'}, last {'Z'};Here are some examples of comparisons using these:
first == 65 first < last 'E' <= first first != lastAll four expressions compare ASCII code values. The first expression returns true because first was initialized with 'A', which is the equivalent of decimal 65. The second expression checks whether the value of first, which is 'A', is less than the value last, which is 'Z'. the ASCII codes for the capital letters are represented by an ascending sequence of numerical values from 65 to 90, 65 representing 'A' and 90 representing 'Z', so this comparison also returns the value true. The third expression returns the value false because 'E' is greater than the value of first. The last expression returns true because 'A' is definitely not equal to 'Z'.
Let’s consider some slightly more complicated comparisons with variables defined by the statements:
int i {-10}, j {20};
double x {1.5}, y {-0.25E-10};
Take a look at the following expressions:
-1 < y j < (10 - i) 2.0*x >= (3 + y)Here you use expressions that result in numerical values as operands. The precedence table for operators that you saw in Chapter 2 shows that none of the parentheses are strictly necessary, but they do help to make the expressions clearer. The first comparison is true, and so returns the bool value true. The variable y has a very small negative value, -0.000000000025, and so is greater than -1. The second comparison returns the value false. The expression 10 - i has the value 20, which is the same as j. The third expression returns true because the expression 3 + y is slightly less than 3.
You can use relational operators to compare values of any of the fundamental types or of the enumeration types, so all you need now is a way of using the results of a comparison to modify the behavior of a program.
The if Statement
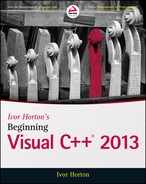
The basic if statement allows your program to execute a single statement — or a block of statements enclosed within braces — if a given conditional expression evaluates to true, or to skip the statement or block of statements if the condition evaluates to false. This is illustrated in Figure 3-1.
A simple example of an if statement is:
if('A' == letter)
   cout << "The first capital, alphabetically speaking.";
The condition to be tested appears in parentheses immediately following the keyword, if, and this is followed by the statement to be executed when the condition is true. Note the position of the semicolon. It goes after the statement following the if and the condition between paren-theses; there shouldn’t be a semicolon after the condition in parentheses because the two lines essentially make up a single statement. You also can see how the line following the if is indented to indicate that it is only executed when the if condition returns the value true. The indentation is not essential, but it helps you to recognize the relationship between the if condition and the statement that depends on it. The output statement in the code fragment is executed only if the variable letter has the value 'A'.
You could extend this example to change the value of letter if it contains the value 'A':
if('A' == letter)
{
   cout << "The first capital, alphabetically speaking.";
   letter = 'a';
}
The block of statements that is controlled by the if statement is delimited by the curly braces. You execute the statements in the block only if the condition ('A' == letter) evaluates to true. Without the braces, only the first statement would be the subject of the if, and the statement assigning the value 'a' to letter would always be executed. Note that there is a semicolon after each of the statements in the block, but not after the closing brace at the end of the block. There can be as many statements as you like within a block. Now, as a result of letter having the value 'A', you change its value to 'a' after outputting the same message as before. If the condition returns false, neither of these statements is executed.
Nested if Statements
The statement to be executed when the condition in an if statement is true can also be an if. This arrangement is called a nested if. The condition for the inner if is only tested if the condition for the outer if is true. An if that is nested inside another can also contain a nested if. You can generally continue nesting ifs one inside the other like this for as long as you still know what you are doing.
The Extended if Statement
The if statement that you have been using so far executes a statement if the condition specified returns true. Program execution then continues with the next statement in sequence. You also have a version of the if that allows one statement to be executed if the condition returns true, and a different statement to be executed if the condition returns false. Execution then continues with the next statement in sequence. As you saw in Chapter 2, a block of statements can always replace a single statement, so this also applies to these ifs.
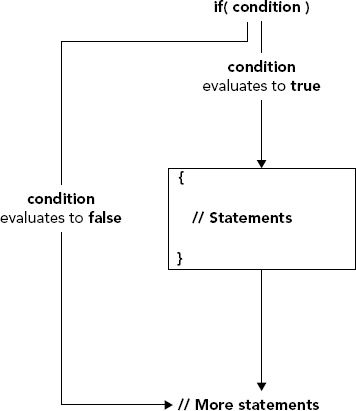
The if-else combination provides a choice between two options. The general logic of the if-else is shown in Figure 3-2.
The arrows in the diagram indicate the sequence in which statements are executed, depending on whether the if condition returns true or false.
Nested if-else Statements
As you have seen, you can nest if statements within if statements. You can also nest if-else statements within ifs, ifs within if-else statements, and if-else statements within if-else statements. This provides considerable room for confusion, so let’s take a look at a few examples. The following is an example of an if-else nested within an if:
if('y' == coffee)
  if('y' == donuts)
    cout << "We have coffee and donuts.";
  else
    cout << "We have coffee, but not donuts";
The test for donuts is executed only if the result of the test for coffee returns true, so the messages reflect the correct situation in each case; however, it is easy to get this confused. If you write much the same thing with incorrect indentation, you can be trapped into the wrong conclusion:
if('y' == coffee)
  if('y' == donuts)
    cout << "We have coffee and donuts.";
else                                  // This else is indented incorrectly
  cout << "We have no coffee...";    // Wrong!
The mistake is easy to see here, but with more complicated if structures you need to keep in mind the rule about which if owns which else.
Whenever things look a bit complicated, you can apply this rule to sort things out. When you are writing your own programs you can always use braces to make the situation clearer. It isn’t essential but it’s a good idea to write the last example as follows:
if('y' == coffee)
{
  if('y' == donuts)
    cout << "We have coffee and donuts.";
  else
    cout << "We have coffee, but not donuts";
}
and it should be absolutely clear. Now that you know the rules, understanding the case of an if nested within an if-else becomes easy:
if('y' == coffee)
{
  if('y' == donuts)
    cout << "We have coffee and donuts.";
}
else
  if('y' == tea)
    cout << "We have tea, but not coffee";
Here, the braces are essential. If you leave them out, the else would belong to the second if, which is looking out for donuts. In this kind of situation, it is easy to forget to include the braces and create an error that may be hard to find. A program with this kind of error compiles fine and even produces the right results some of the time.
If you removed the braces in this example, you get the correct results only as long as coffee and donuts are both equal to 'y' so that the if('y' == tea) check wouldn’t be executed.
if-else statements nested in if-else statements can get very messy, even with just one level of nesting:
if('y' == coffee)
  if('y' == donuts)
    cout << "We have coffee and donuts.";
  else
    cout << "We have coffee, but not donuts";
else
  if('y' == tea)
    cout << "We have no coffee, but we have tea, and maybe donuts...";
  else
    cout << "No tea or coffee, but maybe donuts...";
The logic here doesn’t look quite so obvious, even with the correct indentation. No braces are necessary. The rule you saw earlier verifies that each else belongs to the correct if, but it would be a lot clearer if you included them:
if('y' == coffee)
{
  if('y' == donuts)
    cout << "We have coffee and donuts.";
  else
    cout << "We have coffee, but not donuts";
}
else
{
  if('y' == tea)
    cout << "We have no coffee, but we have tea, and maybe donuts...";
  else
    cout << "No tea or coffee, but maybe donuts...";
}
There are much better ways of dealing with this kind of logic in a program. If you put enough nested ifs together, you can almost guarantee a mistake somewhere. The next section will help to simplify things.
Logical Operators and Expressions
As you have just seen, using ifs where you have two or more related conditions can be a bit cumbersome. We have tried our iffy talents on looking for coffee and donuts, but in practice you may want to test much more complex conditions.
Logical operators provide a neat and simple solution. Using logical operators, you can combine a series of comparisons into a single logical expression, so you end up needing just one if, virtually regardless of the complexity of the set of conditions, as long as the decision ultimately boils down to a choice between two possibilities — true or false.
You have just three logical operators:
&& |
Logical AND |
|| |
Logical OR |
! |
Logical negation (NOT) |
Logical AND
You would use the AND operator, &&, where you have two conditions that must both be true for a true result. You want to be rich and healthy. Thus the && operator produces the result true when both operands have the value true, and false otherwise.
You could use the && operator when you are testing a character to determine whether it’s an uppercase letter; the value being tested must be both greater than or equal to 'A' and less than or equal to 'Z'. Both conditions must return true for the value to be a capital letter.
Taking the example of a value stored in a char variable letter, you could replace the test that uses two ifs with one that uses only a single if and the && operator:
if((letter >= 'A') && (letter <= 'Z'))
  cout << "This is a capital letter.";
The parentheses inside the expression that is the if condition ensure that there is no doubt that the comparison operations are executed first, which makes the statement clearer. Here, the output statement is executed only if both of the conditions that are combined by the && operator are true.
Logical OR
The OR operator, ||, applies when you have two conditions where you want a true result if either or both of them are true. For example, you might be considered credit worthy for a loan from the bank if your income was at least $100,000 a year, or if you had $1,000,000 in cash. This could be tested using the following if:
if((income >= 100000.00) || (capital >= 1000000.00))
  cout << "How much would you like to borrow, Sir (grovel, grovel)?";
The ingratiating response emerges when either or both of the conditions are true. (A better response might be, “Why do you want to borrow?” It’s strange how banks lend you money only if you don’t need it.)
You only get a false result with the || operator when both operands are false.
Logical NOT
The third logical operator, !, takes one operand of type bool and inverts its value. So, if the value of a variable test is true, !test is false; and if test is false, !test is true. To take the example of a simple expression, if x has the value 10, the expression !(x > 5) evaluates to false, because x > 5 is true.
You could also apply the ! operator in an expression that was a favorite of Charles Dickens’:
!(income > expenditure)If this expression is true, the result is misery, at least as soon as the bank starts bouncing your checks.
Finally, you can apply the ! operator to other basic data types. Suppose you have a variable, rate, that is of type float and has the value 3.2. For some reason, you might want to verify that the value of rate is non-zero, in which case you could use the expression:
!(rate)The value 3.2 is non-zero and thus converts to the bool value true, so the result of this expression is false.
The Conditional Operator
The conditional operator is sometimes called the ternary operator because it involves three operands. It is best understood by looking at an example. Suppose you have two variables, a and b, and you want to assign the maximum of a and b to a third variable, c. You can do this with the following statement:
c = a > b ? a : b; // Set c to the maximum of a or bThe first operand for the conditional operator must be an expression that results in a bool value, true or false, and in this case it is a > b. If this expression returns true, the second operand — in this case a — is selected as the value resulting from the operation. If the first argument returns false, the third operand — in this case b — is selected as the value that results from the operation. Thus, the result of a > b ? a : b is a, if a is greater than b, and b otherwise. This value is stored in c by the assignment operation. The use of the conditional operator in this assignment statement is equivalent to the if statement:
if(a > b)
  c = a;
else
  c = b;
The conditional operator can be written generally as:
condition ? expression1 : expression2If condition evaluates to true, the result is the value of expression1, and if it evaluates to false, the result is the value of expression2.
The switch Statement
The switch statement enables you to select from multiple choices based on a set of fixed values for a given expression. It operates like a physical rotary switch in that you can select one of a number of choices. Some washing machines provide a means of choosing an operation for processing your laundry in this way. There are a number of possible positions for the switch, such as cotton, wool, synthetic fiber, and so on, and you can select one of them by turning the knob to point to the option you want.
In the switch statement, the selection is determined by the value of an expression that you specify. You define the possible switch positions by one or more case values, a particular one being selected if the value of the switch expression is the same as the particular case value. There is one case value for each possible choice in the switch, and all the case values must be distinct.
The general form of the switch statement is:
switch(expression)
{
case c1:
  // One or more statements for c1...
  break;
case c2:
  // One or more statements for c2...
  break;
// More case statements...
default:
  // Statements for default case...
  break;
}
Both switch and case are keywords. c1, c2, and so on are integer constants, or expressions that the compiler can evaluate to produce an integer constant; that is, not an expression that has to be executed at run time. The cases can be in any sequence and each case value must be unique to allow the compiler to differentiate between them. When expression evaluates to one of the case values, the statements following that case statement are executed.
If the value of the switch expression does not match any of the case values, the switch automatically selects the default case. You can omit the default case, in which case the default is to do nothing.
The break statement at the end of each case statement causes execution to transfer to the statement following the switch block after a case statement executes. If you leave it out, statements for the next case will execute. The break at the end of the default case is not necessary, but including it is a good idea to provide for the possibility that you add a case statement after the default case later. Let’s see it working.
Unconditional Branching
The if statement provides you with the flexibility to choose to execute one set of statements or another, depending on a specified condition, so the statement execution sequence is varied, depending on the values of the data in the program. The goto statement, in contrast, is a blunt instrument. It enables you to branch to a specified program statement unconditionally. The statement to be branched to must be identified by a statement label, which is an identifier defined according to the same rules as a variable name. This is followed by a colon and placed before the statement requiring labeling. Here is an example of a labeled statement:
myLabel: cout << "myLabel branch has been activated" << endl;This statement has the label myLabel, and an unconditional branch to this statement would be written as follows:
goto myLabel;Whenever possible, you should avoid using gotos in your program. They tend to encourage convoluted code that can be extremely difficult to follow.
REPEATING A BLOCK OF STATEMENTS
The capability to repeat a group of statements is fundamental to most applications. Without this, an organization would need to modify the payroll program every time an extra employee was hired, and you would need to reload your favorite game every time you wanted to play. So, let’s first understand how a loop works.
What Is a Loop?
A loop executes a sequence of statements subject to a given condition. You can write a loop with the statements that you have met so far. You just need an if and the dreaded goto. Look at the following example:
// Ex3_07.cpp
// Creating a loop with an if and a goto
#include <iostream>

using std::cout;
using std::endl;

int main()
{
  int i {1}, sum {};
  const int max {10};

loop:
  sum += i;             // Add current value of i to sum
  if(++i <= max)
     goto loop;         // Go back to loop until i = 11

  cout << endl
       << "sum = " << sum << endl
       << "i = "   << i   << endl;
  return 0;
}
This example accumulates the sum of integers from 1 to 10. The first time through the sequence of statements, i has the initial value 1 and is added to sum, which starts out as zero. In the if, i is incremented to 2 and, as long as it is less than or equal to max, the unconditional branch to loop occurs, and the value of i, now 2, is added to sum. This continues with i being incremented and added to sum each time, until finally, when i is incremented to 11 in the if, the branch back is not executed. If you run this example, you get the following output:
sum = 55
i = 11
This shows quite clearly how the loop works; however, it uses a goto and introduces a label into the program, both of which you should avoid, if possible. You can achieve the same thing, and more, with the for statement, which is specifically for writing a loop.
Variations on the for Loop
Most of the time, the expressions in a for loop are used in a fairly standard way: the first to initialize one or more loop counters, the second to test if the loop should continue, and the third to increment or decrement one or more loop counters. You are not obliged to use these expressions in this way, however, and quite a few variations are possible.
The initialization expression can also include a definition for a loop variable. In the previous example, you could have written the loop to include the definition for the loop counter i in the first control expression.
for(int i {1}; i <= max; i++)         // Loop specification
   sum += i;                          // Loop statement
Naturally, the original definition for i would need to be omitted. If you make this change to the last example, you will find that it does not compile because the loop variable, i, ceases to exist after the loop, so you cannot refer to it in the output statement. A loop has a scope which extends from the for expression to the end of the body of the loop, which of course can be a block of code between braces, as well as just a single statement. The counter i is now defined within the loop scope, so you cannot refer to it in the output statement, which is outside the scope of the loop. If you need to use the value in the counter after the loop has executed, you must define the counter variable outside the scope of the loop.
You can omit the initialization expression altogether from the loop. Because i has the initial value 1, you can write the loop as:
for(; i <= max; i++)                  // Loop specification
   sum += i;                          // Loop statement
You still need the semicolon that separates the initialization expression from the test condition. In fact, both semicolons must always be present, regardless of whether any or all of the control expressions are omitted. If you omit the first semicolon, the compiler is unable to decide which expression has been omitted, or even which semicolon is missing.
The loop statement can be empty. For example, you could place the loop statement in the for loop from the previous example inside the increment expression; in this case the loop becomes:
for(; i <= max; sum += i++); // The whole loopYou still need the semicolon after the closing parentheses, to indicate that the loop statement is now empty. If you omit this, the statement immediately following this line is interpreted as the loop statement. Sometimes you’ll see the empty loop statement written on a separate line, like the following:
for(; i <= max; sum += i++)     // The whole loop
;Using the continue Statement
You write the continue statement simply as:
continue;Executing continue within a loop starts the next loop iteration immediately, skipping over any statements remaining in the body of the loop. I can show how this works with the following code:
#include <iostream>

using std::cin;
using std::cout;
using std::endl;

int main()
{
  int value {}, product {1};

  for(int i {1}; i <= 10; i++)
  {
    cout << "Enter an integer: ";
     cin >> value;

     if(0 == value)                    // If value is zero
        continue;                      // skip to next iteration

     product *= value;
  }

  cout << "Product (ignoring zeros): " << product
       << endl;

  return 0;
}
This loop reads 10 values with the intention of producing the product of the values entered. The if checks each value, and if it is zero, the continue statement skips to the next iteration. This is so that you don’t end up with a zero product if one of the values is zero. Obviously, if a zero value occurred on the last iteration, the loop would end. There are other ways of achieving the same result, but continue provides a very useful capability, particularly with complex loops where you may need to skip to the end of the current iteration from various points in the loop.
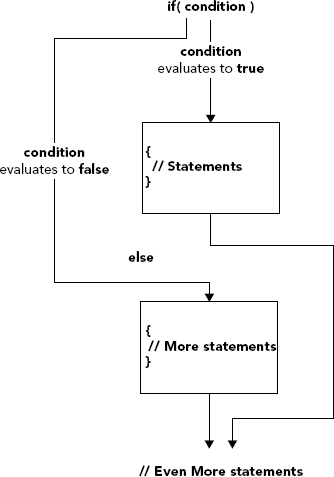
The effect of the break and continue statements on the logic of a for loop is illustrated in Figure 3-4.
Obviously, in a real situation, you would use the break and continue statements with some condition-testing logic to determine when the loop should be exited, or when an iteration of the loop should be skipped. You can also use the break and continue statements with the other kinds of loop, which I’ll discuss later on in this chapter, where they work in exactly the same way.
Floating-Point Loop Counters
You can use a floating-point value as a loop counter. Here’s an example of a for loop with this kind of counter:
double a {0.3}, b {2.5};
for(double x {}; x <= 2.0; x += 0.25)
  cout << "
	x = " << x
       << "	a*x + b = " << a*x + b;
This code fragment calculates the value of a*x + b for values of x from 0.0 to 2.0, in steps of 0.25; however, you need to take care when using a floating-point counter in a loop. Many decimal values cannot be represented exactly in binary floating-point form, so discrepancies can build up with cumulative values. This means that you should not code a for loop such that ending the loop depends on a floating-point loop counter reaching a precise value. For example, the following poorly-designed loop never ends:
   for(double x {}; x != 1.0; x += 0.1)
     cout << x << endl;
The intention with this loop is to output the value of x as it varies from 0.0 to 1.0; however, 0.1 has no exact representation as a binary floating-point value, so the value of x is never exactly 1. Thus, the second loop control expression is always false, and the loop continues indefinitely.
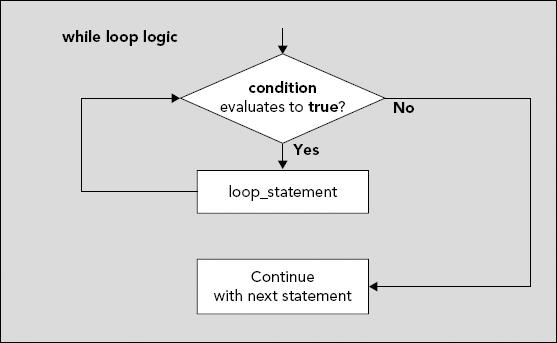
The while Loop
A second kind of loop in C++ is the while loop. Where the for loop is primarily used to repeat a statement or a block for a prescribed number of iterations, the while loop is used to execute a statement or block of statements as long as a specified condition is true. The general form is:
while(condition)
   loop_statement;
Here loop_statement is executed repeatedly, as long as the condition expression has the value true. After the condition becomes false, the program continues with the statement following the loop. As always, a block of statements between braces could replace loop_statement.
The logic of the while loop is shown in Figure 3-5.
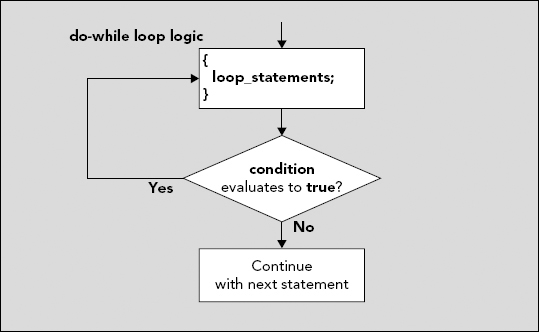
The do-while Loop
The do-while loop is similar to the while loop in that the loop continues as long as the specified loop condition remains true. The main difference is that the condition is checked at the end of the loop — which contrasts with the while loop and the for loop, where the condition is checked at the beginning. Consequently, the do-while loop statement is always executed at least once. The general form of the do-while loop is:
do
{
   loop_statements;
}while(condition);
The logic of this form of loop is shown in Figure 3-6.
You could replace the while loop in the last version of the program to calculate an average with a do-while loop:
   do
   {
     cout << endl
          << "Enter a value: ";
     cin >> value;                 // Read a value
     ++i;                          // Increment count
     sum += value;                 // Add current input to total

     cout << "Do you want to enter another value (enter y or n)?";
     cin >> indicator;             // Read indicator
   } while(('y' == indicator) || ('Y' == indicator));
There’s little difference between the two versions of the loop, except that this version doesn’t depend on the initial value set in indicator for correct operation. As long as you want to enter at least one value, which is not unreasonable for the calculation in question, this version is preferable.
The Range-Based for Loop
I am introducing this loop here so all the loops that you have available appear together. The range-based for loop enables you to iterate over each of the items in a collection of items in a very simple way. You have not met any collections to which you can apply this loop so far, but you will meet arrays in the next chapter where you can use this loop. I’ll discuss how the range-based for loop works in more detail then, and you will learn about other kinds of collections that you can apply the range-based for loop to in Chapter 10.
Nested Loops
You can nest one loop inside another. The usual application for this will become apparent in Chapter 4 — it’s typically applied to repeating actions at different levels of classification. An example might be calculating the total marks for each student in a class, and then repeating the process for each class in a school.
SUMMARY
In this chapter, you learned all the essential mechanisms for making decisions in C++ programs. The ability to compare values and change the course of program execution is what differentiates a computer from a simple calculator. You need to be comfortable with all of the decision-making statements I have discussed because they are all used very frequently. You have also gone through all the facilities for repeating a group of statements. Loops are a fundamental programming technique that you will need to use in every program of consequence that you write. You will find you use the for loop most often, closely followed by the while loop.
EXERCISES
- Write a program that reads numbers from
cinand then sums them, stopping when 0 has been entered. Construct three versions of this program, using thewhile, do-while, andforloops. - Write a program to read characters from the keyboard and count the vowels. Stop counting when a Q (or a q) is encountered. Use a combination of an indefinite loop to get the characters, and a
switchstatement to count them. - Write a program to print out the multiplication tables from 2 to 12, in columns.
- Imagine that in a program you want to set a ‘file open mode’ variable based on two attributes: the file type, which can be text or binary, and the way in which you want to open the file to read or write it, or append data to it. Using the bitwise operators (
&and|) and a set of flags, devise a method to allow a single integer variable to be set to any combination of the two attributes. Write a program that sets such a variable and then decodes it, printing out its setting, for all possible combinations of the attributes.
WHAT YOU LEARNED IN THIS CHAPTER
| TOPIC | CONCEPT |
|---|---|
| Relational operators | The relational operators allow you to combine logical values or expressions that result in a logical value. They yield a bool value — true or false — as the result that you can use in an if statement. |
| Decisions based on numerical values | You can make decisions based on conditions that return non-bool values. Any non-zero value is cast to true when a condition is tested; zero casts to false. |
| Statements for decision-making | The if statement provides the primary decision-making capability in C++. Further flexibility is provided by the switch statement and the conditional operator. |
| Loop statements | There are four basic methods for repeating a block of statements: the for loop, the while loop, the do-while loop, and the range-based for loop. The for loop allows the loop to repeat a given number of times. The while loop allows a loop to continue as long as a specified condition returns true. The do-while executes the loop at least once and allows continuation of the loop as long as a specified condition returns true. The range-based for loop iterates over the items in a collection. |
| Nested loops | Any kind of loop may be nested within any other kind of loop. |
| The continue keyword | The keyword continue allows you to skip the remainder of the current iteration in a loop and go straight to the next iteration. |
| The break keyword | The keyword break provides an immediate exit from a loop. It also provides an exit from a switch at the end of statements in a case. |